
HTR8 LEARNING REMOTE CONTROL - Universal remote NAD - Free user manual and instructions
Find the device manual for free HTR8 LEARNING REMOTE CONTROL NAD in PDF.
| Product Type | Programmable Universal Remote Control |
| Brand | NAD |
| Model | HTR8 Learning Remote Control |
| Number of controlled devices | Up to 8 devices |
| Learning capacity | Up to 360 infrared commands |
| Number of macros | Up to 52 macros (64 commands per macro max) |
| Pre-programmed library | NAD commands for amplifier, DVD, CD, BD, tuner |
| Main functions | Learning, direct access, copy, macro, layer erase, code search, adjustable backlight |
| Key lighting | Backlight with adjustable timeout from 0 to 9 seconds, motion sensor |
| Power source | Batteries (type not specified, estimated: 2 AAA batteries) |
| Programming interface | Mini USB port (cable not included) for Windows PC software |
| Compatibility | Infrared devices of all brands (learning), NAD devices via library |
| Maintenance and cleaning | Clean with a soft, dry cloth. Avoid moisture and solvents. |
| Safety | Use appropriate type of batteries. Do not expose to water or excessive heat. |
| Spare parts and repairability | Not available as spare parts. Programmable via PC software for updates. |
| General information | Manual available in multiple languages. Manufacturer: NAD Electronics International. |
Frequently Asked Questions - HTR8 LEARNING REMOTE CONTROL NAD
User questions about HTR8 LEARNING REMOTE CONTROL NAD
0 question about this device. Answer the ones you know or ask your own.
Ask a new question about this device
Download the instructions for your Universal remote in PDF format for free! Find your manual HTR8 LEARNING REMOTE CONTROL - NAD and take your electronic device back in hand. On this page are published all the documents necessary for the use of your device. HTR8 LEARNING REMOTE CONTROL by NAD.
USER MANUAL HTR8 LEARNING REMOTE CONTROL NAD
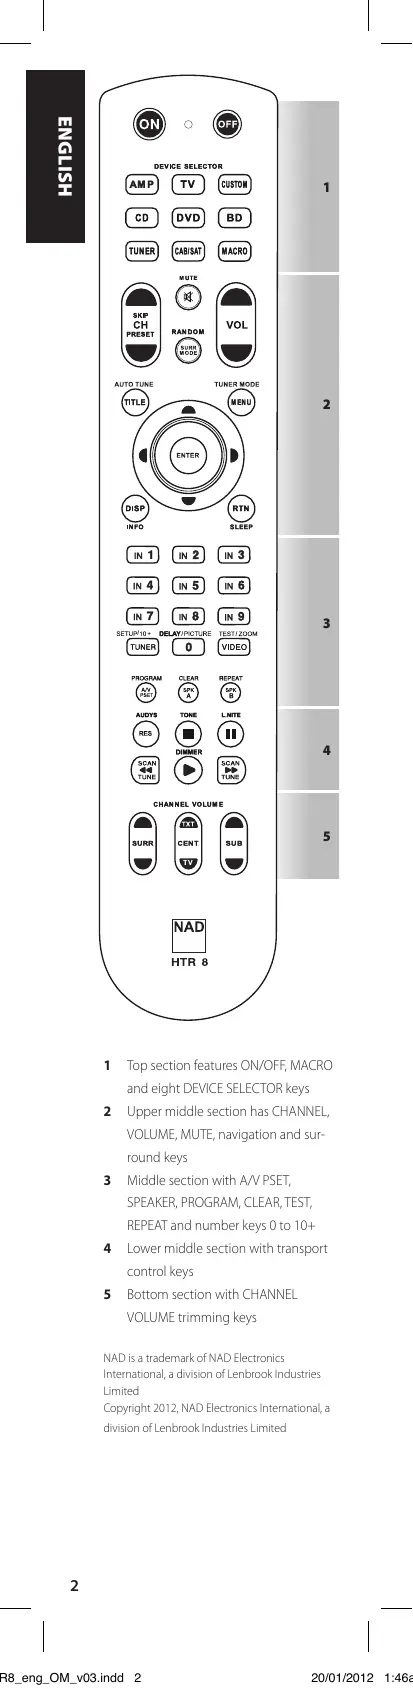
1 Top section features ON/OFF, MACRO and eight DEVICE SELECTOR keys
2 Upper middle section has CHANNEL, VOLUME, MUTE, navigation and surround keys
3 Middle section with A/V PSET, SPEAKER, PROGRAM, CLEAR, TEST, REPEAT and number keys 0 to 10+
4 Lower middle section with transport control keys
5 Bottom section with CHANNEL VOLUME trimming keys
NAD is a trademark of NAD Electronics International, a division of Lenbrook Industries Limited Copyright 2012, NAD Electronics International, a division of Lenbrook Industries Limited
Controls up to 8 devices.
- Learns up to 360 commands.
Records up to 52 macros with a maximum of 64 commands each.
- Configurable punch-through.
Key illumination with programmable timeout.
- Upgradable.
- Contains pre-programmed library of NAD remote codes.
The NAD HTR 8 is ready to operate NAD components right out of the box, but it is really eight remotes in one. Each of the 8 DEVICE SELECTOR keys at the top of the handset can call up a new "page" of remote control codes to be transmitted by the remaining keys. You may "teach" codes from any infrared-remote controlled component, regardless of brand, to any or all of these.
Obviously, the most logical system is that you teach the codes from your DVD player to the [DVD] DEVICE SELECTOR "page", your television's codes to the [TV] "page" and so on, but there is no required scheme: You may load any commands to any key on any page (see "LEARNING CODES FROM OTHER REMOTES" below).
The HTR 8 is already pre-programmed with a full complement of NAD receiver commands on its [AMP] DEVICE SELECTOR page, and as well as with library commands to operate most NAD-brand DVD, BD, CD or TUNER components on the corresponding DEVICE SELECTOR"pages". These default commands are permanent: Even if you teach the HTR 8 new commands to take their place, the underlying library commands remain in place and can easily be recalled should you add an NAD component to your system later (see "DELETE MODE" below).
GETTING FAMILIAR WITH THE HTR 8
The HTR 8 is divided into two main sections. Eight DEVICE SELECTOR keys at the top—[AMP], [DVD], [TV] and so on - set the handset's remaining keys to a "page" of commands to control a particular component. A DEVICE SELECTOR key determines only what component the HTR 8 will command; it does not perform any function on the component. All the remaining keys are function keys that can "learn" control codes from virtually any infrared remote controller, allowing you to teach the codes of your equipment, regardless of brand, to the HTR 8.
All of the function keys on the [AMP] DEVICE SELECTOR "page" are preprogrammed to control NAD amplifiers, preamplifiers and receivers. The HTR 8 can also command many other NAD components from its [DVD], [CD], [BD] and [TUNER] pages.
It is important to note that certain HTR 8 keys perform different functions depending on the selected DEVICE SELECTOR "page". The colour of the DEVICE SELECTOR key-labelling corresponds to the labelling of the function keys. Most centrally, the black [AMP] DEVICE SELECTOR "page" corresponds to the black keys: When the HTR 8's [AMP] DEVICE SELECTOR page is active; these keys select the amplifier or receiver inputs. Similarly, the purple [DVD] DEVICE SELECTOR "page" corresponds to several purple labels and so on.
LEARNING CODES FROM OTHER REMOTES
Begin by positioning the HTR 8 "nose-to-nose" with the source remote so the two devices' infrared windows are about 2 inches apart.
- Enter Learning Mode: On the HTR 8, simultaneously press-and-hold for 3 seconds both a DEVICE SELECTOR key and the [RES] key until the Learn LED of the HTR 8 turns steady green.
- Press the HTR 8's function key you wish to teach a command; the Learn LED will turn amber.
- Press-and-hold the function key on the source remote: The HTR 8's Learn LED will flicker amber for a second or two, then turn solid green. The command is learned.
Press the HTR 8's DEVICE SELECTOR key again to exit the learning mode.
If the Learn LED does not flicker amber you may need to vary the distance between the remotes. If the Learn LED turns red rather than green, that particular command of that source remote command could not be learned. In rare instances, there maybe some IR format that is not compatible with the HTR 8.
Example: Learning "DVD Pause"
Position the HTR 8 and your DVD player's remote as described above.
- On the HTR 8, simultaneously press-and-hold [DVD] and [RES]; the Learn LED turns steady green.
Press the HTR 8's Pause [II] key; the Learn LED turns amber. - Press-and-hold the corresponding Pause key of your DVD player's remote control; the HTR 8's Learn LED flickers amber and then turns solid green. The command is learned.
Press [DVD] again to exit the learning mode.
NOTES
The HTR 8 can learn up to 360 commands making use of all the DEVICE SELECTOR and function keys.
The DEVICE SELECTOR keys can themselves be configured to learn a command.
Press and hold a configured DEVICE SELECTOR for at least 2 seconds to execute a function assigned to the particular DEVICE SELECTOR key.
- Short press of a configured DEVICE SELECTOR will just switch the active device.
CANCEL OPERATION
You can cancel configuring a key, by pressing the active DEVICE SELECTOR key before the learn process is complete; the Learn LED will turn red.
PUNCH THROUGH
The HTR 8's "punch-through" function allows you to retain a function key from one Device Select "page" to another, so that, for example, the AMP [SURR MODE] function might still control the NAD A/V receiver when the DVD DEVICE SELECTOR page is active.
NOTE
The HTR 8's [VOL ] keys are preprogrammed as "punched-through" for all Device Select pages: [VOL ] will operate the NAD's master-volume regardless of the currently selected device. The [SURR] [CENTER] and [SUB] Channel Volume controls similarly are pre-programmed as punched-through.
To set a punch through, after entering the Learning Mode, and pressing the desired key to be punched through, simply press the device key twice of the device to punch through to. The status LED will turn green; press the DEVICE SELECTOR key again to exit Learning Mode.
Example: Punch-through AMP [SURR
MODE] key to the DVD "page"
- On the HTR 8, simultaneously press-and-hold [DVD] and [RES]; the Learn LED turns steady green.
Press [SURR MODE]; the Learn LED turns amber.
Press [AMP] twice; the Learn LED turns green.
Press [DVD] again to exit the learning mode.
COPY A COMMAND FROM ANOTHER KEY
You may copy a command from any HTR 8 key to any other. To copy a key function, after entering the Learning Mode, and pressing the desired key to be copied to, simply press the device key from which you wish to copy, having first pressed its DEVICE SELECTOR key if it resides on another "page." The status LED will turn green; press the DEVICE SELECTOR key again to exit Learning Mode.
Example: Copy the Pause command from the CD page to the AMP [II] button
- On the HTR 8, simultaneously press-and-hold [AMP] and [RES]; the Learn LED turns steady green.
Press Pause [II]; the Learn LED turns amber.
Press [CD]; press Pause [II]; the Learn LED turns green. - Press [AMP] again to exit the learning mode.
NOTE
The copy and punch-through functions are similar. However, if you copy a command and then subsequently delete or overwrite the original (source-key) command, the copied-to key's command remains unchanged. If you punch-through to a command and then delete or overwrite the original key, the punched-through functions also change accordingly.
MACRO COMMANDS
A "macro" command is a series of two or more remote codes issued automatically from a single keypress. You might use a macro to automate a simple command sequence, such as, "Turn on the DVD player and then press PLAY". Or you might compose an elaborate macro to power up an entire system, select a source, choose a Listening Mode, and begin playback again, all from a single keypress. The HTR 8 can store one macro on each of its DEVICE SELECTOR and function keys.
Macros are independent of the currently selected device.
RECORDING MACROS
To record a macro, simultaneously press-and-hold for 3 seconds both the [MACRO] key and the HTR 8 function key to which you wish to assign the macro, until the status LED turns green. The macro button will also light up.
Press the sequence of function keys to be recorded into the macro, being sure to first press the requisite DEVICE SELECTOR key for each function (you may switch devices while recording the macro as many times as necessary), allowing you to create macro containing commands from more than one DEVICE SELECTOR "page."
When you have finished entering the desired command sequence, press [MACRO] again to store the macro; the Learn LED and [MACRO] key illumination will turn off.
NOTE
Each macro can store a maximum of 64 command steps. If you exceed this number, the macro will be stored automatically after the 64th command is added.
Example: Record a Macro to the [0] key to turn ON the NAD Receiver, turn ON the DVD Player, Select Input 1 (Source 1) and commence disc playback of connected Source 1 device (as in the DVD player)
- On the HTR 8, simultaneously press-and-hold [MACRO] and [O] (numeric zero); the Learn LED turns steady green.
- Press [AMP], press [ON]; press [DVD], press [ON]; press [AMP], press [1] (Input 1); press [DVD], press [▶] (Play) - the Learn LED blinks as each step is added.
Press [MACRO] again to exit the macro-record mode.
To clear a macro, perform the above steps without entering any functions.
EXECUTING MACROS
To execute a macro, press and release [MACRO]; its key illumination lights for 5 seconds. While it remains lit, press an HTR 8 key to which a macro has previously been stored.
The corresponding macro will run; as each step executes, its "parent" DEVICE SELECTOR key flashes briefly; when execution is finished, the [MACRO] key illumination goes out. Pressing any other HTR 8 key while a macro is executing will abort the macro. Remember that you must hold the HTR 8 so that its infrared emitter can activate the target components.
NOTE
When a macro executes, a 1 second delay is automatically inserted between its commands. If you need more than a 1 second delay between particular commands—for example, to permit a component to power up completely—you can record "empty" steps into the macro by changing DEVICE SELECTOR "pages" without entering actual command functions.
KEY ILLUMINATION TIMEOUT
The HTR 8's key-illumination can be set to remain lit for 0-9 seconds. The default value is 2 seconds. To set the illumination timeout, simultaneously press-and-hold for 3 seconds both the HTR 8's [DISP] and the [0-9] key, with the digit corresponding to the desired timeout duration; the Learn LED will flash twice to confirm the new setting. When set to zero, the illumination will not turn on at all.
NOTES
Key illumination is activated when one presses any HTR 8 key.
If HTR 8 senses movement, key illumination is activated without having to press a key. If HTR 8 is shaken, key illumination is also activated.
Key illumination is the biggest drain on the HTR 8's batteries. A short key illumination timeout will extend battery life appreciably; turning it off altogether (set it to 0 seconds) will lengthen it still further.
CONFIGURING KEY ILLUMINATION
| Keys to Press (for 3 seconds) | Mode |
| DISP + Digit Key (0-9) | Set key illumination timeout to number of seconds corresponding to digit key. Zero turns off the key illumination entirely. |
| DISP + OFF | Disable light sensor. Key illumination will turn on with any key press. |
| DISP + ON | Enable light sensor. |
| DISP + ENTER | Set the light sensor threshold to the current light level. |
| DISP + RTN | Restore all key illumination settings to the defaults. |
FACTORY RESET
The HTR 8 can be reset to its factory state, deleting all learned commands, copied and punched-through keys, macros, and other setup information; reverting all keys to their pre-programmed library commands.
To perform a factory reset simultaneously press-and-hold for 10 seconds the HTR 8's [ON] and [RTN] keys; the Learn LED will start to flash green. Release [ON] and [RTN] before the second flash is complete; the Learn LED will turn red, indicating the remote has been reset.
NOTE
You must release [ON] and [RTN] before the second flash goes out, otherwise the unit will not reset; should this occur, repeat the full procedure.
DELETE MODE
The HTR 8 can store learned, copied, and "default library" commands on any single key. The default library commands are the pre-programmed NAD codes, such as the native NAD receiver commands on the [AMP]"page".
You can delete commands by layers back "down" to the default library command on any key, removing learned commands, punched-through functions, and copied keys.
NOTE
The default library commands cannot be deleted, so you need not worry that using Delete Mode might cause irreparable changes.
To enter Delete Mode, simultaneously press-and-hold for 3 seconds both the desired key's DEVICE SELECTOR key and the [RTN] key, until the Learn LED turns green. Press the function key whose command you wish to delete; the Learn LED flashes; the number of times indicates which type of function has become active - see the table below. Press the active DEVICE SELECTOR key again to exit Delete Mode.
NOTE
You may delete multiple function-key commands on the same DEVICE SELECTOR "page", but to delete from more than one DEVICE SELECTOR page you must exit Delete Mode and then re-enter it on the required page.
| Flashes | Command Type |
| 1 | Default Library Command |
| 2 | Copied Library Command |
| 3 | Learned Command |
LOADING CODE-LIBRARIES
The HTR 8 can store a different library of default NAD codes for each of its DEVICE SELECTOR "pages". If the original default library does not control your NAD CD player, BD player, DVD player or other component, follow the procedure below to change the code-library.
Begin by ensuring that the component you wish the HTR 8 to control is plugged in and powered-up ("ON", not merely in standby). To enter the HTR 8's Library Mode, simultaneously press-and-hold for 3 seconds both the desired DEVICE SELECTOR key and the [A/V PSET] key, until the Learn LED turns green.
While keeping the HTR 8 pointed toward the component, enter the first appropriate three-digit code-library number from the table below and then press [OFF]. If the component turns off, press [ENTER] to accept that code-library number and exit the Library Mode. If the component does not turn off, enter the next three-digit code-library number from the table.
When you enter the correct number the component will turn off; press [ENTER] to accept that code library number and exit the Library Mode.
| LIBRARY CODE | NAD PRODUCT DESCRIPTION |
| 100 | Receiver/Processor (Discrete ON/OFF) |
| 101 | Receiver/Processor (Toggle ON/OFF) |
| 102 | S170 |
| 103 | L75 |
| 104 | Second Zone Commands (Zone 2) |
| 3112 | Zone 3 |
| 4112 | Zone 4 |
| 105 | L70 |
| 106 | L76 |
| 107 | 118 |
| 108 | L53 |
| 109 | L73 |
| 110 | Stereo Receiver/Amplifier |
| 111 | Stereo Second Zone |
| 112 | Txx5 Series |
| 200 | CD Player |
| 201 | CD Player (old) |
| 202 | S170, S240, S340 |
| 203 | S325 |
| 204 | S060 |
| 205 | M5 |
| 300 | Tuner |
| 301 | L75, L76 Tuner |
| 302 | L70 Tuner |
| 303 | L53 Tuner |
| 304 | L73 Tuner |
| 305 | C425 |
| 306 | C445 |
| 307 | Txx5 Series Tuner |
| 400 | Tape Deck B |
| 401 | TAPE Deck A |
| 500 | TV 280 |
| 501 | MR13 |
| 502 | MR20 |
| 503 | PMR45 |
| 600 | T535, T562, T585, M55 |
| 601 | T550, L55 |
| 602 | T512, T531, T532, T571, T572 |
| 603 | L70, L73 DVD |
| 604 | L56 |
| 605 | T513, T514, T515, T517, T524, T533, T534 |
| 606 | L53 DVD |
If none of the codes from the table, when entered, turns on the component, and if you are quite sure you have followed the above procedure completely and carefully, you may want to try the "search" method as follows:
Enter Library Mode by simultaneously pressing-and-holding for 3 seconds both the desired DEVICE SELECTOR key and the [A/V PSET] key, until the Learn LED turns green. Now press-and-hold the HTR 8's [▶] or [▼] key; the remote will step through all the available codes at a rate of approximately 1 per second.
When the component turns off, immediately release the cursor key; press [ENTER] to accept that code-library and exit the Library Mode. Try a few commands; should you prove to have stepped past the needed code-library, re-enter the Library Mode and use the cursor key to step back to it.
NOTE
It is possible that search mode will find code-libraries that operate, at least partially, some other brand (non-NAD) components. You may certainly exploit such capabilities as you find them. However, since we can only ensure the completeness or accuracy of NAD code-libraries, we cannot support the HTR 8's operation with other-brand components.
CHECKING CODE-LIBRARY NUMBER
You can check the current code-library on any DEVICE SELECTOR key as follows. Enter Library Mode by simultaneously pressing-and-holding for 3 seconds both the desired component's DEVICE SELECTOR key and the [A/V PSET] key, until the Learn LED turns green. Press the [DISP] key; the HTR 8 indicates the current code-library by flashing its [CUSTOM], [BD], and [MACRO] keys.
For example, to indicate code-library #501, the HTR 8 will flash [CUSTOM] 5 times, pause, and then flash [MACRO] once. You might wish to make a note of your components' code-library numbers.
SUMMARY OF THE HTR 8 MODES
| Mode | Keys To Press (for 3 seconds) |
| Learn/Copy/Punch Through | Device Key + RES Key |
| Delete Mode | Device Key + RTN Key |
| Macro Record | MACRO Key + Function Key |
| Library Mode | Device Key + A/V PSET Key |
| Back Light Timeout | DISP Key + Digit Key |
| Factory Reset | See “Factory Reset” above |
USB INTERFACE
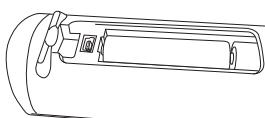
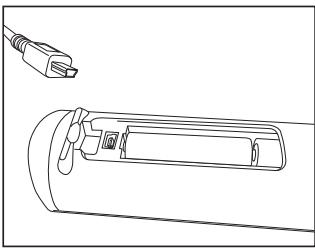
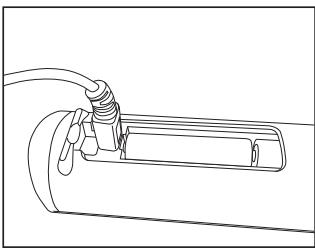
The HTR 8 allows one to upload and download the configuration through a Windows PC and NAD's Proprietary HTR 8 programming software. Use a USB A male to mini USB B male 5-pin cable (not supplied) between your Windows PC and the HTR 8. See illustration below on how to connect a USB A male to mini USB B male 5-pin cable to the HTR 8.
NOTE
Please log onto www. nadelectronics.com/HTR8 for the latest HTR 8 interface control software. Your custom installer or dealer can assist you in the proper setup and configuration of the mini USB interface and software.

PUNCH THROUGH (DURCHSCHALTEN)
Pnnpmep:KoHIpOBaHne KOMaHdbi"Pahy3co cTpaHnUbI KOMaHd DVD Ha KhoNky [II]cTpaHnUbI KOMaHd AMP
Ha npylte HTR 8 odnoBpeMeHNO haXmnte uyepeKnBaTe KhoNky AMPu KhoNky RES. INDnKaTOp oBuYeHnA3aFopNTc 3eJeHbIM LBTOM.
Hajmte KhoIky II. HndkaTOp o6yHeN 3aROpITcJ KEJIbM UBeTOM.
Hajmnte KhoIky CD, Haxmtte KhoIky II.Индikatop obyuHIna 3aIropNTc 3eJIeHbIM ICBETOM.
Hakmnte KhoNky AMP eue pa3dny BbIXoDa n3 pexkma o6yehn.
ПТИМЕЧАНО
Ckonupobahnhbfe yhkuu u c803- hbe yhkuuu npuununauNbHO noxou. OOhako eclu bbl cokupyeme KOMahdy u 3amem ydaumte unu u3mehume uXoohnyo KOMahdy (KOMahdy Khonku-ucmochnka KOnupobahnua), mo cokupobahna KOMaHda ocaMaHcne Hez3MeHHou. Eclu bbl caenaeme KOMahdy c803Hou u 3amem ydaumte unu u3mehume KOMahdy uXoohU KHonku, c803Hra yhkuu maKke u3mehumc coomBemcmyuum 6pbazom.
MAKPOKOMAHdbl
MaKpOKOMHaJa npedctabIaTeT co6oB noCneJeObATEbHcOT dByx IIN 60Jee KOMaHd PylbTa DY, BbIOnJIHeMbx ABToMAtueckn PyTEM HauKaTNa ONDHO KNOpKn. Bbl MoKeTe nCNoJIb3OBaTb MaKpOKOMaHdy DnA for ABToMaTueckOrO BbIOnJIHeHn pnoCTOINocNeJeObATEbHcOHTn ONEpaun TAKo, Ka"BkIoUeHne IpOnIrPbIbATEn DVD-DnCKOB IN HaCuAnO BOCpON3BeDeHn". IVn JIe Bbl MoKeTe COCTaBtB 60Jee CLOXHyO MaKpOKOMaHdy DnB BkIoUeHn BCEINCTeMb, Bi6Opa INCTOHNka, Bbl-6Opa peKIma npocLyuINBaHn IN HaCuAno BOCpON3BeHdN-Hce PyTEM ONDHO HAJAtnK HKNi. B HTR 8 MoxHo CoXPaNITb
OДИN MaKpOс ДЯ КаЖдой KHONКИ DEVICE SELECTORиФУнцINОньHоI KHONКИ.
ПОНМЕЧАНЕ
MaKpOKOMaHbI He 3abucm om ycmpoUcMb, ynpaBneHuem KomopbIM ocuuecMbnaemcB δaHbI MOMehm.
ПОТРAMМИPOBAHWE MAKPOKOMAHД
Длпnpогамміровиma МakpOKOMaHдь ODнOBpeMHNO HaxmMteи у dedжва- te He Me Hee 3 cekyHД кноку MACROи Функцюныную кноку пьыТНВ8, ПОД КOTOPОВ Вbl XOTINTE 3aNPORpaMMi- POBaTb MaKpOKOMaHДу,До tex nop,пoka CBETOBОИ ИndkaTOp He 3aRopITcя зelen- hBIM CTeTOM.Тakke 3aRopITcя рdcbetka KHONKNI MaKpOKOMaHДbl.
HaKMMTe Heo6xOIMbIe FyHKUHOHaJIbHbIe KHOJIKN B TOI NOCIEIOBATEIbHOCTN, B KOtOPOI COOTBEcTBcyIOUIne FyHKUINDoJIKHbIbIPOJHHTbCBy PAMKAX MaKPOKOMAHdb. He 3abSbAaTE O To TpeJdKaJdof FyHKUHOHaJIbHOBKHOHNKOChauJa CnEdyet HaIXIMaTb COOTBEcTBcyIOUYo KHONKY BbIOBaOpA yCTpoiCTB (PnIPnOgPamMnPOBaHm MApKOKOMAHbBl MoJcTe PeKeKJIIOuATb yCTpoiCTBa CTBOKp a3, CKOJIbKO Heo6XoIMo), YTOIO3BOLIeR Bam Co3DaTb MaKPOKOMAHdy, COePeJzAuYo KOMAHdbI bOJe e Hc COnHO"CTpaHNUb"KOMAHd.
ПО кOHУЧАИМ ВБДО на с<DЕДОВТЕЛ-НСТИ ИЕБХODIMBX KOMAнД НаЖМпЕКнОПКУ MACRO[eze pa3对阵coхарениMaKpOKOMaHдь.ИнДикагтOBчEquHЯиN noDcBETka KONIKI MACRO norachyT.
ПОНМЕЧАНЕ
Kakda makuKomamdo mojem
Bkloayb c6e8 makuym 64
fynkuohabHbne kAmdb. B
cnyae npebIeuHua 3mo2o kOnuecmba makuKomahda 6ydeM abmomamuecku coxpaheHa nocne Bboda 64-ou kAmhdb.
I Mo Mepe BbIpOnHeHnKaKJDoI Oepaunu 3aRopaetcN pOcbETKa KHNKn NcXoHOrO yCTpoiCTBa; COOTBETCTByIoUaŋ KHNKa BBbopa yCTpoiCTBa 6yDet MInrTa. I
OKOnHaHn BbIOpJIHeHn MaKpOKoMaHdbIpoNcbetKa KHOKn MacRO rachet. Ecn
BO BpEmyBipINHeHmMaKpOKOMaHb
BbI Haxmete IIOBOI DpyIgO KHONKy NylbTa DY HTR 8, BByIOnIIHeNIE MaKpOKOMaHbI nppeBcTc. POMHnTE O TOM, YTO Bbl DoJNKHbl depKaTb Nylb HTR 8 TakIM o6pa3OM,
YTO6bI INHpaKpaChbI CmHnA1 erO n3ny
yateJ MOr 6ecnpenTCTBHeHNO DCtNrTaB He06XoDMbIX KOMTOHeTOB.
ПОНМЕЧАНИС
Ipu 8bnoJHnHu MaKpOKOMaHdbI
MeJdy 8cemu ee onepauuMa aBom
Mamuecku 8bOdumc 3aedpKa
npoJxmuJIbHocMbU 8 1 cekyHdy.
Eclu BAm Heo6XoDUMo, yMo6bI 3a-
depKa Mekdy 8bInOnHeuem om
deJbHbIX onepauu 6blA 60lee 1
cekyHbI, Hanpumep, 4mo6b damb
BpEma KomnoHeHmy nONocMbU
BKIOUcIMCBs, Bbl MoXeMe BHeCmU 8
MaKpOKOMaHdy "NyCtble" onepauu
nymem nepeKlIoUeHnur "cmaHuc"
KomAnD 6e3 8bOda peaIbHbx fynK-
cuOHaNbHbIX KOMAnD.
OTKJIIOUChE HNE IOCDBETKIN KHOJOK
BbMOjTeHnCTponTb nylbT DY HTR 8 TAKIM O6pa3OM, YTO NOCBeTKa KHONK 6y-ET aBTOMaTneCeCKN OTKIOUaTbcra Chepe3 0-9 cekyn. ITO yMOJuaHnIO yCTaHOBNeHo 3NaueHne, paBHOe 2 cekyndAm. Iyra YCTaHOBKN BpEmEHn AKTNBHOCTN NOcCBtKn ONDOBpEMHeHn HaxmITE uYedxNBAIte B TeueHne 3 cekynd KNOkny DISP nybTa
HTR 8ицфровую кногку 0-9,Знанецп.KOTOPО COOTBETCTBYeT HeO6xOДIMо npOДOLKINTEЛьНOCТИ АКТИВHCOTN NOCBETKN.ИнДИКATOP OБчЕнЯ МИRHT Два раза пдя потberжденя HOВОй HabSTРКИ.Еслу установно Знанецп 0,пODCBETKA He 6byet BKIOUaTbCBA BOOБш.
ПОНМЕЧАНО
Iodceemka Khonok Bklioaemcnpu Haxamuu IIO6oK hONku HTR 8.
Ecnu HTR 8 o6hapuykum dbukenue, nodcbemka KhONOK BkIIOUcMcB63 neo6xodumocmu Haxamura KhONku. Ecnu HTR 8 nompcmu, nodcbemka KhONOK makke BkIIOUcMca.
Iodcembka KhONK RAeMcre cambIM 60bwhum nompebumem Ehep2u3JIeMeHMOB numaHua nybma HTR 8. KopomKaJ npdoJxmuelb Hocmb akmuHocMu nOcembku cyueceBHeNo npdoBeaem cpoK cnjkb3JIeMeHMoB numaHa.npu noNHom oMKIOUeHHu nOcembku (npu ycMaHOBe epemHu ee AkmuHocMu Ha 0 cekyHd) cPCK cny6bl JIeMeHMoB numaHa npdoBeaem Cs eue BoIbwe.
HACTPOIKA IIOCDBETKIN KHOIOK

www.NADelectronics.com
©2012 NAD ELECTRONICS INTERNATIONAL
A DIVISION OF LENBROOK INDUSTRIES LIMITED
- GETTING FAMILIAR WITH THE HTR 8
- LEARNING CODES FROM OTHER REMOTES
- NOTES
- CANCEL OPERATION
- PUNCH THROUGH
- NOTE
- COPY A COMMAND FROM ANOTHER KEY
- MACRO COMMANDS
- RECORDING MACROS
- EXECUTING MACROS
- KEY ILLUMINATION TIMEOUT
- FACTORY RESET
- DELETE MODE
- LOADING CODE-LIBRARIES
- CHECKING CODE-LIBRARY NUMBER
- USB INTERFACE
- PUNCH THROUGH (DURCHSCHALTEN)
- ПТИМЕЧАНО
- MAKPOKOMAHdbl
- ПОНМЕЧАНЕ
- ПОТРAMМИPOBAHWE MAKPOKOMAHД
- ПОНМЕЧАНИС
- OTKJIIOUChE HNE IOCDBETKIN KHOJOK
- ПОНМЕЧАНО
Brand : NAD
Model : HTR8 LEARNING REMOTE CONTROL
Category : Universal remote