
XN091 - Turntable Lauson - Free user manual and instructions
Find the device manual for free XN091 Lauson in PDF.


| Product Type | Turntable |
| Brand | Lauson |
| Model | XN091 |
| Dimensions (L x W x H) | 420 x 350 x 120 mm |
| Weight | 3.5 kg |
| Power Supply | 220-240 V, 50/60 Hz |
| Rotation Speeds | 33 1/3 and 45 RPM |
| Drive Type | Belt Drive |
| Cartridge | Moving Magnet Cartridge (MM) |
| Audio Output | Stereo RCA jack, built-in preamp |
| Main Features | Vinyl playback, auto-stop, adjustable counterweight tonearm |
| Care and Cleaning | Clean the dust cover with a soft cloth. Use an antistatic brush for the record. |
| Safety Instructions | Use on a stable surface. Do not expose to moisture. Unplug before cleaning. |
| Spare Parts and Repairability | Belt, cartridge, 45 RPM adapter available. Repair by a qualified technician. |
| Included Accessories | Dust cover, 45 RPM adapter, RCA cable, user manual |
| General Information | For any issues, consult the complete manual or contact customer service. |
Frequently Asked Questions - XN091 Lauson
User questions about XN091 Lauson
0 question about this device. Answer the ones you know or ask your own.
Ask a new question about this device
Download the instructions for your Turntable in PDF format for free! Find your manual XN091 - Lauson and take your electronic device back in hand. On this page are published all the documents necessary for the use of your device. XN091 by Lauson.
USER MANUAL XN091 Lauson
TURNTABLE WITH ENCODING FUNCTION

natural_image
Vintage portable vinyl record with open lid and power switch (no visible text or symbols)Please read this instruction manual carefully and familiarize yourself with your product. Before using the first time, please retain this manual for future reference.
Dear Customer,
Thank you for purchasing our Turntable Lauson. Please read and follow these instructions, in order to avoid damaging the item. We do not cover any damage that may arise from improper use of the item of the disregard of the safety instructions.

The lighting flash and arrow head within the triangle is warning sign alerting you of dangerous voltage inside the product
CAUTION
RISK OF ELECTRIC SHOCK DO NOT OPEN
CAUTION : TO REDUCE THE RISK OF ELECTRIC SHOCK DO NOT REMOVE COVER (OR BACK). NO USER SERVICIABLE PARTS INSIDE. REFER SERVICING TO QUALIFIED SERVICE PERSONNEL.

The exclamation point within the triangle is a warning sign alerting you of important instructions accompanying the product
IMPORTANT SAFETY INSTRUCTIONS:
- Read the instructions. All uses guidelines must be read before start device.
- Keep the instructions for future use.
- Attention, use and security guidelines must be respected.
- The device must not be used near water or be put in contact with moisture.
- Make sure has no liquid is spilled on device and device openings.
- Move device carefully, avoid shocks.
- Do not block the breakdown of the device outputs.
- Do not place the device near from a heat source (e.g. radiator). Do not expose it to the Sun.
- Plug the device as indicate on this information form.
- This device has a connection with overload protection (security device) decision-making. If the replacement of decision-making is required, please you send has an experienced or the device manufacturer technician.
- The sector cord should be unplugged a long period of use.
- Device should be repaired by a qualified person when:
• The taken or the power cord is damaged.
- Objects have fallen into the apparatus or a liquid has been spilled into device.
• Device was exposes to the rain.
• Device does not work correctly without notable exterior change
• Device fell and the subwoofer is broken.
- The user shall not try to maintain device beyond that which is described in this information form. The guarantee would negate.
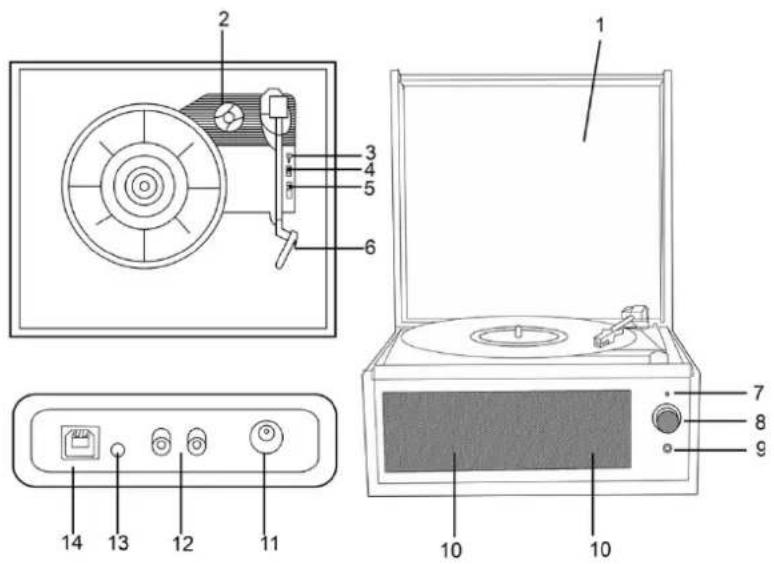
DESCRIPTION
- Dust cover
- 45 RPM adapter
- Tone arm lift-lever
- Auto-stop switch control
- Speed selection (33, 45, 78 rpm)
- Cartridge
- Power LED light
- Power switch / Volume control
- Aux out / Headphone
- Louder Speakers-R&L (behind the Speaker-cover)
- DC power jack (5V 1000mA)
- RCA lineout (R&L)
- Aux in 3.5mm
- USB Encoding connection
INITIAL SET-UP CONNECTION
Make sure that the mains voltage of your home corresponds to the operating voltage of the unit. Your unit is ready to be connected to a mains voltage of 5V DC adaptor
AMPLIFIER CONNECTION (if required)
Whilst you can listen to your new turntable using the built in speakers you may wish to connect it to your existing Hi Fi system. Connect the audio plugs to the Line input on your mixer or amplifier using an RCA cable (not supplied)
• Red plug into R/H channel input.
• White plug into L/H channel input.
PLAYING A RECORD
- Place the record of your choice on the turntable. If required, do not forget to place the adaptor on the record spindle.
- Choose the desired playing speed using the speed selection switch between 33.3, 45 and 78rpm.
• Turn on the Rotary Power Switch (this know also controls volume) - Release the tone arm lock.
- Raise the arm with your hand lightly.
- Place the stylus vertically over the first track of the record, the turntable will start turning automatically.

natural_image
Close-up of gloved hands holding a small electronic component (no visible text or symbols)- Put down the stylus slowly on to the record to play.
- When a record comes to the end, the turntable will stop automatically if the auto-stop switch is in the ON position. If the switch is in the off position then it will keep revolving until the tone arm is returned to the tone arm rest.
- Lift up the tone arm and put it on the rest when finished.
- Replace the protective cap on the stylus and close the tone arm lock.
- Turn off power at mains.

natural_image
Close-up of a hand pressing down on a mechanical component (no visible text or symbols)NOTE: If your record stops before the last track finishes, set the AUTO STOP switch to OFF. Your record will now play to the end, but you will have to stop the turntable rotation manually.
AUTO STOP
- When a record finishes playing, it can be controlled by the auto-stop
- ON/OFF switch.
- Lift up the tone arm and put it on the rest when finished.
- Replace the protective cap on the stylus and close the tone arm lock.
• Turn off the power at the mains.
BLUETOOTH RECEIVER CONTROL
- When the tone arm set to the rest position, Bluetooth function will start automatically.
- User could operate the mobile device and connect it then ready for music playing.
- Tips: The Bluetooth name of the device is: BT Turntable
CONNECTING TO A COMPUTER FOR RECORDING
Before getting start, please install the “AUDACITY” recording software onto your computer. Below is an example using a computer with Microsoft XP and the Audacity software installed. For other Windows OS or Mac OS, please visit Audacity website for details. http://audacity.sourceforge.net/
INSTALLING THE AUDACITY SOFTWARE
- Insert the Audacity disc (included) into the CD drive of your computer
- Click on My computer on the desktop.
- Double click CD drive to view the contents of the CD and select "Windows" under "Audacity" folder.
- Open "Windows" folder and select "Audacity 2.0.3 (Windows 2000, XP, Vista, 7, 8)".
- Double click Audacity set up icon with file name "audacity-win-2.0.3" to install the Audacity software according to the instruction, read license agreements of Audacity before installation.
- User can find further information on the software functions in the help menu and in the operation instructions of the software. there are available at the following links: http://www.audacity.com/
Note:
Free software (AUDACITY) licensed under the GNU general public license (GPL).
More information as well as open source code can be found on the provided CD or on the website at: http://audacity.sourceforge.net/
INSTALL THE USB DRIVE
- Use the included USB cable to connect the turntable to your computer.
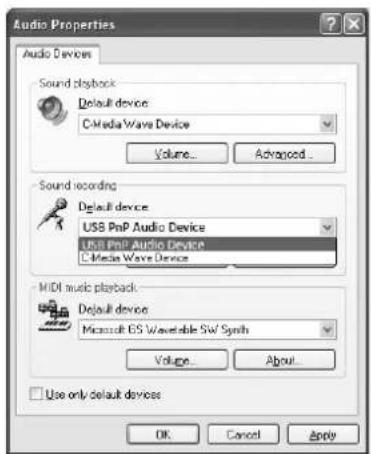
- Your computer will detect the JTA-470 as a "USB PnP Audio Device" & start to install USB drivers for it automatically.
- Waiting for the installation complete until your computer shows a pop up a message that it is installed properly and ready to use.
SET RECORDING INPUT LEVEL (USING A WINDOWS XP COMPUTER)
- Click the "Start" in the left corner of your computer
- Select "All Programs" → "Accessories" → "Entertainment" → "Sound Recorder" to open the sound record interface.

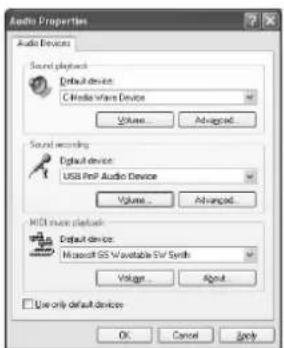
- Select "Edit" and then click "Audio Properties" towards the bottom of the menu to select "Audio properties" interface.


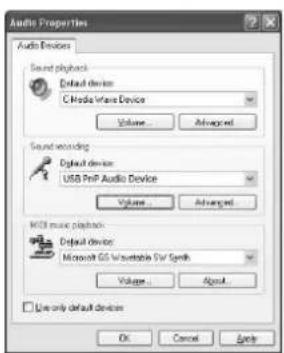
- In the Sound Recording field, click the pull down menu to select "USB PnP Audio Device" as Default device of sound recording.
LAUSON
TURNTABLE
- Click the Volume button under the Sound recording tab to open "Recording Control" interface;
- Adjust the line in volume to a level without distortion. You can play a record on the turntable and use the Sound Recorder to record a short clip of music for testing. The sound wave will show on the interface screen when recording.


RUNNING AUDACITY SOFTWARE
Note: Please review the software license and distribution restrictions found on the software disc. Use of the Audacity software is subject to those conditions and restriction.
For additional help with recording and editing music by using the Audacity software, please visit http://audacity.sourceforge.net/
- Run the Audacity from the Windows start menu or double click the Audacity icon on your computer desktop.
- The Audacity main screen appears. You will find the Record, Play, Pause, Stop, Skip to Start and Skip to End control buttons here. Use the File, Edit, View, Transport, Tracks, Generate, Effect and Analyze menus from your computer screen to Save, Export or Edit the music.

- Click "Preferences" at the bottom of the Edit menu, you can set the Devices, Quality, and various settings here.

- Adjust the input and output volume by sliding the Input and Output Volume bars.
Output Volume Input Volume
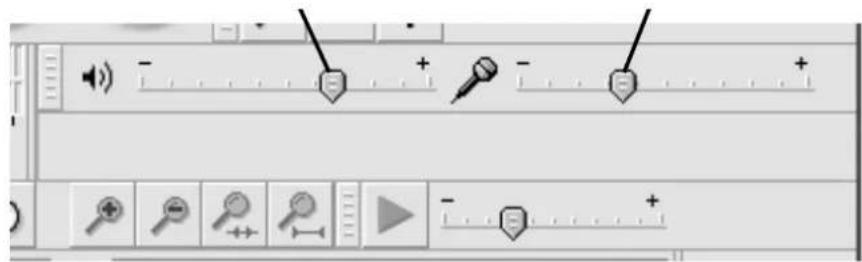
- Click the record button to start recording, left and right tracks will show on your computer screen. If you cannot see the sound waves appear on the Interface when recording, adjust the Input volume bar.

-
Use the Audacity control panel to record or listen the music you have recorded
-
Click the ● button to start recording.
- Click the ◀ button to skip to start;
- Click the ▶ button to skip to end;
- Click the ▶ button to play;
- Click the " button to pause;
- Click the button to stop.

EXPORT THE MUSIC FILES TO WAV OR MP3 FORMAT
Once you have finished recording, make sure you save your recorded music to the computer.
- Click File menu and move down to "Export" to convert the file to WAV format or MP3 format.
- Click on WAV or MP3 format you want to save the music as in pull down menu of "Save as type" field, and you will be asked for the file name of your recorded music
NOTE: Audacity does not export MP3 files directly. If you want to encode your recorded music to MP3 format, you need to download the LAME MP3 encoder either in the CD provided or under the page "Other Audacity Downloads for Windows" of the website http://audacity.sourceforge.net/
INSTALL THE MP3 ENCODER
Insert the included CD into your computer and select "Audacity 2.0(Windows 2000, XP, Vista, 7, 8)" under "Windows" folder.
Open the folder and select "Plug-ins".
Double click the "Lame_v3.99.3_for_windows.exe" file under "Plug-ins" folder to start install the program.

Note: Normally, Audacity will automatically locate the
Lame file that you installed. However, if you change default directory of Lame program, you may need to manually locate it by using Audacity→Edit→Preference→Libraries and the click "Locate" button on computer screen to browse "lame_enc.dll" file where the directory you have installed. See Fig.1 & 2 below and click OK to finish manual installation.

MAINTENANCE
REPLACING THE STYLUS
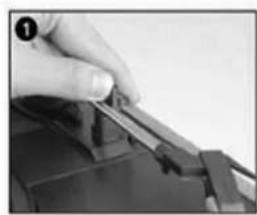
Refer to the figures 1-8:

natural_image
Close-up of a hand holding a small object, possibly a mechanical component or tool, with no visible text or symbols.Push the arm lock to release the tone-arm
natural_image
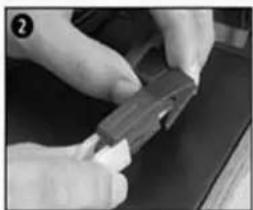
Close-up of hands holding a small electronic component (no visible text or symbols)Take off cap of the cartridge to expose the needle out

natural_image
Close-up of hands using a tool to cut or apply material (no visible text or symbols)Separate the cartridge from the socket lightly

natural_image
Close-up of hands using a sewing machine to adjust or repair a dark object (no visible text or symbols)Take off the audio- line from the cartidges completely

To fit a new one just in opposite deals, inster the audio-line accordingly, and install the cartridge to the socket lightly
Note: Please exercise extreme care whilst performing this operation so as to avoid the tone arm and audio line wires from any damage.
INSTALLING A NEW STYLUS CARTRIDGE
Refer to the figures 5-6:

natural_image
Two-step black-and-white photo showing hands using a tool to adjust or install a component, with no visible text or symbols.Notes: We advise you to clean your records with an anti-static cloth to gain maximum enjoyment from them and to make them last.
We would also point out that for the same reason your stylus should be replaced periodically (approximately every 250 hours)
Dust the stylus from time to time using a very soft brush dipped in alcohol (brushing from back to front of the cartridge)
WHEN TRANSPORTING YOUR RECORD PLAYER DO NOT FORGET TO:
- Replace the protective cap on the stylus.
- Put the rest clip into the pick-up arm.
DISPOSAL
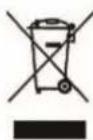
This marking indicates that this product should not be disposed with other household wastes throughout the EU. To prevent possible harm to the environment or human health from uncontrolled waste disposal recycle it responsibly to promote the sustainable reuse of material resources
WARRANTY CONDITIONS
Thank you for purchasing this product. Lauson guarantees the proper functioning of its products for a period of 2 YEARS from the date of purchase, being responsible for any lack of conformity that manifests within this period, including the repair of the defects or the replacement of the product within the Union European
CLAIM PROCEDURE
The holder of the guarantee may contact the technical service by telephone at the number (00) 34 934 536 222 or visiting our Lauson website: www.lauson.es or by going directly to the purchasing center. Before claiming your rights as a consumer, make sure that the product meets the following requirements:
- The guarantee will be valid if it is presented duly completed with the reference of the model, serial number, date of purchase and establishment data. Being an essential requirement that is accompanied by the purchase ticket.
- In case of sending to repair the equipment, it must be in the same conditions (packaging, accessories, manuals ...) in which it was purchased, except for natural deterioration due to use. The guarantee does not cover damages caused by transportation due to inadequate packaging.
- Lauson reserves the right to refuse the guarantee in the event that some of the requested information is not specified, is not legible or is damaged.
- Damages or malfunctions caused by catastrophic causes, falls and blows due to incorrect use by the user, as well as erroneous feeding by energy sources or parts subject to natural wear and tear due to improper use are not covered by this guarantee.
- This product will lose its guarantee if it is handled by technicians or workshops outside our company.
- This guarantee is valid only in scope of the European community. The warranty terms contained in this certificate do not exclude, restrict or modify the rights that legally correspond to the buyer by application to Royal Legislative Decree 1/2007 of November 16.
natural_image
Vintage portable vinyl record with open lid and power switch (no visible text or symbols)The lighting flash and arrow head within the triangle is warning sign alerting you of dangerous voltage inside the product
CAUTION
RISK OF ELECTRIC SHOCK DO NOT OPEN
CAUTION : TO REDUCE THE RISK OF ELECTRIC SHOCK DO NOT REMOVE COVER (OR BACK). NO USER SERVICIABLE PARTS INSIDE. REFER SERVICING TO QUALIFIED SERVICE PERSONNEL.

The exclamation point within the triangle is a warning sign alerting you of important instructions accompanying the product
natural_image
Close-up of gloved hands holding a small mechanical component (no visible text or symbols)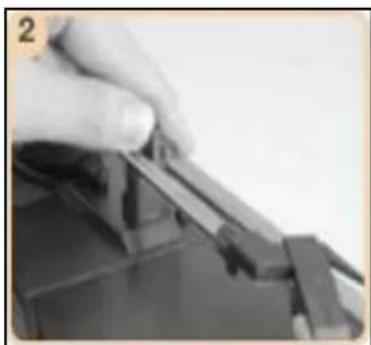
natural_image
Close-up of a hand holding a mechanical component, possibly a tool or part, with no visible text or symbols.

EXPORTAR LOS ARCHIVOS DE MUSICA EN FORMATO WAV O MP3

MANTENIMIENTO
natural_image
Close-up of a hand holding a small object, possibly a tool or component (no visible text or symbols)natural_image
Close-up of gloved hands holding a small electronic component (no visible text or symbols)natural_image
Close-up of hands using a power tool to adjust or install a component (no visible text or symbols)natural_image
Close-up of hands performing a sewing or sewing process on a fabric (no visible text or symbols)natural_image
Close-up of hands using a precision tool to adjust or install a component (no visible text or symbols)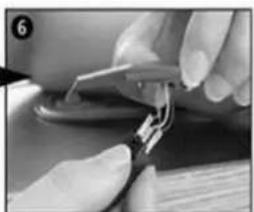
natural_image
Close-up of hands using a tool to adjust a small mechanical component (no visible text or symbols)
natural_image
Close-up of hands using a tool to cut or apply a small component (no visible text or symbols)
natural_image
Close-up of hands assembling or repairing a mechanical component (no visible text or symbols)natural_image
Two-step black-and-white photo showing hands using a tool to adjust or repair a small electronic component, labeled 5 and 6 (no text or symbols present)NOTAS
natural_image
Vintage portable radio with open lid and power switch, no visible text or symbols on device body| The lighting flash and arrow head within the triangle is warning sign alerting you of dangerous voltage inside the product | CAUTION RISK OF ELECTRIC SHOCK DO NOT OPEN CAUTION: TO REDUCE THE RISK OF ELECTRIC SHOCK DO NOT REMOVE COVER (OR BACK). NO USER SERVICIABLE PARTS INSIDE. REFER SERVICING TO QUALIFIED SERVICE PERSONNEL. | The exclamation point within the triangle is a warning sign alerting you of important instructions accompanying the product |
CONSIGNES DE SÉCURITÉ :
BRANCHEMENT PREMIÈRE UTILISATION
natural_image
Close-up of hands holding a small mechanical component (no visible text or symbols)LAUSON
TURNTABLE
natural_image
Close-up of a hand holding a small object, possibly a mechanical component or tool, with no visible text or symbols.AUTO STOP

EXÉCUTION DU LOGICIEL AUDACITY
EXPORTATION DES FICHIERS MUSICAUX AUX FORMATS WAV OU MP3

ENTRETIEN
REEMPLACER LA POINTE DE LECTURE
Observez les gures 1-8 :
natural_image
Close-up of a hand holding a small object, possibly a tool or component (no visible text or symbols)natural_image
Close-up of gloved hands holding a small electronic component (no visible text or symbols)natural_image
Close-up of hands holding a small object with a tool, possibly a tool or device (no visible text or symbols)natural_image
Close-up of hands performing a manual task with a tool on a workbench (no visible text or symbols)natural_image
Close-up of hands using a small mechanical tool to adjust or install components (no visible text or symbols)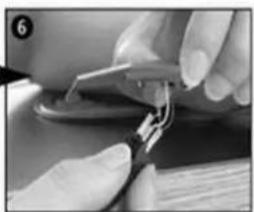
natural_image
Close-up of hands holding a small object with a string, possibly part of a tool or device (no visible text or symbols)
natural_image
Close-up of hands using a tool to adjust or install a mechanical component (no visible text or symbols)
natural_image
Close-up of hands assembling or adjusting a mechanical component (no visible text or symbols)natural_image
Two-step black-and-white photo showing hands assembling electronic components, labeled 5 and 6 (no text or symbols present)REMARQUES:
CONDITIONS DE GARANTIE
natural_image
Vintage portable vinyl record with open lid and power button (no visible text or symbols on device body)
The lighting flash and arrow head within the triangle is warning sign alerting you of dangerous voltage inside the product
CAUTION
RISK OF ELECTRIC SHOCK DO NOT OPEN
CAUTION : TO REDUCE THE RISK OF ELECTRIC SHOCK DO NOT REMOVE COVER (OR BACK). NO USER SERVICIABLE PARTS INSIDE. REFER SERVICING TO QUALIFIED SERVICE PERSONNEL.

The exclamation point within the triangle is a warning sign alerting you of important instructions accompanying the product
ISTRUZIONI DI SICUREZZA:
natural_image
Close-up of gloved hands holding a small electronic component (no visible text or symbols)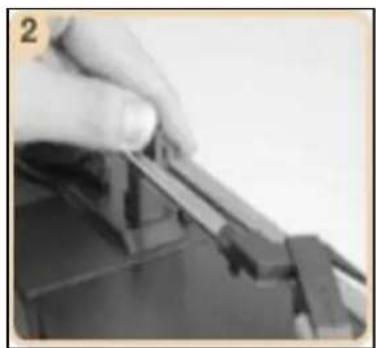
natural_image
Close-up of a hand pressing down on a mechanical component (no visible text or symbols)
AVVIARE IL SOFTWARE AUDACITY
ESPORTARE I FILE MUSICALI AL FORMATO WAV O MP3

MANUTENZIONE
natural_image
Close-up of a hand using a tool to adjust or install a mechanical component (no visible text or symbols)natural_image
Close-up of hands using a tool to apply material or plastic (no visible text or symbols)natural_image
Close-up of hands holding a small object, possibly a tool or component, with no visible text or symbols.natural_image
Close-up of hands holding a small object with a metallic component, possibly a tool or device (no visible text or symbols)natural_image
Close-up of hands using a tool to adjust or install a component (no visible text or symbols)natural_image
Close-up of hands using a tool to adjust a metal hook (no visible text or symbols)
natural_image
Close-up of hands using a tool to adjust or install a mechanical component (no visible text or symbols)
natural_image
Close-up of hands assembling or repairing a mechanical component (no visible text or symbols)natural_image
Two-step black-and-white photo showing hands using a small electronic component to adjust or install a circuit board (no text or symbols visible)NOTE
natural_image
Vintage portable vinyl record with open lid and power button (no visible text or symbols on device body)
The lighting flash and arrow head within the triangle is warning sign alerting you of dangerous voltage inside the product
CAUTION
RISK OF ELECTRIC SHOCK DO NOT OPEN
CAUTION : TO REDUCE THE RISK OF ELECTRIC SHOCK DO NOT REMOVE COVER (OR BACK). NO USER SERVICIABLE PARTS INSIDE. REFER SERVICING TO QUALIFIED SERVICE PERSONNEL.

The exclamation point within the triangle is a warning sign alerting you of important instructions accompanying the product
ERSTINBETRIEBNAHME
natural_image
Close-up of gloved hands holding a small electronic component (no visible text or symbols)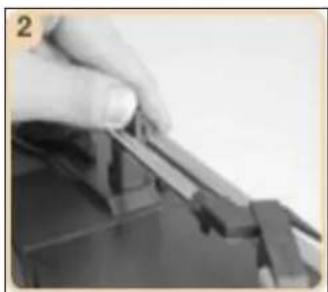
natural_image
Close-up of a hand holding a small object, possibly a tool or component (no visible text or symbols)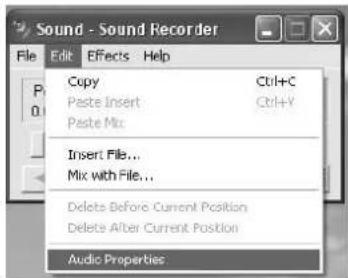
AUSFÜHREN DER AUDACITY-SOFTWARE

WARTUNG
DEN STIFT ERSETZEN
natural_image
Close-up of a hand using a tool to adjust or install electronic components (no visible text or symbols)natural_image
Close-up of hands holding a small electronic component (no visible text or symbols)natural_image
Close-up of hands using pliers to cut a piece of paper (no visible text or symbols)natural_image
Close-up of hands using a sewing machine to adjust or repair a dark fabric item (no visible text or symbols)natural_image
Close-up of hands using a handheld tool to adjust or install a component (no visible text or symbols)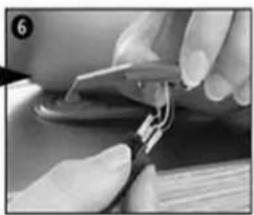
natural_image
Close-up of hands using a tool to adjust or install a small mechanical component (no visible text or symbols)
natural_image
Close-up of hands using a tool to cut or apply a small mechanical component (no visible text or symbols)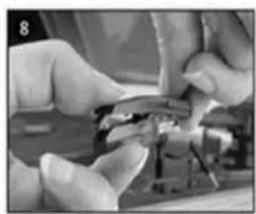
natural_image
Close-up of hands assembling or repairing a mechanical component (no visible text or symbols)natural_image
Two-step black-and-white photo showing hands using a tool to adjust or install a component, with no visible text or symbols.HINWEISE
DECLARATION OF CONFORMITY
Declares that the product listed below:
Turntable with built-in speaker system
Clase Producto:
EuP: EC Regulation 1275/2008
I, the undersigned, under our responsibility, declare that the equipment specified above conforms to the Directive 2014/30/EU, 2014/35/EU & 2009/125/EC
Position: GENERAL MANAGER
Cargo:
Date: jul, 2019
Fecha

Lauson products are subject to high quality and design inspections. As a result, our products have very low failure rates. For this reason, we are the only brand in the sector that offers a 5-year free warranty.
In order to enjoy this guarantee extension, the producto must be registered on our website www.lauson.es before the 30-day period from the date of purchase. Once registered your product will be covered with our 5 year warranty.
We thank you for the trust placed in us and we are sure that you will be 100% satisfied.


- TURNTABLE WITH ENCODING FUNCTION
- CAUTION
- RISK OF ELECTRIC SHOCK DO NOT OPEN
- IMPORTANT SAFETY INSTRUCTIONS:
- DESCRIPTION
- INITIAL SET-UP CONNECTION
- AMPLIFIER CONNECTION (if required)
- PLAYING A RECORD
- AUTO STOP
- BLUETOOTH RECEIVER CONTROL
- CONNECTING TO A COMPUTER FOR RECORDING
- INSTALLING THE AUDACITY SOFTWARE
- Note:
- INSTALL THE USB DRIVE
- SET RECORDING INPUT LEVEL (USING A WINDOWS XP COMPUTER)
- LAUSON
- TURNTABLE
- RUNNING AUDACITY SOFTWARE
- EXPORT THE MUSIC FILES TO WAV OR MP3 FORMAT
- INSTALL THE MP3 ENCODER
- MAINTENANCE
- REPLACING THE STYLUS
- INSTALLING A NEW STYLUS CARTRIDGE
- WHEN TRANSPORTING YOUR RECORD PLAYER DO NOT FORGET TO:
- DISPOSAL
- WARRANTY CONDITIONS
- CLAIM PROCEDURE
- EXPORTAR LOS ARCHIVOS DE MUSICA EN FORMATO WAV O MP3
- MANTENIMIENTO
- NOTAS
- CONSIGNES DE SÉCURITÉ :
- BRANCHEMENT PREMIÈRE UTILISATION
- EXÉCUTION DU LOGICIEL AUDACITY
- EXPORTATION DES FICHIERS MUSICAUX AUX FORMATS WAV OU MP3
- ENTRETIEN
- REMARQUES:
- CONDITIONS DE GARANTIE
- ISTRUZIONI DI SICUREZZA:
- AVVIARE IL SOFTWARE AUDACITY
- ESPORTARE I FILE MUSICALI AL FORMATO WAV O MP3
- MANUTENZIONE
- NOTE
- ERSTINBETRIEBNAHME
- AUSFÜHREN DER AUDACITY-SOFTWARE
- WARTUNG
- DEN STIFT ERSETZEN
- HINWEISE
- DECLARATION OF CONFORMITY
Brand : Lauson
Model : XN091
Category : Turntable