
BAR 210 - Weather Station OREGON SCIENTIFIC - Free user manual and instructions
Find the device manual for free BAR 210 OREGON SCIENTIFIC in PDF.


| Product Type | Weather Station |
| Brand | Oregon Scientific |
| Model | BAR 210 |
| Dimensions (Main Unit) | Approximately 130 x 95 x 30 mm |
| Weight (Main Unit) | Approximately 180 g (without batteries) |
| Power Supply | Main unit: 2 x AAA 1.5V batteries; Remote sensor: 2 x AAA 1.5V batteries |
| Main Functions | Indoor/outdoor temperature; indoor/outdoor humidity; time; date; alarm; weather forecast icons; barometric pressure trend |
| Remote Sensor | Wireless, 433 MHz, up to 30 m open range |
| Temperature Range | Indoor: 0°C to 50°C; Outdoor: -20°C to 60°C |
| Humidity Range | Indoor/outdoor: 25% to 95% RH |
| Display Type | LCD with backlight |
| Mounting Options | Table stand or wall mount |
| Memory | Min/max temperature and humidity recording |
| Alarm | Daily alarm with snooze |
| Care and Cleaning | Wipe with a soft dry cloth; do not use abrasive cleaners or solvents |
| Safety Notes | Keep away from extreme heat and moisture; do not immerse in water |
| Spare Parts and Repairability | No user-serviceable parts; contact Oregon Scientific support for issues |
| General Information | Designed for home use; complies with CE and FCC standards |
Frequently Asked Questions - BAR 210 OREGON SCIENTIFIC
User questions about BAR 210 OREGON SCIENTIFIC
0 question about this device. Answer the ones you know or ask your own.
Ask a new question about this device
Download the instructions for your Weather Station in PDF format for free! Find your manual BAR 210 - OREGON SCIENTIFIC and take your electronic device back in hand. On this page are published all the documents necessary for the use of your device. BAR 210 by OREGON SCIENTIFIC.
USER MANUAL BAR 210 OREGON SCIENTIFIC
Model: BAR210 / BAR210U / BAR210A
USER MANUAL
CONTENTS
Overview....2
LCD Display....2
Back View....2
Bottom View....2
Remote Sensor....3
Getting Started....3
Power Supply....3
Remote Sensor....3
Sensor Data Transmission....4
Clock 4
Clock Reception....4
Set Clock....4
Change Display....5
Weather Forecast....5
Temperature....5
Reset....6
Precautions....6
Specifications....6
About Oregon Scientific....7
EU-Declaration of Conformity....7
FCC Statement....7
Declaration of Conformity....8
OVERVIEW
LCD DISPLAY
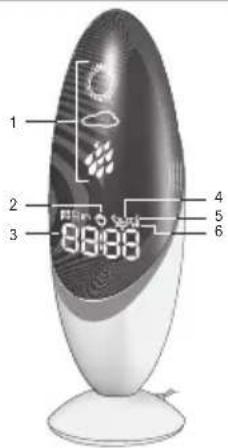
- Weather forecast icons
- Clock signal reception indicator
- Time / temperature display
- Outdoor sensor communication indicator
- Low battery indicator
- Time zone offset display
BACK VIEW
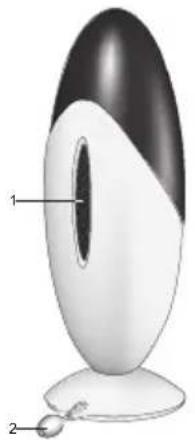
natural_image
Illustration of a stylized electronic device with labeled parts (1 and 2), no text or symbols present.- Ventilation hole
- Adaptor socket
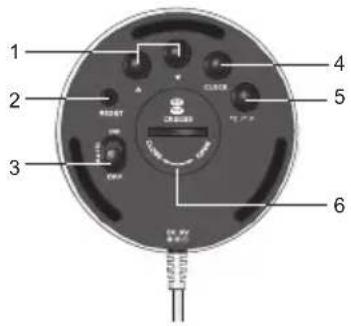
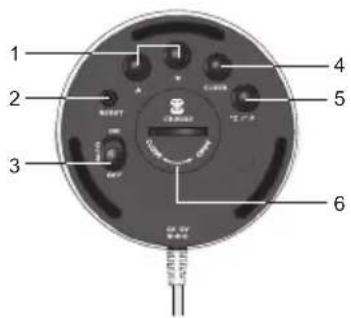
BOTTOM VIEW
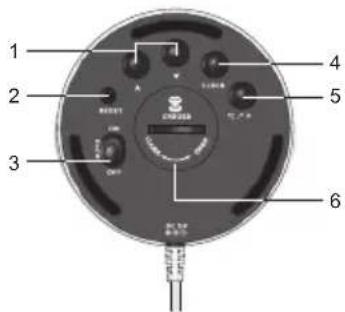
- ▲ / ▼: Increase / decrease setting; activate / deactivate clock reception signal
- RESET: Reset unit to default settings
- AUTO ON / OFF: Select auto toggle mode
- CLOCK: Set time and display mode
- °C / °F: Select temperature unit and display mode
- Battery compartment
REMOTE SENSOR
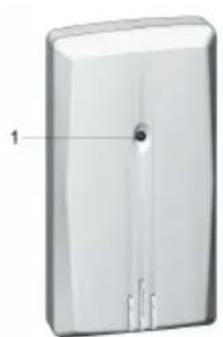
natural_image
3D rendering of a rectangular electronic device with a central hole and labeled component (no text or symbols beyond the number '1')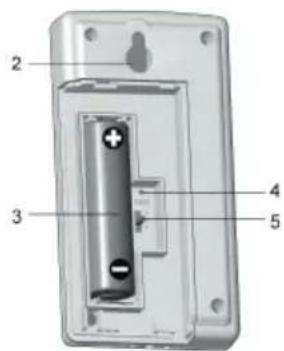
- LED status indicator
- Wall mount hole
- Battery compartment
- RESET hole
- CHANNEL switch
GETTING STARTED
POWER SUPPLY
Batteries serve as back up power supply for the clock.
For continuous use of LCD backlight, always plug in the adapter socket. Make sure the socket outlet is easily accessible to the unit.
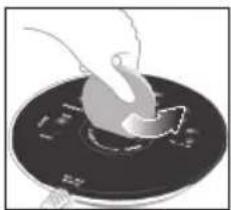
To insert batteries:
natural_image
Illustration of a hand pressing down on a circular object with an arrow indicating rotation (no text or symbols)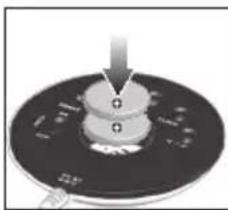
natural_image
Close-up of a mechanical component with three circular features and an arrow indicating direction (no text or symbols)- Remove the battery compartment and insert the batteries, matching the polarities.
- Press RESET after each battery change.

indicates main unit batteries are low.
REMOTE SENSOR
The main unit can be connected to only 1 remote sensor.
To set up the outside sensor:
- Open the battery compartment.
- Select a channel then press RESET.
- Close the battery door.
- Place the outside sensor within 30 m (98 ft) of the main unit using the table stand or wall mount.
TIP The transmission range may vary depending on many factors. You may need to experiment with various locations to get the best results.
NOTE Use alkaline batteries for longer usage and consumer grade lithium batteries in temperatures below freezing.
SENSOR DATA TRANSMISSION
The main unit will automatically search for the outdoor sensor. The sensor reception icon in the remote sensor area shows the status:
| ICON DESCRIPTION | |
| Main unit is searching for sensor. | |
| A channel has been found. | |
| Sensor data received. | |
| The sensor cannot be found. | |
NOTE If the sensor is not found, check the batteries, obstructions and remote sensor location.
For best results:
- Place the sensor out of direct sunlight and rain.
- Position the sensor facing the main unit, minimizing obstructions.
- Place the sensor in a location away from metallic or electronic objects.
- Position the sensor close to the main unit during cold winter months.
CLOCK
CLOCK RECEPTION
This product is designed to synchronize its clock automatically with a clock signal.
BAR210:
• EU: DCF-77 signal: within 1500 km (932 miles) of Frankfurt, Germany.
BAR210U:
- UK: MSF-60 signal: within 1500 km (932 miles) of Anthorn, England.
BAR210A:
- WWVB-60 signal: within 3200km (2000 miles) of Fort Collins Colorado.
To enable / disable signal reception:
Press and hold▲ to enable or▼ to disable signal reception.
NOTE Reception takes 2-10 minutes. If the signal is weak, it can take up to 24 hours to get a valid signal.
Clock signal reception indicator:
| STRONG SIGNAL | WEAK SIGNAL NO SIGNAL | |
 |  |  |
SET CLOCK
To set the clock manually, disable the signal reception first.
-
Press and hold CLOCK.
-
Press ▲r to change the settings.
- Press CLOCK to confirm.
- The settings order is: time zone offset, 12/24 hr format, hour and minute.
BAR210 / BAR210U: Time zone offset sets the clock +/- 23 hours from the received clock signal time. If you have deactivated the clock signal reception, do not set a value for time zone offset.
BAR210A: Select the time zone: (0) Pacific, (1) Mountain (2) Central or, (3) Eastern.
CHANGE DISPLAY
- To change to auto toggle mode (clock > outdoor temperature > indoor temperature), slide AUTO ON / OFF to ON.
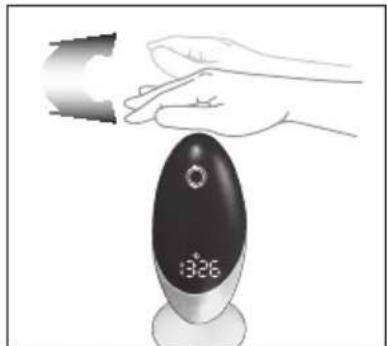
- To manually toggle between time and temperature displays, press CLOCK or wave your hand at least 3 inches or less from the motion sensor located on the top of the main unit.
natural_image
Illustration of a hand holding a digital device with a flame, next to a digital display showing 1326 (no text or symbols on device)NOTE Auto toggle mode and motion sensor will be disabled if a button is pressed, but will be enabled again if no button is pressed for 5 seconds.
NOTE The installed CDS light sensor inside the unit will activate automatic LCD dimming.
WEATHER FORECAST
This product forecasts the next 12 to 24 hours of weather.
| ICON |  | 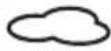 |  |
| COLOR Red Green Blue | |||
| MEANING Sunny Cloudy Rainy | |||
TEMPERATURE
To display temperature mode or select temperature unit: Press °C / °F.
NOTE Please keep the temperature sensor (adjacent to the adaptor socket) away from electrical devices as heat from these devices will affect accurate indoor temperature readings.
RESET
Press RESET to return to the default settings.
PRECAUTIONS
- Do not subject the unit to excessive force, shock, dust, temperature or humidity.
- Do not cover the ventilation hole with any items such as newspapers, curtains etc.
- Do not immerse the unit in water. If you spill liquid over it, dry it immediately with a soft, lint-free cloth.
- Do not clean the unit with abrasive or corrosive materials.
- Do not tamper with the unit's internal components. This invalidates the warranty.
- Only use fresh batteries. Do not mix new and old batteries.
- Images shown in this manual may differ from the actual display.
- When disposing of this product, ensure it is collected separately for special treatment.
- Placement of this product on certain types of wood may result in damage to its finish for which Oregon Scientific will not be responsible. Consult the furniture manufacturer's care instructions for information.
- The contents of this manual may not be reproduced without the permission of the manufacturer.
- Do not dispose old batteries as unsorted municipal waste. Collection of such waste separately for special treatment is necessary.
- Please note that some units are equipped with a battery safety strip. Remove the strip from the
battery compartment before first use.
NOTE The technical specifications for this product and the contents of the user manual are subject to change without notice.
SPECIFICATIONS
| TYPE DESCRIPTION | |
| MAIN UNIT | |
| L x W x H | 70 x 80 x 206 mm(2.76 x 2.76 x 8.11 in) |
| Weight | 235 g (8.3 oz)without battery |
| Indoor Temperature range | -5°C to 50°C(23°F to 122°F) |
| Outdoor Temperature range | -30°C to 50°C(-22°F to 122°F) |
| Resolution 0.1°C (0.2°F) | |
| Signal frequency 433 MHz | |
| Power | 2 x CR2032 batteriesAC / DC adapter |
| REMOTE UNIT (THN132N) | |
| L x W x H | 92 x 60 x 20 mm(3.6 x 2.4 x 0.8 in) |
| Weight | 62 g (2.22 ounces) |
| Transmission range | 30 m (98 ft) unobstructed |
| Temperature range | -40°C to 60°C(-40°F to 140°F) |
| Power 1 x UM-3 (AA) 1.5 V | batteries |
ABOUT OREGON SCIENTIFIC
Visit our website (www.oregonscientific.com) to learn more about Oregon Scientific products. If you're in the US and would like to contact our Customer Care department directly, please visit: www2.oregonscientific.com/service/support
OR
Call 1-800-853-8883.
For international inquiries, please visit: oregonscientific.com/about/international
www2.
EU-DECLARATION OF CONFORMITY
Hereby, Oregon Scientific, declares that this Weather Light (model: BAR210 / BAR210U / BAR210A) is in compliance with the essential requirements and other relevant provisions of Directive 1999/5/EC. A copy of the signed and dated Declaration of Conformity is available on request via our Oregon Scientific Customer Service.

COUNTRIES RTTE APPROVAL COMPLIED
All EU countries, Switzerland

and Norway

FCC STATEMENT
This device complies with Part 15 of the FCC Rules. Operation is subject to the following two conditions: (1) This device may not cause harmful interference, and (2) This device must accept any interference received, including interference that may cause undesired operation.
WARNING Changes or modifications not expressly approved by the party responsible for compliance could void the user's authority to operate the equipment.
NOTE This equipment has been tested and found to comply with the limits for a Class B digital device, pursuant to Part 15 of the FCC Rules. These limits are designed to provide reasonable protection against harmful interference in a residential installation.
This equipment generates, uses and can radiate radio frequency energy and, if not installed and used in accordance with the instructions, may cause harmful interference to radio communications. However, there is no guarantee that interference will not occur in a particular installation. If this equipment does cause harmful interference to radio or television reception, which can be determined by turning the equipment off and on, the user is encouraged to try to correct the interference by one or more of the following measures:
- Reorient or relocate the receiving antenna.
-
Increase the separation between the equipment and receiver.
-
Connect the equipment into an outlet on a circuit different from that to which the receiver is connected.
- Consult the dealer or an experienced radio / TV technician for help.
DECLARATION OF CONFORMITY
The following information is not to be used as contact for support or sales. Please call our customer service number (listed on our website at www.oregonscientific.com or on the warranty card for this product) for all inquiries instead.
We
Name: Oregon Scientific, Inc.
Address: 19861 SW 95 th Ave., Tualatin,
Oregon 97062 USA
Telephone No.: 1-800-853-8883
declare that the product
Product No.: BAR210 / BAR210U / BAR210A
Product Name: Weather Light
Manufacturer: IDT Technology Limited
Address: Block C, 9/F, Kaiser Estate,
Phase 1,41 Man Yue St.,
Hung Hom, Kowloon,
Hong Kong
is in conformity with Part 15 of the FCC Rules. Operation is subject to the following two conditions: 1) This device may not cause harmful interference. 2) This device must accept any interference received, including interference that may cause undesired operation.
Funkwetterstation Thermolight Modell: BAR210 / BAR210U / BAR210A
BEDIENUNGSANLEITUNG
INHALT
Übersicht....2
LCD-Anzeige....2
Rückansicht....2
Bodenansicht....2
Funksendeeinheit....3
Erste Schritte....3
natural_image
Illustration of a stylized computer monitor with labeled parts (1 and 2), no text or symbols present.natural_image
Two-step diagram showing a hand pressing a circular object on a black appliance, with no visible text or symbols.natural_image
Illustration of a hand holding a digital display device with a flame, next to an oval-shaped device (no text or symbols visible)natural_image
Illustration of a stylized computer monitor with a black and white body, labeled parts 1 and 2 (no text or symbols on the device itself)natural_image
Two-step diagram showing a hand pressing down on a circular object on a stovetop, with no visible text or symbols.natural_image
Illustration of a hand holding a digital device with a circular display showing 1326, no text or symbols present.Reinitialisation......6
Précautions....6
natural_image
Illustration of a stylized computer monitor with labeled parts (1 and 2), no text or symbols present.- Indicateur LED
- Trou de fixation murale
- Compartiment des piles
- Fente RESET (Réinitialiser)
- Bouton CHANNEL (Canal)
POUR COMMENCER
natural_image
Two-step diagram showing a hand pressing a circular object on a rotating disc, with no text or symbols present.natural_image
Illustration of a hand holding a digital display device with a flame effect (no text or symbols)www2.oregonscientific.com/service/support.asp
OU
Modello: BAR210 / BAR210U / BAR210A
MANUALE PER L'UTENTE
INDICE
Panoramica 2
Display LCD....2
Vista posteriore....2
natural_image
Illustration of a stylized computer monitor with labeled parts (no text or symbols on the device itself)natural_image
Two-step illustration showing a hand pressing down on a circular object, with no visible text or symbols.natural_image
Illustration of a hand holding a device with a glowing bulb and a digital display showing 1326 (no text or symbols on the device itself)Model: BAR210 / BAR210U / BAR210A
HANDLEIDING
INHOUDSOPGAVE
Overzicht....2
LCD-scherm....2
Achterkant....2
Onderkant 2
Buitensensor....3
Starten....3
Voeding 3
Buitensor....3
Gegevensverzending Sensor....4
Klok....4
Klokontvangst....4
Klok Instellen....5
Scherm Aanpassen 5
natural_image
Illustration of a stylized computer monitor with a black and white body, labeled parts 1 and 2 (no text or symbols on the device itself)- Ventilatiegat
- Adapteringang
ONDERKANT
natural_image
Two-step diagram showing a hand pressing down on a circular object on a stovetop, with no visible text or symbols.natural_image
Illustration of a hand holding a digital display device with a flame, no text or symbols presentnatural_image
Illustration of a stylized computer monitor with a black and white body, labeled parts 1 and 2 (no text or symbols on the device itself)natural_image
Two-step diagram showing a hand pressing down on a circular component, with no visible text or symbols.natural_image
Illustration of a hand holding a digital device with a flame effect, no text or symbols presentnatural_image
Illustration of a stylized computer monitor with a black and white body, labeled parts 1 and 2 (no text or symbols on the device itself)- Ventilationskanal
- Nätadapterjack
VY UNDERIFRÁN
natural_image
Illustration of a hand pressing down on a circular object on a dark surface (no text or symbols visible)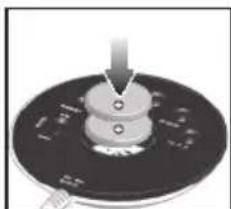
natural_image
Close-up of a mechanical component with a central knob and a downward arrow, no visible text or symbols.natural_image
Illustration of a hand holding a digital device with a brightness brush above it (no text or symbols)- Model: BAR210 / BAR210U / BAR210A
- USER MANUAL
- CONTENTS
- OVERVIEW
- LCD DISPLAY
- BACK VIEW
- BOTTOM VIEW
- GETTING STARTED
- POWER SUPPLY
- REMOTE SENSOR
- To set up the outside sensor:
- SENSOR DATA TRANSMISSION
- For best results:
- CLOCK
- CLOCK RECEPTION
- BAR210:
- BAR210U:
- BAR210A:
- SET CLOCK
- CHANGE DISPLAY
- WEATHER FORECAST
- TEMPERATURE
- RESET
- PRECAUTIONS
- ABOUT OREGON SCIENTIFIC
- EU-DECLARATION OF CONFORMITY
- COUNTRIES RTTE APPROVAL COMPLIED
- FCC STATEMENT
- DECLARATION OF CONFORMITY
- We
- declare that the product
- Funkwetterstation Thermolight Modell: BAR210 / BAR210U / BAR210A
- BEDIENUNGSANLEITUNG
- INHALT
- POUR COMMENCER
- Modello: BAR210 / BAR210U / BAR210A
- MANUALE PER L'UTENTE
- INDICE
- HANDLEIDING
- INHOUDSOPGAVE
- ONDERKANT
- VY UNDERIFRÁN
Brand : OREGON SCIENTIFIC
Model : BAR 210
Category : Weather Station