TEL-2490 - Telephone Steren - Free user manual and instructions
Find the device manual for free TEL-2490 Steren in PDF.


| Product Type | Corded Landline Telephone |
| Brand | Steren |
| Model | TEL-2490 |
| Dimensions (W x H x D) | 22 x 18 x 8 cm |
| Weight | 0.5 kg |
| Power Supply | Power over telephone line (no external adapter required) |
| Display | Backlit LCD for Caller ID and information |
| Caller ID | Yes, with 40-name memory |
| Speakerphone | Full-duplex speakerphone with mute function |
| Handset Volume Control | Adjustable in 3 levels |
| Ringer Volume Control | Off, low, high |
| Memory Keys | 10 one-touch speed dial keys |
| Wall-Mountable | Yes, with included bracket |
| Hearing Aid Compatible | Yes (HAC rated) |
| Redial | Last number redial (up to 32 digits) |
| Hold Function | Yes, with music or beep |
| Care and Cleaning | Wipe with a soft, dry cloth; do not use liquids or sprays |
| Safety Instructions | Use only in dry indoor environment; avoid exposure to rain or moisture |
| Spare Parts | Handset cord, base cord, wall bracket available from Steren |
| Repairability | Contact Steren support for repairs; some parts user-replaceable |
Frequently Asked Questions - TEL-2490 Steren
User questions about TEL-2490 Steren
0 question about this device. Answer the ones you know or ask your own.
Ask a new question about this device
Download the instructions for your Telephone in PDF format for free! Find your manual TEL-2490 - Steren and take your electronic device back in hand. On this page are published all the documents necessary for the use of your device. TEL-2490 by Steren.
USER MANUAL TEL-2490 Steren
natural_image
Illustration of a classic mobile phone with keypad and control buttons (no text or symbols visible)natural_image
Black remote control with a blue arrow pointing to the left side (no text or symbols)Cord & cordless telephone system
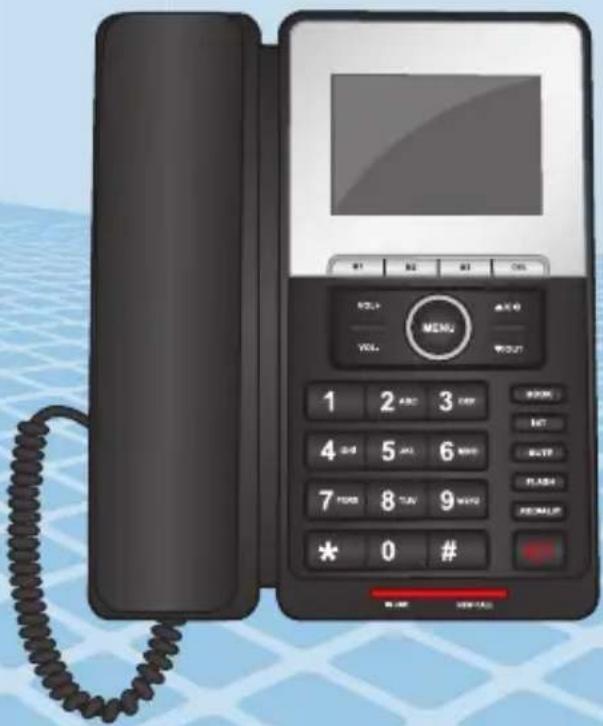
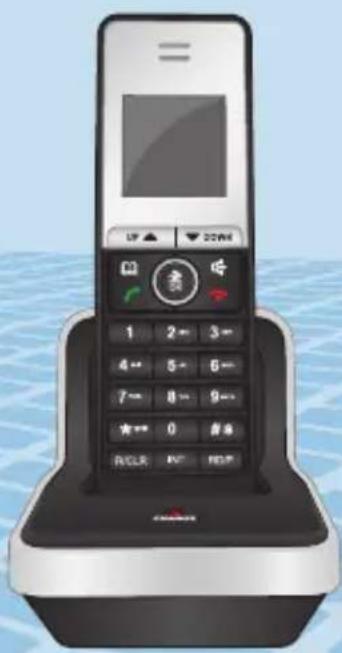
natural_image
Illustration of a classic mobile phone with keypad and control buttons, placed on water surface (no text or symbols visible)Instruction manual
V0712b
S4-B
CORD & CORDLESS TELEPHONE SYSTEM
TEL-2490
Thank You on purchasing your new Steren product.
This manual includes all the feature operations and troubleshooting necessary to install and operate your new Steren's Cord & Cordless Telephone System.
Please review this manual thoroughly to ensure proper installation and operation of this product. For support, shopping, and everything new at Steren, visit our website:
www.steren.com

The instructions of this manual are for reference about the product. There may be differences due to updates.
Please check our web site (www.steren.com) to obtain the latest version of the instruction manual.
IMPORTANT
- Do not try to open the device, may cause damages and warranty will be void.
- Do not expose to extreme temperatures.
- Do not use or store the equipment near wet places. May cause malfunction or shock hazard.
- Avoid dropping the unit as this may cause damage.
- Do not place the device or accessories on surfaces that are tilted, unstable or subject to vibration.
- Do not put heavy objects on the device or accessories.
- Do not expose the device or accessories to dust, smoke or steam.
- Do not use solvents or other chemicals to clean the exterior of the device.
CORDLESS PHONE
- Only use 2 x AAA NiMH rechargeable batteries.
- Do not attempt to recharge non-rechargeable type batteries.
- Do not open the handset (except to replace the handset batteries) or the base. This could expose you to high voltages or other risks.
- Make sure the positive (+) and negative (-) ends of the batteries are inserted in the correct directions.
INDEX
- HIGHLIGHTS 6....
- ICONS & CONTROLS 7
2.1 Cord telephone 7
2.2 Cordless telephone 10
- INSTALLATION 13.
3.1 Install handset battery 13
3.2 Installing cordless phone and handset 14
- MENU 15
4.1 Corded phone 15
4.1.1 Phone book 15
4.1.2 Call log 16
4.1.3 Settings 17
4.2 Cordless phone 19
4.2.1 Phone book 19
4.2.2 Call log 20
4.2.3 BS settings 21
4.2.4 HS Settings 22
- OPERATION 25
5.1 Pause function "P" 25
5.2 Programming/Dialing from speed dial buttons 26
5.3 Intercom function 26
5.4 Call transfer 27
5.5 Conference call 27
- TROUBLESHOOTING 28
- SPECIFICATIONS 29
1. HIGHLIGHTS
Your new phone system has a cordless device with DECT technology, which helps to avoid interference caused by other wireless devices. The system includes a corded phone which will continue operating even in power outages and which also serves as the base of the cordless phone.
Allows connecting up to 4 additional extensions to the same base, has a wide range of functions, such as; languages, ringtones, volume, clock, caller ID, transfer and conference call.
Cordless phone
• 14 segment LCD display
• 40 Caller ID memory
- Intercom
- Low battery tone and icon indicator
• Key lock
- 10 ring tones
- Blue background
Corded phone
- Speaker
• 3 lines, 12 characters display
• 29 memories with caller ID
• 150 phone book memories (12 characters, 20 digits) - Intercom
- 10 ring tones
2. ICONS & CONTROLS
2.1 Cord telephone
| Icon Function | |
| The icon will be displayed when the user has picked up the handset. | |
| The icon will be displayed when ring set to off (the ring volume is set to OFF). | |
| The icon will be displayed when reviewing the phonebook entries. | |
| The icon will be shown when a new voice message is received. | |
| RPT | Repeat call, indicate that the call has been received more than one time. |
| NEW | The icon will be displayed when a new call comes and hasn't been viewed yet. |
| Whenyouscrollandreviewtheincomingoroutgoingnumbers,it appears along with the digit to indicate the sequence of the call | |
| The icon will be displayed when the user has pressed the handfree key. | |
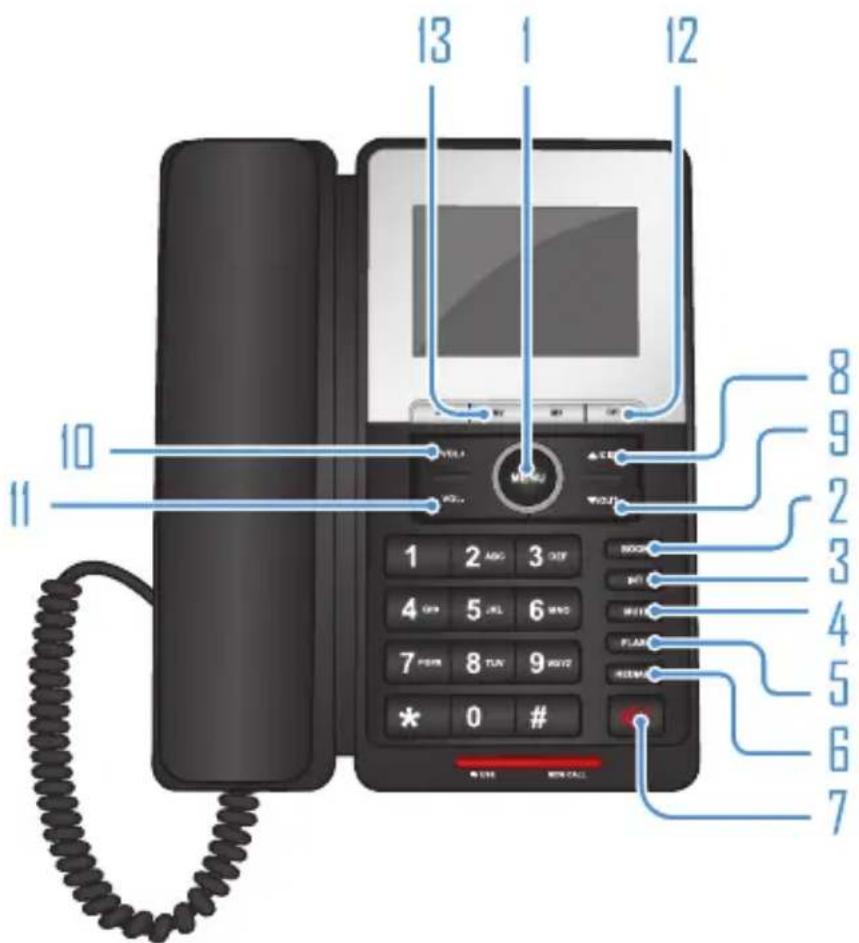
-
MENU: entry to the menu functions from idle mode. Confirming (OK) selections & actions.
-
BOOK: this key is used to enter the phonebook both in standby mode and in talk mode. Exiting from a function during menu operation
-
INT: to set up an internal call to handset.
To transfer an incoming call to handset.
To set up a conference call with an external line and an internal handset.
-
MUTE: during a call, press to use the mute function. When on, your voice will be muted so your caller cannot hear you.
-
FLASH: transfer between two phone calls.
-
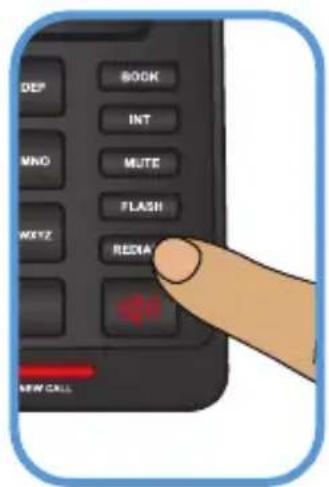
REDIAL/P: in talk mode once pressing to redial the last dialed number. The key will perform PAUSE function if pressed after any digit input both in talk mode and in standby mode.
-
Press this key to enter speakerphone mode.
-
▲/CID: used to navigate through menus. If the speaker mode is selected it increases the volume level. In standby mode, press to view incoming calls.
-
▼/OUT: used to navigate through menus. Press this key to reduce the volume of the speaker. In standby mode, press to see dialed numbers.
-
VOL + : used to navigate through menus. If the speaker mode is selected it increases the volume level. In standby mode, press to view incoming calls.
-
VOL - : used to navigate through menus. Press this key to reduce the volume of the speaker. In standby mode, press to see dialed numbers.
-
DEL: the key is used to delete memory. Use this key to correct a mistake made while dialing a number.
-
M1, M2, M3: use to dial numbers saved in the memory.
2.2 Cordless telephone
| Icon Function | |
| Signal strength. | |
| The icon will be displayed when the user has pressed TALK key | |
| This icon will be displayed when the handset keypad is locked. | |
| The alarm icon will be shown as steady on when the alarm is set.The alarm icon will flash when the alarm is triggered. | |
| The icon will be displayed when ring set to off. | |
| Thephonebookiconwillbedisplayedwhentheviewingthe phonebook entries. | |
| This icon will be shown as steady when a new voice message is received. | |
| RPT | Repeat call (indicate that the calls have been received more than one time), and the icon will be displayed. |
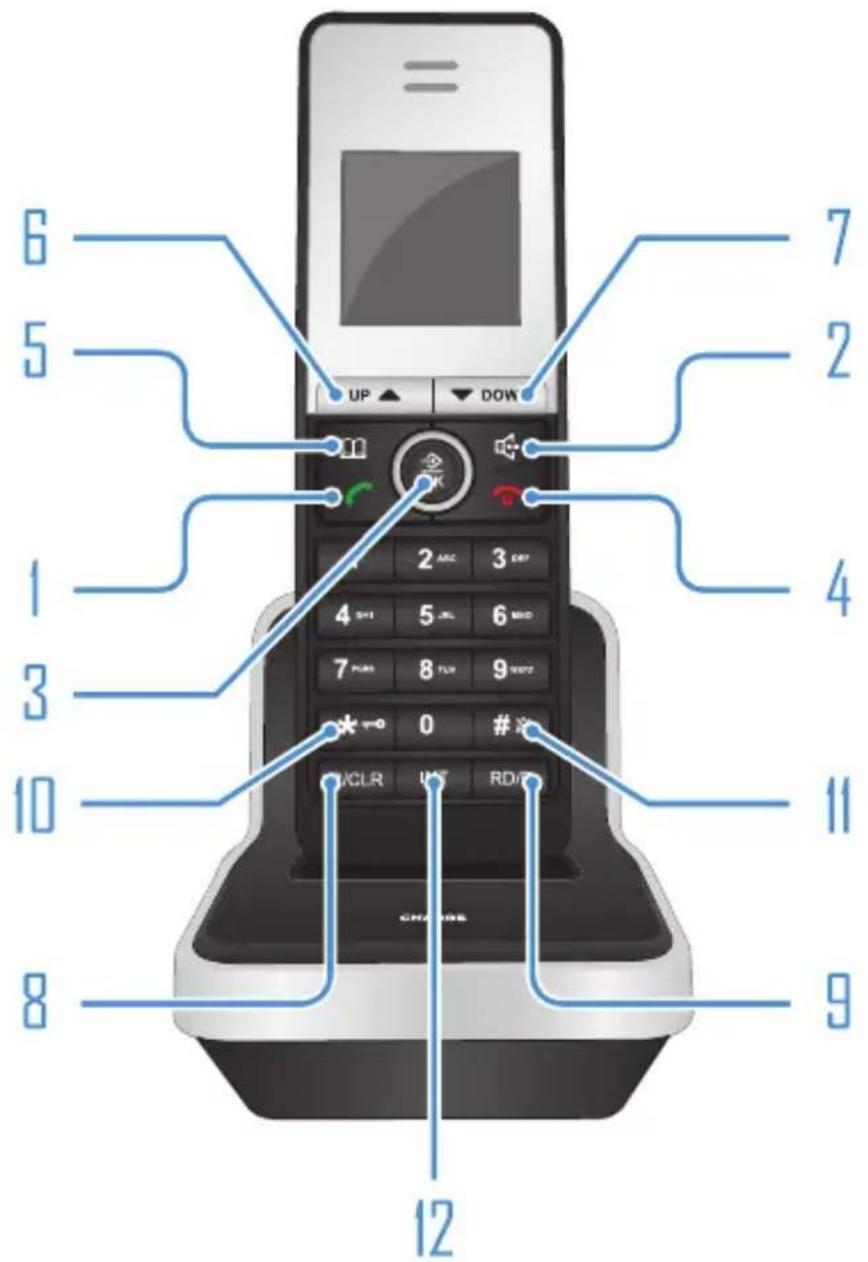
- In standby mode press once to take the handset into off-hook mode.
- In standby mode press once to take the handset to hands-free mode.
- Enter to the menu functions from idle mode. Confirm selections & actions.
- In talk mode, press once to hang up the call. In standby mode, hold for 3 seconds to power down the handset.
- This key is used to enter the phonebook both in standby mode and in talk mode.
- Allow to navigate through menus.
If the speaker mode is selected increases the volume level.
In standby mode, press to view incoming calls.
- Allow to navigate through menus.
Press this key to reduce the volume of the speaker.
In standby mode, press to see dialed numbers. - The key is used to delete memory. Delete the current input by a short pressing while on menu edit.
- In talk mode press once to redial the last dialed number. The key will perform PAUSE function if pressed after any digit input both in talk mode and in standby mode.
- A Long press (6s) to activate key lock. Also used to set up a conference call.
- In addition to its use for text and number entry, used to activate silence function by long press for 3s.
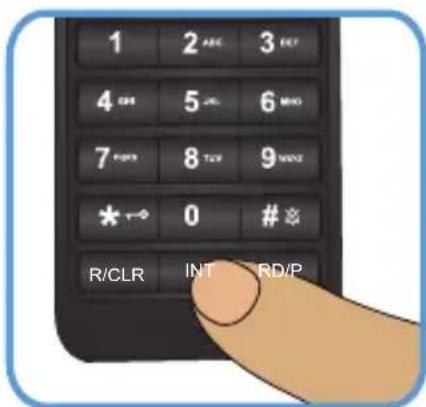
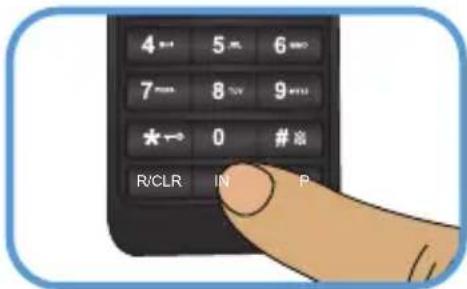
- Set up an internal call to another handset. Transfer an incoming call to another handset. Set up a conference call with an external line and an internal handset.
3. INSTALLATION
For optimum performance of your phone system:
- Choose a location for your cordless telephone as far away as possible from any other cordless (wireless) devices such as cordless telephones, wireless routers (for example, WiFi), microwave ovens, televisions, computers, etc.
- Install your telephone devices away from heat sources and direct sunlight.
- Avoid excessive moisture, dust or extreme cold.
3.1 Install handset battery
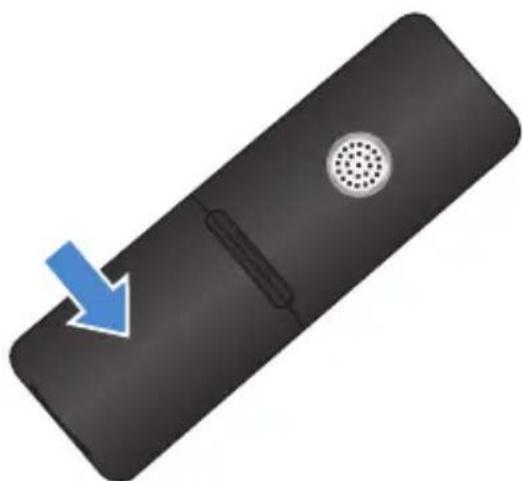
natural_image
Black remote control device with a blue arrow pointing to its left side (no text or symbols)-
Remove the battery compartment cover.
-
Place two rechargeable AAA batteries (included), pay attention to polarity.
-
Replace the battery compartment cover.
-
Charge the batteries for 14 hours in the first use.
- Use only the provided batteries, or equivalents. To obtain a replacement battery, visit our website at: www.steren.com
- Place the wireless headset on the base while is not in use in order to get the best performance.
- If you're planning not to use the phone for a long period of time, remove the batteries to avoid damage.
3.2 Installing cordless phone and handset
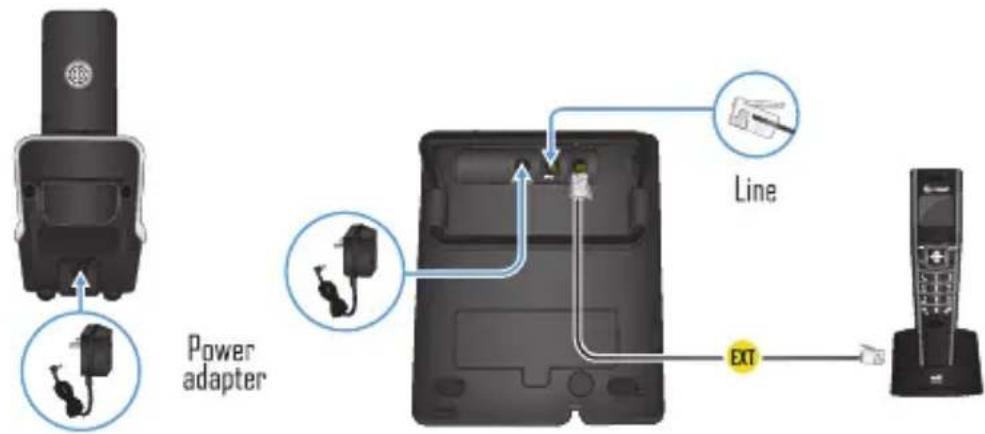
- Connect the power adapter into DC 6V input jack in the base and handset.
- Connect the power adapter into an outlet.
- Connect the phone line cable to LINE input jack, located in the bottom of the phone's base.
- After you install the phone system, and the batteries of the handset are totally charged, check that you have dial tone.
- IF YOU ARE SUBSCRIBER TO A DSL SERVICE (OPTIONAL)
If you receive high speed Internet through your telephone line (commonly referred to as DSL), and you are experiencing interference during conversations, and/or your caller ID features are not functioning properly, and you subscribe to DSL service from your telephone company, install a DSL filter (steren 300-997) to the telephone line between the telephone base and the telephone line jack.
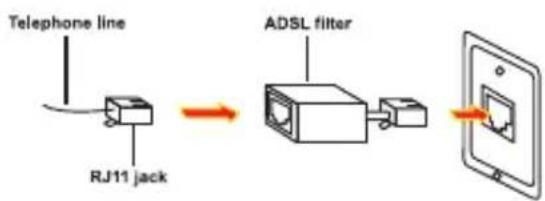
flowchart
graph LR
    A["Telephone line"] --> B["RJ11 jack"]
    B --> C["ADSL filter"]
    C --> D["Screen output"]
4. MENU
4.1 Corded phone
During idle state, press MENU key to enter the menu setting. There are five sub-menus under the base menu item.
- PHONE BOOK.
- CALL LOG.
- SETTINGS.
- REGISTRATION.
Press▲/CID or ▼/OUT key to select the above items and press MENU key to enter. Press BOOK to back to the previous menu.
4.1.1 Phone book
Each individual BASE has its own phonebook, there are 50 phonebook memories that can be viewed and dialed out, each name a maximum of 12 characters, each number a maximum of 20 digits and a melody selected between 1 and 10.
- LIST: the function allows the user to review the phone book record lists by pressing ▲/CID or ▼/OUT key and user can also make a call from the phonebook.
-
NEW ENTRY: this function allows the user to add an entry to the phone book.
-
Press ▲/CID or ▼/OUT key to select NEW ENTRY and press MENU key to enter, if the phonebook is full, an appropriate message will be presented to the user as shown MEM IS FULL, if a free phonebook entry is available, the cursor for the name flashes.
-
Enter the name using the alphanumeric keys. In case of any mistake, press DEL key to correct, press MENU key to confirm. Enter the number confirm with MENU key, select the melody to be stored and press MENU key to confirm.
• EDIT RECORD: this function allows the user to modify a phonebook record.
-
Press ▲/CID or ▼/OUT key to select EDIT RECORD and press MENU key to enter, the first record in the phonebook will be displayed.
-
Press ▲/CID or ▼/OUT key to select the designated record to change.
-
Once a record has been selected, the user will have the option to edit each of the names/number and change melody.
- DEL RECORD: this function allows the user to delete a phonebook entry.
- DELETE ALL: this function allows the user to delete all phonebook entries.
- MEM STATUS: this function allows the user to see how much of the phonebook's memory is being occupied. If it shows 11/50, this means that 11 records are currently stored in the phonebook out of a maximum of 50.
4.1.2 Call log
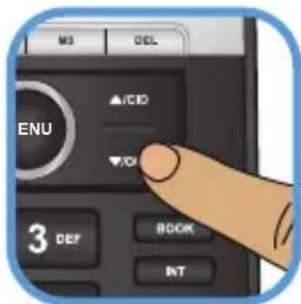
You can enter CALL LOG pressing the MENU key. And there are three items in this menu, MISSED, RECEIVED and DIALED.
When LCD displays CALL LOG, you can:
Press MENU key to enter missed call lists, received call lists or dialed call lists respectively.
-
The LCD will show the last record. (If no entries are available in the list, LCD will show EMPTY).
-
Press ▲/CID or ▼/OUT key to view other record.
When the record is displayed, you can:
- Add to phone book (this function allows the user to add an entry from the caller list to the phone book.)
- DELETE (the function allows the user to delete the currently selected entry from caller list by pressing DEL key.)
4.1.3 Settings
The user is able to change the base setting by pressing the MENU key to enter base settings item.
Using ▲/CID or ▼/OUT key to select. Press MENU key to confirm. Then you can do the following :
- DELETE HANDSET: this function allows the user to delete a handset registration from the base.
- Press MENU key. The first option is DELETE HS.
- Press MENU key to enter, the user will be prompted to enter the PIN CODE.
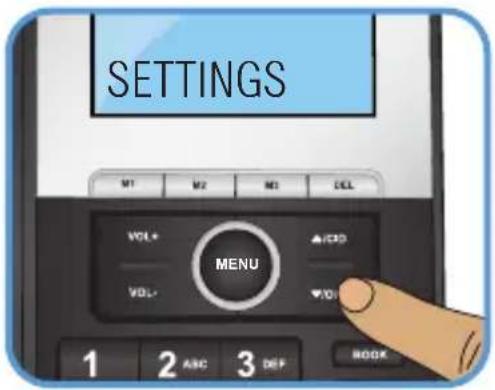
- Input the correct 4-digit PIN code and press MENU key to confirm
- Press ▲/CID or ▼/OUT key will scroll the handset names list up or down. 5. Press MENU key to confirm.
The deleted handset will be deleted from the list of registered handset on the base, and the handset will behave according to the out of range condition.
- RING SETUP: the user is able to change the handset ringing on internal calls and external calls. There are 10 ringer melodies and 5 different volume levels can be set.
- Press MENU key, then using ▲/CID or ▼/OUT key to select RING SETUP item.
- Press MENU key to enter.
- Press ▲/CID or ▼/OUT key to select the INT RING and EXT RING setup.
- Press MENU key to confirm.
- Press ▲/CID or ▼/OUT key to select the MELODY and VOLUME setup.
• DIAL MODE: the user can select to change the dial mode (TONE or PULSE).
- FLASH TIME: the user can select to change the flash time (100ms, 300ms, 600ms and 1000ms).
- KEY TONE: the user is able to change the Base tone settings.
- Press MENU key, then using ▲/CID or ▼/OUT key to select KEY TONE
- Press MENU key to confirm.
- Press ▲/CID or ▼/OUT key to select the ON or OFF to enable or disable the beep sound. Press MENU key to confirm your selection.
- LANGUAGE: the Base will support up to 5 pre-defined languages.
- Press MENU key, then using ▲/CID or ▼/OUT key to select LANGUAGE item.
- Press MENU key to enter.
-
Press ▲/CID or ▼/OUT key to select your desired language. Press MENU key to confirm your selection.
-
DATE & TIME: the user is able to set the date and time on the base by selecting the following option.
-
MODIFY PIN: this function allows the user to change the PIN number of the currently active base.
-
Press MENU key, then using ▲/CID or ▼/OUT key to select MODIFY PIN item.
- Press MENU key to confirm. The user will first be requested to entry the existing PIN code for the base.
- If the old code is validated, the user will be prompted to enter a new PIN code.
- Once a new PIN code has been entered, the user will be requested to the new PIN code again. Once the new PIN code is confirmed, it will be stored in the base.
- BASE DEFAULT: This function allows the user to restore the base setting to the factory default.
Press MENU key, then using ▲/CID or ▼/OUT key to select BS DEFAULT item. Press MENU key to confirm.
The user will be promoted to enter the PIN CODE. If the PIN code is validated all base settings will be returned to the factory default.
4.2 Cordless phone
During idle state, press OK key to enter the menu setting, there are six sub-menus under the handset menu item.
- PHONE BOOK
- CALL LOG
- BS SETTINGS
- HS SETTINGS
- REGISTRATION
Press UP▲ or ▼DOWN key to select the above items and then press OK key to enter.
Press to quit the setting state, or press to back to the previous menu. Details of each item are shown in next parts.
4.2.1 Phone book
Each individual Handset has its own phonebook, independent of each other handset, with a maximum of 50 entries, each name a maximum of 12 characters, each number a maximum of 20 digits and a melody selected between 1 and 10.
- LIST: the function allows the user to review the phone book record lists by using UP▲ or ▼DOWN key, The user can also make a call from phonebook.
-
NEW ENTRY: this function allows the user to add an entry to the phone book.
-
Press UP▲ or ▼DOWN key to select NEW ENTRY and press OK key to enter. If the phonebook is full, an appropriate message will be presented to the user shown as MEM IS FULL. If a free phonebook entry is available, the cursor for the name flashes.
- Enter the name using the alphanumeric keys and press OK key to confirm.
- If you make a mistake, press R/CLR key to correct.
- Enter the number and press OK key to confirm.
- Press UP▲ or ▼DOWN key to select the melody to be stored and press OK key to confirm.
- Edit record: this function allows the user to modify a phonebook record.
- Press UP▲ or ▼DOWN key to select EDIT RECORD and press OK key to enter. The first record in the phone book will be displayed.
- Press UP▲ or ▼DOWN key to select the designated record to change. Once a record has been selected, the user will have the option to edit each of the names/number and change melody.
- Del record: this function allows the user to delete a phonebook entry.
- Delete all: this function allows the user to delete all phonebook entries.
- Mem status: if it shows 11/50, it means a total of 50 records can be stored in the phonebook and 11 records have been stored in it already.
4.2.2 Call log
You can enter CALL LOG by pressing OK key. And there are three items in this menu, MISSED, RECEIVED and DIALED. When LCD display CALL LOG
- Press key to enter missed call lists, received call lists or dialed call lists.
- The LCD will show the last record. (If no entries are available in the list, the LCD will be shown EMPTY).
- Press UP▲ or ▼DOWN key to view other records.
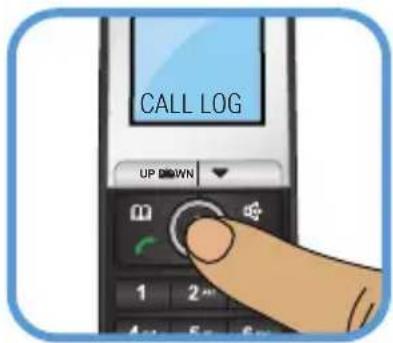
When the record is displayed, you can:
a. Add to phone book : this function allows the user to add an entry from the caller list to the phone book.
b. DELETE : this function allows the user to delete the currently selected entry from caller list by pressing R/CLR key.
4.2.3 BS settings
The user is able to change the base setting in base settings item, press OK key and use UP▲ or ▼DOWN key to select this item. Then you can do the following:
- DELETE HANDSET: this function allows the user to delete a handset registration from the base.
- Press OK key, the first show is DELETE HS.
- Press OK key to enter, the user will be prompted to enter the PIN code.
- Input the correct 4-digit PIN code using digit key (default PIN code is 0000).
- Press UP ▲ or ▼DOWN key will scroll the handset names list up and down.
- Press OK key to confirm. The delete handset will be deleted from the list on registered handset on the base, and the handset will behave according to the out of range condition.
• DIAL MODE: the user can select to change the dial mode (TONE or PULSE).
- FLASH TIME: the user can select to change the flash time (100ms, 300ms, 600ms and 1000ms).
- MODIFY PIN: this function allows the user to change the pin number of the currently active base (default PIN code is 0000).
-
Press OK key, then using UP▲ or ▼DOWN key to select MODIFY PIN item.
-
Press OK key to confirm, and the display shows PIN?
-
Entrer the existing PIN code for the base by using numerical keys, then press OK to confirm.
-
If the old code is validated, the display shows NEW PIN, enter a new PIN code (4 digits), press OK to confirm.
-
The display shows REPEAT, input the new PIN code again.
-
Press OK to confirm, the code will be stored and a tone sounded.
- BASE DEFAULT: this function allows the user to restore the base setting to the factory default.
- Press OK key, then using UP▲ or ▼DOWN key to select BS DEFAULT item.
- Press OK key to confirm.
- The user will be prompted to enter the PIN code, the display shows PIN?, then press numerical keys to input code (default as 0000).
- If the PIN code is validated all base settings will be returned to the factory default.
4.2.4 HS Settings
The user is able to change a number of the settings for the handset to their own individual preferences. Using UP▲ or ▼DOWN key to select HS SETTINGS. Then you can do the following:
• ALARM:
- Press OK key, the first sub-menu is ALARM item. Press OK key to confirm.
- Press UP▲ or ▼DOWN key to select ON or OFF, and press OK to confirm. Select of OFF will turn the alarm off, and the user is dropped back to the ALARM menu, select of ON option will turn the alarm on, and the user will be requested to set the alarm time.
- After select ON, press UP▲ or ▼DOWN key to change the hours, press OK key to confirm, use the same method to select minutes, AM/PM.
- Press OK key, the user will be presented with a further option to select to ON or OFF to enable or disable the snooze function on the alarm. Press OK key to confirm your selection. When the alarm is set, the will appear on the top of the display.
NOTE: If the SNOOZE is set ON, the alarm will be repeated about every 5 minutes for about an hour, with the alarm icon continuing to flash. During the alarming, press any key except (HANG UP/POWER OFF) key to intermit alarming, and will begin to ring after 5 minutes.
- If the SNOOZE is set OFF, the alarm will sound for 45 seconds once.
How to use the alarm
- Intermit alarm: during the alarming, you can switch it off by pressing any key of the handset, or when a call comes, the alarm will be intermitted too.
-
RING SETUP : the user is able to change the handset ringing on internal calls and external calls. There are 10 ringer melodies and 5 different volume levels can be set.
-
Press OK key, then using UP▲ or ▼DOWN key to select RING SETUP item.
-
Press OK key to enter.
-
Press UP▲ or ▼DOWN key to select the INT RING and EXT RING setup.
-
Press OK key to confirm.
-
Press UP ▲ or ▼DOWN key to select the MELODY and VOLUME setup.
- TONE SETUP: the user is able to change the handset tone settings.
- Press OK key, then using UP▲ or ▼DOWN key to select TONE SETUP item.
- Press OK key to enter.
-
Press UP▲ or ▼DOWN key to select the KEY TONE and BATTERY LOW, RANGE ALARM setup.
-
Press OK key to confirm.
- Press UP▲ or ▼DOWN key to select the ON or OFF to enable/disable the sounding of the beep respectively.
- Press OK key to confirm your selection.
Notes: If you turn the tone on for key tone, a beep for key tone will sound when a key is pressed on the handset.
- If you turn the tone on for battery low warning, a beep will sound when the battery is low.
- If you turn the tone on for the out of range warning, a beep will sound when the handset goes out of range of the base unit.
• LANGUAGE: the handset will support up to 5 pre-defined languages.
- Press OK key, then using UP▲ or ▼DOWN key to select LANGUAGE item.
- Press OK key to enter. First display is ENGLISH.
- Press UP▲ or ▼DOWN key to select the language. Each language will display in its own native translation.
- Press OK key to confirm your selection.
• HANDSET NAME: the operation will allow the user to change the handset name
- Press OK key. Using UP▲ or ▼DOWN key to select HS NAME,
- Press OK key, and the display will show a flashing cursor on the name line.
- Key in the handset name, if you make a mistake, press R/CLR key to correct. Press key to confirm.
- AUTO ANSWER: the Handset can be set to answer an incoming call automatically by simply picking it up from the charging cradle. The user is able to select to enable/disable this auto-answer feature.
- BARRING: You can set 4 numbers (up to 4 digits each) for call barring. When the call barring is "ON", any numbers beginning with the programmed digits will not be able to be dialed out, and LCD will display CALLS BARRED
- Press OK key. Using UP▲ or ▼DOWN key to select BARRING,
- Press OK key the user will be prompted to enter the PIN code, input 4-digit code (defaulted as 0000).
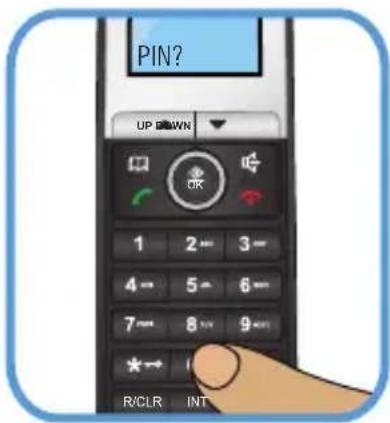
- Press OK key to confirm, then using UP▲ or ▼DOWN key to select ON or OFF, press key to confirm.
- If select ON, using the digit key to input four groups of maximum 4-digit numbers you want to barring.
After setting up the barring numbers, once you dial a number begin with anyone of them, LCD will display CALLS BARRED and the number is not allowed to be dialed out.
- DATE & TIME: The user is able to set the date and time on the handset, by selecting the following option. Press OK key to enter date and time settings.
- Press OK key. Using UP▲ or ▼DOWN key to select DATE&TIME,
- Press OK key and the last two digits of the year flash.
- Edit the year, month, time and date by pressing UP ▲ or ▼DOWN key.
- Press OK key to confirm the setting, and return to the DATE & TIME menu.
Note: The date and time will be automatically set when the first caller ID message is received.
- SELECT BASE
This function allows the handset to choose to link any one of the bases the handset registered.
- Press OK key, then using UP▲ or ▼DOWN key to choose SELECT BASE.
- Press OK key and the LCD displays BASE 1 + .
- Press UP ▲ or ▼DOWN to select base (BASE 1\~4) or AUTO.
- Press OK to begin searching, if you hear a sound of "di-du-di", means the link was successful.
• HANDSET DEFAULT:
This function allows the user to restore the handset setting to the factory default.
- Press OK key, then using UP▲ or ▼DOWN key to select HS DEFAULT item.
- Press OK key to confirm.
- The user will be prompted to enter the PIN CODE. If the PIN code is validated all base settings will be returned to the factory default.
4.2.5 Registration
This function allows the user to register the handset to a specified base. Before registering a handset to the base, the base should first be put into subscription mode
- Press OK key, then using UP▲ or ▼DOWN key to select REGISTRATION item.
- Press OK key to enter.
- Press UP▲ or ▼DOWN key to select BASE names.
-
Press OK key to select base as required. Once the base has been selected the handset will search for the requested base,
-
If the base is found and the handset successfully registered, the PIN code screen will be displayed, then enter the pin code, LCD will display the base registered.
- If the base is not found, the handset will return to the previous registration state.
- If the PIN code entered is invalid, an error tone is sounded, and the Handset will return to the previous registration state.
5. OPERATION
5.1 Pause function "P"
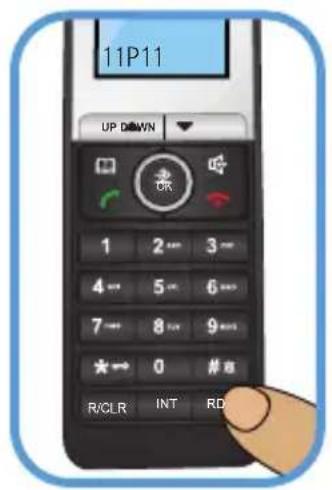
During pre-dialing or one-touch memory programming, press RD/P (handset) or REDIAL/P (base) key inserts a 3.6 second pause into the dialing sequence.
For example: 11P11 where P represents a 3.6 second pause.
This pause is needed to access an outside line on some business
5.2 Programming/Dialing from speed dial buttons
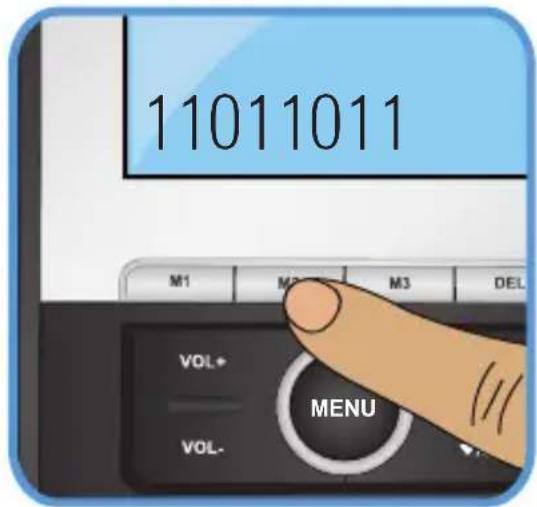
- While off-line, enter phone number on key pad.
- Press and hold the desired memory button (M1, M2 or M3) until it beeps to save.
- To call only press the memory button, it will dial and turn the speakerphone on automatically.
5.3 Intercom function
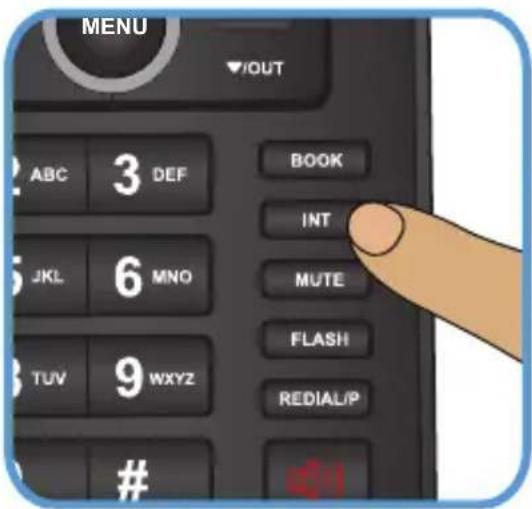
The intercom feature is activated by pressing the INT key.
- In idle mode. Press INT key once. You will be prompted to select the number of the internal handset with which they wish to connect. The destination handset will ring.
- Once the call is connected, the display will be shown on both handsets.
- To end intercom mode, either handset can hang up the call by pressing key.
5.4 Call transfer
During a call, it's used for transferring the call to another handset.
- During a phone call, press INT key once. The user will be prompted to select the number of the internal handset with which they wish to connect.
- The destination handset will ring. With the melody defined for can internal call.
- Press other handset the ⚡key or accept the call. Thetwointernalhandsetswillbeconnected. To complete the transfer of the call, the initiating handset should be placed on the cradle and the external call will now be connected to the second handset.
5.5 Conference call
- Answer the incoming call in the telephone 1.
- Then press INT key once in the telephone 1.
- The destination telephone 2 will ring.
- The telephone 2 needs to answer the call.
- On telephone 1, press * key to initiate conferencing. Both telephones 1 and 2 are now connected to the outside caller.
6. TROUBLESHOOTING
I get noise, static, or weak signal even when I'm near the telephone base
- Place your new phone as far away as possible from any other existing cordless telephone system that is already installed in your home to avoid the two systems from interfering with each other.
- Place your telephone base as far as possible from your router, computer or any other computer devices.
- Other electronic products can cause interference with your phone. Try installing your phone as far away from these types of electronic devices as possible: wireless routers, radios, radiotowers,pagertowers,cellphones,intercoms,roommonitors,televisions,personal computers, kitchen appliances and other cordless phones.
I cannot get a dial tone
- Move the wireless handset closer to the telephone base. You might have moved out of range.
My caller ID isn't working
- Caller ID is a subscription service. You must subscribe to this service for this feature to work on your phone.
7. SPECIFICATIONS
Cordless phone
Base
Power input: 6V---500 mA
Phone
Power input: 2.4V---(2xAAA)
Power converter:
Input: 100-240 V\~ 50/60 Hz 150mA
Output: 6V---500 mA
Corded phone
Input: 6V---500mA (power converter) -48V (phone line)
Power converter:
Power input: 100-240 V\~ 50/60 Hz 150mA
Power output: 6V---500mA
Nominal consumption: 2 Wh / day
Stand-by power consumption: 1.3 Wh /day

Product design and specifications are subject to change, without notice.
Product: Cord & Cordless Telephone System
Part number: TEL-2490
Brand: Steren
WARRANTY
This Steren product is warranted under normal usage against defects in workmanship and materials to the original purchaser for one year from the date of purchase.
CONDITIONS
1.- This warranty card with all the required information, invoice, product box or package, and product, must be presented when warranty service is required.
2.- If the product stills on the warranty time, the company will repair it free of charge.
3.- The repairing time will not exceed 30 natural days, from the day the claim was received.
4.- Steren sell parts, components, consumables and accessories to customer, as well as warranty service, at any of the addresses mentioned later.
THIS WARRANTY IS VOID IN THE NEXT CASES:
If the product has been damaged by an accident, act sof God, mishandling, leaky batteries, failure to follow enclosed instructions, improper repair by unauthorized personnel, improper safe keeping, among others.
a) The consumer can also claim the warranty service in the purchase establishment. b) If you lose the warranty card, we can reissue it, if you show the invoice or purchase ticket.
RETAILER INFORMATION
Name of the retailer
Address
Product
Brand
Part number ____
Serial number ____
Date of delivery ____

In case your product fails or have questions, please contact your nearest dealer. If you are in Mexico, please give a call to our Call Center.
01 800 500 9000

STEREN
Help us to improve this instruction manual, call us:

01800 500 9000
Customer Service Center
www.steren.com

- Cord & cordless telephone system
- IMPORTANT
- CORDLESS PHONE
- INDEX
- HIGHLIGHTS
- Corded phone
- ICONS & CONTROLS
- Cord telephone
- Cordless telephone
- INSTALLATION
- Install handset battery
- Installing cordless phone and handset
- - IF YOU ARE SUBSCRIBER TO A DSL SERVICE (OPTIONAL)
- MENU
- Corded phone
- Phone book
- Call log
- Settings
- Cordless phone
- Phone book
- Call log
- BS settings
- HS Settings
- • ALARM:
- - SELECT BASE
- • HANDSET DEFAULT:
- Registration
- OPERATION
- Pause function "P"
- Programming/Dialing from speed dial buttons
- Intercom function
- Call transfer
- Conference call
- TROUBLESHOOTING
- I get noise, static, or weak signal even when I'm near the telephone base
- I cannot get a dial tone
- My caller ID isn't working
- SPECIFICATIONS
- WARRANTY
- CONDITIONS
- THIS WARRANTY IS VOID IN THE NEXT CASES:
- RETAILER INFORMATION
- STEREN
Brand : Steren
Model : TEL-2490
Category : Telephone