
TEL-2410 - Telephone Steren - Free user manual and instructions
Find the device manual for free TEL-2410 Steren in PDF.


| Product Type | Corded Telephone |
| Brand | Steren |
| Model | TEL-2410 |
| Dimensions | 22.5 x 18.0 x 8.5 cm |
| Weight | 0.52 kg |
| Power Supply | Powered via telephone line (RJ-11) |
| Display | LCD with caller ID and time |
| Main Functions | Caller ID, call waiting, redial, speed dial, mute, hold, volume control |
| Ring Type | Adjustable ring tones and volume |
| Memory | Store up to 50 contacts |
| Connection | RJ-11 telephone jack |
| Cable Length | 2.0 m handset cord, 1.8 m line cord |
| Wall Mountable | Yes (with included bracket) |
| Hearing Aid Compatible | Yes (HAC) |
| Maintenance | Wipe with dry cloth; do not use liquids or cleaners |
| Safety | Do not expose to moisture; use only approved power sources |
| Spare Parts & Repairability | Contact Steren support for replacement parts |
| General Information | Compatible with analog telephone lines (PSTN) |
Frequently Asked Questions - TEL-2410 Steren
User questions about TEL-2410 Steren
0 question about this device. Answer the ones you know or ask your own.
Ask a new question about this device
Download the instructions for your Telephone in PDF format for free! Find your manual TEL-2410 - Steren and take your electronic device back in hand. On this page are published all the documents necessary for the use of your device. TEL-2410 by Steren.
USER MANUAL TEL-2410 Steren
natural_image
Illustration of a red and white remote control with a stylized 'J' design (no text or symbols)IMPORTANTE
natural_image
Simple line drawing of a rectangular object with a small internal component labeled '4' (no text or symbols beyond the number)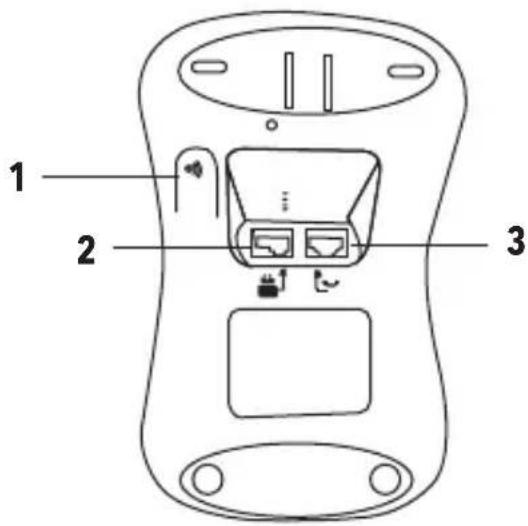
Vista frontal Vista inferior
ELIMINADOR
natural_image
Simple line drawing of a plug and cable (no text or symbols)flowchart
graph LR
    A["Mobile Phone"] --> B["Battery with 2.5V power, 10W indicator, down arrow"]
    B --> C["Device with 2.5V battery, 10W indicator, down arrow"]
    C --> D["Device with 2.5V battery, 10W indicator, up arrow"]
- CONEXIÓN
4. DESCRIPCIÓN
4.1 SIMBOLOGÍA EN LA PANTALLA
12.1.1 CÓMO INTRODUCIR CARACTERES
STEREN PRODUCTO EMPACADO S.A. DE C.V.
Autopista México-Querétaro. Km 26.5 Sin número, Nave Industrial 3-A, Col. Lomas de Boulevares, Tlalnepantla de Baz, Estado de México, C.P. 54020, RFC: SPE-941215-H43



www.steren.com
DECT CORDLESS
PHONE TEL-2410

natural_image
Illustration of a red and white remote control with a stylized 'J' design (no text or symbols)IMPORTANT
Before using the product, carefully read this instruction manual to avoid any malfunction.
The information shown in this manual serves only as a reference for the product.
Due to updates there may be differences.
Check our website www.steren.com for the latest version of this manual.
CAUTIONS
- This device is not intended for use by persons (including children) whose physical, sensory or mental abilities are different or reduced, or who lack experience or knowledge.
- Children should be supervised to make sure they do not use the device as a toy.
- Do not try to open the equipment; may cause a malfunction and the warranty will be voided.
- Do not expose the equipment to extreme temperatures.
- Do not use or store this equipment in places where there are leaks or splashes of water; It can cause a malfunction or an electric shock.
- Avoid falling equipment, as it could be damaged.
- Do not place the equipment or accessories on inclined, unstable or vibrating surfaces.
- Do not place heavy objects on the equipment or its accessories.
- Do not expose the equipment or its accessories to dust, smoke or steam.
- Clean it with a soft, dry cloth.
Operation of this equipment is subject to the following two conditions: (1) this device or device may not cause harmful interference, and (2) this device or device must accept any interference, including interference that may cause undesired operation.
INDEX
- PARTS 4
- BATTERY INSTALLATION OF 6
- CONNECTION 6
- DESCRIPTION 7
4.1 Symbols on the screen 7
4.2 General description of special keys 7
4.3 General navigation in the Main Menu 9
4.4 General Map of the Main Menu 9 - USE OF THE PHONE 10
5.1 Turn on / off headset 10
5.2 Calls 10
5.2.1 Make a call 10
5.2.2 End a call 10
5.2.3 Receive a call 10 - ADJUST THE VOLUME OF THE HEADSET 11
6.1 Mute 11 - INTERCOM 11
7.1 Make an internal call 11
7.2 Receive an internal call 11
7.3 Transfer a call 12
7.4 3-way teleconference 12 - FREE HANDS 13
8.1 How to make a call "hands-free" 13
8.2 Answer a call "hands-free" 13 - REMARKED 14
9.1 See an entry and remark 14
9.2 Copy a number of the remarkation list to the phone book 14
9.3 Delete an entry 15
9.4 Delete all records from the list 15 - LOCK / UNLOCK THE KEYBOARD 15
- SYNC/ SEARCH HEADPHONE 16
- PHONE BOOK 16
12.1 How to store names and numbers 16
12.1.1 How to enter characters 17
12.1.2 Writing Tips 17
12.2 See or mark an entry 18
12.3 Edit a name and number 18
12.4 Delete an entry 18
12.5 Delete all enters 19
13. CALL IDENTIFIER AND CALL LIST 19
13.1 List of calls 19
13.1.1 See the list of calls 19
13.1.2 Mark a number on the call list 20
13.1.3 Copy a number of calls to the phone book 21
13.1.4 Delete an entry 21
13.1.5 Delete all calls from the list 21
14. CLOCK AND ALARM 22
14.1 Set date and time 22
14.2 Adjustment of alarm 22
15. PERSONAL CONFIGURATION 23
15.1 Heaphone tones 23
15.1.1 Ring volume 23
15.1.2 Ring melody 24
15.1.3 Key tone 24
15.2 Handset name 25
15.3 Automatic response 25
15.4 Language 26
16. ADVANCED ADJUSTMENTS 26
16.1 ECO Mode 26
16.1.1 ECO PLUS mode 27
16.2 Automatic prefix 27
16.3 Callback or recovery mode (RECALL) 28
16.4 Dialing mode 28
16.5 Change the base PIN code 29
16.6 Registering an additional handset 30
16.7 Unregistering a headset 31
16.8 Restoring default configuration 31
17. DEFAULT ADJUSTMENTS SPECIFICATIONS 32
1. PARTS
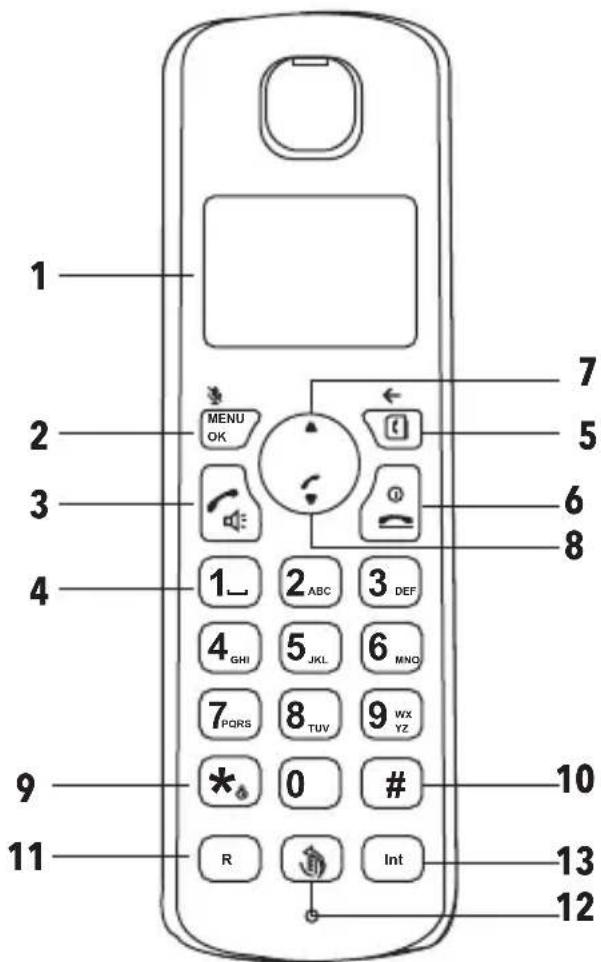
HANDSET
- Screen
- Menu / OK / Silence
- Call / Speaker
- Alphanumeric keyboard
- Agenda / Delete / Back
- Hang up / Power on / off
- Volume + / Scrolling up
- Volume - / Scroll down / List of received and missed calls
- * / Keypad lock
-
/ Pause
- Redial
- List of dialed numbers
- Intercom
BASE
- Locator / Programming
- Power connector
- Telephone line connector
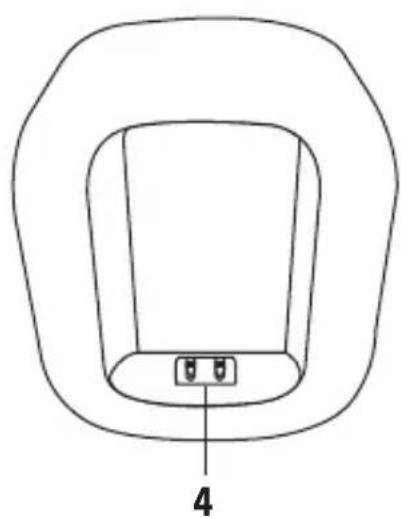
- Loading clip
natural_image
Simple line drawing of a rectangular object with a small internal component labeled '4' (no text or symbols beyond the number)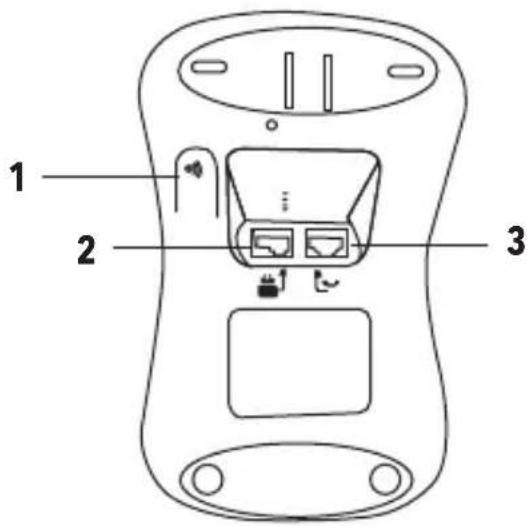
Front view Rear view
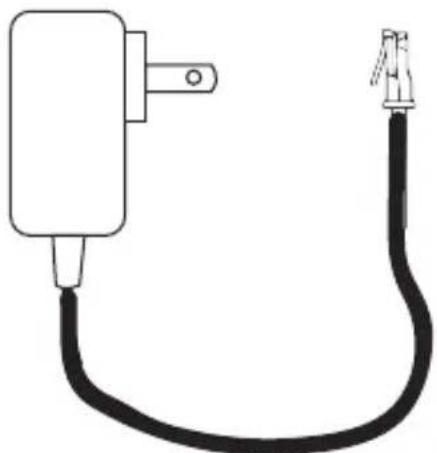
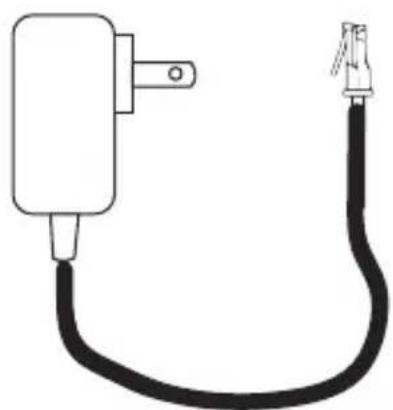
POWER CONVERTER
natural_image
Simple line drawing of a plug with a cable, no text or symbols present2. BATTERY INSTALLATION
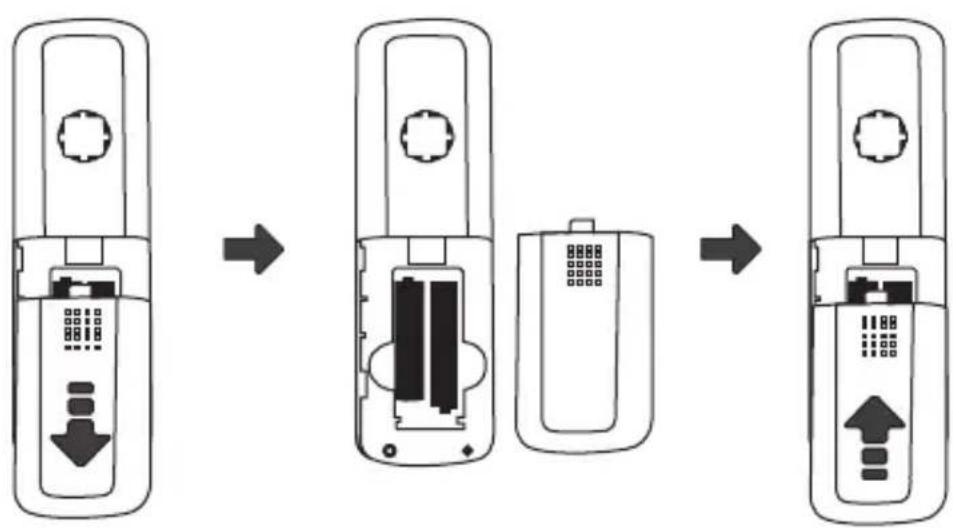
Insert only 1.2 V rechargeable batteries, size AAA.
flowchart
graph LR
    A["Device with ports, buttons, and memory"] --> B["Battery with internal components, connected to a battery"]
    B --> C["Device with battery, buttons, and memory"]
    C --> D["Device with battery, buttons, and memory"]
    D --> E["Device with battery, buttons, and memory"]
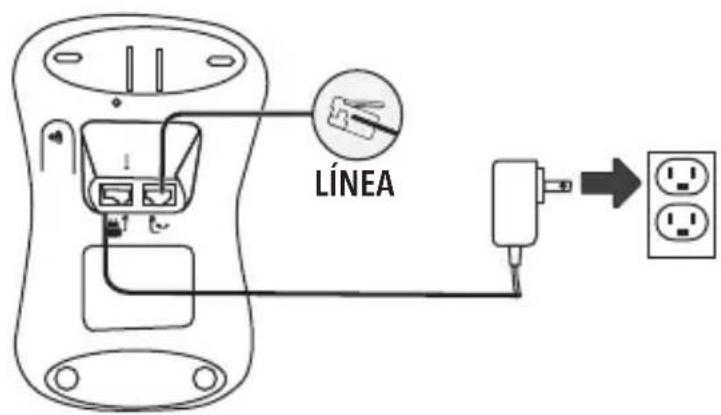
- CONNECTION
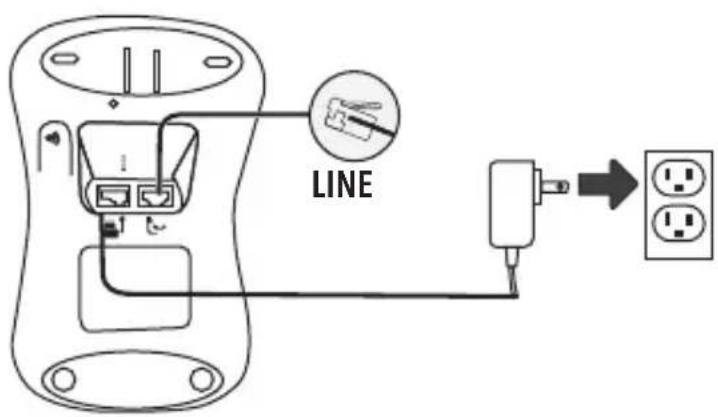
4. DESCRIPTION
4.1 SYMBOLOGY ON THE SCREEN
| In use | |
| Incoming / outgoing call | |
| Missed call | |
| ECO+ (plus) active | |
| Voice message on a tray * | |
| Phonebook | |
| Menu | |
| Locked keyboard |
| ECO mode | |
| Signal status | |
| Silent doorbell | |
| Battery status | |
| Alarm | |
| Speaker | |
| More text |
* Check the service with your telephone provider
4.2 GENERAL DESCRIPTION OF SPECIAL KEYS

During a call, press to increase the volume of the earpiece or speaker.
When the phone is ringing, press to increase or decrease the earpiece ringer volume.
Press to scroll between the options of the Menu, the lists of calls made and missed and the agenda.

During a call, press to mute the microphone.
In standby mode, press to access the Menu.
Within a menu, press to access the options or confirm some action.

Press to activate the loudspeaker during a call.
Press to make and receive calls.

Press and hold the key to lock and unlock the keyboard.
R
Use with switchboard / PABX services and some network services.
When you are on an external call, press to access a call waiting line (after listening for the call waiting signal).
Press again to toggle between two calls.
Press to get a new dial tone.

Press to access the list of last numbers dialed.

In standby mode, press to open the calendar.
Inside a menu, press to return to the previous menu.

During a call, press to hang up.
Within a menu, press to exit and return to standby mode.
Press and hold the key to turn on or to turn off the phone.

Press and hold the key to put the phone on hold during a call.
Int
Press to make internal calls and transfer them to other phones registered in the base.
4.3 GENERAL NAVIGATION IN THE MAIN MENU
- Press MENU to open the Main Menu.
- Next, use the buttons ▲▼ to move between the options.
- Press MENU to select an option or confirm a change.
To return to the previous menu, press 📄.
4.4 GENERAL MAP OF THE MAIN MENU
- Phone book
i. View
ii. Add new
iii. Edit
iv. Delete
v. Delete All - Clock / Alarm
i. Date & Time
ii. Set alarm - Personal set
i. Handset tone - Ring volume
- Ring melody
- Key tone
ii. Handset name
iii. Auto answer
iv. Language - Advanced settings
i. ECO mode
ii. ECO Plus
iii. Area code
iv. Network type - PSTN
- PBX
v. Auto perfix - Digit detect
vi. Recall time - Short
2 medium - Long
vii. Dial mode - Tone
- Pulse
viii. Change PIN
ix. to register
x. unregister
xi. Reset
NOTE: Some functions can be activated or deactivated
5. USE OF THE PHONE
Note:
The duration of all external calls is automatically displayed on the screen. The timer appears after the first 10 seconds of the call. When the call ends, the total duration of the talk time remains on the screen for 3 seconds.
5.1 TURN ON / OFF HEADSET
Press and hold

to turn the headset on or off.
5.2 CALLS
5.2.1 Make a call
Option 1
- Press
- When you hear the dial tone, type the number.
Option 2
Type a number and then press
5.2.2 End a call
Press Ⓤ or return the handset to the base.
5.2.3 Receive a call
Option 1
If the phone is in the base, remove it and press 📋 to answer.
If the "Auto Answer" function is activated, only remove the phone from the base. (See the "Automatic Response" section of this manual).
Option 2
With the phone out of the base, press 🔔 to answer.
6. ADJUST THE VOLUME OF THE HEADSET
During a call, press ▲▼ to increase or decrease the volume. There are 5 levels available.
6.1 MUTE
- During a call, press MENU OK The headset microphone is turned off and the display shows the message MUTE ON; the caller can not listen.
- Press MENU OK again to reactivate the microphone.
7. INTERCOM
7.1 MAKE AN INTERNAL CALL
If you have more than one handset registered in the base, you can make internal calls between the phones.
If there are only 2 registered phones, press ☐ on any headset. The other handset will sound automatically.
If there are more than 2 registered phones, press Int, and scroll with ▲▼ to select the handset you want to call.
7.2 RECEIVE AN INTERNAL CALL
When an internal call is received, the icon ( flashes and the phone number you are calling is displayed.
Press to answer the call.
7.3 TRANSFER A CALL
You can transfer an external call to another registered handset in the base.
- (a) If there are only 2 registered phones in the base, press Int. The other handset will sound automatically.
- (b) If there are more than 2 registered phones on the base, press Int and scroll ▲▼ with to select the headset and then press to transfer the call.
- When the other handset answers, press Ⓞ to complete the transfer.
Note:
If there is no answer from the other handset, press Int to return to the call.
The call is automatically returned to the answering phone, if there is no answer after 60 seconds.
7.4 3-WAY TELECONFERENCE
You can hold a 3-way conference between 2 internal headphones and 1 external call.
- (a) If there are only 2 registered phones in the base, press Int. The other handset will sound automatically.
- (b) If there are more than 2 registered phones in the base, press Int Scroll ▲▼ to select the handset and confirm with MENU OK
- When the other handset answers, press and hold MENU OK to connect.
- Press Ⓞ to end the call.
8. FREE HANDS
To maintain communication without holding the handset or for other people to hear the conversation on the speaker, simply use the "hands-free" function.
8.1 HOW TO MAKE A CALL "HANDS FREE"
- Press twice and then dial the number.
- During the call press 📋 to activate the speaker.
- Press Ⓞ to end the call
Note:
During a hands-free call, press ▲▼ to adjust the volume
8.2 ANSWER A CALL "HANDS FREE"
- When the phone rings, press twice to answer the call.
- During the call, press 📄 to place the call on the speaker.
9. REMARKED
The last 10 outgoing dialed calls are stored in the "redial" list.
9.1 SEE AN ENTRY AND REMARK
- Press 📋 to open the redial list or redial.
- Scroll ▲▼ with to select a number.
- Press ⚙ to mark the displayed entry or press Ⓞ to return to standby mode.
Note:
If the caller ID is active and the number exactly matches a contact in the phonebook, the name will be displayed.
9.2 COPY A NUMBER OF THE REMARKATION LIST TO THE PHONE BOOK
- Press 📋 to open the redial list.
- Scroll ▲▼ to the entry you want.
- Press MENU OK . The display shows SAVE N.
- Press MENU OK . The display shows ENTER NAME
- Enter the name with the alphanumeric keypad and press MENU OK The number will be displayed.
- Edit the number if necessary, then press MENU OK. The number will be stored.
9.3 DELETE AN ENTRY
- Press ☑ to open the redial list.
- Scroll ▲▼ to the entry you want. Press
- Press▼ . The display shows DELETE.
- Press MENU OK twice to confirm.
9.4 DELETE ALL RECORDS FROM THE LIST
- Press 📋 to open the redial list.
- Press MENU OK and until you select ▼ the DELETE ALL option.
- Press MENU OK twice to confirm.
10. LOCK / UNLOCK THE KEYBOARD
You can lock the keyboard so it can not be accidentally operated.
Note:
When the keypad is locked, you can still answer incoming calls and operate the normal headset during the call.
When the call ends, the keypad lock is activated again.
- Press and hold ✦. The keys are locked and the symbol 🔊 appears.
- Press and hold ✦ to unlock the keyboard.
11. SYNC / SEARCH HEADPHONE
You can call the handset from the base to locate it.
- Click ● on the bottom of the base. All headphones registered in the base will sound.
- To stop the ringer press ● on the base again or press any button on the headset.
12. PHONE BOOK
12.1 HOW TO STORE NAMES AND NUMBERS
You can store up to 50 names and numbers in the phonebook. The names can have a length of up to 12 characters and numbers of up to 24 digits.
If your phone is connected to a switchboard, you may need to enter a "pause" in a stored number. This gives the dashboard time to find an outside line.
A pause is normally stored after the access code of the switchboard (eg 9). When you file a number, press and hold # until the display shows P, then you can continue entering the phone number.
If you are subscribed to the caller ID service and you want the name of the incoming call to be shown instead of the number, keep the complete phone number in the phone book, including the area code.
You can store multiple entries with the same number, however, to avoid duplicate entries, you can only store the name once.
- Press MENU OK . The screen shows PHONE BOOK.
- Press MENU OK and scoll ▼ with until ADD NEW.
- Press MENU OK. The display shows ENTER NAME.
- Enter the name with the alphanumeric keypad and press MENU OK. The display shows ENTER NUMBER.
- Enter the number and press MENU OK to save. The screen shows ADD NEW.
- Enter the next name and entry number you want to store in the phonebook or press ⊙ to return to the standby mode.
12.1.1 HOW TO ENTER CHARACTERS
Use the keyboard letters to enter names, for example, to store TOM:
Press 8 once to enter T.
Press 6 three times to enter 0.
Press 6 once to enter M.
12.1.2 WRITING TIPS
Press ☐ to delete the last character or digit.
Press ▲▼ to move between the characters or digits
Press 1_ to insert a space.
Press 1. twice to insert a script.
12.2 SEE OR MARK AN ENTRY
- Press 📋. The icon will appear 📋
- Press ▲▼ to locate an entry or enter the first letter of the contact.
- Press to dial or to return to standby mode.
12.3 EDIT A NAME AND A NUMBER
- Press MENU OK . The display shows PHONE BOOK. Press again MENU OK
- Press ▲▼ to locate the EDIT option and press MENU OK.
- Press ▲▼ to locate the contact and press MENU OK to start editing. When finished press
- Edit the number if necessary, and press MENU OK to save.
12.4 DELETE AN ENTRY
- Press MENU OK. The display shows PHONE BOOK. Press again MENU OK.
- Press▲▼ to locate the DELETE option and press MENU OK.
- Press ▲▼ to locate the contact and press twice MENU OK.
12.5 DELETE ALL ENTERS
- Press MENU OK . The display shows PHONE BOOK. Press again MENU OK .
- Press ▲▼ to locate the DELETE ALL option and press twice MENU OK .
13. CALL IDENTIFIER AND CALL LIST
IMPORTANT
To use the caller ID, you must first subscribe to the service of your network provider.
The cost of this service will depend on the provider.
To see the name of the caller, make sure you have stored the complete phone number, including the area code in the phone book. If the contact is not in the phonebook, only the number will be displayed.
13.1 LIST OF CALLS
The call list stores the details of the last 20 calls received, including the phone number, the date and time, and whether the call has been answered or not. When the list is full and a new call is received, the oldest entry will be automatically deleted.
13.1.1 See the list of calls
- In standby mode, press ▼ to open the call list. If there are no calls in the list, the screen shows LIST EMPTY.
-
Press ▲▼ to scroll through the list.
-
If the call was answered, the icon of the list, the screen will show ----.
appears. If the call was not answered, the icon appears. When you reach the end - If the number is in the phonebook, the name will appear. Press MENU OK to see the details of time and date.
- If the phone number is more than 12 digits, the icon appears. Press 📋 to see the remaining digits.
To see the name of the caller, make sure you have stored the complete phone number, including the area code in the phone book. If the contact is not in the phonebook, only the number will be displayed.
13.1.2 MARK A NUMBER ON THE CALL LIST
- Press ▼ to open the call list.
- Press ▲▼ to scroll through the list.
- Press 🔔 to mark the displayed entry.
13.1.3 COPY A NUMBER OF CALLS TO THE PHONE BOOK
- Press ▼ to open the call list.
- Press ▲▼ to scroll through the list.
- Press MENU OK and scroll ▼ to the option SAFE NUMBER.
- Press MENU OK . The display shows ENTER NAME.
- Enter the name with the alphanumeric keypad and press. The display shows INTR NUMBER.
- Enter the number and press to save.
13.1.4 DELETE AN ENTRY
- Press ▼ to open the call list.
- Press ▲▼ to scroll through the list and press MENU OK.
- Press until you choose the DELETE option and press MENU OK twice.
13.1.5 DELETE ALL CALLS FROM THE LIST
- Press ▼ to open the call list.
- Press ▲▼ to scroll through the list and press MENU OK
- Press until the DELETE ALL option is selected and press twice MENU OK
14. CLOCK AND ALARM
14.1 SET DATE AND TIME
If you are subscribed to the caller ID service, the date and time is updated when a call is received. If not, you can set them manually.
- Press MENU OK and scroll ▼ to the CLOCK / ALARM option. Press MENU OK to access.
- Scroll ▼ to DATE / TIME and press MENU OK
- Enter the date by day-month-year (last two digits) and press MENU OK to confirm.
- Enter the time with the keyboard (in 24-hour format) and press MENU OK to confirm.
14.2 ADJUSTMENT OF ALARM
Each headset can have a different alarm configuration.
- Press MENU OK and scroll to ▼ the CLOCK / ALARM option. Press MENU OK to access.
- Scroll with ▼ up SET ALARM and press MENU OK.
- Press to ▼ select ON and press MENU OK
- Modify the time of the alarm and press MENU OK to confirm.
To deactivate the alarm, in step 3, select the OFF option.
When the alarm is active, the icon 🔔 appears.
15. PERSONAL CONFIGURATION
15.1 HEADPHONE TONES
15.1.1 Ring volume
The earpiece ringer volume can be adjusted to different levels. Choose between 5 volume levels or deactivate it.
- Press MENU OK and scroll ▼ with up to PERS. SET.
- The screen shows HAND SET TONE. Choose MENU OK
- The display shows RING VOLUME. Press MENU OK
- Press ▲▼ to raise or lower the level (1 -5 or OFF).
- Press MENU OK to confirm.
Note:
When the phone is ringing, you can adjust the ringer volume by pressing ▲▼
15.1.2 Ring melody
You can choose between 5 melodies for when there is an incoming call.
- Press MENU OK and scroll with ▼ up to PERS.SET.
- The screen shows HANDSET TONE. Choose MENU OK
- The display shows RING MELODY. Press MENU OK
- Press ▲▼ to go up or down between the melodies.
- Press MENU to confirm.
15.1.3 Key tone
When a button is pressed on the handset's keypad, a tone will be heard.
- Press MENU OK and scroll ▼ with up to PERS. ADJUST.
- The screen shows HANDSET TONEChoose MENU OK
- The screen shows KEY TONE. Press MENU OK
- Press ▲▼ to switch between ON or OFF.
- Press MENU to confirm.
15.2 HANDSET NAME
If you are using more than one headset, you can name each one to easily distinguish them. The name can have a length of up to 10 characters.
- Press MENU OK and scroll ▼ to the PERS SETTINGS option and press MENU OK
- Scroll with ▼ up to HANDSET NAME select with MENU OK
- Edit the name with the alphanumeric keypad and press MENU to confirm. Press ☐ to delete characters.
15.3 AUTOMATIC RESPONSE
The phone is set to automatically answer calls when you pick up the handset from the base or charger. You can change this feature so that calls can only be answered when you press 🔊.
- Press MENU OK and scroll ▼ with to the PERS SETTINGS option and press MENU OK
- Scroll ▼ to AUTO ANSWER. Select with MENU OK.
- Press ▲ to switch between ON or OFF.
- Press MENU OK to confirm.
15.4 LANGUAGE
- Press MENU OK and scroll ▼ to the PERS SETTINGS option and press
- Scroll ▼ with up to LANGUAGE, select with MENU OK
- Press ▲ 0 ▼ to change the language and press to select MENU OK.

16. ADVANCED ADJUSTMENTS
16.1 ECO MODE
The phone offers the ECO mode function that reduces the transmitted power and the power consumption when it is turned on. To activate this function:
- Press MENU OK, scroll ▼ to the ADVANCED SETTINGS option and press MENU OK
- Scroll ▼ with up to ECO MODE, select with MENU OK.
- Press ▲ o ▼ to switch between ON or OFF.
- Press MENU to confirm.
Note:
When the ECO mode is set to ON, the earpiece range will be reduced.
16.1.1 ECO PLUS mode
When ECO PLUS is activated and the unit has been idle for 1 minute, the power transmitted between the handset and the base will stop. It will be reactivated when there is an incoming call or, when any key is pressed, the unit will return to normal mode. To activate ECO PLUS:
- Press MENU OK, scroll ▼ to the ADVANCED SETTINGS option and press MENU OK
- Scroll ▼ with up to ECO PLUS, select with MENU OK
- Press ▲ to switch between ON or OFF.
- Press MENU OK to confirm.
16.2 AUTOMATIC PREFIX
You can set the phone to detect a dialing number and replace it with another number. The number that will be detected can be up to 5 digits and can be substituted with a number of up to 10 digits.
- Press MENU OK and scroll ▼ to the ADVANCES SETTINGS option and press MENU OK
- Scroll ▼ with up to AUTO PREFIX, select with MENU OK
- Enter the number you want to be detected and press MENU OK
- The screen will show PREFIX. Enter the number that will replace the previous one and press MENU OK
16.3 CALLBACK OR RECOVERY MODE (RECALL)
This setting is useful for accessing certain networks and / or the PABX / Switchboard services.
The default recovery time is appropriate for the country and common network operators. It is unlikely that you should change this configuration unless the operator advises you to do so.
- Press MENU OK and scroll ▼ to the ADVANCES SETTINGS option and press MENU OK
- Scroll ▼ with up RECALL TIME, select with MENU OK
- Press o to select between SHORT, MEDIUM and LONG. Confirm with MENU OK
Note:
SHORT = 100ms, MEDIUM = 250ms and LONG = 600ms
16.4 DIALING MODE
The phone is set to dial by tone. This should only be changed if it is connected to an older PBX / PBX type that requires pulse dialing.
- Press MENU OK and scroll ▼ to the ADVANCES SETTINGS option and press MENU OK
- Scroll ▼ with up to DIAL MODE, select with MENU OK
- Press to select between TONE or PULSE. Confirm with MENU OK
16.5 CHANGE THE BASE PIN CODE
Some functions are protected by a 4-digit PIN code that must be entered if you wish to change the configuration. The default PIN is 0000. You can choose your own PIN number.
When entering a PIN, the digits are shown as * * * *.
- Press MENU OK and scroll ▼ to the ADVANCES SETTINGS option and press
- Scroll ▼ with until CHANGE PIN, select with MENU OK
- The display shows NEW ----. Enter the new 4-digit PIN code and press MENU OK
- The screen shows Confirm. Re-enter the new PIN and press MENU to confirm.

Important
If you change the PIN code, please keep a reminder of the new number for future use.
16.6 REGISTERING AN ADDITIONAL HANDSET
You can register up to 4 phones on the base to extend your phone system without having to install extension sockets for each new phone.
At the base:
- Press and hold ••• for 5 seconds. The base will remain in record mode for 90 seconds.
In the headset:
2. If the headset has not registered to a base, press MENU OK and then enter the 4-digit PIN code (default: 0000) and press MENU OK.
3. If the headset has already registered on a base, press MENU OK and scroll to the ADVANCES SETTINGS option and press MENU OK.
4. Move ▼ to the REGISTER option and enter the 4-digit PIN (default: 0000) and press MENU OK
If the registration is successful, a beep will sound
Note:
If the registration is not successful the first time or in case the base registration period runs out, please repeat the process. If the base is not found after a few seconds, the handset returns to the standby mode.
If there are already 4 registered phones in the database and you want to add one more, the registration will fail. You must unregister another headset before you can register a new one.
16.7 UNREGISTERING A HEADSET
Use one headset to unregister another. You can not unregister the headset you are using.
- Press MENU OK and scroll to the ADVANCES SETTINGS option and press MENU OK
- Scroll with ▼ up to NO REGISTRATION, select with MENU OK
- Enter the 4-digit PIN (default: 0000) and press MENU OK
- Press ▲ o ▼ to select the headset and press MEN OK twice to confirm.
16.8 RESTORING DEFAULT CONFIGURATION
You can restore the headset to the default (factory). All phones that are registered in the base will be maintained.
Important
When you reset the phone to the default setting, all entries in the call and redial lists will be deleted. All headset and base settings will also be reset. The entries stored in the phonebook will be deleted.
- Press MENU OK and scroll with ▼ up to ADVANCED SETTINGS and press MENU OK
- Scroll with ▼ until RESET, select with MENU OK
- The screen will display RESET, press MENU to confirm.
Note: Once the handset has been reset, it will ask to set the date and time.
17. DEFAULT ADJUSTMENTS
Key tone On
Automatic answer Off
Ringtone Melody 1
Ring volume 3
Volume of ear 2
Hands free volume 3
Phone book Empty
Call list Empty
List of redials Empty
PIN code 0000
Dialing mode Tone
Eco Mode OFF
ECO PLUS Off
Keypad lock OFF
Recall mode (RECALL) LONG (600ms)
SPECIFICATIONS
Handset:
Input: 2.4 V --- (2xAAA)
Base:
Input: 7.5 V---300 mA (converter)
-48 V---(phone line)
Power Converter:
Input: 100 - 240 V\~ 50/60 Hz 200 mA
Output: 7.5V --- 300 mA
WARRANTY POLICY
Product: Dect Cordless phone
Model: TEL-2410
Brand: Steren

STEREN
This Steren product is warranted under normal usage against defects in workmanship and materials to the original purchaser for one year from the date of purchase.
CONDITIONS
- This warranty card with all the required information, invoice or purchase ticket, product box or package, and product, must be presented when warranty service is required.
- If the product is in the warranty time, the company will repair it free of charge. The supplier will pay for transportation charges.
- The repairing time will not exceed 30 natural days, from the day the claim was received.
- Steren sell parts, components, consumables and accessories to customer, as well as warranty service, at any of the addresses mentioned later.
THIS WARRANTY IS VOID IN THE NEXT CASES:
If the product has been damaged by an accident, acts of God, mishandling, leaky batteries, failure to follow enclosed instructions, improper repair by unauthorized personnel, improper safe keeping, among others.
a) The consumer can also claim the warranty service in the purchase establishment.
b) If you lose the warranty card, we can reissue it, if you show the invoice or purchase ticket.
RETAILER INFORMATION
Name of the retailer
Address
Serial number ____
Product
ELECTRÓNICA STEREN S.A. DE C.V.
Biólogo Maximino Martínez No. 3408, San Salvador Xochimanca, Del. Azcapotzalco Ciudad de México 02870, RFC: EST850628-K51
STEREN PRODUCTO EMPACADO S.A. DE C.V.
Autopista México-Querétaro. Km 26.5 Sin número, Nave Industrial 3-A, Col. Lomas de Boulevares, Tlalnepantla de Baz, Estado de México, C.P. 54020, RFC: SPE-941215-H43
In case your product fails or have questions, please contact your nearest dealer.
If you are in Mexico, please call to our Call Center.
01 800 500 9000

www.steren.com
- IMPORTANTE
- DESCRIPCIÓN
- SIMBOLOGÍA EN LA PANTALLA
- CÓMO INTRODUCIR CARACTERES
- DECT CORDLESS
- PHONE TEL-2410
- IMPORTANT
- Before using the product, carefully read this instruction manual to avoid any malfunction.
- CAUTIONS
- INDEX
- PARTS
- HANDSET
- / Pause
- BASE
- BATTERY INSTALLATION
- DESCRIPTION
- SYMBOLOGY ON THE SCREEN
- GENERAL DESCRIPTION OF SPECIAL KEYS
- R
- Int
- GENERAL NAVIGATION IN THE MAIN MENU
- GENERAL MAP OF THE MAIN MENU
- USE OF THE PHONE
- Note:
- TURN ON / OFF HEADSET
- CALLS
- Make a call
- Option 1
- Option 2
- End a call
- Receive a call
- ADJUST THE VOLUME OF THE HEADSET
- MUTE
- INTERCOM
- MAKE AN INTERNAL CALL
- RECEIVE AN INTERNAL CALL
- TRANSFER A CALL
- 3-WAY TELECONFERENCE
- FREE HANDS
- HOW TO MAKE A CALL "HANDS FREE"
- ANSWER A CALL "HANDS FREE"
- REMARKED
- SEE AN ENTRY AND REMARK
- COPY A NUMBER OF THE REMARKATION LIST TO THE PHONE BOOK
- DELETE AN ENTRY
- DELETE ALL RECORDS FROM THE LIST
- LOCK / UNLOCK THE KEYBOARD
- SYNC / SEARCH HEADPHONE
- PHONE BOOK
- HOW TO STORE NAMES AND NUMBERS
- HOW TO ENTER CHARACTERS
- WRITING TIPS
- SEE OR MARK AN ENTRY
- EDIT A NAME AND A NUMBER
- DELETE AN ENTRY
- DELETE ALL ENTERS
- CALL IDENTIFIER AND CALL LIST
- LIST OF CALLS
- See the list of calls
- MARK A NUMBER ON THE CALL LIST
- COPY A NUMBER OF CALLS TO THE PHONE BOOK
- DELETE AN ENTRY
- DELETE ALL CALLS FROM THE LIST
- CLOCK AND ALARM
- SET DATE AND TIME
- ADJUSTMENT OF ALARM
- PERSONAL CONFIGURATION
- HEADPHONE TONES
- Ring volume
- Ring melody
- Key tone
- HANDSET NAME
- AUTOMATIC RESPONSE
- LANGUAGE
- ADVANCED ADJUSTMENTS
- ECO MODE
- ECO PLUS mode
- AUTOMATIC PREFIX
- CALLBACK OR RECOVERY MODE (RECALL)
- DIALING MODE
- CHANGE THE BASE PIN CODE
- REGISTERING AN ADDITIONAL HANDSET
- At the base:
- UNREGISTERING A HEADSET
- RESTORING DEFAULT CONFIGURATION
- DEFAULT ADJUSTMENTS
- SPECIFICATIONS
- WARRANTY POLICY
- STEREN
- CONDITIONS
- THIS WARRANTY IS VOID IN THE NEXT CASES:
- RETAILER INFORMATION
Brand : Steren
Model : TEL-2410
Category : Telephone