
TEL-625 - Telephone Steren - Free user manual and instructions
Find the device manual for free TEL-625 Steren in PDF.


| Product Type | Corded Telephone |
| Brand | Steren |
| Model | TEL-625 |
| Color | Black |
| Dimensions (approx.) | 22.0 x 17.0 x 8.0 cm (8.7 x 6.7 x 3.1 in) |
| Weight | 0.5 kg (1.1 lb) |
| Power Supply | Phone line (RJ11); no batteries required |
| Display | LCD with caller ID and call timer |
| Keypad | 12 number keys, 4 function keys (redial, hold, flash, memory) |
| Ringer Volume | Adjustable (high/low/off) |
| Handset Volume | Adjustable via slider |
| Memory | 10 speed dial memory locations |
| Redial | Last number redial |
| Hold | Music on hold |
| Flash | Call waiting flash button |
| Pause | Pause button for PBX systems |
| Wall Mountable | Yes |
| Maintenance | Clean with soft dry cloth; avoid liquids |
| Safety | Use only with telephone line; do not use during lightning storms |
| Spare Parts | Coiled handset cord, RJ11 cable, wall mount bracket |
| Repairability | User replaceable handset cord; internal components not user serviceable |
Frequently Asked Questions - TEL-625 Steren
User questions about TEL-625 Steren
0 question about this device. Answer the ones you know or ask your own.
Ask a new question about this device
Download the instructions for your Telephone in PDF format for free! Find your manual TEL-625 - Steren and take your electronic device back in hand. On this page are published all the documents necessary for the use of your device. TEL-625 by Steren.
USER MANUAL TEL-625 Steren
natural_image
3D rendering of a metallic curved object with a central wavy indentation, set against a blue grid background (no text or symbols)natural_image
Diagram showing connection between a router, a game controller, and a power adapter (no text or symbols present)flowchart
graph LR
    A["Game Controller RJ11"] -->|A la base| B["Filtro ADSL"]
    B --> C["Wall-mounted device"]
3. CONTROLES
Auricular
STEREN PRODUCTO EMPACADO S.A. DE C.V.
BiólogoMaximinoMartínezNo.3408Int.2,3y4,San
Salvador Xochimanca, México, D.F. 02870,
Del. Azcapotzalco, RFC: SPE941215H43
ELECTRÓNICA STEREN DEL CENTRO, S.A. DE C.V.
Rep. del Salvador 20 A y B, Centro, 06000,
natural_image
3D rendered illustration of a curved metallic object with a central wavy line, set against a blue grid background (no text or symbols)Instruction manual
0215e
V0.0
DECT CORDLESS PHONE
TEL-625
Thank You on purchasing your new Steren product.
This manual includes all the feature operations and troubleshooting necessary to install and operate your new Steren's DECT cordless phone.
Please review this manual thoroughly to ensure proper installation and operation of this product. For support, shopping, and everything new at Steren, visit our website:
www.steren.com
The instructions of this manual are for reference about the product. There may be differences due to updates.
Please check our website (www.steren.com) to obtain the latest version of the instruction manual.

The operation of this equipment is subject to the following two conditions: (1) it is possible that this computer or device cause harmful interference and (2) this device or device must accept any interference, including interference that may cause undesired operation..
SAFETY INSTRUCTIONS
- Disconnect the device from the electrical outlet before cleaning.
- Use a damp cloth for cleaning. Do not use liquid cleaners.
- Never use it near water sources.
- Place the handset on a firm surface, and where the openings and slots in the back of the unit receive ventilation.
- This product should be operated only from the type of power source indicated on the marking label, consult your dealer or local power company.
- Do not disassemble this product. Opening or removing parts of the telephone base or handset may expose you to dangerous voltages or other risks.
INDEX
ENG
- HIGHLIGHTS .... 5
- INSTALLATION OF THE BASE AND HANDSET 6
- CONTROLS 8
- KEY MAP 14
- CORDLESS PHONE MENU 15
- HOW TO OPERATE THE CORDLESS PHONE 21
- TROUBLESHOOTING 23
- MAINTENANCE 25
- SPECIFICATIONS 26
1. HIGHLIGHTS
The cordless phone has a minimalistic design, luminous LCD display and a range up to 40 meters.
It features speaker, caller ID, 50 numbers phonebook, 16 different languages, and stores the last 30 incoming phone calls and 10 different tones.
You can block outgoing calls and it has status LED.
- Multilanguage
• Up to 5 extensions supported - Caller ID (30 numbers)
• Phonebook (50 memories) - Low battery indicator
• 5 basic tones and 5 melodies
2. INSTALLATION OF THE BASE AND HANDSET
- Choose a location for your cordless telephone as far away as possible from any other cordless (wireless) devices such as cordless telephones, wireless routers (i.e., Wi Fi), microwave ovens, televisions, computers, etc.
- Connect the adapter to the connector DC 6V on the back of the base.
- Connect the power adapter into an outlet and the phone line cord to the connector represented as LINE.

natural_image
Diagram showing connections between a router, a device, and a power plug (no text or symbols present)- Place the handset on the base and verify that the phone has a dial tone.
If you are subscriber to a DSL service (optional)
If you receive high speed Internet through your telephone line (commonly referred as DSL) and you are experiencing interference during conversations, your caller ID features are not functioning properly, install a DSL filter to the telephone line between the telephone base and the telephone line jack (Sternen 300-997).

flowchart
graph LR
    A["User Interface"] -->|To base| B["RJ11 jack"]
    B --> C["ADSL filter"]
    C --> D["Output to ADSL Filter"]
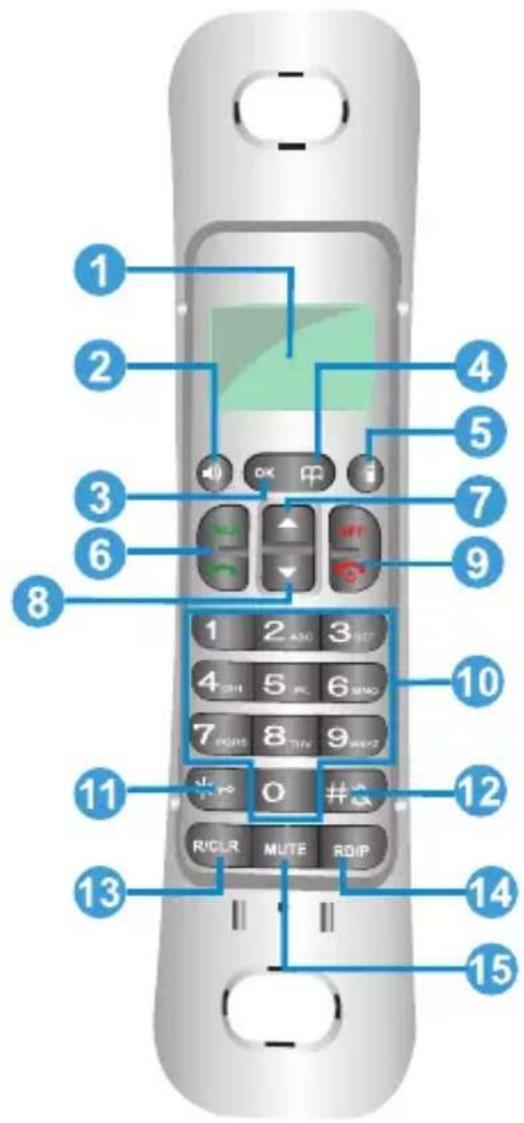
3. CONTROLS
Cordless phone

-
LCD screen
-
Hands free
Press to activate the hands free function.
- OK
Press to enter the main menu, or to confirm a selection.
- Phonebook
Press to search a contact into the phonebook and exit from a function during menu operation. When dialing, allows to erase the last digit.
- INT ( )
Allows you to make internal calls between the headsets. This function will be activated only if you have many wireless phones.
- Answer an incoming call, Talk
Press once to answer an incoming call.
- Up / Incoming call review
Use it to move between submenus.
Press to increase the volume level (5 levels).
Press to check the previously incoming numbers.
- Down/Outgoing call review
Use it to move it between submenus.
Press to check the previously dialed numbers.
Press to decrease the volume level, while using the speaker (5 levels).
- On/Off, end call
Press and hold for three seconds to power on / off the device. Press to end a call.
- Numeric keyboard
- Keylock (*)
In idle mode, press and hold the button for three seconds, the keyboard will be blocked, using this you cannot press the keys accidentally. Press and hold for three seconds, once again, to reestablish the keyboard.
- Ring on/off (#) (✗)
Press and hold the button for 3 seconds to turn the ringer on an incoming call.
-
Flash (R) / CLR button
-
Flash: Press to activate the services you are subscribed with your local telephone company.
-
CLR: During phone edit mode, press it if you have a mistake. The previous letter or number will be deleted, each time you press this button. Reviewing phone calls, press the button to delete the current input.
-
RD/P
• Redial the last dialed number.
- Press to make a pause while dialing (especially useful when calling a PBX).
- Mute
Base

- LED call waiting and call loss
Indicates when the phone is in use and also turns on when you press the page button.
- Page
When you press it, the handset rings, so you can find it.
-
Telephone line input jack (LINE).
-
Power adapter input jack (DC 6V).
Icon description

| Íconos Función | |
 | Signal: Steady when the handset is registered and within range of the base. Flashes when the handset is out of range or searching for the base. |
 | Flashes to indicate new calls list entries received. |
| Appears when the phone keys are locked. | |
| The alarm has been set. | |
| Silent mode: Handset ringer is off. | |
| Displayed when you are viewing the phonebook list. | |
| Flashes to indicate new voicemail messages received. | |
| RPT | An incoming call log several times. |
| NEW | Indicates new missed calls that have not been reviewed yet. |
| When reviewing incoming or missed calls, appears next to the number that occupies the call in the list. | |
| Displayed when the phone is in handsfree mode. | |
| Handset battery level. | |
| AM / PM | Indicates the time in 12 hours. |
- KEY MAP
| Key | 1 | 2 | 3 | 4 | 5 | 6 | 7 | 8 | 9 | 0 | # | * |
| 1st press | • | A | D | G | J | M | P | T | W | 0 | # | • |
| 2nd press | , | B | E | H | K | N | Q | U | X | • | ||
| 3rd press | ! | C | F | I | L | O | R | V | Y | + | ||
| 4th press | ; | 2 | 3 | 4 | 5 | 6 | S | S | Z | = | ||
| 5th press | ! | À | Ô | G | Ł | Ñ | ? | † | 9 | - | ||
| 6th press | i | À | È | I | L | N | R | Ü | W | ( | ||
| 7th press | ? | Ä | É | Í | L | Ñ | R | Ü | Y | ) | ||
| 8th press | ¿ | Ä | Ê | Î | Ô | S | Ü | Y | • | |||
| 9th press | • | Ä | E | Ï | Ô | S | Ü | Z | ‘ | |||
| 10th press | # | À | Ê | Ï | Ô | S | Ü | Z | ? | |||
| 11th press | & | À | Ê | Î | Ô | S | Ü | Z | I | |||
| 12th press | % | Æ | Ê | Ï | Ô | ß | Ù | I | ||||
| 13th press | $ | Ç | Ô | { | ||||||||
| 14th press | € | ć | ∅ | } | ||||||||
| 15th press | £ | Ć | < | |||||||||
| 16th press | ¥ | > | ||||||||||
| 17th press | @ | / | ||||||||||
| 18th press | • | \ | ||||||||||
| 19th press | § | ^ | ||||||||||
| 20th press | - | |||||||||||
| 21th press | | | |||||||||||
| 22th press | ### |
To enter main menu and submenus, press OK
During idle mode, you will see next options:
a) PHONEBOOK
b) CALL LOG
c) BS SETTINGS
d) HS SETTINGS
e) REGISTRATION
a) PHONEBOOK
Use this menu to see the stored contacts in the phone.
- Press OK once, press it again to select PHONEBOOK option. Here you will find next options:
- LIST: Select this option to view a list of the stored phone numbers in phonebook.
- Use to move in through the list. In the screen you will see the name of the contact and the phone number.
- NEW ENTRY: Use the option to enter a new phone number in the phonebook:
- Use numeric keys to enter the name of the contact. Press OK to store changes.
- Use the numeric keys to enter a phone number, confirm with OK.
- Use to choose a different tune. Press OK once again to store all changes.
• EDIT RECORD: Use this option to modify the information of a current contact in the phonebook.
- Use the ▲buttons to select the desired contact to edit.
- Press OK to make the correction.
- Use ▲buttons to select the desired character to edit, enter the right letter.
- Press OK to save the changes.
- Repeat the process to edit the phone number.
- Select the Melody type and Press OK to store the changes. In case of mistake press R/CLR.
- DEL RECORD: Select this option to delete a contact in the phonebook.
- Use ▲buttons to select the desired number to erase.
- Press OK to confirm the selection.
- In the screen you will see the message: CONFIRM?
- Press OK to delete the contact.
- DELETE ALL: With this option you can delete all phone numbers stored in the phonebook.
- Press OK to confirm the action, you will see all the phone numbers in the phonebook.
- Press OK, in the screen will appear the CONFIRM? message. Press OK.
- MEM STATUS: Select this option to know how many contacts are stored in the phonebook.
- You can store up to 50 contacts. If you see 10/50 in the screen, means that you have 10 stored phone numbers.
b) CALL LOG
Press OK once, in the screen you will see CALL LOG. Press OK once again to enter the submenu. There you will see next options:
• MISSED: Allows you to check the unanswered calls.
- Use ▲ to check the missed calls. Press OK.
- If any number is in memory, you will see: EMPTY.
- RECEIVED: Allows you to check the incoming phone calls.
- Press OK
- If any number is in memory, you will see: EMPTY.
• DIALED: Allows you to check the outgoing phone calls.
- Use ▲buttons to check all the dialed phone calls.
- Press OK.
- If there are no numbers saved in the memory, you will see: EMPTY.
c) BS SETTINGS
Use this option to set the wireless phone base. In case the handset is unregistered, you cannot make any change.
- DELETE HS: This option let you delete a handset from the base in use.
- Press OK.
- Insert the PIN, the predetermined number is 0000 (four zeros) Press OK.
- Select the identification number of the handset you want to delete. Press OK.
- DIAL MODE: With this option, you can choose the dial options, either tone or pulse.
- FLASH TIME: With this option, you may change the flash time. You can choose between 100, 300, 600 and 1000 ms.
-
MODIFY PIN: With this option you can change the PIN, that it is used to set some parameters.
-
Press OK to enter in the submenu.
- In the screen will display PIN?, type the current PIN (predetermined number is 0000).
- Press OK to confirm the option.
- In the screen will be displayed NEW PIN, type the new one.
- Press OK to confirm. Repeat the number, finally press OK to store the changes.
- BS DEFAULT: This option will allow you to reset the phone to default parameters.
- Select the submenu by pressing OK.
- Type 0000 (or the current ID number) when the word PIN? displays in the screen.
- Press OK to confirm.
- Once the option is selected, the parameters set by the user are deleted permanently.
d) HS SETTINGS
With this option you can set parameters in the handset, in the submenu you will see next options:
• ALARM: Select this option to activate or deactivate the phone alarm.
- Use the ▲buttons to select an option.
- Press OK in the option ON to activate the alarm.
- Enter the time by using the ▲buttons. Press OK.
- The word Snooze ON and Snooze OFF will display in the screen.
• RING SETUP: Inside the menu, you will find next options:
- INT RING: Allows you to select a melody type for internal calls and the desired volume level. You can choose between 10 melodies.
- Use ▲to choose between the options Tune or Volume, confirm with OK.
- Use ▲ to select a tune and to adjust the volume.
- Press OK to store changes.
- EXT RING: Allows you to select a melody type for external calls and the desired volume level. You can choose between 10 melodies.
- Use the ▲buttons, and press OK to store changes.
- Set the volume in five different levels and OFF.
- Press OK to store changes.
- TONE SETUP: In the submenu you will find the next options:
- KEY TONE: Use it to activate or deactivate the key sounds.
- BATTERY LOW: Activate or deactivate the low battery sound indicator.
- RANGE ALARM: Use this option when the phone is out of the base range.
- LANGUAGE: Select the menu language between 16 different languages.
• HS NAME: Select this option to identify the handset with a name, press OK.
- Use the numeric keys to type a name.
- Press OK to store changes.
• AUTO ANSWER: Activate or deactivate the auto answering function.
• BARRING: Blocking outgoing calls for up to 4 prefixes (up to 4 digits).
Enter the current PIN (default 0000), press OK Select on or off. If you turn on the function, the number 1 appears, press OK, and enter the code to lock and press OK to save changes and use ▲▼ to select the number (from 1 to 4) to be blocked.
• DATE & TIME: Use to set the current date and time.
- Press OK to enter the setting.
- The year will flash, adjust it with ▲ and press OK to confirm.
-
Select the month with ▲ and press OK to confirm, repeat this to set the day and the hour.
-
SELECT BASE: Select the base where the handset will be linked. You have up to 4 different bases to select. Automatic option is available.
- HS DEFAULT: Press to reset the handset to default parameters. Once you select this option, the user settings are completely erased.
e) REGISTRATION
Use this menu to register a handset in an specific base.
- Set the base in Searching mode by pressing the Page button in the base for 5 seconds.
- Select a base, you have up to 4 options, if you have only one base, select BASE 1.
- Press OK to search.
- Type the PIN, (0000 predetermined) when the handset finds a base.
- Press OK to store changes.
- Place the handset contacts over the base terminals, it can be anyway. Make sure it has been placed firmly to prevent slippery, the LED indicator turn on.
The first charge must be 12 hours.
MAKING CALLS
- Press or key once to get dial tone.
- Use the numeric keys to dial a phone number.
- Speak through the handset or speaker.
- After the conversation, press "to end the call.
ANSWERING CALLS
- When you receive an incoming call, press 📞 or 🏠 (if you have the Automatic Answer option, the phone will answer automatically after lifting the speaker).
- To end the call, press "
REDIAL
- When the handset is idle, use ▼button to display the last ten phone numbers dialed from the handset or ▲to display the received calls.
- Press or to dial the displayed phone number.
OTHER OPERATIONS
STORING INCOMING PHONE NUMBERS INTO PHONEBOOK
If you have Caller ID service, you can store the incoming phone numbers into phonebook.
- Use the ▲buttons to check incoming phone numbers.
- Press OK once you find the number. In the screen you will see: Add to PB?
- Press OK to confirm the option, you must enter the contact's name, press OK. You will have to configure the number and ringtone in the same way.
7. TROUBLESHOOTING
| Trouble Solution | |
| • My phone doesn’t work | • Make sure the power cord is plugged in.• Make sure the telephone line cord is plugged firmly into the corded / cordless phone base and wall jack.• Place the handset on the base when not in use.• Charge the batteries in the wireless handset (included). |
| • I cannot get dial tone | • Try all the suggestions above.• Move the wireless handset closer to the telephone base. You might have moved out of range.• Contact your local telephone company. |
| • I cannot dial out | • Make sure you have a dial tone before dialing.• If the other phones in your home are having the issue, the problem is in your wiring or local service. |
| • The battery does not hold a charge | • Charge the battery in the wireless handset.• You may need to purchase a new battery, |
| • I get noise, static, or weak signal even when I’m near the telephone base. | • Other cordless phones and 802.11 wireless routers that are used for home computer networks both use internal radios to communicate. The radios may interfere with one another. |
| I get noise, static, or weak signal even when I'm near the telephone base. | You can improve the performance of your cordless phone and router by:a) Positioning your new phone as far away as possible from any other existing cordless telephone system.b) Positioning your telephone base as far as possible from your router, computer or other devices.Install your phone as far away from these electronic devices as possible: wireless routers, radios, radio towers, pager towers, cellphones,intercoms,roommonitors, televisions, personal computers, kitchen appliances and other cordless phones. |
| My handset doesn't ring when I recieve call | The ringer must be activated. Refer to the section(s) on ringer selection in this user's manual.Make sure the telephone line cord is plugged firmly into the telephone base and jack.Place the cordless phone near the base.Charge the battery in the wireless handset.Unplug other phone extensions you might have.Move the telephone base to another location, preferably on an upper floor.Contact your local telephone company. |
| My caller ID isn't working | You must subscribe to this service for this feature to work on your phone. |
8. MAINTENANCE
Taking care of your telephone
- Place the handset down gently.
- Save the original packing materials to protect your telephone if you ever need to ship it.
- Avoid water.
- Do not use the handset outdoors in the rain, or handle it with wet hands.
Electrical storms
- Be careful when using electric appliances during storms.
Cleaning your telephone
- Clean it only with a soft cloth slightly dampened with water or a mild soap.
- Do not use excess water or cleaning solvents of any kind.
9. SPECIFICATIONS
Handset
Input: 2.4 V = (2 x AAA)
Base
Input: 6 V =500 mA
-48 V = (phone line)
AC / DC power converter
Input: 100-240 V\~ 50/60 Hz 150 mA
Output: 6 V =500 mA
Consumption: 5 Wh/day
Stand-by power consumption: 16 Wh/day
Product design and specifications are subject to change without notice.
Product: DECT cordless phone
Part number: TEL-625
Brand: Steren
WARRANTY
This Sterenproduct is warranted under normal usage against defectsin workmanship and materials to the original purchaser for one year from the date of purchase.
CONDITIONS
- This warranty card with all therequired information, invoice, productboxor package, and product, must be presented when warranty service is required.
- If the product stills on the warranty time, the company will repair it free of charge.
- The repairing time will not exceed 30 natural days, from the day the claim was received.
- Steren sell parts, components, consumables and accessories to customer, as well as warranty service, at any of the addresses mentioned later.
THIS WARRANTY IS VOID IN THE NEXT CASES:
If the product has been damaged by an accident, act sof God, mishandling, leaky batteries, failure to follow enclosed instructions, improper repair by unauthorized personnel, improper safe keeping, among others.
a) The consumer can also claim the warranty service in the purchase establishment.
b) If you lose the warranty card, we can reissue it, if you show the invoice or purchase ticket.
RETAILER INFORMATION
Name of the retailer
Address
Product
Brand
Part number
Serial number
Date of delivery

In case your product fails or have questions, please contact your nearest dealer. If you are in Mexico, please
give a call to our
Call Center.
01 800 500 9000

STEREN
Help us to improve this instruction manual, call us:

01800 500 9000
Customer Service Center
www.steren.com


- CONTROLES
- Auricular
- DECT CORDLESS PHONE
- TEL-625
- SAFETY INSTRUCTIONS
- INDEX
- ENG
- HIGHLIGHTS
- INSTALLATION OF THE BASE AND HANDSET
- If you are subscriber to a DSL service (optional)
- CONTROLS
- Cordless phone
- Base
- Icon description
- b) CALL LOG
- c) BS SETTINGS
- d) HS SETTINGS
- e) REGISTRATION
- MAKING CALLS
- ANSWERING CALLS
- REDIAL
- OTHER OPERATIONS
- STORING INCOMING PHONE NUMBERS INTO PHONEBOOK
- TROUBLESHOOTING
- MAINTENANCE
- Taking care of your telephone
- Electrical storms
- Cleaning your telephone
- SPECIFICATIONS
- Handset
- AC / DC power converter
- WARRANTY
- CONDITIONS
- THIS WARRANTY IS VOID IN THE NEXT CASES:
- RETAILER INFORMATION
- STEREN
Brand : Steren
Model : TEL-625
Category : Telephone