
5KSM7580XEMS ARTISAN - Stand mixer KITCHENAID - Free user manual and instructions
Find the device manual for free 5KSM7580XEMS ARTISAN KITCHENAID in PDF.
| Brand | KitchenAid |
| Model | 5KSM7580XEMS ARTISAN |
| Product Type | Stand mixer with bowl lift |
| Bowl Capacity | 6.9 liters |
| Bowl Material | Stainless steel |
| Motor Power | 500 watts (peak power 1.3 hp) |
| Power Supply | 220-240 V, 50/60 Hz |
| Number of Speeds | 10 speeds with Soft Start |
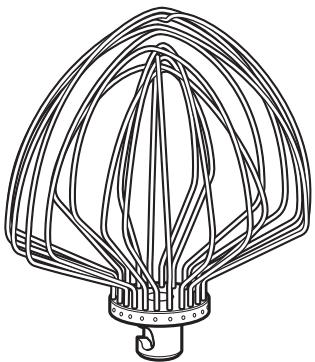
| Included Accessories | Flat beater, spiral dough hook, stainless steel wire whip, pouring shield |
| Bowl Lift Mechanism | Lever lift with lock |
| Mixing Action | Planetary (rotation around the bowl and on its axis) |
| Net Weight | Approximately 12 kg |
| Dimensions (L x W x H) | Approximately 40 x 30 x 40 cm |
| Care and Cleaning | Bowl and accessories dishwasher safe; base cleaned with a damp cloth; do not immerse the mixer |
| Safety | Unplug before cleaning or changing attachments; shutdown in case of overload |
| Warranty | 5 years for this model (domestic use) |
| Maximum Flour Capacity | 2 to 2.2 kg |
| Number of Loaves per Batch | 8 loaves of 450 g |
| Number of Cookies per Batch | 160 pieces |
Frequently Asked Questions - 5KSM7580XEMS ARTISAN KITCHENAID
User questions about 5KSM7580XEMS ARTISAN KITCHENAID
0 question about this device. Answer the ones you know or ask your own.
Ask a new question about this device
Download the instructions for your Stand mixer in PDF format for free! Find your manual 5KSM7580XEMS ARTISAN - KITCHENAID and take your electronic device back in hand. On this page are published all the documents necessary for the use of your device. 5KSM7580XEMS ARTISAN by KITCHENAID.
USER MANUAL 5KSM7580XEMS ARTISAN KITCHENAID
Important Safeguards....3
Electrical Requirements 4
Electrical Waste Disposal 4
PARTS AND FEATURES ....5
SETTING UP YOUR STAND MIXER....6
Assembling your Bowl-Lift Stand Mixer....6
Adjusting your Beater to Bowl Clearance....7
CARE AND CLEANING....9
TIPS FOR GREAT RESULTS
Planetary Mixing Action 10
Mixing Time 10
Mixer Use....10
Mixing Tips....10
Whipping Tips for Egg Whites.... I I
Whipping Tips for Whipped Cream.... I I
Bread Making Tips 12
SERVICE AND WARRANTY
When You Need Service....13
Household KitchenAid™ Bowl-Lift Stand Mixer Warranty 13
Service Centers....14
Customer Service 14
Stand Mixer Safety
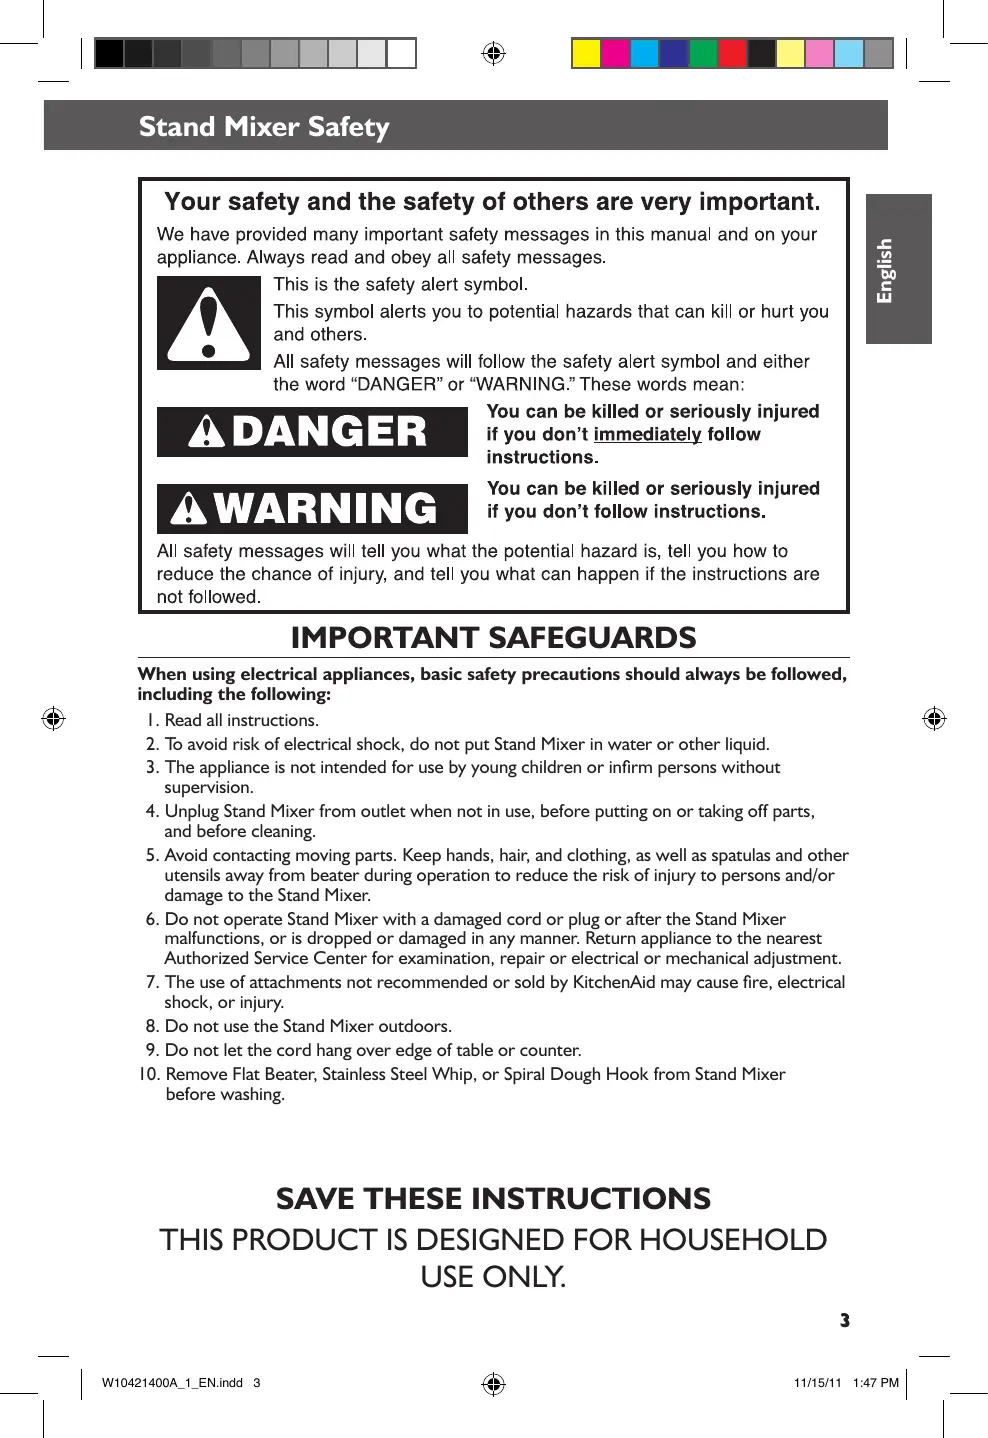
Your safety and the safety of others are very important.
We have provided many important safety messages in this manual and on your appliance. Always read and obey all safety messages.

This is the safety alert symbol.
This symbol alerts you to potential hazards that can kill or hurt you and others.
All safety messages will follow the safety alert symbol and either the word “DANGER” or “WARNING.” These words mean:
! DANGER
You can be killed or seriously injured if you don't immediately follow instructions.
WARNING
You can be killed or seriously injured if you don't follow instructions.
All safety messages will tell you what the potential hazard is, tell you how to reduce the chance of injury, and tell you what can happen if the instructions are not followed.
IMPORTANT SAFEGUARDS
When using electrical appliances, basic safety precautions should always be followed, including the following:
I. Read all instructions.
2. To avoid risk of electrical shock, do not put Stand Mixer in water or other liquid.
3. The appliance is not intended for use by young children or infirm persons without supervision.
4. Unplug Stand Mixer from outlet when not in use, before putting on or taking off parts, and before cleaning.
5. Avoid contacting moving parts. Keep hands, hair, and clothing, as well as spatulas and other utensils away from beater during operation to reduce the risk of injury to persons and/or damage to the Stand Mixer.
6. Do not operate Stand Mixer with a damaged cord or plug or after the Stand Mixer malfunctions, or is dropped or damaged in any manner. Return appliance to the nearest Authorized Service Center for examination, repair or electrical or mechanical adjustment.
7. The use of attachments not recommended or sold by KitchenAid may cause fire, electrical shock, or injury.
8. Do not use the Stand Mixer outdoors.
9. Do not let the cord hang over edge of table or counter.
10. Remove Flat Beater, Stainless Steel Whip, or Spiral Dough Hook from Stand Mixer before washing.
SAVE THESE INSTRUCTIONS
THIS PRODUCT IS DESIGNED FOR HOUSEHOLD USE ONLY.
Stand Mixer Safety
Electrical Requirements
WARNING

Electrical Shock Hazard
Plug into a grounded outlet.
Do not remove ground prong.
Do not use an adapter.
Do not use an extension cord.
Failure to follow these instructions can result in death, fire, or electrical shock.
Volts: 220-240 A.C.
Hertz: 50/60 Hz
NOTE: The power rating for your Stand Mixer is printed on the serial plate, placed under your Stand Mixer.
Do not use an extension cord. If the power supply cord is too short, have a qualified electrician or serviceman install an outlet near the appliance.
The wattage rating is determined by using the attachment that draws the greatest load (power). Other recommended attachments may draw significantly less power.
Electrical Waste Disposal
This appliance is marked according to the European directive 2002/96/EC on Waste Electrical and Electronic Equipment (WEEE).
By ensuring this product is disposed of correctly, you will help avoid potential negative consequences for the environment and human health, which could otherwise be caused by inappropriate waste handling of this product.
The symbol ☒ on the product, or on the documents accompanying the product, indicates that this appliance may not be treated as household waste. Instead it shall be handed over to the applicable collection point for the recycling of electrical and electronic equipment.
Disposal must be carried out in accordance with local environmental regulations for waste disposal.
For more detailed information about treatment, recovery and recycling of this product, please contact your local city office, your household waste disposal service or the shop where you purchased the product.

Parts and Features
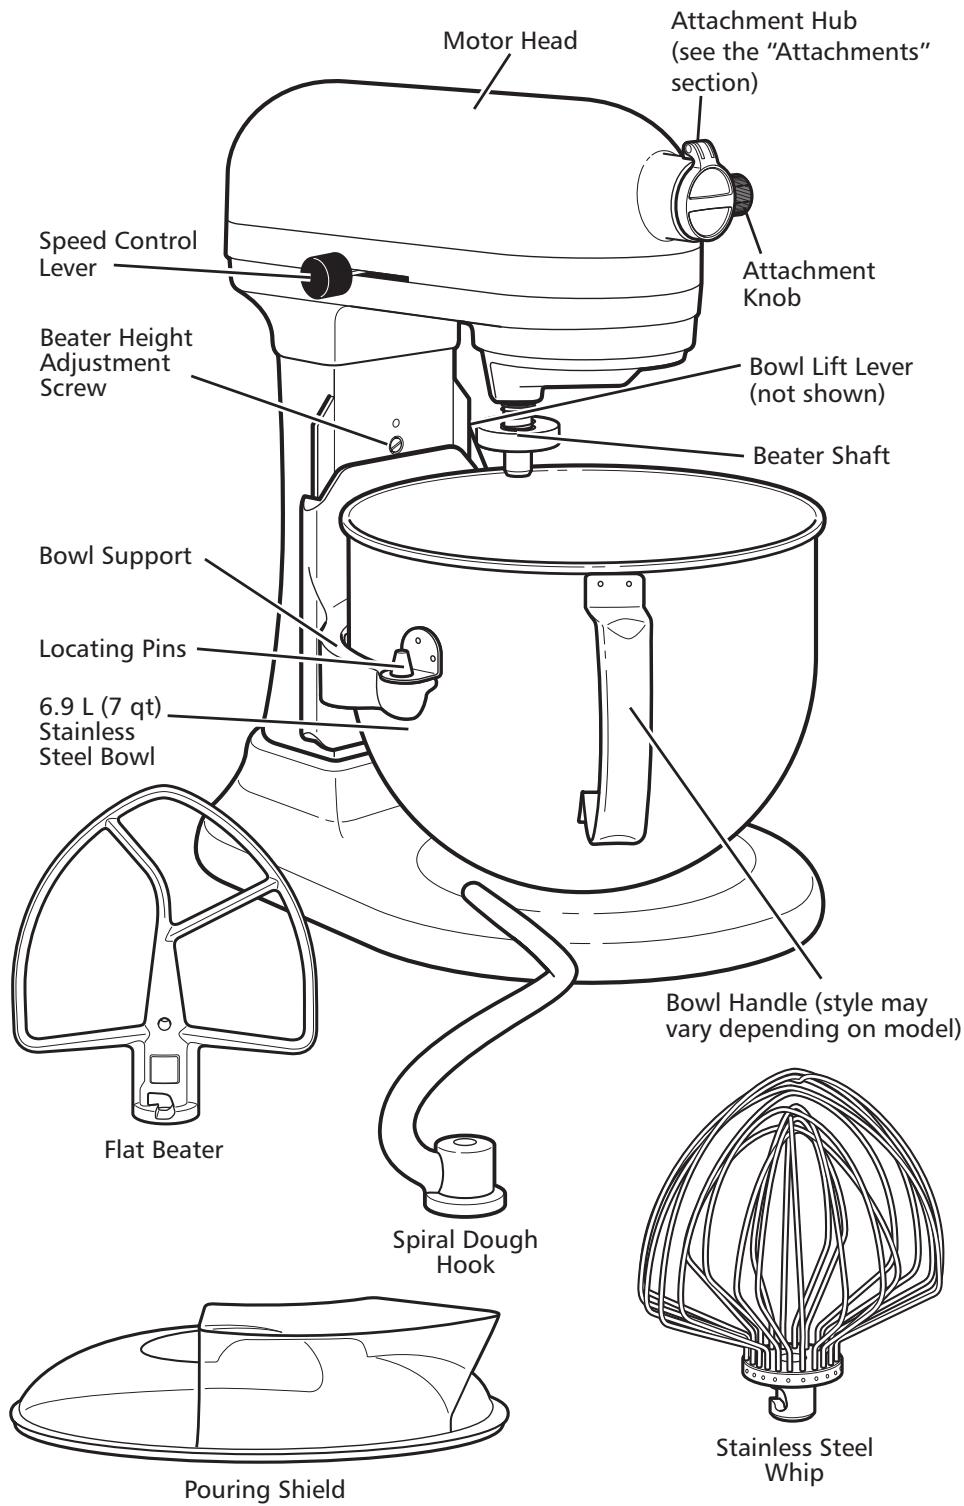
English
Setting up your Stand Mixer
Assembling your Bowl-Lift Stand Mixer
To attach the Stainless Steel Bowl
Turn speed control to "0" (OFF). Unplug Stand Mixer or disconnect power. Place Bowl Lift Lever into down position. Fit Bowl Supports over Locating Pins and press down on back of the bowl until the Bowl Pin snaps into the Spring Latch. (Fig. 1)
IMPORTANT: If the bowl is not securely snapped into place, it will be unstable and wobble during use.
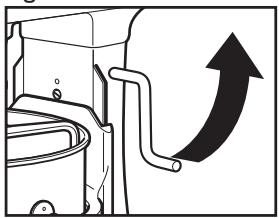
To raise the Stainless Steel Bowl to mixing position
Rotate Bowl Lift Lever counterclockwise to the straight up position. (Fig. 2) The bowl must always be in the raised position when mixing.
To remove the Stainless Steel Bowl
Turn speed control to "0" (OFF). Unplug Stand Mixer or disconnect power: Place Bowl Lift Lever in down position. Grasp Bowl Handle and lift straight up and off Locating Pins.
WARNING
Injury Hazard
Unplug mixer before touching beaters.
Failure to do so can result in broken bones, cuts, or bruises.
Fig. I
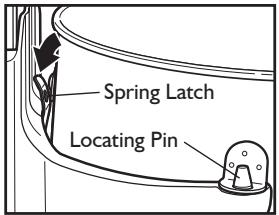
Fig. 2
natural_image
Diagram of a toilet with a curved arrow indicating upward motion (no text or symbols)To attach Flat Beater, Stainless Steel Whip, or Spiral Dough Hook.
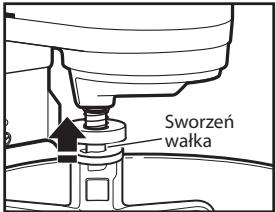
Turn speed control to "0" (OFF). Unplug Stand Mixer or disconnect power. Lower bowl by rotating Bowl Lift Lever downward. Slip beater on Beater Shaft and press upward as far as possible. Turn beater to right, hooking it over the Pin on the Beater Shaft.
(Fig.3)
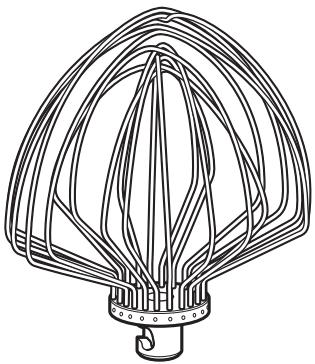
To remove Flat Beater, Stainless Steel Whip or Spiral Dough Hook
Turn speed control to "0" (OFF). Unplug Stand Mixer or disconnect power. Lower bowl by rotating Bowl Lift Lever downward. Press beater upward as far as possible and turn left. Pull beater from Beater Shaft.
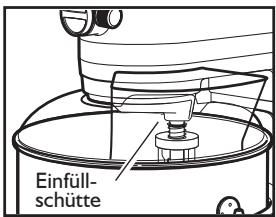
To attach Pouring Shield
Turn speed control to "0" (OFF). Unplug Stand Mixer or disconnect power. Attach Flat Beater, Spiral Dough Hook, or Stainless Steel Whip and bowl. From the front of the mixer, slide the Pouring Shield over the bowl until the it is centered. The bottom rim of the Pouring Shield should fit within the bowl. (Fig. 4)
To use Pouring Shield
For best results, rotate the Pouring Shield so the Motor Head covers the U-shaped gap in the shield. The Pouring Chute will be just to the right of the Attachment Hub as you face the mixer. Pour the ingredients into the bowl through the Pouring Chute.
Fig. 3
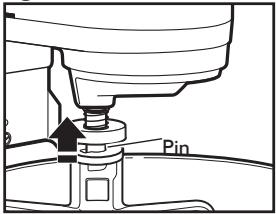
Fig. 4

Setting up your Stand Mixer
Adjusting your Beater to Bowl Clearance
Your Stand Mixer is adjusted at the factory so the Flat Beater just clears the bottom of the bowl. If, for any reason, the Flat Beater hits the bottom of the bowl or is too far away from the bowl, you can correct the clearance easily.
I. Turn speed control to "0" (OFF).
2. Unplug Stand Mixer or disconnect power.
3. Lower the bowl to the down position.
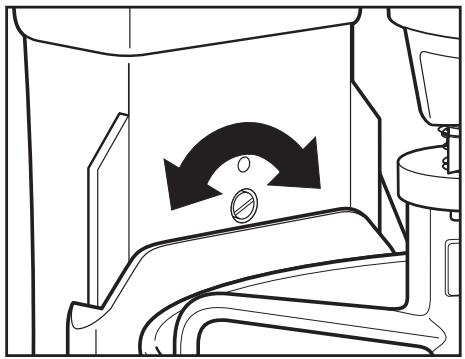
4. Turn Beater Height Adjustment Screw (A) slightly counter clockwise (left) to raise Flat Beater or clockwise (right) to lower Flat Beater.
5. Make adjustment with Flat Beater, so it just clears surface of the bowl. If you over adjust the screw, the Bowl Lift Lever may not lock into place.
NOTE: When properly adjusted, the Flat Beater will not strike on the bottom or side of the bowl. If the Flat Beater or the Stainless Steel Whip is so close that it strikes the bottom of the bowl, coating may wear off the Flat Beater (for coated beaters) or wires on Stainless Steel Whip may wear.
Scraping sides of bowl may be necessary under certain conditions regardless of beater adjustment. The Stand Mixer must be stopped to scrape bowl or damage to mixer may occur.
natural_image
Line drawing of a mechanical device with a rotating arrow and circular component (no text or symbols)Using your Stand Mixer
Speed Control Guide - 10 Speed Stand Mixers
All speeds have the Soft Start feature that automatically starts the Stand Mixer at a lower speed to help avoid ingredient splash-out and “flour puff” at start-up, then quickly increases to the selected speed for optimal performance.

| Speed | Used for | Accessories | Description |
| 1 | Stirring |  | For slow stirring, combining, mashing, starting all mixing procedures. Use to add flour and dry ingredients to batter, and add liquids to dry ingredients. Do not use Speed I to mix or knead yeast doughs. |
| 2 | Slow Mixing, Kneading |  | For slow mixing, mashing, faster stirring. Use to mix and knead yeast doughs, heavy batters, and candies; start mashing potatoes or other vegetables; cut shortening into flour; mix thin or splashy batters. |
| 4 | Mixing, Beating | 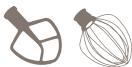 | For mixing semi-heavy batters, such as cookies. Use to combine sugar and shortening and to add sugar to egg whites for meringues. Medium speed for cake mixes. |
| 6 | Beating, Creaming | 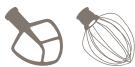 | For medium-fast beating (creaming) or whipping. Use to finish mixing cake, doughnut, and other batters. High speed for cake mixes. |
| 8-10 | Fast Beating, Whipping, Fast Whipping |  | For whipping cream, egg whites, and boiled frostings. For whipping small amounts of cream, egg whites or for final whipping of mashed potatoes. |
NOTE: Use Speed 2 to mix or knead yeast doughs. Use of any other speed creates high potential for Stand Mixer failure. The PowerKnead Spiral Dough Hook efficiently kneads most yeast dough within 4 minutes.
Capacity Chart
| 6.9 L Bowl | |
| Flour | 2 to 2.2 kg |
| Bread | 8 breads of 450 g |
| Cookies / Biscuits | 160 pieces |
| Mashed Potatoes | 3.6 kg |
Attachments
General Information
KitchenAid™ optional Attachments are designed to assure long life. The Attachment Power Shaft and Attachment Hub Socket are of a square design, to eliminate any possibility of slipping during the transmission of power to the attachment. The hub and shaft housings are tapered to assure a snug fit, even after prolonged use and wear. KitchenAid™ Attachments require no extra power unit to operate them; the power unit is built-in.
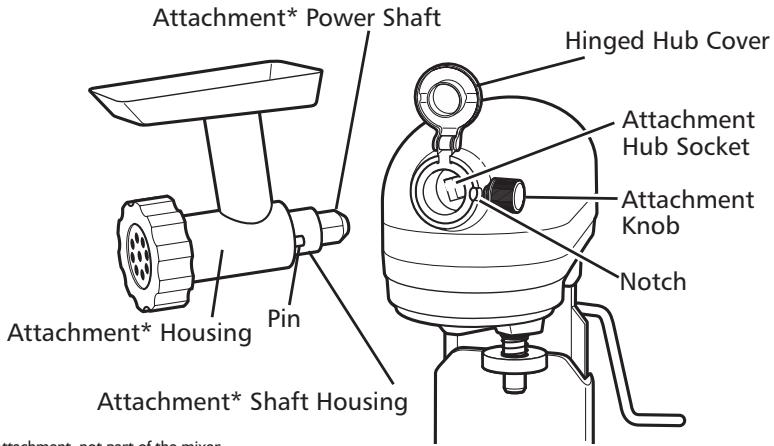
* Optional Attachment, not part of the mixer.
Care and Cleaning
Stainless Steel Bowl, Flat Beater, Stainless Steel Whip, and Spiral Dough Hook may be washed in an automatic dishwasher. Or, clean them thoroughly in hot sudsy water and rinse completely before drying. Do not store beaters on shaft.
WARNING
ELECTRICAL SHOCK HAZARD ALWAYS BE SURE TO UNPLUG MIXER BEFORE CLEANING TO AVOID POSSIBLE ELECTRICAL SHOCK.
Wipe mixer with a damp cloth. DO NOT IMMERSE IN WATER. Wipe off beater shaft frequently, removing any residue that may accumulate.
| Accessories | Coated Metal | Stainless Steel |
 | Silver coated metal beaters and dough hooks are dishwasher-safe. (Available on 5KSM7591 model) | Stainless steel beaters and dough hooks are dishwasher-safe. (Available on 5KSM7580 model) |
 | Not applicable | I I-Wire Stainless Steel Elliptical Whips are dishwasher-safe. (Available on 5KSM7580 and 5KSM7591 models) |
 | Not applicable | All metal bowls are stainless steel and dishwasher-safe. (Available on all Bowl-Lift models) |
Tips for Great Results
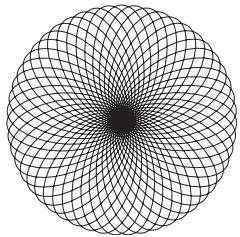
Planetary Mixing Action
During operation, the Flat Beater moves around the stationary bowl, at the same time turning in the opposite direction on its own axis. The diagram shows the complete coverage of the bowl made by the path of the beater.
The 5KSM7580 and 5KSM7591 models are rated 500 Watts and use a Direct Current motor. It is a quiet and highly efficient motor, combined with a direct drive transmission system: this enables to drive 1.3 Horse Power at peak power (output motor power), enabling fast and outstanding mixing result even with heavy dough.
natural_image
Abstract geometric pattern with concentric circles and radial lines (no text or symbols)Mixing Time
Your KitchenAid™ Mixer will mix faster and more thoroughly than most other electric mixers. Therefore, the mixing time in most recipes must be adjusted to avoid overbeating.
To help determine the ideal mixing time, observe the batter or dough and mix only until it has the desired appearance described in your recipe, such as “smooth and creamy.” To select the best mixing speeds, use the “Speed Control Guide” section.
Mixer Use
WARNING
PERSONAL INJURY HAZARD
To avoid personal injury and damage to the beater, do not attempt to scrape bowl while mixer is operating; turn mixer off. Should scraper or other object drop into bowl, turn motor OFF before removing.
The bowl and beater are designed to provide thorough mixing without frequent scraping. Scraping the bowl once or twice during mixing is usually sufficient.
The Stand Mixer may become warm during use. Under heavy loads with extended mixing time periods, you may not be able to comfortably touch the top of the Stand Mixer. This is normal.
Mixing Tips
Adding Ingredients
Always add ingredients as close to side of bowl as possible, not directly into moving beater. The Pouring Shield can be used to simplify adding ingredients. Use Speed I until ingredients have been blended. Then gradually increase to desired speed.
Adding Nuts, Raisins, or Candied Fruits
Follow individual recipes for guidelines on including these ingredients. In general, solid materials should be folded in the last few seconds of mixing on Speed 1. The batter should be thick enough to keep the fruit or nuts from sinking to the bottom of the pan during baking. Sticky fruits should be dusted with flour for better distribution in the batter.
Liquid Mixtures
Mixtures containing large amounts of liquid ingredients should be mixed at lower speeds to avoid splashing. Increase speed only after mixture has thickened.
NOTE: If ingredients in very bottom of bowl are not thoroughly mixed, then the beater is not far enough into the bowl. See the “Setting Up Your Stand Mixer” section.
Tips for Great Results
Whipping Tips for Egg Whites
Place room temperature egg whites in clean, dry bowl. Attach stainless steel bowl and wire whip. To avoid splashing, gradually turn to designated speed and whip to desired stage. See chart below.
AMOUNT
SPEED
I egg white......GRADUALLY to 10
2-4 egg whites ...... GRADUALLY to 8
6 or more egg whites ..... GRADUALLY to 8
Whipping Stages
With your KitchenAid™ Stand Mixer, egg whites whip quickly. So watch to avoid over whipping. This list tells you what to expect.
Frothy
Large, uneven air bubbles.
Begins to Hold Shape
Air bubbles are fine and compact; product is white.
Soft Peak
Tips of peaks fall over when Stainless Steel Whip is removed.
Almost Stiff
Sharp peaks form when Stainless Steel Whip is removed, but whites are actually soft.
Stiff but not Dry
Sharp, stiff peaks form when Stainless Steel Whip is removed. Whites are uniform in colour and glisten.
Stiff and Dry
Sharp, stiff peaks form when Stainless Steel Whip is removed. Whites are speckled and dull in appearance.
Whipping Tips for Whipped Cream
Pour cold whipping cream into chilled bowl. Attach stainless steel bowl and wire whip. To avoid splashing, gradually turn to designated speed and whip to desired stage. See chart below.
AMOUNT
SPEED
50-200 mL......GRADUALLY to 10
More than 200 mL.....GRADUALLY to 8
Whipping Stages
Watch cream closely during whipping. Because your KitchenAid™ Stand Mixer whips so quickly, there are just a few seconds between whipping stages. Look for these characteristics:
Begins to Thicken
Cream is thick and custard-like.
Holds its Shape
Cream forms soft peaks when Stainless Steel Whip is removed. Can be folded into other ingredients when making desserts and sauces.

Stiff
Cream stands in stiff, sharp peaks when Stainless Steel Whip is removed. Use for topping on cakes or desserts, or filling for cream puffs.
Tips for Great Results
Bread Making Tips
Making bread with a mixer is quite different from making bread by hand. Therefore, it will take some practice before you are completely comfortable with the new process. For your convenience, we offer these tips to help you become accustomed to bread-making the KitchenAid™ brand way.
- ALWAYS use the PowerKnead Spiral Dough Hook to mix and knead yeast doughs.
- Use Speed 2 to mix or knead yeast dough. Use of any other speed with heavy doughs may cause mixer to stop rotating to limit mixer damage. This is normal operation. If this occurs, turn the Speed Control Lever to off, and then turn back on to a lower speed.
- Use a candy or other kitchen thermometer to assure that liquids are at temperature specified in the recipe. Liquids at higher temperature can kill yeast, while liquids at lower temperatures will retard yeast growth.
-
Warm all ingredients to room temperature to ensure proper rising of dough. If yeast is to be dissolved in bowl, always warm bowl first by rinsing with warm water to avoid cooling of liquids.
-
Allow bread to rise in a warm place, 26°C to 29°C, free from draft, unless otherwise specified in recipe.
- Recipe rising times may vary due to temperature and humidity in your kitchen. Dough has doubled in bulk when indentation remains after tips of fingers are pressed lightly and quickly into dough.
- Most bread recipes give a range for the amount of flour to be used. Enough flour has been added when the dough starts to clean sides of bowl. If dough is sticky or humidity is high, slowly add more flour, about 60g (1/2 cup) at a time but do not exceed recommended flour capacity. Knead after each addition until flour is completely worked into dough. If too much flour is added, a dry loaf will result.
- When done, yeast breads and rolls should be deep golden brown in colour. other tests for doneness of breads are: Bread pulls away from the sides of pan, and tapping on the top of the loaf produces a hollow sound. Turn loaves and rolls onto racks immediately after baking to avoid sogginess.
Service and Warranty
When You Need Service
! WARNING

Electrical Shock Hazard Unplug before servicing.
Failure to do so can result in death or electrical shock.
Please read the following before calling your service center.
I. The Stand Mixer may warm up during use. Under heavy loads with extended mixing time periods, you may not be able to comfortably touch the top of the unit. This is normal.
- The Stand Mixer may emit a pungent odor, especially when new. This is common with electric motors.
- If the Flat Beater hits the Bowl, stop the Stand Mixer. See the "Setting Up Your Stand Mixer" section.
If your Stand Mixer should malfunction or fail to operate, please check the following:
- Is the Stand Mixer plugged in?
- Is the fuse in the circuit to the Stand Mixer in working order? If you have a circuit breaker box, be sure the circuit is closed.
- Turn off the Stand Mixer for 10-15 seconds, the turn it back on. If the mixer still does not start, allow it to cool for 30 minutes before turning it back on.
- If the problem is not due to one of the above items, see the “Service Centers” section.
Household KitchenAid™ Bowl-Lift Stand Mixer Warranty
| Length of Warranty: | KitchenAid Will Pay For: | KitchenAid Will Not Pay For: |
| Europe, Australia and New Zealand:For the ArtisanTM Mixer5KSM7580:Five years Full Warranty from date of purchase.For the Heavy Duty Mixer5KSM7591:One Year Full Warranty from date of purchase. | The replacement parts and repair labor costs to correct defects in materials or workmanship. Service must be provided by an Authorized KitchenAid Service Center. | A. Repairs when Stand Mixer is used for operations other than normal household food preparation.B. Damage resulting from accident, alterations, misuse, abuse, or installation/operation not in accordance with local electrical codes. |
KITCHENAID DOES NOT ASSUME ANY RESPONSIBILITY FOR INDIRECT DAMAGES.
Service and Warranty
Service Centers
All service should be handled locally by an Authorized KitchenAid Service Center. Contact the dealer from whom the unit was purchased to obtain the name of the nearest Authorized KitchenAid Service Center.
In the U.K.:
Call: 0845 6011 287
In Ireland:
M.X. ELECTRIC
Service Department
25 Alymer Crescent
Kilcock, Co. KILDARE
Call: 87 2581574
Fax: 1 628 4368
In Australia:
Call: 1800 990 990
In New Zealand:
Call: 0800 881 200
Customer Service
In U.K. & Ireland:
Tollfree number 0800 988 1266
(Calls from mobile phones are charged standard network rate)
Address:
KitchenAid Europa, Inc.
PO BOX 19
B-2018 ANTWERP II
BELGIUM
For Southern Ireland:
Tollfree number +44 (0) 20 8616 5148
www.KitchenAid.co.uk
www.KitchenAid.eu

® Registered Trademark of KitchenAid, U.S.A.
^TM Trademark of KitchenAid, U.S.A.
The shape of the Stand Mixer is a trademark of KitchenAid, U.S.A.
© 2011. All rights reserved.
Specifications subject to change without notice.
W10421400A
11/11
14
KitchenAid™
6.9 L BOWL-LIFT STAND MIXER
Instructions
AUFBAU IHRER KÜCHENMASCHINE....20
natural_image
Diagram of a toilet with a curved arrow indicating upward motion (no text or symbols)Abb. 3
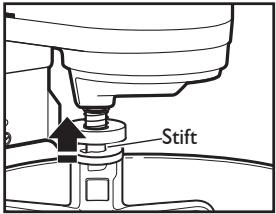
Abb. 4
natural_image
Diagram of a mechanical device with a rotating arrow indicating rotational motion (no text or symbols)natural_image
Abstract geometric pattern with concentric circular lines forming a radial symmetry (no text or symbols)KitchenAid Service & Support, Großhandel
natural_image
Diagram of a toilet with a curved arrow indicating upward motion (no text or symbols)
AVERTISSEMENT
Risque de blessures
natural_image
Diagram of a mechanical device with a rotating arrow and circular component, no text or symbols presentnatural_image
Abstract geometric pattern with concentric circles and radial lines (no text or symbols)natural_image
Diagram of a toilet with a curved arrow indicating upward motion (no text or symbols)! AVVERTENZA
Pericolo di lesioni
natural_image
Diagram of a mechanical device with directional arrows indicating motion or movement (no text or symbols)natural_image
Abstract geometric pattern with concentric circular lines forming a radial symmetry (no text or symbols)natural_image
Diagram of a toilet with a curved arrow indicating upward motion (no text or symbols)natural_image
Diagram of a mechanical device with a rotating arrow and circular component, no text or symbols presentnatural_image
Abstract geometric pattern with concentric circles and radial lines (no text or symbols)natural_image
Diagram of a toilet with a curved arrow indicating upward motion (no text or symbols)ADVERTENCIA
natural_image
Diagram of a mechanical device with a rotating arrow and circular component, no text or symbols presentnatural_image
Abstract geometric pattern with concentric circles and radial lines (no text or symbols)ASSISTÊNCIA E GARANTIA
natural_image
Diagram of a toilet with an arrow indicating upward motion (no text or symbols)natural_image
Diagram of a mechanical device with directional arrows indicating motion or movement (no text or symbols)natural_image
Abstract geometric pattern with concentric circular lines forming a radial symmetry (no text or symbols)natural_image
Diagram of a toilet with a curved arrow indicating upward motion (no text or symbols)⚠️ ΠΡΟΣΟΧΗ
natural_image
Diagram of a mechanical device with directional arrows indicating motion or flow (no text or symbols)natural_image
Abstract geometric pattern with concentric circular lines forming a radial symmetry (no text or symbols)natural_image
Diagram of a toilet with a curved arrow indicating upward motion (no text or symbols)! WARNING
natural_image
Diagram of a mechanical device with a rotating arrow and circular component, no text or symbols presentnatural_image
Abstract geometric pattern with concentric circles and radial lines (no text or symbols)natural_image
Diagram of a toilet with a curved arrow indicating upward motion (no text or symbols)natural_image
Diagram of a mechanical device with a rotating arrow and circular component, no text or symbols presentnatural_image
Abstract geometric pattern with concentric circles and radial lines (no text or symbols)john@servicecompaniet.no
Kundeservice
Norsk Importør:
HOWARD AS:
Hansteensgate 12
0253 OSLO
Tel: 23 08 41 30
www.KitchenAid.no
www.KitchenAid.eu

natural_image
Diagram of a toilet with a curved arrow indicating upward motion (no text or symbols)!VAROITUS
Loukkaantumisriski
Irrota pistoke pistorasiasta ennen kuin kosketat vatkaimia.
natural_image
Diagram of a mechanical device with directional arrows indicating motion or rotation (no text or symbols)Yleiskoneen käyttö
natural_image
Abstract geometric pattern with concentric circles and radial lines (no text or symbols)Model 5KSM7580 Model 5KSM7591


Indhold
K∅KKENMASKINENS SIKKERHED
natural_image
Diagram of a toilet with a curved arrow indicating upward motion (no text or symbols)natural_image
Diagram of a mechanical device with a rotating arrow and circular component, no text or symbols presentnatural_image
Abstract geometric pattern with concentric circles and radial lines (no text or symbols)natural_image
Diagram of a toilet with a curved arrow indicating upward motion (no text or symbols)natural_image
Diagram of a mechanical device with a rotating arrow and circular component, no text or symbols presentnatural_image
Abstract geometric pattern with concentric circles and radial lines (no text or symbols)natural_image
Line drawing of a curved, dome-shaped object with internal cutouts (no text or symbols)Защитный обод
natural_image
Line drawing of a mechanical component with symmetrical blades and a central hub (no text or symbols)natural_image
Diagram of a toilet with a curved arrow indicating upward motion (no text or symbols)natural_image
Diagram of a mechanical device with directional arrows indicating motion or rotation (no text or symbols)natural_image
Abstract geometric pattern with concentric circular lines forming a radial symmetry (no text or symbols)natural_image
Line drawing of a dome-shaped object with internal cutouts, labeled 'Osłona z podajnikiem' below (no other text or symbols)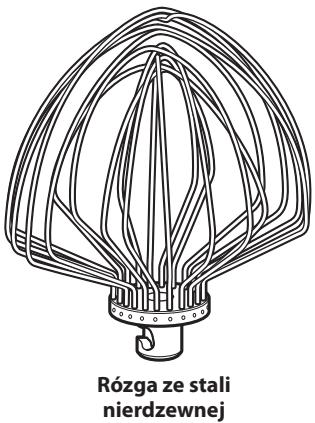
natural_image
Line drawing of a mechanical component with no text or symbolsPolisk!
natural_image
Diagram of a toilet with a curved arrow indicating upward motion (no text or symbols)Rys. 3
natural_image
Diagram of a mechanical device with a rotating arrow and circular component, no text or symbols presentUżytkowanie miksera
natural_image
Abstract geometric pattern with concentric circles and radial lines (no text or symbols)TYTO POKYNY SI USCHOVEJTE
TENTO VÝROBEK JE URČEN POUZE PRO DOMÁCÍ POUŽITÍ.
natural_image
Line drawing of a curved, dome-shaped object with internal cutouts (no text or symbols)Nalévací štít
natural_image
Line drawing of a knitted or wire mesh structure resembling a coiled spring or turbine blade (no text or symbols)natural_image
Diagram of a toilet with a curved arrow indicating upward motion (no text or symbols)⚠ UPOZORNĚNÍ
Riziko zranění
natural_image
Diagram of a mechanical device with a rotating arrow and circular component, no text or symbols presentnatural_image
Abstract geometric pattern with concentric circles and radial lines (no text or symbols)Luboš Vymazal – MAGNUM
Brněnská 37
682 01 Vyškov
Česká republika
tel.: +420 517 346 256
fax: +420 517 330 415
www.kitchenaid.cz
POTTEN & PANNEN - STANĚK group
Obchodní 110
251 01 Čestlice
Česká republika
tel: +420 261 227 373
fax:+420 261 227 372
www.pottenpannen.cz
Zákaznický servis
Luboš Vymazal – MAGNUM
Brněnská 37
682 01 Vyškov
Česká republika
tel.: +420 517 346 256
fax: +420 517 330 415
www.kitchenaid.cz
POTTEN & PANNEN - STANĚK group
Obchodní 110
251 01 Čestlice
Česká republika
tel:+420 261 227 373
fax:+420 261 227 372
www.pottenpannen.cz


www.pottenpannen.cz
www.kitchenaid.cz

DÔLEŽITÉ BEZPEČNOSTNÉ POKYNY
TIETO POKYNY SI USCHOVAJTE
TENTO VÝROBOK JE URČENÝ IBA PRE DOMÁCE POUŽITIE.
natural_image
Line drawing of a curved, dome-shaped object with internal cutouts (no text or symbols)Nalievací kryt

natural_image
Line drawing of a mechanical component with multiple blades and a central hub (no text or symbols)Nerezová šlahacia metla
natural_image
Diagram of a toilet with a curved arrow indicating upward motion (no text or symbols)⚠ UPOZORNENIE
Riziko zranenia
natural_image
Diagram of a mechanical device with a rotating arrow and circular component, no text or symbols presentnatural_image
Abstract geometric pattern with concentric circles and radial lines (no text or symbols)50-200 ml....POSTUPNE AŽ NA 10
Viac než 200 ml......POSTUPNE AŽ NA 8
Fáza šlahania
Luboš Vymazal – MAGNUM
Brněnská 37
682 01 Vyškov
Česká republika
tel.: +420 517 346 256
mob: +420 724 767 114
fax: +420 517 330 415
www.kitchenaid.cz
POTTEN & PANNEN - STANĚK group
Obchodní 110
251 01 Čestlice
Česká republika
tel: +420 261 227 373
fax:+420 261 227 372
www.pottenpannen.cz
Zákaznícky servis
Luboš Vymazal – MAGNUM
Brněnská 37
682 01 Vyškov
Česká republika
tel.: +420 517 346 256
mob: +420 724 767 114
fax: +420 517 330 415
www.kitchenaid.cz
POTTEN & PANNEN - STANĚK group
Obchodní 110
251 01 Čestlice
Česká republika
tel: +420 261 227 373
fax:+420 261 227 372
www.pottenpannen.cz


www.pottenpannen.cz
www.kitchenaid.cz

natural_image
Diagram of a toilet with an arrow indicating upward motion (no text or symbols present)! AVERTISMENT
Pericol de accidentare
natural_image
Diagram of a mechanical device with a rotating arrow and circular component, no text or symbols presentnatural_image
Abstract geometric pattern with concentric circles and radial lines (no text or symbols)natural_image
Diagram of a toilet with a curved arrow indicating upward motion (no text or symbols)
ПРЕДУПРЕЖДЕНИЕ
natural_image
Diagram of a mechanical device with directional arrows indicating motion or movement (no text or symbols)natural_image
Abstract geometric pattern with concentric circles and radial lines (no text or symbols)natural_image
Blank gray image with no visible content, text, or symbols


W10421400A
11/11
- TIPS FOR GREAT RESULTS
- SERVICE AND WARRANTY
- Stand Mixer Safety
- Your safety and the safety of others are very important.
- ! DANGER
- WARNING
- IMPORTANT SAFEGUARDS
- SAVE THESE INSTRUCTIONS
- THIS PRODUCT IS DESIGNED FOR HOUSEHOLD USE ONLY.
- Electrical Requirements
- Electrical Waste Disposal
- Parts and Features
- Setting up your Stand Mixer
- Assembling your Bowl-Lift Stand Mixer
- To attach the Stainless Steel Bowl
- To raise the Stainless Steel Bowl to mixing position
- To remove the Stainless Steel Bowl
- To attach Flat Beater, Stainless Steel Whip, or Spiral Dough Hook.
- To remove Flat Beater, Stainless Steel Whip or Spiral Dough Hook
- To attach Pouring Shield
- To use Pouring Shield
- Adjusting your Beater to Bowl Clearance
- Using your Stand Mixer
- Speed Control Guide - 10 Speed Stand Mixers
- Attachments
- General Information
- Care and Cleaning
- Planetary Mixing Action
- Mixing Time
- Mixer Use
- PERSONAL INJURY HAZARD
- Mixing Tips
- Adding Ingredients
- Adding Nuts, Raisins, or Candied Fruits
- Liquid Mixtures
- Whipping Tips for Egg Whites
- AMOUNT
- SPEED
- Whipping Stages
- Frothy
- Begins to Hold Shape
- Soft Peak
- Almost Stiff
- Stiff but not Dry
- Stiff and Dry
- Whipping Tips for Whipped Cream
- Begins to Thicken
- Holds its Shape
- Stiff
- Bread Making Tips
- When You Need Service
- Please read the following before calling your service center.
- If your Stand Mixer should malfunction or fail to operate, please check the following:
- Household KitchenAid™ Bowl-Lift Stand Mixer Warranty
- Service Centers
- Customer Service
- KitchenAid™
- AUFBAU IHRER KÜCHENMASCHINE....20
- AVERTISSEMENT
- ! AVVERTENZA
- ADVERTENCIA
- ASSISTÊNCIA E GARANTIA
- ⚠️ ΠΡΟΣΟΧΗ
- ! WARNING
- Kundeservice
- HOWARD AS:
- !VAROITUS
- Yleiskoneen käyttö
- Indhold
- K∅KKENMASKINENS SIKKERHED
- Użytkowanie miksera
- TYTO POKYNY SI USCHOVEJTE
- TENTO VÝROBEK JE URČEN POUZE PRO DOMÁCÍ POUŽITÍ.
- ⚠ UPOZORNĚNÍ
- Luboš Vymazal – MAGNUM
- POTTEN & PANNEN - STANĚK group
- Zákaznický servis
- DÔLEŽITÉ BEZPEČNOSTNÉ POKYNY
- TIETO POKYNY SI USCHOVAJTE
- TENTO VÝROBOK JE URČENÝ IBA PRE DOMÁCE POUŽITIE.
- ⚠ UPOZORNENIE
- Fáza šlahania
- Zákaznícky servis
- ! AVERTISMENT
- ПРЕДУПРЕЖДЕНИЕ
Brand : KITCHENAID
Model : 5KSM7580XEMS ARTISAN
Category : Stand mixer