
ER2405K - Beard trimmer PANASONIC - Free user manual and instructions
Find the device manual for free ER2405K PANASONIC in PDF.


| Product Type | Beard Trimmer |
| Brand | Panasonic |
| Model | ER2405K |
| Dimensions (approx.) | 15.0 x 3.0 x 3.0 cm |
| Weight (approx.) | 200 g |
| Power Source | Rechargeable Lithium-Ion Battery |
| Charging Time | Approximately 8 hours |
| Usage Time | Approximately 40 minutes |
| Cutting Length Settings | Adjustable from 1 mm to 10 mm |
| Blade Type | Stainless Steel |
| Waterproof | Washable under running water (detachable blade) |
| Included Accessories | 3 comb attachments (3 mm, 6 mm, 9 mm), cleaning brush, oil |
| Maintenance | Clean after each use, oil blade regularly |
| Safety Features | Blade guard, safety lock off switch |
| Spare Parts Availability | Replacement blade (model: ER9...) |
| Reparability | User-replaceable blade |
| Country of Manufacture | Japan |
| Warranty | 2 years |
| Manual Languages | EN, KO, TH, ZH |
| Manual Format | PDF (28 pages) |
Frequently Asked Questions - ER2405K PANASONIC
User questions about ER2405K PANASONIC
0 question about this device. Answer the ones you know or ask your own.
Ask a new question about this device
Download the instructions for your Beard trimmer in PDF format for free! Find your manual ER2405K - PANASONIC and take your electronic device back in hand. On this page are published all the documents necessary for the use of your device. ER2405K by PANASONIC.
USER MANUAL ER2405K PANASONIC
Operating Instructions
使用說明書
사용 설명서
คู่มือการใช้งาน
Body Hair & Beard Trimmer
體毛 / 鬍子 修剪器
체모/슈염 트리때
Before operating this unit, please read these instructions completely.
操作此產品前,請先讀畢此守則。
natural_image
Two black hairbrushes with different tip sizes, one showing a serrated blade and the other a flat blade (no text or symbols visible)Safety Instructions
To ensure proper operation of the appliance, please carefully read all information contained in these Safety Instructions.
All information in this section is provided to instruct you in the correct and safe operation of this appliance so that you can avoid injuries to yourself and others as well as damage to property.
Safety warnings, cautions and precaution symbols are distinguished as follows ALWAYS FOLLOW THESE IMPORTANT SAFETY PRECAUTIONS!
WARNING:
This message indicates potentially hazardous actions and situations, which, if not avoided, could result in death or serious injury.
CAUTION:
This message indicates potentially hazardous actions and situations, which, if not avoided, could result in personal injury or property damage.
Safety Precautions Symbols
A circle and slash symbolizes prohibited actions and behaviors.
● A solid circle denotes mandatory actions and instructions to be followed for safe operation.
After reading these safety instructions, ensure they are kept in a place allowing easy viewing at all times by the appliance user.
WARNING
Mandatory!
● Always ensure the appliance is operated on an electric power source matched to its rated voltage.
Failure to do so could result in fire or electric shock.
Unplug!
- Be sure to remove the plug from the electrical outlet before maintenance. Failure to remove the plug could result in electric shock.
Mandatory!
- Clean the plug regularly to prevent dust getting on it. Failure to do this will cause dust to get on the plug and could result in insulation failure and fire due to moisture etc.
Do not use with wet hands!
● Never insert the plug into or remove it from the electrical outlet with wet hands.
It could result in electric shock.
Avoid water contact!
● Never wet the charger, splash water on it or wash it with water. It could result in electric shock or shorting.
Do not dismantle!
- Do not alter the appliance. Also, do not disassemble or repair it. It could result in fire, electric shock or injury. Contact the shop where you purchased the appliance or your nearest servicenter for repairs.
Do not use in the wet room!
●Never use the charger in the bath or shower room. It could result in electric shock, fire or shorting.
Prohibited!
- Do not use when the cord or plug is damaged or the plug is loose when it is inserted into the electrical outlet. It could result in electric shock, shorting or fire.
- Do not scratch, damage, bend more than necessary, pull, twist or make any modifications to the cord. Also, do not place heavy objects on the cord or wind the cord around such objects. It could result in electric shock or fire.
- Do not charge other appliances with the dedicated charger. Also, do not charge this appliance with a charger other than the dedicated charger. It could result in fire due to shorting or overheating.
CAUTION!
Mandatory!
- Be sure to lubricate the blades before using them. Not doing this may cause the appliance to pull your hairs or damage your skin.
- Check that the blades are not damaged before using them. Not doing this may damage your skin.
●Hold the plug when removing it from the electrical outlet. Do not hold the cord.
Holding the cord to remove the plug may cause electric shock or shorting.
- Remo ve the plug from the electrical outlet except when using the appliance. Not doing this may cause electric shock, leakage or fire due to insulation deterioration and injury or burns.
Prohibited!
- Do not press the blades with excessive force against the soft parts of your skin such as your lips, chin and around the nape of your neck. It may damage your skin.
- Do not use the appliance except for its intended use to cut beards, moustaches, sideburns and downy hair. It may damage your skin.
- Do not place metal objects such as coins or clips on top of the charger. The charger may become hot and burn you.
Important
▶ Cautions for charging
- Do not use any charger other than this charger (RE9-24).
- Dry the appliance completely before charging it.
- We strongly recommend that you do not charge the appliance at temperatures below 0^ or above 40^ , or where it will be exposed to direct sunlight or other heat sources.
- We strongly recommend that you do not continue charging for more than 48 hours as it may damage the battery.
- The appliance may become warm during operation and charging. This is normal.
▶ Cautions for charger
- We strongly recommend that you do not attempt to use any charger other than the included one which is specifically designed for this model. Use only the included charger.
- Keep the charger away from water and handle it only with dry hands.
- Store the charger in a dry area where it is protected from damage.
▶ Cautions for use and storage
- Turn off the appliance before changing the trimming length or removing the comb attachment.
- Keep out of reach of children.
- We strongly recommend that you do not tamper with the moving parts.
- We strongly recommend that you do not use the appliance on animals.
- We strongly recommend that you do not disassemble the appliance. Take it to a qualified serviceperson when service or repair is required.
- We strongly recommend that you do not store the appliance in a place exposed to direct sunlight or near a heater or other source of heat.
- This appliance is not intended for use by persons (including children) with reduced physical, sensory or mental capabilities, or lack of experience and knowledge, unless they have been given supervision or instruction concerning use of the appliance by a person responsible for their safety. Children should be supervised to ensure that they do not play with the appliance.
▶ Cautions for cleaning
- We strongly recommend that you do not take the housing apart as this can affect the watertight construction of the appliance.
- Wash the appliance in tap water. We strongly recommend that you do not use salt water or boiling water. Also, we strongly recommend that you do not use cleaning products that are designed for toilets, bathrooms or kitchen appliances. We strongly recommend that you do not submerge the appliance in tap water for a long time.
- Clean the housing only with a soft cloth slightly dampened with tap water or soapy tap water. We strongly recommend that you do not use a caustic cleaner such as benzine or bleach.
Specifications
Power source: See the name plate on the product. (Automatic voltage conversion)
Motor voltage: 1.2 V DC
Charging time: 8 hours
This product is intended for household use only.
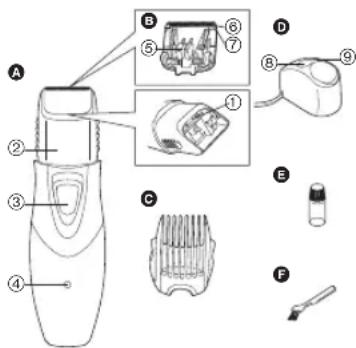
Parts identification
A Main body
① Mounting hook
② Trimming length indicator
③ Switch
④ Charge indicator lamp
B Blade block
⑤ Cleaning lever
⑥ Moving blade
⑦ Stationary blade
C Comb attachment
D Charger (RE9-24)
(Convenient induction
Charging Base)
⑧ Oil stand
⑨ Cleaning brush stand
E Oil
F Cleaning brush
Store
Storing and charging the trimmer
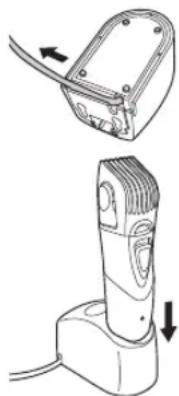
Place the trimmer on the charger when storing or charging it. You can fully charge the trimmer in 8 hours if it is losing speed. The oil and the cleaning brush also can be placed on their stands.
- Pass the power cord through one of the cord guides on the right or left.
natural_image
Technical illustration of a device with two views: top shows a cable inserted into a housing, bottom shows a mounted device with arrows indicating direction (no text or symbols)-
Plug the power cord into a household outlet and place the charger on a flat surface.
-
Turn off the trimmer and insert it in the charger as illustrated.
-
The charge indicator lamp lights and stays on until the trimmer is removed from the charger.
- A full charge supplies enough power for approximately 10 trims (5 minutes per trim for a normal beard).
- Charge the trimmer for at least 16 hours when charging it for the first time or when it has not been used for more than 6 months.
- If the shape of the plug does not fit the power outlet, use an attachment plug adaptor of the proper configuration.
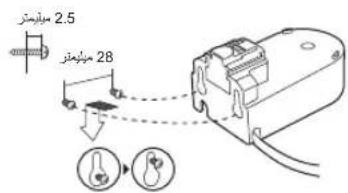
▶ Fixing the charger to the wall
- Attach two screws to the wall as illustrated. Screws are sold separately.
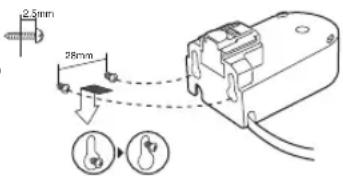
- Hook the charger onto these screws.
- Plug the power cord into a household outlet.
Use
Using the trimmer
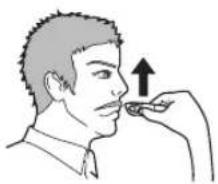
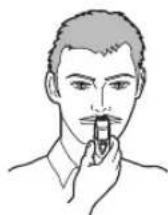
▶ Trimming your moustache
- Apply a few drops of the oil to the blades.
- Grasp the sides of the comb attachment and move it to the desired trimming length (between 3 mm and 15 mm).
| Indicator Trimming length | |
| 3 | 3 mm |
| 6 | 6 mm |
| 9 | 9 mm |
| 12 12 | mm |
| 15 15 | mm |
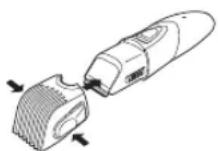
-
Slide the switch on the main body upwards to turn on the trimmer.
-
Move the trimmer upwards with the switch on the main body facing downwards as illustrated.
natural_image
Line drawing of a person applying a nasal swab with an upward arrow (no text or symbols)▶ Shaping your moustache
- Remove the comb attachment and turn on the trimmer.
- Trim around your moustache.
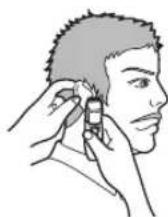
▶ Shaping your sideburns
- Remove the comb attachment and turn on the trimmer.
- Place the trimmer at a right angle to your skin and cut your sideburns.
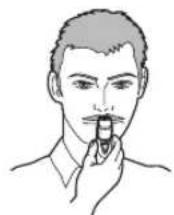
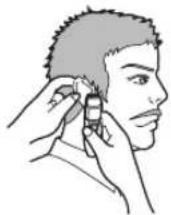
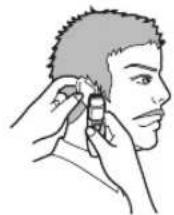
▶ Trimming your body hair
You can also trim your body hair.
After using the trimmer
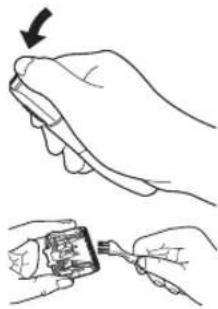
▶ Using the cleaning brush
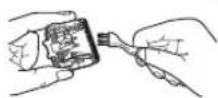
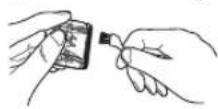
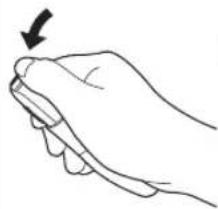
- Hold the main body, place your thumb against the blades and then push them away from the main body.
- Brush off any hair trimmings from the main body and from around the blade.
- Brush any hair trimmings out from between the stationary blade and the moving blade while pressing down the cleaning lever to raise the moving blade.
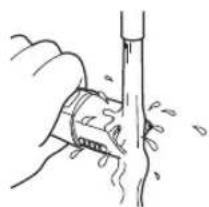
▶ Washing with water
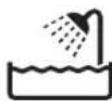
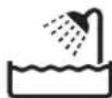
The following is the symbol for a wet trimmer. The symbol means the hand-held part may be used in a bath or shower.
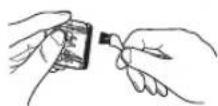
- Remove the blade.
- Rinse off any hair trimmings that are sticking to the blade with running water.
- Rinse off any hair trimmings that are sticking to the blade with running water.
natural_image
Illustration showing a hand holding a small electronic device with a pencil inserted, and another hand inserting a package into it (no text or symbols present)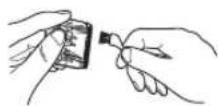
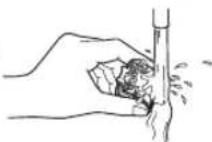
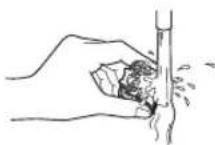
- Rinse out any hair trimmings that are inside the trimmer with running water.
natural_image
Illustration of a hand using a tool to lift a cylindrical object (no text or symbols visible)- Gently shake the trimmer 4 or 5 times and then wipe off any water drops from the trimmer and the blade.
- Place the trimmer on a towel with the switch on the main body facing downwards to let it dry fully.
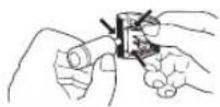
Lubrication
Lubricate the blades before using them or after cleaning them.
- Apply a few drops of the oil to the points indicated by the arrows.
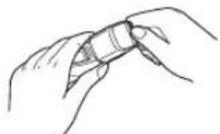
Remounting the blade
- Fit the mounting hook into the blade mounting on the trimmer and then push in until it clicks.
▶ Blade life
Blade life varies according to the frequency and length of use of the trimmer.
For example, the blade life is approximately 3 years when using the trimmer for 5 minutes 10 times a month. Replace the blades if cutting efficiency reduces substantially despite proper maintenance.
▶ Battery life
Battery life varies according to the frequency and length of use of the appliance. For example, the battery life is approximately 3 years when the battery is charged 3 times a month.
We strongly recommend that you do not leave the trimmer for more than 6 months without charging it. The charge drains from the battery and the battery life may be shortened.
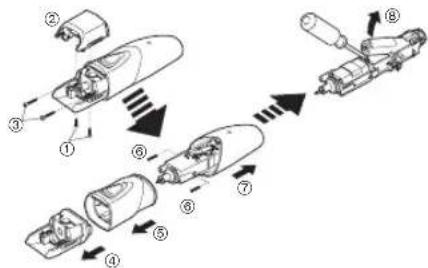
Removing the built-in rechargeable battery
Remove the battery as illustrated.
- Discharge the battery completely before removing it.
- Be careful not to short the + and - terminals of the battery after removing it.
For environmental protection and recycling of materials
This trimmer contains Nickel-Metal Hydride battery. Please make sure that the battery is disposed of at an officially assigned location, if there is one in your country.
重要事項
▶ 充電注意事項

儲存修剪器、為修剪器充電
natural_image
Line drawing of a handheld electronic device with a cable and arrow indicator (no text or symbols)▶ 將充電器固定於牆壁上
natural_image
Line drawing of a hand gripping a piece of paper with a downward arrow indicating compression (no text or symbols)- 掃除主機體和刀片上修剪下來的毛髮。
natural_image
Illustration of a hand using a tool to lift a vertical pipe (no text or symbols visible)
트리머 보관 및 충전
트리머 보관 및 충전
natural_image
Line drawing of a handheld electronic device with a base and cable, showing no text or symbols.▶벽에 충전기 장착
natural_image
Line drawing of a person applying oral care to their mouth, with an upward arrow indicating the point of care (no text or symbols present)▶ cure수염 모양 다듬기
natural_image
Line drawing of a hand gripping a finger with a black arrow indicating force direction (no text or symbols)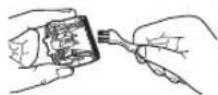
natural_image
Illustration of a hand using a tool to lift a cylindrical object (no text or symbols visible)환경 보호 및 자원 재활용
จดเทีย
natural_image
Line drawing of a handheld electronic device with a button and cable (no text or symbols)natural_image
Illustration of a person applying a nasal swab with an upward arrow (no text or symbols)▶ การตกแต่งหนวด
natural_image
Line drawing of a hand gripping a piece of paper with a downward arrow indicating motion (no text or symbols)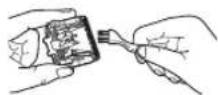
natural_image
Illustration of a hand holding a tool with liquid, no text or symbols presentnatural_image
Illustration of two hands holding a small electronic device with a cable, no text or symbols presentnatural_image
Illustration of a hand using a tool to lift or lift a vertical pipe (no text or symbols)natural_image
Line drawing of a hand gripping a piece of paper with a black arrow pointing downward (no text or symbols)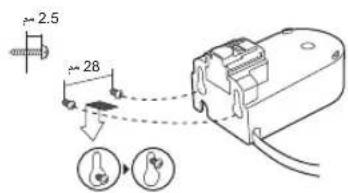
الجسم الرئيسي A
①خطاف التركيب
natural_image
Illustration of two hands holding a small electronic device with a cable, no text or symbols present2
3
□□□□□□□□□ □
natural_image
Illustration of a hand using a tool to lift or lift water, creating splashes (no text or symbols)5 4 14 5 14
□□□□□□□□□□□□ ▼
1 2
□□□□□□□□□□□□
12
□□□□□□□□□□□□□□□□
The image contains a series of identical rectangular shapes, each containing a single square and a vertical line. There is no text or mathematical content to extract. Therefore, the correct OCR output is an empty string.
□□□□□□□□□□□□□□□□□□□□
1
natural_image
Line drawing of a hand gripping a piece of paper with a black arrow pointing to the left side (no text or symbols)
natural_image
Line drawing of a handheld electronic device with a base and cable, showing no text or symbols.بدنه اصلی Ⓐ
① قلاب نصب
② نشانگر طول اصلاح
③
④ چراغ نشانگر شارز
مجموعه تيغه ها Ⓑ
⑤ اهرم تميز كنده
⑥ تَيْغَه مِتْحَرِك
⑦ تيغه ثابت
وسيله الحاقى شانه ©
(RE9-24) شارژر Ⓓ
natural_image
Black handheld device with a central lens and control buttons (no visible text or symbols)Printed in Japan
ER971024056J Y0707-51014
- Safety Instructions
- Important
- ▶ Cautions for charging
- ▶ Cautions for charger
- ▶ Cautions for use and storage
- ▶ Cautions for cleaning
- Specifications
- Parts identification
- A Main body
- B Blade block
- C Comb attachment
- D Charger (RE9-24)
- E Oil
- F Cleaning brush
- Store
- Storing and charging the trimmer
- Use
- Using the trimmer
- After using the trimmer
- Lubrication
- Remounting the blade
- ▶ Blade life
- ▶ Battery life
- Removing the built-in rechargeable battery
- For environmental protection and recycling of materials
- 重要事項
- ▶ 充電注意事項
- 儲存修剪器、為修剪器充電
- ▶ 將充電器固定於牆壁上
- 트리머 보관 및 충전
- ▶벽에 충전기 장착
- 환경 보호 및 자원 재활용
- จดเทีย
Brand : PANASONIC
Model : ER2405K
Category : Beard trimmer