
OptiPlex 170L - Desktop computer DELL - Free user manual and instructions
Find the device manual for free OptiPlex 170L DELL in PDF.


| Product Type | Desktop Computer |
| Brand | Dell |
| Model | OptiPlex 170L |
| Form Factor | Mini-Tower |
| Dimensions (H x W x D) | 14.5 x 6.5 x 16.5 inches |
| Weight | Approximately 25 lbs (11.3 kg) |
| Processor | Intel Pentium 4 or Celeron, up to 2.8 GHz |
| Memory (RAM) | Up to 2 GB DDR SDRAM (typically 256 MB or 512 MB) |
| Storage | 40 GB or 80 GB ATA/100 Hard Drive |
| Optical Drive | CD-ROM or DVD-ROM Drive |
| Operating System | Windows XP Professional or Home Edition |
| Power Supply | 250 W |
| Network | 10/100 Ethernet |
| USB Ports | 4 x USB 2.0 |
| Video Output | Integrated or AGP slot for graphics card |
| Expansion Slots | 2 PCI, 1 AGP |
| Cleaning Instructions | Use a soft, dry cloth to clean the exterior. Do not use liquid cleaners. |
| Safety Precautions | Unplug the system before cleaning or servicing. Ensure proper ventilation. |
| Spare Parts Availability | Available through Dell or third-party vendors (memory, drives, power supply). |
| Repairability | Easy to upgrade RAM, hard drive, and optical drive. No soldering required. |
Frequently Asked Questions - OptiPlex 170L DELL
User questions about OptiPlex 170L DELL
0 question about this device. Answer the ones you know or ask your own.
Ask a new question about this device
Download the instructions for your Desktop computer in PDF format for free! Find your manual OptiPlex 170L - DELL and take your electronic device back in hand. On this page are published all the documents necessary for the use of your device. OptiPlex 170L by DELL.
USER MANUAL OptiPlex 170L DELL
Dell™ OptiPlex™ 170L
Quick Reference Guide
Models MTC2 and DHS
Notes, Notices, and Cautions

NOTE: A NOTE indicates important information that helps you make better use of your computer.

NOTICE: A NOTICE indicates either potential damage to hardware or loss of data and tells you how to avoid the problem.

CAUTION: A CAUTION indicates a potential for property damage, personal injury, or death.
If you purchased a Dell ^™ n Series computer, any references in this document to Microsoft ^® Windows ^® operating systems are not applicable.
The Drivers and Utilities CD (ResourceCD), operating system media, and Quick Reference Guides are optional and may not ship with all computers.
Information in this document is subject to change without notice.
© 2004 Dell Inc. All rights reserved.
Reproduction in any manner whatsoever without the written permission of Dell Inc. is strictly forbidden.
Trademarks used in this text: Dell, the DELL logo, and OptiPlex are trademarks of Dell Inc.; Microsoft and Windows are registered trademarks of Microsoft Corporation.
Other trademarks and trade names may be used in this document to refer to either the entities claiming the marks and names or their products. Dell Inc. disclaims any proprietary interest in trademarks and trade names other than its own.
Models MTC2 and DHS
September 2004 P/N C7558 Rev. A00
Contents
Finding Information for Your Computer 5
About Your Small Desktop Computer 8
Front and Back Views 8
Inside Your Computer 9
Attaching and Removing the Computer Stand. 10
About Your Mini-Tower Computer 11
Front and Back Views 11
Inside Your Computer 12
Setting Up Your Computer 13
Small Desktop Computer 14
Mini-tower Computer 15
Completed Setup 16
Small Desktop Computer 16
Mini-Tower Computer 16
Solving Problems 17
Dell Diagnostics. 17
System Lights. 19
Diagnostic Lights 20
Beep Codes. 22
Running the Dell™ IDE Hard Drive Diagnostics 23
Resolving Software and Hardware Incompatibilities 24
Using Microsoft® Windows® XP System Restore . . . . . . . . . . . 25
Reinstalling Microsoft ^® Windows ^® XP 26
Using the Drivers and Utilities CD 29
Index 31
Finding Information for Your Computer
What Are You Looking For? Find It Here
• A diagnostic program for my computer
- Drivers for my computer
• My computer documentation
• My device documentation
- Desktop System Software (DSS)
Drivers and Utilities CD (also known as the ResourceCD)
Documentation and drivers are already installed on your computer. You can use the CD to reinstall drivers, run the Dell Diagnostics, or access your documentation.
Readme files may be included on your CD to provide last-minute updates about technical changes to your computer or advanced technical-reference material for technicians or experienced users.
NOTE: The latest drivers and documentation updates can be found at support.dell.com.
NOTE: The Drivers and Utilities CD is optional and may not ship with all computers.
- OS updates and patches
- Warranty information
- Safety instructions
• Regulatory information
- Ergonomics information
• End User License Agreement
• How to remove and replace parts
- Technical specifications
• How to configure system settings
• How to troubleshoot and solve problems
Desktop System Software
Located on the Drivers and Utilities CD and the Dell Support website at support.dell.com.
Product Information Guide
Dell™ OptiPlex™ User's Guide
Microsoft ^® Windows ^® XP Help and Support Center
1 Click the Start button and click Help and Support.
2 Click User's and system guides and click User's guides.
The User's Guide is also available on the Drivers and Utilities CD.
What Are You Looking For? Find It Here
| Service Tag and Express Service CodeMicrosoft Windows License Label | Service Tag and Microsoft Windows LicenseThese labels are located on your computer.Use the Service Tag to identify your computer when you use support.dell.com or contact technical support.Enter the Express Service Code to direct your call when contacting technical support. The Express Service Code is not available in all countries. | 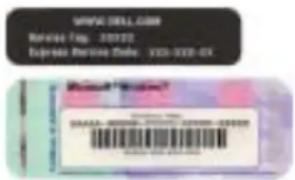 |
| Latest drivers for my computerAnswers to technical service and support questionsOnline discussions with other users and technical supportDocumentation for my computer | Dell Support Website — support.dell.comNOTE: Select your region to view the appropriate support site.The Dell Support website provides several online tools, including:Solutions — Troubleshooting hints and tips, articles from technicians, and online coursesCommunity — Online discussion with other Dell customersUpgrades — Upgrade information for components, such as memory, the hard drive, and the operating systemCustomer Care — Contact information, order status, warranty, and repair informationDownloads — Drivers, patches, and software updatesReference — Computer documentation, product specifications, and white papers | |
| Service call status and support historyTop technical issues for my computerFrequently asked questionsFile downloadsDetails on my computer configurationService contract for my computer | Dell Premier Support Website — premiersupport.dell.comThe Dell Premier Support website is customized for corporate, government, and education customers. This website may not be available in all regions. | |
| What Are You Looking For? Find It Here | |
| How to use Windows XPDocumentation for my computerDocumentation for devices (such as a modem) | Windows Help and Support Center1 Click the Start button and click Help and Support.2 Type a word or phrase that describes your problem and click the arrow icon.3 Click the topic that describes your problem.4 Follow the instructions on the screen. |
| How to reinstall my operating system | Operating System CDThe operating system is already installed on your computer. To reinstall your operating system, use the Operating System CD. See your OptiPlex User's Guide for instructions. After you reinstall your operating system, use the Drivers and Utilities CDto reinstall drivers for the devices that came with your computer.Your operating system product key label is located on your computer.NOTE: The color of your CD varies based on the operating system you ordered.NOTE: The operating system media are optional and may not ship with all computers. After you reinstall your operating system, use the Drivers and Utilities CDto reinstall drivers for the devices that came with your computer.Your operating system product key label is located on your computer.NOTE: The color of your CD varies based on the operating system you ordered.NOTE: The operating system media are optional and may not ship with all computers. |
| Regulatory Model Information and Chassis Type | DIIS—Small desktop chassisMT'C2—Mini-tower chassis |
About Your Small Desktop Computer
Front and Back Views
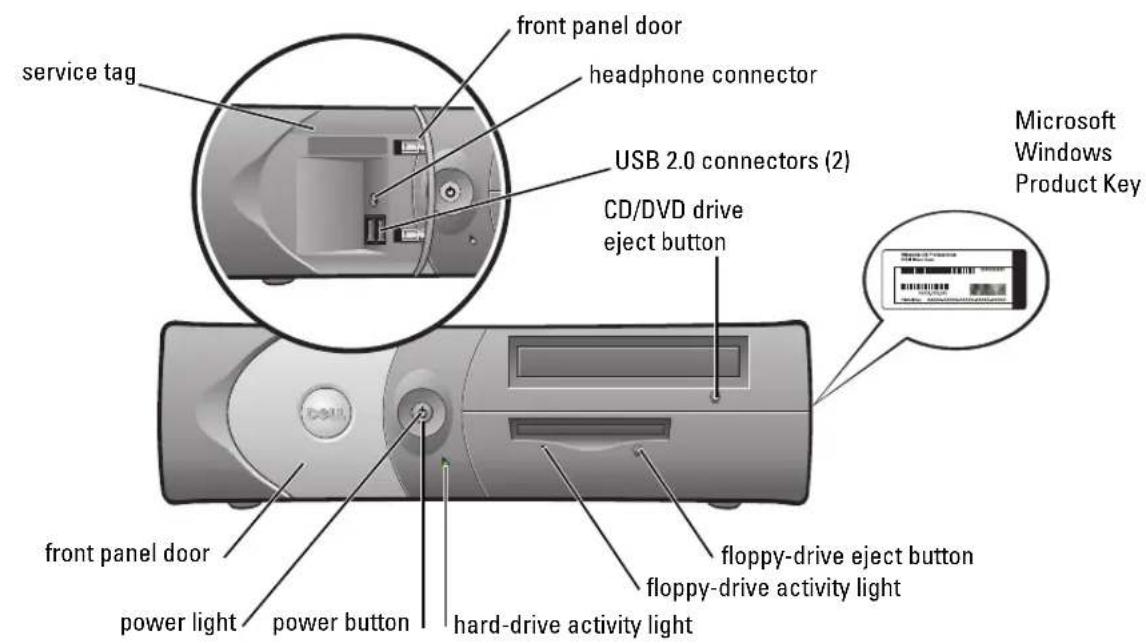
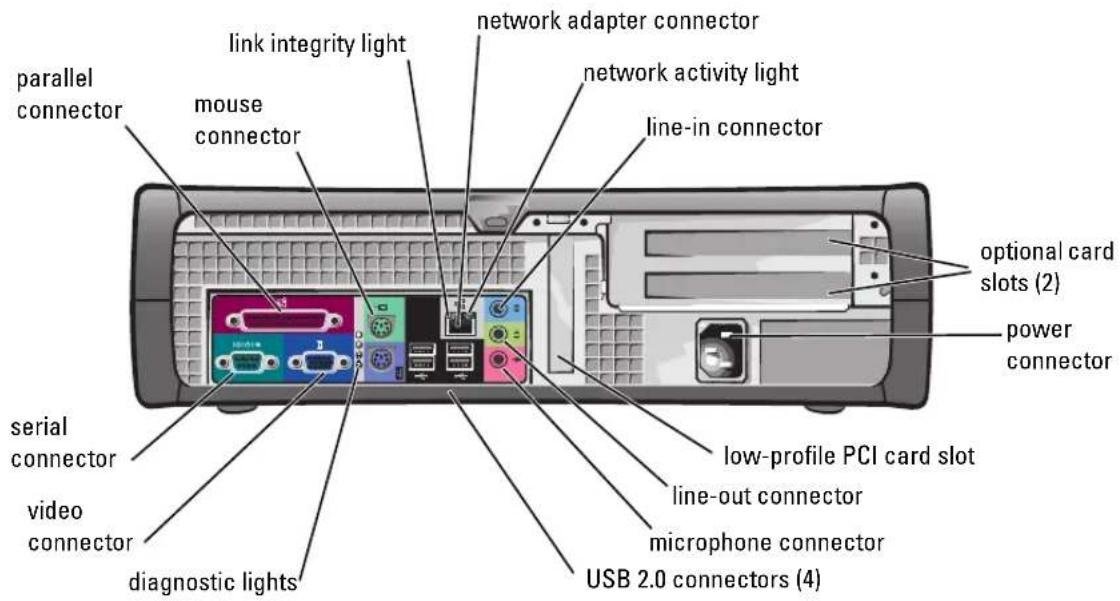
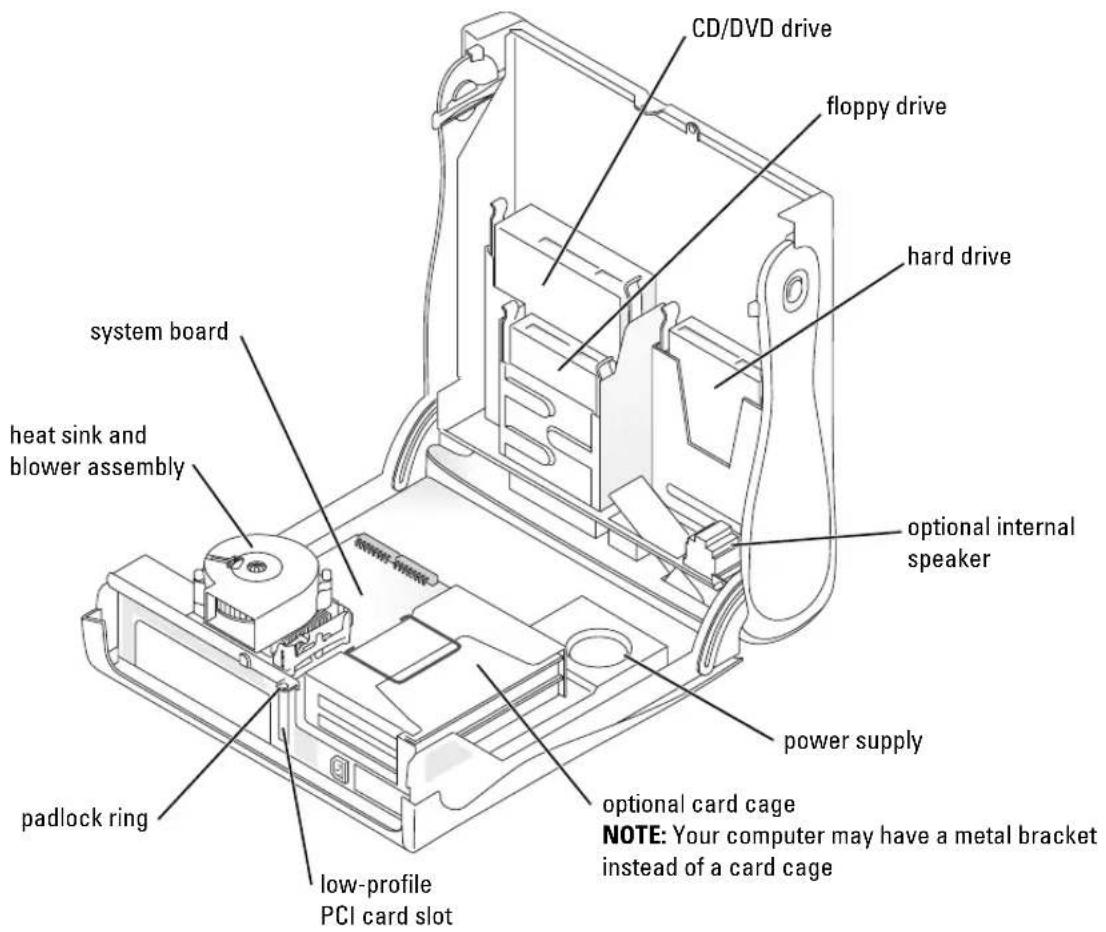
Inside Your Computer

CAUTION: Before you begin any of the procedures in this section, follow the safety instructions in the Product Information Guide.

CAUTION: To avoid electrical shock, always unplug your computer from the electrical outlet before opening the cover.

NOTICE: Be careful when opening the computer cover to ensure that you do not accidentally disconnect cables from the system board.
Attaching and Removing the Computer Stand

CAUTION: Before you begin any of the procedures in this section, follow the safety instructions in the Product Information Guide.

NOTE: Place your computer on a soft surface to prevent scratching the top cover.
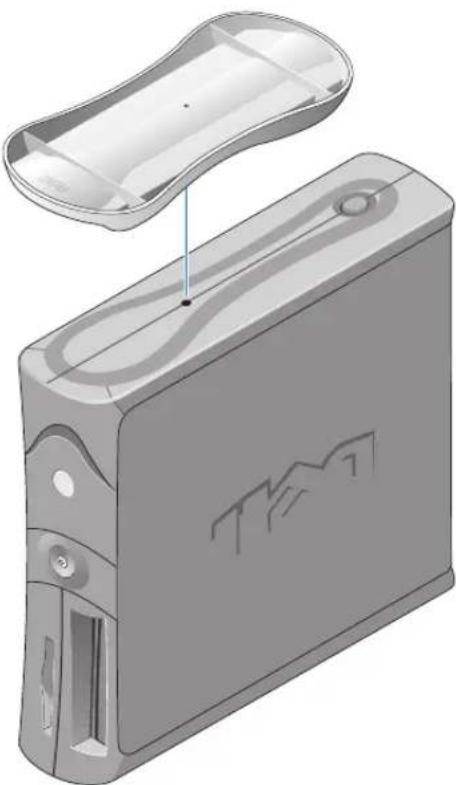
Your computer can be used in either a vertical or horizontal position.
To use the computer in a vertical position, you must attach the computer stand:
1 Place the computer on its right side so that the drive bays are at the bottom and fit the stand onto what was the left side of the computer:
a Position the stand as shown in the following figure by aligning the large round hole in the stand with the securing button on the side of the cover.
b Align the captive screw in the stand with the screw hole in the cover, and tighten the thumbscrew.
2 Rotate the computer so that the stand is at the bottom and the drives are at the top.
natural_image
3D rendering of a mechanical device with a curved top component and internal structure (no text or symbols visible)About Your Mini-Tower Computer
Front and Back Views
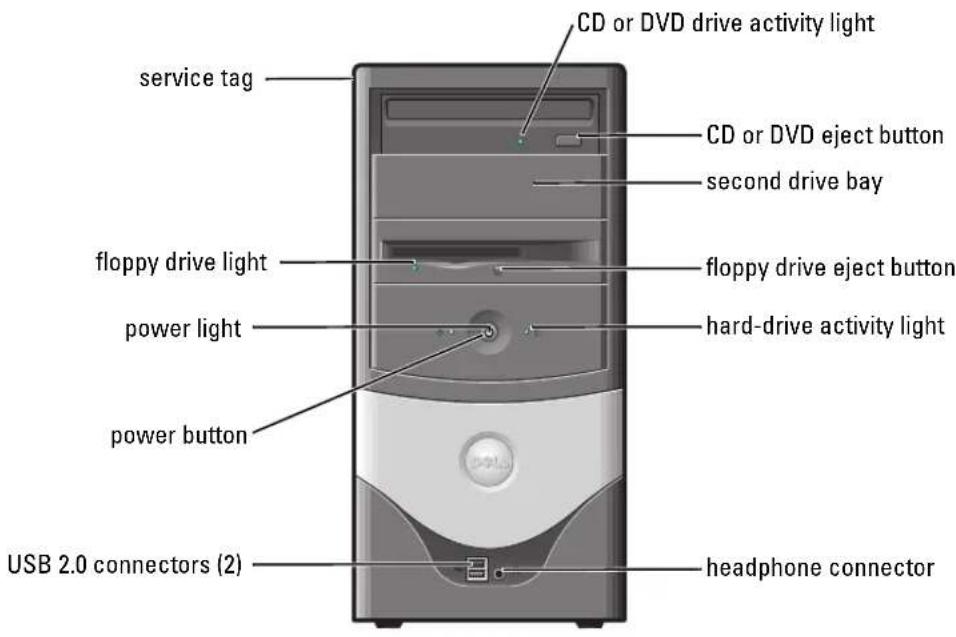
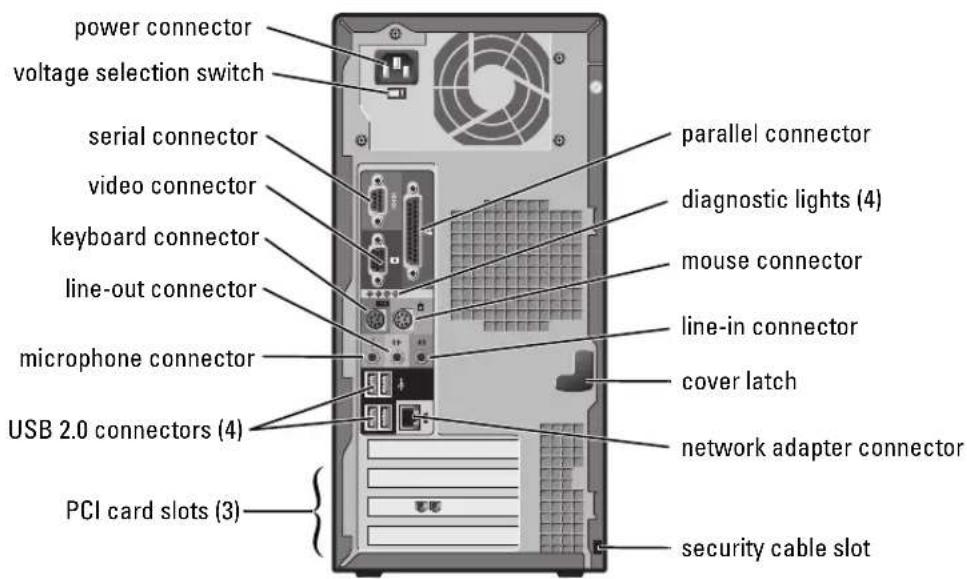
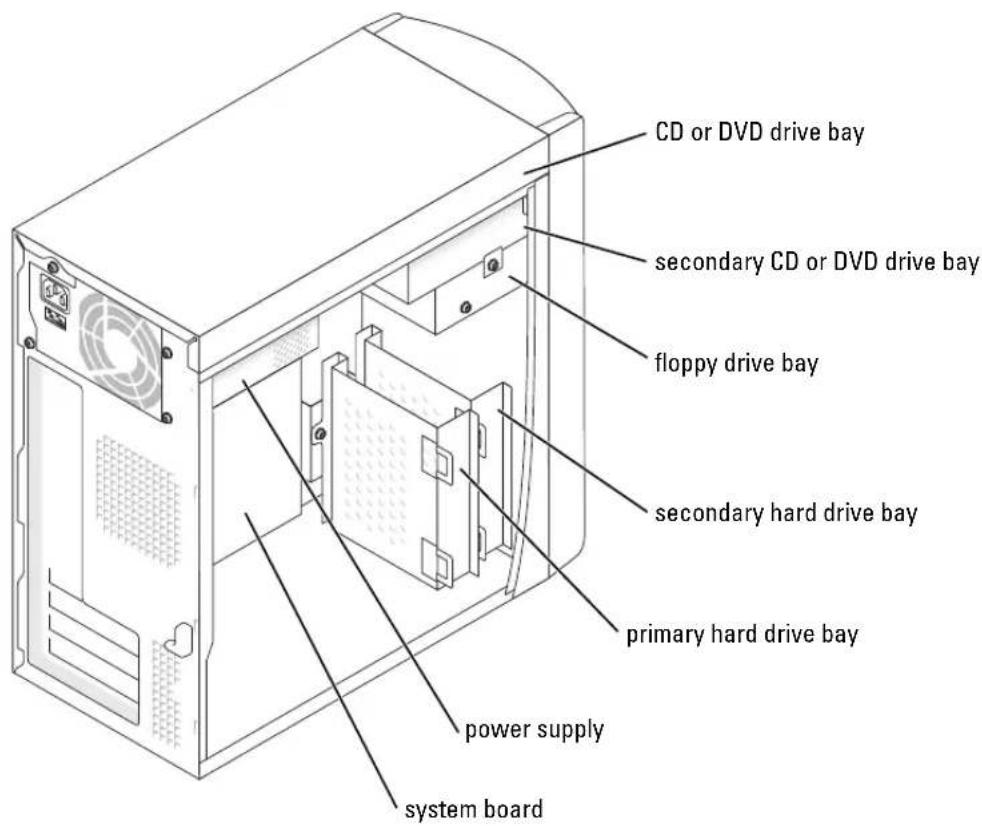
Inside Your Computer
CAUTION: Before you begin any of the procedures in this section, follow the safety instructions in the Product Information Guide.
CAUTION: To avoid electrical shock, always unplug your computer from the electrical outlet before opening the cover.
NOTICE: Be careful when opening the computer cover to ensure that you do not accidentally disconnect cables from the system board.
Setting Up Your Computer

CAUTION: Before performing any of the procedures in this section, follow the safety instructions in the Product Information Guide.

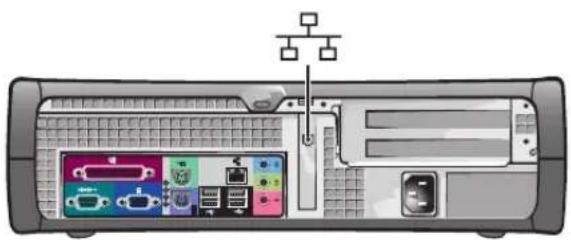
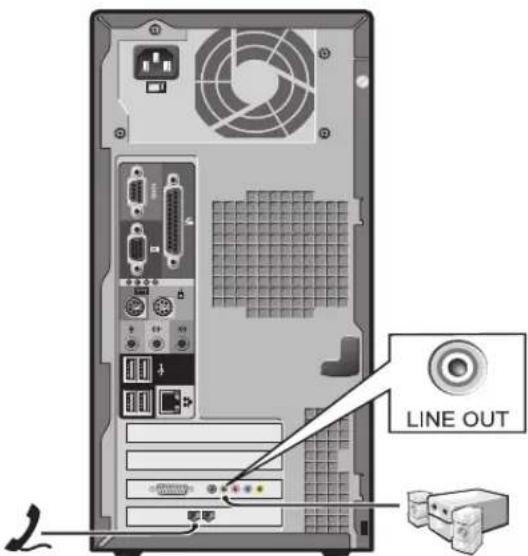
NOTICE: If your computer has an expansion card installed (such as a modem card), connect the appropriate cable to the card, not to the connector on the back panel.
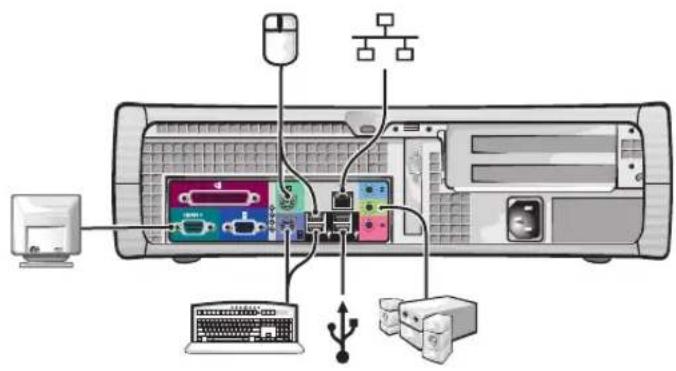
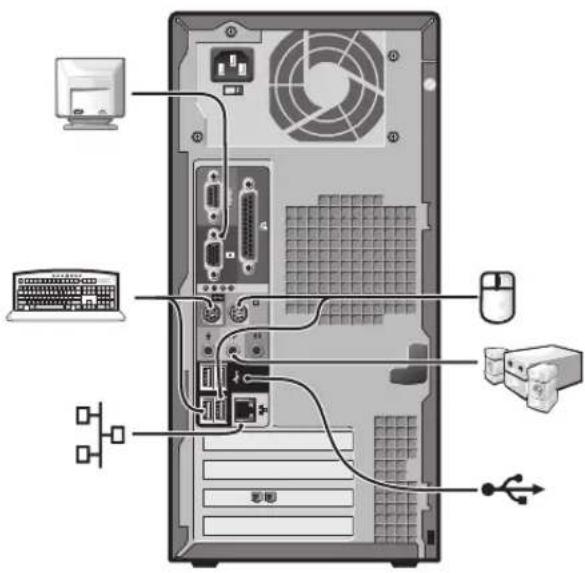
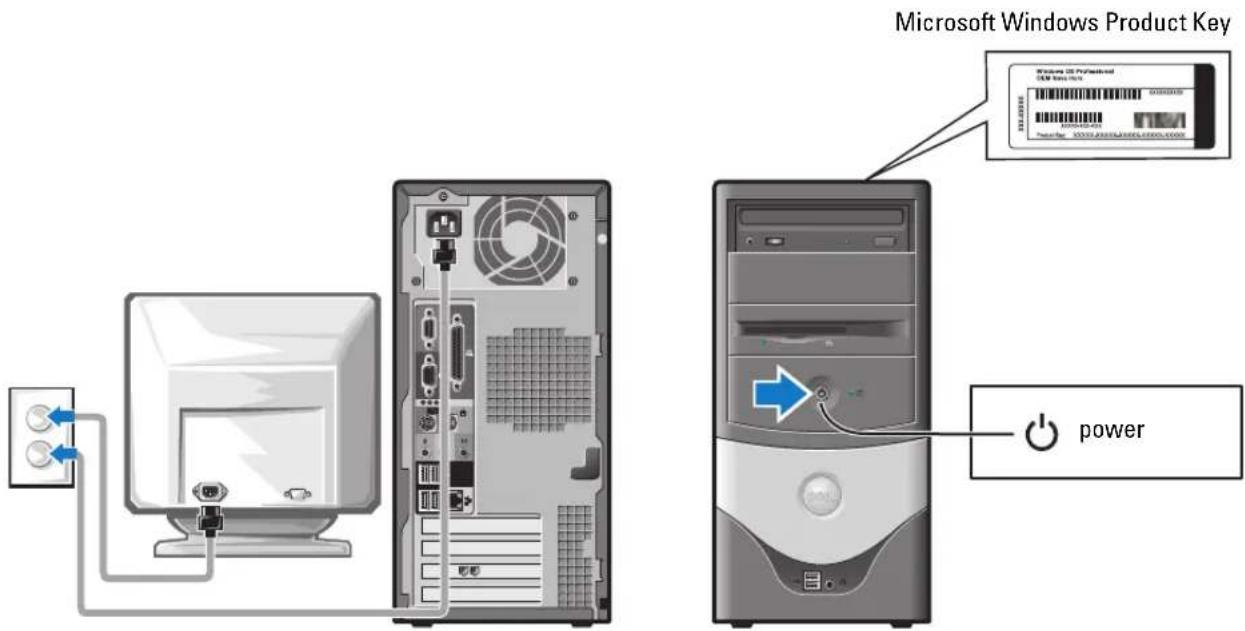
You must complete all steps to properly set up your computer. See the appropriate illustrations that follow the instructions.
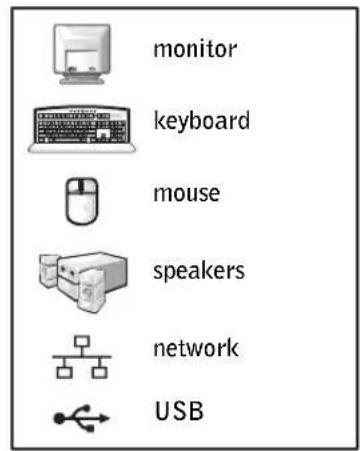
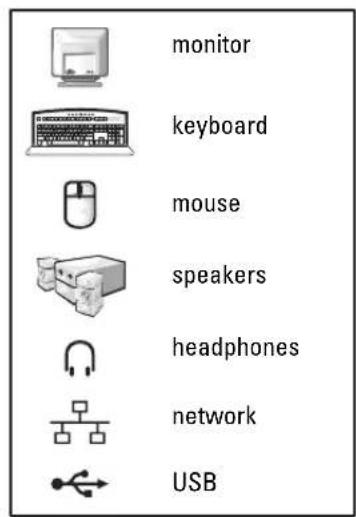
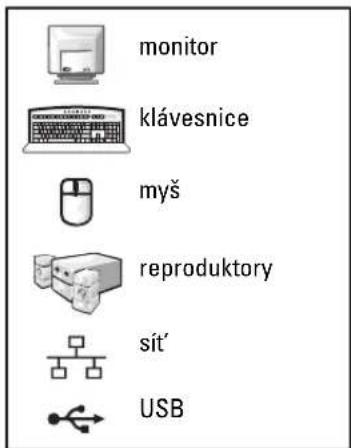
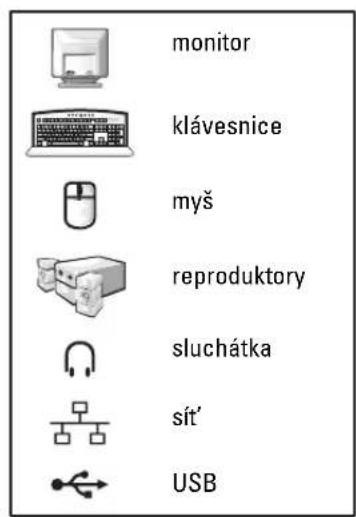
1 Connect the keyboard and mouse.

NOTICE: Do not attempt to operate a PS/2 mouse and a USB mouse simultaneously.

NOTE: If you have a USB-compliant mouse or keyboard, use the USB connectors on the back of your computer.
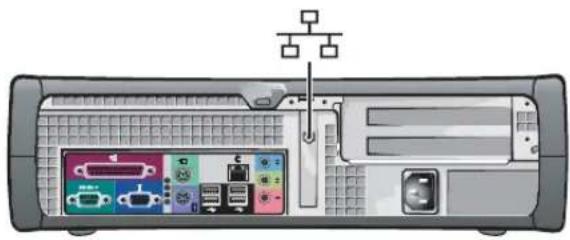
2 Connect the modem or network cable.
Insert the network cable, not the phone line, into the network connector. If you have an optional modem, connect the phone line to the modem.

NOTICE: Do not connect a modem cable to the network adapter. Voltage from telephone communications can cause damage to the network adapter.
3 Connect the monitor.
Align and gently insert the monitor cable to avoid bending connector pins. Tighten the thumbscrews on the cable connectors.

NOTE: Some monitors have the video connector underneath the back of the screen. See the documentation that came with your monitor for its connector locations.
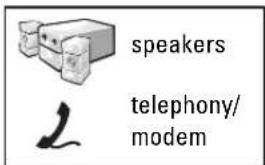
4 Connect the speakers.
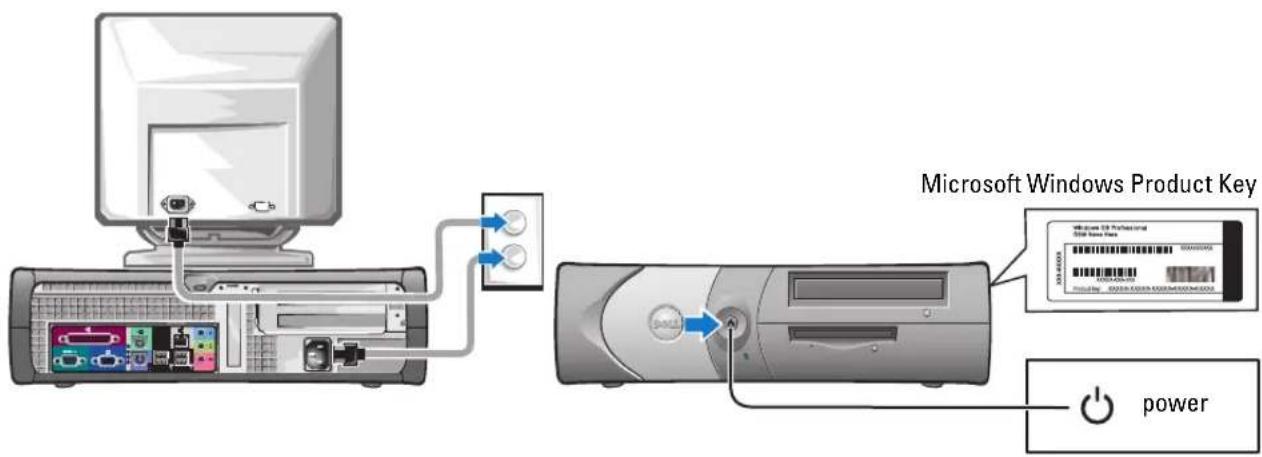
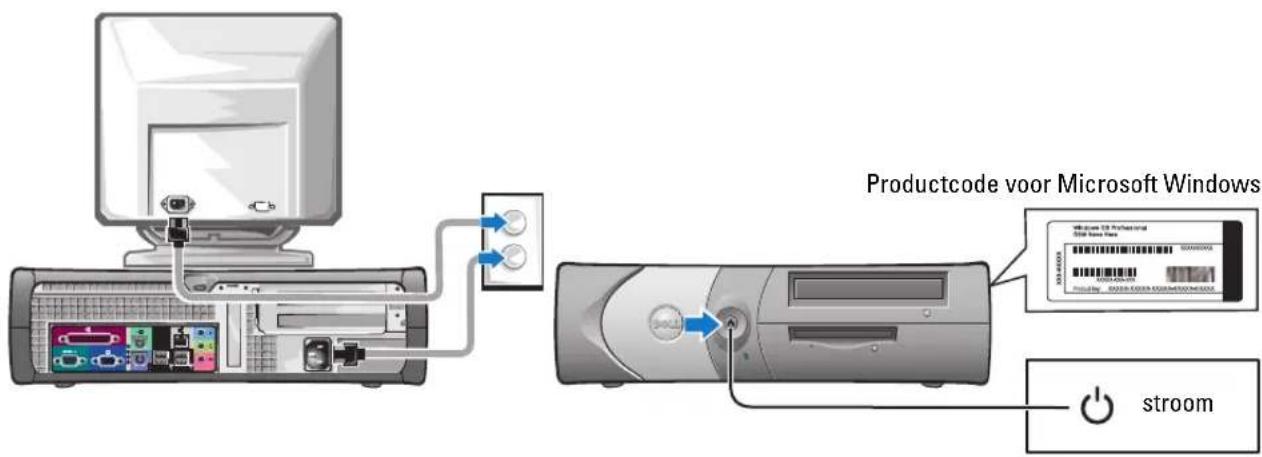
5 Connect power cables to the computer, monitor, and devices and insert the other ends of the power cables to electrical outlets.
6 Verify that the voltage selection switch is set correctly for your location. Your computer has a manual voltage selection switch. Computers with a voltage selection switch on the back panel must be manually set to operate at the correct operating voltage.

NOTICE: To help avoid damaging a computer with a manual voltage selection switch, set the switch for the voltage that most closely matches the AC power available in your location.

NOTE: Before you install any devices or software that did not ship with your computer, read the documentation that came with the software or device, or contact the vendor to verify that the software or device is compatible with your computer and operating system.
Small Desktop Computer
Setup Without Cards
Setup With Cards
Mini-tower Computer
Setup Without Cards
Setup With Cards
Completed Setup
Small Desktop Computer
Mini-Tower Computer
Solving Problems
Dell provides a number of tools to help you if your computer does not perform as expected. For the latest troubleshooting information available for your computer, see the Dell Support website at support.dell.com.
If computer problems occur that require help from Dell, write a detailed description of the error, beep codes, or diagnostics light patterns; record your Express Service Code and Service Tag below; and then contact Dell from the same location as your computer.
See "Finding Information for Your Computer" on page 5 for an example of the Express Service Code and Service Tag.
Express Service Code:
Service Tag: ____
Dell Diagnostics

CAUTION: Before you begin any of the procedures in this section, follow the safety instructions located in the Product Information Guide.
When to Use the Dell Diagnostics
If you experience a problem with your computer, perform the checks in "Solving Problems" of your online User's Guide and run the Dell Diagnostics before you contact Dell for technical assistance.
It is recommended that you print these procedures before you begin.

NOTICE: The Dell Diagnostics works only on Dell™ computers.
Enter system setup, review your computer's configuration information, and ensure that the device you want to test displays in system setup and is active.
Start the Dell Diagnostics from either your hard drive or from the optional Drivers and Utilities CD (also known as the ResourceCD).
Starting the Dell Diagnostics From Your Hard Drive
1 Turn on (or restart) your computer.
2 When the DELL ^™ logo appears, press

NOTE: If you see a message stating that no diagnostics utility partition has been found, run the Dell Diagnostics from your Drivers and Utilities CD.
If you wait too long and the operating system logo appears, continue to wait until you see the Microsoft ^® Windows ^® desktop. Then shut down your computer and try again.
3 When the boot device list appears, highlight Boot to Utility Partition and press
4 When the Dell Diagnostics Main Menu appears, select the test you want to run.
Starting the Dell Diagnostics From the Optional Drivers and Utilities CD
1 Insert the Drivers and Utilities CD.
2 Shut down and restart the computer.
When the DELL logo appears, press
If you wait too long and the Windows logo appears, continue to wait until you see the Windows desktop. Then shut down your computer and try again.
NOTE: The next steps change the boot sequence for one time only. On the next start-up, the computer boots according to the devices specified in system setup.
3 When the boot device list appears, highlight IDE CD-ROM Device and press
4 Select the IDE CD-ROM Device option from the CD boot menu.
5 Select the Boot from CD-ROM option from the menu that appears.
6 Type 1 to start the ResourceCD menu.
7 Type 2 to start the Dell Diagnostics.
8 Select Run the 32 Bit Dell Diagnostics from the numbered list. If multiple versions are listed, select the version appropriate for your computer.
9 When the Dell Diagnostics Main Menu appears, select the test you want to run.
Dell Diagnostics Main Menu
1 After the Dell Diagnostics loads and the Main Menu screen appears, click the button for the option you want.
| Option Function | |
| Express Test | Performs a quick test of devices. This test typically takes 10 to 20 minutes and requires no interaction on your part. Run Express Test first to increase the possibility of tracing the problem quickly. |
| Extended Test | Performs a thorough check of devices. This test typically takes an hour or more and requires you to answer questions periodically. |
| Custom Test Tests a specific device. You can customize the tests you want to run. | |
| Symptom Tree Lists the most common symptoms encountered and allows you to select a test based on the symptom of the problem you are having. | |
2 If a problem is encountered during a test, a message appears with an error code and a description of the problem. Write down the error code and problem description and follow the instructions on the screen.
If you cannot resolve the error condition, contact Dell.
NOTE: The Service Tag for your computer is located at the top of each test screen. If you contact Dell, technical support will ask for your Service Tag.
3 If you run a test from the Custom Test or Symptom Tree option, click the applicable tab described in the following table for more information.
| Tab Function | |
| Results | Displays the results of the test and any error conditions encountered. |
| Errors Displays error conditions encountered, error codes, and the problem description. | |
| Help Describes the test and may indicate requirements for running the test. | |
| Configuration Displays your hardware configuration for the selected device.The Dell Diagnostics obtains configuration information for all devices from system setup, memory, and various internal tests, and it displays the information in the device list in the left pane of the screen. The device list may not display the names of all the components installed on your computer or all devices attached to your computer. | |
| Parameters Allows you to customize the test by changing the test settings. | |
4 When the tests are completed, if you are running the Dell Diagnostics from the Drivers and Utilities CD, remove the CD.
5 Close the test screen to return to the Main Menu screen. To exit the Dell Diagnostics and restart the computer, close the Main Menu screen.
System Lights
Your power light may indicate a computer problem.
| Power Light Problem Description Suggested Resolution | ||
| Solid green Power is on, and the computer is operating normally. | No corrective action is required. | |
| Blinking green The computer is in the suspended state (Microsoft® Windows® 2000 and Windows XP). | Press the power button, move the mouse, or press a key on the keyboard to wake the computer. | |
| Blinks green several times and then turns off | A configuration error exists. | Check "Diagnostic Lights" on page 20 to see if the specific problem is identified. |
| Solid yellow | The Dell Diagnostics is running a test, or a device on the system board may be faulty or incorrectly installed. | If the Dell Diagnostics is running, allow the testing to complete.Check "Diagnostic Lights" on page 20 to see if the specific problem is identified.If the computer does not boot, contact Dell for technical assistance. |
| Blinking yellow A power supply or system board failure has occurred. | Check "Diagnostic Lights" on page 20 to see if the specific problem is identified. See "Power Problems" in your online User's Guide. | |
| Solid green and a beep code during POST | A problem was detected while the BIOS was executing. | See "Bcep Codes" on page 22 for instructions on diagnosing the beep code. Also, check "Diagnostic Lights" on page 20 to see if the specific problem is identified. |
| Solid green power light, no beep code and no video during POST | The monitor or the graphics card may be faulty or incorrectly installed. | Check "Diagnostic Lights" on page 20 to see if the specific problem is identified. |
| Solid green power light and no beep code but the computer locks up during POST | An integrated system board device may be faulty. | Check "Diagnostic Lights" on page 20 to see if the specific problem is identified. If the problem is not identified, contact Dell for technical assistance. |
Diagnostic Lights

CAUTION: Before you begin any of the procedures in this section, follow the safety instructions located in the Product Information Guide.
To help you troubleshoot a problem, your computer has four lights labeled "A," "B," "C," and "D" on the back panel. The lights can be yellow or green. When the computer starts normally, the patterns or codes on the lights change as the boot process completes. If the POST portion of system boot completes successfully, all four lights display solid green. If the computer malfunctions during the POST process, the pattern displayed on the lights may help identify where in the process the computer halted.
| Light Pattern | Problem Description Suggested Resolution | ||
| DCBA | off | The computer is in a normal off condition or a possible pre-BIOS failure has occurred. | ·Verify that the computer is plugged into a working electrical outlet and that you have pressed the power button. |
| off | |||
| off | |||
| off | |||
| DCBA | yellow green yellow yellow | A possible processor failure has occurred. | • Reinstall the processor and restart the computer. |
| DCBA | green green yellow yellow | Memory modules are detected, but a memory failure has occurred. | • If you have one memory module installed, reinstall it and restart the computer.• If you have two memory modules installed, remove the modules, reinstall one module, and then restart the computer. If the computer starts normally, reinstall the second module.• If available, install properly working memory of the same type into your computer.• If the problem persists, contact Dell. |
| DCBA | yellow yellow green yellow | A possible PCI expansion card failure has occurred. | • Determine if a conflict exists by removing a card (not the video card) and then restarting the computer.• If the problem persists, reinstall the card that you removed, remove a different card, and then restart the computer.• Repeat this process for each card. If the computer starts normally, troubleshoot the last card removed from the computer for resource conflicts (see ""Resolving Software and Hardware Incompatibilities" on page 24").• Move each card one at a time to a different PCI slot and restart the computer after each move.• If the problem persists, contact Dell. |
| DCBA | yellow green green yellow | A possible IDE drive failure has occurred. | • Reseat all IDE drive power and data cables and restart the computer. |
| DCBA | green green green yellow | A possible USB failure has occurred. | • Reinstall all USB devices, check cable connections, and then restart the computer. |
 | yellow yellow yellow green | No memory modules are detected. | • Reinstall all memory modules and restart the computer.• To eliminate the possibility of a faulty memory connector, remove all memory modules, reinstall one memory module (if the computer supports a single module), and then restart the computer. If the computer starts normally, move the memory module to a different connector and restart the computer. Continue until you have identified a faulty connector or reinstalled all modules without error. |
 | yellow green yellow green | Memory modules are detected, but a memory configuration or compatibility error exists. | • Ensure that no special memory module/memory connector placement requirements exist (see "Memory" in the online User's Guide for more information).• Verify that the memory modules that you are installing are compatible with your computer.• If the problem persists, contact Dell. |
 | yellow green green green | Another failure has occurred. | • Ensure that the cables are properly connected to the system board from all installed hard drives.• Check the computer message that appears on your monitor screen.• If the problem persists, contact Dell. |
 | green green green green | The computer is in a normal operating condition after POST. | • None . |
Beep Codes
Your computer might emit a series of beeps during start-up if the monitor cannot display errors or problems. This series of beeps, called a beep code, identifies a problem. One possible beep code (code 1-3-1) consists of one beep, a burst of three beeps, and then one beep. This beep code tells you that the computer encountered a memory problem.
If your computer beeps during start-up:
1 Write down the beep code.
2 See "Dell Diagnostics" on page 17 to identify a more serious cause.
3 Contact Dell for technical assistance.
Code Cause Code Cause
| 1-1-2 Microprocessor register failure 3-1-4 Slave interrupt mask register failure | ||
| 1-1-3 NVRAM read/write failure 3-2-2 Interrupt vector loading failure | ||
| 1-1-4 ROM BIOS checksum failure 3-2-4 Keyboard Controller Test failure | ||
| 1-2-1 Programmable interval timer failure 3-3-1 NVRAM power loss | ||
| 1-2-2 DMA initialization failure 3-3-2 Invalid NVRAM configuration | ||
| 1-2-3 DMA page register read/write failure | 3-3-4 Video Memory Test failure | |
| 1-3 Video Memory Test failure | 3-4-1 Screen initialization failure | |
| 1-3-1 through 2-4-4 Memory not being properly identified or used | 3-4-2 Screen retrace failure | |
| 3-1-1 Slave DMA register failure | 3-4-3 Search for video ROM failure | |
| 3-1-2 Master DMA register failure | 4-2-1 No timer tick | |
| 3-1-3 Master interrupt mask register failure | 4-2-2 Shutdown failure | |
| 4-2-3 Gate A20 failure | 4-4-1 Serial or parallel port test failure | |
| 4-2-4 Unexpected interrupt in protected mode | 4-4-2 Failure to decompress code to shadowed memory | |
| 4-3-1 Memory failure above address 0FFFFh | 4-4-3 Math-coprocessor test failure | |
| 4-3-3 Timer-chip counter 2 failure | 4-4-4 Cache test failure | |
| 4-3-4 Time-of-day clock stopped | ||
Running the Dell™ IDE Hard Drive Diagnostics
The Dell IDE Hard Drive Diagnostics is a utility that tests the hard drive to troubleshoot or confirm a hard drive failure.
1 Turn on your computer (if your computer is already on, restart it).
2 When F2= Setup appears in the upper-right corner of the screen, press
3 Follow the instructions on the screen.
If a failure is reported, see "Hard Drive Problems" in the "Solving Problems" section of the online User's Guide.
Resolving Software and Hardware Incompatibilities
If a device is either not detected during the operating system setup or is detected but incorrectly configured, you can use the Hardware Troubleshooter to resolve the incompatibility. In the Microsoft® Windows® 2000 operating system, you can also use Device Manager to resolve incompatibilities.
Windows XP
To resolve incompatibilities using the Hardware Troubleshooter:
1 Click the Start button and click Help and Support.
2 Type hardware troubleshooter in the Search field and click the arrow to start the search.
3 Click Hardware Troubleshooter in the Search Results list.
4 In the Hardware Troubleshooter list, click I need to resolve a hardware conflict on my computer, and click Next.
Windows 2000
To resolve incompatibilities using Device Manager:
1 Click the Start button, point to Settings, and then click Control Panel.
2 In the Control Panel window, double-click System.
3 Click the Hardware tab.
4 Click Device Manager.
5 Click View and click Resources by connection.
6 Double-click Interrupt request (IRQ).
Incorrectly configured devices are indicated by a yellow exclamation point (!) or a red X if the device has been disabled.
7 Double-click any device marked with an exclamation point to display the Properties window. The Device status area in the Properties window reports the cards or devices that need to be reconfigured.
8 Reconfigure the devices or remove the devices from the Device Manager. See the documentation that came with the device for information on configuring the device.
To resolve incompatibilities using the Hardware Troubleshooter:
1 Click the Start button and click Help.
2 Click Troubleshooting and Maintenance on the Contents tab, click Windows 2000 troubleshooters, and then click Hardware.
In the Hardware Troubleshooter list, click I need to resolve a hardware conflict on my computer and click Next.
Using Microsoft ^® Windows ^® XP System Restore
The Microsoft ^® Windows ^® XP operating system provides System Restore to allow you to return your computer to an earlier operating state (without affecting data files) if changes to the hardware, software, or other system settings have left the computer in an undesirable operating state. See the Windows Help and Support Center for information on using System Restore.

NOTICE: Make regular backups of your data files. System Restore does not monitor your data files or recover them.
Creating a Restore Point
1 Click the Start button and click Help and Support.
2 Click System Restore.
3 Follow the instructions on the screen.
Restoring the Computer to an Earlier Operating State

NOTICE: Before you restore the computer to an earlier operating state, save and close any open files and exit any open programs. Do not alter, open, or delete any files or programs until the system restoration is complete.
1 Click the Start button, point to All Programs → Accessories → System Tools, and then click System Restore.
2 Ensure that Restore my computer to an earlier time is selected and click Next.
3 Click a calendar date to which you want to restore your computer.
The Select a Restore Point screen provides a calendar that allows you to see and select restore points. All calendar dates with available restore points appear in boldface type.
4 Select a restore point and click Next.
If a calendar date has only one restore point, then that restore point is automatically selected. If two or more restore points are available, click the restore point that you prefer.
5 Click Next.
The Restoration Complete screen appears after System Restore finishes collecting data and then the computer restarts.
6 After the computer restarts, click OK.
To change the restore point, you can either repeat the steps using a different restore point, or you can undo the restoration.
Undoing the Last System Restore
NOTICE: Before you undo the last system restore, save and close all open files and exit any open programs. Do not alter, open, or delete any files or programs until the system restoration is complete.
1 Click the Start button, point to All Programs → Accessories → System Tools, and then click System Restore.
2 Click Undo my last restoration and click Next.
3 Click Next.
The System Restore screen appears and the computer restarts.
4 After the computer restarts, click OK.
Enabling System Restore
If you reinstall Windows XP with less than 200 MB of free hard-disk space available, System Restore is automatically disabled. To see if System Restore is enabled:
1 Click the Start button and click Control Panel.
2 Click Performance and Maintenance.
3 Click System.
4 Click the System Restore tab.
5 Ensure that Turn off System Restore is unchecked.
Reinstalling Microsoft® Windows® XP
Before You Begin
If you are considering reinstalling the Windows XP operating system to correct a problem with a newly installed driver, first try using Windows XP Device Driver Rollback. If Device Driver Rollback does not resolve the problem, then use System Restore to return your operating system to the operating state it was in before you installed the new device driver.
NOTICE: Before performing the installation, back up all data files on your primary hard drive. For conventional hard drive configurations, the primary hard drive is the first drive detected by the computer.
To reinstall Windows XP, you need the following items:
- Dcll™ Operating System CD
• D Drivers and Utilities CD
NOTE: The Drivers and Utilities CD contains drivers that were installed during assembly of the computer. Use the Drivers and Utilities CD or go to the Dell support site to load any required drivers.
NOTE: The Operating System and Drivers and Utilities CDs are optional and may not ship with all computers.
Reinstalling Windows XP
NOTICE: You must use Windows XP Service Pack 1 or later when you reinstall Windows XP.
To reinstall Windows XP, perform all the steps in the following sections in the order in which they are listed.
The reinstallation process can take 1 to 2 hours to complete. After you reinstall the operating system, you must also reinstall the device drivers, virus protection program, and other software.
NOTICE: The Operating System CD provides options for reinstalling Windows XP. The options can overwrite files and possibly affect programs installed on your hard drive. Therefore, do not reinstall Windows XP unless a Dell technical support representative instructs you to do so.
NOTICE: To prevent conflicts with Windows XP, disable any virus protection software installed on your computer before you reinstall Windows XP. See the documentation that came with the software for instructions.
Booting From the Operating System CD
1 Save and close any open files and exit any open programs.
2 Insert the Operating System CD. Click Exit if Install Windows XP message appears.
3 Restart the computer.
4 Press
If the operating system logo appears, wait until you see the Windows desktop, and then shut down the computer and try again.
5 Press the arrow keys to select CD-ROM, and press
6 When the Press any key to boot from CD message appears, press any key.
Windows XP Setup
1 When the Windows XP Setup screen appears, press
2 Read the information on the Microsoft Windows Licensing Agreement screen, and press
3 If your computer already has Windows XP installed and you want to recover your current Windows XP data, type r to select the repair option, and remove the CD.
4 If you want to install a new copy of Windows XP, press
5 Press
The Windows XP Setup screen appears, and the operating system begins to copy files and install the devices. The computer automatically restarts multiple times.
NOTE: The time required to complete the setup depends on the size of the hard drive and the speed of your computer.
NOTICE: Do not press any key when the following message appears: Press any key to boot from the CD.
6 When the Regional and Language Options screen appears, select the settings for your location and click Next.
7 Enter your name and organization (optional) in the Personalize Your Softwarescreen, and click Next.
8 At the Computer Name and Administrator Password window, enter a name for your computer (or accept the one provided) and a password, and click Next.
9 If the Modem Dialing Information screen appears, enter the requested information and click Next.
10 Enter the date, time, and time zone in the Date and Time Settings window, and clickNext.
11 If the Networking Settings screen appears, click Typicaland click Next.
12 If you are reinstalling Windows XP Professional and you are prompted to provide further information regarding your network configuration, enter your selections. If you are unsure of your settings, accept the default selections.
Windows XP installs the operating system components and configures the computer. The computer automatically restarts.
NOTICE: Do not press any key when the following message appears: Press any key to boot from the CD.
13 When the Welcome to Microsoft screen appears, click Next.
14 When the How will this computer connect to the Internet? message appears, click Skip.
15 When the Ready to register with Microsoft? screen appears, select No, not at this time and click Next.
16 When the Who will use this computer? screen appears, you can enter up to five users.
17 Click Next.
18 Click Finish to complete the setup, and remove the CD.
19 Reinstall the appropriate drivers with the Drivers and Utilities CD.
20 Reinstall your virus protection software.
21 Reinstall your programs.
NOTE: To reinstall and activate your Microsoft Office or Microsoft Works Suite programs, you need the Product Key number located on the back of the Microsoft Office or Microsoft Works Suite CD sleeve.
Using the Drivers and Utilities CD
To use the Drivers and Utilities CD (also known as the ResourceCD) while you are running the Windows operating system:

NOTE: To access device drivers and user documentation, you must use the Drivers and Utilities CD while you are running Windows.
1 Turn on the computer and allow it to boot to the Windows desktop.
2 Insert the Drivers and Utilities CD into the CD drive.
If you are using the Drivers and Utilities CD for the first time on this computer, the ResourceCD Installation window opens to inform you that the Drivers and Utilities CD is about to begin installation.
3 Click OK to continue.
To complete the installation, respond to the prompts offered by the installation program.
4 Click Next at the Welcome Dell System Owner screen.
5 Select the appropriate System Model, Operating System, Device Type, and Topic.
Drivers for Your Computer
To display a list of device drivers for your computer:
1 Click My Drivers in the Topic drop-down menu.
The Drivers and Utilities CD scans your computer's hardware and operating system, and then a list of device drivers for your system configuration is displayed on the screen.
2 Click the appropriate driver and follow the instructions to download the driver to your computer.
To view all available drivers for your computer, clickDrivers from the Topic drop-down menu.
Index
B
beep codes, 22
C
CD
operating system, 7
computer
beep codes, 22
restore to previous state, 25
conflicts
software and hardware incompatibilities, 24
D
Dell
premier support website, 6 support site, 6
Dell Diagnostics, 17
Dell Premier Support website, 6
Device Manager, 24
diagnostic lights, 19-20
diagnostics
bccp codes, 22
Dell, 17
Drivers and Utilities CD, 5
lights, 19-20
documentation
device, 5
online, 6
Quick Reference, 5
ResourceCD, 5
User's Guide, 5
drivers
ResourceCD, 5
Drivers and Utilities CD, 5
E
error messages
beep codes, 22
diagnostic lights, 19-20
H
hardware
beep codes, 22
conflicts, 24
Dell Diagnostics, 17
Hardware Troubleshooter, 24
Help and Support Center, 7
|
IRQ conflicts, 24
L
labels
Microsoft Windows, 6 Service Tag, 6
light, 19
lights
back of computer, 20
diagnostic, 19-20
front of computer, 19
power button, 19
system, 19
M
Microsoft Windows label, 6
0
Operating System
CD, 7
Installation Guide, 7
operating system
reinstalling Windows XP, 26
Operating System CD, 7
P
power light, 19
problems
beep codes, 22
conflicts, 24
Dell Diagnostics, 17
diagnostic lights, 19-20
restore to previous state, 25
R
reinstalling
Drivers and Utilities CD, 5
ResourceCD, 5
Windows XP, 26
ResourceCD
Dell Diagnostics, 17
s
Service Tag, 6
software
conflicts, 24
stand
attach, 10
remove, 10
system lights, 19
System Restore, 25
T
troubleshooting
conflicts, 24
Dell Diagnostics, 17
diagnostic lights, 19-20
Hardware Troubleshooter, 24
Help and Support Center, 7
restore to previous state, 25
U
User's Guide, 5
W
Windows 2000
Device Manager, 24
Hardware Troubleshooter, 24
Windows XP
Hardware Troubleshooter, 24
Help and Support Center, 7
reinstalling, 26
System Restore, 25
Dell™ OptiPlex™ 170L
natural_image
3D rendering of a mechanical device with a curved top component and internal components (no text or symbols visible)Počítač Mini-Tower
Počítač Mini-tower
Dell Diagnostics, 49
Dell Premier Support, webový server, 39
Dell Diagnostics, 49
konflikty, 57
zvukové signály, 55
Hardware Troubleshooter, 57
|
IRQ, konflikty, 57
K
konflikty
nekompatibility softwaru a hardwaru, 57
Dell Diagnostics, 49
Dell Diagnostics, 49
R
řešení problémů
Dell Diagnostics, 49
Klein bureaumodel computer 80
Minitower computer. 81
Complete installatie 82
Klein bureaumodel computer 82
Minitower computer. 82
Problemen oplossen 83
Dell Diagnostics. 83
Systeemlampjes. 86
Controlelampjes. 87
Geluidscodes 89
Het diagnoseprogramma Dell™ IDE Hard Drive Diagnostics
uitvoeren 90
Software- en hardwareconflicten oplossen. 91
Microsoft ^® Windows ^® XP Systeemherstel uitvoeren ..... 92
Microsoft ^® Windows ^® XP opnieuw installeren. 93
natural_image
3D rendering of a mechanical device with a curved top component and internal components (no text or symbols visible)Over uw minitower computer
Klein bureaumodel computer
Minitower computer
Klein bureaumodel computer
Express Service Code:
Servicelabel:
Dell Diagnostics

cd Drivers and Utilities, 71
Dell Premier Support-website, 73 Support-website, 72
Dell Diagnostics, 83
Dell Premier Support- website, 73
diagnoseprogramma ed Drivers and Utilities, 71 Dell, 83 geluidscodes, 89 lampjes, 86-87
natural_image
3D rendering of a mechanical device with a curved top component and internal structure (no text or symbols visible)
CD Drivers and Utilities, 105
CD Drivers and Utilities, 105
Dell, 118
CD Drivers and Utilities, 105
ResourceCD, 105
Windows XP, 131
ετικέτα Microsoft
Windows, 106
οδηγός User's Guide, 106
π
natural_image
3D rendering of a mechanical device with a lid and internal components (no text or symbols visible)
Express Service Code: ____
Service Tag: ____
Dell Diagnostics

natural_image
3D rendering of a mechanical device with a curved top component and internal structure (no text or symbols visible)
Dell Diagnostics, 188
dysk CD Drivers and Utilities, 175
kody dźwiękowe, 195
lampki, 191-192
dokumentacja
dysk ResourceCD, 175
Informator o systemie, 175 online, 177
dysk CD Drivers and Utilities, 175
E
etykiety
Microsoft Windows, 176
dysk CD Drivers and Utilities, 175
dysk ResourceCD, 175
Windows XP, 199
problemy
Dell Diagnostics, 188
kody dźwiękowe, 195
konflikty, 196
Dell Diagnostics, 188
Hardware Troubleshooter, 196
konflikty, 196
Dell Diagnostics, 188
kody dźwiękowe, 195
konflikty, 196
sterowniki
dysk ResourceCD, 175
stojak
zakładanie, 181
zdejmowanie, 181
system operacyjny
CD, 178
Drivers and Utilities
CD
211,(הכלה)
n
תְבָרִי
תַלְרָה) Dell Diagnostics
223, (Dell כְרַעָה)
230, מַרְׁעֹתָה
228, כְרָה בְּרָה
n
Drivers and Utilities
CD
211,(הכלה)
212 ,Premier Support
1
תְקָרִי
(בַרְׁה) Drivers and Utilities CD (בַרְׁה)
,ResourceCD כְרָבִיַעֹת, (הַרָבִיַעֹת כְרָבִיַעֹת) Drivers and Utilities CD כְרָבִיַעֹת כְרָבִיַעֹת:Windows כְרָבִיַעֹת כְרָבִיַעֹת כְרָבִיַעֹת
- Drivers and Utilities CD (הכלה) Drivers and Utilities CD (הכלה) Drivers and Utilities CD (הכלה) ResourceCD Installation (הכלה)
.הכלה (הכלה) OK 3
Drivers and Utilities CD
2
Ready to register with Microsoft? (Microsoft) Next, (Microsoft), No, not at this time. Who will use this computer?
19 (הכלה) Drivers and Utilities CD
Microsoft Works Suite IN Microsoft Office Software (https://www.wk.com/) Microsoft Works Suite IN Microsoft Office Software (https://www.wk.com/) Product Key

Windows XP 70 70
. Windows XP Service Pack 1-7:

.
.הכלההוּרָהוּרָהוּרָהוּרָהוּרָהוּרָהוּרָהוּרָהוּרָהוּרָהוּרָהוּרָהוּרָהוּרָהוּרָה
Windows XP 76
(1) Accessories ← (2) All Programs ← Start (3) System Tools ←
.(אַעְה) Next (אַעְה) Undo my last restoration 2
.(ΝΟΥ) Next 3
(הכלהה) Performance and Maintenance 2
.(תְבָרִי) System 3
.(הכלהה) Help and Support (הכלה) Start 1
.(תְבַרָה בְרִי) System Restore 2
(1) Accessories ← (2) All Programs ← (3) Start ← (4) System Tools ←
2 Restore my computer to an earlier time. (אַלְׁ) Next
3
.(הכלהה) Help and Support (הכלהה) Start
הַלְרָאִי (עַרְבּוֹ) Search (עַרְבּוֹ) hardware troubleshooter 2
| הכלההכלההכלההכלההכלההכלההכלההכלההכלההכלההכלההכלההכלההכלההכלההכלההכלההכלההכלההכלההכלההכלההכלההכלההכלההכלההכלההכלההכלההכלההכלההכלההכלההכלה | ||
| אַתְבָרִי לַעֹרִי לַעֹרִי לַעֹרִי לַעֹרִי לַעֹרִי לַעֹרִי לַעֹרִי לַעֹרִי לַעֹרִי לַעֹרִי לַעּוּוּוּוּוּוּוּוּוּוּוּוּוּוּוּוּוּוּוּוּוּוּוּוּוּוּוּוּוּוּוּוּוּו·אַתְבָרִי לַעֹרִי לַעֹרִי לַעֹרִי לַעֹרִי לַעֹרִי לַעֹרִי לַעֹרִי לַעֹרִי לַעֹשִׁהִי לַעֹשִׁהִי לַעֹשִׁהִי לַעֹשִׁהִי לַעֹשִׁהִי לַעֹשִׁהִי לַעֹשִׁהִי לַעֹרִי לַעֹשִׁהִי לַעֹשִׁהִי לַעֹשִׁהִי לַעֹשִׁהִי לַעֹשִׁהִי לַעֹשִׁ, לַעֹשִׁהִי לַעֹשִׁהִי לַעֹשִׁהִי לַעֹשִׁהִי לַעֹשִׁהִי לַעֹשִׁהִי לַעֹשִі, לַעֹשִі, לַעֹשִі, לַעֹשִі, לַעֹשִі, לַעֹשִі, לַעֹשִі, לַעֹשִі, לַעֹשִі, לַעֹשִі, (230) לַעֹשִі, לַעֹשִі, לַעֹשִі, לַעֹשִі, לַעֹשִі, לַעֹשִі, לַעֹשִі, לַעֹשִі, לַעֹשִі, 230) לַעֹשִі, לַעֹשִі, לַעֹשִі, לַעֹשִі, לַעֹשִі, לַעֹשִі, לַעֹשִі, לַעֹשִі, לַעֹש–'א:PCI לַעֹשִі, לַעֹשִі, לַעֹשִі, לַעֹשִі, לַעֹשִі, לַעֹשִі, לַעֹשִі, לַעֹשִі, לַעֹשִі, for all-time, for all-time, for all-time, for all-time, for all-time, for all-time, for all-time, for all-time, for all-time, for all-time, for all-time, for all-time, for all-time, for all-time, for all-time, for all-time, for all-time, for all-time, for all-time, for all-time, for all-time, for all-time, for all-time, for all-time, for all-time, for all-tim, for all-time, for all-time, for all-time, for all-time, for all-time, for all-time, for all-time, for all-time, for all-time, for all-time, for all-time, for all-time, for all-time, for all-time, for all-time, for all-time, for all-time, for all-time, for all-time, for all-time, for all-time, for all-time, for all-time, for all-time, for all- Time, for all-time, for all-time, for all-time, for all-time, for all-time, for all-time, for all-time, for all-time, for all-time, for all-time, for all-time, for all-time, for all-time, for all-time, for all-time, for all-time, for all-time, for all-time, for all-time, for all-time, for all-time, for all-time, for all-time, for all-time, for all-Time, for all-time, for all-time, for all-time, for all-time, for all-time, for all-time, for all-time, for all-time, for all-time, for all-time, for all-time, for all-time, for all-time, for all-time, for all-time, for all-time, for all-time, for all-time, for all-time, for all-time, for all-time, for all-time, for all-time, for all-time, for all-Time, for all-time, for all-time, for all-time, for all-time, for all-time, for all-time, for all-time, for all-time, for all-time, for all-time, for all-time, for all-time, for all-time, for all-time, for all-time, for all-time, for all-time, for all-time, for all-time, for all-time, for all-time, for all-time, for all-time, for all-time, for all time, for all-time, for all-time, for all-time, for all-time, for all-time, for all-time, for all-time, for all-time, for all-time, for all-time, for all-time, for all-time, for all-time, for all-time, for all-time, for all-time, for all-time, for all-time, for all-time, for all-time, for all-time, for all-time, for all-time, for all-time, for all-site, for all-time, for all-time, for all-time, for all-time, for all-time, for all-time, for all-time, for all-time, for all-time, for all-time, for all-time, for all-time, for all-time, for all-time, for all-time, for all-time, for all-time, for all-time, for all-time, for all-time, for all-time, for all-time, for all-time, for all-time, for all-late, for all-time, for all-time, for all-time, for all-time, for all-time, for all-time, for all-time, for all-time, for all-time, for all-time, for all-time, for all-time, for all-time, for all-time, for all-time, for all-time, for all-time, for all-time, for all-time, for all-time, for all-time, for all-time, for all-time, for all-time, for all-rate, for all-time, for all-time, for all-time, for all-time, for all-time, for all-time, for all-time, for all-time, for all-time, for all-time, for all-time, for all-time, for all-time, for all-time, for all-time, for all-time, for all-time, for all-time, for all-time, for all-time, for all-time, for all-time, for all-time, for all-time, forall-time, for all-time, for all-time, for all-time, for all-time, for all-time, for all-time, for all-time, for all-time, for all-time, for all-time, for all-time, for all-time, for all-time, for all-time, for all-time, for all-time, for all-time, for all-time, for all-time, for all-time, for all-time, for all-time, for all-time, for all-time,for all-time, for all-time, for all-time, for all-time, for all-time, for all-time, for all-time, for all-time, for all-time, for all-time, for all-time, for all-time, for all-time, for all-time, for all-time, for all-time, for all-time, for all-time, for all-time, for all-time, for all-time, for all-time, for all-time, for all-time, for all-time,for an initial state, then one state, then two states, then three states, then four states, then five states, then six states, then seven states, then eight states, then nine states, then 10 states, then 11 states, then 12 states, then 13 states, then 14 states, then 15 states, then 16 states, then 17 states, then 18 states, then 19 states, then 20 states, then 21 states, then 22 states, then 23 states, then 24 states, then 25 states, then 26 states, then 27 states, then 28 states, then 29 states, then 30 states, then 31 states, then 32 states, then 33 states, then 34 states, then 35 states, then 36 states, then 37 states, then 38 states, then 39 states, then 40 states, then 41 states, then 42 states, then 43 states, then 44 states, then 45 states, then 46 states, then 47 states, then 48 states, then 49 states, then 50 states, then 51 states, then 52 states, then 53 states, then 54 states, then 55 states, then 56 states, then 57 states, then 58 states, then 59 states, then 60 states, then 61 states, then 62 states, then 63 states, then 64 states, then 65 states, then 66 states, then 67 states, then 68 states, then 69 states, then 70 states, then 71 states, then 72 states, then 73 states, then 74 states, then 75 states, then 76 states, then 77 states, then 78 states, then 79 states, then 80 states, then 81 states, then 82 states, then 83 states, then 84 states, then 85 states, then 86 states, then 87 states, then 88 states, then 89 states, then 90 states, then 91 states, then 92 states, then 93 states, then 94 states, then 95 states, then 96 states, then 97 states, then 98 states, then 99 states, then 100 states, then 101 states, then 102 states, then 103 states, then 104 states, then 105 states, then 106 states, then 107 states, then 108 states, then 109 states, then 110 states, then 111 states, then 112 states, then 113 states, then 114 states, then 115 states, then 116 states, then 117 states, then 118 states, then 119 states, then 120 states, then 121 states, then 122 states, then 123 states, then 124 states, then 125 states, then 126 states, then 127 states, then 128 states, then 129 states, then 130 states, then 131 states, then 132 states, then 133 states, then 134 states, then 135 states, then 136 states, then 137 states, then 138 states, then 139 states, then 140 states, then 141 states, then 142 states, then 143 states, then 144 states, then 145 states, then 146 states, then 147 states, then 148 states, then 149 states, then 150 states, then 151 states, then 152 states, then 153 states, then 154 states, then 155 states, then 156 states, then 157 states, then 158 states, then 159 states, then 160 states, then 161 states, then 162 states, then 163 states, then 164 states, then 165 states, then 166 states, then 167 states, then 168 states, then 169 states, then 170 states, then 171 states, then 172 states, then 173 states, then 174 states, then 175 states, then 176 states, then 177 states, then 178 states, then 179 states, then 180 states, then 181 states, then 182 states, then 183 states, then 184 states, then 185 states, then 186 states, then 187 states, then 188 states, then 189 states, then 190 states, then 191 states, then 192 states, then 193 states, then 194 states, then 195 states, then 196 states, then 197 states, then 198 states, then 199 states, then 200 states, then 201 states, then 202 states, then 203 states, then 204 states, then 205 states, then 206 states, then 207 states, then 208 states, then 209 states, then 210 states, then 211 states, then 212 states, then 213 states, then 214 states, then 215 states, then 216 states, then 217 states, then 218 states, then 219 states, then 220 states, then 221 states, then 222 states, then 223 states, then 224 states, then 225 states, then 226 states, then 227 states, then 228 states, then 229 states, then 230 states, then 231 states, then 232 states, then 233 states, then 234 states, then 235 states, then 236 states, then 237 states, then 238 states, then 239 states, then 240 states, then 241 states, then 242 states, then 243 states, then 244 states, then 245 states, then 246 states, then 247 states, then 248 states, then 249 states, then 250 states, then 251 states, then 252 states, then 253 states, then 254 states, then 255 states, then 256 states, then 257 states, then 258 states, then 259 states, then 260 states, then 261 states, then 262 states, then 263 states, then 264 states, then 265 states, then 266 states, then 267 states, then 268 states, then 269 states, then 270 states, then 271 states, then 272 states, then 273 states, then 274 states, then 275 states, then 276 states, then 277 states, then 278 states, then 279 states, then 280 states, then 281 states, then 282 states, then 283 states, then 284 states, then 285 states, then 286 states, then 287 states, then 288 states, then 289 states, then 290 states, then 291 states, then 292 states, then 293 states, then 294 states, then 295 states, then 296 states, then 297 states, then 298 states, then 299 states, then 300 states, then 301 states, then 302 states, then 303 states, then 304 states, then 305 states, then 306 states, then 307 states, then 308 states, then 309 states, then 310 states, then 311 states, then 312 states, then 313 states, then 314 states, then 315 states, then 316 states, then 317 states, then 318 states, then 319 states, then 320 states, then 321 states, then 322 states, then 323 states, then 324 states, then 325 states, then 326 states, then 327 states, then 328 states, then 329 states, then 330 states, then 331 states, then 332 states, then 333 states, then 334 states, then 335 states, then 336 states, then 337 states, then 338 states, then 339 states, then 340 states, then 341 states, then 342 states, then 343 states, then 344 states, then 345 states, then 346 states, then 347 states, then 348 states, then 349 states, then 350 states, then 351 states, then 352 states, then 353 states, then 354 states, then 355 states, then 356 states, then 357 states, then 358 states, then 359 states, then 360 states, then 361 states, then 362 states, then 363 states, then 364 states, then 365 states, then 366 states, then 367 states, then 368 states, then 369 states, then 370 states, then 371 states, then 372 states, then 373 states, then 374 states, then 375 states, then 376 states, then 377 states, then 378 states, then 379 states, then 380 states, then 381 states, then 382 states, then 383 states, then 384 states, then 385 states, then 386 states, then 387 states, then 388 states, then 389 states, then 390 states, then 391 states, then 392 states, then 393 states, then 394 states, then 395 states, then 396 states, then 397 states, then 398 states, then 399 states, then 400 states, then 401 states, then 402 states, then 403 states, then 404 states, then 405 states, then 406 states, then 407 states, then 408 states, then 409 states, then 410 states, then 411 states, then 412 states, then 413 states, then 414 states, then 415 states, then 416 states, then 417 states, then 418 states, then 419 states, then 420 states, then 421 states, then 422 states, then 423 states, then 424 states, then 425 states, then 426 states, then 427 states, then 428 states, then 429 states, then 430 states, then 431 states, then 432 states, then 433 states, then 434 states, then 435 states, then 436 states, then 437 states, then 438 states, then 439 states, then 440 states, then 441 states, then 442 states, then 443 states, then 444 states, then 445 states, then 446 states, then 447 states, then 448 states, then 449 states, then 450 states, then 451 states, then 452 states, then 453 states, then 454 states, then 455 states, then 456 states, then 457 states, then 458 states, then 459 states, then 460 states, then 461 states, then 462 states, then 463 states, then 464 states, then 465 states, then 466 states, then 467 states, then 468 states, then 469 states, then 470 states, then 471 states, then 472 states, then 473 states, then 474 states, then 475 states, then 476 states, then 477 states, then 478 states, then 479 states, then 480 states, then 481 states, then 482 states, then 483 states, then 484 states, then 485 states, then 486 states, then 487 states, then 488 states, then 489 states, then 490 states, then 491 states, then 492 states, then 493 states, then 494 states, then 495 states, then 496 states, then 497 states, then 498 states, then 499 states, then 500 states, then 501 states, then 502 states, then 503 states, then 504 states, then 505 states, then 506 states, then 507 states, then 508 states, then 509 states, then 510 states, then 511 states, then 512 states, then 513 states, then 514 states, then 515 states, then 516 states, then 517 states, then 518 states, then 519 states, then 520 states, then 521 states, then 522 states, then 523 states, then 524 states, then 525 states, then 526 states, then 527 states, then 528 states, then 529 states, then 530 states, then 531 states, then 532 states, then 533 states, then 534 states, then 535 states, then 536 states, then 537 states, then 538 states, then 539 states, then 540 states, then 541 states, then 542 states, then 543 states, then 544 states, then 545 states, then 546 states, then 547 states, then 548 states, then 549 states, then 550 states, then 551 states, then 552 states, then 553 states, then 554 states, then 555 states, then 556 states, then 557 states, then 558 states, then 559 states, then 560 states, then 561 states, then 562 states, then 563 states, then 564 states, then 565 states, then 566 states, then 567 states, then 568 states, then 569 states, then 570 states, then 571 states, then 572 states, then 573 states, then 574 states, |
Drivers (Dell Diagnostics, Dells and Utilities CD) 4 . Main Menu (Dell Diagnostics, Dells and Utilities CD) and Utilities CD Dell Diagnostics-Main Menu (Dell Diagnostics, Dells and Utilities CD) Main Menu (Dell Diagnostics, Dells and Utilities CD)
תְרָה בְּרָה
Drivers and Utilities CD (Dell Diagnostics) Dell Diagnostics (Dell Diagnostics)
.(הכלההוּרָהִיַעֹרְהָהִיַעֹרְהָהִיַעֹרְהָהִיַעֹרְהָהִיַעֹרְהָהִיַעֹרְהָהִיַעֹרְהָהִיַע Drivers and Utilities CD
הכלהה כרְׁהָה, כרְׁהָה, כרְׁהָה, כרְׁהָה, כרְׁהָה, כרְׁהָה, כרְׁהָה, כרְׁהָה, כרְׁהָה, כרְׁהָה, Los Angeles County, Los Angeles County, Los Angeles County, Los Angeles County, Los Angeles County, Los Angeles County, Los Angeles County, Los Angeles County, Los Angeles County, Los Angeles County, Los Angeles County, Los Angeles County, Los Angeles County, Los Angeles County, Los Angeles County, Los Angeles County, Los Angeles County, Los Angeles County, Los Angeles County, Los Angeles County, Los Angeles County, Los Angeles County, Los Angeles County, Los Angeles County, Los Angeles County, Los Angeles county
- Men (Dell Diagnostics-ה) Main Menu (Dell Diagnostics-ה)
תְרָהִיַעֹרִי
(Dell Diagnostics) Dell Diagnostics
"Solving Problems" (הכלה) "Solving Problems" (Dell Diagnostics) Dell Diagnostics
Drivers and Utilities (Dell Diagnostics)
בְרַעָה אַלְרָה
בְרַעָה אַלְרָה
בַרְשָׁה בַרְשָׁה
natural_image
3D rendering of a mechanical device with a curved top component and internal components (no text or symbols visible)(הכלהה) Drivers and Utilities
(ResourceCD כאָרִי)
Write Through Readme
drivers and Utilities CD :
drivers and Utilities
.(הכלה) Help and Support
User's and system guides 2
User's guides (תְׁרָה)
- (Dell Diagnostics) Dell Diagnostics
225.
226.
- . . . . . . . . . . . . . . . . . . . . . . . . . . . . . . . . . . . . . . . . . . . . . . . . . . . . . . . . . . . . . .
Dell™ IDE Hard Drive Diagnostics
- IDE כר Dell 76 menin
230.
- Dell™ OptiPlex™ 170L
- Quick Reference Guide
- Notes, Notices, and Cautions
- Contents
- Finding Information for Your Computer 5
- About Your Small Desktop Computer 8
- About Your Mini-Tower Computer 11
- Setting Up Your Computer 13
- Completed Setup 16
- Solving Problems 17
- Using the Drivers and Utilities CD 29
- Index 31
- Finding Information for Your Computer
- What Are You Looking For? Find It Here
- Drivers and Utilities CD (also known as the ResourceCD)
- Desktop System Software
- Dell™ OptiPlex™ User's Guide
- About Your Small Desktop Computer
- Inside Your Computer
- Attaching and Removing the Computer Stand
- About Your Mini-Tower Computer
- Setting Up Your Computer
- Small Desktop Computer
- Mini-tower Computer
- Completed Setup
- Solving Problems
- Dell Diagnostics
- When to Use the Dell Diagnostics
- Starting the Dell Diagnostics From Your Hard Drive
- Starting the Dell Diagnostics From the Optional Drivers and Utilities CD
- Dell Diagnostics Main Menu
- System Lights
- Diagnostic Lights
- CAUTION: Before you begin any of the procedures in this section, follow the safety instructions located in the Product Information Guide.
- Beep Codes
- Running the Dell™ IDE Hard Drive Diagnostics
- Resolving Software and Hardware Incompatibilities
- Windows XP
- Windows 2000
- Using Microsoft ® Windows ® XP System Restore
- Creating a Restore Point
- Restoring the Computer to an Earlier Operating State
- Undoing the Last System Restore
- Enabling System Restore
- Reinstalling Microsoft® Windows® XP
- Before You Begin
- Reinstalling Windows XP
- Booting From the Operating System CD
- Windows XP Setup
- Using the Drivers and Utilities CD
- Drivers for Your Computer
- Index
- B
- C
- D
- E
- H
- |
- L
- M
- 0
- P
- R
- s
- T
- U
- W
- Počítač Mini-Tower
- K
- Complete installatie 82
- Problemen oplossen 83
- Over uw minitower computer
- Klein bureaumodel computer
- Minitower computer
- π
- n
- 1
- (בַרְׁה) Drivers and Utilities CD (בַרְׁה)
- Windows XP 70 70
- Windows XP 76
- תְרָה בְּרָה
- Drivers and Utilities CD (Dell Diagnostics) Dell Diagnostics (Dell Diagnostics)
- (Dell Diagnostics) Dell Diagnostics
- בַרְשָׁה בַרְשָׁה
Brand : DELL
Model : OptiPlex 170L
Category : Desktop computer