
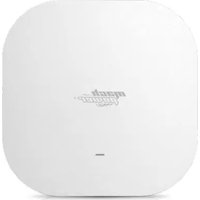
WL-APODB1200P48-083 - Access Point Mach Power - Free user manual and instructions
Find the device manual for free WL-APODB1200P48-083 Mach Power in PDF.


| Product Type | Dual-band Wireless Access Point |
| Brand | Mach Power |
| Model | WL-APODB1200P48-083 |
| Wireless Standards | 802.11a/b/g/n/ac |
| Frequency Bands | 2.4 GHz and 5 GHz |
| Maximum Data Rate | 1200 Mbps (300 Mbps on 2.4 GHz + 867 Mbps on 5 GHz) |
| Operating Modes | Fit AP (default) and Wireless Router |
| Default IP Address | 192.168.1.2 |
| Default Username | admin |
| Default Password | admin |
| Power Supply | PoE (Power over Ethernet), 48V |
| Dimensions (approx.) | 180 x 180 x 30 mm |
| Weight (approx.) | 300 g |
| Wireless Security | WPA2-AES, WPA-PSK, WPA2-PSK, Open |
| Management Features | Web interface, centralized controller, cloud management |
| Advanced Features | Multiple SSIDs, VLAN, WMM, user isolation, PING watchdog, scheduled reboot, weak signal rejection |
| Firmware Update | Local upload or cloud upgrade |
| LED Control | On/Off via schedule or immediate switch |
| WAN Connection Types | DHCP, Static IP, PPPoE |
| Mounting | Ceiling/wall mount (typical) |
| Operating Temperature | 0°C to 40°C (estimated) |
| Humidity | 10% to 90% non-condensing (estimated) |
Frequently Asked Questions - WL-APODB1200P48-083 Mach Power
User questions about WL-APODB1200P48-083 Mach Power
0 question about this device. Answer the ones you know or ask your own.
Ask a new question about this device
Download the instructions for your Access Point in PDF format for free! Find your manual WL-APODB1200P48-083 - Mach Power and take your electronic device back in hand. On this page are published all the documents necessary for the use of your device. WL-APODB1200P48-083 by Mach Power.
USER MANUAL WL-APODB1200P48-083 Mach Power
3.2 Wireless router mode ... 6
- WAN settings ... 6
- Wireless Settings ... 6
- WiFi planning ... 7
- LED ... 7
- AC management (Controller) ... 8
8.1 Centralized management ... 8
8.2 Cloud management ... 8
9. System settings ... 8
9.1 Change Password ... 8
9.2 System upgrade ... 8
9.2.1 Firmware update ... 8
9.2.2 Configuration management ... 8
9.2.3 AP reboot ... 9
- Advanced Settings ... 9
10.1 DHCP server ... 9
10.2 Multiple SSID setting ... 10
10.3 RF parameters ... 10
10.4 PING-WatchDog ... 11
10.5 Scheduled Reboot ... 12
10.6 System Time ... 12
1. Access to the AP interface
Set the computer's IP address: 192.168.1.23 (example), subnet mask: 255.255.255.0 The default IP address of the AP is 192.168.1.2, the default password is admin.

2. Network Status (Dashboard)
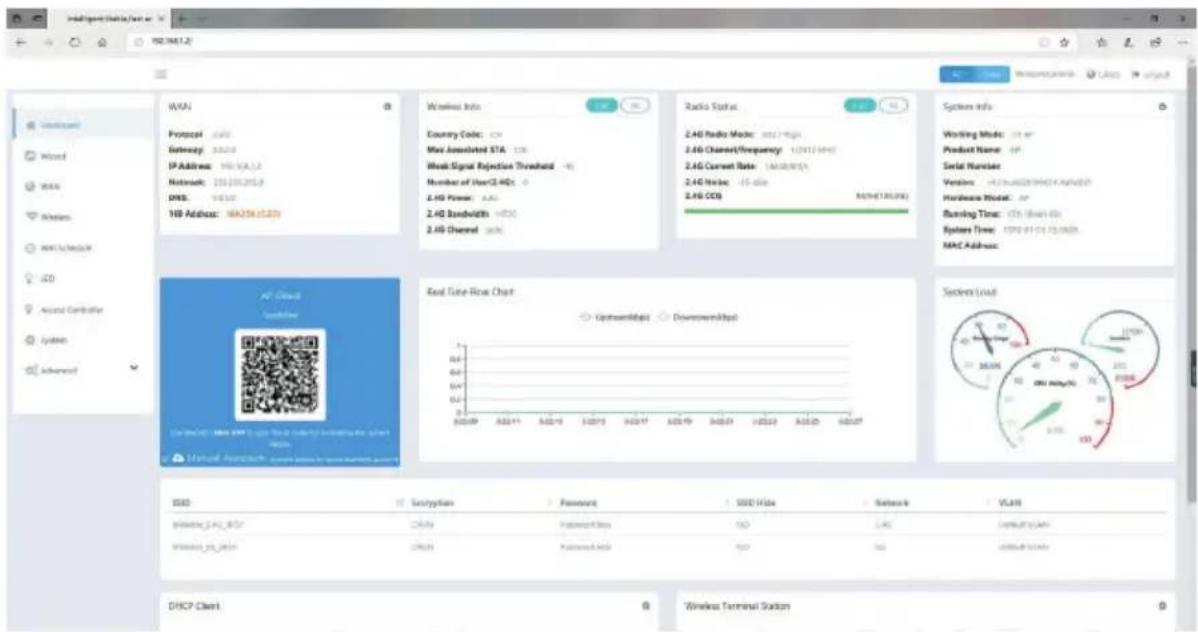
- WAN: Shows information about the AP's network configuration, WAN and LAN ports IP address, gateway address, subnet mask and DNS. (Address 169: it is the IP address automatically assigned to the AP when DHCP is not assigned).
- Wireless info: Shows the 2.4G and 5G wireless information of different countries, the maximum number of connections, the handover roaming threshold, the power, the bandwidth and the channel.
- Radio status: Show 2.4G and 5G wireless protocol mode, channel / frequency, wireless speed, noise and link quality.
- System info: Shows the operating mode, the device model, the firmware version, the execution time and the MAC address.
• Real Time Flow Chart: Indicates the current upstream and downstream speed of the AP. -
System load: Indicates the use of the CPU and memory, the use of the session
-
SSID: Shows the information of different configurations of multiple SSIDs
- DHCP client: Shows a list of IP addresses assigned by the AP to the terminal. Available only for wireless routing modes.
- Wireless terminal station: Displays the list of clients currently connected to the AP.
3. Wizard
Step by step guide to configure your AP
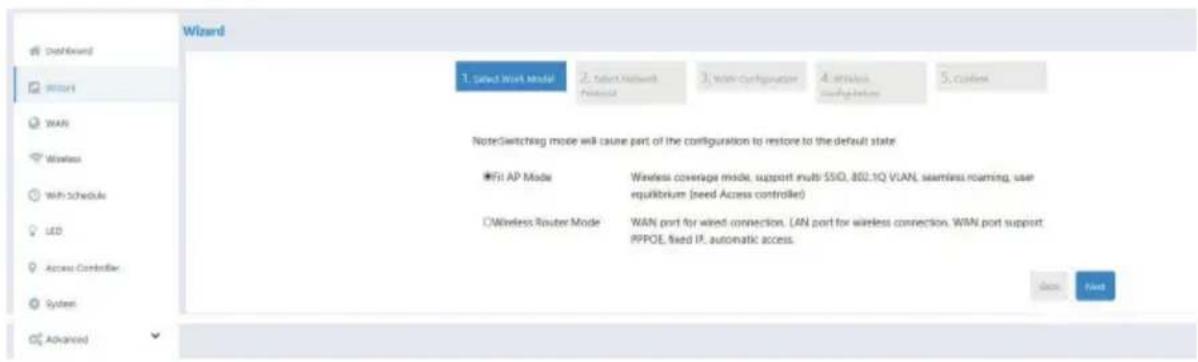
3.1 First step
Select the working mode for your AP ("Fit AP") is the default mode. * Note: DHCP service cannot be enabled in this mode. DHCP will be handled by your router.
- In AP Mode (default mode): The AP is connected to the router and will act as a wireless access point. For better performance and control options, you can connect to an AC controller (sold separately). For more details, refer to the gateway manual.

flowchart
graph LR
    A["MODEM"] --> B["ROUTER 192.168.11.1/24"]
    B --> C["POE SWITCH"]
    C --> D["AP 192.168.1.2/24"]
    D --> E["Smartphone 192.168.11.3/24"]
- Select the network protocol (DHCP or Static).
Note: The default IP address of the AP (192.168.1.2) will be changed to the IP address selected during this step.
- WAN Configuration: You can set the DNS.
- Wireless setup: You can change the SSID name and encryption mode and go to "Wireless Settings" to change the detailed setup
- Confirm that the setup is complete.
Note: Once you have changed the default IP of the AP, you will need to log in with the newly assigned IP. If the settings were "static", use the static IP address assigned to the unit. If the settings were "DHCP", log in to the router which is assigning the IP to this AP unit and search the IP assigned to the AP by searching the MAC address of the AP from the router's connected device list.
3.2 Wireless router mode (If supported)
The WAN port of the AP will be connected directly to the MODEM. Start the DHCP service of the AP.

flowchart
graph LR
    A["MODEM"] --> B["AP"]
    B --> C["192.168.11.1/24"]
    B --> D["192.168.11.100/24"]
- Select the network connection mode: select the type of Internet service to which you have subscribed with the ISP (DHCP, Static, PPPoE).
- Configure the external network: DHCP: IP, subnet and Gateway will be assigned automatically by your ISP. Static IP: Enter the IP, subnet and gateway information provided by your ISP. PPPoE: Enter the ID and password provided by your ISP.
- Configure the wireless network: Change the SSID name and encryption mode and go to "Wireless Settings" to change the detailed configuration.
- Confirm that the setup is complete.
Note: When wireless routing mode is selected, the IP address of the AP will be changed to 192.168.11.1 and the DHCP service will be enabled.
4 WAN settings
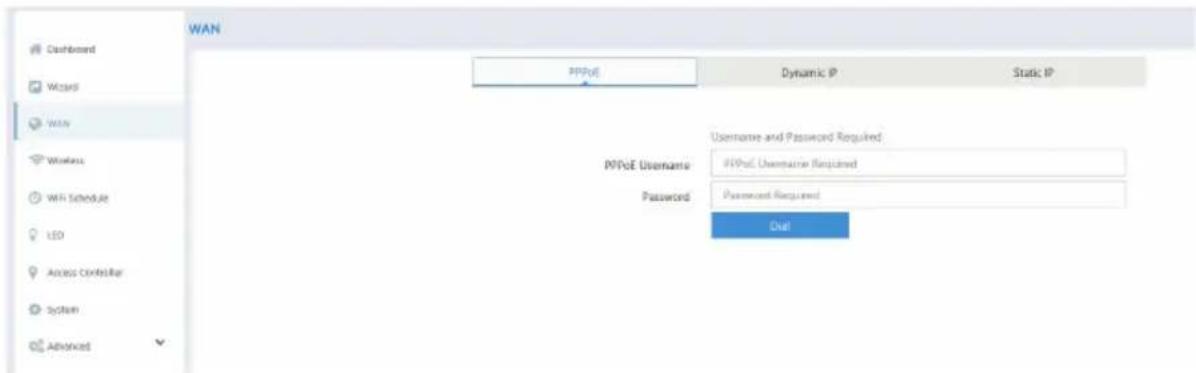
Configure the AP to connect to the WAN: DHCP, static IP, PPPoE are supported.
Note: If you have previously followed the configuration process using the wizard, you do not need to configure these options again.
5 Wireless settings
Configure the 2.4GHz and 5GHz wireless settings by entering SSID and encryption methods. Note: If you have previously followed the configuration process using the wizard, you do not need to configure these options again. If you need more SSIDs, you can go to the "Advanced" tab and set the additional SSID names.

6 WiFi planning
You can set up a WiFi availability schedule by entering the start and end times for each day of the week by enabling the "WiFi Schedule" option. If not enabled, WiFi will always be available

7 LED
The LED light on the AP can be "ON" or "OFF"

8 AC Management (Controller)
Cloud Direct or Cloud Managed Centralized Gateway Options
8.1 Centralized Management
By default, the AP is managed through a Gateway Appliance which offers centralized and quick management of multiple AP units. Refer to the AP Management section of the Gateway User Manual.
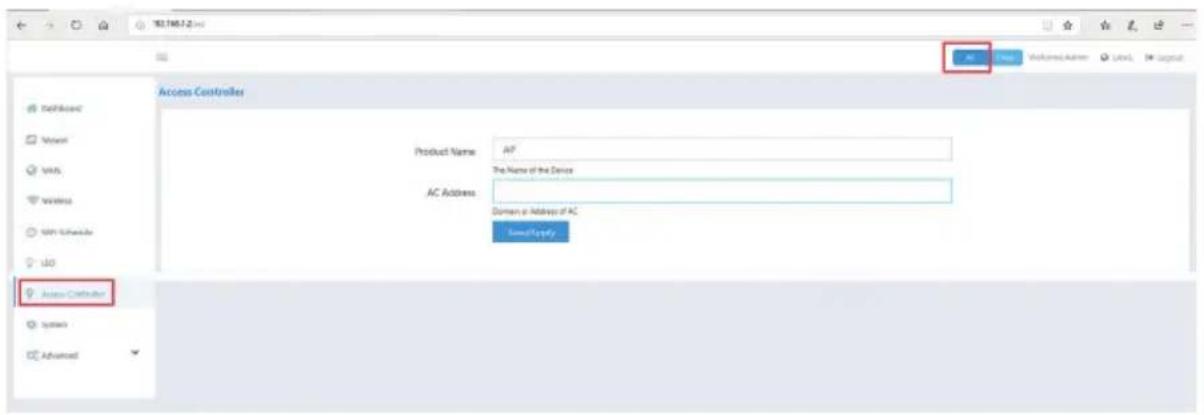
8.2 Cloud Management
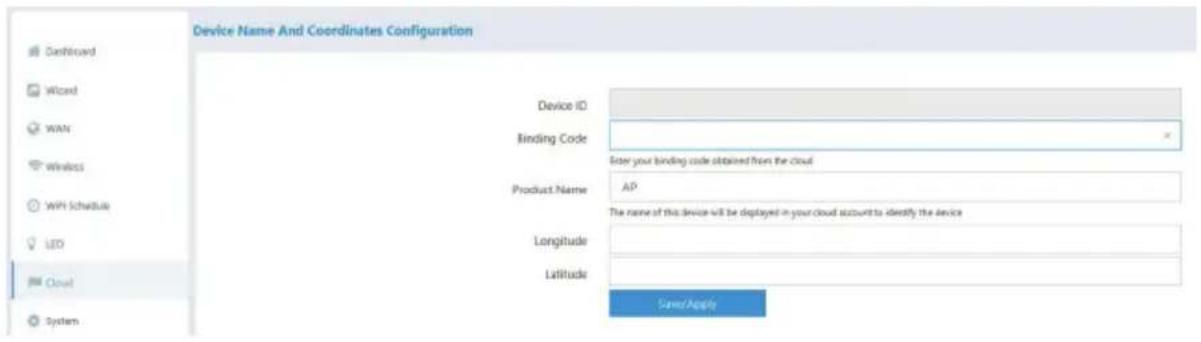
When this option is checked, the AP is registered directly on the cloud server (http://165.22.140.64). Once you have created your user account on the site, you will be assigned a binding code which must be used to associate the AP with your cloud account. You will now be able to manage your APs via the Cloud account. For a detailed explanation, refer to the Cloud Account Guide.
9 System Settings
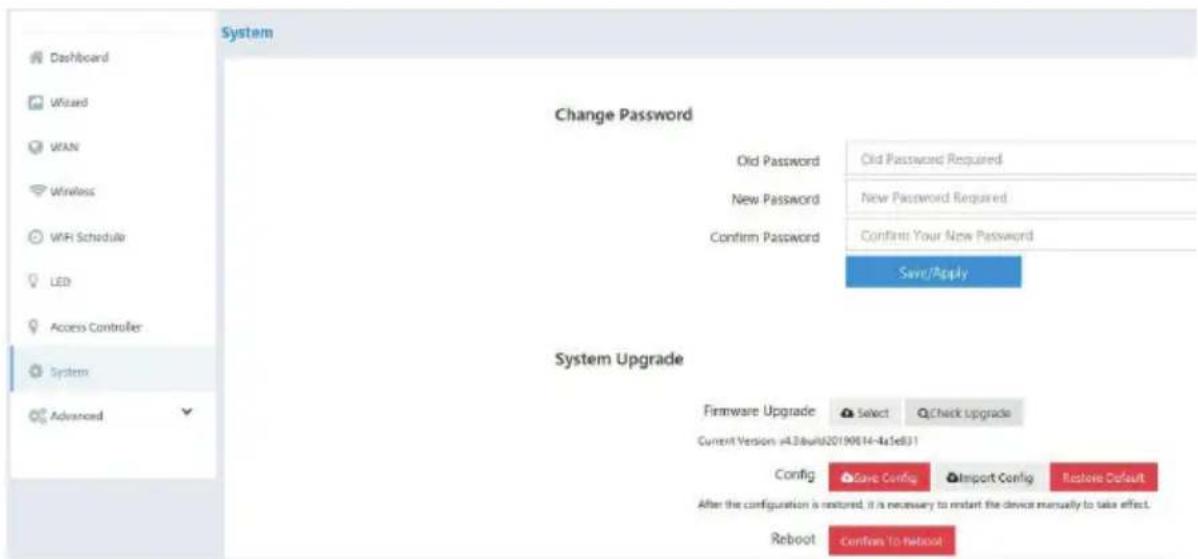
9.1 Change password: to change the password, enter the old password, enter the new password, confirm the new password and click "Save / Apply" to make the changes.
9.2 System update: In this section you can update the firmware (manually from a local file or via the cloud update), save and import configuration files and restore factory settings.
9.2.1 Firmware update
- Click "Select" to manually update from a downloaded firmware file.
- Click "Check Upgrade" to check and upgrade from a cloud server when new firmware is available.
9.2.2 Configuration Management
- Click on "Save Config" to save the current AP configuration on a local PC.
- Click on "Import Config" to restore a configuration saved in the AP.
- Click "Restore Default" to restore all settings to the factory default state on the AP
9.2.3 AP reboot
Click "Confirm to Reboot" to reboot the AP
10 Advanced Settings
10.1 DHCP Server
If enabled, it will automatically assign IP addresses to connected devices.
(Feature available on supported models and applicable only when the AP mode is set to "Wireless Router Mode")

10.2 Multiple SSID Settings
Ability to create or delete multiple SSIDs for the AP in the 2.4GHz or 5GHz bands

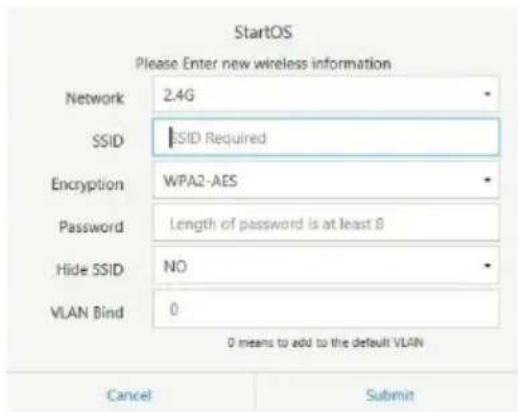
Click on "Add", select the 2.4G or 5G network channel, enter the required SSID and password, select "YES" or "NO" in "Hide SSID" to display or not the SSID and fill in the "VLAN Bind "if necessary, then click" Submit".
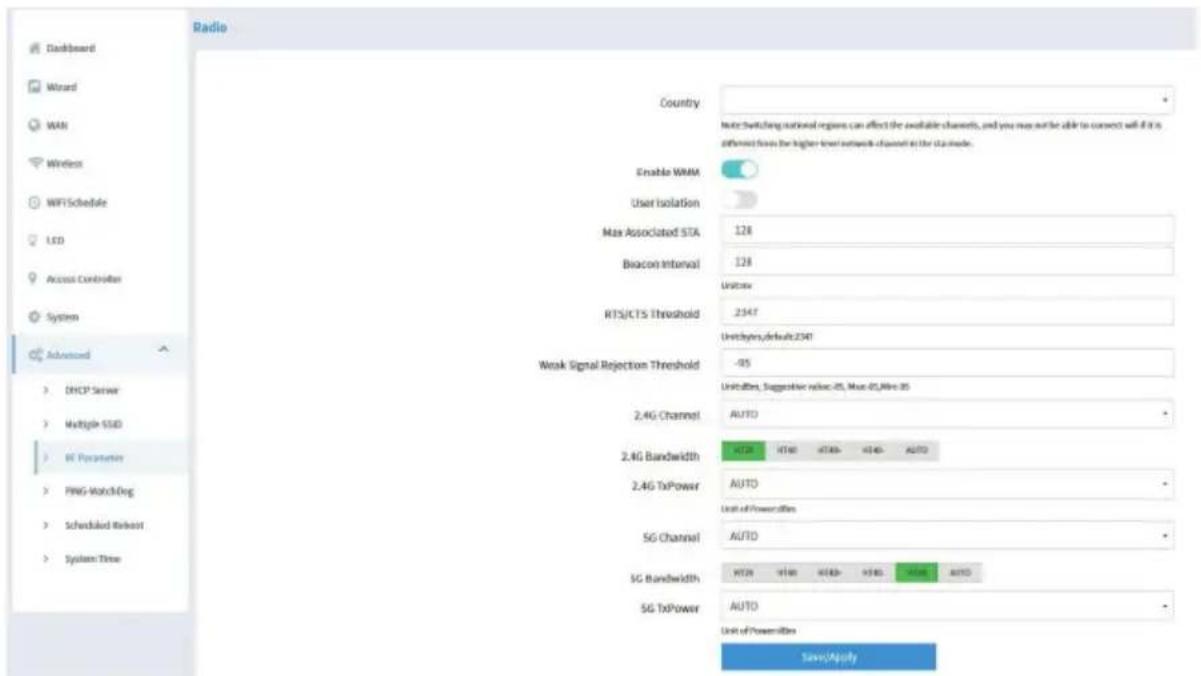
10.3 RF parameters

• Country: Select the corresponding country where the device is located.
- WMM: Wi-Fi Multimedia, when "Enabled", will provide the basic Quality of Service (QoS) functions. WMM prioritizes traffic based on four access categories (AC): voice (AC_VO), video (AC_VI), best effort (AC_BE), and background (AC_BK). However, it does not provide the guaranteed bandwidth range. It is suitable for well-defined applications that require QoS, such as Voice over IP (VoIP) on Wi-Fi phones.
- User Isolation: It is recommended to activate this function only if necessary, as if activated, all terminal devices connected via Wi-Fi will not be able to access each other after connection.
- Max Associated STA: Limit the number of devices that can connect to this AP, 40-50 is recommended.
- Beacon Interval: The Beacon Interval could help your WiFi network maintain connection with other devices. It is recommended to keep the default values.
- RTS/CTS Threshold: The wireless AP sends request to send (RTS) frames to a particular receiving device and negotiates the sending of a data frame. After receiving an RTS, the device responds with a Clear to Send (CTS) frame to acknowledge the right to initiate transmission. It is recommended to keep the default values.
- Weak Signal Rejection Threshold: The AP will reject the connection to any wireless device that tries to connect with a signal strength lower than the set value.
- 2.4G / 5G Channel: 2.4G / 5G frequencies support automatic adaptation to allowed wifi channels according to the selected country code.
• 2.4G Bandwidth: Support 20/40/40 + / 40- MHz
• 5G Bandwidth: 20/40/40 + / 40- / 80MHz
- 2.4 / 5G TxPower: 2.4G supports up to 27dBm and 5G supports up to 23dBm.
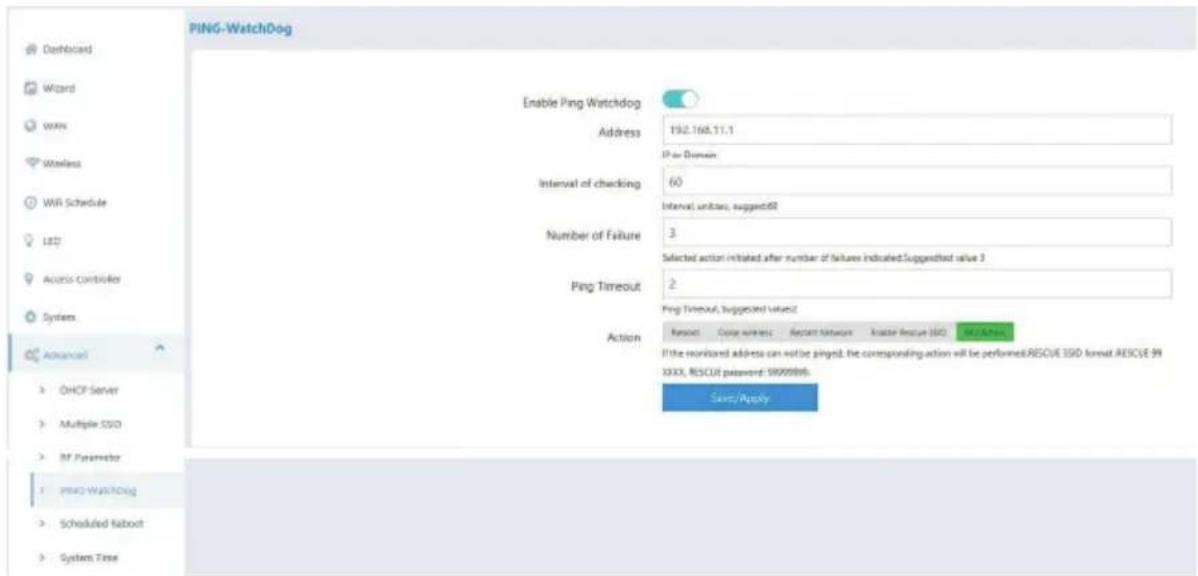
10.4 PING-WatchDog
After the function has been enabled, the AP can perform line detection and perform preset actions.
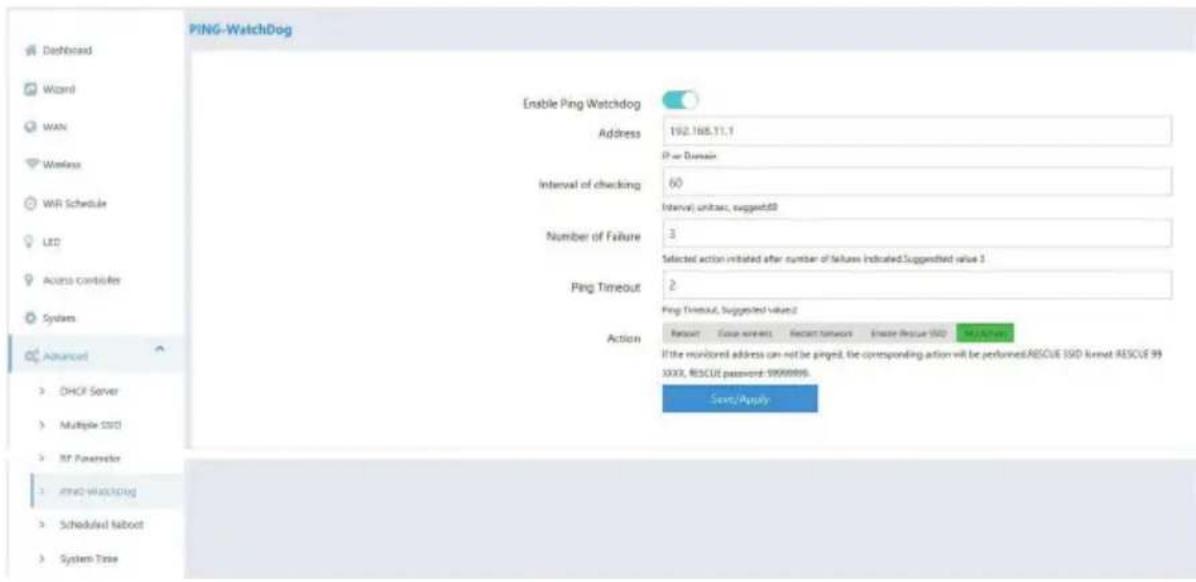
- Watchdog monitoring address: The AP performs the PING test on the address or domain name
- Interval of checking: Ping test interval (unit: second)
- Number of failure: Ping checks the number of consecutive failures and takes actions. The suggested value is 3.
- Ping Timeout: maximum ping time (unit: second)
• Watchdog monitoring action:
- Reboot: Reboot the device
- Turn off wireless: 2.4G and 5G wireless signals are turned off
- Restart the network: Restart the network ports
- Open RESCUE SSID: Increase the wireless RESCUE SSID, name format: RESCUE_99_XXXX, password: 99999999
- No action: No action
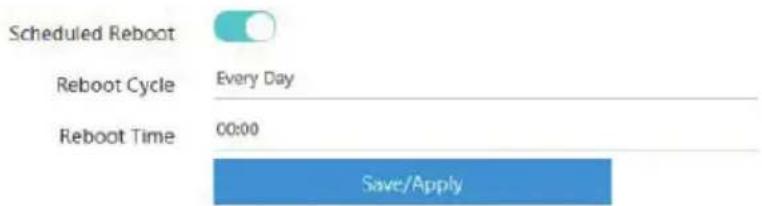
10.5 Scheduled Reboot:
When this feature is on, the AP can be set to auto reboot daily, weekly or monthly according to the schedule created.
10.6 System time
When "NTP (Network Time Protocol)" is enabled, the AP will synchronize the system time installed based on the geographical location. Internet connection required.
INDICE
3.1 Primo passo
8 Gestione AC (Controller)
8.2 Gestione cloud
10.3 Parametri RF
• Watchdog monitoring action:
INDICE
- Acceso a la interfaz AP ... 28
- Estado de la red (panel) ... 28
- Asistente ... 29
3.1 Primer paso
6 Planificación WiFi
9 Ajustes del sistema
10.3 RF parámetros

For any information and product updates
visit our website www.machpower.it
Mach Power® is a registered trademark
All rights reserved
REV02-221121
- Access to the AP interface
- Network Status (Dashboard)
- Wizard
- First step
- Wireless router mode (If supported)
- WAN settings
- Wireless settings
- WiFi planning
- LED
- AC Management (Controller)
- Centralized Management
- Cloud Management
- System Settings
- Firmware update
- Configuration Management
- AP reboot
- Advanced Settings
- DHCP Server
- Multiple SSID Settings
- RF parameters
- PING-WatchDog
- Scheduled Reboot:
- System time
- INDICE
- Primo passo
- Gestione AC (Controller)
- Gestione cloud
- Parametri RF
- • Watchdog monitoring action:
- Primer paso
- Planificación WiFi
- Ajustes del sistema
- RF parámetros
Brand : Mach Power
Model : WL-APODB1200P48-083
Category : Access Point