
the Fast Slow Pro BPR700 - Multicooker BREVILLE - Free user manual and instructions
Find the device manual for free the Fast Slow Pro BPR700 BREVILLE in PDF.


| Product Type | Multi Cooker |
| Brand | Breville |
| Model | the Fast Slow Pro BPR700 |
| Pot Capacity | 6 liters (removable pot) |
| Power Supply | 110-120 V, 50/60 Hz |
| Power | 1200 W |
| Display | Interactive LCD |
| Cooking Functions | Pressure cooking, slow cooking, steaming, searing, saut\u00e9ing, reducing, keep warm |
| Pressure Levels | 8 levels (1.5 to 12.0 psi) |
| Temperature Settings (slow cooking) | Low (LO) and High (HI) |
| Timer | Up to 2 hours (pressure cooking), up to 12 hours (slow cooking) |
| Keep Warm | Up to 4 hours |
| Steam Release Methods | Auto Quick, Auto Pulse, Natural (hands-free) |
| Altitude Adjustment | Yes, up to 6000 feet |
| Pot Coating | Ceramic without PFOA or PTFE |
| Lid | Removable, dishwasher-safe, silicone gasket |
| Included Accessories | Stainless steel steam basket, stainless steel rack, condensation cup |
| Safety | Safety valve, lock pin, lid lock, overheat protection |
| Cleaning | Pot and lid dishwasher-safe; silicone gasket hand-washable |
Frequently Asked Questions - the Fast Slow Pro BPR700 BREVILLE
User questions about the Fast Slow Pro BPR700 BREVILLE
0 question about this device. Answer the ones you know or ask your own.
Ask a new question about this device
Download the instructions for your Multicooker in PDF format for free! Find your manual the Fast Slow Pro BPR700 - BREVILLE and take your electronic device back in hand. On this page are published all the documents necessary for the use of your device. the Fast Slow Pro BPR700 by BREVILLE.
USER MANUAL the Fast Slow Pro BPR700 BREVILLE
natural_image
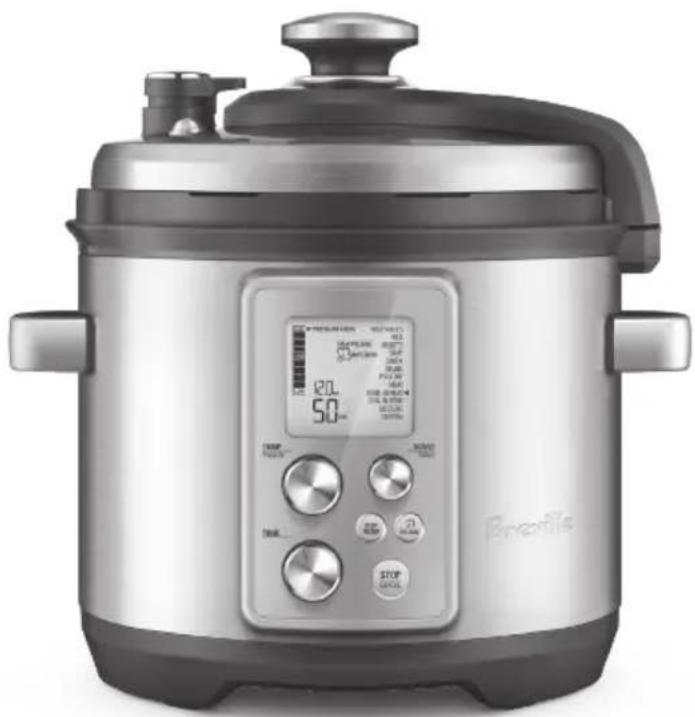
Exterior view of a Breatile rice cooker with digital display and control buttons (no text or symbols on main body)EN
INSTRUCTION BOOK
FR-CA
MANUEL D'INSTRUCTIONS
ES-MX
2 Breville recommends safety first
6 Components
8 Important Safety Information for your Fast Slow Pro ^TM
10 Functions
25 Care & Cleaning
27 Troubleshooting
BREVILLE RECOMMENDS SAFETY FIRST
At Breville we are very safety conscious. We design and manufacture consumer products with the safety of you, our valued customer, foremost in mind. In addition we ask that you exercise a degree of care when using any electrical appliance and adhere to the following precautions.
IMPORTANT SAFEGUARDS cULus
READ ALL INSTRUCTIONS BEFORE USE AND SAVE FOR FUTURE REFERENCE
- Remove and safely discard any packaging material and promotional labels before use.
• To eliminate a choking hazard for young children, remove and safely discard the protective cover fitted to the power plug of this appliance.
• Always ensure the appliance is properly assembled before use.

WARNING
Only use the cooking vessel intended for this appliance; using cooking vessels not provided will result in a non-resettable issue.
- Do not touch hot surfaces. Appliance surfaces are hot during and after operation. To prevent burns or personal injury, always use protective hot pads or insulated oven mitts, and use available handles and knobs.
- Do not place the appliance near the edge of a bench or table during operation. Ensure that the surface is dry, level, clean and free of any liquid and other substances.
- Do not use the appliance on (or close to) a hot gas or electric burner, or where it could touch a heated oven or surface.
- Do not place the appliance in a heated oven.
- Allow to cool before assembling or removing parts.
• Always attach plug to appliance first, then plug cord into the power outlet. - Extreme caution must be used when the cooker contains hot food and liquids and/or is under pressure. Improper use may result in injury. When using this appliance to pressure cook, slow cook and steam, ensure the lid is properly assembled and locked into position before use.
- Do not move the appliance when in use.
- Only use the side handles to carry or move the appliance.
- Do not place food or liquid directly into the stainless steel base. Only the removable cooking bowl is designed to contain food or liquid.
- Never operate the appliance without food and liquid in the removable cooking bowl.
• Always ensure proper liquid/food level in removable cooking bowl.
-‘MAX’ level - Do not exceed the maximum fill level. Overfilling may cause personal injury or property damage or affect the safe use of the appliance.
-‘½’ level - When cooking foods that expand (such as dried vegetables, beans, grains, rice, etc.) DO NOT fill past the middle fill level.
-‘MIN’ level – When pressure cooking, slow cooking or steaming, make sure the removable cooking bowl is filled to at least the minimum fill level (combined food and liquid) to ensure proper operation and to avoid thermal damage and fire.
-Be aware that certain foods, such as apple sauce, cranberries, pearl barley, oatmeal or other cereals, split peas, noodles, macaroni, rhubarb, or spaghetti can foam, froth, and splutter, and clog the pressure release valve. These foods should not be cooked in a pressure cooker.
- Before use, always check pressure release valve and safety locking pin for clogging or obstruction and clean if necessary. Check to make sure the safety locking pin under the lid moves freely.
• Always ensure the safety locking pin is properly aligned within the opening of the lid arm and is not restricted in any way. If the pin is restricted or
cannot align properly, do not operate the appliance and call Breville Consumer Support.
- Do not attempt to open the lid after pressure cooking until all internal pressure has been released and is slightly cooled. If the lid will not turn to unlock, this indicates that appliance is still under pressure – do not force lid open. Any pressure remaining can be hazardous. See operating instructions in this instruction book.
- Never place your hands, arms or face over the pressure release valve.
- Do not use this appliance for pressure frying with oil.
- Do not attempt to operate the appliance by any method other than those described in this book. Do not leave the appliance unattended when in use.
- A short power-supply cord is used to reduce the risk resulting from it being grabbed by children, becoming entangled in, or tripping over a longer cord.
- Intended for countertop use only.
- Before cleaning, ensure the cooker is turned off, unplugged, cooled to room temperature
and all pressure has been released.

WARNING
Spilled food can cause serious burns. Keep appliance and cord away from children. Never drape cord over edge of counter, never use outlet below counter, and never use with an extension cord.
IMPORTANT SAFEGUARDS FOR ALL ELECTRICAL APPLIANCES
- Fully unwind the power cord before use. Do not let the power cord hang over the edge of a bench or table, touch hot surfaces or become knotted.
• To avoid electric shock, do not immerse the cord, plug or appliance in water (or other liquids). - If the appliance is to be left unattended, cleaned, moved, assembled or stored, always ensure the cooker is turned off by pressing and holding the STOP/CANCEL button on the control panel. The cooker is off when the button backlight is no
longer illuminated. Unplug the cord from the power outlet.
- Close adult supervision is necessary when this appliance is used by or near children.
- It is recommended to regularly inspect the appliance and power cord. Do not use the appliance if there is damage to the power cord or plug, or after the appliance malfunctions, has been dropped or damaged in any way. Immediately stop use and call Breville Consumer Support.
- The use of attachments not recommended or sold by Breville may cause fire, electric shock or injury.
- This appliance is for household use only. Do not use this appliance for anything other than its intended use. Do not use in moving vehicles or boats. Do not use outdoors. Misuse may cause injury.
BREVILLE ASSIST® PLUG
Your Breville appliance comes with a unique Assist® Plug, conveniently designed with a finger hole to ease removal from the power outlet.
SHORT CORD INSTRUCTIONS
Your Breville appliance is fitted with a short power supply cord to reduce personal injury or property damage resulting from pulling, tripping or becoming entangled with a longer cord.
CALIFORNIA PROPOSITION 65:
(Applicable to California residents only). This product contains chemicals known to the State of California to cause cancer, birth defects or other reproductive harm.
FOR HOUSEHOLD USE ONLY SAVE THESE INSTRUCTIONS

Components
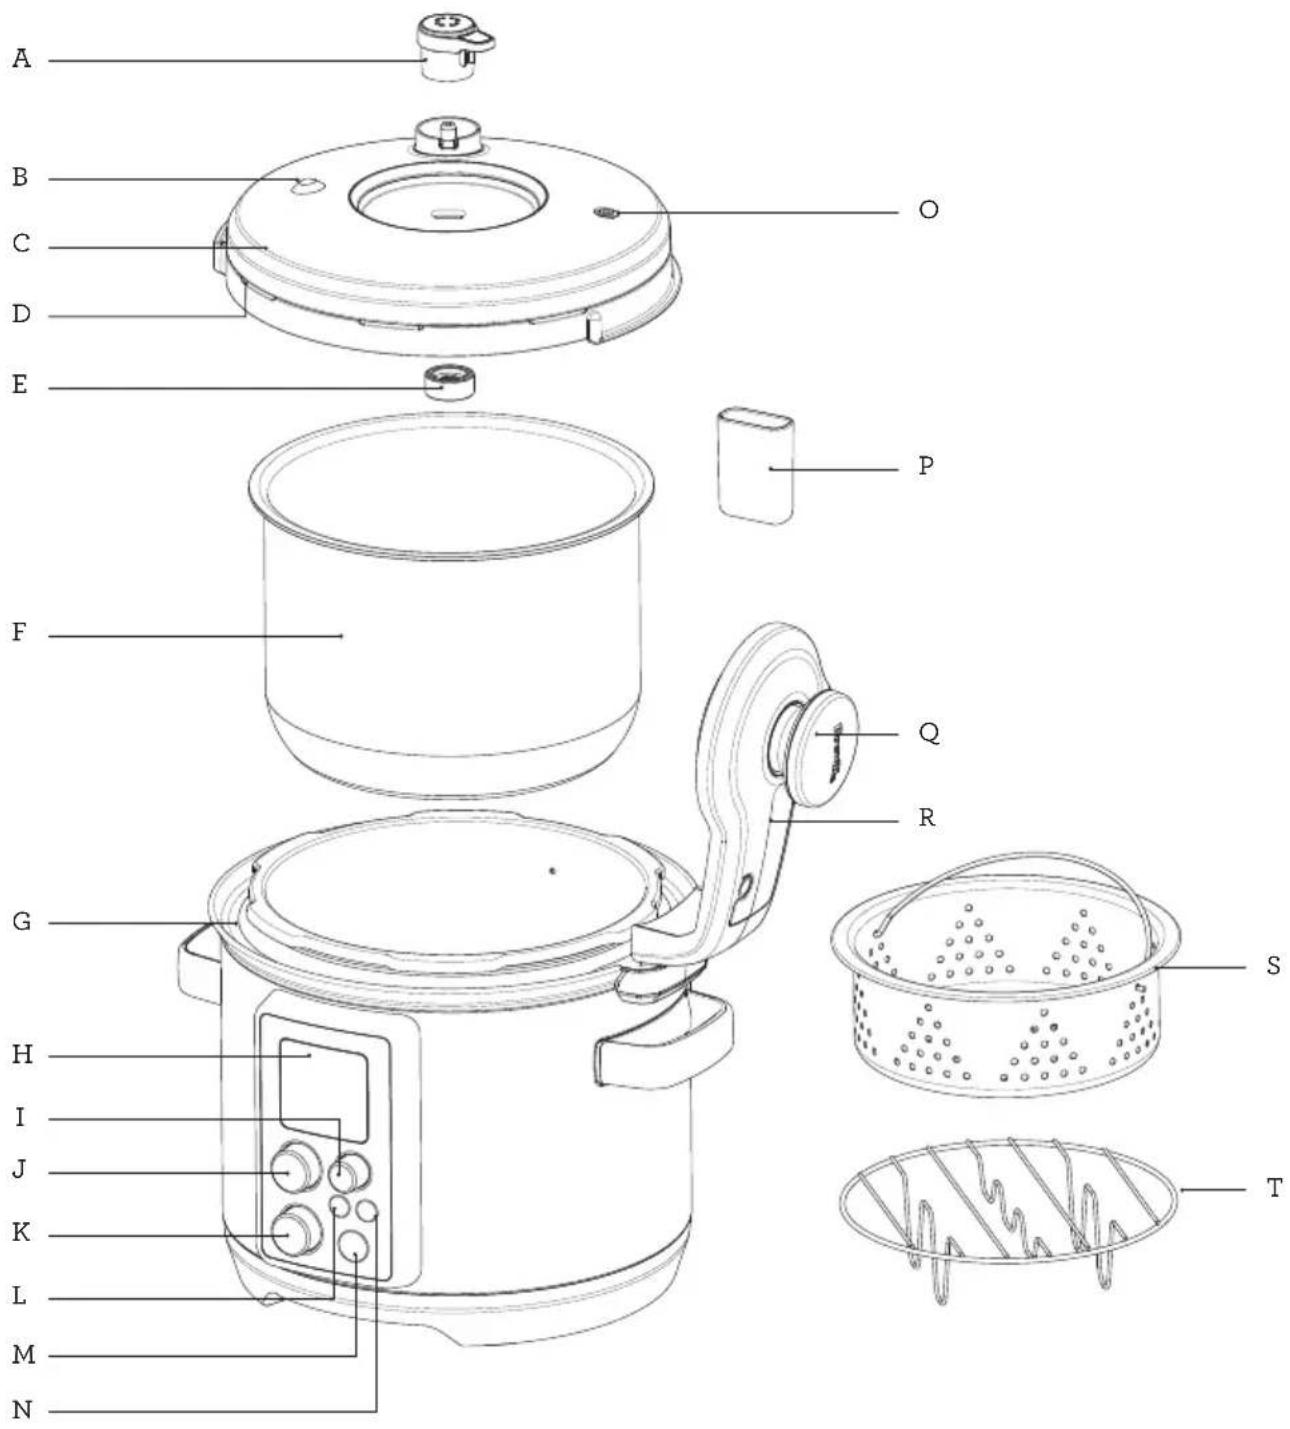
A. Pressure Release Valve Automatically controls the rate at which steam is released from the cooker.
B. Pressure Safety Valve C. Dishwasher Safe Removable Lid
D. Silicone Gasket Easy fitting for hassle free assembly and cleaning.
E. Sealing Nut F. 6 Quart (6L) Removable Cooking Bowl Ceramic coating does not contain PFOA or PTFE.
G. Easy Clean Moat Catches condensation drips and food spills for a mess-free clean up.
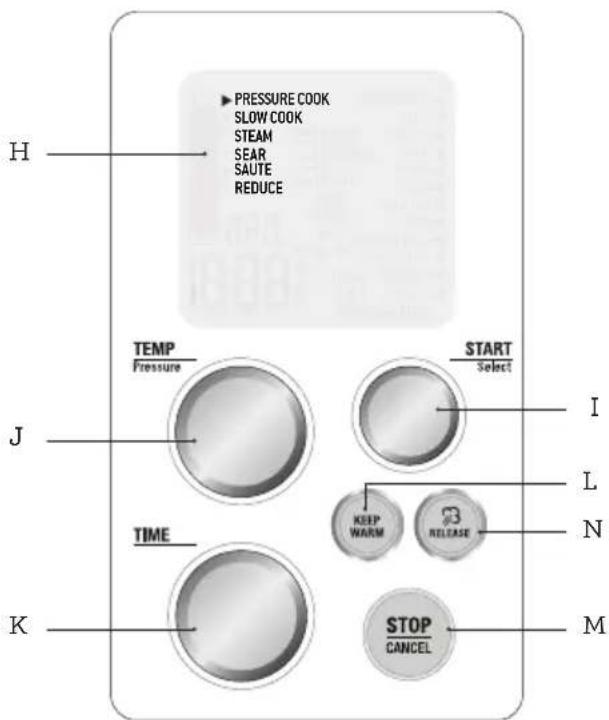
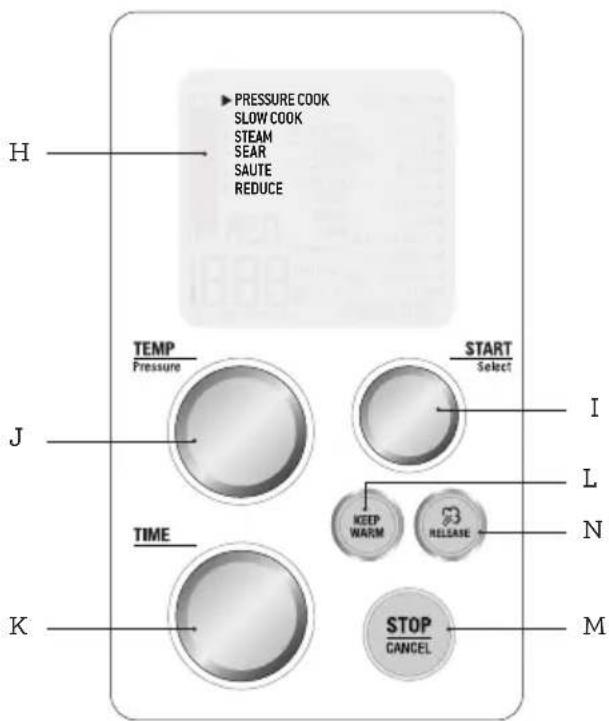
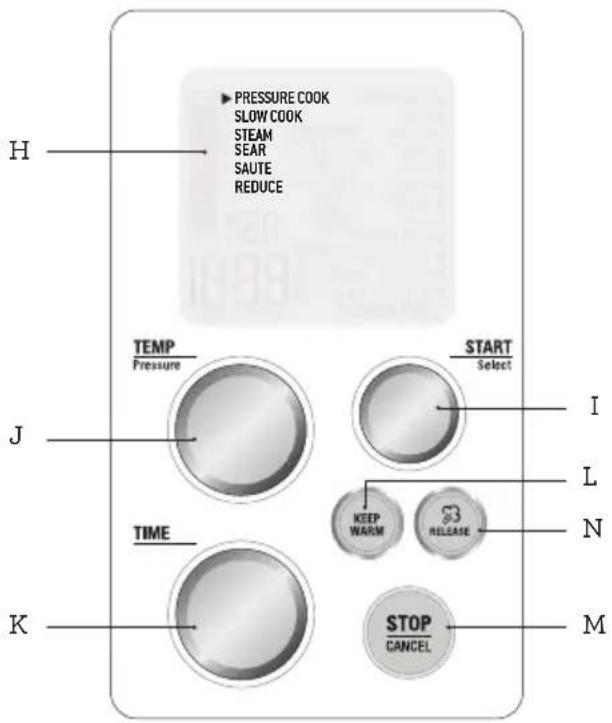
H. Interactive LCD Tells you when the cooker is building pressure, cooking and releasing steam.
I. Start/Select Dial J. Temperature/Pressure Dial 8 pressure levels range from low for delicate foods to high for extra fast cooking. 2 heat settings allow slow cooking from 2 to 12 hours.
Select from 3 heat settings in sauté and reduce settings.
K. Time Dial
L. Keep Warm Holds food at a safe serving temperature for up to 4 hours. Can be automatically enabled at the end of pressure or slow cook cycles.
M. Stop/Cancel Press to pause cooking or return to previous screen.
N. Release Button Press to select between Auto Quick, Auto Pulse and Natural steam release. Press and hold to open the pressure release valve.
O. Safety Locking Pin Pin pops up once pressure is reached, acting as a safety locking device.
P. Condensation Drip Cup Q. Lid Knob Turn to lock/unlock lid.
R. Lid Arm S. Stainless Steel Steamer Basket
T. Stainless Steel Rack Raises food out of the cooking liquid and also supports the steamer basket when steaming.
IMPORTANT SAFETY INFORMATION FOR YOUR FAST SLOW PRO™
This appliance cooks under pressure and must be operated and maintained as described in this manual. The trapped air pressure inside the pressure cooker may cause a hazardous situation if not operated and maintained as described in this manual.
• Always ensure proper liquid/food level in the removable cooking bowl.
- 'MAX' level (4.5 quarts) - Do not exceed the maximum fill level. Overfilling may cause personal injury or property damage or affect the safe use of the cooker.
- '½' level (3 quarts) - When cooking foods that expand (such as dried vegetables, beans, grains, rice, etc.) DO NOT fill past the middle fill level.
- 'MIN' level (1 quart) – When pressure cooking, slow cooking or steaming, make sure the removable cooking bowl is filled to at least the minimum fill level (combined food and liquid) to ensure proper operation and to avoid thermal damage and fire.
NEVER FORCE THE LID CLOSED
CLOSING THE LID
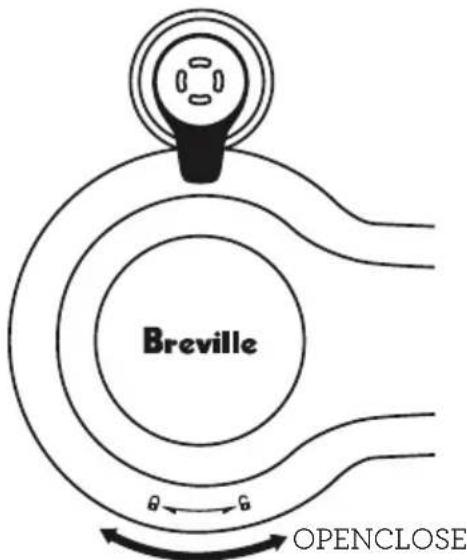
- Make sure the silicone gasket is properly inserted around the wire ring on the underside of the lid and that the safety locking pin moves freely. - Lower the lid into the closed position. Turn the lid knob clockwise towards the closed lock graphic. The lid should close and lock into place with ease and minimal effort. DO NOT STRAIN OR FORCE THE LID TO CLOSE. The cooker alert will sound when the lid locks.
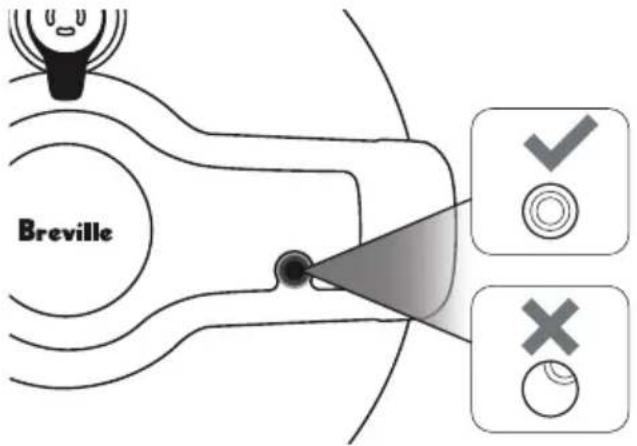
• Always ensure the safety locking pin is properly aligned within the opening of the lid arm and is not restricted in any way.

NOTE
If the contents of the cooker are hot when closing the lid, it may be necessary to press down slightly on the lid knob while the lid is still in the unlocked position, allowing the lid to turn easily.
AUTOMATIC HANDS-FREE STEAM RELEASE
The cooker features automatic hands-free steam release that will occasionally release steam as the cooker pressurizes as well as automatically start the steam release cycle after cooking.
- Never place your hands, arms or face over the pressure release valve.

NOTE
In addition to the automatic hands-free steam release, pressure can be released by pressing the RELEASE button or by manually turning the pressure release valve.
NEVER FORCE THE LID OPEN
OPENING THE LID
- Turn the lid knob counter-clockwise towards the open lock graphic. The cooker alert will sound when the lid unlocks.
- The lid should open with ease if all internal pressure has been released. Never force the lid open.
- If the lid will not unlock, or if you encounter resistance, it may indicate the cooker is still pressurized. Press and hold the RELEASE button until all internal pressure is released and the lid opens easily.

Functions
PREPARING THE FAST SLOW PRO™
- Remove and safely discard any packaging material, promotional labels and tape from the cooker.
- Open the lid by turning the lid knob counter-clockwise and lifting the lid up and off the cooker until it is in the hinged open position. Unscrew and remove the sealing nut from the center of the lid and pull the lid away from the lid arm.
- Wash the lid, silicone gasket, removable cooking bowl and condensation drip cup in hot, soapy water, then rinse and dry thoroughly. Wipe the inside and outside of the cooker base with a soft, damp cloth and dry thoroughly.
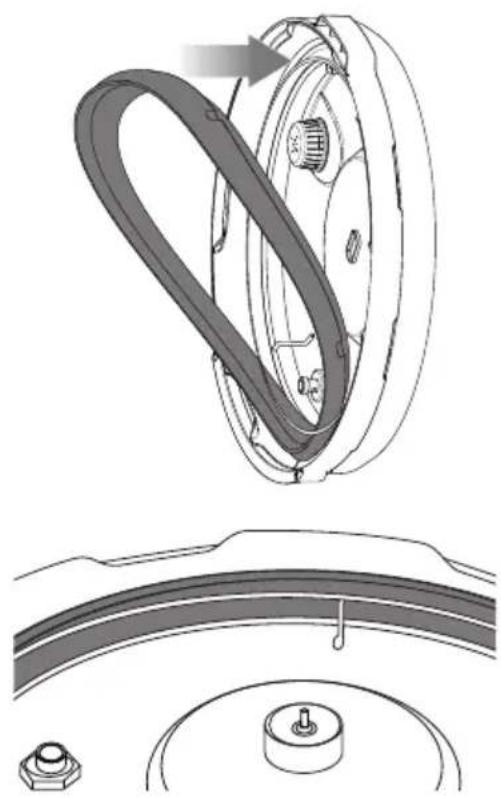
- The silicone gasket is reversible and can be inserted in either direction. Insert the silicone gasket around the outer edge of the wire ring on the underside of the lid. Ensure that it is fully inserted and lies flat under the wire ring.
natural_image
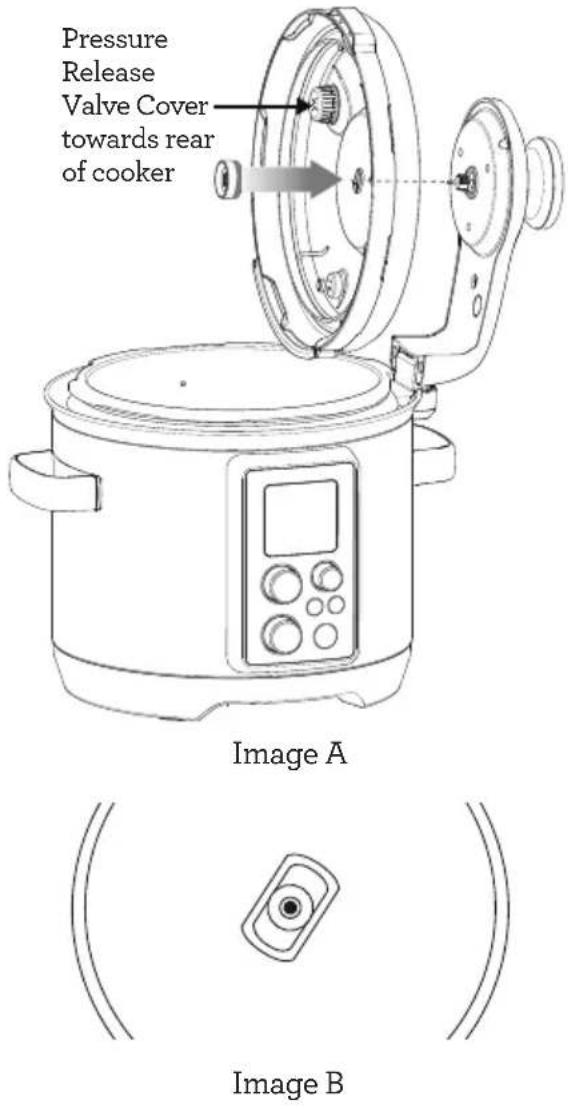
Technical diagram of a mechanical component with a central gear and housing, shown from top and side views (no text or labels)- The lid can only be inserted one way and must be assembled correctly for the cooker to operate. Position the lid so the steam release valve cover is to the rear of the cooker (Image A). Align the center of the lid with the bolt on the underside of the lid arm (Image B) and push it into position to expose the screw thread. Screw the sealing nut, with the red ring touching the lid, onto the bolt to secure the lid. Once assembled, ensure the steam release valve is properly seated in position and facing the lid knob.
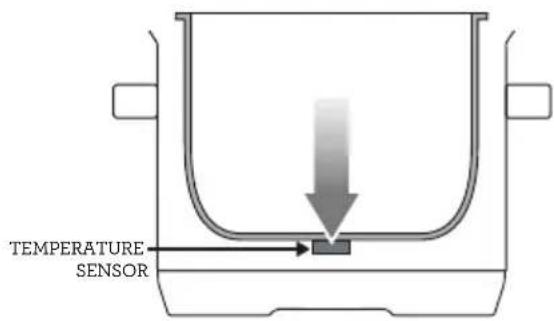
- Clean and dry the underside of the removable cooking bowl and the temperature sensor, making sure there are no unwanted materials on the surface. The removable cooking bowl must sit flat on the temperature sensor to ensure proper contact.
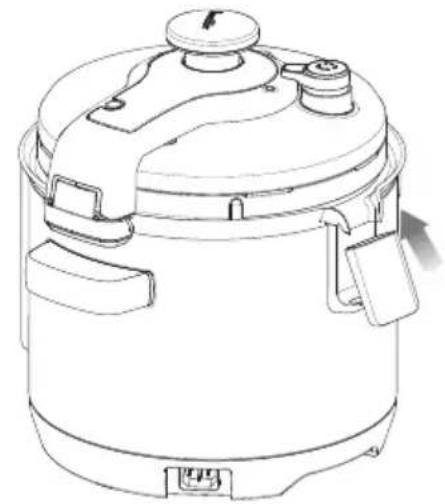
- Click the condensation drip cup into place.
natural_image
Line drawing of a cooking pot with lid, handle, and side panel (no text or symbols)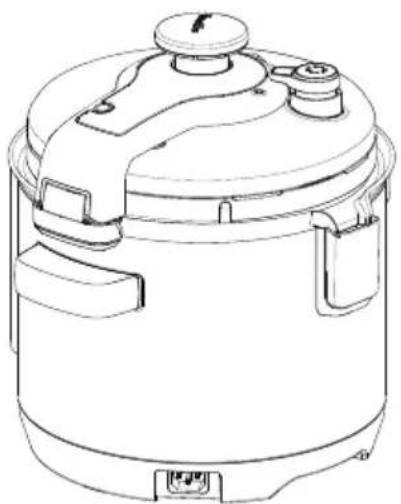
natural_image
Line drawing of a cylindrical cooking pot with lid and side compartments (no text or symbols)-
Insert the connector end of the power cord into the cooker base, ensuring it is completely dry. Insert the power plug into a 120 volt power outlet.
-
The cooker alert will sound and the LCD screen will illuminate. The setting options will appear with an indicator on the PRESSURE COOK setting.
SMART SETTINGS
The Fast Slow Pro™ features 6 Smart Settings; Pressure Cook, Slow Cook, Steam, Sear, Sauté, and Reduce. Pressure and slow cook settings have a list of commonly used food types with preset cooking times and temperatures/ pressure levels to give the best results; however, we suggest experimenting with these depending on the recipe, amount of food being cooked, and your personal taste. Alternatively, you can use the CUSTOM setting to select your own cooking times and temperatures/ pressure levels.
Your CUSTOM setting will remain in the memory of the cooker, even after the cooker is unplugged. To reset to the factory setting, unplug cooker from the power outlet and press and hold the START/SELECT dial while plugging it back in. The letter 'd' and a number will briefly appear on the screen, confirming the reset to factory settings.
HANDS-FREE VARIABLE STEAM RELEASE
The Fast Slow Pro ^TM features 3 steam release methods:
Auto Quick
Pressure is released quickly to minimize overcooking of foods or recipes with short cook times.
Auto Pulse
Pressure is released in bursts to reduce disturbance to the food inside, as well as prevent foam from starchy foods from spraying out of the release valve.
Natural
Pressure subsides naturally without releasing steam through the pressure release valve to prevent the churning up or breaking apart of sensitive ingredients like stocks and beans during pressure release.
The desired steam release method can be selected using the RELEASE button on the control panel.

The selected steam release method will automatically start at the end of the PRESSURE COOK cycle.
Pressing and holding the RELEASE button while the unit is pressurized will open the pressure release valve for 30 seconds.
KEEP WARM
The KEEP WARM function maintains hot foods at safe serving temperature (140°F/60°C or above) until you are ready to serve. The default KEEP WARM time is 2 hours and it can be adjusted up to a maximum of 4 hours. Turn the TIME dial to adjust the programmed KEEP WARM time. After the time is set the LCD screen will continue counting up.
To use KEEP WARM as a standalone function, press the KEEP WARM button on the control panel while in the main settings menu. The LCD screen will display 'KEEP WARM' and the timer will start counting up.

The KEEP WARM function will automatically switch on after any SLOW COOK cycle; however it can be toggled on and off in both PRESSURE COOK and SLOW COOK using the KEEP WARM button on the control panel.
STOP/CANCEL BUTTON AND STANDBY MODE
Pressing the STOP/CANCEL button during any cooking cycle will pause the cycle for up to 5 minutes. If the cycle is not restarted during this time, the cooker will go into standby mode.
Pressing the STOP/CANCEL button during setup or while the cooker is paused will return to the previous screen.
Pressing the STOP/CANCEL button from the main settings menu will switch the cooker to standby mode.
Press and hold the STOP/CANCEL button for 2 seconds at any time to enter standby mode. If there is pressure inside the cooker when it switches to standby mode, it will instead switch to pressure release mode with Natural release selected. Press the RELEASE button to switch to a different release method or press and hold the RELEASE button for an extended release.
ALTITUDE ADJUST
At higher altitudes, the temperature at which water boils decreases as a result of the drop in air pressure. This lower air pressure creates very different conditions for cooking with a pressure cooker.
In order to maintain consistent cooking results at various altitudes, the Fast Slow Pro ^™ has an Altitude Adjust feature that adjusts the settings based on the altitude of your current location.
- To enter Altitude Adjust mode, press and hold STOP/CANCEL to activate standby mode. The button backlight will go out and the LCD screen will no longer illuminate.
- Once in standby, press and hold both the KEEP WARM and RELEASE buttons for 2 seconds. 'ALt' will appear on the screen.
- Turn the TIME dial to enter the altitude of your current location. Altitude can be adjusted from 1,000 ft to 6,000 ft in 1,000 ft increments. The pressure cooker should not be used above 6,500 ft.
- Press the START/SELECT dial to confirm.
- The cooker's settings have now been adjusted for your current altitude. To reset to the factory setting (sea level), unplug cooker from the power outlet and press and hold START/SELECT while plugging it back in. The letter 'd' and a number will briefly appear on the screen, confirming the reset to factory settings.
SETTING MENU RECOMMENDED SETTING SUITABLE FOR
| PRESSURE COOK | VEGETABLES 7.5 psi8 MINAUTO PULSE | Whole & cut potatoes, winter squashArtichokesCarrots, beets & other root vegetables |
| RICE 7.5 psi5 MINAUTO PULSE | Short, medium, long grain white riceShort, medium, long grain brown riceQuinoaAncient grains | |
| RISOTTO 6.0 psi6 MINAUTO QUICK | Arborio riceCarnaroli rice | |
| SOUP 9.0 psi15 MINAUTO QUICK | Broth-based soupsPureed soups | |
| STOCK 12.0 psi60 MINNATURAL | Chicken or meat stockVegetable stock, seafood stock | |
| BEANS 12.0 psi20 MINNATURAL | All dried beans (kidney, black, pinto,cannellini, chickpeas, etc.)Lentils | |
| POULTRY 9.0 psi20 MINAUTO PULSE | Whole chickenBone-in chicken piecesDuck legs, cornish hens | |
| MEAT 12.0 psi40 MINNATURAL | Pot roast, pork buttCorned beefBrisket | |
| BONE-IN MEAT 12.0 psi50 MINAUTO QUICK | Lamb shanksOsso buccoRibsBone-in roasts | |
| CHILI & STEW 10.5 psi20 MINAUTO QUICK | Ground meat chiliesMeat saucesBeef, lamb and other hearty stews | |
| DESSERT 3.0 psi20 MINNATURAL | CustardsCheesecakesBread puddingCompotes | |
| CUSTOM 1.5 psi10 MINAUTO PULSE |
SETTING MENU RECOMMENDED SETTING SUITABLE FOR
| SLOWCOOK | SOUP LO4:00 HRS | Broth soupsPureed soups | |
| STOCK LO6:00 HRS | Chicken or meat stockVegetable stock, seafood stock | ||
| BEANS LO8:00 HRS | All dried beans* (black, pinto,cannellini, chickpeas, kidney, etc.)Lentils | ||
| POULTRY LO4:00 HRS | Whole chickenBone-in chicken pieces | ||
| MEAT LO8:00 HRS | Pot roast, pork buttCorned beefBrisket | ||
| BONE-IN MEAT LO10:00 HRS | Lamb shanksOsso buccoribsBone-in roasts | ||
| CHILI & STEW LO6:00 HRS | Ground meat chiliesMeat saucesBeef, lamb and other hearty stews | ||
| DESSERT LO4:00 HRS | CustardsCheesecakesBread puddingCompotes | ||
| CUSTOM HI4:00 HRS | |||
| STEAM 15 MIN Gently cooking vegetables,seafood and poultrySteaming dumplings | |||
| SEAR Count up time Browning ground meat, roasts,poultry and stew meatBrowning vegetables | |||
| SAUTÉ HICount up time | Onion, garlic and other aromatics | ||
| REDUCE HI10 MIN | Finishing and thickening saucesReducing stocksReducing syrups and glazes | ||
PRESSURE COOK
The PRESSURE COOK setting is a great option for cooking succulent meats, richly flavored stews, delicious soups and even desserts in a fraction of the time and energy taken by conventional cooking methods.
Pressure cooking is a method of cooking food and a small amount of liquid in a gasket-sealed vessel. All the steam from cooking gets retained inside the vessel, building pressure. This increase in pressure raises the temperature of the liquid and steam inside to well above boiling point, allowing food to be cooked up to 70% faster.
- Turn the START/SELECT dial until the indicator reaches the PRESSURE COOK setting. Press the START/SELECT dial to confirm.
- Turn the START/SELECT dial until the indicator on the right hand side of the LCD reaches the desired setting.
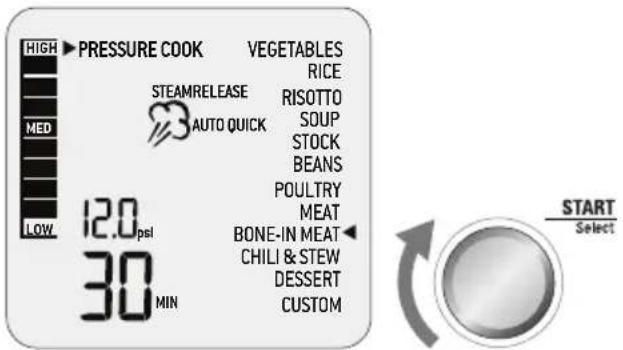
- The top figure on the LCD screen indicates the preset pressure level for the selected setting. Turn the TEMP/PRESSURE dial to the left to reduce the pressure or to the right to increase the pressure. Pressure can be adjusted from 1.5 psi (low) to 12.0 psi (high).
-
The bottom figure on the LCD screen indicates the preset cooking time for the selected setting. Turn the TIME dial to the left to reduce the cooking time or to the right to increase the cooking time. Time can be adjusted up to 2 hours.
-
The steam graphic on the LCD screen indicates the preset steam release method for the selected setting. Use the preset method or press the RELEASE button to select between 'AUTO QUICK', 'AUTO PULSE' or 'NATURAL' steam release.
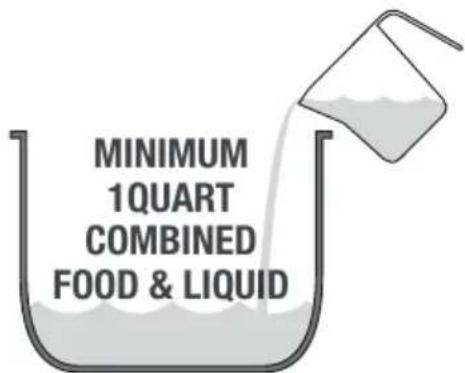
- Place food into the removable cooking bowl. Ensure there is at least 1 quart (1 liter) of combined food and liquid in the bowl.
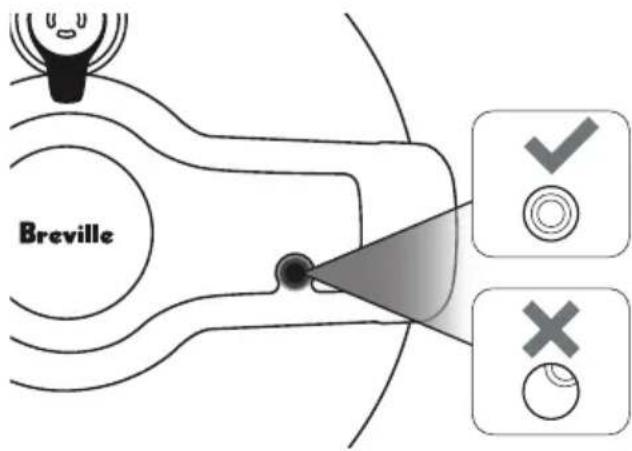
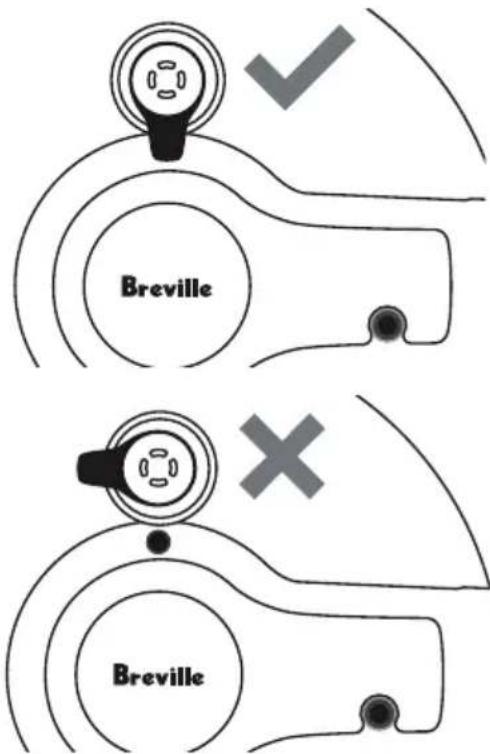
- Close the lid and turn the lid knob clockwise to lock the lid into place. The cooker alert will sound when the lid has been locked. Check that the safety locking pin is properly aligned with the opening in the lid arm and is not restricted in any way.
- Ensure the pressure release valve is placed on the lid, is properly seated in position and facing the lid knob.
-
Press the START/SELECT dial to begin cooking. The STOP/CANCEL button backlight will illuminate red, the LCD screen will illuminate orange, 'PREHEATING' will appear, and the pressure bar on the left will climb to indicate the cooker is building pressure. As pressure builds inside the cooker, the pressure release valve will occasionally release steam. This is the cooker stabilizing its internal pressure and is a normal occurrence.
-
If the lid has not been locked correctly, 'LOCK LID' will appear on the LCD screen. Turn the lid knob clockwise to lock the lid and begin cooking.
-
Once the cooker has reached pressure, the 'PREHEATING' indicator will go out, the cooker alert will sound, the timer will start counting down and the pressure bar will stop climbing, indicating the current pressure in the vessel.
-
The cooking time can be adjusted during the PRESSURE COOK cycle by turning the TIME dial. The cycle can be paused at any time by pressing the STOP/CANCEL button. To end the cycle, press the STOP/CANCEL button a second time.
The pressure level can be increased during the PREHEATING or PRESSURE COOK cycle by turning the TEMP/PRESSURE dial to the right.
The steam release method can be changed during the PRESSURE COOK cycle by pressing the RELEASE button. When 'STEAM RELEASE' flashes on the screen, turn the START/SELECT dial to change the release method. Press the START/SELECT dial to confirm.
-
At the end of the PRESSURE COOK cycle, the cooker alert will sound, the STEAM RELEASE cycle will automatically begin and the steam graphic will flash.
-
At the end of the STEAM RELEASE cycle, the cooker alert will sound, the STOP/CANCEL button backlight will go out, the LCD screen will illuminate blue, and the timer will start counting up.
-
After 30 minutes of inactivity, the LCD screen will go out and standby mode will be activated.

NOTE
If the lid will not unlock after the STEAM RELEASE cycle has completed, this indicates the cooker is still under pressure. Do not force the lid open as any remaining pressure can be hazardous.
Press the RELEASE button until all internal pressure is released and the lid opens easily.
SLOW COOK
The SLOW COOK setting has cooking profiles designed for long cook times at low temperatures. It is ideal for breaking down tough cuts of meat and developing deep flavors.
- Turn the START/SELECT dial until the indicator reaches the SLOW COOK setting. Press the START/SELECT dial to confirm.
- Turn the START/SELECT dial until the indicator on the right hand side of the LCD reaches the desired setting.
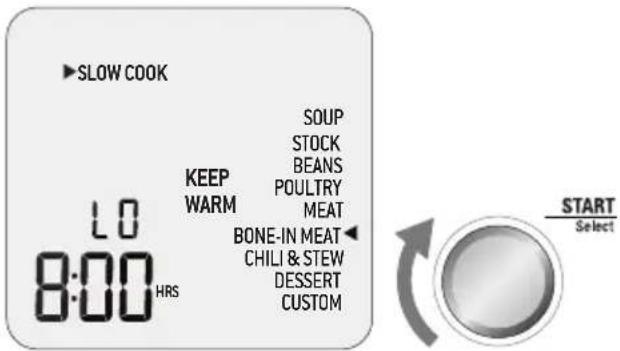
- The top figure on the LCD screen indicates the preset temperature for the selected setting. Turn the TEMP/PRESSURE dial to the left to reduce the temperature or to the right to increase the temperature. Temperature can be adjusted to either 'LO' or 'HI'.
- The bottom figure on the LCD screen indicates the preset cooking time for the selected setting. Turn the TIME dial to the left to reduce the cooking time or to the right to increase the cooking time. Time can be adjusted between 2 and 12 hours.
-
'KEEP WARM' indicates the KEEP WARM function will automatically switch on after the SLOW COOK cycle completes. Press the KEEP WARM button on the control panel to select or deselect the function.
-
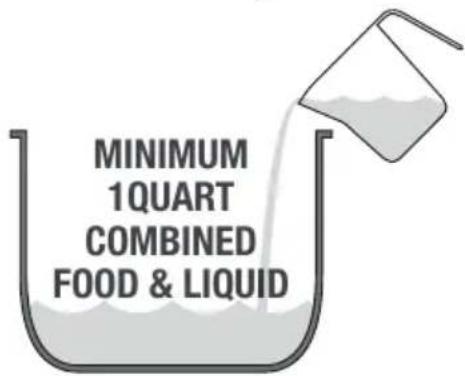
Place food into the removable cooking bowl. Ensure there is at least 1 quart (1 liter) of combined food and liquid in the bowl.
- Close the lid, turn and align to lock position.
- Make sure the pressure release valve weight is on the lid and in close position.
- Press the START/SELECT dial to begin cooking. The STOP/CANCEL button backlight will illuminate red, the LCD screen will illuminate orange and the timer will start counting down.
- The time can be adjusted during the SLOW COOK cycle by turning the TIME dial. The cycle can be paused at any time by pressing the STOP/CANCEL button. To end the cycle, press the STOP/CANCEL button a second time. The temperature can be adjusted during the SLOW COOK cycle by turning the TEMP/PRESSURE dial.
- If 'KEEP WARM' has been selected, at the end of the SLOW COOK cycle, the cooker will automatically switch to the KEEP WARM function. The LCD screen will display 'KEEP WARM' and the timer will start counting up to a maximum of 4 hours. The KEEP WARM cycle can be paused at any time by pressing the STOP/CANCEL button. To end the cycle, press the STOP/CANCEL button a second time.
- If 'KEEP WARM' has not been selected, at the end of the SLOW COOK cycle the cooker alert will sound, the STOP/CANCEL button backlight will go out, the LCD screen will illuminate blue and the timer will start counting up.
- After 30 minutes of inactivity, the LCD screen will go out and standby mode will be activated.
TIPS FOR PRESSURE & SLOW COOKING
Rice
- The PRESSURE COOK RICE setting is designed to cook rice so the rice grains remain separate and tender. It is suitable for all types of rice such as long grain, jasmine, basmati and brown rice.
- When pressure cooking brown rice, increase the cooking time to 20 minutes.
- Measure or weigh dry rice accurately and wash well with cold water until water runs clear. Drain well and place into the removable cooking bowl.
- Add corresponding water amount. For white rice use 1.25 parts water to 1 part rice. For brown rice use 1.5 parts water to 1 part rice. Refer to the table on this page for more information.
• After cooking, allow rice to stand in bowl for 5 minutes before stirring and serving. - Rice will swell and double in size after cooking. Do not overfill the cooking bowl. The total volume of uncooked rice and liquid should not exceed the ‘ 1/2 ’ level marking inside the removable cooking bowl.
Rice Measurements
White Rice Water Servings
| 2 cups 2.5 cups 4-6 |
| 3 cups 3.75 cups 6-8 |
| 4 cups 5 cups 8-12 |
Brown Rice Water Servings
| 2 cups 3 cups 4-6 |
| 3 cups 4.5 cups 6-8 |
| 4 cups 6 cups 8-12 |
Risotto
- The PRESSURE COOK RISOTTO setting is ideal for making creamy risotto, without all the stirring and in a fraction of the time.
- Use the SAUTÉ setting to soften onions and other aromatics, as well as deglaze the cooking bowl with wine.
- The key to creamy risotto is toasting the rice grains before the liquid is added. Use the SAUTÉ setting to toast the rice, stirring frequently, for 3–5 minutes or until the edges become transparent and then turn white.
- With little or no evaporation during pressure cooking, it is important to keep to the ratio of 1 part rice to 3 parts stock. If adding a lot of vegetables to the risotto, reduce stock by a third.
- Rice will swell and double in size after cooking. Do not overfill the cooking bowl. The total volume of uncooked rice and stock should not exceed the 12 level marking inside the removable cooking bowl.
Vegetables
- The PRESSURE COOK VEGETABLES setting is ideal for cooking both large and small portions of various hard vegetables.
- Vegetables can be left whole and unpeeled or cut into smaller pieces and peeled as desired. If pressure cooking whole vegetables, wash well and prick 3–4 times with a knife or fork.
- Add 1 cup of water to the cooking bowl along with prepared vegetables. Vegetables can be placed directly in the cooking bowl, on the rack or in the steamer basket.
- The size and age of vegetables will impact cooking time. Increase the time for larger vegetables.
- Use the STEAM setting for softer vegetables such as broccoli, green beans and asparagus.
- Do not overfill the cooking bowl. The total volume of vegetables should not exceed the 'MAX' level marking inside the removable cooking bowl.
Vegetables Cooking Time
| (minutes) | |
| Artichokes, whole (medium, large) | 5, 8 |
| Beets, whole (small, medium, large) | 15, 20, 25 |
| Brussels sprouts 3-5 | |
| Carrots, whole 6-8 | |
| Cauliflower, whole 6 | |
| Corn (on the cob) 3-5 | |
| Collard and other hearty greens | 10-12 |
| Eggplant, whole 5 | |
| Potatoes, medium/large 10-12 | |
| Potatoes, small/new/ quartered | 8 |
| Squash (acorn, butternut), chunks | 4 |
| Squash (acorn, butternut, spaghetti), halved | 8 |
| Sweet potatoes 8 | |
| Turnips, rutabagas, kohlrabi 5 |
Stock
- The PRESSURE & SLOW COOK STOCK setting is suitable for making all kinds of stock, including chicken, beef and vegetable.
- To make a brown stock, use the SEAR setting to brown bones and vegetables prior to pressure or slow cooking.
- Vegetables such as onions, carrots and celery should be cut into large pieces. This will help keep the stock clear and make it easier to strain at the end of cooking.
- To shorten the pressurizing time, add cold water to bowl while still in the SEAR setting and allow the water to come to a simmer before pressure cooking.
- Do not overfill the cooking bowl. The total volume of water, bones and/or aromatics should not exceed the 'MAX' level marking inside the removable cooking bowl.
Soup
- The PRESSURE & SLOW COOK SOUP setting is suitable for cooking a variety of soups from light broths to hearty minestrone to pureed vegetable soups.
- Use the SAUTÉ setting to soften aromatics and vegetables prior to pressure or slow cooking. Use the SEAR setting to brown meats, bacon or chicken.
- To shorten the pressurizing time, add cold water/stock to bowl while still in the SAUTÉ or SEAR setting and allow the water to come to a simmer before pressure cooking.
- Do not overfill the cooking bowl. The total volume of soup should not exceed the 'MAX' level marking inside the removable cooking bowl.
Beans
- The PRESSURE & SLOW COOK BEANS setting is suitable for cooking all types of dried beans, lentils and other legumes.
- When slow cooking dried kidney, cannellini or broad beans, it is necessary to boil them for 10 minutes before slow cooking. This neutralizes a toxin called phytohemagglutinin that can cause acute digestive distress.
- Beans and other legumes can produce a lot of foam during cooking. The preset NATURAL steam release setting ensures foam does not interfere with the steam release valve.
- Cooking times are based on unsoaked dried beans. To shorten the cooking time, soak beans in cold water overnight. Discard soaking water and cook with fresh cold water for half of the preset cooking time.
- Use a ratio of 1 part beans to 3 parts water.
- Beans and legumes swell and double in size after cooking. Do not overfill the cooking bowl. The total volume of uncooked legumes and water should not exceed the 1/2 level marking inside the removable cooking bowl.
Chili & Stew
- The PRESSURE & SLOW COOK CHILI & STEW setting is ideal for cooking ground meat chilies, meat sauces and hearty stews.
- Use the SEAR & SAUTÉ settings to brown meat and soften aromatics prior to cooking.
- Unlike traditional stovetop methods, pressure and slow cooking have almost no evaporation. For thick, rich chilies and stews use less liquid than called for in traditional recipes. Use the REDUCE setting after cooking to thicken foods that are too soupy.
- Do not overfill the cooking bowl. The total volume of uncooked chili or stew ingredients should not exceed the 'MAX' level marking inside the removable cooking bowl.
Poultry
- The PRESSURE & SLOW COOK POULTRY setting is designed for cooking whole birds and poultry pieces.
- Use the SEAR setting to brown skin before pressure or slow cooking.
- To cook a whole chicken, pour 34 cup (180ml) water or other liquid in the removable cooking bowl. Place the chicken upright on the rack, neck pointing upward.
- Do not overfill the cooking bowl. The total volume of uncooked ingredients should not exceed the 'MAX' level marking inside the removable cooking bowl.
Meat
- The PRESSURE & SLOW COOK MEAT setting uses high temperature/pressure to dissolve connective tissue, producing fork-tender, succulent results. Sauces become thick and well developed.
- Choose well-marbled cuts of meat for the best flavor and texture.
- Cut larger pieces of meat into 2 or 3 pieces to better fit the cooking bowl.
- Use the SEAR setting to brown meat prior to cooking.
- Unlike traditional stewing or braising, pressure and slow cooking have almost no evaporation. For deeply flavored dishes, use less liquid than called for in traditional recipes, 1 - 112 cups (240-360ml) maximum.
- Do not overfill the cooking bowl. The total volume of uncooked ingredients should not exceed the 'MAX' level marking inside the removable cooking bowl.
Bone-in Meat
- The PRESSURE & SLOW COOK BONE-IN MEAT setting uses high temperature/pressure and increased time for tender results all the way through. Connective tissues are broken down, meat falls off the bone and sauces become thick and well developed.
- Choose bone-in roasts that will easily fit the removable cooking bowl; have your butcher cut larger pieces in half.
- Use the SEAR & SAUTÉ settings to brown meat and soften aromatics prior to cooking.
- Unlike traditional stewing or braising, pressure and slow cooking have almost no evaporation. For deeply flavored dishes, use less liquid than called for in traditional recipes, 1–1½ cups (240–360ml) maximum.
- Do not overfill the cooking bowl. The total volume of uncooked ingredients should not exceed the 'MAX' level marking inside the removable cooking bowl.
Dessert
- The PRESSURE & SLOW COOK DESSERT setting is ideal for cakes, cheesecakes, custards and fruit compotes.
- Cook desserts in one large bowl or pan, or use small ramekins for individual servings. The smaller the cooking container the shorter the cooking time and vice-versa.
- Suitable cookware materials include aluminium, stainless steel, silicone, Pyrex and ceramic. Each material will cook differently; be aware of cookware differences when adjusting cooking times.
- Cover pans or ramekins with foil and place on the rack. Add 1 cup (240ml) water to the removable cooking bowl.
- Do not overfill the cooking bowl. The total volume of uncooked ingredients should not exceed the ‘MAX’ level marking inside the removable cooking bowl.
STEAM
The STEAM setting is ideal for steaming delicate vegetables, fish, poultry and dumplings. It can also be used to reheat plates of leftovers.
- Turn the START/SELECT dial until the indicator reaches the STEAM setting. Press the START/SELECT dial to confirm.
- The bottom figure on the LCD screen indicates the preset cooking time for the STEAM setting. Turn the TIME dial to the left to reduce the cooking time or to the right to increase the cooking time. Time can be adjusted up to 1 hour.
- Fill the removable cooking bowl with water to the MIN level marking. During steaming, please check the water level and add water when needed.
- Insert the rack into the bowl and place the steamer basket on top. If reheating a plate of leftovers, place the plate on top of the rack.
- Arrange food in the steamer basket, allowing 12 inch (1 cm) gaps between the food so steam can flow evenly around all sides.
- Close the lid, turn and align to lock position.
-
Remove the weight of the steam release valve from the lid.
-
Press the START/SELECT dial to begin cooking. The STOP/CANCEL button backlight will illuminate red, the LCD screen will illuminate orange and 'PREHEATING' will display on the screen.
- If the lid has been locked, the cooker alert will sound and 'OPEN LID' will display on the LCD screen.
- Once the cooker has reached the temperature, 'PREHEATING' light will go out and the timer will start counting down.
- The time can be adjusted during the STEAM cycle by turning the TIME dial. The cycle can be paused at any time by pressing the STOP/CANCEL button. To end the cycle press the STOP/CANCEL button a second time.
- At the end of the STEAM cycle, the cooker alert will sound, the STOP/CANCEL button backlight will go out, the LCD screen will illuminate blue and the timer will start counting up.
- If further steaming is required, ensure there is sufficient water in the cooker.
- After 30 minutes of inactivity, the LCD screen will go out and standby mode will be activated.
SEAR
The SEAR setting is designed to brown and caramelize food directly in the cooking bowl before pressure or slow cooking, resulting in more flavorful meals.
- Turn the START/SELECT dial until the indicator reaches the SEAR setting. Press the START/SELECT dial to confirm.
- The STOP/CANCEL button backlight will illuminate red, the LCD screen will illuminate orange and 'PREHEATING' will display on the screen.
- Keep the lid open in the hinged position. If the lid has not been opened, the cooker alert will sound and 'OPEN LID' will display on the LCD screen.
- Once the cooker has reached temperature, 'PREHEATING' will go out and the timer will start counting up. Place food in the removable cooking bowl.
- The cycle can be paused at any time by pressing the STOP/CANCEL button. To end the cycle, press the STOP/CANCEL button a second time.
- The maximum SEAR cycle is 45 minutes. At the end of the cycle, the cooker alert will sound, the STOP/CANCEL button backlight will go out and the LCD screen will illuminate blue.
- After 5 minutes of inactivity, the LCD screen will go out and standby mode will be activated.
SAUTÉ
The SAUTÉ setting is ideal for softening and lightly browning onions, garlic and smaller pieces of food prior to pressure or slow cooking.
- Turn the START/SELECT dial until the indicator reaches the SAUTÉ setting. Press the START/SELECT dial to confirm.
- The top figure on the LCD screen indicates the preset temperature for the SAUTÉ setting. Turn the TEMP/PRESSURE dial to the left to reduce the temperature or to the right to increase temperature. Temperature can be set to either 'LO', 'MED', or 'HI'.
- Press the START/SELECT dial to begin cooking. The STOP/CANCEL button backlight will illuminate red, the LCD screen will illuminate orange and 'PREHEATING' will be displayed on the screen.
- Keep the lid open in the hinged position. If the lid has not been opened, the cooker alert will sound and 'OPEN LID' will display on the LCD screen.
- Once the cooker has reached temperature, 'PREHEATING' will go out and the timer will start counting up. Place food in the removable cooking bowl.
- The cycle can be paused at any time by pressing the STOP/CANCEL button. To end the cycle, press the STOP/CANCEL button a second time. The temperature can be changed during the SAUTE cycle by turning the TEMP/PRESSURE dial.
- The SAUTÉ cycle is 45 minutes. At the end of the cycle, the cooker alert will sound, the STOP/CANCEL button backlight will go out and the LCD screen will illuminate blue.
- After 5 minutes of inactivity, the LCD screen will go out and standby mode will be activated.
REDUCE
The REDUCE setting is ideal for thickening and intensifying the flavor of sauces, syrups and stocks.
- Turn the START/SELECT dial until the indicator reaches the REDUCE setting. Press the START/SELECT dial to confirm.
- The top figure on the LCD screen indicates the preset temperature for the REDUCE setting. Turn the TEMP/PRESSURE dial to the left to reduce the temperature or to the right to increase temperature. Temperature can be set to either 'LO', 'MED', or 'HI'.
- The bottom figure on the LCD screen indicates the preset cooking time for the REDUCE setting. Turn the TIME dial to the left to reduce the cooking time or to the right to increase the cooking time. Time can be adjusted up to 2 hours.
- Place liquid to be reduced into the removable bowl.
- Press the START/SELECT dial to begin cooking. The STOP/CANCEL button backlight will illuminate red, the LCD screen will illuminate orange and 'PREHEATING' will display on the screen.
-
Keep the lid open in the hinged position. If the lid has not been opened the cooker alert will sound and 'OPEN LID' will appear on the LCD screen.
-
Once the cooker has reached the temperature, 'PREHEATING' light will go out and the timer will start counting down. Place liquid to be reduced into the removable cooking bowl.
- The time can be adjusted during the REDUCE cycle by turning the TIME dial. The cycle can be paused at any time by pressing the STOP/CANCEL button. To end the cycle press the STOP/CANCEL for a second time. The temperature can be adjusted during the REDUCE cycle by turning the TEMP/PRESSURE dial.
- At the end of the REDUCE cycle, the cooker alert will sound, the STOP/CANCEL button backlight will go out, the LCD screen will illuminate blue and the timer will start counting up.
- After 30 minutes of inactivity, the LCD screen will go out and standby mode will be activated.

NOTE
If reducing a cooking sauce after pressure or slow cooking, remove the meat and/or vegetables before starting the REDUCE cycle. Once sauce has reached the desired consistency and flavor, rewarm the food in the sauce if necessary.

Care & Cleaning
Before cleaning, ensure the cooker is turned off, unplugged, cooled to room temperature and all pressure has been released.
Do not use harsh abrasives, caustic cleaners or oven cleaners when cleaning the cooker. Cleaning with a dry cloth or abrasive cleaners may scratch the surface.
Cleaning the bowl and outer body
-
The removable cooking bowl can be washed in the dishwasher. However, to maintain the ceramic coating, it is recommended to wash the cooking bowl in warm soapy water. Rinse with clean water and dry thoroughly.
-
Wipe the moat and outer body with a soft, damp sponge. Apply the cleanser to the sponge, not the cooker surface, before cleaning.
-
Remove the condensation drip cup by gently pulling the bottom away from the body. Wash in warm soapy water, rinse with clean water, dry thoroughly and click back into position.
-
Wipe the LCD screen with a soft damp cloth.
-
Let all surfaces dry thoroughly prior to inserting the power plug into a power outlet and turning the cooker on.

WARNING
To avoid electric shock, do not immerse the cord, plug or cooker in water (or other liquids).
Cleaning the lid
-
Open the lid. Unscrew and remove the sealing nut from the center of the lid and pull the lid away from the lid arm.
-
Gently pull the silicone gasket out from around the wire ring on the underside of the lid.
-
Wash the sealing nut and pressure release valve in warm soapy water. Rinse with clean water and dry thoroughly.
-
Wash the silicone gasket and the lid on the top rack of the dishwasher. Alternatively, wash in warm soapy water, rinse with clean water and dry thoroughly.
-
After cleaning the lid, regularly inspect and ensure the following:
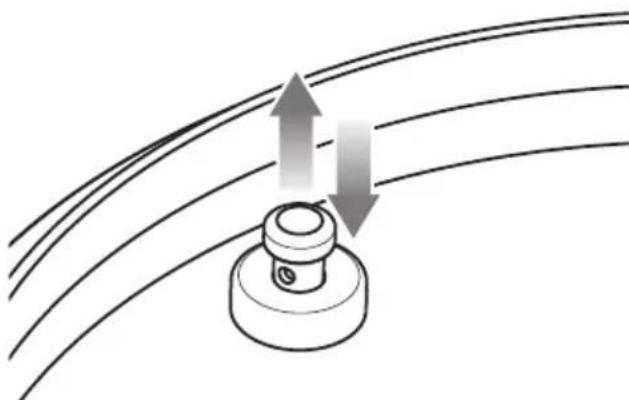
a) Safety locking pin moves up and down freely. Always remove any oil or food residue left on this area.
natural_image
Diagram showing curved lines with two upward arrows and one downward arrow, no text or symbols presentb) Pressure release valve and cover are clean and free of food or liquid. To clean, twist and pull the pressure release valve cover off the lid, wipe with a soapy cloth, rinse and dry thoroughly. Clip cover back into its original position.
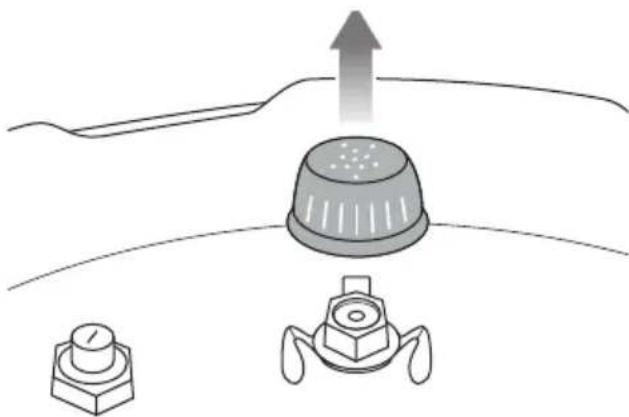
natural_image
Diagram showing a sensor or sensor device with an upward arrow above it, and a separate sensor device below (no text or symbols present)c) Pressure safety valve is clean and free of food or liquid. To clean, push the valve from inside so the valve lifts above the lid and remove any oil or food residue. Ensure the valve moves in and out smoothly after cleaning.
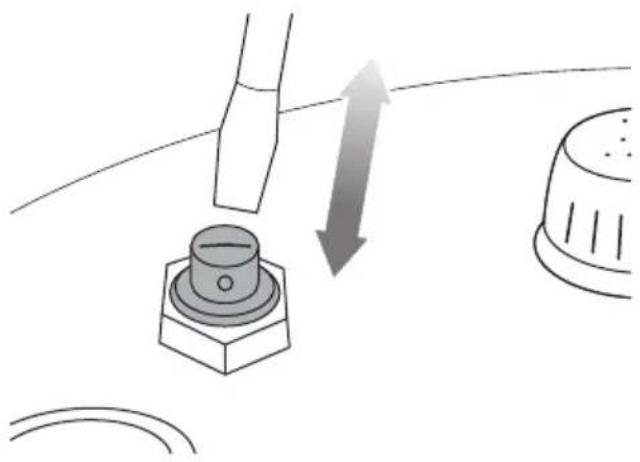
natural_image
Diagram showing a mechanical component with an arrow indicating upward motion, no text or symbols present- See page 10, steps 4 and 5 to reattach the silicone gasket and lid.
Cleaning the steamer basket and rack
- Wash all accessories in warm soapy water with a soft sponge or soft plastic scouring pad. Rinse and dry thoroughly. Do not use abrasive cleansers, metal scouring pads or metal utensils to clean any of the accessories as they may damage the surfaces.
- To extend the life of your accessories, we do not recommend placing them in the dishwasher.

TIPS
To help eliminate food odors, combine 2 cups (480ml) hot water, 12 cup (120ml) lemon juice, 1 tablespoon lemon rind and 1 tablespoon vanilla extract in the removable cooking bowl. Pressure cook at 12.0 psi for 5 minutes using Natural steam release.
Storage
- Ensure the cooker is turned off by pressing the STOP/CANCEL button on the control panel. The cooker is off when the button backlight is no longer illuminated.
- Remove the power plug from the power outlet. Allow the cooker and all accessories to cool completely before disassembling and cleaning.
- Ensure the cooker and all accessories are clean and dry.
- Ensure the bowl is inserted into the cooker; the rack is inserted into the steamer basket and placed inside the bowl.
- Ensure the lid is closed and in the locked position.
- Store the appliance in an upright position standing level on its support legs. Do not store anything on top.

Troubleshooting
PROBLEM EASY SOLUTION
| The lid cannot be opened at the end of the cooking cycle | Press the RELEASE button until all internal pressure is released and the lid opens easily.If this occurs frequently, the cooker may need to be adjusted to suit your current altitude. Follow “Altitude Adjust” instructions on page 13. |
| ‘Open Lid’ is displayed on the LCD when the lid is open | Turn the lid knob counter-clockwise as far as it will go. If the knob won’t turn, lower the lid to about 45° and turn it clockwise then counter-clockwise. |
| Steam is escaping from the lidORSafety locking pin does not riseORCooker is not getting to pressureORTimer will not count down | Assemble the lid correctly ensuring there is no gap between lid arm and the stainless steel lid. The sealing nut should be screwed on tightly. Follow step 5 on page 10.Ensure the silicone gasket is clean, free from damage or cracks and is properly inserted. Follow step 4 on page 10.Ensure that the safety locking pin can move freely up and down. Follow step 5a on page 25.When the lid is locked, ensure the safety locking pin is properly aligned within the opening of the lid arm. See step 7, page 16.Ensure that the pressure release valve is properly seated in position and facing the lid knob. Follow step 8 on page 17.Add more liquid/food to the bowl. There should be a minimum of 1 quart (1 liter) combined food and liquid.If problem persists, call Breville Consumer Support. |
| The cooker automatically switches to keep warm without going through a complete cooking cycle | Add more water to the cooking bowl and restart the cycle. |
| Water is collecting on the countertop | Ensure the cooker is on a flat, level surface and that the condensation drip cup is installed on the back of the cooker. Follow step 7 on page 11.Empty the condensation drip cup. |

Notes
the Fast Slow Pro™
natural_image
Exterior view of a Breatile rice cooker with digital display and control buttons (no text or symbols on main body)FR-CA
MANUEL D'INSTRUCTIONS
Breville®

Table des matières
M. Touche ARRÊT/Annuler
natural_image
Technical diagram of a mechanical component with a curved ring and mounting base (no text or symbols)natural_image
Simple diagram with concentric circular patterns around a central dot, no text or symbols presentImage B
natural_image
Line drawing of a cylindrical container with lid and side ports (no text or symbols)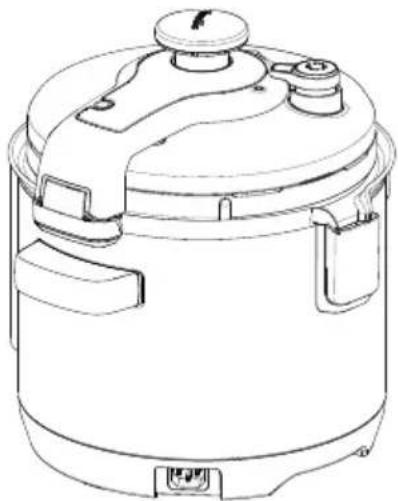
natural_image
Line drawing of a cooking pot with lid and side compartments (no text or symbols)| 2 tasses 2.5 tasses 4-6 |
| 3 tasses 3.75 tasses 6-8 |
| 4 tasses 5 tasses 8-12 |
Riz brun Eau Portions
| 2 tasses 3 tasses 4-6 |
| 3 tasses 4.5 tasses 6-8 |
| 4 tasses 6 tasses 8-12 |
Risotto
natural_image
Diagram showing curved lines with two upward arrows and one downward arrow, no text or symbols presentnatural_image
Diagram showing a device with a dome-shaped component and two base components, one upward and one downward, against a curved background (no text or symbols)natural_image
Diagram showing a mechanical component with an arrow indicating direction, no text or symbols presentnatural_image
Exterior view of a Breatile rice cooker with digital display and control buttons (no text or symbols on main body)ES-MX MANUAL DE INSTRUCCIONES
Breville®

Contenido
natural_image
Technical diagram of a mechanical assembly showing a rotating wheel and housing components (no text or labels)natural_image
Simple diagram with concentric oval shapes and a central dot, no text or symbols presentImagen B
natural_image
Line drawing of a cooking pot with lid and side buttons (no text or symbols)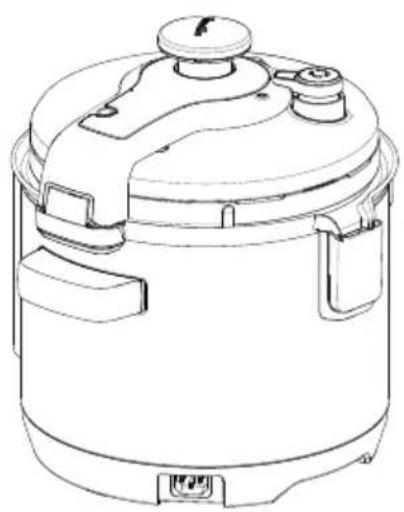
natural_image
Line drawing of a cooking pot with lid and side compartments (no text or symbols)natural_image
Diagram showing curved lines with directional arrows pointing upward and downward, no text or symbols presentnatural_image
Diagram showing a mechanical component with an upward arrow and two separate parts (no text or symbols)natural_image
Diagram showing a mechanical component with an arrow indicating direction, no text or symbols presentBreville Service Center
USA Mail: Breville USA
19400 S. Western Ave, Torrance CA
90501-1119
Phone: 1-866-273-8455
1-866-BREVILLE
Web: breville.com/us/support
Canada Mail: Breville Canada
9800 Boulevard Cavendish,
Suite 250, Saint-Laurent
Québec, H4M 2V9
Phone: 1-855-683-3535
Web: breville.ca/support
Breville is a registered trademark of Breville Pty. Ltd. A.B.N. 98 000 092 928.
Copyright Breville Pty. Ltd. 2023.
- Due to continued product improvement, the products illustrated/photographed in this brochure may vary slightly from the actual product.
- BREVILLE RECOMMENDS SAFETY FIRST
- IMPORTANT SAFEGUARDS cULus
- WARNING
- IMPORTANT SAFEGUARDS FOR ALL ELECTRICAL APPLIANCES
- BREVILLE ASSIST® PLUG
- SHORT CORD INSTRUCTIONS
- CALIFORNIA PROPOSITION 65:
- FOR HOUSEHOLD USE ONLY SAVE THESE INSTRUCTIONS
- Components
- IMPORTANT SAFETY INFORMATION FOR YOUR FAST SLOW PRO™
- NEVER FORCE THE LID CLOSED
- CLOSING THE LID
- NOTE
- AUTOMATIC HANDS-FREE STEAM RELEASE
- NEVER FORCE THE LID OPEN
- OPENING THE LID
- Functions
- PREPARING THE FAST SLOW PRO™
- SMART SETTINGS
- HANDS-FREE VARIABLE STEAM RELEASE
- Auto Quick
- Auto Pulse
- Natural
- KEEP WARM
- STOP/CANCEL BUTTON AND STANDBY MODE
- ALTITUDE ADJUST
- PRESSURE COOK
- SLOW COOK
- TIPS FOR PRESSURE & SLOW COOKING
- Rice
- Risotto
- Vegetables
- Stock
- Soup
- Beans
- Chili & Stew
- Poultry
- Meat
- Bone-in Meat
- Dessert
- STEAM
- SEAR
- SAUTÉ
- REDUCE
- Care & Cleaning
- Cleaning the bowl and outer body
- Cleaning the lid
- Cleaning the steamer basket and rack
- TIPS
- Storage
- Troubleshooting
- the Fast Slow Pro™
- Table des matières
- Contenido
- Breville Service Center
Brand : BREVILLE
Model : the Fast Slow Pro BPR700
Category : Multicooker