
the Rice Box Induction BRC800 - Multicooker BREVILLE - Free user manual and instructions
Find the device manual for free the Rice Box Induction BRC800 BREVILLE in PDF.


| Product Type | Induction Rice Cooker / Multicooker |
| Brand | Breville |
| Model | The Rice Box Induction BRC800 |
| Power Supply | 230V-240V |
| Heating Method | Induction Heating (IH) |
| Capacity | Up to 10 cups uncooked rice (approx. 1.8L) |
| Number of Cooking Functions | 11 preset functions |
| Cooking Functions | White Rice, Brown Rice, Sushi Rice, Clay Pot, Slow Cook, Steam, Soup, Congee, Quinoa, Reheat, Quick Cook |
| Cooking Progress Display | Yes (Preheat, Stage 1-4) |
| Delay Start | Yes, adjustable (default 1 hour, up to 24 hours) |
| Keep Warm | Auto (2 hours) and Manual (up to 4 hours) |
| Removable Cooking Bowl | Enamel-coated iron with water level markings |
| Lid Components | Detachable lid seal assembly and steam vent |
| Accessories Included | Stainless steel steaming basket, rice measuring cup (150g), rice serving spoon |
| Control Panel | LED screen with Function, Start, Keep Warm/Cancel, Quick Cook, Time, Delay Start, Plus/Minus buttons |
| Safety Features | Overheat protection, auto shut-off, non-slip feet |
| Cleaning | Hand wash bowl and parts; steaming basket dishwasher safe |
| Warranty | Limited warranty (see manual for details) |
| Customer Service | Breville Service Centre (Australia: 1300 139 798, New Zealand: 0800 273 845) |
| Power Cord | Detachable, length approx. 1m |
Frequently Asked Questions - the Rice Box Induction BRC800 BREVILLE
User questions about the Rice Box Induction BRC800 BREVILLE
0 question about this device. Answer the ones you know or ask your own.
Ask a new question about this device
Download the instructions for your Multicooker in PDF format for free! Find your manual the Rice Box Induction BRC800 - BREVILLE and take your electronic device back in hand. On this page are published all the documents necessary for the use of your device. the Rice Box Induction BRC800 by BREVILLE.
USER MANUAL the Rice Box Induction BRC800 BREVILLE
the Rice Box™ Induction
Instruction Book - LRC800
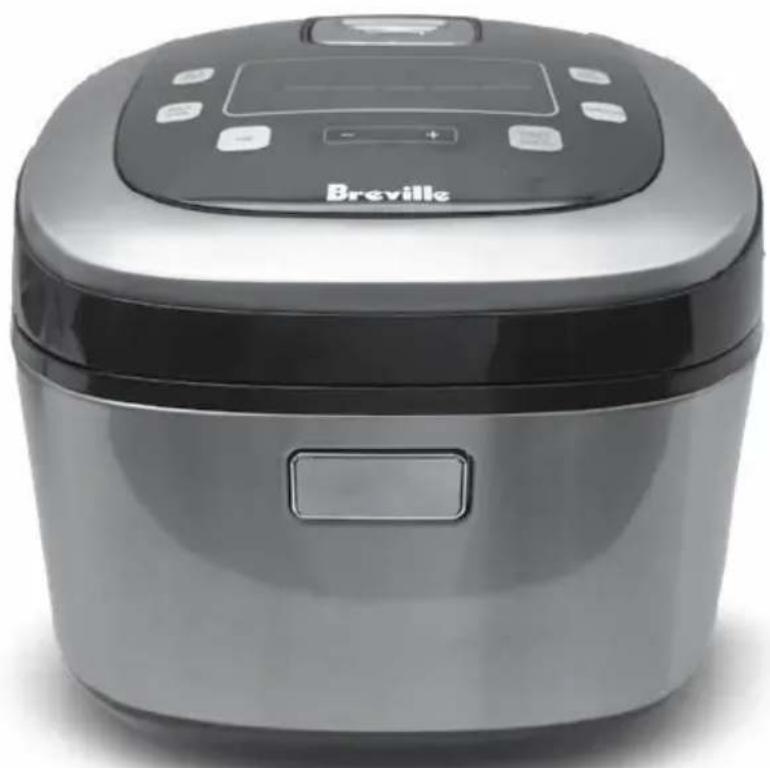
natural_image
Exterior view of a modern rice cooker with digital display and control buttons (no visible text or symbols)
CONTENTS
2 Limited Product Warranty
2 Breville® Recommends Safety First
7 Components
8 Accessories
9 Control Panel
10 Assembly
11 Functions
17 Rice Cooking Guide
19 Hints & Tips
20 Care, Cleaning & Storage
21 Troubleshooting
LIMITED PRODUCT WARRANTY
Breville's warranty for this product covers the repair or replacement if it's found to be defective due to faulty materials, workmanship, or function within the warranty period. All legal warranty rights under applicable national legislation will be respected and will not be impaired by our warranty. For details on length of warranty, to obtain a printed copy or to read full terms and conditions please

QR149
scan the QR code or visit www.breville.com. Alternatively, call the Breville Service Centre (see back cover for contact details).
BREVILLE® RECOMMENDS SAFETY FIRST
At Breville® we are very safety conscious. We design and manufacture consumer products with the safety of you, our valued customer, foremost in mind. In addition we ask that you exercise a degree of care when using any electrical appliance and adhere to the following precautions.
IMPORTANT SAFEGUARDS
READ ALL INSTRUCTIONS BEFORE USE AND SAVE FOR FUTURE REFERENCE
- Remove and safely discard any packaging material and promotional labels before using the rice cooker for the first time.
- When unpacking the rice cooker, check to see you have received all the items listed in the parts list before discarding the packaging.
- Always ensure the rice cooker is properly assembled before use. Follow the instructions provided in this book.
• Always operate the rice cooker on a stable and heat resistant surface.
- Do not place the rice cooker near the edge of a bench or table during operation. Ensure that the surface is level, clean and free of water and other substances.
- Do not operate the rice cooker on a sink drain board.
- Position the rice cooker so that the lid steam vent is directed away from you. Lift and open the lid carefully to avoid scalding from escaping steam.
- Do not place the rice cooker directly on a heat sensitive bench top, such as a stone bench top, when cooking. This type of bench top is heat sensitive to uneven heat and may crack if heated locally. To cook on a heat sensitive bench top, place a chopping board or heat proof mat underneath the cooker.
- Do not operate the rice cooker on an inclined plane. Do not move the rice cooker while it is switched on.
- Always insert the connector end of the power cord into the appliance inlet before inserting the power plug into the power outlet and switching on the appliance.
- The appliance connector and power cord must be removed before the rice cooker is cleaned and the inlet must
be dry before inserting to the connector end of the power cord and before use.
• Take care to avoid spillage on the connector.
- Never plug in or switch on the rice cooker without having the removable cooking bowl placed in the rice cooker.
- Use the removable cooking bowl supplied with the rice cooker. Do not use any other bowl in the rice cooker.
- Ensure the removable cooking bowl is correctly positioned in the rice cooker before you commence cooking.
- Do not use a damaged or dented removable cooking bowl. If damaged or dented, replace bowl before using.
- Do not place food or liquid in the rice cooker base. Only the removable cooking bowl is designed to contain food or liquid.
- Never operate the rice cooker without food and liquid in the removable cooking bowl. Ensure the cooking bowl is at least 12 to 34 full of food or liquid when using the slow cooking function.
- Do not leave the rice cooker unattended when in use.
- The enamel surface of the cooking bowl is not ideal for dry cooking.
• Always ensure there is enough liquid in the removable cooking bowl when steaming. At least 4 cups (1 litre) of liquid is required when steaming. Ensure the water sits below the steaming tray when situated inside the cooking bowl.
- Do not place anything on top of the rice cooker lid when assembled, when in use or when stored.
- Do not allow condensed water from the lid to drip into the rice cooker base, only into the removable cooking bowl.
- Do not touch hot surfaces. Use the handle for lifting and carrying the rice cooker. Open the lid carefully and angled away from you to avoid scalding from escaping steam. Allow the rice cooker to cool completely before moving or cleaning any parts.
- Extreme caution must be used when the rice cooker contains hot food and liquids.
- The temperature of accessible surfaces will be high when the rice cooker is operating and for some time after use.
- Care should be taken when handling the rice cooker after cooking, ensuring that the rice cooker housing and parts are not touched as these may still be hot due to residual heat.
- Do not place the hot cooking bowl on any surface that may be affected by heat.
- The removable cooking bowl is made from durable and heat conducting iron which is covered in a hard-wearing enamel coating. Any residue from cooking left in the bowl may be cleaned with a light scrub. For hard to remove residue, soaking in warm, soapy water before cleaning may assist.
- With cleaning, the glossy enamel finish on the bowl may become dull or discoloured. This will not impact the bowl performance.
- To prevent scratching the enamel surface of the removable cooking bowl, always use wooden, silicon or plastic utensils.
- If using plastic utensils, do not leave inside the rice cooker when hot.
- High humidity, altitude, cold tap water, ingredients and minor fluctuations may affect the cooking times in the rice cooker.
- The recommended cooking times are approximate. Cooking times can vary depending on ingredients and quantities.
-
If you are not home during the slow cooking process and the power goes out, throw away the food even if it looks cooked.
-
If you are at home during the slow cooking process and the power goes out, transfer the contents of the bowl to a cooking pot and finish cooking the ingredients immediately by some other means such as a gas stove, on an outdoor grill or elsewhere where the power is on.
- If you are at home when the power goes out and the food was completely cooked through before the power outage, the food should remain safe up to two hours in the cooker with the power off.
- The rice cooker is not intended to be operated by means of an external timer or separate remote-control system or any other device that switches the rice cooker on automatically.
- Do not place the removable cooking bowl on a gas burner or electric hotplate.
- To avoid an electrical overload, it is recommended that no other appliances are plugged into the same circuit as your rice cooker when it is in use.
- Do not plunge a hot cooking bowl into cold water. While the enamel is designed to be durable, thermal shock may still occur, resulting in cracking or loss of enamel.
- Do not use chemicals, steel wool, metal scouring pads
or abrasive cleaners to clean the outside of the rice cooker housing or the cooking bowl as these can damaged the housing or the coating of the cooking bowl.
- To prevent damage to the rice cooker, do not use alkaline cleaning agents when cleaning, use a soft cloth and mild detergents.
- Keep the rice cooker clean. Follow the cleaning instructions provided in this book.
IMPORTANT SAFEGUARDS FOR ALL ELECTRICAL APPLIANCES
- Fully unwind the power cord before use.
- Connect only to a 230V or 240V power outlet.
- Do not let the power cord hang over the edge of a bench or table, touch hot surfaces or become knotted.
- To protect against electric shock, do not immerse the power cord, power plug or appliance in water or any other liquid or allow moisture to come in contact with the parts, unless it is recommended in the cleaning instructions.
- The appliance is not intended for use by persons (including children) with reduced physical, sensory, or mental capabilities, or lack of experience and
knowledge unless they have been given supervision or instruction concerning use of the appliance by a person responsible for their safety.
• Children should be supervised to ensure that they do not play with the appliance.
- It is recommended to regularly inspect the appliance. To avoid a hazard, do not use the appliance if power cord, power plug or appliance becomes damaged in any way. Return the entire appliance to the nearest authorized Breville service centre for examination and/or repair.
- Any maintenance other than cleaning should be performed at an authorised Breville Service Centre.
- This appliance is for household use only. Do not use this appliance for anything other than its intended use. Do not use in moving vehicles or boats. Do not use outdoors. Misuse may cause injury.
- The installation of a residual current device (safety switch) is recommended to provide additional safety protection when using electrical
appliances. It is advisable that a safety switch with a rated residual operating current not exceeding 30mA be installed in the electrical circuit supplying the appliance. See your electrician for professional advice.
• Always turn the appliance to the OFF position, switch off at the power outlet and unplug at the power outlet when the appliance is not in use.
- Before cleaning, always turn the appliance to the OFF position, switch off at the power outlet, unplug at the power outlet and remove the power cord, if detachable, from the appliance and allow all parts to cool.
- Do not place this appliance on or near a heat source, such as hotplates, ovens, or heaters.
- Position the appliance at a minimum distance of 20cm away from walls, curtains and other heat or steam sensitive materials and provide adequate space above and on all sides for air circulation.
FOR HOUSEHOLD USE ONLY SAVE THESE INSTRUCTIONS

COMPONENTS
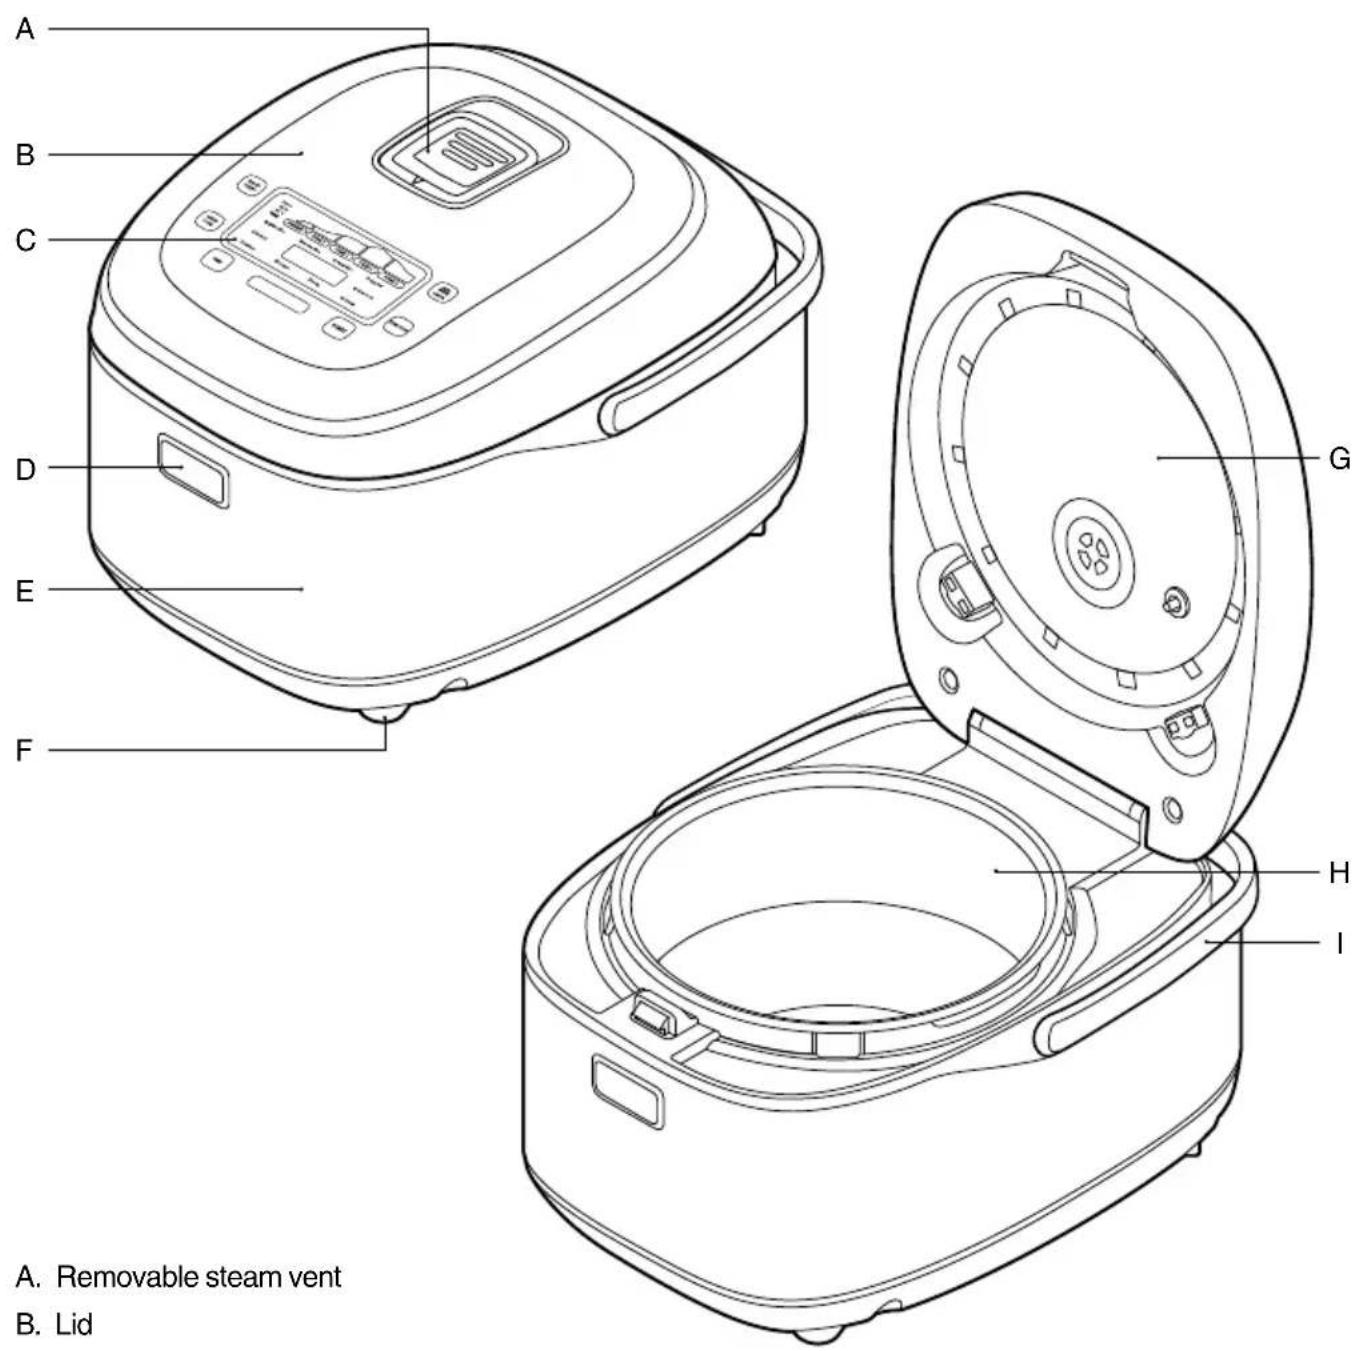
A. Removable steam vent
B. Lid
C. Control panel with LED screen
D. Lid release button
E. Rice cooker housing
F. Non-slip feet
G. Detachable lid seal assembly
H. Removable enamel coated iron cooking bowl with water level markings
I. Carry handle
Not pictured
- Removable power cord
• Power cord connector inlet

ACCESSORIES
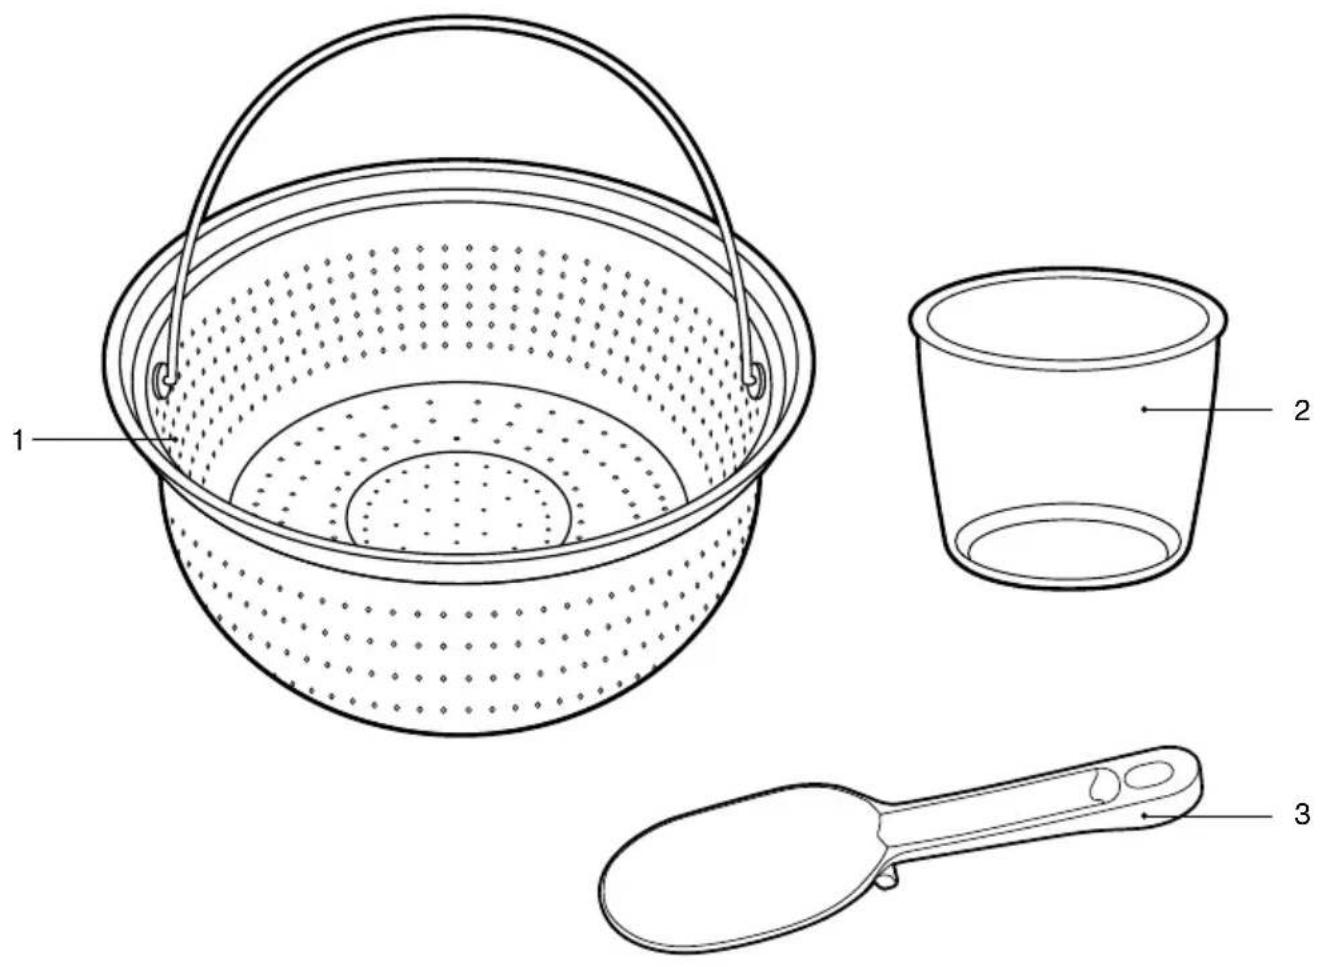
- Stainless steel steaming basket
- Rice measuring cup
- Rice serving spoon

CONTROL PANEL
flowchart
graph TD
    A["100°C"] --> B["PREHEAT STAGE 1 STAGE 2 STAGE 3 STAGE 4"]
    B --> C["KEEP WARM CANCEL"]
    C --> D["G"]
    B --> E["50°C"]
    B --> F["25°C"]
    B --> G["TIME"]
    B --> H["START"]
    B --> I["I"]
    B --> J["J"]
    B --> K["C"]
    B --> L["D"]
    B --> M["E"]
    B --> N["F"]
    B --> O["C"]
    B --> P["B"]
    B --> Q["DELAY START"]
    B --> R["QUICK COOK"]
    B --> S["Reheat"]
    B --> T["Sushi Rice"]
    B --> U["Brown Rice Clay Pot"]
    B --> V["White Rice"]
    B --> W["Slow Cook"]
    B --> X["Quinoa Congee Soup Steam"]
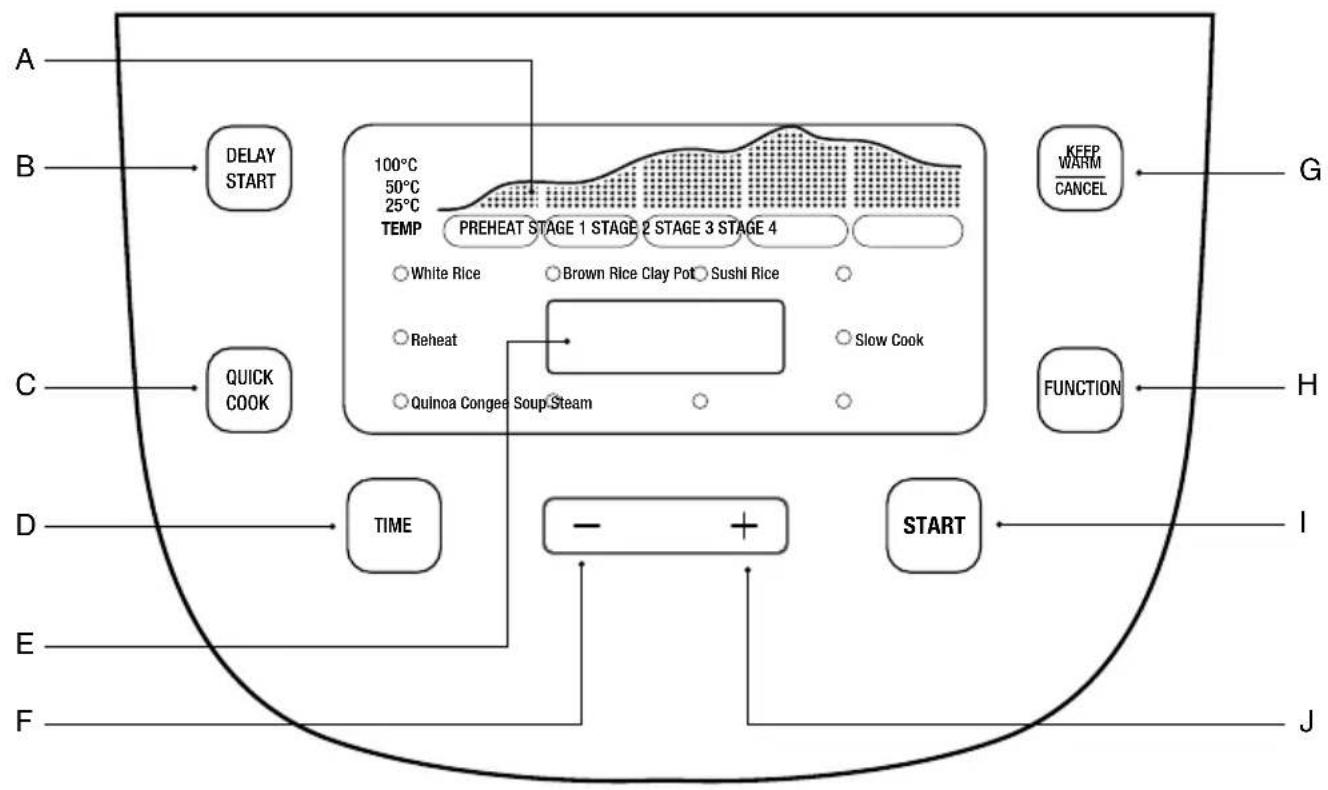
A. Cooking progress display
B. Delay start
C. Quick cook
D. Time
E. Display screen
F. Minus
G. Keep warm | Cancel
H. Function
To access White Rice, Brown Rice, Sushi Rice, Clay Pot, Slow Cook, Steam, Soup, Congee, Quinoa, Reheat
I. Start
J. Plus

ASSEMBLY
BEFORE FIRST USE
Remove all promotional labels and any packaging materials from the rice cooker. Ensure that all parts and accessories listed have been accounted for before discarding the packaging.
Remove the accessories from inside the rice cooker and pull the removable steam vent out from the top of the lid.
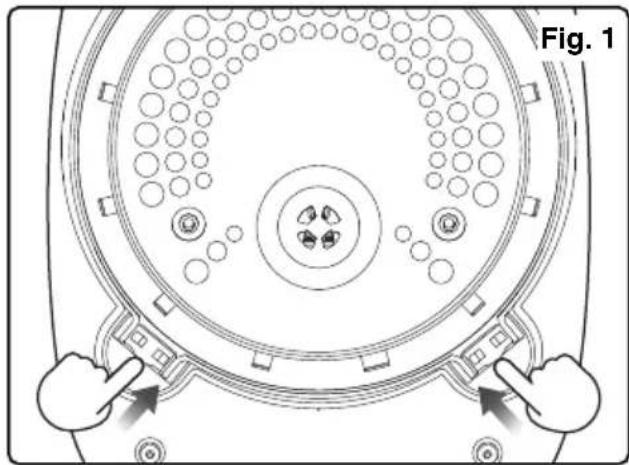
To remove the detachable lid seal assembly, open the lid and push upwards on the two clips. (Fig. 1) The detachable lid seal assembly will release from the lid.
natural_image
Diagram of a circular mechanical component with internal holes and two hands adjusting its base (no text or symbols)Wash the detachable lid seal assembly, removable steam vent, removable cooking bowl, steam basket, rice measuring cup and rice serving spoon in hot soapy water, then rinse and dry thoroughly.
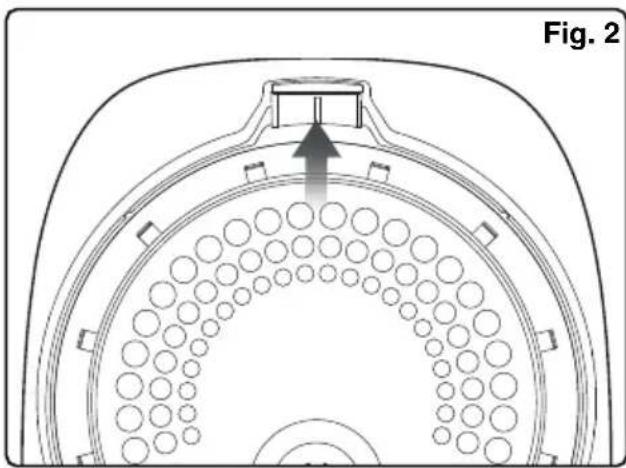
Replace the lid seal assembly by sliding into the slot (Fig. 2) and push the two clips in until they click into place. Replace the steam vent back into top of the lid.
natural_image
Technical diagram of a circular mechanical component with concentric rings and a central hub, labeled Fig. 2 (no text or symbols on the diagram itself)Ensure that the rice cooker housing and the interior of the cooking bowl are clean and clear of any debris before placing the cooking bowl into the rice cooker to ensure proper contact with the inner cooking surface.

FUNCTIONS
USING YOUR BREVILLE INDUCTION HEATING (IH) RICE COOKER
Always ensure that the lid seal assembly and the steam vent are correctly fitted before operating.
Place the rice cooker on a flat and level surface. Insert the power cord into the power connector inlet on the rice cooker and plug the power plug into a 230V or 240V power outlet and turn the outlet on.
The rice cooker will beep once and "on" will appear on the display screen indicating the rice cooker is in standby mode.
Ensure the removable cooking bowl is correctly positioned with food and liquid content added before operating. Press down on the lid to lock, then select the desired cooking function by following the below steps.

NOTES
- If the cooking bowl is not in place when START is pressed, an E0 error message will display on the screen.
- Opening the lid during operation will not pause cooking, however, for best results, it is recommended to keep lid closed when cooking, particularly when using the rice functions, as this may impact the final cooking result.
COOKING FUNCTIONS
The Breville induction rice cooker has 11 preset cooking functions. Except for Quick Cook, which has its own button, all other cooking functions can be accessed by pressing the FUNCTION button.
- Press FUNCTION until the light beside the desired cooking function illuminates.
- Press START to commence cooking. The internal heat circulating fan will start as heating commences.
- To cancel a selected function, or to cancel cooking at any time during operation, press KEEP WARM | CANCEL.
- When cooking is complete, the rice cooker will return to standby mode or switch to Auto Keep Warm, depending on the cooking function selected.

NOTE
- This rice cooker has a memory function so if power is interrupted during cooking, the rice cooker will remember the last cooking function and the remaining time for up to 30 seconds. Press START and the rice cooker will resume cooking.
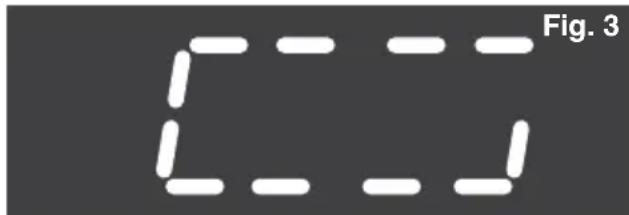
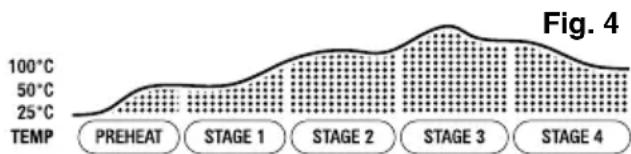
For all rice menus, including Quick Cook, Quinoa and Clay Pot, the cooking time cannot be manually adjusted as this is determined by the amount of food and liquid content using the inbuilt fuzzy logic technology. When using these functions, the screen will display a rotating loop (Fig. 3) until Stage 4, when a countdown timer will appear on the screen during the final minutes of cooking. The Progress Display will illuminate during each stage of cooking (Fig. 4).
line
| Stage | Temperature | | --------- | ----------- | | PREHEAT | 0°C | | STAGE 1 | ~50°C | | STAGE 2 | ~75°C | | STAGE 3 | ~100°C | | STAGE 4 | ~75°C |Steam, Soup, Slow Cook, Congee and Reheat functions all display a default time when selected. The time can be adjusted for these functions before pressing Start by following the instructions under TIME.

NOTE
The default time for each cooking function is a suggestion only. Time may need to be adjusted depending on food type and quantity.
TIME
The cooking time can be adjusted on the following functions only: Slow Cook, Soup, Steam, Congee, Reheat & Keep Warm.
The time can be adjusted after selecting the desired cooking function and before pressing START.
The time adjustment range using - & + buttons is as follows:
- Adjusts in 1-minute increments for each preset below 30 minutes.
- Adjusts in 5-minute increments for each preset above 30 minutes.
- Adjusts in 30-minute increments for each preset above 2 hours.
-
Adjusts in 30-minute increments for the slow cook preset.
-
Press FUNCTION until the light beside the desired cooking function illuminates and the default time is displayed on the screen. Press START to commence cooking.
- Alternatively, to adjust the time, press TIME followed by MINUS or PLUS until the desired time is displayed in hours and/or minutes. Press START to commence cooking.
- The time can be adjusted any time during cooking by pressing TIME followed by MINUS or PLUS. The time will flash on screen, then illuminate solid and the new time will countdown automatically. The new set time will commence within 4 seconds.
- To cancel a selected function or to cancel cooking at any time during operation, press KEEP WARM I CANCEL.
- When cooking is complete, the rice cooker will return to standby mode or switch to Auto Keep Warm, depending on the cooking function selected.

NOTE
Refer to the Functions Table found in this booklet for default times and adjustable time range by function.
DELAY START
DELAY START is only available to use on rice cooking functions Quick Cook, White Rice, Brown Rice, and Sushi Rice.
The default time is 1 hour and can be adjusted after selecting the desired rice cooking function.
- Place the required amount of rice and water into the cooking bowl as per rice cooking instructions.
- Place the cooking bowl with rice and water into the rice cooker and close the lid.
- Press FUNCTION to select the desired rice function or press Quick Cook.
- Press DELAY START and 1:00 hr will display on the screen. Press START to start the countdown timer or use MINUS or PLUS to adjust the time in hours and/or minutes, then press START.
- The DELAY START button will illuminate and the timer will count down.
- Once the time reaches 0:00, the DELAY START light will extinguish and cooking will commence.
- To cancel a selected function or to cancel cooking at any time during operation, press KEEP WARM | CANCEL.
- Once cooking is complete, the rice cooker will beep 3 times and return to standby mode.

NOTE
If the START button is not pressed, the delay start countdown timer will automatically begin after 6 seconds.
KEEP WARM | CANCEL
Auto Keep Warm after cooking has finished is available on all functions except Sushi Rice, Quinoa, Reheat and steam.
AUTO & MANUAL KEEP WARM
When Auto Keep Warm activates, the KEEP WARM | CANCEL button will illuminate, and the display will count upwards to 2 hours. Once the display reaches 2:00, the KEEP WARM | CANCEL button light will extinguish, and the rice cooker will return to standby mode.
The maximum Manual Keep Warm time that can be set is 4 hours.
Press KEEP WARM | CANCEL followed by TIME, then MINUS or PLUS until the desired time up to 4 hours is displayed in hours and/or minutes. Press START and the time will count down until it reaches 0:00.
To cancel keep warm at any time, press KEEP WARM I CANCEL.
WHITE RICE, BROWN RICE, SUSHI RICE, CLAY POT & QUINOA
The Cooking Progress Display will show the cooking stages when using the following cooking functions: Quick Cook, White Rice, Brown Rice, Sushi Rice, Clay Pot and Quinoa.
For accurate water level measurements, it is recommended to sit the removable bowl on a level surface or benchtop, place rice and water into the bowl, then place the bowl into the rice cooker.
Lightly spray the cooking bowl before adding ingredients to prevent rice sticking.
For Clay Pot, spray the bowl with baking spray before adding ingredients.
- Use the rice measuring cup provided to measure the rice or quinoa. Always ensure to measure a level cup, not heaped. The provided rice measuring cup holds approximately 150g of rice or 180ml of water.
- It is recommended to wash the rice by placing it in a sieve under cold running water to help remove any excess starch. The rice is ready when the water runs clear from the sieve. Drain the rice well before adding to the cooking bowl.
- Place the rice into the cooking bowl, spreading evenly across the bottom of the bowl.
-
Add the required quantity of water using the relevant water level markings located inside of the cooking bowl. Refer to the Rice Cooking Guide found in this booklet for more information.
-
Place the cooking bowl with rice and water into the rice cooker and close the lid.
- Press FUNCTION to select the desired rice/ quinoa cooking function, then press START to commence.

NOTE
Ensure that the lid seal assembly and steam vent are correctly fitted before operating.
- The Cooking Progress Display will display 'PREHEAT'. During the cooking cycle, 'STAGE 1', 'STAGE 2', 'STAGE 3', and 'STAGE 4' will illuminate to indicate cooking progress. During 'STAGE 4', a countdown timer will appear on the screen during the final 15 minutes of cooking.

NOTE
During STAGE 4 when using the QUICK COOK function, the final 5 minutes of cook time will be displayed.
- Once cooking has finished, the rice cooker will beep 3 times before automatically switching to Keep Warm on all rice cooking functions except for Sushi Rice.
- The KEEP WARM | CANCEL button will illuminate, and the time display will commence counting upwards to 2 hours, unless cancelled by pressing KEEP WARM | CANCEL.
- When 2 hours have elapsed, the rice cooker will stop operating and return to standby mode.

NOTE
For extra fluffy rice, it is recommended to allow the rice to Keep Warm for 10 minutes before serving.
- Press the lid release button to open and use the rice serving spoon to fluff up the rice before serving.
- Turn the rice cooker off at the power outlet and remove the plug.

CAUTION
Use caution when opening the lid after cooking to avoid scalding from escaping steam.
QUICK COOK

IMPORTANT
The QUICK COOK function is best suited to cooking white rice quickly. It is not recommended for brown rice.
The QUICK COOK function cooks white rice faster by skipping the 'PREHEAT' stage. The Cooking Progress Display will start at 'STAGE 1' when using Quick Cook.
- Follow Steps 1 to 5 under WHITE RICE, BROWN RICE, SUSHI RICE, CLAY POT & QUINOA above.
- Place the cooking bowl with white rice and water into the rice cooker and close the lid.
- Press QUICK COOK. The QUICK COOK button will illuminate, then press START to commence.
- 'PREHEAT' and 'STAGE 1' will illuminate on the Cooking Progress Display. During the cooking cycle, 'STAGE 2', 'STAGE 3', and 'STAGE 4' will illuminate to indicate cooking progress. During 'STAGE 4', a countdown timer will appear on the screen during the final 5 minutes of cooking.
- Once cooking has finished, the rice cooker will beep 3 times before automatically switching to Keep Warm.
- Follow remaining steps 9-12 under WHITE RICE, BROWN RICE, SUSHI RICE, CLAY POT & QUINOA above.
STEAM
The Cooking Progress Display will only illuminate 'PREHEAT' when using the Steam function.

NOTE
Keep the lid closed to prevent steam from escaping which can result in uneven cooking results.
- Pour 1 litre of water or stock into the cooking bowl before placing the bowl into the rice cooker and close the lid.
- Press FUNCTION to select Steam, and the default time of 15 minutes will display.
- Press START or follow the instructions under TIME to adjust.
- 'PREHEAT' will illuminate on the Cooking Progress Display. Once preheat has finished, the rice cooker will beep 2 times and the timer will commence counting down.
- Place food into the steaming basket. Carefully open the lid and use the basket handle to lower into the cooking bowl. Close the lid.
- Once the timer reaches zero, the rice cooker will beep 3 times and return to standby mode.
- Press the lid release button to open and remove the basket using the handle. Check food is fully cooked before removal. If the food needs further steaming, check the water levels before repeating the previous steps.
- Turn the rice cooker off at the power outlet and remove the plug.

NOTE
The time can be adjusted any time during cooking, however, if more time is needed after the rice cooker has returned to standby mode, depending on the temperature of the water in the bowl, 'PREHEAT' may not display and the rice cooker will go directly to the timer countdown.
For further information on steaming, refer to the Steaming Guide in this booklet.

CAUTION
Use caution when opening the lid after cooking to avoid scalding from escaping steam.
SLOW COOK, SOUP, CONGEE & REHEAT

IMPORTANT
SLOW COOK
When using the Slow Cook function, place the food and liquids into the cooking bowl, ensuring that the contents fill at least 12 to 34 of the bowl. Do not exceed the rice 6 cup line.

NOTE
The small capacity will result in faster than conventional slow cooking times - check your food regularly to prevent overcooking.
SOUP
Do not exceed the 10-cup rice marking when cooking soup.
CONGEE
Follow the congee markings for minimum and maximum quantities.
REHEAT
- Reheat is recommended to reheat rice only. It is not recommended for reheating other foods.
- To reheat any amount of rice, add 1/2 cup of water to the rice.
- Check rice every 15 minutes and stir to ensure even heating.
-
Ensure that the quantity of rice to be reheated is above the 2 cups marking and below the 6 cups marking.
-
Place all ingredients in the cooking bowl ensuring an even spread across the bottom of the cooking bowl.
- Place the cooking bowl into the rice cooker and close the lid.
-
Press FUNCTION to select the desired function and the default time is displayed. Adjust the TIME if required, then press START to commence cooking.
-
KEEP WARM | CANCEL button will illuminate, and the time display will commence counting upwards to 2 hours unless cancelled by pressing KEEP WARM | CANCEL.
-
When 2 hours have elapsed, the rice cooker will stop operating and return to standby mode.

NOTE
The rice cooker can also be manually set to Keep Warm for up to 4 hours.
| FUNCTION DEFAULT | VARIABLE TIME | DELAY START | PREHEAT TIME | AUTO KEEP WARM | |
| White rice | N/A N/A Yes N/A Yes | ||||
| Brown rice | N/A | N/A | Yes | N/A | Yes |
| Sushi rice | N/A N/A Yes N/A N/A | ||||
| Clay pot | N/A N/A N/A N/A Yes | ||||
| Slow cook | 3 hrs 1 – 10 hrs N/A N/A Yes | ||||
| Steam | 15 mins 1 min – 2 hrs N/A 5 – 10 mins N/A | ||||
| Soup | 1 hr | 30 mins – 3 hrs | N/A | N/A | Yes |
| Congee | 1 hr 30 mins – 2 hrs N/A N/A Yes | ||||
| Quinoa | N/A N/A N/A N/A N/A | ||||
| Reheat | 30 mins 5 mins – 1 hr N/A N/A N/A | ||||
| Quick cook | N/A N/A Yes N/A Yes | ||||
| Keep warm | 2 hrs 1 min – 4 hrs N/A N/A N/A | ||||
TIME ADJUSTMENT
• 1-minute increments below 30 minutes.
- 5-minute increments above 30 minutes.
• 30-minute increments above 2 hours.
- 30-minute increments for the slow cook function.

RICE COOKING GUIDE
WHITE RICE
For accurate water level measurements, it is recommended to sit the removable bowl on a level surface or benchtop, place rice and water into the bowl, then place the bowl into the rice cooker.

NOTE
Water levels should be measured to the middle of the appropriate line in the cooking bowl.
| CUPS OF UNCOOKED RICE | FILL WITH WATER TO | CUPS OF COOKED RICE (APPROX.) | COOKING TIME ON WHITE FUNCTION (APPROX) | COOKING TIME ON QUICK COOK (APPROX) |
| 2 | 2 level RICE marking | 5 35-45 mins 23-33 mins | ||
| 4 | 4 level RICE marking | 10 40-45 mins 25-35 mins | ||
| 6 | 6 level RICE marking | 15 40-45 mins 28-38 mins | ||
| 8 | 8 level RICE marking | 20 45-55 mins 32-42 mins | ||
| 10 | 10 level RICE marking | 25 45-55 mins 34-44 mins | ||
BROWN / MIXED RICE
| CUPS OF UNCOOKED RICE | FILL WITH WATER TO | CUPS OF COOKED RICE (APPROX.) | COOKING TIME ON BROWN FUNCTION (APPROX) |
| 2 | 2 level RICE marking | 4 55-65 mins | |
| 4 | 4 level RICE marking | 8 55-65 mins | |
| 6 | 6 level RICE marking | 14 55-65 mins | |
| 8 | 8 level RICE marking | 18 60-70 mins | |
| 10 | 10 level RICE marking | 22 65-75 mins |

NOTE
- The Quick Cook function is not recommended for cooking brown rice.
- Utilise the designated line markings inside the bowl while preparing white rice, brown/mixed rice, sushi rice and congee.
SUSHI RICE
| CUPS OF UNCOOKED RICE | FILL WITH WATER TO | CUPS OF COOKED RICE (APPROX.) | COOKING TIME ON SUSHI FUNCTION (APPROX) |
| 2 | 2 level RICE marking | 4 35-45 mins | |
| 4 | 4 level RICE marking | 8 40-50 mins | |
| 6 | 6 level RICE marking | 12 40-50 mins | |
| 8 | 8 level RICE marking | 16 40-50 mins | |
| 10 | 10 level RICE marking | 20 45-55 mins |

NOTE
The Quick Cook function is not applicable when preparing sushi rice.

TIPS
RICE VARIATIONS
- Savoury rice: prepare rice in the rice cooker as specified, but substitute 12 the full amount of water with the same volume of chicken, beef, fish, or vegetable stock.
- Sweet rice: prepare rice in the rice cooker as specified, substituting half the water with apple, orange, or pineapple juice.
- Saffron rice: add 12 teaspoon of threads to every 2 cups of water. Follow the white rice cooking table and mix well when cooking is complete.
- Arborio rice: follow the brown rice cooking tables.
- Jasmine rice: follow the white rice cooking tables.
- Basmati rice: follow the white rice cooking tables.
- Wild rice: it is not recommended to cook wild rice alone in the rice cooker as it requires substantial amounts of water. Blend wild rice with white or brown rice for best results.
STEAMING VEGETABLES
- Smaller pieces will steam faster compared to larger pieces.
- To ensure consistent cooking results, vegetables should be of uniform size.
-
Both fresh and frozen vegetables can be steamed but note that frozen ones will take longer to cook. If using frozen vegetables, there is no need to thaw before cooking.
-
Depending on the size, shape of vegetables, and personal preference, you might need to adjust the recommended cooking times. To achieve a softer vegetable texture, you may need to extend the cooking duration.
- Make sure the water or stock in the removable cooking bowl does not reach the steaming basket.
- Water may need to be topped up in the bowl if steaming for longer periods.
STEAMING GUIDE
| Food Type | Cooking Time (approx.) | Quantity Preparation and Tips | |
| Green Vegetables | 2-5 mins 250g Fresh | ||
| Peas | 2-5 mins | 1 cup | Frozen |
| Corn | 5-10 mins 2 small cobs Whole corn cobs | ||
| Root Vegetables | 10-15 mins 200-400g | Peel and cut into 3-5cm pieces. | |
| Chicken | 250g | ||
| • Breast 10-20 mins | Place the thickest part towards the outside of the steaming basket. | ||
| • Thigh 20-30 mins | |||
| • Drumstick 20-40 mins | |||
| Fish | 250g | ||
| • Fillets 8-20 mins | Steam until opaque and easy to flake. A cutlet is cooked when the centre bone can be easily removed. | ||
| • Whole 20-35 mins | |||
| • Cutlets 15-25 mins | |||
| Dumplings – Frozen | 10-15 mins | Single layer in steaming basket. | |
| Dumplings – Fresh | 15-20 mins | Single layer in steaming basket. | |

CARE, CLEANING & STORAGE
Turn the rice cooker off at the power outlet and unplug the power cord before cleaning.

WARNING
Allow all parts of the rice cooker to cool before disassembling and cleaning.
- Ensure that all parts of the rice cooker have completely cooled before attempting to disassemble or clean the rice cooker.
- Remove the steam vent, lid seal assembly, cooking bowl and steaming basket (if used).
- Use an absorbent sponge or paper towel to wipe the moat around the cooking bowl cavity for any liquid that may have collected during the cooking process.
- Wash the cooking bowl, lid seal assembly, steam vent, steaming basket, serving spoon and rice measuring cup in hot, soapy water, then rinse and dry thoroughly.
- Reassemble the lid seal assembly and steam vent.
- Use a soft, damp cloth to wipe over the outer housing of the rice cooker, then dry.
- Place the cooking bowl, steaming basket, measuring cup, serving spoon and power cord into the rice cooker and close the lid for storage.

NOTE
Only the steaming basket is dishwasher safe.

WARNING
- Do not wash any parts of the rice cooker, except for the steaming basket, in the dishwasher. Dishwashers use harsher cleaning detergents and high-water temperatures that could damage or distort parts of the rice cooker.
- The detachable power cord must be removed from both the power outlet and rice cooker before the rice cooker is cleaned.
- Do not immerse the rice cooker housing or power cord in water or any other liquid as this may cause electrocution.
- The removable iron cooking bowl has a hard-wearing and durable enamel coating. If food residue sticks to the bowl, lightly scrub to remove with a soft scrubber. If residue is resistant to gentle scrubbing, soak in hot, soapy water for 10 minutes before cleaning.
- Do not use chemicals, steel wool, metal scouring pads or abrasive cleaners to clean the rice cooker or cooking bowl as these may cause damage.
- Cleaning and prolonged use may cause the glossy enamel coating to dull or discolour. This will not impact the bowl cooking performance.
Problem Possible Cause What to Do
| E0 displays on the screen | The removable cooking bowl is not in the rice cooker | Place the cooking bowl correctly in the rice cooker. |
| E1 displays on the screen | Bottom sensor open circuit protection | Switch the unit off and contact the Breville Customer Service Centre. |
| E2 displays on the screen | Bottom sensor open circuit protection | Switch the unit off and contact the Breville Customer Service Centre. |
| E3 displays on the screen | Top sensor open circuit protection | Switch the unit off and contact the Breville Customer Service Centre. |
| E4 displays on the screen | Top sensor open circuit protection | Switch the unit off and contact the Breville Customer Service Centre. |
| E5 displays on the screen | Sensor has overheated | Switch the unit off and wait for it to cool down before switching back on. |
| E7 displays on the screen | Low voltage in the home | Resume cooking once voltage has been restored to normal. |
| E8 displays on the screen | High voltage in the home | Resume cooking once voltage has been restored to normal. |
| E9 displays on the screen | Heat sink NTC open circuit | Switch the unit off and contact the Breville Customer Service Centre. |
| E10 displays on the screen | Heat sink NTC short circuit | Switch the unit off and contact the Breville Customer Service Centre. |
| E11 displays on the screen | Heat sink is overheated | Switch the unit off and contact the Breville Customer Service Centre. |
Problem Possible Cause What to Do
| There is no power in the house | ·Verify the presence of electrical power within the household. If power is absent, switch the unit off and wait for the power to return before turning the unit back on. If the problem persists, contact the Breville Customer Service Centre. | |
| Cooking incomplete and unit appears to have turned off (no heat emitting from cooking bowl and no lights on the control panel) | Malfunctioning power outlet | ·Reset the rice cooker by switching the unit off at the power outlet, wait a few seconds, and then switch it back on.·Verify the presence of electrical power within the household. If there is power, check if the power outlet where the rice cooker is plugged in is functioning properly. Try plugging another device into the same outlet to confirm if it is supplying power.·If the problem persists after performing these checks, contact the Breville Customer Service Centre. |
| Heating element or PCB failure | ·Contact the Breville Customer Service Centre. | |
| Food splatter | The steam vent, inner lid, sealing ring, or heating plate have not been adequately cleaned | ·Adhere to the provided cleaning instructions. |
| There is rice stuck to the rim of the inner pot and/or seal | ·Adhere to the provided cleaning instructions. | |
| Uneven placement of cooking bowl | ·Ensure that the removable bowl is placed correctly prior to cooking. | |
| Rice has not been rinsed enough | ·Rinse rice until water runs clear prior to cooking. | |
| Incorrect rice to water ratio | ·Ensure that water is filled to the correct line marking prior to cooking. |
Problem Possible Cause What to Do
| Steam is being released from the rim | There is rice stuck to the rim of the inner pot and/or seal | Adhere to the provided cleaning instructions. |
| The lid might not have been closed during the cooking process | Ensure the lid is closed completely prior to cooking. | |
| The sensor, heating element, outer surface of the cooking bowl, or inner pot might not have been properly cleaned | Adhere to the provided cleaning instructions. | |
| Steam vent, inner lid, seal ring or heating plate is not clean | Adhere to the provided cleaning instructions. | |
| Delay start not working | There may be an issue with the PCB | Turn off the rice cooker and contact Breville Customer Service Centre. |
| The start or cancel function is not operational | The inner pot or power cord might not have been correctly inserted | Follow assembly instructions. |
| A noise is generated while cooking | Water might be present at the base of the cooking bowl | Make sure the base of the unit is devoid of water and clean before operating. Turn off the unit, disconnect from the power source, allow it to cool down, and then clean it. |
| Unable to close lid completely | Food debris may be present around the detachable lid seal assembly and/or the lid release button. | Thoroughly clean the area using a cotton bud. |
Breville Customer Service Centre
Australian Customers
Phone:1300 139 798
Web: www.breville.com
New Zealand Customers
Phone: 0800 273 845
Web: www.breville.com
Breville®
Breville, the Breville Logo and Rice Box are trademarks of Breville Pty Ltd ("Breville") and
Breville's products are distributed in Australia and New Zealand under license.
Copyright Breville Pty. Ltd. 2024.
Due to continued product improvement, the products illustrated/photographed
in this booklet may vary slightly from the actual product.
- the Rice Box™ Induction
- CONTENTS
- LIMITED PRODUCT WARRANTY
- BREVILLE® RECOMMENDS SAFETY FIRST
- IMPORTANT SAFEGUARDS
- IMPORTANT SAFEGUARDS FOR ALL ELECTRICAL APPLIANCES
- FOR HOUSEHOLD USE ONLY SAVE THESE INSTRUCTIONS
- COMPONENTS
- Not pictured
- ACCESSORIES
- CONTROL PANEL
- ASSEMBLY
- BEFORE FIRST USE
- FUNCTIONS
- USING YOUR BREVILLE INDUCTION HEATING (IH) RICE COOKER
- NOTES
- COOKING FUNCTIONS
- NOTE
- TIME
- DELAY START
- KEEP WARM | CANCEL
- AUTO & MANUAL KEEP WARM
- WHITE RICE, BROWN RICE, SUSHI RICE, CLAY POT & QUINOA
- Lightly spray the cooking bowl before adding ingredients to prevent rice sticking.
- CAUTION
- QUICK COOK
- IMPORTANT
- STEAM
- SLOW COOK, SOUP, CONGEE & REHEAT
- SLOW COOK
- SOUP
- CONGEE
- REHEAT
- TIME ADJUSTMENT
- RICE COOKING GUIDE
- WHITE RICE
- TIPS
- RICE VARIATIONS
- STEAMING VEGETABLES
- CARE, CLEANING & STORAGE
- WARNING
- Breville Customer Service Centre
- Breville®
Brand : BREVILLE
Model : the Rice Box Induction BRC800
Category : Multicooker