
the Searing Slow Cooker BSC650 - Multicooker BREVILLE - Free user manual and instructions
Find the device manual for free the Searing Slow Cooker BSC650 BREVILLE in PDF.


| Type of Product | Slow Cooker / Multicooker |
| Brand | Breville |
| Model | The Searing Slow Cooker BSC650 |
| Capacity | 6 Liters |
| Cooking Bowl | Removable aluminum with non-stick coating and cool-touch handles |
| Lid | Toughened glass with dual locking handles and steam vent |
| Trivet | Large stainless steel trivet for steaming and roasting |
| Control Panel | Electronic with LED display, 5 browning settings and 4 cooking functions |
| Browning Settings | Gentle (100°C), Low (120°C), Medium (150°C), Sauté (170°C), High Sear (180°C) |
| Browning Time | Default 15 minutes, adjustable 5–60 minutes in 5-minute intervals |
| Cooking Functions | Low Slow Cook (6–14 hrs), High Slow Cook (2–8 hrs), Steam (5–120 mins), Yoghurt (6–12 hrs) |
| Keep Warm | Automatic after slow cook for up to 4 hours; manual selectable |
| Power Supply | 230–240V AC |
| Cleaning | Hand wash recommended; not dishwasher safe; avoid abrasive cleaners |
| Safety Features | Locking lid, cool-touch handles, automatic shut-off, heat-resistant base |
| Included Accessories | Cooking bowl, glass lid, stainless steel trivet, instruction book |
| Usage Warnings | Do not immerse housing; use only with supplied bowl; never cook without food/liquid |
Frequently Asked Questions - the Searing Slow Cooker BSC650 BREVILLE
User questions about the Searing Slow Cooker BSC650 BREVILLE
0 question about this device. Answer the ones you know or ask your own.
Ask a new question about this device
Download the instructions for your Multicooker in PDF format for free! Find your manual the Searing Slow Cooker BSC650 - BREVILLE and take your electronic device back in hand. On this page are published all the documents necessary for the use of your device. the Searing Slow Cooker BSC650 by BREVILLE.
USER MANUAL the Searing Slow Cooker BSC650 BREVILLE
the Searing Slow Cooker™
Instruction Book - LSC650BSS
natural_image
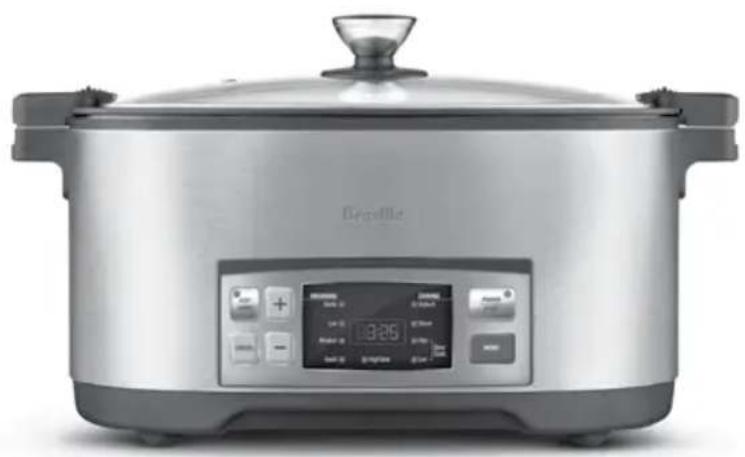
Exterior view of a Breville rice cooker with digital display and control buttons (no visible text or symbols on main body)
Contents
2 Breville Recommends Safety First
9 Components
10 Functions
14 Slow Cooking Guide
16 Steaming Guide
18 Yoghurt Making Guide
19 Care & Cleaning
BREVILLE RECOMMENDS SAFETY FIRST
At Breville we are very safety conscious. We design and manufacture consumer products with the safety of you, our valued customer, foremost in mind. In addition, we ask that you exercise a degree of care when using any electrical appliance and adhere to the following precautions.
IMPORTANT SAFEGUARDS
READ ALL INSTRUCTIONS BEFORE USE AND SAVE FOR FUTURE REFERENCE
- Carefully read all instructions before operating the Breville slow cooker for the first time and save for future reference.
- Remove and safely discard any packaging material and promotional labels before using the slow cooker for the first time.
• To eliminate a choking hazard for young children, remove and safely discard the protective cover fitted to the power plug of this slow cooker. - When unpacking the slow cooker, check to see you have received all the items listed in the parts list, before discarding the packaging.
• Always ensure the slow cooker is properly assembled before use. Follow the instructions provided in this book.
• Always operate the slow cooker on a stable and heat resistant surface.
- Do not place the slow cooker near the edge of a bench or table during operation. Ensure that the surface is level, clean and free of water and other substances.
- Do not operate the slow cooker on a sink drain board.
- Do not place the cooker directly on a heat sensitive bench top, such as a stone bench top, when cooking. This type of bench top is heat sensitive to uneven heat and may crack if heated locally. To cook on a heat sensitive bench top, place a chopping board or heat proof mat underneath the cooker.
- Do not operate the slow cooker on an incline plane. Do not move while the slow cooker is switched on.
- Use the removable cooking bowl supplied with the slow cooker. Do not use any other bowl inside the slow cooker housing.
- Do not use a damaged or dented removable cooking bowl. If damaged or dented, replace bowl before using.
- Position the lid so that the steam vent is directed away from you. Lift and remove the lid carefully to avoid scalding from escaping steam.
- Never plug in or switch on the slow cooker without having the removable cooking bowl placed inside the slow cooker housing.
-
Ensure the removable cooking bowl is correctly positioned in the slow cooker base before you commence cooking.
-
Do not place food or liquid in the slow cooker housing. Only the removable cooking bowl is designed to contain food or liquid.
- Never operate the slow cooker without food and liquid in the removable cooking bowl. Ensure the cooking bowl is at least 12 to 34 full of food or liquid before switching on the slow cooker.
• Always slow cook with the glass lid on for the recommended time. -
Do not place anything, other than the provided lid, on top of the slow cooker when assembled, when in use and when stored.
• Always have the lid placed correctly into position on the removable cooking bowl throughout operation of the slow cooker unless stated in the recipe to have it removed. -
Do not allow water from the lid to drip into the slow cooker housing, only into the removable cooking bowl.
-
Do not touch hot surfaces. Use the handle for lifting and carrying the slow cooker and use dry oven mitts to remove the lid and / or removable cooking bowl. Lift and remove the lid carefully and angled away from you to avoid scalding from escaping steam. Allow the slow cooker to cool completely before moving or cleaning any parts.
• The glass lid has been specially treated to make it stronger, more durable and safer than ordinary glass, however it is not unbreakable. If struck extremely hard, it may break or weaken, and could at a later time shatter into many small pieces without apparent cause. -
Extreme caution must be used when the slow cooker contains hot food and liquids.
- The temperature of accessible surfaces will be high when the slow cooker is operating and for some time after use.
-
Do not place the removable cooking bowl when hot on any surface that may be affected by heat.
• To prevent scratching the non-stick surface of the removable cooking bowl, always use wooden, silicon or plastic utensils.
• High humidity, altitude, cold tap water, ingredients and minor fluctuations may affect the cooking times in the slow cooker.
• The recommended cooking times are approximate. Cooking times can vary depending on ingredients and quantities in recipes. -
Care should be taken when handling the slow cooker after cooking, ensuring that the slow cooker body and parts are not touched as these may still be hot.
- If you are not home during the slow cooking process and the power goes out, throw away the food even if it looks cooked.
- If you are at home during the slow cooking process and the power goes out, finish cooking the ingredients immediately by some other means such as a gas stove, on an outdoor grill or elsewhere, where the power is on.
- When you are at home, and if the food was completely cooked before the power went out, the food should remain safe up to two hours in the cooker with power off.
-
If using plastic utensils, do not leave inside the slow cooker when hot or on browning settings.
-
When using the yoghurt cooking process, ensure the kitchen thermometer used to monitor temperature of the milk is suitable and sterile for use with food and liquids.
- The slow cooker is not intended to be operated by means of an external timer or separate remote control system or any other device that switches the slow cooker on automatically.
- Do not use the removable cooking bowl in a conventional oven or microwave oven.
- Do not place the removable cooking bowl on a gas burner or electric hotplate.
• To avoid an electrical overload, it is recommended that no other appliances are plugged into the same circuit as your slow cooker when it's in use.
- Do not use chemicals, steel wool, metal scouring pads or abrasive cleaners to clean the outside of the slow cooker housing or the cooking bowl as these can damaged the housing or the coating of the cooking bowl.
- Keep the slow cooker clean. Follow the cleaning instructions provided in this book.
IMPORTANT SAFEGUARDS FOR ALL ELECTRICAL APPLIANCES
- Fully unwind the power cord before use.
- Connect only to a 230V or 240V power outlet.
- Do not let the power cord hang over the edge of a bench or table, touch hot surfaces or become knotted.
• To protect against electric shock, do not immerse the power cord, power plug or appliance in water or any other liquid or allow moisture to come in contact with the parts, unless it is recommended in the cleaning instructions.
• The appliance is not intended for use by persons (including children) with reduced physical, sensory or
mental capabilities, or lack of experience and knowledge, unless they have been given supervision or instruction concerning use of the appliance by a person responsible for their safety.
• Children should be supervised to ensure that they do not play with the appliance.
- It is recommended to regularly inspect the appliance. To avoid a hazard, do not use the appliance if power cord, power plug or appliance becomes damaged in any way. Return the entire appliance to the nearest authorized Breville service centre for examination and / or repair.
- Any maintenance other than cleaning should be performed at an authorised Breville Service Centre.
• This appliance is for household use only. Do not use this appliance for anything other than its intended use. Do not use in moving vehicles or boats. Do not use outdoors. Misuse may cause injury.
- The installation of a residual current device (safety switch) is recommended to provide additional safety protection when using electrical appliances. It is advisable that a safety switch with a rated residual operating current not exceeding 30mA be installed in the electrical circuit supplying the appliance. See your electrician for professional advice.
• Always turn the appliance to the OFF position, switch off at the power
outlet and unplug at the
power outlet when the
appliance is not in use.
- Before cleaning, always turn the appliance to the OFF position, switch off at the power outlet, unplug at the power outlet and remove the power cord, if detachable, from the appliance and allow all parts to cool.
- Do not place this appliance on or near a heat source, such as hot plates, ovens or heaters.
- Position the appliance at a minimum distance of 20cm away from walls, curtains and other heat or steam sensitive materials and provide adequate space above and on all sides for air circulation.
FOR HOUSEHOLD USE ONLY SAVE THESE INSTRUCTIONS

Components
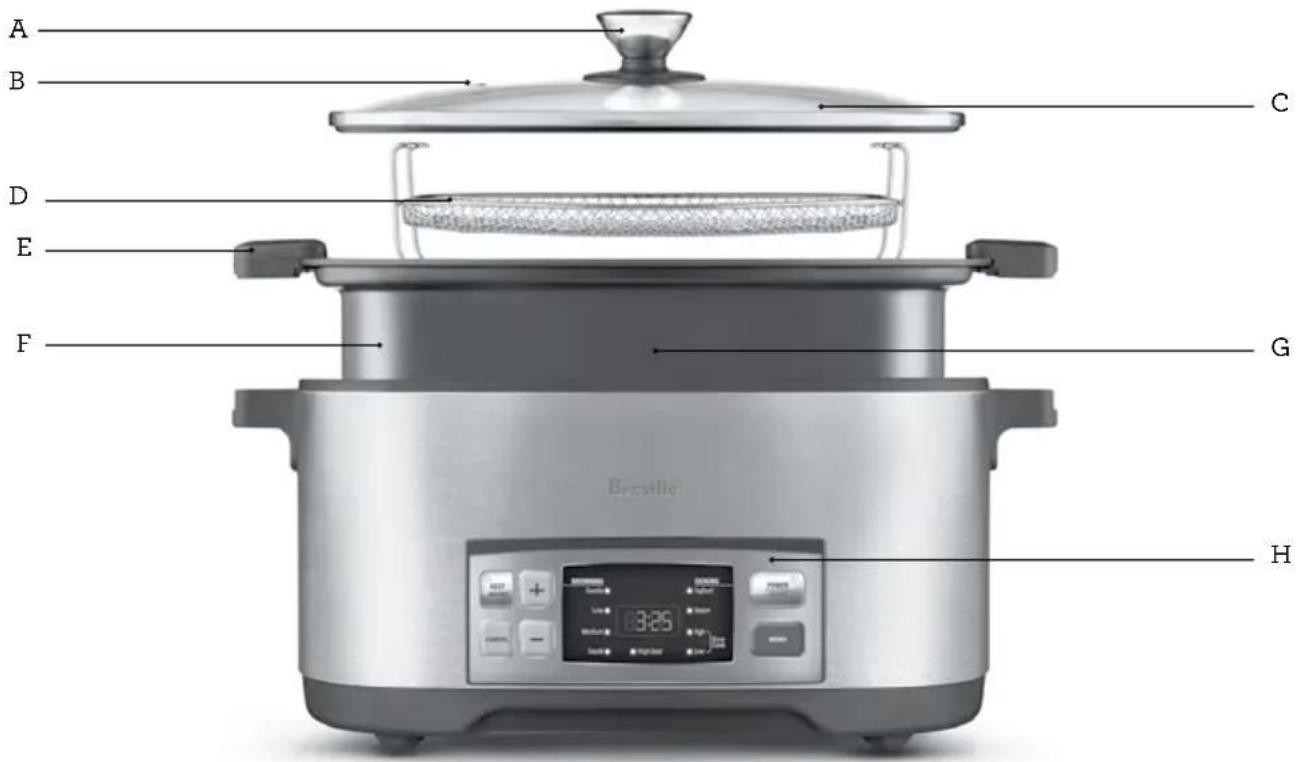
A. Lid knob handle
B. Lid steam vent
C. Toughened glass lid
D. Large stainless steel trivet
For large portion steaming and roasting.
E. Dual locking lid handles
To secure the lid to the cooking bowl
while cooking and when storing.
F. Removable, aluminium cooking bowl
With non-stick coating and cool
touch handles.
G. Large family size 6L capacity
H. Easy-operation control panel
With 5 browning settings and 4 cooking functions.
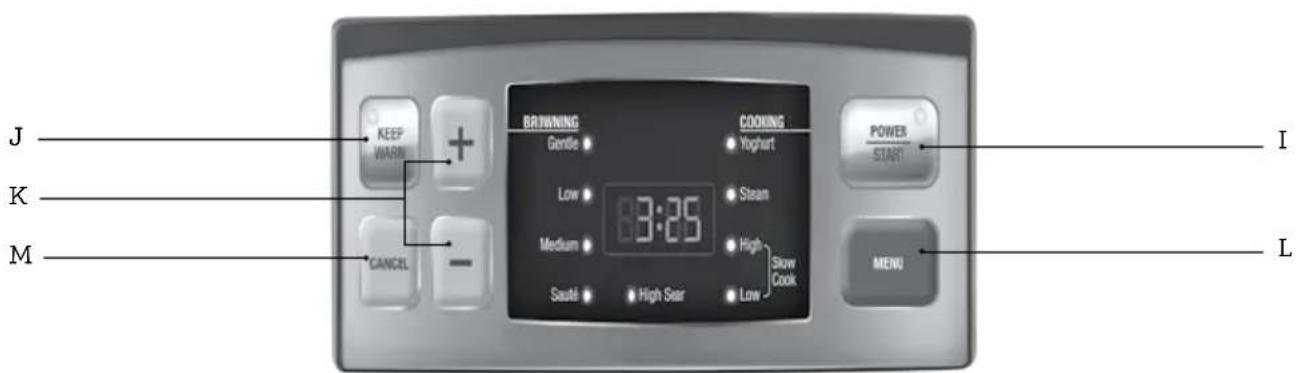
I. POWER / START button with indicator light
J. KEEP WARM button with indicator light
K. — and + buttons
To increase or decrease cooking times.
L. MENU button
M. CANCEL button

Functions
BEFORE FIRST USE
Remove all promotional labels and packaging materials from the slow cooker. Ensure that all parts and accessories listed are accounted for before discarding the packaging. Wash the cooking bowl, glass lid and trivet in hot, soapy water, rinse and dry thoroughly.
Ensure that the slow cooker housing and the exterior of the removable cooking bowl are clean and clear of any debris before placing the cooking bowl into the slow cooker housing.
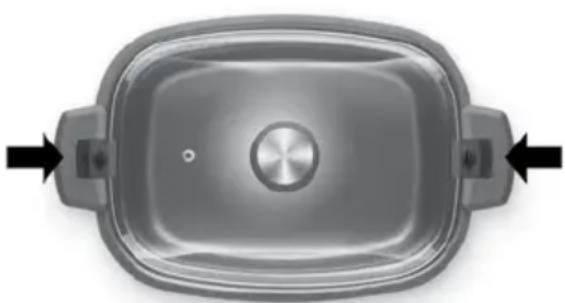
Place the glass lid on the cooking bowl so it is level and resting on the bowl lip. Push the lid locks on both handles towards the lid knob until they clip into place.
The lid is locked onto the slow cooker bowl but the bowl can still be easily removed from the slow cooker housing using the cooking bowl handles.
natural_image
Top-down view of a metallic kitchen pot with a central knob and two side handles (no text or symbols visible)The removable cooking bowl is aluminium with a non-stick coating, it is not suitable for use on a burner, hotplates on gas, electric or ceramic stove tops or for use in an oven.
All cooking tasks must be completed with the cooking bowl securely placed in the slow cooker housing.

WARNING
Do not lift the removable cooking bowl with the lid knob. Use the cooking bowl handles on both sides.

WARNING
Always operate the slow cooker on a stable and heat resistant surface.

WARNING
Do not place the cooker directly on a heat sensitive bench top, such as a stone bench top, when cooking. This type of bench top is heat sensitive to uneven heat and may crack if heated locally. To cook on a heat sensitive bench top, place a chopping board or heat proof mat underneath the cooker.
Insert the power plug into a 230V or 240V power outlet and switch on. The slow cooker will beep and the screen will illuminate, indicating that it is now in standby mode.
Use the MENU button to select your desired function, starting in the top left corner and moving in an anti-clockwise direction.
Once you have reached your desired function, the LED display will show the default time. Use the + and - buttons to increase or decrease the cooking time for the selected function, within the available time range. The slow cooker allows 60 seconds for you to confirm the function and timing and to start cooking before it starts beeping. This indicates that the slow cooker is turned on but not yet cooking.
Select the POWER/START button to confirm the selection and start cooking.
The CANCEL button can be pressed at any time to stop and cancel the function. The slow cooker will return to standby mode.
To turn the slow cooker off, hold the POWER/START button for 3 seconds. The slow cooker should also be switched off and unplugged from the power point.

CAUTION
To prevent scratching the non-stick surface of the removable cooking bowl, always use wooded, silicon or plastic utensils.
THE SEARING SLOW COOKER FUNCTIONS
BROWNING DEFAULT TIME VARIABLE TIME RANGE KEEP WARM
| Gentle 15 mins 5-60mins (5 min intervals) Manual |
| Low 15 mins 5-60mins (5 min intervals) Manual |
| Medium 15 mins 5-60mins (5 min intervals) Manual |
| Sauté 15 mins 5-60mins (5 min intervals) Manual |
| High Sear 15 mins 5-60mins (5 min intervals) Manual |
| NOTE: All browning functions have automatic preheat.Once the slow cooker has completed the preheat, the timer will start counting down. |
COOKING DEFAULT TIME VARIABLE TIME RANGE KEEP WARM
| Low Slow Cook 8 hrs 6-14 hrs (10 min intervals) Auto / Manual | |||
| High Slow Cook 6 hrs 2-8 hrs (10 min intervals) | Auto / Manual | ||
| Steam | 20 mins | 5-120 mins (1 min intervals) | Manual |
| Yoghurt | 8 hrs | 6-12 hrs (10 min intervals) | Manual |
BROWNING FUNCTIONS
The slow cooker has 5 browning functions for all sautéing, browning and searing tasks. These functions are ideal for sealing meats and pre-cooking vegetables prior to slow cooking, allowing you to seal in flavours and juices creating more flavoursome slow cooked dishes.
| BROWNING FUNCTION | TEMPERATURE (APPROX) |
| Gentle | 100°C |
| Low | 120°C |
| Medium | 150°C |
| Sauté | 170°C |
| High Sear 180°C |
Select the desired browning function using the MENU button. The default time for all browning functions is 15 mins, if more time is required, use the + and — buttons.
Select the POWER/ START button to confirm the selection, the light next to the selected function will illuminate.
The LED screen will display a flashing rectangle and the slow cooker will start preheating. When the slow cooker beeps and the timer starts counting down, the preheat is complete and ready to start cooking.
Once the timer reaches zero, the unit will beep and switch into standby mode. Alternatively, the CANCEL button can be selected at any time. If proceeding to a cooking function, use the MENU button to select the desired function.
COOKING FUNCTIONS
LOW & HIGH SLOW COOK
With the cooking bowl securely placed into the slow cooker housing, place all ingredients into the cooking bowl, ensuring food is evenly spread across the base of the bowl. Place the lid onto the cooking bowl and using the locking clips, lock the lid in place.
Select the desired cooking function using the MENU button, then use the + and - buttons to adjust the cooking time. Select the POWER/START button to confirm the selection and commence cooking. The light next to the selected function will illuminate and the LED display will show the countdown timer.
Once the cooking time reaches zero, the slow cooker will beep five times, before automatically switching to KEEP WARM, the corresponding light will illuminate. The automatic keep warm will operate for up to 4 hours before switching to standby mode.
The LOW slow cook setting gently heats food for an extended period of time without overcooking or burning. No stirring is required when using this setting.
The HIGH slow cook setting will cook food in approximately half the time required for LOW setting. Some foods may boil when cooked on the HIGH setting, so it may be necessary to add extra liquid. This will depend on the recipe and the amount of time in which it is cooked. Occasional stirring of stews and casseroles will improve the flavour distribution.
For more information, refer to the Slow Cooking Guide on page 14 of this manual.

WARNING
If you are not home during the slow cooking process and the power goes out, throw away the food even if it looks cooked.

CAUTION
Do not touch hot surfaces. Use the handle for lifting and carrying the slow cooker and use dry oven mitts to remove the lid and or removable cooking bowl. Lift and remove the lid carefully and angled away from you to avoid scalding from escaping steam. Allow the slow cooker to cool completely before moving or cleaning any parts.

CAUTION
Extreme caution must be used when the slow cooker contains hot food and liquids.

WARNING
The temperature of accessible surfaces will be high when the slow cooker is operating and for some time after use.
STEAM
Before steaming, ensure that the cooking bowl is clean. Place the steaming trivet into the base of the cooking bowl.. Place 1-1.3L of water into the cooking bowl, ensuring that it sits just below the level of the steaming trivet.
Depending on the food and desired cooking result, the food to be steamed can either be placed on the steaming trivet before the function is selected or once the water is boiling. It will take approximately 10 minutes for 1-1.3L of water to start boiling.
Place the food to be steamed onto the trivet and place the lid onto the cooking bowl and lock in place. For best results, do not open the lid until food is cooked, Opening the lid will allow steam to escape and will result in a prolonged cooking time.
Use the MENU button to select the STEAM function, then use the + and - buttons to adjust the required steaming time. Ensure that you allow enough time for the water to boil.
While steaming, monitor the water levels in the cooking bowl. If more water is required, unlock and remove the lid using dry heat proof mitts, top up with hot water before closing and relocking the lid.
Once steaming is complete, use heat-proof mitts to remove the trivet from the cooking bowl. Alternatively, use tongs to remove steamed food from the trivet and allow the trivet to completely cool before removing it from the cooking bowl.
For more information, refer to the Steaming Guide page 16 of this manual.
YOGHURT
All equipment and utensils used in yoghurt making should be sterilised before use.
Combine all ingredients in a separate bowl before placing into the cooking bowl. Place the lid on the cooking bowl and lock into place. Use the MENU button to select the YOGHURT function, then use the + and - buttons to adjust the required cooking time.
Do not attempt to use this function for anything else, for food safety reasons. This function should only to be used for making yoghurt
For more information, refer to the Yoghurt Making Guide on page 18 of this manual.
KEEP WARM
This slow cooker has both automatic and manual KEEP WARM functions. The automatic keep warm will activate after the LOW and HIGH SLOW COOK functions, once the timer has reached zero. The manual KEEP WARM can be selected, once the slow cooker has completed a browning, cooking or automatic keep warm function. When selected, the indicator light will illuminate and the display will commence counting up.
Both manual and automatic keep warm functions will operate for up to 4 hours before the slow cooker will switch to standby mode. Keep warm can be cancelled at any time by pressing the CANCEL button.

CAUTION
Do not place the removable cooking bowl or glass lid into or under cold water while it is still hot.

WARNING
Do not reheat food using the removable cooking bowl.

Slow Cooking Guide
The Searing Slow Cooker is designed for flavour layering, which allows you to enhance and deepen the taste of meals by using the same pan for browning, searing and slow cooking. Depending on the temperature and ingredients, slow cooking can take between 3 and 12 hours.
Browning prior to slow cooking is recommended but not strictly necessary. Searing and browning seals in the moisture, intensifies the flavour and provides most tender results.
PREPARING MEAT
When purchasing meat for slow cooking, select leaner cuts and trim the meat or poultry of any visible fat.
For casserole type recipes, cut the meat into cubes, approximately 2.5-3 cm. Slow cooking allows less tender cuts of meat to be used. The bones can be left on meat or poultry, if desired, and will help to keep meat tender during cooking but will increase the required cooking time.
SUITABLE CUTS FOR SLOW COOKING
| Beef Chuck, skirt, round steak, boneless shin (gravy) beef, bone-in-shin (Osso Bucco) |
| Lamb Shanks, drumsticks (frenched shanks), neck chops, boned out forequarter or shoulder |
| Veal Diced leg, shoulder / forequarter chops and steaks, neck chops, knuckle |
| Pork Leg steaks, diced belly, diced shoulder, boneless loin chops |
| Chicken Drumsticks, thigh meat, Maryland, lovely legs and wing drumettes without skin |
PREPARING VEGETABLES
All vegetables should be cut into even-sized pieces (approximately 2-3cm) to ensure even cooking. Frozen vegetables must be thawed before adding to other foods cooking in the slow cooker.
PREPARING DRIED BEANS AND PULSES
For best results, it is recommended to soak dried beans and pulses overnight. After soaking, drain, rinse and place into the slow cooker bowl with sufficient water to allow the beans or pulses to double in volume. Cook on HIGH SLOW COOK for 2-4 hours.
Roasting meats in the slow cooker creates tender, flavoursome results. The long, slow, covered cooking process breaks down and softens the connective and muscle tissue within the meat, making it easier to slice. Cheaper cuts of meat can be used with this method.
Meat will not brown during the slow cooking process, for browner results, sear the meat using the HIGH SEAR function prior to slow cooking.
The addition of liquid is not required for roasting. Elevate the meat to be cooked on the trivet. This will assist in keeping the surface of the meat dry and free from any fat release while cooking.
SUITABLE CUTS FOR ROASTING
| Beef Blade, rump, rib roast, fillet, sirloin, topside |
| Lamb Leg, mid loin, rack, crown roast, shanks, shoulder, mini roasts |
| Veal Leg, loin, rack, shoulder / forequarter |
| Pork Loin, neck, leg, racks (remove skins and fat) |
The addition of liquid is required for pot-roasting. Place sufficient liquid in the cooking bowl, to cover up to a third of the meat. Meat will not brown during the pot-roasting process, so for browner results sear the meat first using the HIGH SEAR function.
SUITABLE CUTS FOR POT ROASTING
| Beef Topside, blade, silverside, roasts, rolled brisket |
| Lamb Forequarter, shank, shoulder |
| Veal Shoulder / forequarter |
| Pork Loin, neck, scotch |
TIMING
General slow cooking time:
SETTING COOKING TIME RANGE
| LOW 6-14 hours |
| HIGH 2-8 hours |
| TRADITIONAL COOKING TIME | SLOW COOKER COOKING TIME (WITHOUT SEARING) |
LOW HIGH
35-60 minutes 6-10 hours 3-5 hours
1-3 hours 8-10 hours 4-6 hours
| TRADITIONAL COOKING TIME | SLOW COOKER COOKING TIME (WITH SEARING) |
LOW HIGH
35-60 minutes 4-5 hours 2-3 hours
1-3 hours 5-6 hours 3-4 hours

NOTE
The above cooking times are to be used as a guideline only. Timing will depend on ingredients, temperatures and quantities used.

TIPS
- Trim all visible fat from meat or poultry.
- Meat and poultry require at least 6-7 hours of cooking on LOW SLOW COOK or 34 hours on HIGH SLOW COOK.
- Ensure that the food and liquid only 3 14 fills the cooking bowl.
- If after cooking, the liquid quantity is excessive, remove the lid and operate the slow cooker on HIGH SLOW COOK for 30-45 minutes or until liquid begins to reduce. Alternatively, the liquid can be thickened by adding a mixture of cornflour and water to the hot liquid.

Do's
√ Always thaw frozen meat and poultry before cooking.
√ Use dry oven mitts when lifting the lid or removing the cooking bowl after use.
√ Place the cooking bowl onto a heat-proof mat when serving.

Don'ts
✗ Do not operate the slow cooker without the cooking bowl in position in the slow cooker housing.
✗ Do not cook with frozen meats or poultry.
✗ Do not remove the lid from the slow cooker unnecessarily as it will result in a major loss of heat.
✗ Do not use the HIGH SLOW COOK setting if you intend on being away from the house for over 3 hours.

WARNING
- Never place water or other liquids into the slow cooker housing.
- Never immerse the slow cooker housing, power cord, or power plug in water or any other liquid.
- Never touch hot surfaces. Use dry, heat-proof oven mitts when removing the lid or cooking bowl after cooking.

Steaming Guide
Steamed foods retain most of their nutritional value. Foods can be steamed by placing them on the provided trivet over stock or water in the cooking bowl. Ensure that the food sits above the water level in the bowl.
When steaming, it is important to keep the lid closed and locked in place, as opening it will allow the steam to escape, resulting in prolonged cooking times. Depending on the food and desired cooking result, the food to be steamed can either be placed on the steaming trivet before the function is selected or once water is boiling. The below cooking tables are based on using 1.2L of tap water and include pre-heat time.
STEAMING VEGETABLES:
- Smaller pieces will steam faster than larger pieces.
- Vegetables should be a uniform size to ensure a more consistent cooking result.
- Fresh or frozen vegetables can be steamed, though frozen will take longer to cook but should not be thawed before cooking.
- Size and shape of vegetables and personal preference may call for adjustments to the advised cooking times. For softer vegetables, allow extra cooking time.
- Do not allow the water or stock in the removable cooking bowl to reach the steaming trivet.
| VEGETABLES | PREPARATION & TIPS | QUANTITY | COOKING TIME(APPROX) |
| Asparagus trim, leave as spears 2 bunches 12-16 minutes | |||
| Beans top and tail, leave whole 200g 12-16 minutes | |||
| Broccoli cut into florets 250g 12-15 minutes | |||
| Brussel Sprouts cut a cross in the base | 200g 17-20 minutes | ||
| Carrots | cut into batons | 3 medium (300g) | 20-25 minutes |
| Cauliflower | cut into florets | 300g | 22-25 minutes |
| Corn | whole corn cobs | 2 small cobs | 20-25 minutes |
| Snow peas | topped and tailed | 250g | 12-15 minutes |
| Peas | fresh, peeled | 250g | 15-18 minutes |
| Peas | frozen | 250g | 12-15 minutes |
| Potatoes | new, chat whole | 8 (80g each) | 40-50 minutes |
| Sweet Potato | cut into 3cm pieces | 400g | 25-30 minutes |
| Pumpkin | cut into 3 cm pieces | 400g | 24-29 minutes |
| Spinach (English) | leaves and stems cleaned | 1 bunch | 8-10 minutes |
| Squash (baby) | topped and tailed | 350g | 20-25 minutes |
| Turnips | peeled and cut into 3cm pieces | 150g | 20-25 minutes |
| Zucchini | cut into 3cm pieces | 330g | 17-20 minutes |
STEAMING FISH AND SEAFOOD
- Season fish with fresh herbs, onions, lemon etc. before cooking.
- Ensure fish fillets are in a single layer on the trivet and do not overlap.
- Fish is cooked when it flakes easily with a fork and is opaque in colour.
TYPE SUGGESTIONS AND TIPS COOKING TIME (APPROX)
| Fish - fillets | Steam until opaque and easy to flake. A cutlet is cooked when the centre bone is able to be easily removed | 20-24 minutes |
| - whole | 25-30 minutes | |
| - cutlets | 22-25 minutes | |
| Mussels - in shell Clean and remove beard, steam until just opened 15-18 minutes | ||
| Clams and Pipis Clean, steam until just opened 15-20 minutes | ||
| Prawns - in shell Steam until pink 15-20 minutes | ||
| Scallops Steam until opaque 10-15 minutes | ||
STEAMING POULTRY
- Select similar sized pieces of poultry to ensure even cooking.
- For even cooking results arrange poultry in a single layer in the trivet.
- Remove visible fat and skin.
- To obtain a browned appearance, sear the chicken before steaming.
- Check poultry is cooked by piercing the thickest part. It is cooked when the juices run clear.
TYPE SUGGESTIONS AND TIPS COOKING TIME (APPROX)
| Breast fillet | Place the thickest part of the chicken fillet to outside of the steaming trivet (250g) | 25-30 minutes |
| Drumstick | Place thickest part to outside of the steaming trivet | 30-35 minutes |
| Thigh fillet | Place thickest part to outside of the steaming trivet | 25-30 minutes |
STEAMING DUMPLINGS
- Fresh or frozen dumplings and savoury buns can be steamed.
- Place small pieces of baking paper, cabbage or lettuce leaves, or spray the trivet with oil under the dumplings to avoid sticking while cooking.
TYPE SUGGESTIONS AND TIPS COOKING TIME (APPROX)
| BBQ pork or chicken buns | Cook from frozen | 15-19 minutes |
| Dumplings - frozen | Separate before cooking | 17-20 minutes |
| Dumplings - fresh | 20-25 minutes |

Yoghurt Making Guide
Yoghurt is made when pasteurised milk and starter culture bacteria are combined and allowed to incubate at the correct temperature for several hours. The starter culture bacteria convert most of the lactose in whole milk into lactic acid creating the soft, creamy curd and the distinctive taste of yoghurt.
Starter culture bacteria can be either a commercial natural yoghurt, yoghurt made previously, a powdered yoghurt mix available from supermarkets or a bacterial yoghurt starter available from health food stores.

TIPS
- Ensure that all equipment is clean and rinsed in hot water then dried prior to use. This will help eliminate interfering bacteria.
- Ensure all ingredients are fresh.
- Ensure all ingredients are suitable for yoghurt making.
- Avoid moving the slow cooker during the cooking process. Doing so could result in curdling.
- Avoid leaving the yoghurt to incubate for longer than suggested.
- Do not leave the slow cooker near a heat source, in direct sunlight or outdoors.
- Refrigerate the finished yoghurt for a couple of hours before using. The texture and flavour will improve with longer refrigeration.
- If a thicker consistency of yoghurt is preferred, filter the yoghurt using a clean muslin cloth over a bowl to catch the whey until the desired thickness is achieved.
YOGHURT RECIPES
FULL CREAM MILK NATURAL YOGHURT
3 litres full cream milk
250ml natural yoghurt
150g full cream milk powder
250ml natural skim milk yoghurt
150g skim milk powder
GOAT'S MILK NATURAL YOGHURT
3 litres pasteurised goat's milk
250ml natural goat's milk yoghurt
300g goat's milk powder (if not available increase goat's milk yoghurt to 375ml)
PRE-PACKAGED STARTER YOGHURT MIX
4 litres room-temperature tap water
4 packets (approx. 560g) natural unsweetened powdered yoghurt mix
FLAVOURING SUGGESTIONS
FLAVOUR YOGHURT, BEFORE INCUBATION AND REFRIGERATION BY:
- Using a variety of flavoured milks to make sweet flavoured yoghurts.
• Using flavoured yoghurts as the starter.
FLAVOUR YOGHURT, AFTER INCUBATION AND REFRIGERATION BY:
- Sweetening with maple syrup, golden syrup or honey.
- Stirring in pureed fruits such as banana, pineapple, raspberries, mango.
- Adding texture with a small amount of muesli and finely chopped fresh fruit.
- Stirring in 1-2 tablespoons apple sauce, some raisins and a dash of cinnamon.

Care & Cleaning
Before cleaning, turn the slow cooker off by holding the POWER/START button for 3 seconds then switch off at the power outlet and unplug. Always allow the slow cooker to fully cool before removing the lid and cooking bowl for cleaning.
Wash the removable cooking bowl, glass lid and steaming trivet in hot, soapy water, rinse and dry thoroughly.
It is not recommended that any part of the slow cooker be cleaned in the dishwasher. Doing so can damage the coating on the cooking bowl. To prolong the life of the non-stick coating, it is recommended to wash with hot, soapy water using a mild detergent, then rinse and dry thoroughly.
The housing can be wiped over with a soft, damp cloth and dried thoroughly.
To remove stubborn cooked on foods from the cooking bowl, soften by filling the bowl with warm, soapy water and soaking for 20-30 minutes. Use a soft nylon kitchen brush to lightly scrub the food off the bowl.

WARNING
Do not use chemicals, steel wool, metal scouring pads or abrasive cleaners to clean the outside of the slow cooker housing or cooking bowl as these can damage the housing or the coating of the cooking bowl.

WARNING
Do not immerse the housing, power cord or power outlet in water or any other liquid as this may cause electrocution.
STORAGE
Before storing, ensure the slow cooker is switched off and unplugged from the power point.
Ensure the slow cooker is completely cool, clean and dry before storing. Store the slow cooker with the cooking bowl in the housing and the lid locked onto the cooking bowl.

WARNING
Do not store anything on top of the slow cooker.
Breville Customer Service Centre
Australian Customers
Mail: Locked Bag 2000
Botany NSW 1455
AUSTRALIA
Phone: 1300 139 798
Fax: (02) 9700 1342
Email: Customer Service:
askus@breville.com.au
Web: www.breville.com.au
New Zealand Customers
Mail: Private Bag 94411
Botany Manukau 2163
Auckland NEW ZEALAND
Phone: 0800 273 845
Fax: 0800 288 513
Email: Customer Service:
askus@breville.co.nz
Web: www.breville.co.nz
Breville®
Thought for food
Breville is a registered trademark of Breville Pty. Ltd. A.B.N. 98 000 092 928.
Copyright Breville Pty. Ltd. 2017.
Due to continued product improvement, the products illustrated/photographed
in this brochure may vary slightly from the actual product.
- the Searing Slow Cooker™
- Contents
- BREVILLE RECOMMENDS SAFETY FIRST
- IMPORTANT SAFEGUARDS
- READ ALL INSTRUCTIONS BEFORE USE AND SAVE FOR FUTURE REFERENCE
- IMPORTANT SAFEGUARDS FOR ALL ELECTRICAL APPLIANCES
- FOR HOUSEHOLD USE ONLY SAVE THESE INSTRUCTIONS
- Components
- Functions
- BEFORE FIRST USE
- WARNING
- CAUTION
- THE SEARING SLOW COOKER FUNCTIONS
- BROWNING FUNCTIONS
- COOKING FUNCTIONS
- LOW & HIGH SLOW COOK
- STEAM
- YOGHURT
- KEEP WARM
- Slow Cooking Guide
- PREPARING MEAT
- PREPARING VEGETABLES
- PREPARING DRIED BEANS AND PULSES
- TIMING
- NOTE
- TIPS
- Do's
- Don'ts
- Steaming Guide
- STEAMING VEGETABLES:
- STEAMING FISH AND SEAFOOD
- STEAMING POULTRY
- STEAMING DUMPLINGS
- Yoghurt Making Guide
- YOGHURT RECIPES
- FULL CREAM MILK NATURAL YOGHURT
- GOAT'S MILK NATURAL YOGHURT
- PRE-PACKAGED STARTER YOGHURT MIX
- FLAVOURING SUGGESTIONS
- FLAVOUR YOGHURT, BEFORE INCUBATION AND REFRIGERATION BY:
- FLAVOUR YOGHURT, AFTER INCUBATION AND REFRIGERATION BY:
- Care & Cleaning
- STORAGE
- Breville Customer Service Centre
Brand : BREVILLE
Model : the Searing Slow Cooker BSC650
Category : Multicooker