
FC-31501 WH - Autre appareil ménager Vivax - Free user manual and instructions
Find the device manual for free FC-31501 WH Vivax in PDF.


| Brand | Vivax |
| Model | FC-31501 WH |
| Product Type | Freestanding Cooker (Gas Hob + Electric Oven) |
| Dimensions (width x depth x height) | 50 x 60 x 85 cm (approx.) |
| Weight | Approx. 50 kg |
| Power Supply | 230 V ~ 50 Hz, single phase |
| Gas Connection | G 1/2″ thread, natural gas or LPG |
| Hob Burners | 1 small (0.9 kW), 1 medium (1.5 kW), 1 large (1.95 kW) |
| Electric Hot Plates | 1 left front 1000W, 1 left back 1500W |
| Oven Heating Elements | Top (800W) + Bottom (1000W) |
| Oven Features | Grill, rotisserie, thermostat (0–300°C), timer (up to 90 min) |
| Oven Capacity | Approx. 60 L (estimated) |
| Safety Systems | Flame failure device on gas burners, push-to-turn knobs, child safety warning |
| Ignition | Automatic spark ignition (push button) |
| Oven Lighting | Internal 15W lamp |
| Cooktop Material | Enameled steel (estimated) |
| Oven Door | Removable glass door for easy cleaning |
| Cleaning | Removable burner caps and grids; oven cavity washable with warm detergent; do not use abrasive |
| Gas Conversion | Adaptable to LPG or natural gas with nozzle replacement |
| Certifications | CE, EEC Directives 73/23, 90/683, 90/336, 93/68 |
| Warranty | 24 months (standard) |
Frequently Asked Questions - FC-31501 WH Vivax
User questions about FC-31501 WH Vivax
0 question about this device. Answer the ones you know or ask your own.
Ask a new question about this device
Download the instructions for your Autre appareil ménager in PDF format for free! Find your manual FC-31501 WH - Vivax and take your electronic device back in hand. On this page are published all the documents necessary for the use of your device. FC-31501 WH by Vivax.
USER MANUAL FC-31501 WH Vivax
Congratulations on your purchase of this appliance provided by high technical element and produced in a modern factory. Please read this manual carefully and keep it on hand for future reference.
IMPORTANT: This new appliance is easy to use, however, to obtain the results, it is important to read this booklet and to follow all the instructions before using it for first time.
The booklet contains the necessary information regarding installation, use and maintenance, as well as giving useful advice.
CE This appliance complies with the following E.E.C. Directives.
• 73/23 – 90/683 (Low Voltage Directive)
• 90/336 (Gas Appliance Directive)
• 93/68 (General Directives)
and subsequent modifications
it is very important that this instruction book should be kept safety for future cosultation. If the appliance should be sold or given to another person, please ensure that the booklet goes together with it so that the new owner can know of the functions of the machine and also be aware of the warning.
This warning has been given for the safety of you and others. We therefore, ask you to carefully read the procedures of the installing and using this cooker.
- This appliance has been designed for use by adults, take care, therefore the children do not attempt to play with it.
- This product is intended for cooking of food and must not be used for other purposes
- Placing distances of appliance;
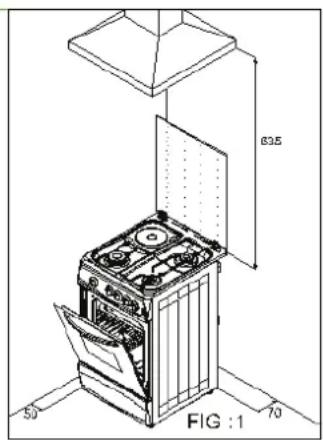
- The work of installation must be carried out by competent and qualified installers according to the regulations in force.
- modifications to the domestic electrical mains, which may be necessary for the installation of the appliance should be carried out only by competent personnel. It is dangerous to modify, or attempt to modify, characteristics of this appliance.
- Unstable or deformed pans, should not be placed on the burners or plates in order to avoid accidents caused by upsetting or boiling over.
- Particular care should be taken when cooking with oil or fat.
-
The appliance remains hot for a long time after being switched off.
-
Supervise children at all times, paying attention that they do not touch surfaces or remain in the vicinity of the appliance when in use or when not completely cooled.
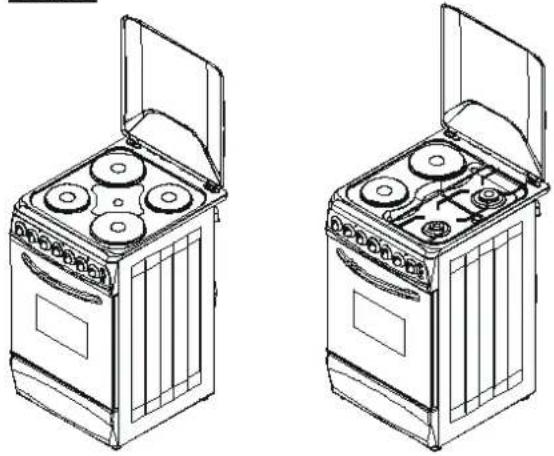
- If the appliance is fitted with a cover. Its function is to protect the surface from dust when closed and to accumulate splashes of grease when open.
- Do not use for other purposes.
• Always clean the cover before closing it. - Leave the burners and / or plates to cool before closing the cover
- All covers, glass or metal, are removable to facilitate cleaning.
- Always ensure that the knobs are in the "0" (STOP) position when the appliance is not in use.
- Always insert the dripping pan when using the grill or when cooking meat on the grid. Pour a little water in to dripping pan to avoid grease burning and the creating unpleasant smells.
• Always use oven gloves to remove dripping pan from the oven. - The accessories (grid and dripping pan) should be washed before using for the first time.
- Take care when using cleaning products in spray form, never direct the spray onto the resistance.
- If when placing food in the oven or when removing it, a large quantity of oil, juice, etc. spills onto the bottom of the oven re-clean before starting to cook to avoid unpleasant smoke and also the possibility of these substances catching fire.
- Ensure that air can circulate around the gas appliance, poor ventilation can produce a lack of oxygen.
WARNING: The use of a gas cooking appliance produces the heat and humidity in the room in which it is installed. Ensure good ventilation of the room keeping natural ventilation openengs clear or installing an extractor hood with a discharge tube.
- For reasons of hygiene and safety this must be always kept clean. A build up of grease or other food can cause fires.
- Avoid installation of the cooker near inflammable material (e.g. curtains, tea towels, etc.)
- Do not shut lid when burner alight.
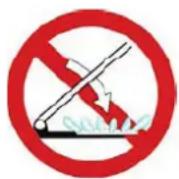
Fig 2
- Supply the appliance with the type of gas stamped on the relevant adhesive label situated in the immediate vicinity of the gas connection tube.
- The gas oven becomes hot with the movement of air.
- The appliance heavy, move it carefully.
- Before maintenance and cleaning disconnect the appliance and allow to cool.
- To facilitate ignition, light the burners before placing pans on the grid. After having lit, check that the flame is regular.
Always lower the flame or turn it off before removing the pan.
Ensure that the oven grids are inserted correctly.
If there are self-cleaning panels they should only be cleaned with soap and water.
Only heat-resistant plates may be placed in the drawer / dishwarmer compartment situated under the oven. Do not combustible materials there.
- In case of repairs, do not attempt to do it by yourself, repairs carried out by unqualified persons can cause damage. Contact an authorized assistance center and insist an original spare parts.
- Never place empty pan as oven or hob burner running.
USAGE
natural_image
Line drawings of two open electric cooktops with four fans and a lid, shown from different angles (no text or symbols)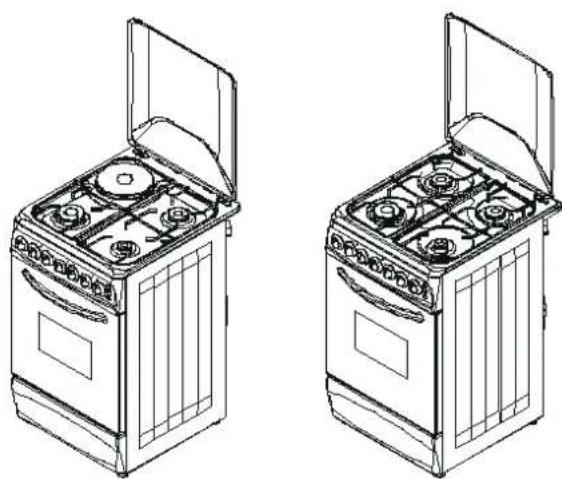
natural_image
Line drawings of two open electric cooktop cabinets with visible steamers and doors (no text or symbols)Fig 3.
IGNITION OF HOB BURNERS
To ignite a burner, before positioning the saucepan, use the appropriate switch marked by a small spark, push the corresponding knob in completely and turn in an anticlockwise direction to the maximum position, push ignition, by having a flame, regulate the flame as required.

FIG. 4 IGNITION
If after a few attempts the burner does not ignite, check that the baffle and its cap are correctly positioned.
To interrupt the supply of gas, turn the knob in a clockwise direction to the position "0" During cooking, when using fats or oils, take particular care as they can, when over-heated, self ignite.
The knobs for using the gas cooker are found on the control panel.
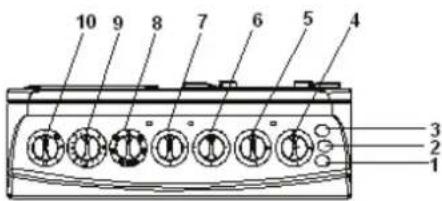
Fig. 5a
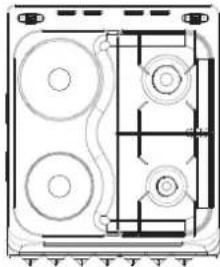
natural_image
Technical line drawing of a mechanical component with circular features and mounting brackets (no text or symbols)Fig. 5b
Table 1.
| 1-LAMP | 7-LEFT FRONT 1000W HOT PLATE |
| 2-IGNITION | 8-OVEN KNOB |
| 3-CHICKEN ROTISSERIE | 9-THERMOSTAT |
| 4-RIGHT FRONT SMALL BURNER | 10-TIMER |
| 5-RIGHT BACK MEDIUM BURNER | |
| 6-LEFT BACK 1500W HOT PLATE |
The regulation knobs should be turned in anticlockwise.
USING BURNER:
Each gas burner is equipped with a gas valve which has "push and turn" safety system in order to ignite gasburner;
*push and turn on left softly the button of gas burner you want to ignite
*ignite the burner by lighter or by pressing "button on the control panel(if your appliance has this feature)"
*you can adjust power of flame by turning the button.
- No gas supply
6 Maximum gas supply
Minimum gas supply
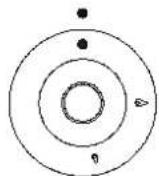
Fig.6
USING ELECTRIC HOT PLATE : (MIXED HOBS)
Turn corresponding knob for hot plate clockwise, the signal lamp will light showing that hot plate is working. When cooking is finished, turn off by turning the knob to "0" position. Hot plate cooker has heat grades shown in (table 1).
Table 2.
| Knob position | 0 | 1 (250 W) | 2 (750 W) | 3 (1000 W) |
| Function | Off | low heating, Cooking Level | cooking & boiling level | fast cooking boiling&grill level |
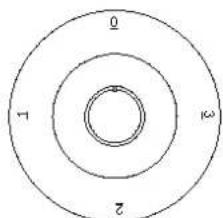
FIG. 7 HOT PLATE KNOB
WHEN USING ELECTRIC HOT PLATE, NOTE THE FOLLOWINGS
- At first use, switch on the hot plate at three position for 5 minutes, so upper surface protection material will be stable.
- Use flat pan with diameter same as hot plate.
- Do not put anything between hot plate and pan.
- After using the hot plate, when it cool, clean the surface with wet fabric, do not use strong or rigid material for cleaning.
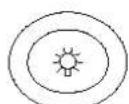
FIG. 8 LAMP
When you push the buton, oven lamp runs.
USING MECHANIC TIMER:
Mechanic timer use by set the time max 90 minutes. You can set the time turning the switch clockwise. When Time's up the timer alerts. If you want to cancel the countdown before the time you set, turn the switch to "0" position.
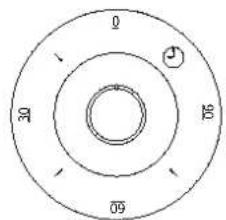
FIG. 9 Mechanic Timer
TERMOSTAT:
This feature is for electric oven only. You can turn the knob to clockwise and brign desired position to adjust temperature.
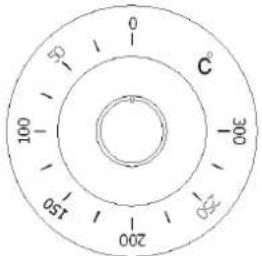
Fig. 10 Thermostat
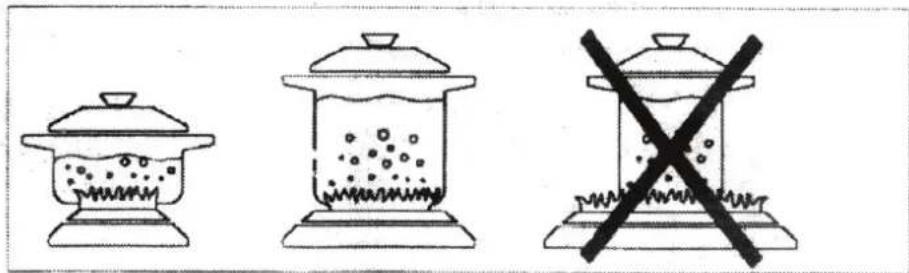
Remember that a wide-bottomed pan allows a faster cooking that a narrow one Always use pots which properly fit what you have to clock.
Particulary make sure that the pans are not too small for liquids, since these could easily overflow.
Moreover, the pans should not be too large for a faster cooking. In fact, grease and juices may spread on the bottom and burn easily.
It is better to use non-openable moulds for baking cakes. In fact, an openable mould lets juices and sugar leak through, falling on the bottom of the oven and consequently burning on the bottom of the baking tray, making cleaning difficult.
Avoid putting plastic-handled pans in the oven as they are not heat-proof.
You should use pans with the right diameter to fit the burner, in order to make he most out of it, thus reducing gas consumption.
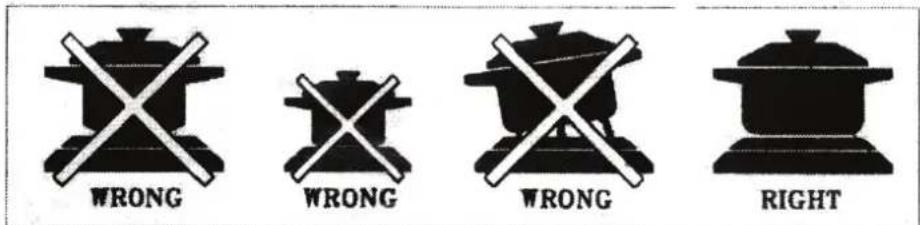
RULES FOR USING ELECTRIC COOKER ARE SHOWNED ON THE PICTURE BELLOW
Fig.11
natural_image
Three simple line drawings: a jar with contents, a lid, and a cross-shaped container (no text or symbols)Fig. 12
It is also advisable to cover any boiling liquids and. As soon as the liquid starts boiling, lover the flame enough to keep the boiling point.
USING THE ELECTRIC OVEN ;
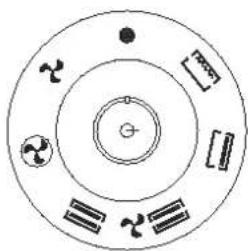
Electric oven has top heating element with grill heating element, bottom heating element, turbo fan and turbo fan with heating element(multifuntion turbo fan). In order to bring the knob desired position;
Gril heating element:
Top heating element:....
Turbo fan+top and bottom heating element:

Top and bottom heating element......

Turbo fan wit heating element:......

Turbo fan :....

natural_image
Circular diagram with concentric rings and small symbols (no text or labels)FIG 13 Oven Knob
The Oven Controller commands oven burner and gril burner. In These models, the security System turns off the gas supply in the case the flame is extinguish.
If you want to use the oven down burner, you turn the switch counter —unticlockwise and push the ignite button until it burns. Push and hold 10-15 seconds for security system runs. To adjust the flame height, you can get the controller knob to the big flame sign or small flame sign.
If you want to use the grill burner, you turn the switch clockwise and push he ignition until it burns.
The device shall not be operated for more than 15s. If after 15s the burner has not lit, stop operating device and openthe compartment door and /or wait at least 1 min. Before attempting a further ignition of the burner.
Manuel Ignition Of Gas Oven:
Press and put the flame to the burner you want to ignite.
Turn the related knob anticlock wise to the max position.
Keep pressing for 15 seconds and leave the knob.
If burner goes of repeat the operation.
PREHEATING:
After turn-on the oven, leave the door open for a few minutes, then close it and turn the regulator knob to the temperature required. Preheat the oven for about 15 minutes before inserting the food to be cooked.
TURNING ON THE TURNSPIT:
Pres the corresponding grill knob to operate the grill. The grill burner can only be turned on when the oven burner off. (a safety switch prevents the use of the two different heat sources simultaneously)
USING THE ROTISSERIE (TURNSPIT):
Impale the food for cooking on the rotisserie spit, taken care that it is secured between the two forks, balance the weight to avoid forcing the motor unnecessarily.
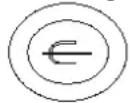
FIG.14 ROTISSERIE
When you push the rotisserie button, chicken rotisserie runs.
INSTALLATION INSTRUCTIONS:
This appliance is not provided with a combustion product discharge device. It is recommended that it be installed in sufficiently aried places, in terms of the laws in force.
ELECTRICAL CONNECTION:
The unit is preset to work with voltage of single phase 230 V.
Before making the connection make sure that;
- The energy power available in teh user's house is sufficient for the normal supply of this appliance (see reating plate)
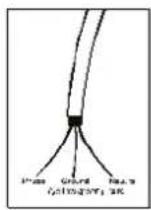
Fig. 15
- The unit is correctly connected to earth through a suitable plug and according to installed appliance.
The appliance is supplied without plug: Consequently, you have to install a plug fit for the eload shown in the serial number plate. The plug has to be connected to an adequate socket. If you wish to directly connect to the manis, tou have to interpose an omni polar mains, complying with the existing regulations. The brown live wire (originating from the clamp of the cooker junction box) must always be connected to the phase of the manis supply. In any case. The supply cord must be positioned in such a way as it doesn't reach in any point a temperature higher by 50°C than the room temperature.
THE MANUFACTURER REFUSES ANY RESPONSIBILITY IN CASESWHERE NORMAL SAFETY MEASURES ARE NOT AVAILABLE.
WARNING: This appliance must be earthed.
GAS CONNECTION:
Gas connection must be carried out according to the rules in force. The manufacturing company release the unit tested adjusted for the kind of gas stated on the rating plate located for the back of the range, next to connection pipe. Be sure that you are going to connect the unit to the same kind of gas written on the plate.
USING A RIGID PIPE OF FLEXIBLE METAL PIPE FOR CONNECTION:
To ensure higher safety, it is recommended to carry out the connection to the gas system using rigid pipes (ex. Copper) or using flexible stainless steel pipe to avoid any stretch of the unit (
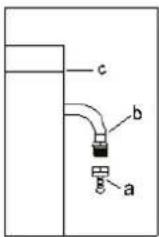
Fig. 16
Gas feeding pipe fitting is G 12
For this type of installation, connection on the gas supply should be carried out using only and exclusively flexible metallic tubes in conformity with rules in force.
USING FLEXIBLE, NON METAL PIPES FOR CONNECTION:
When the connection (can be easily inspected) in its full extent, there is teh chace to while using flexible pipe use according to the rules in force.
The flexible pipe must be tightly using clambs according to the rules in force, (fig/)
The flexible pipe should include following conditions:
- No where it can reach over tempature, other than room tempature higher than 30^ in between range
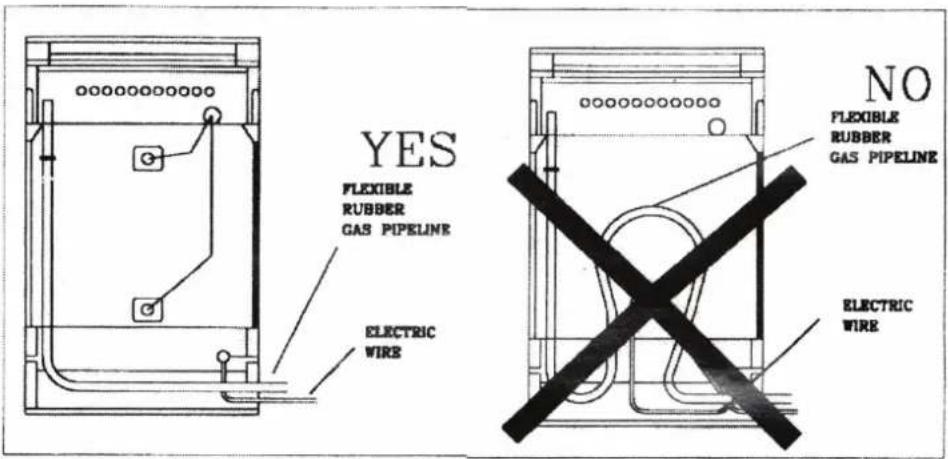
Fig 17.
• It is no longer than 1500 mm
- It is shows no throttlex.
- It is not subject to traction or force.
- It can be easily inspected in order to check it's condition
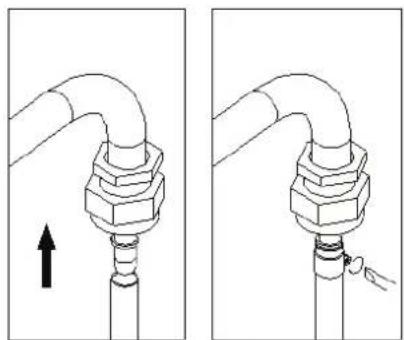
natural_image
Two technical diagrams showing pipe fittings with a valve, one upward and one downward (no text or symbols)Fig.18
The control of preservation of the flexible pipe consist in checking that;
- It doesn't show crack's cuts, marks, of burning both on the end parts and on its full extent
- The material is not hardened, but shows its normla elasticity,
• The fastening clamps are not rusted. - Expiry term is not over.
If one more anormalities are seen, do not repair the pipe, replace it.
IMPORTANT
Once installation is complete, check the perfect seal of every pipe fitting, using a soapy solution, never a flame.
ADAPTATION TO DIFFERENT KINDS OF GAS
To adapt the appliance to a different kind of gas from the one the appliance has been set for, follow the instruction below in their order.
GAS CONNECTION
LPG
: Use the rubber pipe holder.
Natural Gas
: Use the pipe fitting 'Always insert the gasket.
Then proceed with the gas connection, as indicated in the relevant paragraphs.
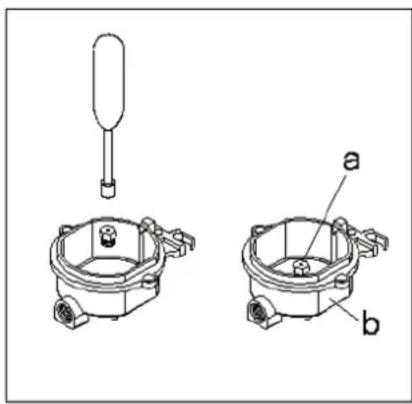
natural_image
Technical line drawing of two mechanical components labeled a and b, with no visible text or symbols beyond labels.Fig. 19
HOB BURNER NOZZLES REPLACEMENT
- Remove the pan supports.
- Extract the caps and the wall baffles of the burners.
- Using a socket spanner 7 unscrew and remove the nozzles replacing them with the ones required.
For the kind of gas in use
Reassemble the parts following the same procedure backwards.
These burners do to not need any primary air regulation.
HOB BURNERS ADJUSTMENT OF MINIMUM LEVEL
To adjust the minimum level;
1- Turn the knob to position of minimum flame;
2- Remove the knob
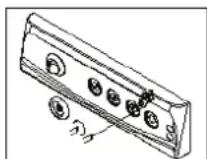
Fig. 20
3- a) In case of conversion from naturel gas to LPG, tightly screw the by-pass screw, of the cooks;
b) when converting from LPG to naturel gas unscrew about one-fourth turn by-pass screw, until a regular small flame is reached.
Reassemble the turning quickly the knob from the maximum position to the minimum one, the flame does not go out.
SUGGESTIONS FOR COOKING:
Start your cooking with a big flame as necessary. The outside of the flame is much hotter than its inside (nucleus). Accordingly, the top of the flame mean a waste of gas. In contrast gas burners do not require flat-bottomed pans; the flames lick the bottom and spread the heat all over the surface.
No special pans are required for gas burners. However, thin walled pans transmit the heat to the food more quickly than thick-walled ones.
A thick pan bottom prevents partial overheating as it allos sufficient thermal compensation.
Avoid very small pans. Wide and shallow pans are more suitable than narrow and deep ones as they allow a faster heating. Cooking is not quickened by placing narrow pans or wide burners. The result is just a waste of gas. For a proper usage, place small pans on small burners and large pans on large burners.
Remember to cover pans to reduce gas consumption.
SUGGESTIONS FOR OPERATING OF OVEN
Traditional cooking:
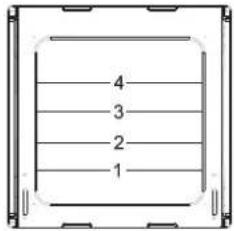
Heat derives from the top and the bottom. Therefore preferable to use the central guides. If cooking requires more heat from the bottom or the top, use the upper or lower guides.
ADVISE FOR USE OF THE TRADITIONAL OVEN
For the cooking of cakes
Pre-heat the oven, unless indicated differently, for at least 10 minutes before use. Do not open the oven door when cooking dishes which must raise (e.g raised parstries and souffles); the jet of cold air would block the raising process. To check if cakes are cooked, insert a toth stick into the mixture; if it comes out clean the cake is ready. Wait until at least 3/4 of the cooking time has passed before doing this check. As a general rule remember that;
A dish which is well-cooked on the outside but not sufficiently cooked inside would have required a lower temperature and longer cooking time. On the contrary a “dry” texture would have required a shorter time and higher cooking temperature.
For the cooking of meat
If you want roasts with a good color, use very little oil. If the pieces lean, use oil or butter or a little of both. Butter o oil are on the other hand unnecessary it the piece has a strip of fat. If the place has a strip of fat. If the place has a strip o fat on one side only, put in the oven with. This side upwards; when melting the fat will grease the lower side sufficiently. Red meat should be removed from the fridge one hour before cooking otherwise the sudden change of temperature could couse it to become tought. A roast especially if of red meat, must not be salted at the beginning of cooking as salt causes juices and blood to seep put of the meat thus preventing the formation of a well-browned crust. It is advisable to salt the outside of the meat after just over half the cooking time. Please the roast in the oven in a dish having a low rim; a deep dish shields heat. Meat can be placed on an ovenproof dish or directly on the grill under which the dripping pan will be inserted to collect juice ingredients for gravy should only be put in the dish immediately if cooking time is brief, otherwise they should be added during the last half hour.
Beging cooking rare meat at a high temperature reducing the temperature to finish cooking the inside. The cooking temperature for white meat can be moderate throughout. The degree of cooking can be checked by pressing the meat with a fork, if
it does not give the mea cooked. At the end cooking it is advisable to wait at least 15 minutes before cutting the meat in order that the wices are not lost.
Before serving plates can be kept warm in the oven at minimum temperature.
For the cooking of finish:
Cook small fish from start to finish at a high temperature. Cook medium-sized fish initially at a high temperature and then gradually lower the temperature from start to finish.
Check that baked fish is cooked by gently witing one side of the gut; the meat must be white and opaque through, except in the case of salmon, trout or similar.
Grilling
The following types of meat are suitable for grilling. Mostly meat cut in slices or pieces of various sizes, but not usually very thick, poultry cut in half and flattened, fish, some vegetables (e.g. corrugates, aurbergines, tomatoes, etc.), of meat or fish and seafood. Meat and fish to be grilled should be lightly brushed with oil and always placed on the grill; meat should be salted upon completion of cooking; whereas fish should be salted on the inside before cooking. The grill should be positioned in the guides nearest or furthest from the grill element according to the thickness of the meat, in order to avoid burning the surface and cooking the inside insufficiently.
The formation of smoke caused by drops of juise and fat can be avoided by pouring 1 or 2 glasses of water the dripping pan.
The grill can also be used to brown, toast bread and grill certain types of fruit, such as bananas, halved grapefruit, slices of pineapples, etc. Fruit should not be placed too near the source of heat.
Cooking times
Cooking times cab vary according to the type of food, its consistency and its volume. It is advisable to watch when cooking for the first time and check results since conditions, similar results are obtained.
The 'TABLE OF COOKING TIMES' relating to cooking in the oven and by grill is provided as a guid.
Experience will show possible variations to the values set out in the table.
Nevertheless carefully follow the indications given in the receipt you intend to fallow.
ATTENTION: do not place any urensils such as dripping pan, cake tins, casseroles,
Pyrex dishes, aluminium foil or other on the base of the oven when the oven in use. A stagnation of heat would result which would compromise the results of cooking and could damage the oven enamel.
Table 3.
| Food | Temperature C | Slide position Gas Oven | Cooking Time Minutes |
| Pastry | |||
| Bottom of cake to be gasnishod 200 3 15-20 | |||
| Butter-milk curd cake 200 2 35-40 | |||
| Jam cake 200 2 35-40 | |||
| Leavening dough cakes in moulds | |||
| Brioche 200 2 35-40 | |||
| Beaten mixture cakes in moulds | |||
| Black and white flour cake 175 2 60-70 | |||
| Royal flat bread-cake 175 3 60-70 | |||
| Margharita cake 175 3 35-40 | |||
| Small cakes | |||
| Pastry 170 3 15-20 | |||
| Cream puff | 200 3 30-40 | ||
| Lasagne | 225 2 40-50 | ||
| Pizza 240 2 20-25 | |||
| Poultry | |||
| Duck 1 - 1/2 - 2 kg 200 2 120-180 | |||
| Goose 3 kg 200 2 150-210 | |||
| Roast chicken 200 2 60-90 | |||
| Turkey 5 kg 175 2 230-250 | |||
| Game | |||
| Hare 200 2 60-90 | |||
| Roe-deer rib 200 2 90-160 | |||
| Deer haunch 175 2 90-160 | |||
| Meat (cooking time for every cm of thickness | |||
| Long cooking roast meat 175 2 12,-15 | |||
| Short cooking roast meat | 200 2 10,-12 | ||
| Meat loaf | 200 2 30-40 | ||
| Vegetables | |||
| Bolled vegetables flab | 200 2 40-45 | ||
| Fish | |||
| Frey muilets | 200 2 40-50 | ||
| Grill | |||
| Chops | 3 15-20 | ||
| Sausages | 3 20-25 | ||
| Grilled chicken | 3 60-70 | ||
| Roast veal on the spit 0,6 kg | 70-80 | ||
| Chicken on the spit | 60-90 |
MAINTENANCE
Before each operation disconnect the unit.
Cleaning the cooker
Drops of sauce, fruit juice etc., should be removed as soon as possible with a soft cloth soaked in warm detergent water. Do not use steel wool or knives to take of layers of crust. Remove stubborn marks with a well wetted soap impregnated pad, but care must be taken not to scratch the enamel. Wash the enameled grids with water and detergent; these can also be washed a dishwasher.
Take off the burner covers and the grids and wash them carefully with warm water and detergent. Dry them well before putting them back in position.
Moreover make sure that these are properly re-placed. The burner can be rubbed with steel wool or a slightly abrasive cloth.
Clean the oven door and crystal cover, in models equipped with these items, only with warm water, and avoid the use of rough or abrasive substances; in cooker with an automatic ignition the sparling bulb should be cleaned periodically and accurately to avoid difficulties in lighting; furthermore check that the burner holes are not obstructed.
Cleaning oven
Clean carefully the oven cavity after use when it is still warm. In fact at this moment it is easy to take of deposits of fa tor other substances such as fruit juice, sugar particles or fat. You can warm detergent water or one of the appropriate spray oven cleaners. Do not direct the spray at the mat steel parts as this could damage them and always follow the manufacturer's instructions. Clean the oven accessories (grate, grid, plate, etc.) with warm water and detergent.
Remove possible incrustations with a slightly abrasive powder.
Never line say part of the oven with aliminium foil. It would result in an accumulation of heat which might damage the cooking results and also damage the enamel.
Periodical control
Periodically check the condition of the flexible pipe of gas connection and make it replaced by skilled technicians as soon as it show abnormalities. Annual replacement is recommended.
Have the cooks periodically lubricated by skilled technicians in case of unusual working have the range chacked by skilled technicians.
In ranges with cylinder holder, do not use this space to leave a non-connected or an empty cylinder.
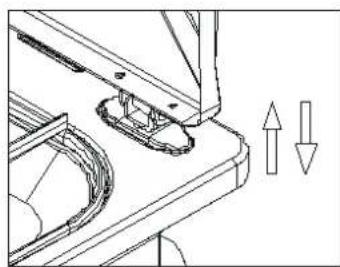
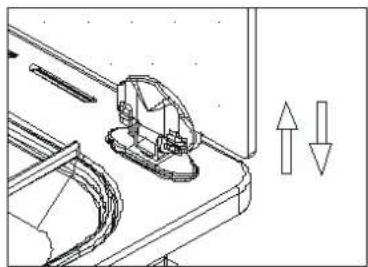
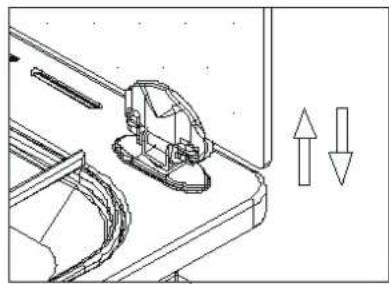
Lid cleaning
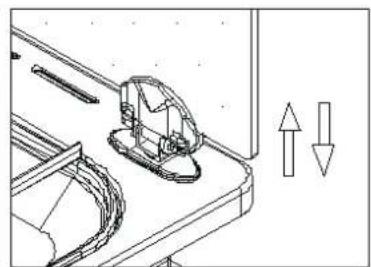
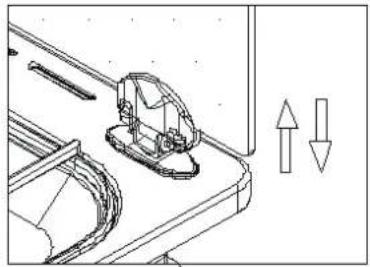
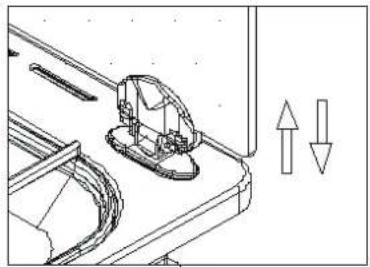
All the cooker lids can be disassembled as shown in fig. As regards lids, follow instruction in (fig 20a, 20b)
natural_image
Technical line drawing of a mechanical assembly with no visible text or symbolsFig 21 a Metal lid
natural_image
Technical line drawing of a mechanical assembly with directional arrows indicating movement (no text or symbols)Fig 21b Glass lid
After proper cleaning carefully reposition the lid into its hinges.
Cleaning the oven door
For a more complete cleaning of the oven door, it is advisable to disassemble to disassemble it in the following way.
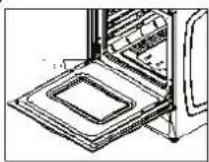
Fig. 22
Open the door fully, turn the two caps stituated on the arm of the hinge to 180^ , partially close the door to an angle of 30^ , lift the door and extract from the front. Re-mount the door be reversing the operation described above.
If the appliance doesn't work properly check tje following points before asking for service:
The follow of gas seems abnormal
Make sure that:
- The flame speeder holes are not obstructed;
- The pressure regulator is working;
- The bottle valve is completely open.
Gas smell in the room
Make sure that;
- The gas valve is not open
- The gas supply tube is well positioned and good condition; remember to replace it at last once a year.
Never look for an escape of gas with a match; use instead soapy water.
The oven doesn't heat
- Make sure that the oven knobs are in the correct working positions.
Cooking time is too long
- Check that the temperature is correct for the type of food to be cooked.
The cooker produces smoke
-We advise you to clean to oven after use. Splashes of fat can occur during the cooking of meat and, if the oven isn't cleaned properly, these produce smoke and bad smell. (see paragraph concerning cleaning).
If after following all the above check the appliance still doesn't work, call your. Nearest service center given them all the necessary information, such as model and serial number of the appliance.
INSTRUCTIONS FOR THE INSTALLER
The following instructions are meant for a qualified installer, in order that the operations of installing, regulations and service executed according to the existing regulations.
Whenever changes are mode involving the disconnect of the machine it is necessary to proceed with maximum caution.
THE MANUFACTURER COMPANY DECLINES ANY RESPONSABILITY FOR POSSIBLE DAMAGES RESULTING FROM AN INSTALLATION WHICH DOESN'T COMPLY WITH THE RULES IN FORCE
INSTALLATION ENVIRONMENT
Warning-this unit can be installed and can work only in constantly ventilared rooms, according to rules in force.
In order to make the gas unit work properly, it is necessary that air sufficient to gas combustion can naturally flow in the (the installer must follow the rulesin force).
The air flow into the room must come directly through openings of external walls. These openings (or opening) should be realized in such a way not to be obstacle.
Both from inside and outside.
Installation and maintenance must be carried out by qualified technician, in compliance with rules in force.
The electric connection must be carried out in compliance with rules EN 60335. our responsibility will not be involved in case of accidents caused by a defective or non existent earthconnection.
Gas cooking units must discharge combustion products through hoods directly connected to flues or outside.
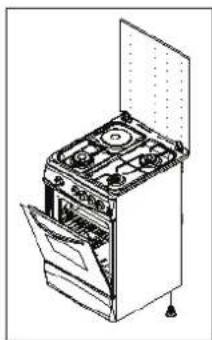
LEVELING
The appliance is provided with adjustable small feet placed in the back and frond corners of the base. By adjusting the small fett .
natural_image
Line drawing of an open kitchen stove with doors and cabinetry (no text or symbols)Fig. 23
it is possible to change the hight of the appliance so as to ensure a better leveling with other surfaces and a uniform distribution of the liquids contained in pans or pots.
Tray eve s
TABLE 4.
| 50*60 | 50*60 | 50*60 | |
| FC-31501WH | FC-22501WH | FC-04501WH | |
| small burner 0,9kw 0,9kw ,- | |||
| 0,028 lt/h | 0,028 lt/h | ,- | |
| middle burner | 1,5kw | 1,5kw | ,- |
| 0,046 lt/h | 0,046 lt/h | ,- | |
| big burner | 1,95kw | ,- | ,- |
| 0,060 lt/h | ,-,- | ||
| lamp | 15w | 15w | 15w |
| down resistance | 1000w | 1000w | 1000w |
| up resistance | 800w | 800w | 800w |
| plate | 1000w | 1000w | 1000w x 2 |
| plate 1500w 1500w x 2 | |||
VIVAX
home
HR
BiH
CG
Upute za uporabu
Samostojeći štednjaci
FC-31501 WH
FC-22501 WH
FC-04501 WH
Napomena:
natural_image
Line drawings of two open electric cooktop cabinets with four fans and a stove (no text or symbols)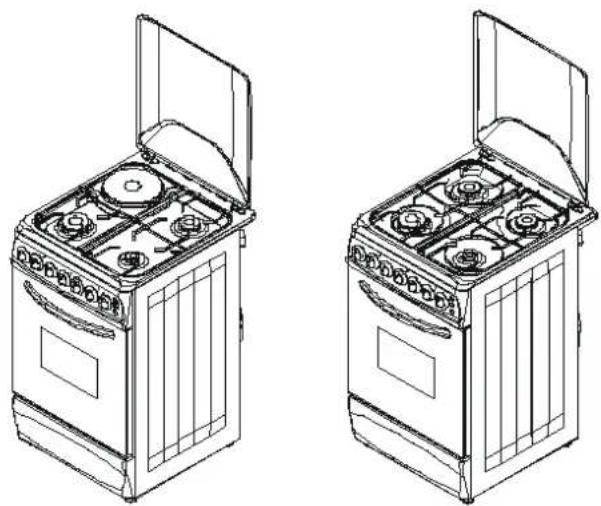
natural_image
Line drawings of two open electric cooktop cabinets with visible steam and fan blades (no text or symbols)PALJENJE PLAMENIKA
natural_image
Pure technical diagram of a mechanical or electrical component with no text, numbers, or symbolsSl. 5b
Tablica 1.
| 1-LAMPICA | 7-PREDNJA LIJEVA 1000W EL. PLOČA |
| 2-PALJENJE | 8-REGULATOR ZA PEĆNICU |
| 3-GRIL | 9-TERMOSTAT |
| 4-PREDNJI DESNI MALI PLAMENIK | 10-SAT |
| 5-STRAŽNJI DESNI SREDNJI PLAMENIK | |
| 6-STRAŽNJA LIJEVA 1500W E. PLOČA |
natural_image
Circular diagram with concentric rings and small symbols (no text or labels)SL.13 Regulator pećnice
Regulator pećnice upravlja plamenikom pećnice i plemenikom grila. Kod ovih modela sigurnosni sustav isključuje dovod plina ukoliko se plamen ugasi.
Ukoliko želite koristiti donji plamenik pećnice okrenite regulator ulijevo i pritisnite prekidač za paljenje dok se plemenik ne zapali. Pritisnite i držite 10-15 sekundi da se sigurnosti sustav deaktivira. Kako biste podesili jačinu plamena možete okrenuti regulator na oznaku malog ili velikog plamena.
Ukoliko želite koristiti plamenik grila okrenite regulator udesno i pritisnite prekidač za paljenje dok se plamenik ne upali.
Prekidač za paljenje se ne smije koristiti dulje od 15 s. Ukoliko se nakon 15 s plamenik na zapali prekinite sa uporabom prekidača i otvorite vrata pećnice te pričekajte minimalno 1 minutu prije ponovnog pokušaja paljenja plamenika.
Ručno paljenje plinske pećnice:
Pritisnite regulator te plameniku koji želite zapaliti prinesite plamen.
Okrenite odgovarajući regulator ulijevo na maksimalan položaj.
Držite regulator pritisnutim 15 sekundi te ga zatim otpustite.
Ukoliko se plamenik ugasi ponovite gornji postupak.
ZAGRIJAVANJE:
Nakon što upalite pećnicu ostavite vrata otvorenima na nekoliko minuta, zatim ih zatvorite i okrenite regulator na željeni položaj. Prije umetanja hrane otprilike 15 minuta zagrijavajte pećnicu.
UKLJUČIVANJE GRILA:
Za uporabu grila okrenite odgovarajući regulator. Plamenik grila se može upaliti samo kada je plamenik pećnice isključen (Sigurnosni prekidač onemogućuje istovremenu uporabu dvaju različitih izvora topline).
UPORABA GRILA:
natural_image
Two technical diagrams showing pipe fittings with a valve, one upward and one downward (no text or symbols)Sl.18
natural_image
Technical line drawing of two mechanical components with labeled parts (a and b), no text or symbols present.SI. 19
ZAMJENA MLAZNICA PLAMENIKA
- Uklonite nosače posuda.
- Uklonite poklopce i zaštitu plamenika.
natural_image
Technical line drawing of a mechanical assembly with two directional arrows indicating movement or force (no text or symbols present)Sl. 21a Metalni poklopac
natural_image
Technical line drawing of a mechanical assembly with no visible text or symbolsSl.21b Stakleni poklopac
natural_image
Line drawing of an open oven with visible flames and doors (no text or symbols)Sl. 23
natural_image
Three-panel mechanical assembly showing a cylindrical component with a metallic housing and a rotating knob (no text or symbols visible)Slika-1
natural_image
Close-up of mechanical components with arrows indicating rotation or adjustment (no visible text or symbols)Slika-4 Slika-5
natural_image
Close-up of a mechanical component being adjusted, showing a hand holding a metallic bracket and a pipe fitting (no visible text or symbols)Slika-6 Slika-7
natural_image
Technical line drawing of a mechanical assembly with circular components and mounting brackets (no text or symbols)Sl. 5b
Tablica 1.
| 1-LAMPICA | 7-PREDNJA LEVA 1000W EL. PLOČA |
| 2-PALJENJE | 8-REGULATOR ZA RERNU |
| 3-GRIL | 9-TERMOSTAT |
| 4-PREDNJI DESNI MALI PLAMENIK | 10-SAT |
| 5-ZADFNJI DESNI SREDNJI PLAMENIK | |
| 6-ZADNJA LEVA 1500W E. PLOČA |
Regulatore bi trebalo da okrećete ulevo (suprotno od smera kazaljke na satu).
UPOTREBA PLAMENIKA:
natural_image
Three simple line drawings: a jar with contents, a lid, and a cross-shaped container (no text or symbols)Sl. 12
natural_image
Circular diagram with concentric rings and symbols (no text or labels)SL.13 Regulator rerne
Regulator rerne upravlja plamenikom rerne i plemenikom grila. Kod ovih modela sigurnosni sistem isključuje dovod plina ukoliko se plamen ugasi.
Ukoliko želite da koristite donji plamenik rerne, okrenite regulator ulevo i pritisnite prekidač za paljenje dok se plemenik ne zapali. Pritisnite i držite 10-15 sekundi da se sigurnosti sistem deaktivira. Da bi podesili jačinu plamena možete da okrenete regulator na oznaku malog ili velikog plamena.
Ako želite da koristite plamenik grila, okrenite regulator udesno i pritisnite prekidač za paljenje dok se plamenik ne upali.
Prekidač za paljenje ne sme da se koristi duže od 15 s. Ukoliko se nakon 15 s plamenik na zapali, prekinite sa upotrebom prekidača i otvorite vrata rerne i sačekajte minimalno 1 minut pre ponovnog pokušaja paljenja plamenika.
natural_image
Two technical diagrams showing pipe fittings with a valve, one upward and one downward (no text or symbols)Sl.18
Provera ispravnosti fleksibilne cevi se sastoji od provere sledećeg;
Sl. 19
ZAMENA MLAZNICA PLAMENIKA
- Skinite nosače posuda.
- Skinite poklopce i zaštitu plamenika.
- Odvijačem 7 odvijte i skinite mlaznice i zamenite ih vrstom mlaznica koja odgovara tipu plina koji nameravate da koristite.
Sastavite plamenike prateći korake za rastavljanje u suprotnom smeru.
Ovi plamenici ne trebaju primarnu regulaciju propusnosti.
PODEŠAVANJE MINIMALNOG NIVOA PLAMENA PLAMENIKA
Za podešavanje minimalnog nivoa;
natural_image
Technical line drawing of a mechanical component with directional arrows indicating movement (no text or symbols)Sl. 21a Metalni poklopac
natural_image
Technical line drawing of a mechanical assembly with no visible text or symbolsSI.21b Stakleni poklopac
natural_image
Line drawing of an open kitchen oven with visible door, fan, and stove (no text or symbols)Sl. 23
Podešavanjem dotičnih nožica moguće je promeniti visinu uređaja da bi se osigurao ravan položaj uređaja i jednako raspoređivanje tečnosti u posudama.
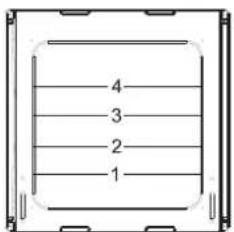
Nivo rešetke u rerni
TABLICA SA TEHNIČKIM PODACIMA
TABLICA 5
| Model | FC-31501WH | FC-22501WH | FC-04501WH |
| Dimenzije (cm) 50*60 | 50*60 50*60 | ||
| Mali plamenik | 0,9k W | 0,9k W | ,- |
| 0,028 L/h 0,028 L/h ,- | |||
| Srednji plamenik | 1,5k W | 1,5k W | ,- |
| 0,046 L/h 0,046 L/h ,- | |||
| Veliki plamenik | 1,95k W | ,- | ,- |
| 0,060 L/h ,- ,- | |||
| Sijalica 15 W 15 W | 15 W | ||
| Donji grejač 1000 W | 1000 W 1000 W | ||
| Gornji grejač 800 W | 800 W | 800 W | |
| El. ploča | 1000 W 1000 W | 1000 W x 2 | |
| El. ploča | 1500 W | 1500 W x 2 | |
VIVAX
home
AL
Udhëzime
për
shfrytëzim
Stofë e
veçantë
FC-31501 WH
FC-22501 WH
FC-04501 WH
natural_image
Technical line drawing of a mechanical assembly with circular components and mounting holes (no text or symbols)Fig. 5b
Tabela 1.
| 1-LAMPA | 7-PLLAKA E PËRPARME E MAJTË EL. 1000W |
| 2-NDEZJA | 8-RREGULATOR PËR FURËN |
| 3-SKARA | 9-TERMOSTATI |
| 4-DJEGËSI I PËRPARMË I DJATHTË I VOGËL | 10-SAT |
| 5-DJEGËSI I PASËM I MESËM I DJATHTË | |
| 6-PLLAKA E PASME E MAJTË EL. 1500W |
natural_image
Three simple line drawings: a jar with liquid, a lid with contents, and a crossed-out box (no text or symbols)Fig. 12
natural_image
Circular diagram with concentric rings and small symbols (no text or labels)natural_image
Two-step diagram showing a pipe fitting with a valve, one upward and one downward (no text or symbols)Fig. 18
Fig. 19
NDRYSHIMI I FISKAJËS SË STUFËS
natural_image
Technical line drawing of a mechanical assembly with no visible text or symbolsFig. 21a Kapaku metalik
natural_image
Technical line drawing of a mechanical assembly with no visible text or symbolsFig. 21b Kapaku prej qelqi
natural_image
Line drawing of an open kitchen oven with visible panes and doors (no text or symbols)Fig. 23
natural_image
Technical line drawing of a mechanical component with circular features and internal channels (no text or symbols)Сл.5b
Табела 1.
| 1-СВЕТЛО | 7-ПРЕДНА ЛЕВА ЕЛ. ПЛОЧА 1000W |
| 2-ПАЛЕЊЕ | 8-РЕГУЛАТОР ЗА РЕРНАТА |
| 3-ГРИЛ | 9-ТЕРМОСТАТ |
| 4-ПРЕДЕН ДЕСЕН МАЛ ПЛАМЕНИК | 10-ЧАСОВНИК |
| 5-ЗАДЕН ДЕСЕН СРЕДЕН ПЛАМЕНИК | |
| 6-ЗАДНА ЛЕВА ЕЛ. ПЛОЧА 1500W |
natural_image
Circular diagram with concentric rings and small symbols (no text or labels)natural_image
Two technical diagrams showing pipe fittings with a valve, one upward and one downward (no text or symbols)Сл.18
Сл.19
ЗАМЕНА НА МЛАЗНИЦАТА НА ПЛАМЕНИКОТ
natural_image
Technical line drawing of a mechanical assembly with two directional arrows indicating movement or force (no text or symbols present)Сл.21а Метален капак
natural_image
Technical line drawing of a mechanical assembly with directional arrows indicating movement (no text or symbols)Сл.21b Стаклен капак
natural_image
Line drawing of an open oven with visible internal components and doorways (no text or symbols)Сл. 23
POTPIS I PEČAT PRODAVATELJA
- Ovim jamstvom jamči proizvođač proizvoda, preko M SAN GRUPA d.d, kao uvoznika i davatelja jamstva u Republici Hrvatskoj besplatan popravak istog u skladu s važećim propisima i u skladu s uvjetima opisanim u ovom jamstvenom listu. Ovim jamstvom jamčimo da će predmet ovog jamstva raditi bez greške uzrokovane eventualnom lošom izradom i lošim materijalom izrade. Svi eventualno nastali kvarovi biti će besplatno otklonjeni u ovlaštenom servisu u jamstvenom roku.
- UVJETI JAMSTVA Jamstveni rok počinje teći od dana kupnje proizvoda i traje 24 mjeseca za Vivax Home velike kućanske aprate (perilice rublja, hladnjake, perilice posuđa, štednjake, ugradbenu tehniku), a 12 mjeseci za Vlvax home male kućanske aparate (uključujući mikrovalne pećnice, grijalice I radijatore).
- U slučaju kvara na proizvodu koji je predmet ovog jamstva, obavezujemo se da ćemo isti popraviti u najkraćem mogućem roku, a najkasnije u roku od 45 dana. Ako se proizvod ne može popraviti ili se ne popravi u roku od 45 dana, biti će zamijenjen novim. Jamstvo na uređaj se produžuje za ono vrijeme koliko traje popravak uređaja.
- Jamstvo se priznaje samo uz račun o kupnji, te uz ovaj jamstveni list koji mora biti ispravno popunjen odnosno mora sadržavati datum prodaje, pečat i potpis prodavatelja.
- Davalac jamstva osigurava servis i rezervne dijelove 7 godina od datuma kupnje.
- JAMSTVO NE OBUHVAĆA Redovnu provjeru, održavanje uz zamjenu dijelova koji se troše normalnom upotrebom. Prilagođavanje ili promjene za poboljšanje proizvoda za primjenu koji nisu opisane u tehničkim uputama za korištenje, osim ako je za te preinake predočena suglasnost M SAN GRUPA d.d.
- Jamstvo se ne priznaje u sljedećim slučajevima: Ako kupac ne predoči ispravan jamstveni list i račun o kupnji. Ako se kupac nije pridržavao uputa o korištenju proizvoda. Ako je proizvod otvaran, prepravljan ili popravljan od neovlaštene osobe. Ako su kvarovi na proizvodu nastali djelovanjem više sile kao što su: udar groma, strujni udari u električnoj mreži elementarne nepogode i slično. Ako su kvarovi nastali oštećivanjem zbog nepropisane upotrebe ili nepravilnim transportiranjem. Ako je kvar nastao greškom u sustavu na koji je proizvod priključen.
- Ovo jamstvo ne mijenja zakonska potrošačka prava važeća u Republici Hrvatskoj u odnosu na ona koja propisuje proizvođač.
- Izjavu o sukladnosti i presliku izvorne Izjave sukladnosti (EC Declaration of Conformity) moete jednostavno preuzeti na našoj internetskoj stranici www.msan.hr/dokumentacijaartikala
Naziv tvrtke davatelja jamstva : M SAN Grupa d.d., Buzinski prilaz 10, 10020 Zagreb-Buzin, tel: 01/ 3654-961
SERVIS
DATUM PRIMITKA UREĐAJA U SERVIS
DATUM POPRAVKA
DATUM PRIMITKA UREĐAJA U SERVIS
DATUM POPRAVKA
DATUM PRIMITKA UREĐAJA U SERVIS
DATUM POPRAVKA
POTPIS I PEČAT PRODAVATELJA
- Ovom garancijom garantira
proizvođač proizvoda, preko KIM TEC d.o.o., kao uvoznika i davatelja garancije u Republici Bosni i Hercegovini besplatan popravak istog u skladu s važećim propisima i u skladu s uvjetima opisanim u ovom garantnom listu. Ovom garancijom garantiramo da će predmet ove garancije raditi bez greške uzrokovane eventualnom lošom izradom i lošim materijalom izrade. Svi eventualno nastali kvarovi biti će besplatno otklonjeni u ovlaštenom servisu u garantnom roku.
-
UVJETI GARANCIJE Garantni rok počinje teći od dana kupnje proizvoda i i traje 24 mjeseca za Vivax Home velike kućanske aprate (perilice rublja, hladnjake, perilice posuđa, štednjake, ugradbenu tehniku), a 12 mjeseci za Vlvax home male kućanske aparate (uključujući mikrovalne pečnice, grijalice I radijatore).
-
U slučaju kvara na proizvodu koji je predmet ove garancije, obavezujemo se da ćemo isti popraviti u najkraćem mogućem roku, a najkasnije u roku od 45 dana. Ako se proizvod ne može popraviti ili se ne popravi u roku od 45 dana, biti će zamijenjen novim. Ako popravak proizvoda traje duže od 10 dana, garancija će se produžiti za vrijeme trajanja popravka.
-
Garancija se priznaje samo uz račun o kupnji, te uz ovaj garantni list koji mora biti ispravno popunjen odnosno mora sadržavati datum prodaje, pečat i potpis prodavatelja.
-
Davalac garancije osigurava servis i rezervne dijelove 7 godina od datuma kupnje.
-
GARANCIJA NE OBUHVAĆA
BROJ RAČUNA PRODAVAOCA
POTPIS I PEČAT PRODAVAOCA
- Ovom garancijom
GARANTNI ROK I USLOVI
Garantni rok počinje da teče od dana kupovine proizvoda i traje 24 meseca za Vivax Home velike kućne aparate (mašine za veš, frižidere, mašine za suđe, šporete, ugradnu tehniku), a 12 meseci za Vivax home male kućne aparate (uključujući mikrotalasne rerne, grejalice i radijatore).
HRN EN 61000-3-3:1997+A1:2008+A2:2008
Certifikat pod brojem EMC 80100483 izdan od nadležnog tijela :
- KONČAR-Institut za elektrotehniku d.d., Fallerovo šetalište 22, 10002 Zagreb
natural_image
Abstract circuit-like pattern with branching lines and a central red marker (no text or symbols)
IZJAVA O SUKLADNOSTI
Mi, kao uvoznik proizvoda M SAN GRUPA d.d. Buzinski prilaz 10, 10010 Zagreb MATIČNI BROJ SUBJEKTA (MBS): 080157581
HRN EN 61000-3-3:1997+A1:2008+A2:2008
Certifikat pod brojem EMC 80100483 izdan od nadležnog tijela : - KONČAR-Institut za elektrotehniku d.d., Fallerovo šetalište 22, 10002 Zagreb
Declaration of Conformity
We (Manufacturer /Importer)
MESTAS METAL END SANT IC A.S
(Company name)
Organize Sanayi Bolgesi 8.Cad. No:50, Kayseri, Turkey
(Address)
Declares under our sole responsibility that the product
Product name : FREESTANDING COOKER
Brand name : VIVAX
Model No. : FC-22501 WH
To which this declaration relates is in conformity with the following standard(s) or other normative document(s):
EN 55014-1:2006+A1:2009
EN 55014-2:1997+A1:2001
EN 61000-3-2:2006
EN 61000-3-3:1995+A1:2001+A2:2005
* EN 60335-1:2002+A11:2004+A1:2004+A12:2006+A2:2006+A13:2008
EN 60335-2-6:2003+A1:2005
EN 60335-2-102:2006
EN 62233:2008
EN 30-1-1:2008
a. EN 30-2-1:1998
EN 30-2-1:1998+A1:2003
Following the provisions of EUROPEAN COUNCIL DIRECTIVE:
2004/108/EC, 2006/95/EC and 2009/142/EC
Place: __ Kayseri ____ Signature: __
Date: 3rd May 2010 Full name: MR RAHMI INCETAN Title: GENERAL MANAGER
Declaration of Conformity
We (Manufacturer /Importer)
MESTAS METAL END SANT IC A.S
(Company name)
Organize Sanayi Bolgesi 8.Cad. No:50, Kayseri, Turkey
(Address)
Declares under our sole responsibility that the product
Product name : FREESTANDING COOKER
Brand name : VIVAX
Model No. : FC-31501 WH
To which this declaration relates is in conformity with the following standard(s) or other normative document(s):
EN 55014-1:2006+A1:2009
EN 55014-2:1997+A1:2001
EN 61000-3-2:2006
EN 61000-3-3:1995+A1:2001+A2:2005
* EN 60335-1:2002+A11:2004+A1:2004+A12:2006+A2:2006+A13:2008
EN 60335-2-6:2003+A1:2005
EN 60335-2-102:2006
EN 62233:2008
EN 30-1-1:2008
EN 30-2-1:1998
EN 30-2-1:1998+A1:2003
Following the provisions of EUROPEAN COUNCIL DIRECTIVE:
2004/108/EC, 2006/95/EC and 2009/142/EC
Place: __ Kayseri ____ Signature :
Date: 3 ^rd May 2010 Full name:MR RAHMI INCETAN
Title: GENERAL MANAGER
Declaration of Conformity
We (Manufacturer /Importer)
MESTAS METAL END SANT IC A.S
(Company name)
Organize Sanayi Bolgesi 8.Cad. No:50, Kayseri, Turkey
(Address)
Declares under our sole responsibility that the product
Product name : FREESTANDING COOKER
Brand name : VIVAX
Model No. : FC-04501 WH
To which this declaration relates is in conformity with the following standard(s) or other normative document(s):
EN 55014-1:2006+A1:2009
= EN 55014-2:1997+A1:2001
EN 61000-3-2:2006
* EN 61000-3-3:1995+A1:2001+A2:2005
EN 60335-1:2002+A11:2004+A1:2004+A12:2006+A2:2006+A13:2008
EN 60335-2-6:2003+A1:2005
EN 62233:2008
Following the provisions of EUROPEAN COUNCIL DIRECTIVE:
- 2004/108/EC, 2006/95/EC
Place: __ Kayseri ____ Signature :
Date: 3 ^rd May 2010 Full name: MR RAHMI INCETAN

Title: GENERAL MANAGER
MMM. vivax.com
VIVAX
home
MMM.vivax.com
- IGNITION OF HOB BURNERS
- USING BURNER:
- USING ELECTRIC HOT PLATE : (MIXED HOBS)
- WHEN USING ELECTRIC HOT PLATE, NOTE THE FOLLOWINGS
- TERMOSTAT:
- USING THE ELECTRIC OVEN ;
- Manuel Ignition Of Gas Oven:
- TURNING ON THE TURNSPIT:
- INSTALLATION INSTRUCTIONS:
- ELECTRICAL CONNECTION:
- IMPORTANT
- ADAPTATION TO DIFFERENT KINDS OF GAS
- GAS CONNECTION
- HOB BURNER NOZZLES REPLACEMENT
- HOB BURNERS ADJUSTMENT OF MINIMUM LEVEL
- SUGGESTIONS FOR COOKING:
- SUGGESTIONS FOR OPERATING OF OVEN
- ADVISE FOR USE OF THE TRADITIONAL OVEN
- For the cooking of meat
- For the cooking of finish:
- Grilling
- Cooking times
- MAINTENANCE
- Cleaning the cooker
- Cleaning oven
- INSTALLATION ENVIRONMENT
- LEVELING
- VIVAX
- home
- Napomena:
- PALJENJE PLAMENIKA
- Ručno paljenje plinske pećnice:
- ZAMJENA MLAZNICA PLAMENIKA
- UPOTREBA PLAMENIKA:
- ZAMENA MLAZNICA PLAMENIKA
- PODEŠAVANJE MINIMALNOG NIVOA PLAMENA PLAMENIKA
- Udhëzime
- për
- shfrytëzim
- Stofë e
- veçantë
- NDRYSHIMI I FISKAJËS SË STUFËS
- ЗАМЕНА НА МЛАЗНИЦАТА НА ПЛАМЕНИКОТ
- POTPIS I PEČAT PRODAVATELJA
- SERVIS
- DATUM PRIMITKA UREĐAJA U SERVIS
- DATUM POPRAVKA
- BROJ RAČUNA PRODAVAOCA
- POTPIS I PEČAT PRODAVAOCA
- GARANTNI ROK I USLOVI
- IZJAVA O SUKLADNOSTI
- Declaration of Conformity
- vivax.com
- MMM.vivax.com
Brand : Vivax
Model : FC-31501 WH
Category : Autre appareil ménager