
TM6105 - Blender VOX - Free user manual and instructions
Find the device manual for free TM6105 VOX in PDF.


| Product Type | Blender |
| Brand | VOX |
| Model | TM6105 |
| Dimensions (H x W x D) | 40 cm x 18 cm x 18 cm |
| Weight | 2.5 kg |
| Power Supply | 220-240V, 50/60Hz |
| Power Consumption | 750 W |
| Jug Capacity | 1.5 liters |
| Jug Material | Glass |
| Blade Material | Stainless steel |
| Number of Speeds | 2 speeds + pulse |
| Main Functions | Blending, ice crushing, smoothie making, milkshakes |
| Safety Features | Overload protection, non-slip feet, safety lock on lid |
| Maintenance & Cleaning | Detachable jug; dishwasher safe jug and lid; wipe motor base with damp cloth |
| Spare Parts Available | Jug, blade assembly, lid, sealing ring |
| Repairability | Repairable by qualified technician; spare parts available from service centers |
| Warranty | 2 years |
Frequently Asked Questions - TM6105 VOX
User questions about TM6105 VOX
0 question about this device. Answer the ones you know or ask your own.
Ask a new question about this device
Download the instructions for your Blender in PDF format for free! Find your manual TM6105 - VOX and take your electronic device back in hand. On this page are published all the documents necessary for the use of your device. TM6105 by VOX.
USER MANUAL TM6105 VOX
TM-6105
OPERATING INSTRUCTIONS STAND BLENDER
UPUTSTVO ZA UPOTREBU BLENDER
natural_image
Line drawing of a blender with handle and control knob (no text or symbols)IMPORTANT SAFEGUARDS
When using this electrical appliance, basic safety precautions should always be followed, including the following:
- Read all the instructions.
-
Before using check that the voltage indicated on the product corresponds with the voltage of your electrical outlet.
-
Do not let the cord hang on a hot surface or over the edge of a table or counter.
-
Do not operate any appliance with a damaged cord or plug or after the appliance malfunction or has been damaged in any manner. Return the appliance to the nearest authorized service facility for examination, repair or adjustment.
-
If the supply cord is damaged, it must be replaced by the manufacturer or its service agent or a similarly qualified person in order to avoid a hazard.
-
Close supervision is necessary when any appliance is used by or near children.
-
Avoid contacting the moving parts.
-
Keep hands and utensils out of the container while blending to reduce the risk of severe injury to persons or damage to the blender.
-
The use of attachments not recommended or sold by manufacturer may cause on fire, electric shock or injury.
-
Unplug from outlet when not in use. Method: turn all speed control switch to 0 position, then remove plug from wall outlet by grasping the plug.
-
To reduce the risk of injury, never place blade assembly on base without the jar properly attached.
-
This appliance is not intended for use by persons (including children) with reduced physical, sensory or mental capabilities, or lack of experience and knowledge, unless they have been given supervision or instruction concerning use of the appliances by a person responsible for their safety.
-
Children should be supervised to ensure that they do not play with the appliance.
-
Do not leave the machine on unattended.
-
When removing the blender from the base, wait until the blades have completely stopped.
-
Always operate blender with the cover in place.
-
Always use the appliance on a secure, dry level surface.
-
Never place this appliance on or near a hot gas or an electric burner or where it could touch any heated appliance.
-
Do not use outdoors.
-
Do not use the appliance for other than its intended use.
WARNING: Potential injury from misuse. Care shall be taken when handling the sharp cutting blades, emptying the bowl and during cleaning.
CAUTION: Ensure that the blender is switched off before removing it from the stand. Switch off the appliance and disconnect from supply before changing accessories or approaching parts that move in use.
HOUSEHOLD USE ONLY
KNOW YOUR BLEANDER
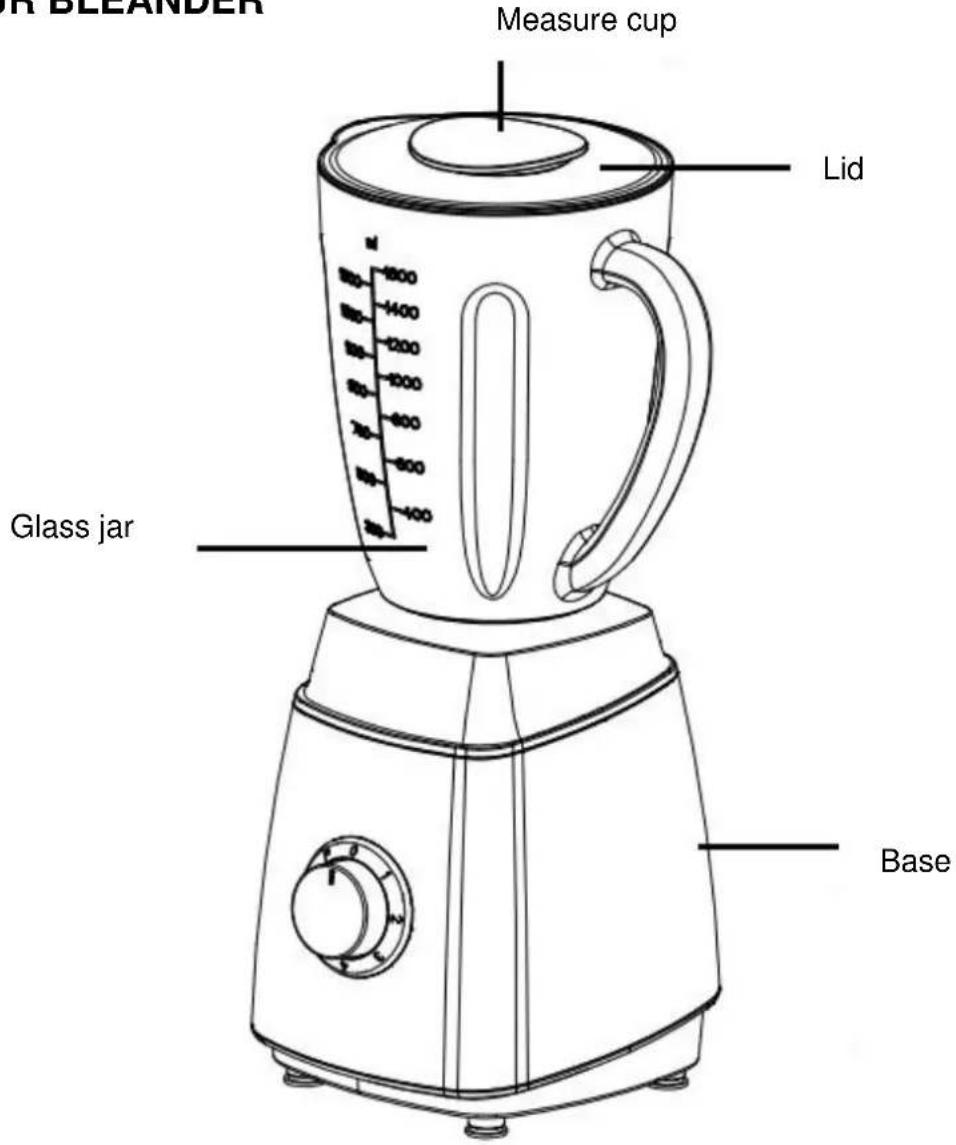
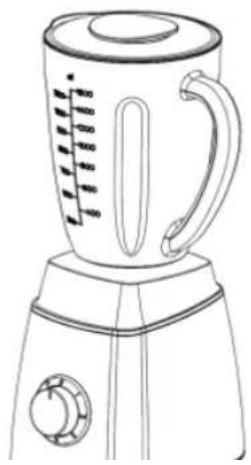
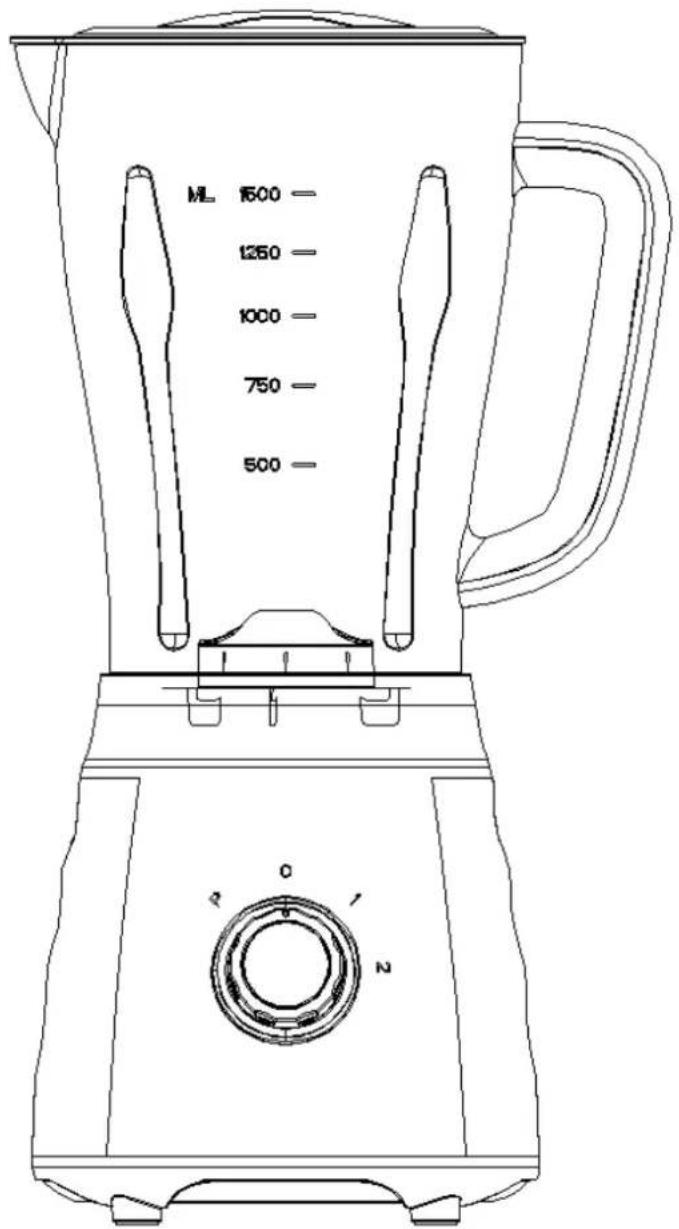
Main unit/Jar components (Fig.1)
SPEED KNOB
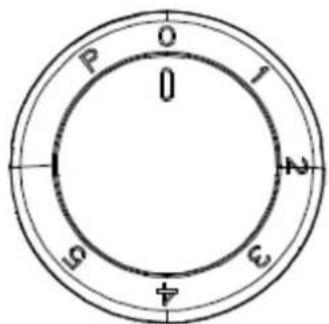
Fig.2
HOW TO USE
Before initial use
- Before first use, unpack the appliance and place all parts on a horizontal surface.
-
The jar assembly (as Fig.1, including the measure cup, lid, glass jar) has already been assembled into the base. Disassemble to wash all detachable parts except the base. Please refer to the latter chapter CARE AND CLEANING.
-
Once all pieces have been cleaned and dry thoroughly, reassemble them.
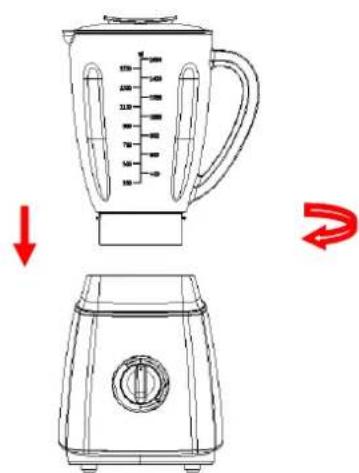
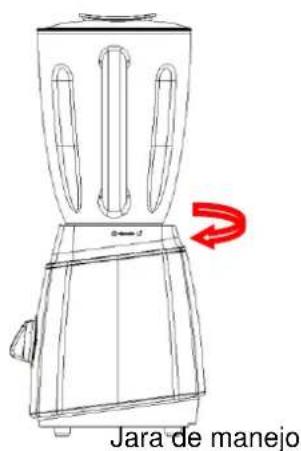
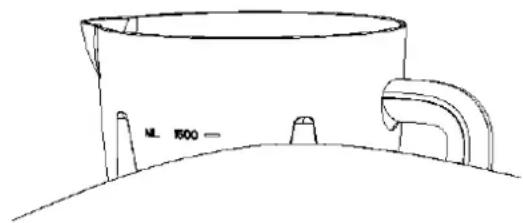
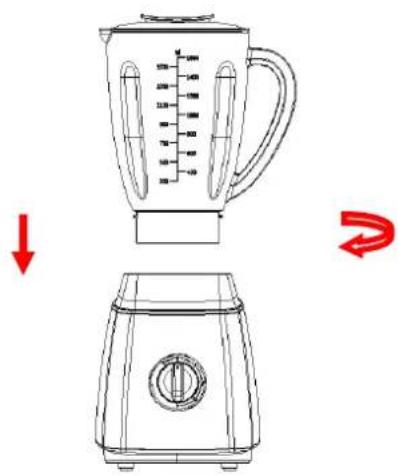
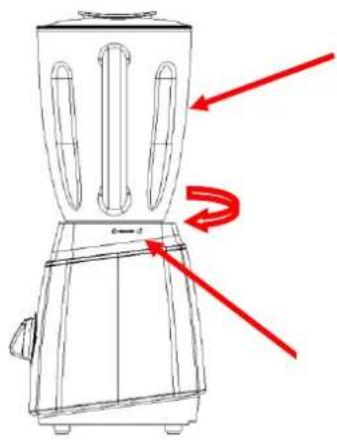
1) Re-position the jar assembly with its opening upwards, and then put the lid onto the jar assembly. Place the measure cup exactly into the lid by aiming at a fixed position in the middle of the lid and turning the cup clockwise up to tightly. (See Fig.3) 2) Finally, place the assembled jar onto the base by adjusting well the connector at the bottom of the jar (Please make the handle down towards the unlock sign on base and tighten to the locking sign) (See Fig.4 and 5)
CAUSION: Do not try to twist the jar and jar base onto base
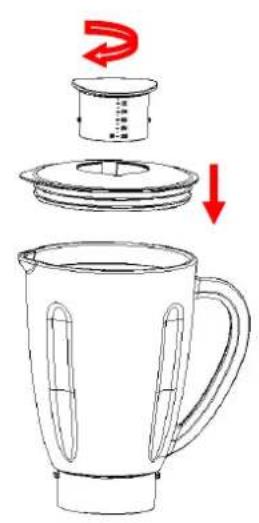
Fig.3
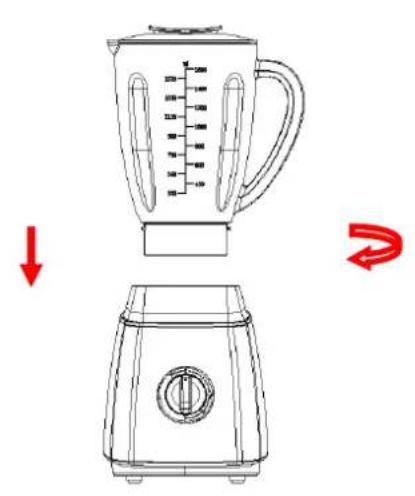
Fig.4
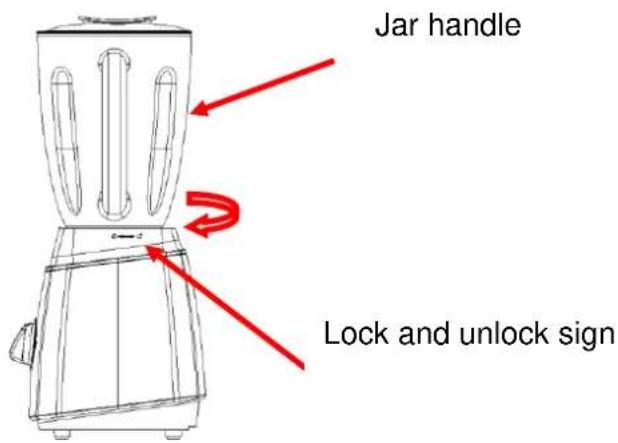
Fig.5
The using of jar:
- Peel or core fruit or vegetables and then cut it into small dices.
- Place the food to be blended into the jar (See Fig.6). Usually, certain amount of purified water has to be added to facilitate the smooth running of appliance. The proportion of food and water is 2:3. The amount of mixture should not exceed the max level as indicated on the jar.
RECIPE
| FOOD TYPE | SPEC | WEIGHT | SPEED |
| Carrot (apple, pear etc.) | Cut into 15mm*15mm*15mmm | Carrot: 640g Water: 960g | High speed |
- Put the lid on the jar. Be sure the measuring cup is in place.
- Plug the power cord into a standard wall outlet.
- Turn the speed knob to the appropriate speed setting for your task.
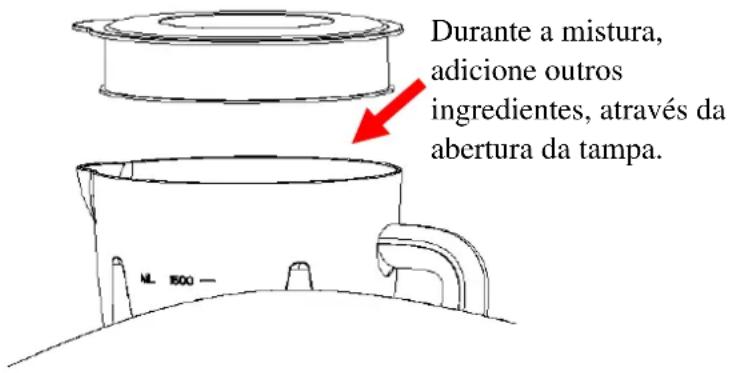
- For quick or delicate blending tasks, turn the speed knob to P position and hold for a few seconds and then release, the knob will reset to O position automatically. Operate several times until the consistence you want is obtained. If you want to add ingredients while the blender is working, remove the measuring cup and place through the lid opening. (See Fig.7)
- When the consistence you desire is obtained, turn the knob to O position.
Note: 1) For each use, the consecutive operation time should not exceed 3 minutes. At least 10 minutes rest time must be maintained between two continuous cycles, let the unit cool to room temperature before performing next
operation cycle.
2) If you want to stop the device while operating, turn the knob to 0 position anytime.
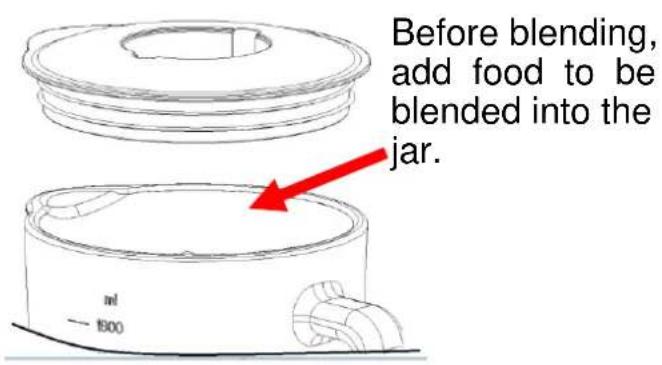
Fig.6
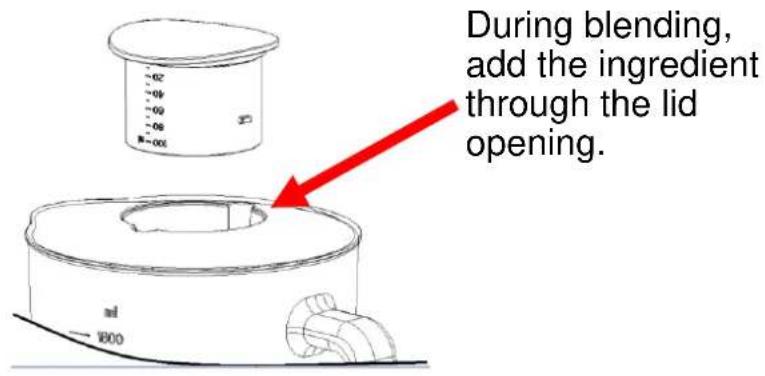
Fig.7
Important operating tips
- For best circulation of food that is to be blended with some liquid, pour the liquid into the jar first, then add solids.
- Some of the tasks that cannot be performed efficiently with a blender are: beating egg whites, whipping cream, mashing potatoes, grinding meat, mixing dough, extracting juice from fruit and vegetable, etc.
- The following items should never be placed in the unit as they may cause damage: bones, large pieces of solid, frozen food, or tough foods.
CARE AND CLEANING
This product contains no user serviceable parts. Refer service to qualified service personnel.
- Before cleaning, unplug the blender.
- Always wash immediately after use for easier cleaning. Don't let food dry on the jar assembly as this will make cleaning difficult.
- Pour a little warm soapy water into the jar and turn the knob to P position for a few seconds. And then empty the jar.
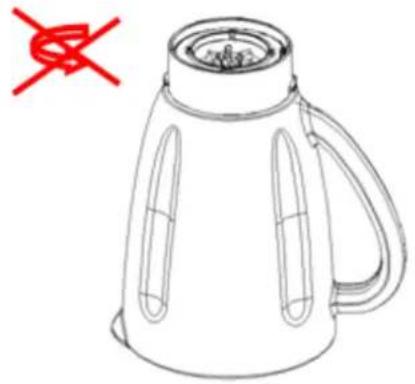
- Dismantle all detachable parts. Lift the jar assembly off the base, the blade base on the jar cannot be detached and should be cleaned with the jar together. (see fig.8).
natural_image
Line drawing of a kettle with handle and side slots, marked with a red prohibition symbol (no text or labels)Fig.8
-
Rinse the measure cup, lid, jar, seal ring, blade assembly by hands or in a dishwasher and then dry. They are dishwasher safe components, but the temperature setting shall not exceed 70^ C.
-
Using warm soapy water to scrub the blade, then rinse thoroughly under the tap. Do not touch the sharp blades, handle with care. Place it upside down for drying in the air where children can't reach. Don't place the blade assembly in water for long time without cleaning in case of hurt due to inattention.
-
Wipe the base surface with a damp cloth and dry thoroughly. Remove the stubborn spots by rubbing with non-abrasive cleaner. If liquids spill into the base, first unplug the unit, then wipe with a dry cloth and dry thoroughly.
CAUSION
1) Do not immerse the base in liquid to prevent the risk of electric shock.
2) Do not use rough scouring pads or cleansers on parts or finish.
3) Do not place base into dishwasher for cleaning. This base is not available for dishwasher.
ENVIRONMENT FRIENDLY DISPOSAL

natural_image
Symbol of a trash bin crossed out by two diagonal lines (no text or numbers present)You can help protect the environment! Please remember to respect the local regulations: hand in the non-working electrical equipment to an appropriate waste disposal centre.
UPUTSTVO ZA UPOTREBU
BLENDER
Model: TM-6105
natural_image
Line drawing of a blender with handle and control knob (no text or symbols)VAŽNA BEZBEDNOSNA UPUTSTVA
Glavna jedinica/Delovi posude (Fig.1)
DUGME ZA REGULISANJE BRZINE
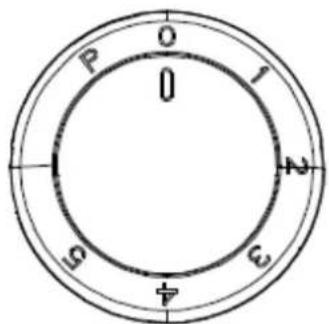
Fig.2
UPOTREBA BLENDERA
Pre prve upotrebe
- Pre prve upotrebe, raspakujte uređaj i postavite sve delove na horizontalnu površinu.
- Posuda sa dodacima (Slika 1, uključujući čašu sa merama, poklopac, zaptivni prsten, posudu, kućište sa sečivima) je već postavljena na kućište motora. Molimo konsultujte deo ČIŠĆENJE I ODRŽAVANJE.
- Nakon što ste sve delove očistili i temeljno osušili, ponovo ih sastavite.
1) Ponovo stavite posudu sa dodacima okrenutu nagore, zatim stavite poklopac na posudu. Postavite čašu za merenje u otvor na sredini poklopca i okrenite posudu u smeru kazaljke na satu dok dobrone zatvorite. (Vidi sliku 3)
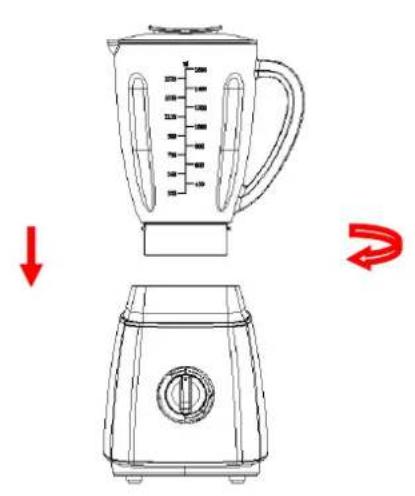
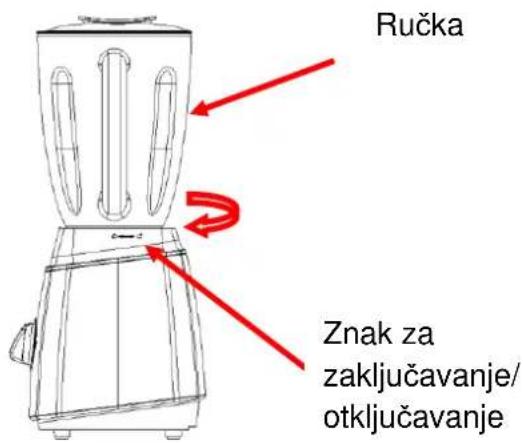
2) Na kraju, postavite posudu sa dodacima na kućište motora, ravnajući indikatore na dnu posude i dobro zategnite. (Molimo ručku spustite nadole prema znaku za otključavanje na postolju i zategnite u smeru zaključavanja prateći znak na postolju). (Vidi sliku 4 i 5)
Slika 3
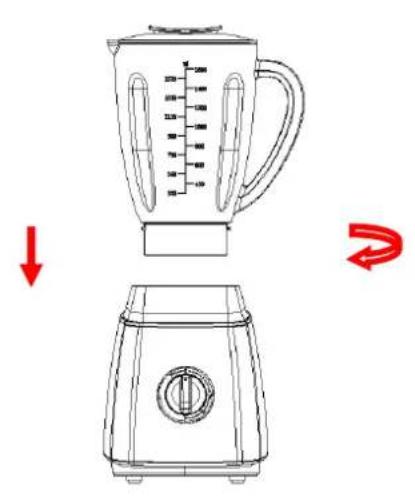
Slika 4
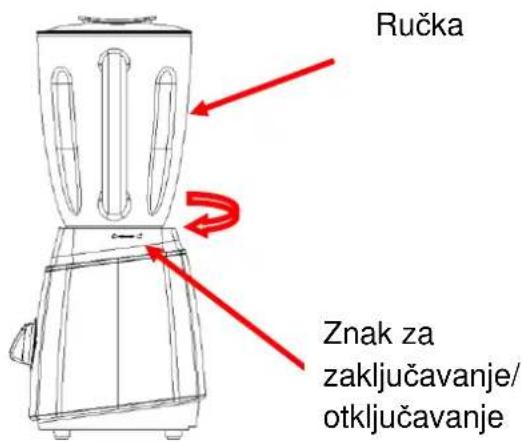
Slika 5
Upotreba posude:
-
Oljuštite voće ili povrće i izvadite koštice, zatim ga isecite na male kocke.
-
Stavite hranu u posudu blendera (Vidi Sliku 6). Obično je potrebno dodati određenu količinu čiste vode da bi se olakšao rad blendera. Odnos hrane i vode je 2:3. Količina smese za obradu ne sme preći maksimalni nivo označen na posudi.
RECEPT
| HRANA UPUTSTVO TEŽINA BRZINA | |||
| Šargarepa(jabuka,kru ška, itd) | Iseći na komade15mm*15mm*15mmm | Šargarepa: 640gVoda: 960g | Visoka brzina |
- Stavite poklopac na posudu. Proverite da li je čaša s merama postavljena u otvor poklopca.
- Ukliučite utikač u standardnu zidnu utičnicu.
- Okrenite dugme za regulisanje brzine na željeni nivo.
- Za brza ili gruba mlevenja, okrenite regulator brzine na poziciju P i držite nekoliko sekundi, a zatim pustite. Regulator brzine će se automatski vratiti u poziciju O. Ukoliko je to nephodno ponovite ovaj proces više puta dok ne dobijete željeni rezultat. Ukoliko želite da dodate neke sastojke dok blender radi, skinite čašu sa merama sa vrha poklopca i kroz otvor dodajte sastojke. (Vidi Sliku 7)
- Kada je hrana obrađena u skladu sa Vašim potrebama, stavite regulator u položaj O.
natural_image
Line drawing of a kettle with handle and side slots, marked with a red prohibition symbol (no text or labels)Slika 8
-
Operite čašu sa merama, poklopac, posudu, zaptivni prsten, postolje sa sečivima za mlevenje, postolje sa sečivima za seckanje ručno ili u sudomašini. To su delovi bezbedni za pranje u sudomašini, ali temperatura pranja ne sme prelaziti70°C.
-
Očistite sečivo koristeći toplu, sapunjavu vodu i temeljno isperite pod tekućom vodom. Ne dodirujte oštro sečivo i rukujte njime pažljivo. Ne potapajte sečivo u vodu. Okrenite ga nakon pranja naopačke i ostavite ga dase osuši, držeći ga podalje od dece.
-
Obrišite motornu jedinicu vlažnom krpom i osušite temeljno. Uklonite tvrdokorne fleke nekom neabrazivnom tečnošću. Ako se desi da se prospe tečnost na motornu jedinicu, prvo iskopčajte uređaj iz struje, a zatim prebrišite temeljno suvom krpom i ostavite da se osuši.
PAŽNJA
1- Ne potapajte motornu jedinicu u tečnost kako biste sprečili rizik od strujnog udara.
2- Ne koristite grube četke za čišćenje i jaka sredstva za čišćenje.
3- Ne stavljajte postolje sa motorom u sudomašinu radi čišćenja. Ovaj deo nije prikladan za pranje u sudomašini.
PRAVILNO ODLAGANJE UREĐAJA

natural_image
Symbol of a trash bin crossed out by two diagonal lines (no text or labels)Fig 2
COMO USAR
natural_image
Line drawing of a blender with a lid and handle, showing a red arrow indicating rotation (no text or symbols)Fig. 3
natural_image
Line drawing of a blender with a side view showing the blade and lid (no text or symbols)Fig. 4
natural_image
Technical line drawing of a mechanical component with a circular top and curved base (no text or symbols)Fig.6
natural_image
Line drawing of a cylindrical container with a handle and side port, no text or symbols presentFig.7
natural_image
Line drawing of a kettle with handle and side slots, marked with a red prohibition symbol (no text or labels)Fig.8
natural_image
Symbol of a trash bin crossed with no text or numbers, representing waste sorting or disposal (no text present)MANUAL DE INSTRUÇÕES
LIQUIDIFICADOR
Model:TM-6105
PRECAUÇÕES IMPORTANTES
Fig 2
COMO UTILIZAR
Fig. 3
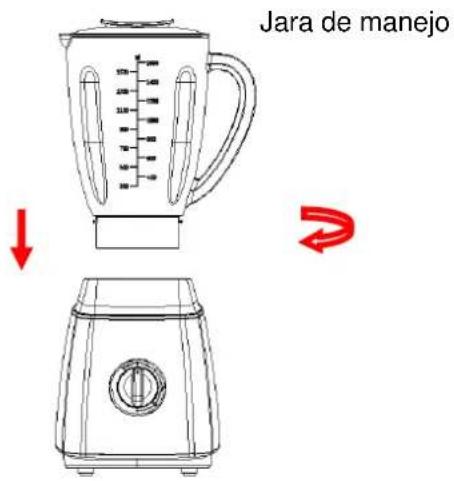
Fig.6
natural_image
Line drawing of a kettle with handle and side slots, marked with a red prohibition symbol (no text or labels)Fig.8
natural_image
Symbol of a trash bin crossed with no text or numbers, representing waste sorting or disposal (no text present)natural_image
Line drawing of a blender with handle and control knob (no text or symbols)Eik. 2
Eik. 3
Eik. 4
Λαβή κανάτας
natural_image
Line drawing of a kettle with handle and side slots, marked with a red prohibition symbol (no text or labels)Eik. 8
natural_image
Pure electrical circuit lines without any symbolsnatural_image
Line drawing of a blender with handle and control knob (no text or symbols)POMEMBNI VARNOSTNI NAPOTKI
Slika
UPORABA BLENDERJA
Pred prvo uporabo
Fig.3
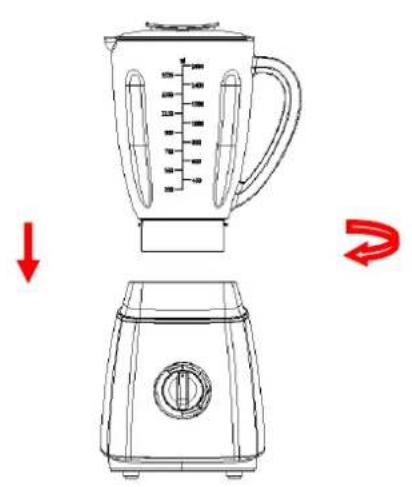
Fig.4
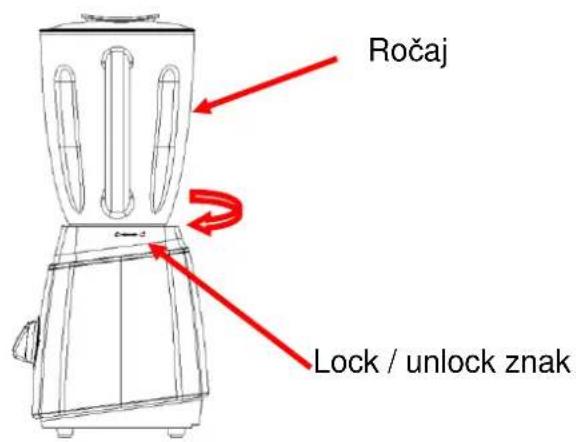
Fig.5
Uporaba vrča:
natural_image
Line drawing of a kettle with handle and side slots, marked with a red prohibition symbol (no text or labels)Slika 8
natural_image
Symbol of a trash bin crossed out by two diagonal lines (no text or numbers present)natural_image
Line drawing of a blender with handle and control knob (no text or symbols)VAŽNE BEZBJEDNOSNE UPUTE
Slika 2
UPORABA BLENDERA
Prije prve uporabe
Slika 3
Slika 4
Slika 5
Uporaba posude:
-
Oljuštite voće ili povrće i izvadite koštice, zatim ga isijecite na male kocke.
-
Stavite hranu u posudu blendera (Vidi Sliku 6). Obično je potrebno dodati određenu količinu čiste vode da bi se olakšao rad blendera. Odnos hrane i vode je 2:3. Količina smjese za obradu ne smije preći maksimalnu razinu označenu na posudi.
RECEPT
| HRANA UPUTA TEŽINA BRZINA | ||
| Mrkva(jabuka,kru ška, itd) | Isjeći na komade15mm*15mm*15mmm | Mrkva: 640gVoda: 960g |
- Stavite poklopac na posudu. Provjerite da li je čaša s mjerama postavljena u otvor poklopca.
- Uključite utikač u standardnu zidnu utičnicu.
- Okrenite gumb za reguliranje brzine na željenu razinu.
- Za brza ili gruba mljevenja, okrenite regulator brzine na poziciju P i držite nekoliko sekundi, a zatim pustite. Regulator brzine će se automatski vratiti u poziciju O. Ukoliko je to nephodno ponovite ovaj proces više puta dok ne dobijete željeni rezultat. Ukoliko želite da dodate neke sastojke dok blender radi, skinite čašu sa mjerama sa vrha poklopca i kroz otvor dodajte sastojke. (Vidi Sliku 7)
- Kada je hrana obrađena u skladu sa Vašim potrebama, stavite regulator u položaj O.
Napomena: 1) Kod svake uporabe, kontiniurani rad ne smije preći 3 minuta. Najmanje 10 minuta uređaju treba da se ohladi između dva uzastopna ciklusa rada, sačekajte da se uređaj ohladi do razine sobne temperature prije nego što nastavite s radom.
natural_image
Line drawing of a kettle with handle and side slots, marked with a red prohibition symbol (no text or labels)Slika 8
natural_image
Simple line drawing of a trash bin with no text or symbolsnatural_image
Line drawing of a blender with handle and control knob (no text or symbols)VAŽNA BEZBJEDNOSNA UPUTSTVA
Prije upotrebe ovog električnog uređaja trebalo bi uvijek ispuniti osnovne preduslove uključujući sljedeće:
- Pročitajte sva uputstva.
- Prije upotrebe provjerite da li napon na vašem uređaju odgovara naponu u zidnoj utičnici.
- Ne dozvolite da kabl za napajanje tokom upotrebe visi sa ivice stola, radne površine ili blizu bilo kakvog grijnog tijela.
- Ne koristite uređaj sa oštećenim kablom za napajanje ili utikačem ili ukoliko je uređaj prestao da radi ili se oštetio na bilo koji način. Vratite uređaj u najbliži ovlašćeni servis na pregled, popravku ili zamjenu.
- Ako se kabl za napajanje ošteti, može ga zamijeniti samo ovlašćeno lice u servisu ili neko drugo kvalifikovano lice, kako biste izbjegli moguću povredu.
- Neophodan je nadzor ukoliko se uređaj koristi od strane djece ili u njihovoj blizini.
- Izbjegavajte kontakt sa dijelovima koji se pomijeraju.
- Držite ruke ili kuhinjska pomagala van blendera dok je u funkciji kako biste smanjili rizik od ozbiljnih povreda ili nanošenja štete blenderu. Strugač za hranu možete koristiti samo ukoliko uređaj nije u funkciji.
- Upotreba dodataka koji nisu preporučeni ili kupljeni od strane proizvođača može dovesti do požara, strujnog udara ili povrede korisnika.
- Isključite uređaj iz utičnice kada nije u upotrebi, prije sastavljanja ili rastavljanja dijelova, kao i prije čišćenja. Da biste isključili uređaj pritisnite bilo koje dugme na 'off', zatim isključite uređaj iz zidne utičnice, povlačenjem utikača, nikako samog kabla.
- Da biste smanjili rizik od povrede, uvijek pravilno postavite posudu.
- Ovaj uređaj nije predviđen za upotrebu od strane osoba (uključujući djecu) sa smanjenim psihičkim, senzornim ili mentalnim sposobnostima, ili nedostatkom iskustva ili znanja, osim kada su pod nadzorom ili su im data uputstva za bezbjednu upotrebu od strane osobe odgovorne za njihovu bezbjednost.
- Djeca treba da budu pod nadzorom da biste se uvjerili da se ne igraju s uređajem.
- Nemojte ostavljati uređaj da radi bez nadzora.
- Kada sklanjate bledner sa motorne jedinice, sačekajte da se sječiva zaustave u potpunosti.
- Uvijek koristite blender sa postavljenim poklopcem.
- Uvijek koristite blender na sigurnoj, suvoj i ravnoj podlozi.
- Nikada ne stavljajte uređaj na ili u blizini vrućeg plina ili električnog gorionika ili tamo gdje može doći u dodir s vrućim uređajima.
- Nemojte koristiti na otvorenom.
- Koristite uređaj samo za predviđenu namjenu.
UPOZORENJE: Moguće povrede u slučaju nepravilnog korišćenja. Budite pažljivi kada rukujete s oštrim sječivima, prilikom pražnjenja posude i tokom čišćenja.
Slika 2
UPOTREBA BLENDERA
Prije prve upotrebe
Slika 3
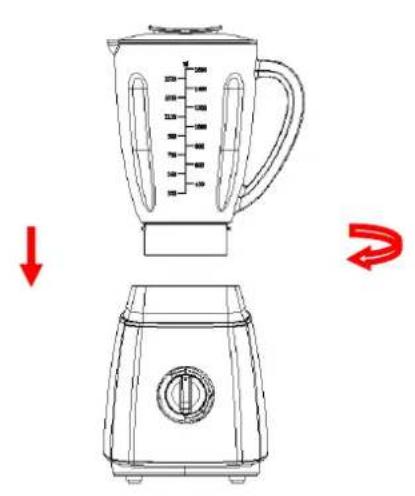
Slika 4
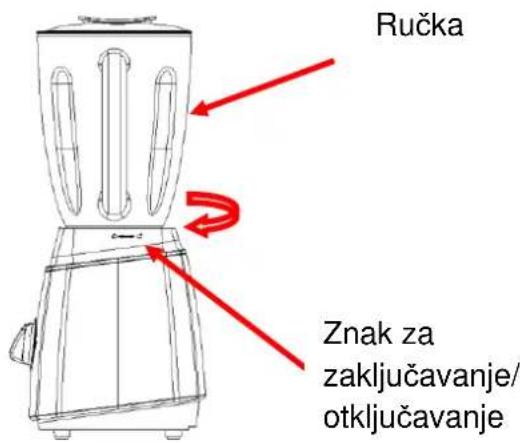
Slika 5
Upotreba posude:
- Oljuštite voće ili povrće i izvadite koštice, zatim ga isijecite na male kocke.
- Stavite hranu u posudu blendera (Vidi Sliku 6). Obično je potrebno dodati određenu količinu čiste vode da bi se olakšao rad blendera. Odnos hrane i vode je 2:3. Količina smjese za obradu ne smije preći maksimalni nivo označen na posudi.
RECEPT
| HRANA UPUTSTVO TEŽINA BRZINA | |||
| Mrkva(jabuka,kru ška, itd) | Isjeći na komade15mm*15mm*15mmm | Mrkva: 640gVoda: 960g | Visoka brzina |
- Stavite poklopac na posudu. Provjerite da li je čaša s mjerama postavljena u otvor poklopca.
- Uključite utikač u standardnu zidnu utičnicu.
- Okrenite dugme za regulisanje brzine na željeni nivo.
- Za brza ili gruba mljevenja, okrenite regulator brzine na poziciju P i držite nekoliko sekundi, a zatim pustite. Regulator brzine će se automatski vratiti u poziciju O. Ukoliko je to nephodno ponovite ovaj proces više puta dok ne dobijete željeni rezultat. Ukoliko želite da dodate neke sastojke dok blender radi, skinite čašu sa mjerama sa vrha poklopca i kroz otvor dodajte sastojke. (Vidi Sliku 7)
- Kada je hrana obrađena u skladu sa Vašim potrebama, stavite regulator u položaj O.
Napomena: 1) Kod svake upotrebe, kontiniurani rad ne smije preći 3 minuta. Najmanje 10 minuta uređaju treba da se ohladi između dva uzastopna ciklusa rada, sačekajte da se uređaj ohladi do nivoa sobne temperature prije nego što nastavite s radom.
natural_image
Line drawing of a kettle with handle and side slots, marked with a red prohibition symbol (no text or labels)Slika 8
-
Operite čašu sa mjerama, poklopac, posudu, zaptivni prsten, postolje sa sječivima za mljevenje, postolje sa sječivima za sjeckanje ručno ili u sudomašini. To su dijelovi bezbjedni za pranje u sudomašini, ali temperatura pranja ne smije prelaziti 70°C.
-
Očistite sječivo koristeći toplu, sapunjavu vodu i temeljno isperite pod tekućom vodom. Ne dodirujte oštro sječivo i rukujte njime pažljivo. Ne potapajte sječivo u vodu. Okrenite ga nakon pranja naopačke i ostavite ga da se osuši, držeći ga podalje od djece.
-
Obrišite motornu jedinicu vlažnom krpom i osušite temeljno. Uklonite tvrdokorne fleke nekom neabrazivnom tečnošću. Ako se desi da se prospe tečnost na motornu jedinicu, prvo iskopčajte uređaj iz struje, a zatim prebrišite temeljno suvom krpom i ostavite da se osuši.
PAŽNJA
natural_image
Symbol of a trash bin crossed out by two diagonal lines (no text or labels)natural_image
Line drawing of a blender with handle and control knob (no text or symbols)Слика 2
УПОТРЕБА НА БЛЕНДЕРОТ
Пред прва употреба
Слика 3
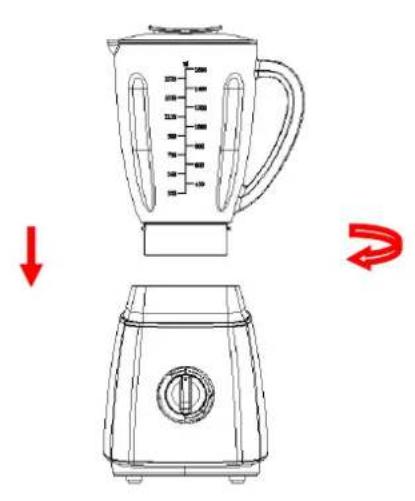
Слика 4
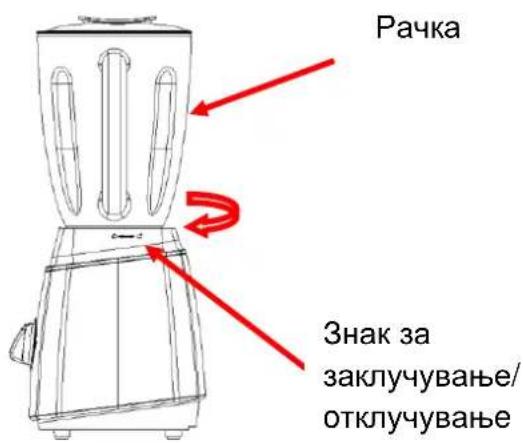
natural_image
Line drawing of a kettle with handle and side slots, marked with a red prohibition symbol (no text or labels)Слика 8
natural_image
Symbol of a trash bin crossed out by two diagonal lines (no text or labels)
natural_image
Line drawing of a blender with handle and control knob (no text or symbols)UDHËZIME TË RËNDËSISHME TË SIGURISË
Fig.2
PËRDORIMI I BLENDERIT
Fig.3
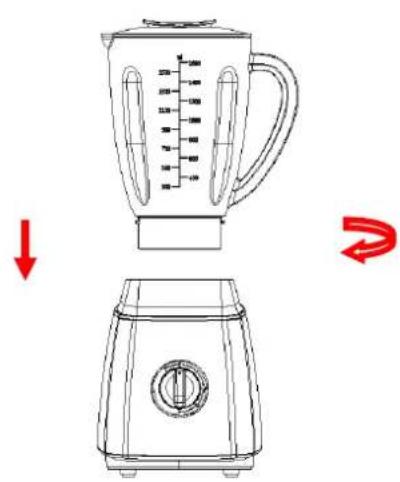
Fig.4
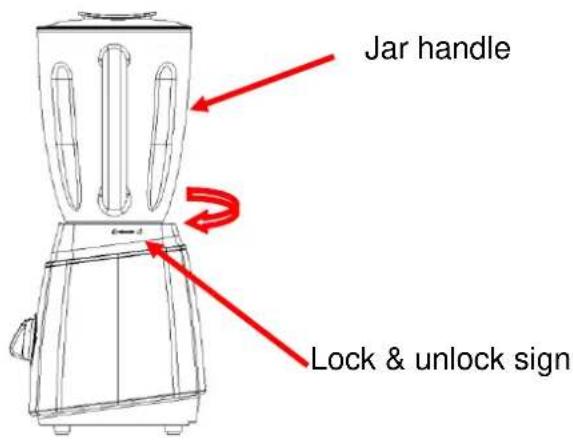
Fig.5
natural_image
Line drawing of a kettle with handle and side slots, marked with a red prohibition symbol (no text or labels)Fig.8
natural_image
Symbol of a trash bin crossed out by two diagonal lines (no text or labels)- IMPORTANT SAFEGUARDS
- HOUSEHOLD USE ONLY
- HOW TO USE
- Before initial use
- The using of jar:
- Important operating tips
- CARE AND CLEANING
- CAUSION
- ENVIRONMENT FRIENDLY DISPOSAL
- UPUTSTVO ZA UPOTREBU
- BLENDER
- Model: TM-6105
- VAŽNA BEZBEDNOSNA UPUTSTVA
- UPOTREBA BLENDERA
- Pre prve upotrebe
- Upotreba posude:
- PAŽNJA
- PRAVILNO ODLAGANJE UREĐAJA
- COMO USAR
- MANUAL DE INSTRUÇÕES
- LIQUIDIFICADOR
- Model:TM-6105
- PRECAUÇÕES IMPORTANTES
- COMO UTILIZAR
- POMEMBNI VARNOSTNI NAPOTKI
- UPORABA BLENDERJA
- Pred prvo uporabo
- Uporaba vrča:
- VAŽNE BEZBJEDNOSNE UPUTE
- UPORABA BLENDERA
- Prije prve uporabe
- Uporaba posude:
- VAŽNA BEZBJEDNOSNA UPUTSTVA
- Prije prve upotrebe
- УПОТРЕБА НА БЛЕНДЕРОТ
- Пред прва употреба
- UDHËZIME TË RËNDËSISHME TË SIGURISË
- PËRDORIMI I BLENDERIT
Brand : VOX
Model : TM6105
Category : Blender