721-134 - Lawn mower Meec Tools - Free user manual and instructions
Find the device manual for free 721-134 Meec Tools in PDF.


| Product Type | Lawn mower |
| Brand | Meec Tools |
| Model | 721-134 |
| Engine Type | 4-stroke petrol engine |
| Engine Power | 2.6 kW (3.5 hp) |
| Engine Speed | 3000 rpm |
| Cutting Width | 525 mm |
| Cutting Height Range | 20–75 mm |
| Grass Catcher Capacity | 75 L |
| Drive Type | Self-propelled (rear wheel drive) |
| Sound Pressure Level | 81 dB(A) (K=3 dB) |
| Measured Sound Power Level | 96 dB(A) (K=3 dB) |
| Guaranteed Sound Power Level | 98 dB(A) (K=3 dB) |
| Vibration Level | 5.5 m/s² (K=3 dB) |
| Blade Material | Steel (40MnB) |
| Blade Bolt Torque | 45 Nm |
| Spark Plug Gap | 0.75 mm |
| Oil Capacity | Not specified (fill to dipstick max mark) |
| Fuel Type | 95 octane unleaded petrol |
| Fuel Tank Capacity | Not specified |
| Weight | Not specified |
| Safety Features | Flywheel brake lever, blade guard, self-closing guard |
| Maintenance | Oil change every 25 hours, air filter cleaning, blade replacement |
Frequently Asked Questions - 721-134 Meec Tools
User questions about 721-134 Meec Tools
0 question about this device. Answer the ones you know or ask your own.
Ask a new question about this device
Download the instructions for your Lawn mower in PDF format for free! Find your manual 721-134 - Meec Tools and take your electronic device back in hand. On this page are published all the documents necessary for the use of your device. 721-134 by Meec Tools.
USER MANUAL 721-134 Meec Tools
Operating Instructions for Lawn Mower
721-134
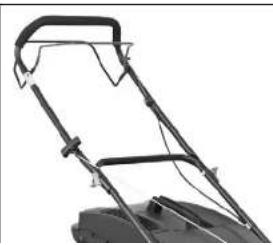
natural_image
Close-up of a lawn mower frame with metal frame and handle (no text or symbols visible)SVENSKA 5
SÄKERHETSANVISNINGAR 5
TEKNISKA DATA 6
BESKRIVNING 6
Symboler 8
MONTERING 9
Uppackning 9
Tillbehör 9
Montering 9
HANDHAVANDE 10
Adjusting the cutting height....47
Oil cap/dipstick 48
Refilling the petrol 48
Starting the engine 49
Stopping the engine 49
Mowing tips 49
MAINTENANCE 49
Cleaning 50
Replacing the blade 50
Changing the oil 50
Spark plug 51
Air filter 51
Draining the fuel tank and carburettor 51
MAINTENANCE 52
Maintenance schedule 52
Storage 52
Environment and waste disposal 52
Service 53
TROUBLESHOOTING....53
SVENSKA
SÄKERHETSANVISNINGAR
SVENSKA
Symboler
natural_image
Line drawing of a lawn mower with visible motors and wheels (no text or symbols)- Oljelock/oljesticka
- Övre nivåmarkering
- Undre nivåmarkering
NGP 40MnB D5-5A-002-000
natural_image
Two images showing a spark plug and its close-up of its tip, with no visible text or symbols.Luftfilter
NORSK
Symboler
Symbolene nedenfor forekommer på apparatel.

natural_image
Line drawing of a lawn mower with visible motors and wheels (no text or symbols)- Kjørebetjening
- Håndtak
- Svinghjulsbremsespak
- Oljelokk/peilepinne
- ∅vre marking
- Nedre marking
Motoren leveres uten olje. Fyll på olje i henhold til anvisningene i avsnittet om motoren i denne bruksanvisningen.
natural_image
Two technical images showing a spark plug and a tool, one with a 0.75mm dimension label (no text or symbols on the devices themselves)Luftfilter
- Flottørhus
- Avtappingsplugg
- Skive
- Drivstofffilter
VEDLIKEHOLD
Vedlikeholdsskjema
POLSKI
Symbole
natural_image
Line drawing of a lawn mower with visible blades and wheels (no text or symbols)NGP 40MnB D5-5A-002-000
natural_image
Technical line drawing of a mechanical assembly with no visible text or symbolsRead the Operating Instructions carefully before use!
- Read these instructions carefully and familiarise yourself with the controls on the machine and how they are used.
- Keep hands and feet away from moving parts. Always keep at a safe distance from the ejector opening.
- Persons who are not familiar with these instructions must not use the machine.
- Carefully inspect the area where the machine is to be used and remove any objects that can fasten in the blades and be thrown out.
• Do not use the machine when other persons, especially children, or pets are in the vicinity. - Always wear heavy-duty shoes and long trousers when using the machine. Do not use the machine if you are barefoot or wearing open shoes.
- Be very careful when going backwards or pulling the machine towards you. Look for any obstacles behind you, before and while you are going backwards.
- Never use the machine if the guards or covers are dismantled or damaged. Never use the machine without the safety devices fitted, e.g. ejector guide and/or catcher.
• Only use parts and accessories that are recommended by the manufacturer. - Stop the blades when crossing gravel entrances and paths, etc.
- Switch off the engine and disconnect the spark plug lead from the spark plug in the following situations.
- Before clearing blockages or cleaning the ejector.
- Before checking, cleaning or doing any other work on the machine.
- If you run into an object: check the machine and repair any damage before using it again.
- If the lawn mower starts vibrating abnormally (check immediately).
- Switch off the engine, release the spark plug lead from the spark plug, and wait until all moving parts have completely stopped before removing the grass catcher.
- Only use the machine in daylight, or in good artificial lighting
• Never use the machine is you are tired or under the influence of drugs, alcohol or medication. - Do not use the machine in wet grass. Make sure you always have a firm footing and a firm grip on the handle. Operate carefully. Never run with the machine.
• Repair/replace the muffler if it gets damaged - Wear safety glasses.
• Watch out for holes, hollows and clumps of grass. Long grass can conceal obstacles. - Do not mow too close to streams/ditches or steel slones – risk of losing control
ENGLISH
- Switch off the engine, release the spark plug lead from the spark plug, and wait until all moving parts have completely stopped before adjusting the cutting height.
- Regularly check the grass catcher for wear or damage. When necessary, replace any parts with parts recommended by the manufacturer.
• The blades are very sharp – risk of personal injury. Wear protective gloves when handling blades. - Do not change the speed governor setting and do not race the engine.
• Be very careful when going backwards or pulling the machine towards you. - Stop the blades if the machine has to be tilted when moving it over an ungrassed surface, or when moving to and from the area to be mowed.
- Disengage and place all levers in neutral before starting the engine.
• Start the engine carefully according to the instructions. Keep your feet away from the blades. - Do not tilt the machine when starting the motor, unless this is necessary to start it. If the machine has to be tilted, do not tilt it more than is absolutely necessary. Lift up the end furthest away from the user.
- Do not stand in front of the ejector opening when starting the engine.
- Never lift or carry the machine when the engine is running.
- Reduce the throttle and turn off the fuel cock (if there is one) before stopping the engine.
TECHNICAL DATA
Petrol engine 2.6 kW, 3 kW, 4.4 kW
automatic with high cutting height
Engine speed 3000 rpm
Cutting width 525 mm
Cutting height 20-75 mm
Catcher capacity 75
Sound pressure level, LpA 81 dB(A), K=3 dB
Measured Sound power level, LwA 96 dB(A), K=3 dB
Guaranteed Sound power level, LwA 98 dB(A), K=3 dB
Vibration level 5,5 m/s ^2 , K=3 dB
Always use hearing protection!
The declared vibration value, which has been measured by a standardised test method, can be used to compare different tools with each other and for a preliminary assessment of exposure.
WARNING! The actual vibration level when using power tools may differ from the specified maximum value, depending on how the tool is used. It is therefore necessary to determine which safety precautions are required to protect the user, based on an estimate of exposure in actual operating conditions (taking into account all stages of the work cycle, e.g. the time when the tool is switched off and when it is idling,
ENGLISH
DESCRIPTION
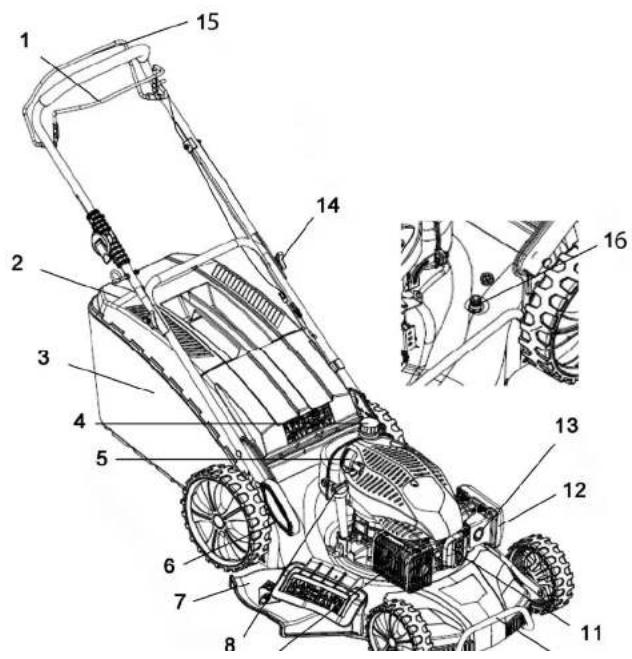
ENGLISH
Symbols
The following symbols are used on the machine.

Read the Operating Instructions.
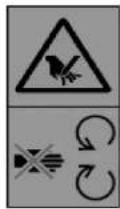
DANGER Rotating parts. Keep your hands and feet away from openings when the machine is in operation.
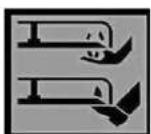
WARNING
Keep your hands and feet away from cutting deck when the machine is in operation.

Keep onlookers at a safe distance.
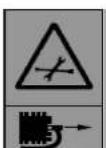
Switch off the engine, release the spark plug lead from the spark plug, and wait until all moving parts have completely stopped before working on the

Remove any objects that could fasten in the blade and be thrown out.
ENGLISH
ASSEMBLY
Read these instructions carefully before assembly and use.
IMPORTANT! The machine is supplied without petrol and engine oil. The machine is supplied assembled and tested.
Unpacking
Roll out the machine from the box and check that there are no loose parts left in the box.
Accessories
The lawn mower is supplied with the grass catcher already fitted.
IMPORTANT! Open the handle carefully so that no wires are clenched.
Assembly
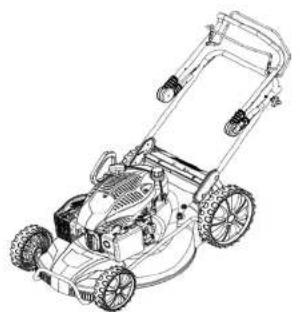
natural_image
Line drawing of a lawn mower with visible blades and wheels (no text or symbols)- Open up the handle until the lower part locks in place.
- Remove the transport guard, open the upper part of the handle in line with the lower, and tighten both locking screws.
- Remove the transport guard that holds the drive lever pressed against the upper part of the handle.
ENGLISH
OPERATION
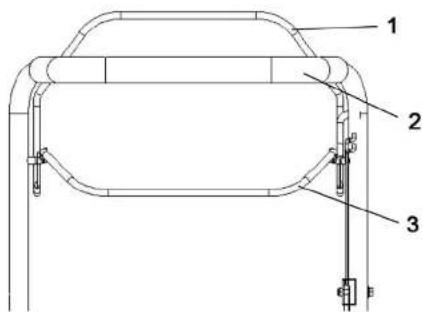
- Drive lever
- Handle
- Flywheel brake lever
Flywheel brake lever
- Hold pressed down to start the engine.
- Release to stop the engine.
Starter handle
Used to start the engine.
Wheel drive lever
Used to engage and disengage the wheel drive.
Engine speed
The engine speed is set at the factory and cannot be changed.
Wheel drive
• Engage and disengage the wheel drive by pressing the drive lever against the handle, moving the
ENGLISH
Oil cap/dipstick
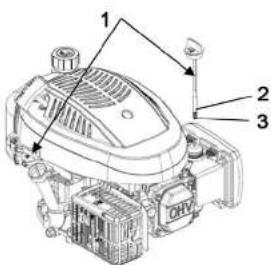
- Oil cap/dipstick
- Upper level mark
- Lower level mark
The engine is supplied without oil. Fill up with oil in accordance with the instructions in the section on the engine in these operating instructions.
IMPORTANT! Do not overfill the oil over the maximum marking, as this will cause the muffler to smoke when starting.
- Place the machine on a level surface.
- Remove the oil cap and dipstick.
- Fill up with oil to the maximum marking on the dipstick.
- Put back and tighten the dipstick.
IMPORTANT!
• Always check the oil level before using the machine and top up, if necessary. Fill up with oil to the maximum marking on the dipstick.
- Change the oil after 25 hours of operation, or every season. Change the oil more frequently if the machine is used in dusty and/or dirty conditions. Change the oil in accordance with the instructions in the section on the engine in these operating instructions.
Refilling the petrol
- Do not overfill the tank. The fuel must not come up the filler tube. Only use fresh, clean, 95 octane unleaded petrol. Do not mix oil in the petrol. Petrol is a perishable product. Do not buy more petrol
ENGLISH
IMPORTANT! Ethanol or methanol blended fuels may attract water, which can lead to separation and the formation of acids during storage, which can damage the fuel system. The fuel system should be drained if the machine will not be used for at least 30 days in order to avoid engine problems. Empty the fuel tank. Start the engine and use up the petrol in the carburettor and fuel lines. Fill up with new petrol next season. More information is available in the section on storage. Never use detergents for the engine or carburettor in the fuel tank – risk of serious material damage.
Starting the engine
Check that the spark plug lead is connected to the spark plug, that the oil level is correct, and that there is petrol in the fuel tank.
NOTE! The engine has a protective coating which can cause the emission of fumes the first time the engine is run. This is completely normal. Hold the drive lever pressed against the handle. Pull the starter cord slowly until it catches and then pull quickly. Do not release handle, but move it back slowly to its original position.
NOTE! When the engine is cold, press the fuel primer bulb (see table 1) once or twice to pump fuel into the carburettor before pulling the starter cord.
Do not use the primer bulb when the engine is hot.
| Temperature Times to press | |
| < 0° 2–3 | |
| 0-10° | 1–2 |
| 10-20° | 0–1 |
| > 20° 0 | |
NOTE! You may need to repeat the above steps if it is very cold.
Stopping the engine
Release the drive lever to stop the engine.
WARNING! The blade continues to rotate for a few seconds after the engine is switched off. Release the spark plug lead from the spark plug if the machine is left unattended.
Mowing tips
ENGLISH
-
Regularly check the self-closing guard and grass catcher for wear or damage.
-
Pay attention to the following when handling, transporting or tilting the machine.
-
Wear safety gloves.
-
Lift the machine by gripping the places where you can get a firm grip, and so that the weight is evenly distributed.
Cleaning
-
Rinse the machine with water after using it.
-
Remove grass and soil etc. from underneath the cutting deck. Dried debris can make it difficult to start the machine next time. The paint underneath the cutting deck can peel off in time. If this happens, touch it up with rust protection paint as soon as possible.
-
Clean the transmission once or twice a year. Release the screws, remove the transmission cover and clean round the transmission and drive belts with a brush or compressed air.
-
Clean the inside of the drive wheels once per season. Remove both drive wheels.
-
Clean the gear wheel and gear ring from grass and debris with a brush or compressed air.
Replacing the blade
-
Drain off the engine oil before replacing the blade.
-
Undo the screw to replace the blade.
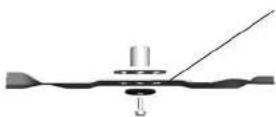
NGP 40MnB D5-5A-002-000
-
Refit as shown in the diagram. Tighten the screw to 45 Nm.
-
Replace the screw together with the blade.
Changing the oil
-
Allow the engine run out of fuel and wait until it has stopped and cooled down.
-
Release the spark plug lead and keep it away from the plug.
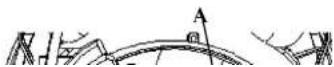
ENGLISH
Spark plug
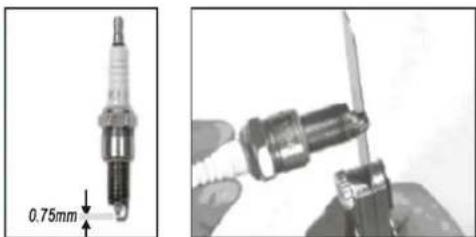
- Allow the engine to cool, remove the plug, and clean with a wire brush.
- Adjust the spark gap to 0.75 mm with a feeler gauge.
- Replace the spark plug. Do not overtighten.
natural_image
Two industrial components: a cylindrical spark plug and a screwdriver, shown from different angles (no text or symbols visible)Air filter
- Release the filter cover and remove the foam plastic filter element.
- Replace the filter cover to prevent any objects getting into the air intake.
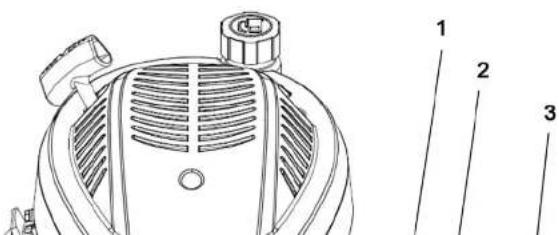
- Foam plastic filter element
ENGLISH
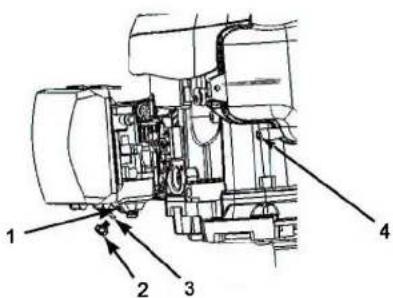
- Float housing
- Drain plug
- Washer
- Fuel filter
MAINTENANCE
Maintenance schedule
| ROUTINE MAINTENANCE(4) | Before use | 1 month or 5 | 3 months or 25 | 6 months or 50 | 12 months or | 24 months or | Page | |
| Carry out after the given number of months or operating hours (whichever comes first). | ||||||||
| Engine oil | Check | 0 | 8 | |||||
| Replace | 0 | 0(2) | ||||||
| Air filter | Check | 0 | 9 | |||||
| Replace | 0 | |||||||
| Check, | n | |||||||
ENGLISH
- Collect all the used oil when changing the oil. Avoid spilling. Used oil must be disposed of in accordance with local regulations.
- Replace the muffler, if necessary. Only use original spare parts.
- The carburettor should be adjusted by qualified personnel.
- Clean the air filter in accordance with these instructions.
- Products that have reached the end of their useful life must be disposed of in accordance with local regulations.
Service
The product should be checked every year by an authorised service centre or other qualified person. Contact your dealer for service and spare parts, etc.
TROUBLESHOOTING
| Engine does not start Possible cause Action | ||
| 1. Check the fuel level. There is no petrol. Fill with petrol. | ||
| Aged or contaminated petrol. Empty fuel tank and carburettor.Fill with fresh petrol. | ||
| 2. Remove and check the spark plug. | The spark plug is defective,contaminated or has the wrongspark gap. | Replace spark plug. |
| The spark plug is wet with fuel (engine flooded). | Dry and refit the spark plug. | |
| 3. See the workshop manual,or take the engine to anauthorised service centre. | Clogged fuel filter, carburettorfault, ignition fault, stuck valves,etc. | Replace or repair the defectivecomponents. |
| 4. Press the fuel primer bulb. When the engine is cold. Press the fuel primer bulb. | ||
| Low engine power Possible cause Action | ||
| 1. Check the air filter. The air filter is blocked. Clean or replace air filter, | ||
| 2. Fill up with fuel. | Aged or contaminated petrol. | Empty fuel tank and carburettor.Fill with fresh petrol. |
| 3. See the workshop manual,or take the engine to anauthorised service centre. | Clogged fuel filter, carburettorfault, ignition fault, stuck valves,etc. | Replace or repair the defectivecomponents. |
| Object | Technical data | Maintenance |

EC DECLARATION OF CONFORMITY EG FÖRSÄKRAN OM ÖVERENSSTÄMMELSE EF SAMSVARSERKLÆRING DEKLARACJA ZGODNOŚCI WE

Jula AB, Box 363, SE-532 24 SKARA, SWEDEN
Machinery Directive 2006/42/EC Electromagnetic Compatibility Directive 2004/108/EC Outdoor Noise Directive 2000/14/EC, amended by 2005/88/EC
EN 836:1997+A4 EN ISO 14982:2009
- SVENSKA 5
- SÄKERHETSANVISNINGAR
- SVENSKA
- Symboler
- Luftfilter
- Symbole
- Read the Operating Instructions carefully before use!
- ENGLISH
- TECHNICAL DATA
- Always use hearing protection!
- Symbols
- ASSEMBLY
- Unpacking
- Accessories
- OPERATION
- Flywheel brake lever
- Starter handle
- Wheel drive lever
- Engine speed
- Wheel drive
- Oil cap/dipstick
- IMPORTANT!
- Refilling the petrol
- Starting the engine
- Stopping the engine
- Cleaning
- Replacing the blade
- Changing the oil
- Spark plug
- Air filter
- Service
- EC DECLARATION OF CONFORMITY EG FÖRSÄKRAN OM ÖVERENSSTÄMMELSE EF SAMSVARSERKLÆRING DEKLARACJA ZGODNOŚCI WE
Brand : Meec Tools
Model : 721-134
Category : Lawn mower