BM-950 - Bread maker Heinner - Free user manual and instructions
Find the device manual for free BM-950 Heinner in PDF.


| Product Type | Bread Maker |
| Brand | Heinner |
| Model | BM-950 |
| Power Consumption | 700 W |
| Voltage | 220-240 V |
| Frequency | 50 Hz |
| Number of Programs | 12 (Basic, French, Whole Wheat, Quick, Sweet, Ultra Fast I & II, Dough, Jam, Cake, Sandwich, Extra Bake) |
| Maximum Loaf Size | 2.5 lb (1.2 kg) |
| Crust Color Options | Light, Medium, Dark |
| Delay Timer | Up to 13 hours |
| Keep Warm Function | 1 hour |
| Baking Pan | Non-stick coated, removable |
| Kneading Blade | Removable, non-stick |
| Viewing Window | Yes |
| Safety Features | Automatic shut-off, overheat protection, hot surface warning |
| Accessories Included | Measuring cup, measuring spoon, kneading blade |
| Dishwasher Safe Parts | No (baking pan, kneading blade, measuring cup and spoon not dishwasher safe) |
| Cleaning Instructions | Wipe exterior with damp cloth; clean pan with warm water (no soap); do not immerse body |
| Storage | Dry all parts, close lid, do not store items on top |
| Environmental Disposal | Comply with local regulations for electronic waste |
| Certifications | Conforms to European Community norms and standards |
Frequently Asked Questions - BM-950 Heinner
User questions about BM-950 Heinner
0 question about this device. Answer the ones you know or ask your own.
Ask a new question about this device
Download the instructions for your Bread maker in PDF format for free! Find your manual BM-950 - Heinner and take your electronic device back in hand. On this page are published all the documents necessary for the use of your device. BM-950 by Heinner.
USER MANUAL BM-950 Heinner
natural_image
White industrial bread maker with control panel and digital display (no visible text or symbols)WW. heiner.ro
VIII. Butoane panou de control, ecran si functii
Ecran
Copyright © 2013 Network One Distribution. All rights reserved.
http://www.heinner.com, http://www.nod.ro
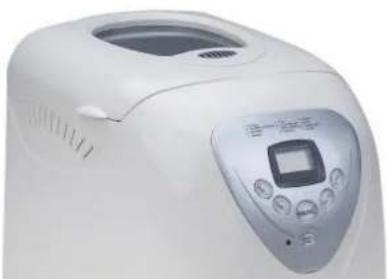
HEINNER
BREAD MAKER
Model: BM-950
natural_image
Close-up of a white industrial bread maker with control panel and display (no visible text or symbols)WW.heiner.com
Thank you for choosing this product!
I. INTRODUCTION
Please read this instruction manual carefully before using it and kee it for later information
This manual is conceived for offering you all of the necessary info regarding installation, using and maintenance of the machine. For a correctly and safely use of the machine, please, read this manual before installation and using.
II. PACKAGE CONTENTS
III. SAFETY REGULATIONS
The use of any electrical appliance requires the following of basic common sense safety rules.
Primarily there is danger of personal injury and secondly the danger of damage the property and the appliance. These are indicated in the text by the following two conventions:
WARNING: Danger of personal injury
IMPORTANT: Damage to the appliance
In addition we offer the following essential safety advice.
- Always locate your appliance away from the edge of a worktop.
- Do not let the mains lead hang over the edge of a worktop where a child could reach it.
- Check that the voltage on the rating plate of your appliance corresponds with your house electricity supply which must be A.C. (Alternating Current). If the socket outlets in your home are not suitable for the plug supplied with this appliance, the plug should be removed and the appropriate one fitted.
- Ensure that the appliance is used on a firm, flat surface.
- Do not use outdoors.
- To protect against electrical shock, do not immerse cord or plug in water or other liquid.
- The mains lead should reach from the socket to the base unit without straining the connections.
- WARNING: Do not touch hot surfaces. Use over mitts or oven gloves when removing the hot bread pan. Do not cover the steam vent openings under any circumstances.
- WARNING: Avoid contact with moving parts.
- Extreme caution must be observed when moving an appliance with hot contents.
-
Do not use Breadmaker for storage purposes nor insert any utensils, as they may create a fire or
-
To avoid damaging the appliance, do not place the baking pan or any object on the top of the unit.
- Do not clean with scouring pads. Do not wash the baking pan, kneading blade measuring cup or spoon in a dishwasher.
- The baking pan must be in place prior to switching on the appliance.
- Always remove the plug from the socket whenever the machine is not in use, when attaching accessory parts, cleaning the machine or whenever a disturbance occurs. Pull on the plug, not the cable.
- WARNING: THIS APPLIANCE MUST BE EARTHED
- Should the fuse in the 13 amp plug require changing a 13 amp BS1362 fuse must be fitted.
- The plug removed from the mains lead, if severed, must be destroyed as a plug with bared flexible cord is hazardous if engaged into a live socket outlet.
Before first use, please take a few minutes to read this instruction book and to find a place to keep it handy for reference. Pay particular attention to the safety instructions.
- Carefully unpack the breadmaker and remove all packaging materials.
- Remove any dust that may have accumulated during packing
- Wipe the baking pan, kneading blade and outside surface of the breadmaker with a clean, damp cloth. The bread pan is non-stick coated. Do not use scouring pads or any abrasives on any part of the breadmaker.
- For first time use use oil, butter or margarine to grease the bread pan and bake empty for about 10 minutes (select the Extrabake program).
- Clean once more.
- Place the kneading blade on the axle in the baking pan
VI. ABOUT THE RECIPES
The recipes in this booklet have been thoroughly tested to ensure best results. On the same time it is recommended to respect the indication from special bread floor package.
- Always add ingredients in the order they are listed in the recipe.
- Accurate measuring of ingredients is vital. Do not use large amounts.
VII. COMPONENTS
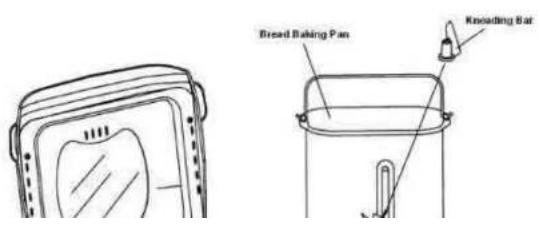
VIII. Control panel buttons, display & functions
Display window
➢ Color: Shows browning level selected;
Size: Shows weight selected;
Program: Shows the program number;
➢ Shows time left before completion (3:20, for example: 3 hours and 20 minutes; 0:20 is for
20 minutes
➢ Show temperature warning - see "Troubleshooting"
Timer delay buttons
Use to delay the start of bread for selecting crust colour from light, making (all programs except Fastbake) medium or dark (certain programs only).
Start: Press to start for approx 1 second, a beep program sounds and the colon (:) flashes and the program starts;
➢ Stop: Press to stop for approx 2 seconds. When the breadmaker is switched on beep sounds to confirm;
Menu Buton: For choosing the bread making from the list 1 to 12;
➢ Loaf size button: The loaf size defaults to crusty. For loaves (2lb and 2.5lbs) press loaf size once.
IX. Program descriptions
- Quick (1:40):
- For white bread that is required in a shorter time. Bread baked on this setting is usually smaller with a dense texture;
- Sweet (2:55 si 2:50):
- For the baking of sweet type bread which gives a crisper crust than on basic setting. The crisper crust is produced by the sugar 'burning';
- Kneading rise and baking 2LB bread in a short time;
- Ultra fast - II (00: 58):
- Kneading rise and baking 2.5LB bread in a short time;
- Dough (1:30):
- This setting only makes the dough and will not bake the final bread. Remove the dough and shape it to make bread rolls, pizza, etc. Any dough can be prepared on this setting. Do not exceed 1kg (2lb) of combined Ingredients;
- Jam (1:20):
- Use this setting for making jam from fresh fruits and marmalade. Do not increase the quantity or allow the recipe to boil over the pan into baking chamber. Should this happen, stop the machine immediately. Remove the pan carefully, allow cooling a little and cleaning thoroughly;
10 Cake (2-50)
12. Extra bake (1:00):
- This setting is bake only and can be used to increase the baking time on selected settings. This is especially useful to help 'set' jams and marmalade. When started the default time is 1 hour (1:00) minimum and counts down in 10 minute intervals. You will have to manually switch this off by pressing the stop button, when you have completed the Extra bake process. It is advised that you check the condition of the bread or jam after 10 minutes and at 10 minute intervals. Pressing ▲ increases the time in increments of 10 minutes. When selecting Extra bake straight after another program, if the message H:HH is displayed, open the lid, remove the pan and allow to cool for 10 minutes. When cool, replace the baking pan and its contents, set program and press start;
X. Using your bread maker
1. Take out the pan:
- Open the lid and remove the pan by lifting the handle, turning anti-clockwise and lifting out. Place on the work surface. It is important that the pan is filled with ingredients outside the machine so that any accidental spillage is not ignited by
5. Plug in:
- Plug into the power supply. The bread maker will automatically be set to basic bread menu and normal time;
- Every time you press a button you will hear a beep to confirm;
6. Select program:
- Choose the desired setting from the list by pressing the Menu button;
7. Select weight:
- Press Loaf size button to choose between crusty and small/large. The setting defaults to crusty when the bread maker is switched on;
8. Select color:
- Choose desired crust color by pressing color button;
9. Select the delay time:
- If you wish the bread to be ready later, set the time delay now, as described in next section;
10. Start:
- Press the Start Stop button to start the machine. The remaining time will count down in one minute increments;
11. Progress:
- The breadmaker will automatically proceed through the programmed stages as shown in the 'Baking cycle times' section. If the breadmaker has a program selected that has a second kneading process, beeps sound to inform that fruits and/or nuts may be added,
14. Remove the food:
- Press Stop. Open the lid. WARNING: Use oven gloves when removing the baking pan (talking care as it is very hot)
15. Turn out the bread:
- Allow the bread to cool in the pan for 15 minutes, then turn the pan upside down and tap the bread from the pan onto a rack to cool. Fill the pan with warm water immediately to prevent the blade from sticking to the shaft. Occasionally the kneading blade will stay in the loaf. Wait until the loaf is cool and then remove the blade with a wooden or plastic utensil to avoid damage to the non-stick surface.
16. Always unplug the appliance after use:
- Do not open the lid whilst the bread maker is operating as this will affect the quality of the bread, especially its ability to rise properly. Only open the lid when the recipe needs you to add additional ingredients, see recipes;
Room temperature note:
The bread maker will work well in a wide range of temperatures, but there could be a difference in loaf size between a very warm room and a very cold room. We recommend the room temperature should be between 15°C and 34°C.
Using the timer:
Use the timer when you want the bread ready later, or in the morning. A maximum of 13 hours can be set. Check if function is available by consulting 'Baking cycle times' section. Do not use this function with recipes that use perishable ingredients such as eggs, fresh milk, sour cream, or cheese.
- Decide when you want the bread to be ready and calculate the difference In time between now and then. For example, if you want a loaf at 8am, and it is now 7:30 p.m., the difference is 12 % hours;
- Enter this time by pressing 'Time T' and 'Time S' buttons. Arrows will move time up or down in 10-minute increments. After you have pressed Start, the colon will flash.
- If you have selected the wrong time press stop for 2 seconds. The timer will go back to the program time, repeat step 1 and 2
- The timer delay is up to a maximum of 13 hours. This is when the bread will be ready to be removed from the machine, see page 8 item 14 'Remove the food';
Beeper:
The beeper sounds:
- when pressing any button;
- during the second kneading cycle of certain programs to indicate that cereals, fruit, nuts or other ingredients can be added;
- when the program finishes;
- when keep warm finishes.
Power interruption
After a brief power supply failure
Slicing and storing bread:
- Since homemade bread has no preservatives it tends to dry out and become stale faster than commercially made bread;
- Leftover slightly hardened bread may be cut into 1.3 cm (half inch) or 2.5 cm (1 inch) cubes and used in favourite recipes to make croutons, bread pudding or stuffing.
Care and cleaning:
Caution: To prevent electrical shock, unplug the unit before cleaning!
- Walt until the bread maker has cooled;
- IMPORTANT: Do not immerse or splash either the body or lid in any liquid as this may cause damage and/or electric shock;
- Exterior: Wipe the lid and outer body of the unit with a damp cloth or slightly dampened sponge;
- Interior: Use a damp cloth or sponge to wipe the interior of the bread maker;
- Baking pan: Clean the baking pan with warm water, soap is not necessary. Avoid scratching the non-stick surface. Dry it thoroughly before placing it back in the baking chamber;
- Do not wash the baking pan, measuring cup, spoon or kneading blades in the dishwasher;
- Do not soak the baking pan for long periods as this could interfere with the working of the drive shaft;
- If the paddle becomes stuck in the bread pan, pour hot water over it and allow to soak for 30 minutes. This will enable you to remove the paddle more easily;
Storing the unit:
Be sure to dry all parts before storing including wiping any moisture from the viewing window. Close the lid and do not store anything on top of the lid.
Note: DO NOT use abrasive or strong household cleaners as these will damage the non-stick surface of the Bread Maker.
Know your ingredients - Understanding baking:
- It is often said that cooking is an art relying on the creativity of the chef while baking bread is much more of a science.
- This means that the process of combining flour, water and yeast results in a reaction that produces bread. You have to remember that when the ingredients combine with each other they produce a specific result.
Read the following information carefully to gain a better understanding of the importance that each ingredient plays in the bread making process;
XI. INGREDIENTS
Important note on flours
Flours, while visibly similar, can be very different by virtue of how they were grown, milled, stored, etc. You may find that you will have to experiment with different brands of flour to help you make that perfect loaf. Storage is also very important, as all flours should be kept in an airtight container;
Self-rising flour
- Self-rising flour contains unnecessary leavening ingredients that will interfere with bread and cake making. It is not recommended for use.
Bran
- Bran (unprocessed) & Wheat Germ are the coarse outer portions of the wheat or rye grains separated from flour by sifting or bolting. They are often added in small quantities to bread for nutritional enrichment, heartless and flavor. They are also used to enhance the texture of bread.
Oatmeal
• Oatmeal comes from rolled or steel-cut oats. They are used primarily to enhance flavor and texture
Other ingredients
Yeasts (active dry yeast):
- Yeast through a fermentation process produces gas (carbon dioxide) necessary to make the bread rise. Yeast must be able to feed on sugar and flour carbohydrates In order to produce this gas. Fast action granular yeast is used in all recipes that call for yeast
- There are basically three different types of yeast available, fresh, traditional dry active and fast action. It is recommended that fast action yeast be used.
- Fresh or compressed cake yeast is not recommended as they will produce poor results. Store yeast according to manufacturer's instructions. Ensure your yeast is fresh by checking its expiration date. Once a package or can of yeast is opened it is important that the remaining contents be immediately resealed and refrigerated as soon as possible for future use. Often bread or dough, which falls to rise, is due to stale yeast being used
The following test can be used to determine whether your yeast is stale and inactive:
Sugar
- Sugar is important for the color and flavor of breads. It is also food for the yeast as it is part of the fermentation process. Artificial sweeteners cannot be used as a substitute for sugar as the yeast will not react properly with them;
Salt
- Salt is necessary to balance the flavor of breads and cakes, as well as for the crust color that develops during baking. Salt also limits the growth of yeast so the amounts shown in the recipes should not be increased. For dietary reasons it may be reduced, however, your baking may suffer;
Liquids/milk
- Liquids such as milk or a combination of powdered milk and water can be used when making bread. Milk will improve flavor provide a velvety texture and soften the crust, while water alone will produce a crispier crust. Some liquids call for juice (orange, apple, etc) to be added as a flavor enhancer.
Note: For most recipes we suggest the use of dry skimmed milk.
Eggs
- Eggs add richness and a velvety texture to bread dough's and cakes;
Sunflower oil
- 'Shortens' or tenderizes the texture of yeast breads. Butter or margarine can be used as a substitute. If butter or margarine is used direct from the refrigerator it should be softened for easier blending during the mixing cycle t;
Baking powder
- Baking powder is a raising agent used in cakes. This type of raising agent does not require rising time before baking as the chemical reaction works when liquid ingredients are added;
Bicarbonate of soda
- Ricarbonate of soda is another raising agent not to be confused or substituted for baking
Dry measurements
- Dry measurements (especially flours) must be done using the measuring cup provided. The measuring cup is based on the American standard 8 fluid oz cup - British cup is 10 fluid oz. Dry measuring must be done by gently spooning ingredients into the measuring cup and then once filled, leveling off with a knife. Scooping or tapping a measuring cup will pack the ingredients and you will end up with more than is required. This extra amount could affect the balance of the recipe. Do not sift the flour, unless stated;
- When measuring small amounts of dry or liquid ingredients (i.e. yeast, sugar, salt, powered milk, honey, molasses) the measuring spoon which is provided must be used
- Measurements must be level, not heaped as this small difference could throw out the critical balance of the recipe;
- Your breadmaker produces delicious baked goods with ease. This machine requires only that you carefully follow the recipe instructions, in basic cooking, normally 'a pinch of this and a dash of that' is fine but not for breadmakers. Using an automatic breadmaker requires you accurately measure each ingredient for best results.
ATENTION!
The bread flour quantity can never exceed 620g on any program. If the added bread flour quantity exceeds 620g, the motor may jam or there can appear other failures.
Ingredient temperatures
- All immediate, including the machine and one and especially chloride fume as
Special glazes to enhance your bread
Egg glaze
- Beat 1 large egg and 1 tablespoon of water together, brush generously. Note: apply only to doughs before baking;
Melted butt
• Brush melted butter over just baked bread for a softer tender crust;
Milk glass
• For a softer, shiny crust, brush just baked bread with milk or cream
Sweet icing glaze
- Mix 1 cup sifted icing sugar with 1 to 2 tablespoons of milk to make a glaze consistency and drizzle over raisin bread or sweet breads;
Poppy/Sesame/Caraway seed/Oatmeal
• Sprinkle your choice of these seeds generously over just glazed bread
Other tips
- Place all recipe ingredients into the baking pan so that yeast is not touching any liquid; After completing the process of making dough in your bread maker, typically when letting dough rise outside the bread maker, allow 30 minutes or until dough doubles in size. Dough should be lightly greased and covered with grease proof paper and a dry towel. It should be placed in a warm area free from drafts;
- Humidity can cause problems, therefore humidity and high altitudes require adjustments. For high humidity, add an extra tablespoon of flour if consistency is not right. For high altitudes,
Other tips
- After 5 minutes of kneading, open the lid and check the dough consistency. The dough should form a soft, smooth ball. If too dry, add liquid. If too wet, add flour (1/2 to tablespoon at a time)
XII. RECIPES
Retete
All of the following recipes use this same general method :
- Measure ingredients into baking pan.
- Use tepid water 21-28
- Insert baking pan securely into unit, close lid.
- Select appropriate bread setting.
- Push start button.
- When bread is done, remove pan from unit using even mitts.
- Remove bread from baking pan (and kneading blade from bread if necessary).
-
Allow to cool before slicing.
-
Recips for basic breads
Softgrain bread
| 1.5 lb | 2 lb | ||
| Water | 1+1/8 cup | 1+1/2cup | |
| Skimmed milk powder | 2+1/2 tbsp | 4 tbsp | |
| Sunflower oil | 2+1/2 tbsp | 4 tbsp | |
| Sugar | 2+1/4 tbsp | 3 tbsp | |
| Salt | 1+1/4 tsp | 2 tsp | |
| Strong white bread flour | 3 cups | 4 cups | |
| Fast action yeast | 1+1/4 tsp | 1+1/4 tsp | |
| Use setting | 1 Basic | 1 Basic | |
Italian herb bread
| 1.5 lb | 2 lb | ||
| Water | 1+1/8 cup | 1+1/2 cup | |
| Skimmed milk powder | 2+1/2 tbsp | 3 tbsp | |
| Sunflower oil | 2+1/2 tbsp | 3 tbsp | |
| Sugar | 2+1/4 tbsp | 2+1/2 tbsp | |
| Salt | 1+1/2 tsp | 2 tsp | |
| Strong white bread flour | 3 cups | 4 cups | |
| Dried marjoram | 1+1/2 tsp | 2 tsp | |
| Dried basil | 1+1/2 tsp | 2 tsp | |
| Dried thyme | 1+1/2 tsp | 1+1/2 tsp | |
| Fast action yeast | 1+1/4 tsp | 1+1/4 tsp | |
Cheese & onion bread
| 1.5lb | 2lb | ||
| Water | 1cup | 1+1/4cup | |
| Skimmed milk powder | 2tbsp | 2+1/2tbs | |
| Sugar | 1tbsp | 2tbsp | |
| Salt | 1/2tsp | 1tsp | |
| Onion granules | 1+1/2tbsp | 2tbsp | |
| Mature grated cheddar cheese | 1cup | 1+1/2cup | |
| Strong white bread flour | 3cups | 4cups | |
| Fast action yeast | 1+1/2tsp | 1+34tsp | |
| Use setting | 1 Basic | 1 Basic |
Raisin bread
| 1.5lb | 2lb | |
| Water | 1+1/4cup | 1+1/2cup |
| Skimmed milk powder | 3tbsp | 4tbsp |
| Sunflower oil | 3tbsp | 4tbsp |
| Sugar | 2tbsp | 3tbsp |
| Salt | 1+1/2tsp | 2 tsp |
| Cinnamon | 3/4tsp | 1tsp |
| Strong white bread flour | 1+1/2tsp | 2tsp |
| Fast action yeast | 1+1/2tsp | 2tsp |
| Raisins† | 5/8cup | 3/4cup |
| Using setting | 1Basic | 1Basic |
Malt loaf
| 1.5lb | 2lb | |||
| Water | 1cup | 1+1/4cup | ||
| Salt | 1 tsp | 1 tsp | ||
| Sunflower oil | 2 tsp | 3 tbsp | ||
| Black treacle | 1+1/2 tbsp | 2+1/2 tbsp | ||
| Malt extract | 2 tbsp | 3 tbsp | ||
| Plain flour | 3cups | 4cups | ||
| Fast action yeast | 1 tsp | |||
| Sultanas | 1/2 cup | |||
| Using setting | 1 Basic | |||
*Add the fruit when the beeper sounds
- Recipes for french breads
| French bread | |||
| 1.5 lb | 2 lb | ||
| Water | 1 cup | 1+1/4 cup | |
| Skimmed milk powder | 2 tbsp | 2+1/2 tbsp | |
| Sugar | 1 tbsp | 1+1/4 tbsp | |
| Salt | 1 tsp | 1+1/4 tsp | |
| Sunflower oil | 1 tbsp | 1+1/2 tbsp | |
| Strong white bread flour | 3 cup | 4 cup | |
| Fast action yeast | 1 tsp | 1+1/4 tsp | |
| Using setting | 2 French | 2 French | |
Granary loaf
| 1.5 lb | 2 lb | |
| Water | 1+1/8cup | 1+5/8cup |
| Skimmed milk powder | 2 tbsp | 3 tbsp |
| Sunflower oil | 2 tbsp | 3 tbsp |
| Soft brown sugar | 2+1/2 tbsp | 5 tbsp |
| Salt 1+1/4 tsp | 2 tsp | |
| Granary malted brown bread flour | 3cup 4cup | |
| Fast action yeast | 1+1/4 tsp | 1 tsp |
| Vitamin C tablet | 1x100mg | |
| Using setting 3 Whole wheat | ||
- Recipes for quick setting
Banana and nut bread
| Ingredients group1 | ||
| Butter (melted) | 2tbsp | |
| Milk | 1tbsp | |
| Mashed banana | 1cup | |
| Egg | 1 | |
| Walnuts (chopped) | 1/2cup | |
| Lemon | 1tsp | |
Ingredients group 2
| Plain flour | 1+1/2cup |
Porridge oats bread
Milk 1cup
Egg (beaten) 2
Sunflower oil 1/2tsp
Golden syrup 2tbsp
Sugar 1/4cup
Salt 1tsp
Plain flour 2cup
Porridge powder 1cup
Baking powder 1/2tsp
Bicarboante of soda 1/2tsp
Using setting 4Basic
5.Sweet
Mixed fruit loaf
| 1.5lb | 2lb | |
| Water | 1+1/8cup | 1+1/3cup |
| Skimmed milk powder | 2+1/2tbsp | 3tbsp |
| Sunflower oil | 2+1/2tbsp | 3tbsp |
| Sugar | 1/4tbsp | 1/3tbsp |
Chocolate bread
| 1.5lb | 2lb | ||
| Water | 1cup | 1+1/2cup | |
| Egg (beaten) | 1medium | 1medium | |
| Skimmed milk powder | 1tbsp | 1+1/2tbsp | |
| Sunflower oil | 1tbsp | 1+1/2tbsp | |
| Sugar | 1/2cup | 3/4cup | |
| Salt | 1/2tsp | 1tsp | |
| Walnuts (shopped) | 1/4cup | - | |
| Strong white bread flour | 2+1/8cup | 3cup | |
| Cocoa powder | 1/2cup | 3/4cup | |
| Fast action yeast | 1tsp | 1+1/2tsp | |
| Using setting | 5Sweet | 5Sweet | |
*Add the walnuts when the beeper sounds
6. Recipes for Fastbake I
Fastbake small white
| Water | 270ml | |
| Strong white bread flour | 3cup | |
| Skimmed milk powder | 2tbsp | |
| Salt | 1tsp | |
| Sugar | 4tsp |
8. Recipes for dough
White bread rolls
Water 1+1/4cup
1tbsp
Skimmed milk powder
Butter (melted) 2tbsp
Sugar 2tbsp
Salt 1+1/2tsp
Strong white bread flour 3+1/4cup
Fast action yeast 1+1/2tsp
Using setting 8Dough
Method
- Knead and shape the dough into 6 rolls.
- Place on a greased baking tray.
- Brush lightly with melted butter.
- Cover for 20-25 minutes.
- Allow to rise until they are double in size and glaze.
- Bake for approx 15-20 minutes at 190°C
Whole wheat bread rolls
Water
1÷1/4cup
Hot cross buns
Water 1cup
Butter (melted) 1/4cup
Sugar 1/4cup
Egg (beaten) 1
Salt 1tsp
Strong white bread flour 3+3/4cup
Cinnamon 1tsp
Nutmeg 1/4tsp
Raisins 1cup
Using setting 8Dough
Method
- Divide Into 8-12 pieces, Shape and flatten slightly.
- Glaze with egg and milk (but not cross).
- Cover and allow to rise for 30 minutes.
- Bake in oven 375°F (190°C) for 16-18 minutes.
Pizza base
Water 1cup
9. Recipes for jams
Marmalade
Juice from oranges 3medium
Rind of oranges grated 2
Preserving sugar 1cup
Water 1tbsp
Pectin If needed 2tsp
Using setting 9Jam
Comments
- Warm the jars before filling.
- Use extra bake time if needed according to set of the marmalade and the size of the oranges.
- Remove the paddle with tongs before pouring the marmalade into the jars.
• Do not lift the lid during mixing.
• Seville oranges should be used for marmalade but are only available in January.
• If using other oranges pectin will be needed to firm up the marmalade.
10. Recipes for cakes
Standard cake mix
Ingredients group1
Butter (melted) 3/4cup
Vanilla essence 1/4tsp
Egg (beaten) 3 medium
Lemon juice 2tsp
Ingredients group2
Plain flour 1+5/8cup
Baking powder 2tsp
Caster sugar 1cup
Method
- Mix group 1 together in a separate bowl.
- Sieve group 2 together in a second bowl.
- Combine group 1 and group 2 together until mixed.
- Pour mixture into bread pan.
Mixed fruit cake
Ingredients group1
Butter (melted) 3/4cup
Vanilla essence 1/4tsp
- Recipes for sandwich breads
Sandwich loaf
| 1.5lb | 2lb | ||
| Water | 260ml | 1+1/3cups | |
| Butter (melted) | 1+1/2tbsp | 2tbsp | |
| Salt | 1/2tsp | 1tsp | |
| Sunflower oil | 1+1/2tbsp | 2tbsp | |
| Sugar | 3tbsp | 3+1/2tbsp | |
| Strong white bread flour | 3 cup | 4cup | |
| Fast action yeast | 34tsp | 1tsp | |
| Using setting | 11Sandwich |
XIV. BAKING CYCLES
*ten beeps, ingredients can be added
| Program no. (time) Bread type | Knead1 (min) | Rise1 (min) | Knead2 (min) | Rise2 (min) | Rise3 (min) | Bake (min) | Total (hours) | Keep Warm (min) |
| 1Basic 1.5lb | 9 | 20 | 14* | 25 | 45 | 60 | 2-53 | 60 |
XIV. QUESTION ABOUT GENERAL PERFORMANCE AND OPERATION
Question about general performance and operation
Question 1
What should I do if the kneading blade comes out with the bread?
Remove it with a pair of plastic tongs before slicing the bread. Since the blade can be disconnected
from the pan, it is not a malfunction if it comes out in your bread.
Question 2
Why does my bread sometimes have some flour on the side crust?
In some cases, the flour mix may remain on the comers of the baking pan. When this happens, I
usually can be eaten or simply trim off that portion of the outer crust with a sharp knife.
Question 3
Why isn't the dough mixing? I can hear the motor running.
The Kneading Blade or baking pan may not be inserted property. Make sure the pan is facing the
right-way and that it has 'clicked' and seated into the bottom of the bread maker.
Question 4
How long does it take to make bread?
Timings for each setting are outlined earlier.
Question 5
Why Can't I use the timer when baking with fresh milk?
The milk will spoil if left sitting in the machine too long. Fresh ingredients such as eggs and milk should
never be used with the delayed timer feature.
Question 6
Why do I have to add the ingredients in a certain order?
Question 10
What will happen if I leave the finished bread in the baking pan?
Whilst still in the breadmaker for the first hour after baking is complete the bread 'keeps warm' to prevent it becoming 'soggy'. Leaving the bread in the breadmaker after the keep warm period may result in a 'soggy' loaf of bread as excess steam (moisture) would not be able to escape. Remove and allow to cool on a wire rack after baking to prevent this.
Question 11
Why did the dough only partially mix? Why didn't it mix completely?
The dough may be too heavy or dry. Also the kneading blade or baking pan may not be inserted properly. Ingredients may have been added in the wrong order.
Question 12
Why didn't the bread rise?
The yeast could be bad past it's sell by date or possibly no yeast was added at all. Also, if the mixing was not complete rising problems could develop.
Question 13
Why can't the delayed finish be set for more than 13 hours? What is the minimum time a cycle may be delayed?
The maximum length of delay is 13 hours including the total cycle time. For example, Setting 1 (basic small) has a cycle time of 3:20. This start is delayed by a maximum of 9:40. The minimum length of delay for each setting is 10 minutes. The delay clock increases and decreases in increments of 10 minutes.
Questions about ingredients and recipes
Question 14
How do I know when to add raisins, nuts, etc. to the bread?
There is a beeper tone to signal that you may add raisins, nuts etc. during the second kneading cycle.
Note: See 'Baking cycle times' chart for 'Add nuts & raisins' time.
In some cases, ingredients can be broken up during the initial kneading cycle. Each recipe indicates the best time to add fruit and nuts to the dough.
Question 18
Can I use my favourite bread recipes (traditional yeast bread) in my bread machine?
Yes, but you will need to experiment to get the right proportion of ingredients. Become familiar with the unit and make several loaves of bread before you begin experimenting. Never exceed a total amount of 5 cups dry ingredients (that includes the total amount of flour, oats, oatmeal, bran). Use the recipes in this book to help determine the ratio to dry ingredients to liquid and amounts of yeast, sugar, salt and oil/butter/margarine to use. We advise creating your own bread recipes using the basic mode, then progress to the others using the Banking cycle times chart as a guide.
Question 19
Is it important for ingredients to be at room temperature before adding them to the baking pan?
Yes, even when the delay timer is being used. (Water must be between 21 C and 28 C).
Question 20
Why do the loaves vary in height and weight? Wheat/whole wheat breads are always shorter. Something wrong?
No. It is normal for Whole Wheat and Wholemeal breads to be shorter and denser than Basic or French breads. Whole Wheat and Wholemeal flour are heavier than white bread flour therefore they don't rise as much during the bread making process. This is also true for bread containing fruit, nuts oats and bran.
Question 21
Can I premix the yeast with water?
No, the yeast must be kept dry and put into the baking pan last, above the flour, this is especially important when the delay timer is being used.
Question 22
Why is there a large hold in the base of the bread?
This hole has been created by the kneading blade. Sometimes this hole is larger than normal. This is because the dough has sorted to the side of the blade after the second kneading cycle, normal with
XV. Trouble Shooting Guide
PROBLEM
The Bread Maker Machine Will Not Start
Cause 1: The appliance is not plugged in correctly to power outlet.
Solutions: Always plug appliance correctly into 230-240 volt power outlet.
Note: There is a preheat at the beginning of the wheat cycle. It is normal for there to be no dough blade activity during this time.
PROBLEM
The Bread Maker Does Not Bake the Bread
Cause: The DOUGH program was selected.
Solution: Choose the appropriate program for the recipe you have chosen..
PROBLEM
Bread Collapses When Bread
Cause1: Salt was reduced or omitted.
Solution: Measure salt carefully using standard measuring spoons that have been leveled off.
Cause 2: Too much liquid was used.
Solution: If dough is too wet the bread will collapse. In future reduce water or liquid by at least 1 tablespoon and up to 4 tablespoons Let the machine knead too dry, add additional water 1 tablespoon at a time, up to 4 tablespoons.
Cause 3: Warm weather, high humidity or overheated liquid all speed up yeast action which may cause the dough to rise too fast and the bread to collapse during baking.
Solution: If room temperature is over 27 centigrade degrees try using chilled water. Try reducing the amount of yeast used by 1/4 teaspoon.
PROBLEM
The Loaf of Bread is Small or Out of Shape
Cause: Too much flour was used.
Solution: Measure flour carefully. Spoon flour into measuring cup being careful not to pack down. Level
cup off with a knife.
PROBLEM
Bread Rose too high, Touching the Lid
Cause 1: Weather very hot and/or humid.
Solution: Do not bake bread in the machine until the weather is cooler and/or less humid.
Cause 2: Too much or wrong type of yeast used.
Solution: Measure yeast carefully. Active dry yeast is recommended for all recipes in this booklet.
PROBLEM
Bread Did Not Bake Thoroughly
Solution: Do not open lid during final rising and baking cycle.
Cause 1: Lid was opened during baking
Cause 2: Ingredients were not measured correctly.
Solution: Measure carefully, remembering to level off all cup and spoon measurements of dry ingredients.
Cause 3: Machine is being used in a very cold room.
Solution: Only use appliance in warm location.
Cleaning and Storage
Disconnect the machine from power outer and allow it cool down completely before you start to clean it.
- Clean the Inside of the machine with a damp, slightly soapy dish cloth. Wipe over again with a clean damp cloth to remove any of the soapy residue.
- To clean the Bread Pan. Rub the inside and outside of the pan with a damp cloth. Kneading Bar: If the kneading bar is difficult to remove from the axle, soak the bread pan in water beforehand.

Environment friendly disposal
You can help protect the environment!
Please remember to respect the local regulations: hand in the non-working electrical equipment's to

HEINNER is a registered trademark of Network One Distribution SRL. Other brands and product names are trademarks or registered trademarks of their respective holders.
No part of the specifications may be reproduced in any form or by any means or used to make any derivative such as translation, transformation, or adaptation without permission from NETWORK ONE DISTRIBUTION.

This product is in conformity with norms and standards of European Community
Importer: Network One Distribution
Marcel Iancu Street, 3-5, Bucharest, Romania
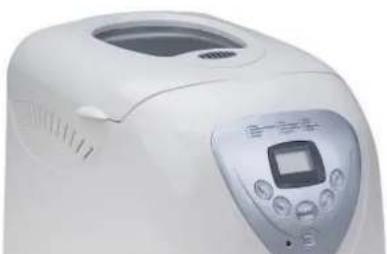
HEINNER
Хлебопекарна
BM-950
natural_image
Close-up of a white industrial bread maker with control panel and display (no visible text or symbols)W.W. heinere.com
- For the baking of light weight bread such as French bread which has a crisper crust and light texture;
natural_image
Close-up of a white industrial bread maker with control panel and digital display (no visible text or symbols)WW. heinner.ro
Program 1Basic 1Basic
Barna kenyér
680g
900g
Program 11 Sandwich 11 Sandwich
4 csésze
1 kiskanál
natural_image
Close-up of a white industrial bread maker with control panel and digital display (no visible text or symbols)WW. heinner.ro
VIII. PRZYCISKI PANELA STEROWANIA, WYSWIETLACZ I FUNKCIE
Wyświetlacz
Taojiao music 2/1uks
www.heinner.com
700W, 50Hz, 220-240V
- Przepisy na chleb do kanapek
Chleb do kanapek
Copyright © 2013 Network One Distribution. All rights reserved.
http://www.heimer.com, http://www.noit.co
- Butoane panou de control, ecran si functii
- Ecran
- HEINNER
- Thank you for choosing this product!
- INTRODUCTION
- PACKAGE CONTENTS
- SAFETY REGULATIONS
- ABOUT THE RECIPES
- COMPONENTS
- Control panel buttons, display & functions
- Display window
- Timer delay buttons
- Program descriptions
- Extra bake (1:00):
- Using your bread maker
- Take out the pan:
- Plug in:
- Select program:
- Select weight:
- Select color:
- Select the delay time:
- Start:
- Progress:
- Remove the food:
- Turn out the bread:
- Always unplug the appliance after use:
- Room temperature note:
- Using the timer:
- Beeper:
- Power interruption
- Slicing and storing bread:
- Care and cleaning:
- Caution: To prevent electrical shock, unplug the unit before cleaning!
- Storing the unit:
- Know your ingredients - Understanding baking:
- INGREDIENTS
- Important note on flours
- Self-rising flour
- Bran
- Oatmeal
- Other ingredients
- Yeasts (active dry yeast):
- Sugar
- Salt
- Liquids/milk
- Eggs
- Sunflower oil
- Baking powder
- Bicarbonate of soda
- Dry measurements
- ATENTION!
- Ingredient temperatures
- Special glazes to enhance your bread
- Egg glaze
- Melted butt
- Milk glass
- Sweet icing glaze
- Poppy/Sesame/Caraway seed/Oatmeal
- Other tips
- RECIPES
- Retete
- Porridge oats bread
- 5.Sweet
- Recipes for Fastbake I
- Recipes for dough
- White bread rolls
- Method
- Whole wheat bread rolls
- Hot cross buns
- Pizza base
- Recipes for jams
- Marmalade
- Comments
- Recipes for cakes
- Standard cake mix
- Mixed fruit cake
- BAKING CYCLES
- QUESTION ABOUT GENERAL PERFORMANCE AND OPERATION
- Trouble Shooting Guide
- PROBLEM
- Cleaning and Storage
- Barna kenyér
- 680g
- 900g
- PRZYCISKI PANELA STEROWANIA, WYSWIETLACZ I FUNKCIE
- Wyświetlacz
Brand : Heinner
Model : BM-950
Category : Bread maker