010-644 - Multitool Meec Tools - Free user manual and instructions
Find the device manual for free 010-644 Meec Tools in PDF.


| Product Type | Multi-Tool (Oscillating) |
| Model | 010-644 |
| Brand | Meec Tools |
| Power Supply | Corded electric, 230 V, 50 Hz |
| Power Consumption | 300 W |
| Oscillation Angle | 3.2° |
| Variable Speed | 10,000 - 20,000 oscillations per minute |
| Weight | 1.6 kg |
| Dimensions (L x W x H) | 35 x 9 x 10 cm |
| Main Functions | Cutting, sanding, scraping, grinding (with appropriate accessories) |
| Included Accessories | 3 sanding pads, 2 saw blades, 1 scraper blade, hex key |
| Accessory Attachment | Tool-free blade change with quick-release system |
| Ergonomics | Soft-grip handle, adjustable auxiliary handle |
| Safety Features | Lock-on switch, dust extraction port |
| Maintenance | Clean vents regularly; replace worn accessories |
| Spare Parts Availability | Replacement blades and pads available from retailer |
| Repairability | User-replaceable carbon brushes and power cord |
| Warranty | 2 years |
Frequently Asked Questions - 010-644 Meec Tools
User questions about 010-644 Meec Tools
0 question about this device. Answer the ones you know or ask your own.
Ask a new question about this device
Download the instructions for your Multitool in PDF format for free! Find your manual 010-644 - Meec Tools and take your electronic device back in hand. On this page are published all the documents necessary for the use of your device. 010-644 by Meec Tools.
USER MANUAL 010-644 Meec Tools
natural_image
Product photo of a red and black power tool with various cutlery and metal components (no visible text or symbols)SAFETY INSTRUCTIONS....35
TECHNICAL DATA 39
dESCRIP1oN 39
ASSEMBLY 40
oPERATION 42
mAINTENANCE 43
TRoUbLESHooTING 43
SE - Bruksanvisning i original
NO - Bruksanvisning i original
EN - Operating instructions in original
Date of production: 2014-07-29
© Julia AB
SÄKERHETSANVISNINGAR
natural_image
Mechanical assembly diagram showing a pipe with a circular component and directional arrows indicating motion (no text or symbols)natural_image
Close-up of a welding torch component (no visible text or symbols)natural_image
Mechanical component diagram showing a fan blade assembly with numbered parts (no text or symbols visible)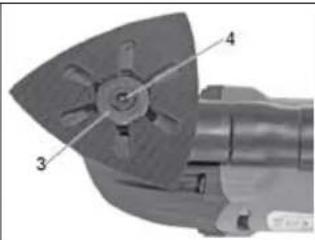
natural_image
Close-up of a mechanical tool with numbered parts (3, 4), no visible text or symbolsnatural_image
Mechanical assembly diagram showing a pipe with a valve and adjustment arrows (no text or symbols)natural_image
Close-up of a mechanical welding torch component (no visible text or symbols)natural_image
Mechanical component diagram showing a fan blade and cylindrical shaft assembly (no text or symbols)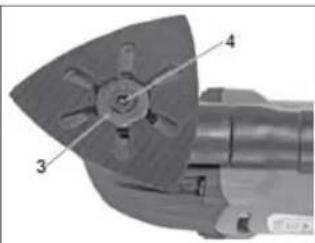
natural_image
Close-up of a mechanical tool with numbered parts (3, 4) indicating different components, no visible text or symbols.natural_image
Mechanical assembly diagram showing a pipe fitting with a circular component and directional arrows indicating motion (no text or symbols)natural_image
Close-up of a welding torch component with attached strap (no visible text or symbols)Montaż narzędzia
natural_image
Close-up of a mechanical component with numbered parts (1, 2), no visible text or symbols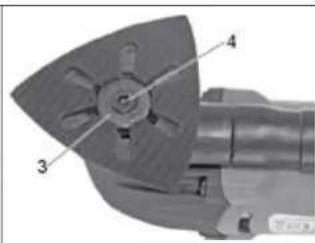
natural_image
Close-up of a mechanical tool with numbered parts (3, 4) indicating different components, no visible text or symbols.natural_image
Pure electrical circuit lines without any symbolsDBAJ O ŚRODOWISKO!
Read the operating instructions carefully before use!
Please retain for future reference.
Work area safety
A. Keep the work area clean and well lit. Cluttered or dark areas increase the risk of accidents.
B. Do not operate power tools in explosive environments, e.g. in the vicinity of flammable liquids or gases or flammable dust. Power tools create sparks which can ignite dust or fumes.
C. Keep children and bystanders at a distance while operating a power tool. If you become distracted this could lead to you losing control of the tool.
Electrical safety
A. Power tool plugs must fit the power outlet. Never modify the plug in any way. Never use adapters together with earthed power tools. Unmodified plugs and matching outlets will reduce risk of electric shock.
B. Avoid body contact with earthed surfaces such as pipes, radiators, cookers and refrigerators. There is an increased risk of electric shock if your body is earthed.
C. Do not expose power tools to rain or moisture. Water entering a power tool will increase the risk of electric shock.
D. Do not abuse the power cord. Never use the cord for carrying, pulling or unplugging the power tool. Keep the cord away from heat, oil, sharp edges or moving parts. Damaged or entangled cords increase the risk of electrocution.
E. When operating a power tool outdoors, use an extension cord suitable for outdoor use. Use of a cord suitable for outdoor use reduces the risk of electric shock.
F. If operating a power tool in a damp environment is unavoidable, use a power supply protected with an RCD. Use of an RCD reduces the risk of electric shock.
Personal safety
A. Stay alert, watch what you are doing and use common sense when operating a power tool. Never use a power tool while you are tired or under the influence of drugs, alcohol or medication. A moment of inattention while operating power tools may result in serious injury.
B. Use personal protective equipment. Always wear eye protection. Protective equipment such as dust mask, non-skid safety shoes, hard hat, or hearing protection used for appropriate conditions will reduce the risk of injury.
C. Prevent unintentional starting. Ensure the switch is in the off position before connecting to the power source and/or battery pack, picking up or carrying the tool. Carrying power tools with your finger on the switch or energizing power tools that have the switch in the on position invites accidents.
D. Remove any adjusting key or wrench before starting the power tool. A wrench or a key left attached to a rotating part of the power tool may result in personal injury.
E. Do not overreach. Keep a proper footing and balance at all times. This will enable you to have better control of the power tool in unexpected situations.
ENE
F. Wear appropriate clothing. Do not wear loose clothing or jewellery. Keep your hair, clothing and gloves away from moving parts. Loose clothes, jewellery or long hair can get caught in moving parts.
G. If equipment is provided for dust extraction and dust collection, make sure that this is connected and properly used. The use of such devices can reduce dust-related hazards.
Use and care of power tools
A. Do not force the power tool. Use the correct power tool for your application. The correct power tool will do the job better and more safely when used with the load for which it was designed.
B. Do not use the power tool if it cannot be turned on and off by means of the switch. Any power tool that cannot be controlled with the switch is dangerous and must be repaired.
C. Disconnect the plug from the power source and/or remove the battery from the power tool before making any adjustments, changing accessories, or storing the power tool. Such preventive safety measures reduce the risk of accidentally starting the power tool.
D. Power tools that are not being used should be stored out of the reach of children. Do not allow persons unfamiliar with the power tool or these instructions to operate the power tool. Power tools are dangerous in the hands of untrained users.
E. Maintain the power tool. Check for misalignment or jamming of moving parts, breakage of parts and any other condition that may affect the operation of the power tool. If the power tool is damaged, it should be repaired before use. Many accidents are caused by poorly maintained power tools.
F. Keep cutting tools sharp and clean. Properly maintained cutting tools with sharp cutting edges are less likely to jam and are easier to control.
G. Use the power tool, accessories and tool bits etc. in accordance with these instructions, taking into account the working conditions and the work to be performed. Use of the power tool for operations different from those intended can result in hazardous situations.
Service
Have your power tool serviced by a qualified repair person using only identical replacement parts. This will ensure that the power tool remains safe to use.
Special safety instructions
- Only use accessories recommended by the manufacturer. The use of any other accessories may result in the risk of injury.
- Only use the tool for dry sanding. If water enters the tool, the risk of electric shocks will increase.
- Check whether sanding the surface you intend to use the tool on could generate harmful dust and/or harmful fumes. Dust/fumes from wood, metal, paint etc. can cause allergic reactions and/or damage your health. Take particular care to avoid inhaling and making skin contact with these materials. Materials which contain asbestos should only be handled by qualified personnel.
- Keep your hands away from the cutting area and blade. If you hold the tool with both hands, they will not be able to come into contact with the blade.
-
Do not place your hands underneath the workpiece. Contact with the blade can cause injury.
-
Start the tool before you place the blade against the workpiece. If the blade gets stuck it could slip or be thrown backwards from the workpiece when the tool is started.
- Never hold the workpiece in your hands or over your legs. Attach the workpiece to a stable surface. It is important to make sure the workpiece has enough support so that body contact is minimised, the blade does not get stuck and you do not lose control.
- The workpiece should be free from nails, screws and other foreign objects.
- Do not use blunt or damaged blades. Blades with blunt or damaged teeth lead to increased friction and could cause the blade to get stuck, which increases the risk of kickback.
- Be particularly careful when plunge cutting in walls or similar areas where you cannot see what lies behind. The protruding blade may strike objects which could cause kickback.
• The work area should be well ventilated. - Wear safety goggles.
- Wear hearing protection.
- Use a dust filter mask if the work you are doing is dusty.
- Wear protective gloves.
- Use a hair net if you have long hair.
- Do NOT wear loose-fitting clothing, jewellery, watches or similar objects which could get caught in moving parts.
- If there is equipment for dust extraction and dust collection, this should be connected and used correctly. Clean the air vents regularly. If large quantities of metal dust accumulate, the accessible metal parts of the tool may become live and therefore present a risk of electric shocks.
Additional safety information
- Use the insulated gripping surfaces to hold the power tool when performing an operation where the tool could come into contact with hidden electrical wiring or its own cord. If there is contact with a live conductor, the tool's metal components will become live and present a risk for electrocution.
- Before starting work on walls, ceilings or floors, check that there is no hidden electrical wiring or piping. Locate hidden wiring using a wire tracker or ask an electrician for help. If these instructions are not followed, there is a risk of fire, explosion, electric shocks, injury and/or damage to properly.
- Avoid unintentional starting. Turn the tool off if the power supply is interrupted, for example during a power cut or if the cable is pulled out.
- Secure the workpiece. Secure the workpiece with a clamp or vice. Never hold the workpiece with your hands.
- Keep your work area clean. It is particularly dangerous if dust from different materials mixes together. Dust from light metals, for example aluminium, can ignite or explode.
-
Do not use the tool if the cable is damaged. Pull the cable out immediately if it becomes damaged while you are working. Do not pull on the cord to pull out the plug. Damaged cables increase the risk of electric shocks.
-
Avoid letting the tool and workpiece overheat - risk of damage to property.
- Do not touch any accessories during or immediately after use - risk of burns.
- Never clean hot tools with flammable agents - risk of fire and/or explosion.
- Keep the handles clean, dry and free from oil and grease. Slippery handles make the tool difficult to hold - risk of injury and/or property to damage.
- As well as these instructions, you should always follow applicable regulations and laws concerning health, safety and the environment.
- Symbols and labels on the product must not be removed or covered up. Replace any stick-on labels which have become illegible or have disappeared.
Residual risks
Even if all appropriate safety regulations are followed and safety devices are used, it is not possible to eliminate every single risk. The following risks remain:
- Risk of contact with uncovered parts of moving parts.
- Kickback from the workpiece or part of the workpiece.
Vibration
IMPORTANT! Risk of injury as a result of vibration. Vibrations from the power tool can cause injury. Immediately stop working and seek advice from a doctor if you experience numbness, itching, a tingling feeling, pain, change in skin complexion or loss of sensation. The vibration during actual use may deviate from the stated value, depending on how the tool is used. The following factors can affect the level of vibration:
- Incorrect/inappropriate use.
- Unsuitable accessories.
• Working on unsuitable materials.
• Inadequate maintenance.
Follow the instructions below to reduce the risk of injury as a result of vibration:
- Maintain the tool in accordance with these instructions.
- Avoid working at low temperatures.
- Keep your body, and particularly your hands, warm.
• Take regular breaks and flex your hands to stimulate circulation.
TECHNICAL DATA
| Nominal voltage 230 V / 50 Hz |
| Rated power 220 W |
| Protection class II |
| Oscillation frequency 11,000-20,000 strokes/min |
| Oscillation angle ± 1.4^ |
| Sound pressure level, LpA 85 dB(A), K=3 dB(A) |
| Sound power level, LwA 96 dB(A), K=3 dB(A) |
| Vibration level: 12 m/s ^2 , K=1.5 m/s ^2 |
Always use hearing protection!
The declared vibration value, which has been measured in line with a standardised testing method, can be used to compare different tools with each other and for a preliminary assessment of exposure.
WARNING! The actual vibration level during the power tool's use can vary from the specified total value depending on how the tool is used. You must therefore identify the safety measures required to protect the user, based on an estimate of exposure during actual operating conditions (taking into account all parts of the work cycle as well as the time the tool is switched off and when running idle, in addition to the start up time).
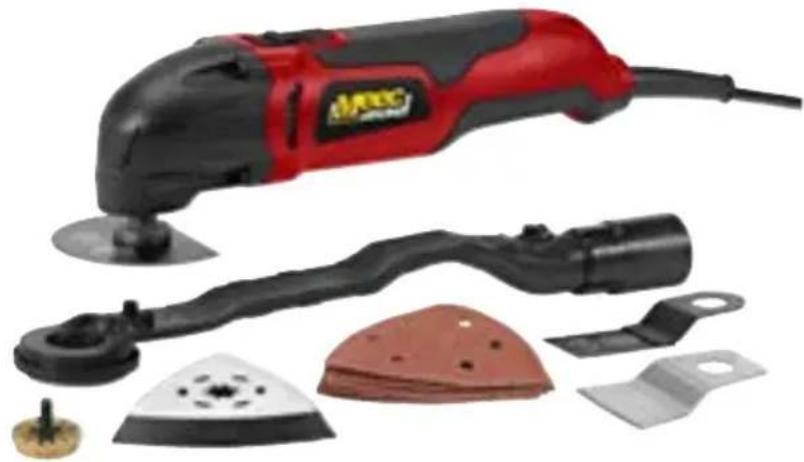
DESCRIPTION
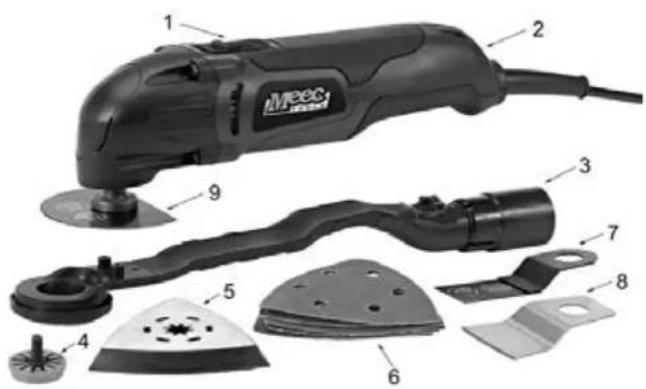
-
Power switch
-
Sanding paper
-
Speed control
-
Plunge cutting blade 32 mm
-
Dust extraction adapter
-
Scraper
-
Adapter for Bosch® tool
-
Segment saw blade ∅ 80 mm
-
Sanding plate
ASSEMBLY
Assembling the dust extraction adapter
NOTE: The dust extraction port can only be used together with a sanding plate and sawing blades with holes.
- Assemble the various parts of the dust extraction adapter.
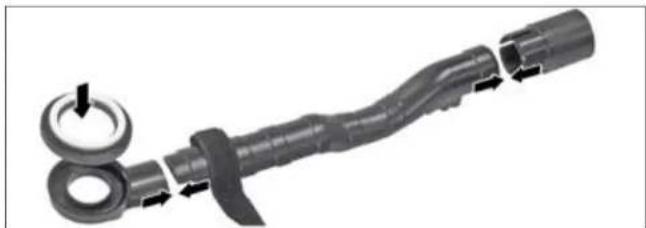
natural_image
Mechanical assembly diagram showing a pipe with a circular component and directional arrows indicating motion (no text or symbols)- Attach the dust extraction adapter to the multi tool and fasten it using the Velcro strap.
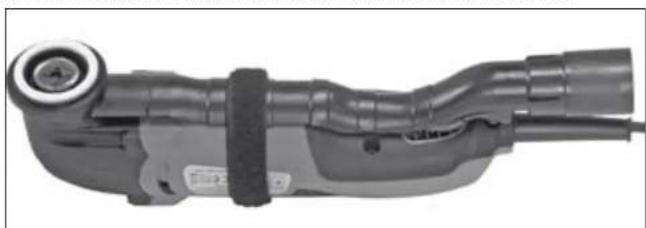
natural_image
Close-up of a welding torch component with attached strap (no visible text or symbols)Assembling the tool
WARNING! Do not touch the tool during or immediately after use - risk of burns. Never clean hot tools with flammable agents - risk of fire and/or explosion.
IMPORTANT! Use protective gloves when handling the tool - risk of cuts.
NOTE: The assembled tool can be tilted in stages of 30^ for an optimal working position.
Assembling the tool
- Place the tool (1) onto the tool attachment (2) so that the notches on the tool fit into the ridges on the tool attachment.
- Place the locking washer (3) and bolt (4) into the tool attachment's threads.
- Tighten the bolt.
- Make sure the tool is assembled correctly.
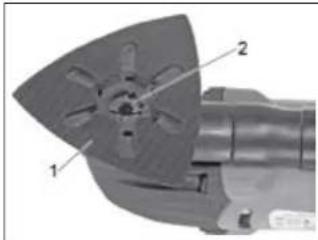
natural_image
Close-up of a mechanical tool component with numbered parts (1, 2), no visible text or symbols beyond labels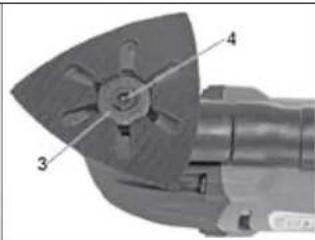
natural_image
Mechanical component diagram showing a grinding tool with labeled parts (no text or symbols present)Assembling the adapter for Bosch® tools
- The adapter section with notches should be placed on the tool attachment. The adapter section's raised edge should be placed so that it fits around the tool attachment.
- Place the Bosch® tool onto the adapter.
- Place the other adapter section with the points directed so that they fit into the Bosch® tool's notches.

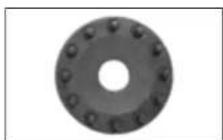
- Place the locking washer and bolt into the tool attachment's threads.
- Tighten the bolt.
- Check that the adapter and tool are assembled correctly.
Assembling sanding paper
-
Fit the sanding plate to the tool attachment according to the instructions in Assembling the tool.
-
Align the sanding paper with the sanding plate and press it down into place.
OPERATION
Starting/Switching off
- Starting: Move the power switch (1) forwards.
- Switching off: Move the power switch (1) backwards.
• Speed control: Adjust the desired speed using the speed control (2).
NOTE: The motor can overheat when used for a prolonged period with a heavy load and/or at low speed. Run the motor unloaded at a higher speed to allow it to cool down.
Sawing
- Select a saw blade intended for the task you are carrying out.
- Ensure the workpiece is securely fastened. Never hold the workpiece in your hands or knees, or against any other part of your body while working. Do not work on a workpiece that is too small to be securely fastened.
- Start the multi tool and move the saw blade towards the workpiece. Do not press too hard while working, as this does not speed up results but instead risks overheating the multi tool.
- Depending on which saw blade you have selected, you will be able to saw wood, plastic and thin steel.
Sanding
NOTE: The multi tool may only be used for dry sanding of wood and metal.
- Select a sanding paper intended for the task you are carrying out.
- Ensure the workpiece is securely fastened. Never hold the workpiece in your hands or knees, or against any other part of your body while working. Do not work on a workpiece that is too small to be securely fastened.
- Start the multi tool and align the sanding paper with the workpiece. Do not press too hard while working, as this does not speed up results but instead risks overheating the multi tool.
- Ensure the entire sanding plate is pressed against the workpiece, not just the tip. If the tip of the sanding paper begins to wear, the sanding paper should be released and rotated.
- Sand using light pressure and even, continuous movements.
Scraping
The accompanying scraper can be used to remove paint, glue, carpet remains, etc.
- Ensure the workpiece is securely fastened. Never hold the workpiece in your hands or knees, or against any other part of your body while working. Do not work on a workpiece that is too small to be securely fastened.
- Start the multi tool and move the scraper towards the workpiece. Do not press too hard while working, as this does not speed up results but instead risks overheating the multi tool.
MAINTENANCE
NOTE: Switch the tool off, pull the plug out and wait until all moving parts have completely stopped before carrying out any maintenance.
- Clean the motor's air vents as necessary. Use a brush or a vacuum cleaner.
- Clean the tool using a lightly dampened cloth.
TROUBLESHOOTING
| Problem Possible cause Remedy | ||
| Tool does not work. No power supply. | Check the cable, plug, power | socket and fuse. |
| The tool is faulty. Contact the retailer. | ||
| Poor quality cutting when saw-ing/sanding. | Unsuitable accessories for the material being worked on. | Fit suitable accessories. |
| The accessory is worn. Fit a new accessory. | ||
Do not attempt to dismantle or repair the tool. Incorrectly executed repairs will lead to the guarantee becoming null and void.
Jula reserves the right to make changes. In the event of problems, please contact our service department. www.jula.com
natural_image
Pure electrical circuit lines without any symbolsCare for the environment!
Must not be discarded with household waste!
This product contains electrical or electronic components that should be recycled.
Leave the product for recycling at the designated station e.g. the clocal authority's recycling station.
CE
EC DECLARATION OF CONFORMITY
EG FÖRSÄKRAN OM ÖVERENSSTÄMMELSE
EF SAMSVARSERKLÆRING
DEKLARACJA ZGODNOŚCI WE

Jula AB, Box 363, SE-532 24 SKARA, SWEDEN
Machinery Directive 2006/42/EC
EN 60745-1:2009+A11, EN 60745-2-4:2009+A11
Electromagnetic Compatibility Directive 2004/108/EC
EN 55014-1:2006+A1+A2, EN 55014-2:1997+A1+A2
EN 61000-3-2:2006+A1+A2, EN 61000-3-3:2008
RoHS Directive 2011/65/EU
EN 62321:2009
This product was CE marked in year -13
Name and address of the person authorised to compile the technical file:
Bo Eriksson
PRODUCT MANAGER
- SÄKERHETSANVISNINGAR
- Montaż narzędzia
- DBAJ O ŚRODOWISKO!
- Read the operating instructions carefully before use!
- Work area safety
- Electrical safety
- Personal safety
- ENE
- Use and care of power tools
- Service
- Special safety instructions
- Additional safety information
- Residual risks
- Vibration
- TECHNICAL DATA
- ASSEMBLY
- Assembling the dust extraction adapter
- Assembling the tool
- Assembling the adapter for Bosch® tools
- Assembling sanding paper
- OPERATION
- Starting/Switching off
- Sawing
- Sanding
- Scraping
- MAINTENANCE
- Care for the environment!
- CE
- EC DECLARATION OF CONFORMITY
- EG FÖRSÄKRAN OM ÖVERENSSTÄMMELSE
- EF SAMSVARSERKLÆRING
- DEKLARACJA ZGODNOŚCI WE
Brand : Meec Tools
Model : 010-644
Category : Multitool