000-704 - Multitool Meec Tools - Free user manual and instructions
Find the device manual for free 000-704 Meec Tools in PDF.


| Product Type | Multi-tool |
| Brand | Meec Tools |
| Model | 000-704 |
| Folded Length | 10 cm (approx.) |
| Open Length | 16 cm (approx.) |
| Weight | 150 g (approx.) |
| Material | Stainless steel |
| Number of Tools | 15 |
| Main Tools | Pliers, wire cutter, knife blade, saw, file, Phillips screwdriver, flathead screwdriver, can opener, bottle opener, awl |
| Locking Mechanism | Liner lock on blade |
| Pocket Clip | Yes, stainless steel pocket clip |
| Handle Material | Stainless steel with textured grip |
| Power Source | Manual (no batteries required) |
| Maintenance | Clean with damp cloth; oil pivot points regularly |
| Safety Warnings | Keep away from children; use with caution; lock blade when not in use |
| Spare Parts Availability | Not available individually; contact Meec Tools support |
| Repairability | Limited; some screws may be replaceable |
| Warranty | 2 years (subject to retailer policy) |
Frequently Asked Questions - 000-704 Meec Tools
User questions about 000-704 Meec Tools
0 question about this device. Answer the ones you know or ask your own.
Ask a new question about this device
Download the instructions for your Multitool in PDF format for free! Find your manual 000-704 - Meec Tools and take your electronic device back in hand. On this page are published all the documents necessary for the use of your device. 000-704 by Meec Tools.
USER MANUAL 000-704 Meec Tools
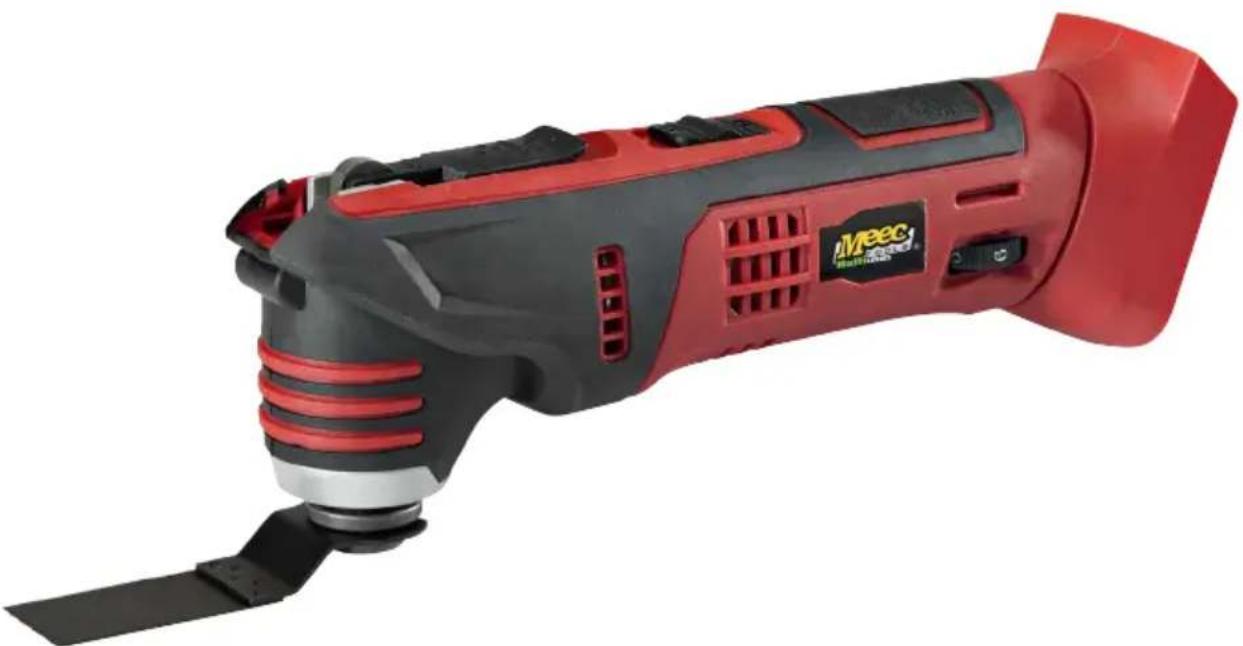
natural_image
Red and black Meec 1500 power tool with visible buttons and blade (no text or symbols on body)EN - Operating instructions (Translation of the original instructions)
Jula reserves the right to make changes. In the event of problems, please contact our service department.
www.jula.com
Tillverkare/ Produsent / Produenci/ Manufacturer
Jula AB, Box 363, 532 24 SKARA
Importör/ Importør/ Importer/ Importer
Care for the environment!
Must not be discarded with household waste! This product contains electrical or electronic components that should be recycled. Leave the product for recycling at the designated station e.g. the local authority's recycling station.
SVENSKA....5
SÄKERHETSANVISNINGAR....5
Symboler 11
TEKNISKA DATA....11
BESKRIVNING 12
HANDHAVANDE 13
SAFETY INSTRUCTIONS 44
Symbols 50
TECHNICAL DATA 50
DESCRIPTION 51
USE....52
Intended use 52
Battery 52
Accessories 53
MAINTENANCE 56
SÄKERHETSANVISNINGAR
natural_image
Icon of a person reading a book inside a circle (no text or symbols)natural_image
Black electronic device with indicator lights and a black arrow pointing to it (no visible text or symbols on body)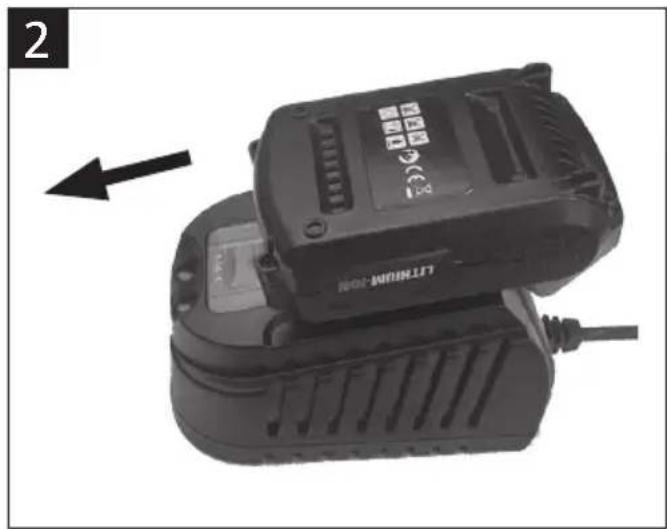
natural_image
Close-up of a black Litter 100 charging station with a power cord and cable, no visible text or symbols on the device itself.Ladda batteri
OBS!
natural_image
Close-up of a lithium-ion battery component with an arrow indicating direction (no text or symbols on the device itself)Lossa batteri
natural_image
Mechanical component with a rotating arrow indicating rotation, showing a base and shaft assembly (no text or symbols)natural_image
Close-up of a hand holding a mechanical component with a circular opening (no visible text or symbols)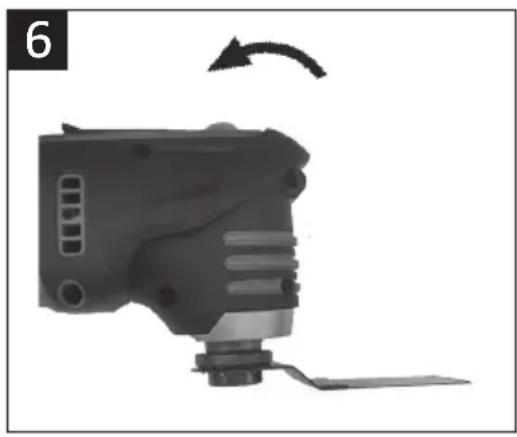
natural_image
Mechanical component with a curved arrow indicating rotation, no visible text or symbolsnatural_image
Icon of a person reading a book inside a circle (no text or symbols)natural_image
Close-up of a black industrial battery with a labeled sensor and power cord, showing no visible text or symbols.Lade batteriet
OBS!
natural_image
Mechanical component with a rotating arrow indicating rotation, showing a base and shaft assembly (no text or symbols)- Velg ønsket tilbehør for det aktuelle arbeidet. Pass inn tilbehørets festehull over multifunksjonshodets tapper (bilde 5).
natural_image
Close-up of a hand holding a mechanical component with a circular opening (no visible text or symbols)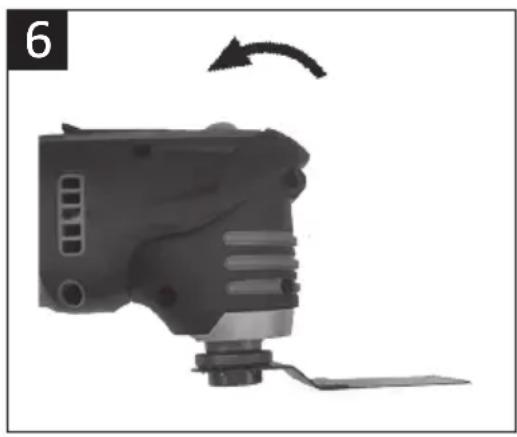
natural_image
Mechanical component with a curved arrow indicating rotation, no visible text or symbolsnatural_image
Icon of a person reading a book inside a circle (no text or symbols)natural_image
Black electronic device with indicator lights and a black arrow pointing to it (no visible text or symbols on body)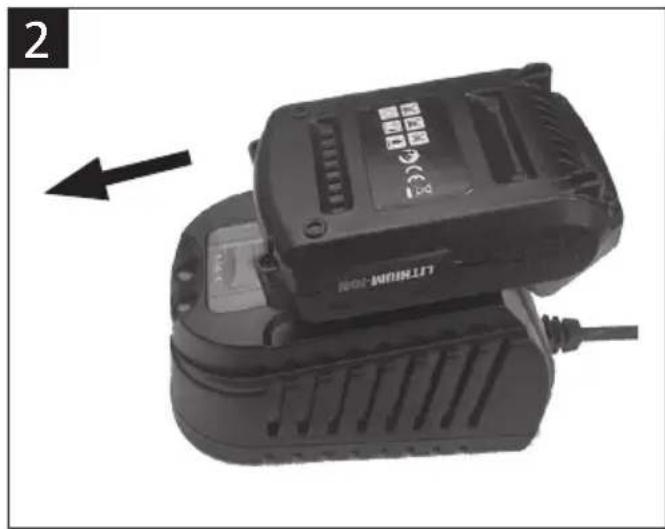
natural_image
Close-up of a black lithium-ion battery with a power cord and indicator lights, no visible text or symbols on the device itself.natural_image
Close-up of a lithium-ion battery component with an arrow indicating direction (no text or symbols on the device itself)natural_image
Mechanical component with a rotating arrow and base, no visible text or symbolsnatural_image
Close-up of a hand holding a mechanical component with a circular opening (no visible text or symbols)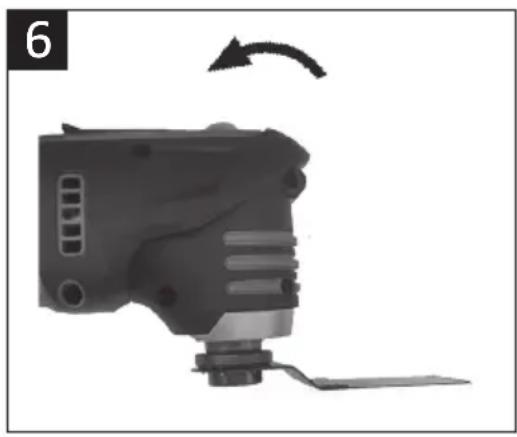
natural_image
Mechanical component with a curved arrow indicating rotation, no visible text or symbolsRead the operating instructions carefully before use.
Save them for future reference.

WARNING: Read all the safety instructions and other instructions. Failure to follow the safety instructions and other instructions can result in electric shock, fire and/or serious personal injury. Save all the safety instructions and other instructions for future reference. The term "power tool" in the safety instructions refers to your mains-powered (corded) or battery-powered (cordless) power tool.
Work area
- Keep the work area clean and well lit. Dark and cluttered work areas increase the risk of accidents and injuries.
- Do not use power tools in explosive environments, such as in the vicinity of flammable liquids, gases or dust. Power tools produce sparks that can ignite dust and fumes.
- Keep children and onlookers at a safe distance when using power tools. A moment of inattention can cause you to lose control of tool.
Electrical safety
- The mains plug on the power tool must match the mains outlet. Never modify the plug in any way. Never use an adapter with earthed power tools. Unmodified plugs and matching outlets reduce the risk of electric shock.
- Avoid body contact with earthed surfaces such as pipes, radiators, cookers and refrigerators. There is an increased risk of electric shock if your body is earthed.
- Do not expose power tools to rain or moisture. There is a greater risk of electric shock if water gets into a power tool.
- Never use the power cord to carry or pull the tool, or to pull out the plug from the mains socket. Keep the power cord away from heat, oil, sharp edges and moving parts. Damaged or tangled power cords increase the risk of electric shock.
- If using the tool outdoors, only use an extension cord approved for outdoor use. Cords intended for outdoor use reduce the risk of electric shock.
- If it is absolutely necessary to use power tools in damp conditions, use a mains connection protected by an RDC. Using an RCD reduces the risk of electric shock.
Personal safety
- Stay alert. Pay attention to what you are doing, and use your common sense when working with power tools. Never use power tools if you are tired or under the influence of drugs, alcohol or medication. A moment of inattention when using a power tool can result in serious personal injury.
- Use personal safety equipment. Wear safety glasses. Depending on the type of power tool and how it is used, safety equipment such as dust masks, non-slip safety shoes, safety helmets and ear protection reduce the risk of personal injury.
- Avoid accidental starting. Check that the power tool is switched off before connecting the power cord and/or battery, or lifting/carrying the tool. Carrying a power tool with your finger on the switch, or connecting a tool to the mains when the switch is in the ON position, increases the risk of accidents and injuries.
- Remove Allan keys/spanners etc. before starting the tool. Allen keys, or the like, left in a rotating part of a power tool can cause personal injury.
- Do not overreach. Always maintain a firm footing and good balance. This ensures better control over the power tool in unexpected situations.
- Wear suitable clothing. Do not wear loose-fitting clothing or jewellery. Keep your hair, clothing and gloves away from moving parts. Loose-fitting clothing, jewellery and long hair can get caught in moving parts.
- If dust extraction and dust collection equipment is available, this should be connected and used correctly. The use of such devices can reduce the risk of dust-related problems.
Use and care
- Do not force the power tool. Use the correct power tool for the planned work. The tool does the job better and safer when used at the rate for which it was designed.
- Do not use the tool if it cannot be switched on and off with the power switch. Power tools that cannot be controlled with the power switch are dangerous and must be repaired.
- Unplug the power cord and/or remove the battery before making any adjustments, changing accessories or putting the power tool away. These safety precautions reduce the risk of accidentally starting the tool.
-
Store power tools out of the reach of children when not in use. Never allow children, or anyone who is unfamiliar with the power tool and these instructions, to use the tool. Power tools are dangerous if used by inexperienced persons.
-
Keep the power tool properly maintained. Check that moving parts are properly adjusted and do not jam, and that no parts are incorrectly fitted or damaged. Check for other factors that could affect functionality. If the power tool is damaged, it must be repaired before being used again. Many accidents are caused by poorly maintained power tools.
- Hand in the tool and the battery to an authorised service centre for inspection and repair if it is damaged.
- Keep cutting tools sharp and clean. Properly maintained cutting tools with sharp cutting edges are less likely to jam and are easier to control.
- Use power tools, accessories, and bits etc. in accordance with these instructions, with due consideration to the actual working conditions and the work that is to be done. It can be dangerous to use power tools for purposes other than those they are intended to be used for.
Additional instructions for cordless power tools
- Only use a battery charger recommended by the manufacturer. Using a battery charger intended for a different type of battery can result in a fire risk.
- Only use the intended battery model in the cordless power tool. The use of other battery models can result in a risk of personal injury or fire.
- When the battery is not in use keep it away from other metal objects such as paperclips, coins, keys, nails, screws and other small metal objects that can short circuit the terminals. Short circuiting the battery terminals can cause burns or a fire.
- Incorrect use can cause fluid to leak from the battery; avoid contact with this fluid. In the event of unintentional contact, rinse with water. If you get fluid in your eyes, rinse with water and seek medical attention. Fluid from the battery can irritate the skin or cause burn injuries.
Service
- The power tool must only be serviced by qualified service personnel using identical spare parts. This will ensure that the tool remains safe to use.
- Keep children and onlookers at a safe distance when using power tools. Avoid accidental starting.
- Unplug the power cord and/or remove the battery before making any adjustments, changing accessories or putting the power tool away.
• These safety precautions reduce the risk of accidentally starting the power tool. - Switch off the tool and wait until all moving parts have completely stopped before putting the tool away.
Important safety instructions for the battery and battery charger
- These operating instructions contain important safety and user information on the battery charger.
- WARNING: Never insert a cracked or damaged battery in the battery charger – risk of electric shock.
- WARNING: Do not expose the charger to water or any other liquid – risk of electric shock and /or material damage. To ensure that batteries and chargers cool more quickly after use they should not be put in warm spaces or closed cabinets etc.
- Carefully read all the instructions and warnings on the charger and battery, and in this section on using the battery, before using the charger.
- Do not attempt to charge different types of batteries than the ones supplied with the tool – risk of electric shock.
- Do not put any objects on the charger or place in on soft or pliable surfaces – risk of overheating. Do not place the charger near sources of heat.
- Do not pull the power cord to unplug the plug on the charger.
- Place the power cord so that there is no risk of treading on it, or tripping over it.
- Do not use an extension cord unless absolutely necessary. Unsuitable extension cords can cause a risk of fire and/or electric shock.
- If the charger has been subjected to knocks or blows, or been otherwise damaged, it must not be used until it has been checked and repaired by an electrician.
- Do not dismantle the charger. Hand it to an authorised electrician or service centre if it needs repairing. Tampering or incorrect assembly can result in the risk of fire or electric shock.
- Unplug the power cord before cleaning – risk of electric shock. It is not enough to just remove the battery from the charger.
- Never try to connect two or more battery chargers together.
- Never store or use the charger in conditions where the temperature can exceed 50^ C.
- The charger is intended to be supplied from a domestic power point and produces an output voltage of 18 V. Never attempt to use the charger with other voltages.
- The battery is not fully charged on delivery from the factory.
- Best lifespan and performance are achieved if the battery is charged at an ambient temperature of 18 to 24°C. Avoid charging the battery at temperatures less than 10°C or higher than 50°C. This will reduce the risk of inferior performance and battery damage.
- Never burn the battery, not even if it is damaged and can no longer be charged. Batteries can explode if burned.
- Never attempt to open the battery. Do not use, or charge the battery if the plastic casing is damaged or cracked.
- Charge the battery in a well ventilated area.
- The adapter, charger and battery become hot when charging. This is completely normal.
- When possible, charge the battery in normal room temperatures.
- Avoid covering over the battery – risk of overheating.
- Avoid charging the battery in direct sunlight, or near sources of heat.
Overload protection
- The overload protection protects the battery from overloading. The charger switches off automatically when the battery is fully charged to protect it from overload damage.
Over-discharge protection
- The battery has a built-on over-discharge protection. This stops further discharging of the battery when the lowest battery voltage is reached.
Overheating protection
- The battery has a built-in temperature sensor, which stops the charging if the battery gets too hot. The temperature sensor protects the battery when the tool is in use. Otherwise in the event of overloading or prolonged use the battery temperature could reach a dangerously high level.
- The battery must cool before it can be used again if the overheating protection trips. Depending on the ambient temperature and how the tool is used, it can take up to 30 minutes for the battery to cool.
Overcurrent protection
- The battery will be temporarily switched off to prevent damage if the maximum voltage is exceeded. Normal battery function is reset automatically a few seconds after the overload protection trips.
Short-circuit protection
- The short-circuit protection trips and immediately breaks the battery circuit if the battery is short circuited. This prevents damage to the battery and/or the tool.
Remaining risks
- Even if the tool is used in accordance with the instructions it is impossible to rule out all risk factors. The following potential risks are related to the design and functionality of the tool:
– damage to lungs if dust filter mask is not used
– hearing impairment if ear protection is not used
– eye injuries if safety glasses are not used
- vibration injuries if the tool is used for long periods, or is not used or maintained properly.
Vibration
WARNING:
- Declared total vibration values are measured in accordance with a standard test method, and can be used for comparisons between tools.
- The declared values can also be used for a preliminary assessment of exposure.
- Vibration levels can deviate from the declared value, depending on how the tool is used.
- Try as far as possible to reduce exposure to vibrations by, for example, wearing gloves and taking suitable breaks at regular intervals in the work.
- The tool produces an electromagnetic field when in use. This field can in some circumstances affect active or passive medical implants. If you have a medical implant you should consult your doctor and/or the manufacturer of the medical implant before using the tool to reduce the risk of serious or fatal personal injury.
SYMBOLS

natural_image
Icon of a person reading a book inside a circle (no text or symbols)Read the operating instructions carefully before use. Save them for future reference.
TECHNICAL DATA
| Weight 1085 g | |
| Length 260 mm | |
| Speed | 500-15000/min |
| Voltage 18 V | |
| Sound pressure level No load: LPA = 78 dB (A), KPA = 3 dB | |
| Sound power level No load: LPA = 89 dB (A), KPA = 3 dB | |
| Vibration No load: ah = 7.529 m/s ^2 , K = 1.5 m/s ^2 | |
| Vibration Sanding: ah = 2.829 m/s ^2 , K = 1.5 m/s ^2 | |
Always wear ear protection.
DESCRIPTION
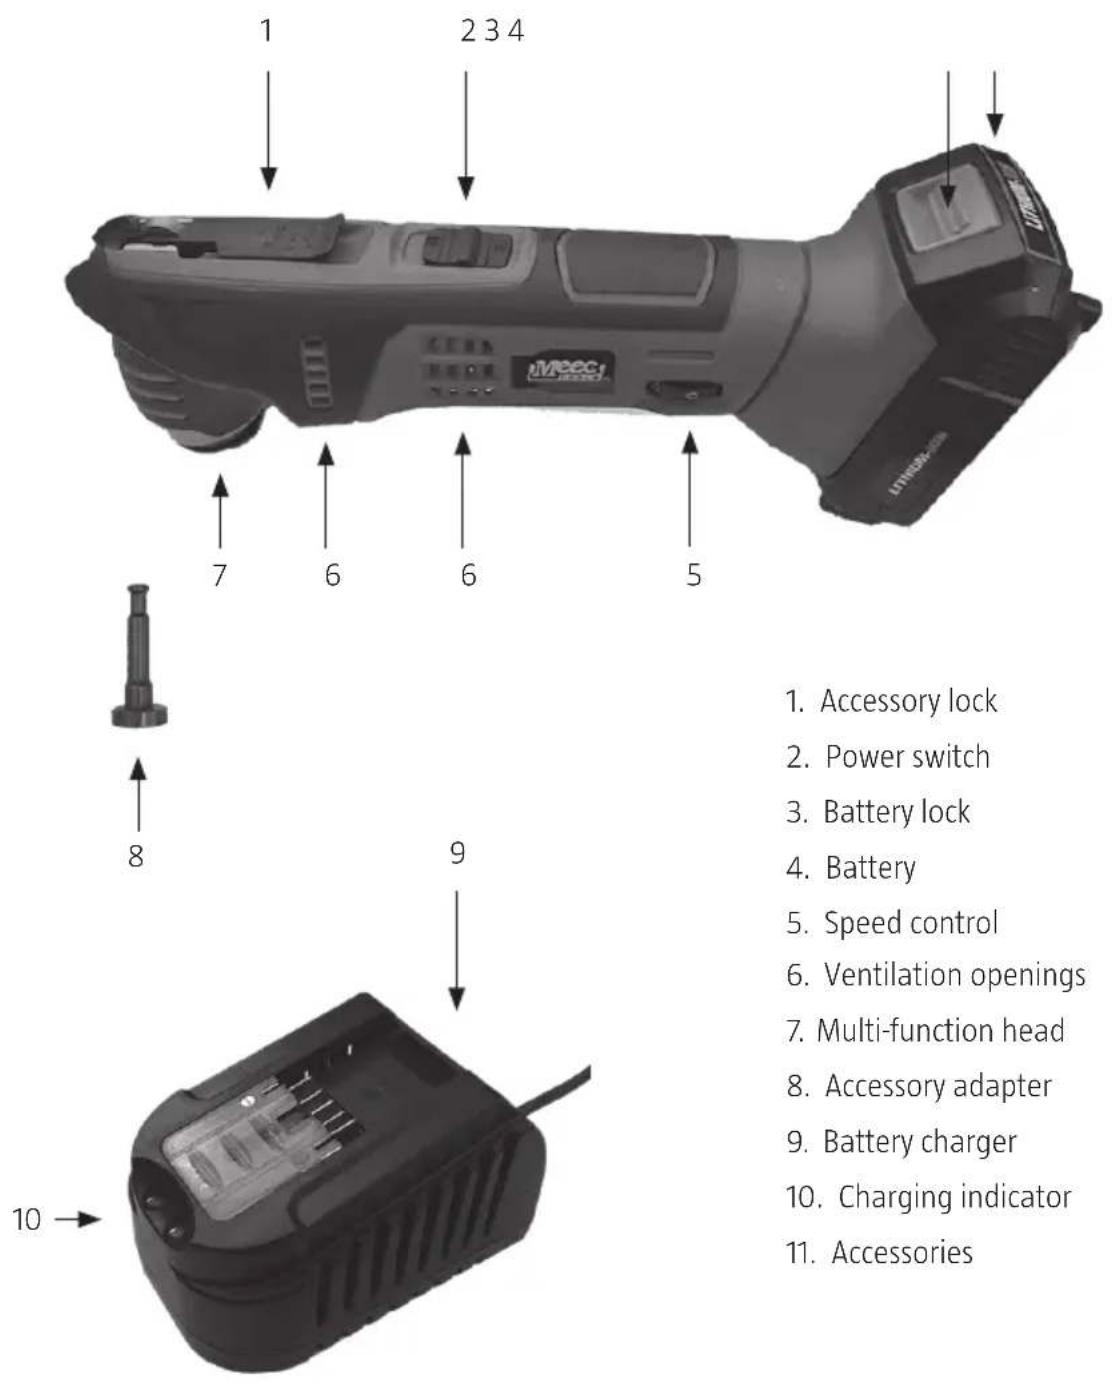
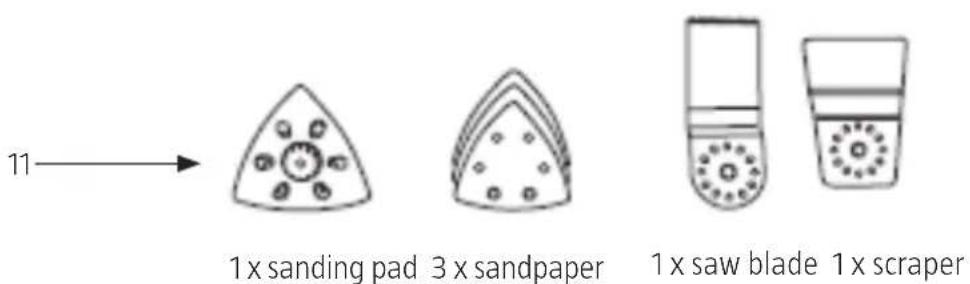
USE
INTENDED USE
Multi-function tool for a variety of different DIY jobs, such as drilling, sanding, sawing, screw driving and cutting.
BATTERY
NOTE:
• Make sure the power switch is not pressed in when inserting or replacing the battery.
- Do not force the battery when connecting it, use a moderate pressure. An incorrectly connected battery can damage the battery terminals or the battery socket on the tool.
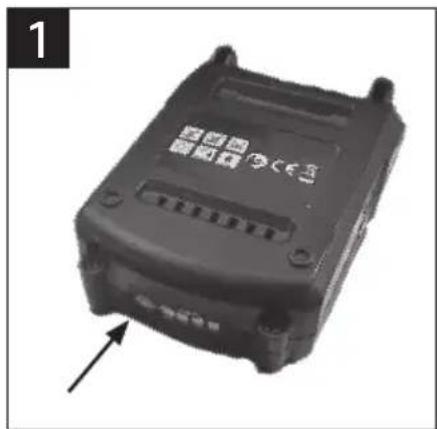
- Use the "Press" button (diagram 1) on the battery to check the charging status; 1-4 red LEDs, where 1 indicates low battery status.
natural_image
Black electronic device with indicator lights and a black arrow pointing to it (no visible text or symbols on body)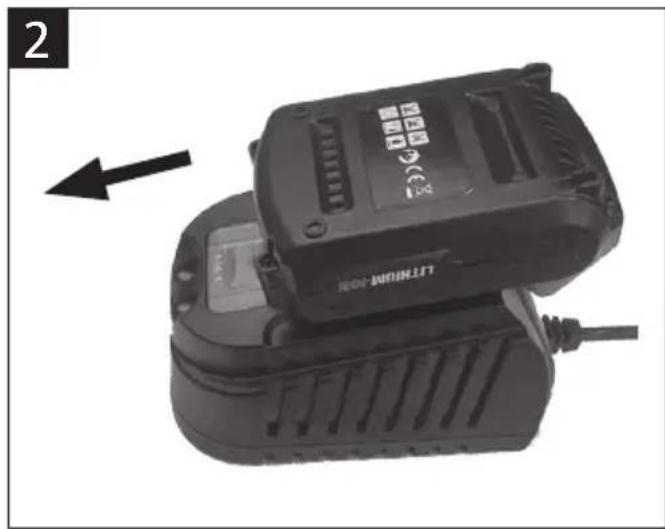
natural_image
Close-up of a black Litter Monitor device with a cable, showing internal components and a directional arrow (no text or symbols on the device itself)Charging the battery
NOTE:
- The battery must be charged before the power tool can be used.
• After charging for the first time, use the tool until the battery is completely discharged. Repeat this charging and discharging cycle 4 to 5 times.
• If the LEDs on the charger do not go on when charging:
- check that the charger's mains adapter is properly plugged into the power point and that the charger is switched on
– check that the battery is correctly inserted in the charger
-
Place the battery charger on a level and stable surface. Plug the charger into a 230 V power point.
-
Connect the battery to the charger so that it clicks into place (diagram 2). The red LED lights up on the charger when correct contact is made.
-
When the battery is fully charged, after about one hour, the red LED goes off and only the green LED stays on.
-
Unplug the charger from the power point and remove the battery from the charger.
Connecting the battery
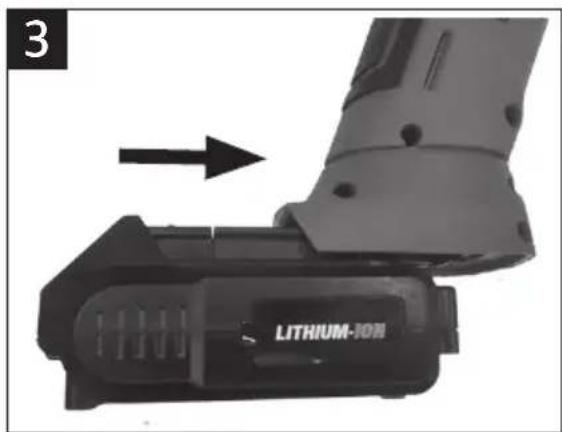
- Connect the battery to the battery socket on the multi-tool so that it clicks into place (diagram 3).
natural_image
Close-up of a lithium-ion battery component with an arrow indicating direction (no text or symbols on the device itself)Removing the battery
- Press the battery lock and remove the battery from the tool.
ACCESSORIES
Replacing accessories
WARNING: Remove the battery before replacing accessories – risk of personal injury.
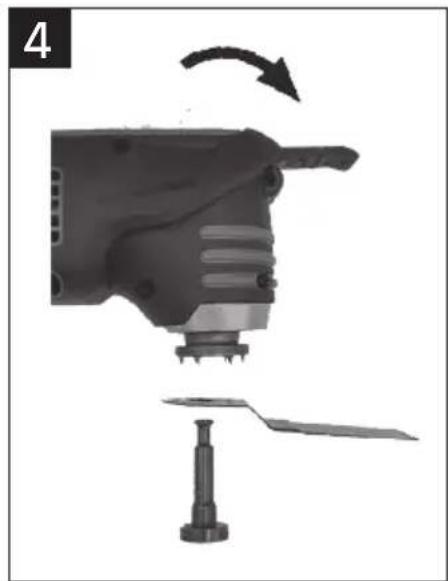
- Turn forward the accessory lock 180 degrees to release the accessory and the accessory adapter (diagram 4).
natural_image
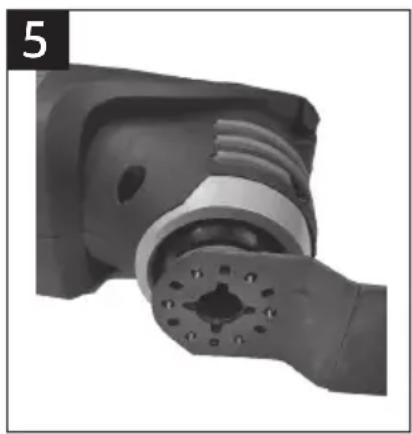
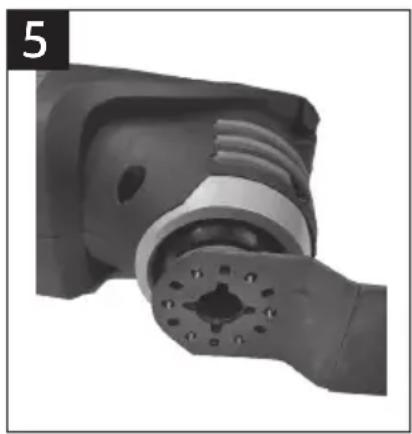
Mechanical component with a rotating arrow indicating rotation, no visible text or symbols- Select the required accessory for the actual job. Align the mounting holes on the accessory over the pins on the multi-function head (diagram 5).
natural_image
Close-up of a hand holding a mechanical component with a circular opening (no visible text or symbols)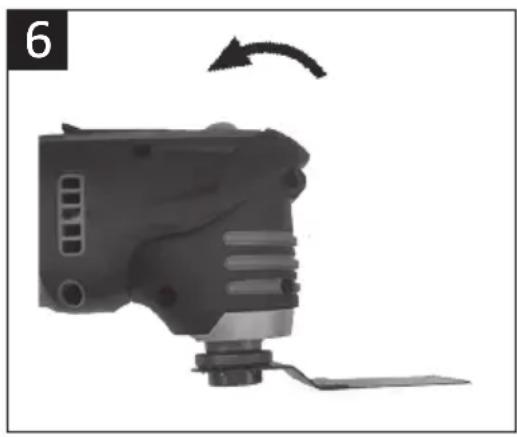
natural_image
Mechanical component with a curved arrow indicating rotation, no visible text or symbols- Hold the accessory adapter and accessory against the multi-function head. Release the accessory lock (diagram 6).
Selecting sandpaper
NOTE: Work with moderate pressure on the tool when sanding, otherwise it is easy to mark the workpiece.
- There is a number on the back of the sandpaper. The higher the number, the smaller the grit, and the lower the number, the larger the grit. Large grit remove more material and are suitable for removing paint or rough sanding of raw surfaces with burrs and nicks etc. The sanded surface will be relatively rough.
- Sandpaper with medium grit is often suitable for sanding more simple wooden structures and carpentry.
- Sandpaper with fine grit is suitable for sanding untreated wood when a soft and smooth surface is required.
- Sandpaper with extra fine grit is suitable for fine sanding and polishing, or for sanding between coats of varnish.
Fitting and replacing sandpaper
- Align the sandpaper to the Velcro fastener on the sanding pad, and press in place.
- When replacing or adjusting the position of the sandpaper, pull the sandpaper carefully off from one of the corners.
Sanding
WARNING: Sanding dust hazardous to health is produced from both wood and metal. Wear a dust filter mask and safety glasses.
NOTE: Always test sand a sample piece first.
- Hold the sanding pad just over the workpiece, without the sandpaper touching the workpiece. Start the multi-tool and move the power switch to position 1, and wait until the tool has reached full power.
-
Bring the tool down flush with the workpiece, so that all the sanding surface is in contact with the workpiece.
-
Do not overload the tool. The tool does the job better and safer when used at the rate for which it was designed.
- Do not angle the tool to sand with only one edge – this can damage the sanding pad prevent the sandpaper fastening properly.
-
Make use of the corners and the triangular shape of the sanding pad to sand places that are difficult to reach.
-
Switch off the multi-tool by moving the power switch back to position 0.
Sawing
WARNING: Hold the multi-tool by the insulated grips when working in areas where the accessory can come into contact with concealed electrical cables. Contact with a live cable will cause the metal parts on the tool to also become live – risk of electric shock.
NOTE: Check before sawing that the saw blade is straight and undamaged, and that the planned cut is free from nails and screws etc.
- Secure the workpiece with a clamp, clips or vice.
- Hold the multi-tool so that the saw blade is not touching the workpiece. Start the multi-tool and move the power switch to position 1, and wait until the tool has reached full power.
- Switch off the multi-tool by moving the power switch back to position 0.
Scraper
- Hold the multi-tool so that the scraper is not touching the workpiece. Start the multi-tool and move the power switch to position 1, and wait until the tool has reached full power.
- Move the scraper at a slight angle to the workpiece.
- Do not overload the tool – work by applying a light pressure on the scraper. Excessive pressure can lead to nicks and marks in the workpiece, or overload the multi-tool.
- Switch off the multi-tool by moving the power switch back to position 0.
MAINTENANCE
- Power tools not in use should be stored in a dry, frost-free place and out of the reach of children.
- Keep the ventilation openings on the tool free from debris, and when necessary blow off sanding dust with compressed air.
- When necessary, wipe the tool with a damp cloth. Do not use solvents.
CE
EC DECLARATION OF CONFORMITY EG FÖRSÄKRAN OM ÖVERENSSTÄMMELSE EF SAMSVARSERKLÆRING DEKLARACJA ZGODNOŚCI WE

Jula AB, Box 363, SE-532 24 SKARA, SWEDEN
RoHS Directive 2011/65/EU EN 62321:2009
This product was CE marked in year -15
- Care for the environment!
- SVENSKA....5
- SÄKERHETSANVISNINGAR....5
- TEKNISKA DATA....11
- HANDHAVANDE 13
- SAFETY INSTRUCTIONS 44
- TECHNICAL DATA 50
- SÄKERHETSANVISNINGAR
- Ladda batteri
- OBS!
- Lossa batteri
- Lade batteriet
- Read the operating instructions carefully before use.
- Work area
- Electrical safety
- Personal safety
- Use and care
- Additional instructions for cordless power tools
- Service
- Important safety instructions for the battery and battery charger
- Overload protection
- Over-discharge protection
- Overheating protection
- Overcurrent protection
- Short-circuit protection
- Remaining risks
- Vibration
- WARNING:
- SYMBOLS
- DESCRIPTION
- USE
- INTENDED USE
- BATTERY
- NOTE:
- Charging the battery
- Connecting the battery
- Removing the battery
- ACCESSORIES
- Selecting sandpaper
- Fitting and replacing sandpaper
- Sanding
- NOTE: Always test sand a sample piece first.
- Sawing
- NOTE: Check before sawing that the saw blade is straight and undamaged, and that the planned cut is free from nails and screws etc.
- Scraper
- MAINTENANCE
- CE
- EC DECLARATION OF CONFORMITY EG FÖRSÄKRAN OM ÖVERENSSTÄMMELSE EF SAMSVARSERKLÆRING DEKLARACJA ZGODNOŚCI WE
Brand : Meec Tools
Model : 000-704
Category : Multitool