
DP47460 - Television SANYO - Free user manual and instructions
Find the device manual for free DP47460 SANYO in PDF.


| Product Type | HDTV (47-inch class) |
| Brand | Sanyo |
| Model | DP47460 |
| Display Type | LCD |
| Screen Size | 47 inches (class) |
| Aspect Ratio | 16:9 |
| Resolution | 1920 x 1080 |
| Refresh Rate | 120Hz (Motion Sync) |
| Power Requirement | AC 120V, 60Hz |
| Power Consumption | 221 watts |
| Weight (with stand) | 45 lbs |
| Dimensions (with stand) | 44.6" W x 29.4" H x 12.7" D |
| Dimensions (without stand) | 44.6" W x 27.2" H x 4.6" D |
| Inputs | 3x HDMI, 2x Component, 1x Composite, 1x S-Video, 1x PC (VGA), 2x USB, 1x Ethernet, 1x Antenna (RF), 1x Digital Audio Out (Coaxial) |
| Outputs | Stereo Audio Out (L/R) |
| Energy Star | Yes |
| Audio Decoding | Dolby Digital |
| Special Features | Motion Sync, Photo Viewer, V-Chip, HDMI-CEC (Xacti-Link) |
| Remote Control | Included (AAA batteries not included) |
| Wall Mount | VESA 400 x 400, M6 screws (max 12mm length) |
| Warranty | 1 year limited parts and labor |
| Cleaning Instructions | Clean with dry cloth only; do not use liquids |
| Disposal | Contains mercury lamps; dispose properly |
Frequently Asked Questions - DP47460 SANYO
User questions about DP47460 SANYO
0 question about this device. Answer the ones you know or ask your own.
Ask a new question about this device
Download the instructions for your Television in PDF format for free! Find your manual DP47460 - SANYO and take your electronic device back in hand. On this page are published all the documents necessary for the use of your device. DP47460 by SANYO.
USER MANUAL DP47460 SANYO
Owner's Manual 4 Table of Contents
natural_image
Black-and-white photo of a modern city skyline on a monitor, no visible text or symbolsDP47460
Model No. / No. de Modelo
© 2010 Sanyo Manufacturing Corporation
Part No./No. de parte: 1/06P1 P0377A-
CAUTION
RISK OF ELECTRIC SHOCK DO NOT OPEN!
CAUTION: TO REDUCE THE RISK OF ELECTRIC SHOCK, DO NOT REMOVE COVER (OR BACK). NO USER-SERVICEABLE PARTS INSIDE. REFER SERVICING TO QUALIFIED SERVICE PERSONNEL.
THIS SYMBOL INDICATES THAT DANGEROUS VOLTAGE CONSTITUTING A RISK OF ELECTRIC SHOCK IS PRESENT WITHIN THIS UNIT.

THIS SYMBOL INDICATES THAT THERE ARE IMPORTANT OPERATING AND MAINTENANCE INSTRUCTIONS IN THE LITERATURE ACCOMPANYING THIS UNIT.

WARNING: TO REDUCE THE RISK OF FIRE OR ELECTRIC SHOCK, DO NOT EXPOSE THIS APPLIANCE TO RAIN OR MOISTURE.
IMPORTANT SAFETY INSTRUCTIONS
- Read these instructions.
- Keep these instructions.
- Heed all warnings.
- Follow all instructions.
- Do not use this apparatus near water.
-
Clean only with dry cloth.
-
Do not block any ventilation openings. Install in accordance with the manufacturer's instructions.
-
Do not install near any heat sources such as radiators, heat registers, stoves, or other apparatus (including amplifiers) that produce heat.
-
Do not defeat the safety purpose of the polarized or grounding-type plug. A polarized plug has two blades with one wider than the other. A grounding-type plug has two blades and a third grounding prong. The wide blade or the third prong are provided for your safety. If the provided plug does not fit fully into your outlet, consult an electrician for replacement of the obsolete outlet.
-
Protect the power cord from being walked on or pinched particularly at plugs, convenience receptacles, and the point where they exit from the apparatus.
-
Only use attachments/accessories specified by the manufacturer.
-
Use only with the cart, stand, tripod, bracket, or table specified by the manufacturer, or sold with the apparatus. When a cart is used, use caution when moving the cart/apparatus combination to avoid injury from tip-over.
-
Unplug this apparatus during lightning storms or when unused for long periods of time.
-
Refer all servicing to qualified service personnel. Servicing is required when the apparatus has been damaged in any way, such as power-supply cord or plug is damaged, liquid has been spilled or objects have fallen into the apparatus, the apparatus has been exposed to rain or moisture, does not operate normally, or has been dropped.

- If an outside antenna is connected to the television equipment, be sure the antenna system is grounded so as to provide some protection against voltage surges and built up static charges. In the U.S. Selection 810-21 of the National Electrical Code provides information with respect to proper grounding of the mast and supporting structure, grounding of the lead-in wire to an antenna discharge unit, size of grounding conductors, location of antenna discharge unit, connection to grounding electrodes, and requirements for the grounding electrodes.
- An outside antenna system should not be located in the vicinity of overhead power lines or other electrical light or power circuits, or where it can fall into such power lines or circuits. When installing an outside antenna system, extreme care should be taken to keep from touching such power lines or circuits as contact with them might be fatal.
EXAMPLE OF ANTENNA GROUNDING ACCORDING TO NATIONAL ELECTRICAL CODE, ANSI/NFPA 70
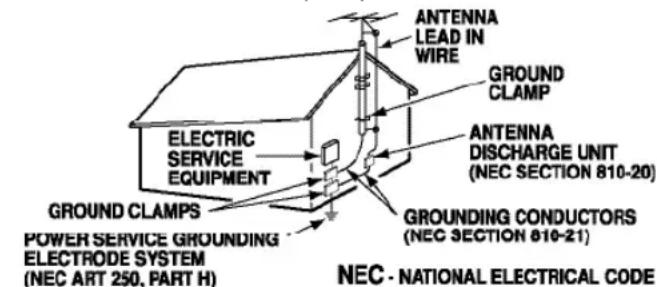
"Note to CATV system installer:
This reminder is provided to call the CATV system installer's attention to Article 820-40 of the NEC that provides guidelines for proper grounding and, in particular, specifies that the cable ground shall be connected to the grounding system of the building, as close to the point of cable entry as practical."
-
Wall or Ceiling Mounting—The product should be mounted to a wall or ceiling only as recommended by the manufacturer.
-
Apparatus shall not be exposed to dripping or splashing and no objects filled with liquids, such as vases, shall be placed on the apparatus.
-
When the MAINS plug is used as the disconnect device, the disconnect device shall remain readily operable.
2
Need help?

www.sanyoctv.com

1-877-864-9604
FCC INFORMATION
This equipment has been tested and found to comply with the limits for a Class B digital device, pursuant to Part 15 of the FCC Rules. These limits are designed to provide reasonable protection against harmful interference in a residential installation. This equipment generates, uses and can radiate radio frequency energy and, if not installed and used in accordance with the instructions, may cause harmful interference to radio communications. However, there is no guarantee that interference will not occur in a particular installation. If this equipment does cause harmful interference to radio or television reception, which can be determined by turning the equipment off and on, the user is encouraged to try to correct the interference by one or more of the following measures:
- Reorient or relocate the receiving antenna.
- Increase the separation between the equipment and receiver.
- Connect the equipment into an outlet on a circuit different from that to which the receiver is connected.
- Consult the dealer or an experienced radio/TV technician for help.
CAUTION: FCC Regulations state that improper modifications or unauthorized changes to this unit may void the user's authority to operate the unit.
TRADEMARKS

Manufactured under license from Dolby Laboratories. Dolby and the double-D symbol are trademarks of Dolby Laboratories.

HDMI, the HDMI Logo and High-Definition Multimedia Interface are trademarks or registered trademarks of HDMI Licensing LLC in the United States and other countries.

As an Energy Star ^® Partner, Sanyo Manufacturing Corporation has determined that this product meets the Energy Star ^® guidelines for energy efficiency.

Adobe ^® , Adobe Flash ^® , and Flash Lite ^® are either registered trademarks or trademarks of Adobe Systems Incorporated in the United States and/or other countries.
PC RESOLUTION CHART
| RESOLUTION | ASPECT RATIO | REFRESH RATE | HORIZONTAL FREQUENCY | VERTICAL FREQUENCY |
| 640 x 480 | 4:3 | 60 Hz | 31.47 kHz | 69.94 Hz |
| 72 Hz | 37.86 kHz | 72.81 Hz | ||
| 75 Hz | 37.50 kHz | 75.00 Hz | ||
| 85 Hz | 43.27 kHz | 85.01 Hz | ||
| 720 x 400 | 18:10 | 70 Hz | 31.47 kHz | 70.00 Hz |
| 800 x 600 | 4:3 | 68 Hz | 35.16 kHz | 66.25 Hz |
| 60 Hz | 37.88 kHz | 60.32 Hz | ||
| 72 Hz | 48.08 kHz | 72.19 Hz | ||
| 75 Hz | 46.88 kHz | 75.00 Hz | ||
| 85 Hz | 63.57 kHz | 85.06 Hz | ||
| 1024 x 768 | 4:3 | 60 Hz | 48.36 kHz | 60.00 Hz |
| 70 Hz | 56.48 kHz | 70.07 Hz | ||
| 75 Hz | 60.02 kHz | 75.02 Hz | ||
| 85 Hz | 68.88 kHz | 85.00 Hz | ||
| 1152 x 864 | 4:3 | 75 Hz | 67.90 kHz | 75.00 Hz |
| 1280 x 768 | 5:3 | 60 Hz | 47.40 kHz | 60.00 Hz |
| 60 Hz | 47.78 kHz | 69.87 Hz | ||
| 75 Hz | 60.29 kHz | 74.89 Hz | ||
| 85 Hz | 68.63 kHz | 84.84 Hz | ||
| 1280 x 960 | 4:3 | 60 Hz | 60.00 kHz | 60.00 Hz |
| 86 Hz | 85.94 kHz | 85.00 Hz | ||
| 1280 x 1024 | 5:4 | 60 Hz | 63.98 kHz | 60.02 Hz |
| 75 Hz | 79.98 kHz | 76.02 Hz | ||
| 85 Hz | 91.18 kHz | 86.02 Hz | ||
| 1360 x 768 | 16:9 | 60 Hz | 47.71 kHz | 60.00 Hz |
| 1440 x 500 | 16:10 | 60 Hz | 65.83 kHz | 69.89 Hz |
| 80 Hz | 55.47 kHz | 59.90 Hz | ||
| 1920 x 1080 | 16:9 | 60 Hz | 67.50 kHz | 60.00 Hz |
Need help?

www.sanyoctv.com

1-877-864-9604
CONTENTS
IMPORTANT SAFETY INSTRUCTIONS ..... 2
FCC INFORMATION ....3
TRADEMARKS 3
PC RESOLUTIONS ....3
CONTENTS 4
SPECIFICATIONS 4
PROTECTING THE SCREEN ....4
POSITIONING THE HDTV 5
STAND REMOVAL/ASSEMBLY 5
WALL MOUNTING ....5
GETTING STARTED—
Remote Control Battery Installation ....5
Antenna Connections for off-air or cable .....5
HDTV INPUT/OUTPUT REFERENCE....6
A/V CONNECTIONS (SIDE PANEL) 7
A/V CONNECTIONS (BACK PANEL) 8
POWER CONNECTION / INITIAL CHANNEL SEARCH ...9
REMOTE CONTROL OPERATION....10
Channel Search ....11
Channel Scan Memory ....11
Input Setting 11
Video3 Setting 12
HDMI Linking 12
Setup 13
Menu Language 13
Digital Caption 13
Energy Setting 13
Clock Timer 14
Motion Sync 14
V-Chip 15
Picture 16
Pix-Shape Settings....17
Sound 18
PC CONNECTIONS & MENU OPERATION....19
PHOTO VIEWER ....20
WARRANTY....21
GNU GENERAL PUBLIC LICENSE .....22

CONTAINS MERCURY LAMPS, DISPOSE OF PROPERLY

SPECIFICATIONS
Power Requirement: Source: AC 120V, 60Hz
AC Power Consumption: Weight:
221 watts 45 lbs.(w/stand)
Dimensions:
| MODEL | WIDTH | HEIGHT | DEPTH |
| DP47460 | 44.6 | 29.4 | 12.7 |
| w/o stand | 27.2 | 4.6 |
NOTE: Dimensions are in inches
Please read before operating your HDTV!
PROTECTING THE SCREEN
CAUTION: The screen can be damaged if it is not maintained properly.
- Do not use hard objects such as hard cloth or paper to clean the screen.
- Do not use excessive pressure when cleaning the screen; excessive pressure can cause permanent discoloration or dark spots.
- NEVER spray liquids on the screen.

HANDLING PRECAUTIONS
- Handle by the cabinet only.
- Never touch the screen when handling.
- Handling damage is not covered under warranty.
POSITIONING THE HDTV
●Always use a firm and flat surface when positioning your HDTV.
- Do not position the unit in a confined area.
- Allow adequate space for proper ventilation.
- Do not position the HDTV where it is easily reachable by small children and may present risk of injury.
STAND REMOVAL
1 Place HDTV face down on a padded or cushioned flat surface to protect the screen and finish
2 Remove the four (4) screws securing the foot stand. CAUTION: Hold the stand firmly as you remove the last screw.
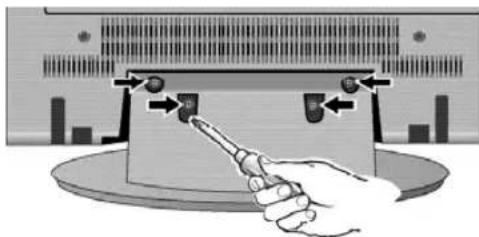
STAND ASSEMBLY
1 Place HDTV face down on a padded or cushioned flat surface to protect the screen and finish.
2 Carefully insert the stand base to the bottom of the HDTV and secure the base by inserting 4 screws as indicated in the above diagram.
NOTE: If your HDTV came packed with the Stand Base unassembled, these screws will be found in the literature package.
WALL MOUNTING
Wall mounting of the HDTV must be performed by a skilled person.
Use the screws you would use to attach the stand base to secure the HDTV to a wall mounting kit (not included.)
VESA standard interface: 400 x 400
Mounting screws measurements:
M6(6mm) Diameter, Length-12mm (maximum)
GETTING STARTED
1 BATTERY INSTALLATION
Install two (2) "AAA" batteries in the remote control. (Not included)
To ensure safe operation, please observe the following precautions:
- Replace both batteries at the same time. Do not use a new battery with a used battery.
- There's a risk of explosion if a battery is replaced by an incorrect type.
- Do not expose the Remote Control unit to moisture or heat.
- Be sure to match the "+" and " -" signs on the batteries with marks inside the remote control.
2 ANTENNA CONNECTION FOR OFF-AIR SIGNALS OR CABLE
Hook up your antenna or your cable service to the HDTV's ANT terminal with the use of a 75 OHM coaxial cable.
NOTE: Keep your indoor antenna at least 3 ft. away from the television set and any other electronic equipment.
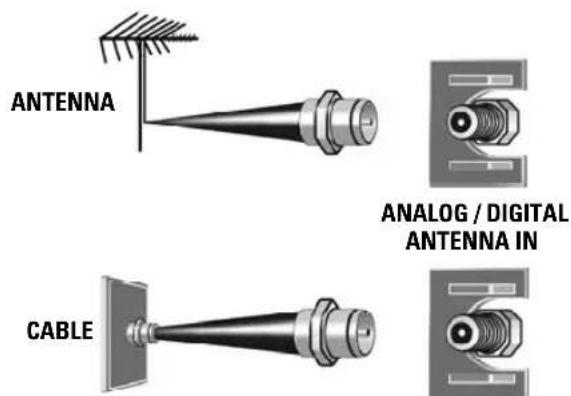
The tuner in this HDTV can receive:
• Digital and Analog off air signals from an antenna
- Analog or ClearQAM cable channels from a direct Cable TV connection.
GETTING STARTED
HDTV INPUT/OUTPUT REFERENCE
flowchart
graph TD
    A["VIDEO INPUT 1"] --> B["R"]
    B --> C["L (MONO)"]
    C --> D["VIDEO"]
    D --> E["S-VIDEO"]
    F["VIDEO INPUT 2"] --> G["R"]
    G --> H["L (MONO)"]
    H --> I["Pr"]
    I --> J["Pb"]
    J --> K["Y"]
    L["ANT"] --> M["HDMI INPUT3"]
    N["HDMI INPUT2"] --> O["Output"]
    P["HDTV BACK PANEL"] --> Q["Audio OUTPUT"]
    Q --> R["L"]
    R --> S["Audio"]
    style A fill:#f9f,stroke:#333
    style F fill:#f9f,stroke:#333
    style N fill:#f9f,stroke:#333
    style L fill:#ccf,stroke:#333
    style P fill:#ccf,stroke:#333
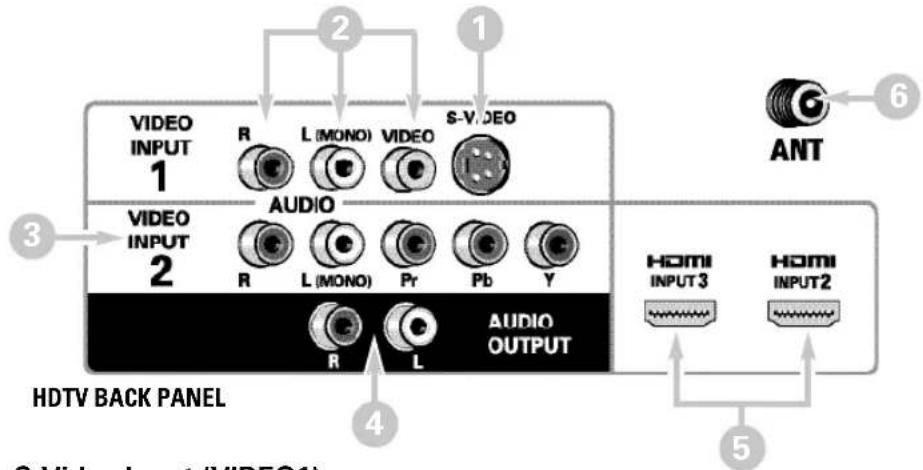
1 S-Video Input (VIDEO1)
NOTE: An S-Video connection will override a connection to the Video1 (yellow) input jack.
2 Composite AV Input (VIDEO1) - Yellow (Video), plus white and red (Audio) input jacks.
3 Component AV Input (VIDEO2) – Green (Y), blue (Pb), and red (Pr) Video inputs plus the white and red Audio inputs.
4 Stereo Audio Out (L/R) Jacks
5 HDMI (INPUT2 & 3) – An all digital AV interface accepting uncompressed video signals up to 1080p for the best picture possible.
6 Analog / Digital Antenna Input – Connect a 75 OHM cable from an antenna or direct Cable service.
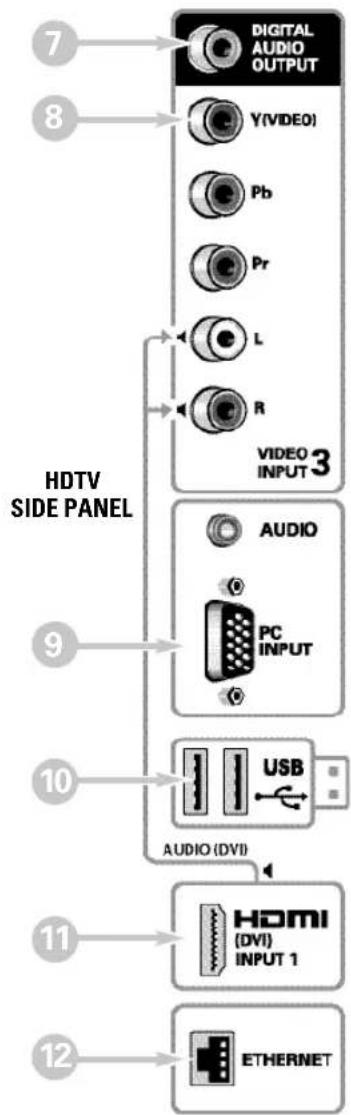
7 Digital Audio Output (Coaxial)
8 Component AV Input (VIDEO3) – Green (Y), blue (Pb), and red (Pr) Video inputs plus the white and red Audio inputs.
NOTE: A Composite connection is possible via VIDEO INPUT3 using the Y (VIDEO) jack and the L/R audio jacks. (See Video 3 Setting on page 12.)
9 PC Input and Stereo Audio (Mini)
• MONITOR RGB (D-SUB)
• AUDIO R/L (Stereo Mini Jack)
NOTE: See page 19 for proper PC hookup and setup.
flowchart
graph TD
    A["7 DIGITAL AUDIO OUTPUT"] --> B["8 Y(VIDEO)"]
    B --> C["9 HDTV SIDE PANEL"]
    C --> D["10 AUDIO (DVI)"]
    D --> E["11 HDMI (DVI) INPUT 1"]
    E --> F["12 ETHERNET"]
    C --> G["3 VIDEO INPUT"]
    G --> H["USB"]
    H --> I["PC INPUT"]
10 USB Input
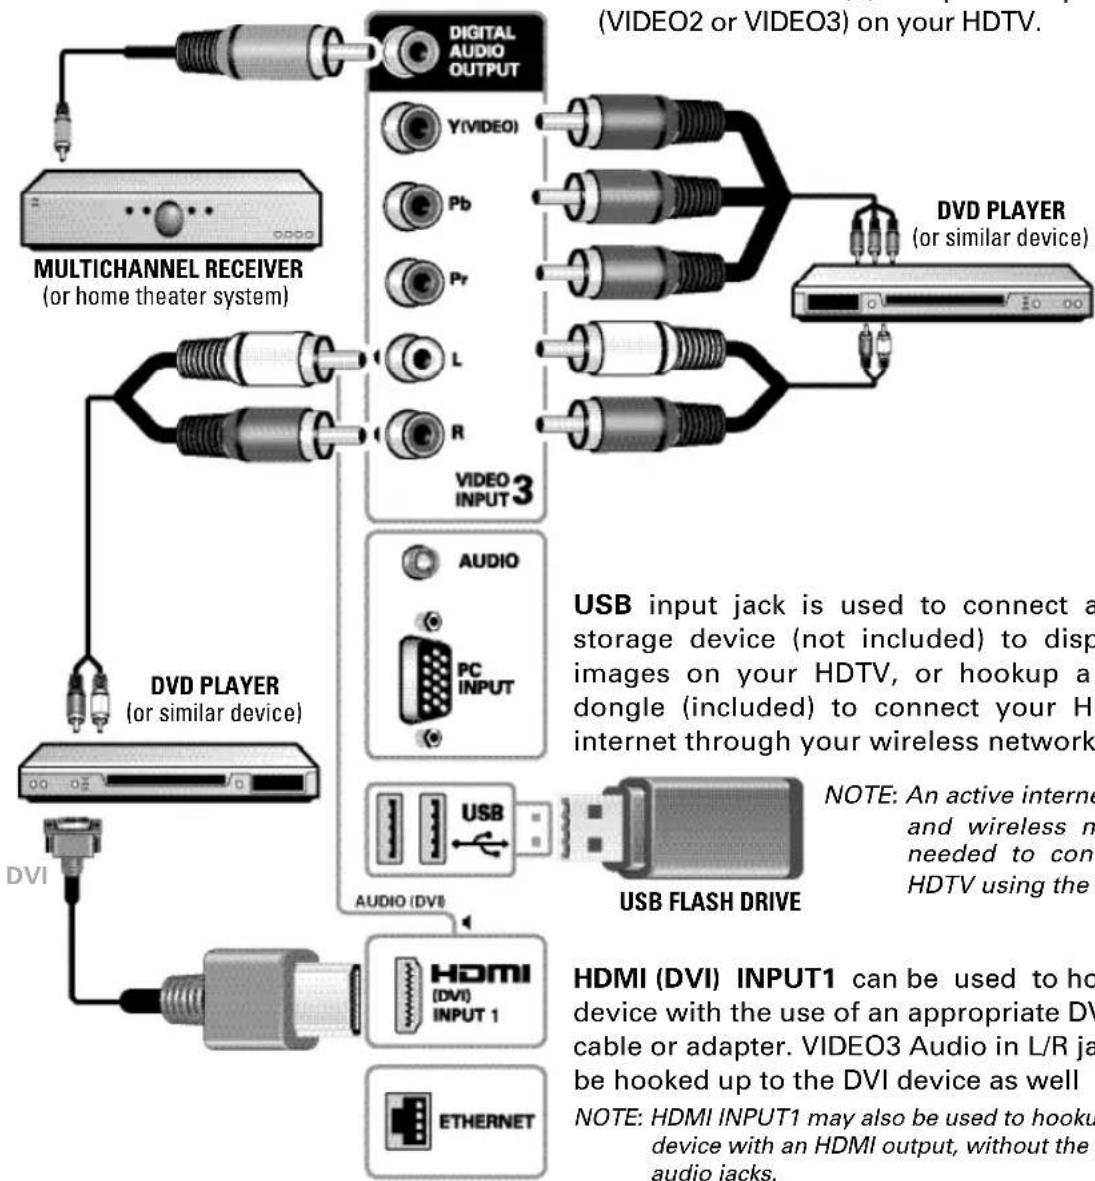
View pictures stored in a USB flash drive or connect to the internet with the WiFi dongle. *
11 HDMI (INPUT1) – An all digital AV interface accepting uncompressed video signals up to 1080p for the very best picture possible.
NOTE: A DVI connection is possible via the HDMI INPUT1 (DVI) using an appropriate adapter and the VIDEO3 Audio jacks for sound output.
12 ETHERNET Port
Hook up your HDTV to the internet with the use of an appropriate ethernet cable and a correct internet setup. *
* NOTE: Please refer to the Internet Ready HDTV Guide for the proper connection methods.
GETTING STARTED
3 AUDIO / VIDEO CONNECTIONS (SIDE PANEL)
Digital Audio Output is used to output the HDTV's Audio through your home theater system.
Hook up the HDTV's Digital Audio Output to your home theater system's input with the use of a phono-type Digital Audio cable.
COMPONENT connections will accept SDTV, EDTV and HDTV video signals. Use them for great image quality from digital devices such as a DVD player or Video Game system.
Match your digital device's Component output jacks to either of the two (2) Component input jack sets (VIDEO2 or VIDEO3) on your HDTV.
flowchart
graph TD
    A["MULTICHANNEL RECEIVER (or home theater system)"] --> B["VIDEO2 or VIDEO3"]
    B --> C["VIDEO INPUT 3"]
    C --> D["VIDEO PLAYER (or similar device)"]
    D --> E["USB Flash DRIVE"]
    E --> F["USB INPUT 1"]
    F --> G["HDMI INPUT 1"]
    G --> H["ETHERNET"]
    I["DVI"] --> J["AUDIO"]
    J --> K["PC INPUT"]
    K --> L["VIDEO3 Audio in L/R jack"]
    L --> M["USB INPUT 1"]
    N["NOTED: An active internet and wireless m needed to con HDTV using the USB input jack is used to connect a storage device (not included) to display images on your HDTV, or hookup a dongle (included) to connect your HI internet through your wireless network."]
    O["NOTED: HDMI INPUT1 may also be used to hook up device with an HDMI output, without the audio jacks."]
Need help?

www.sanyoctv.com

1-877-864-9604
3 AUDIO / VIDEO CONNECTIONS (BACK PANEL)
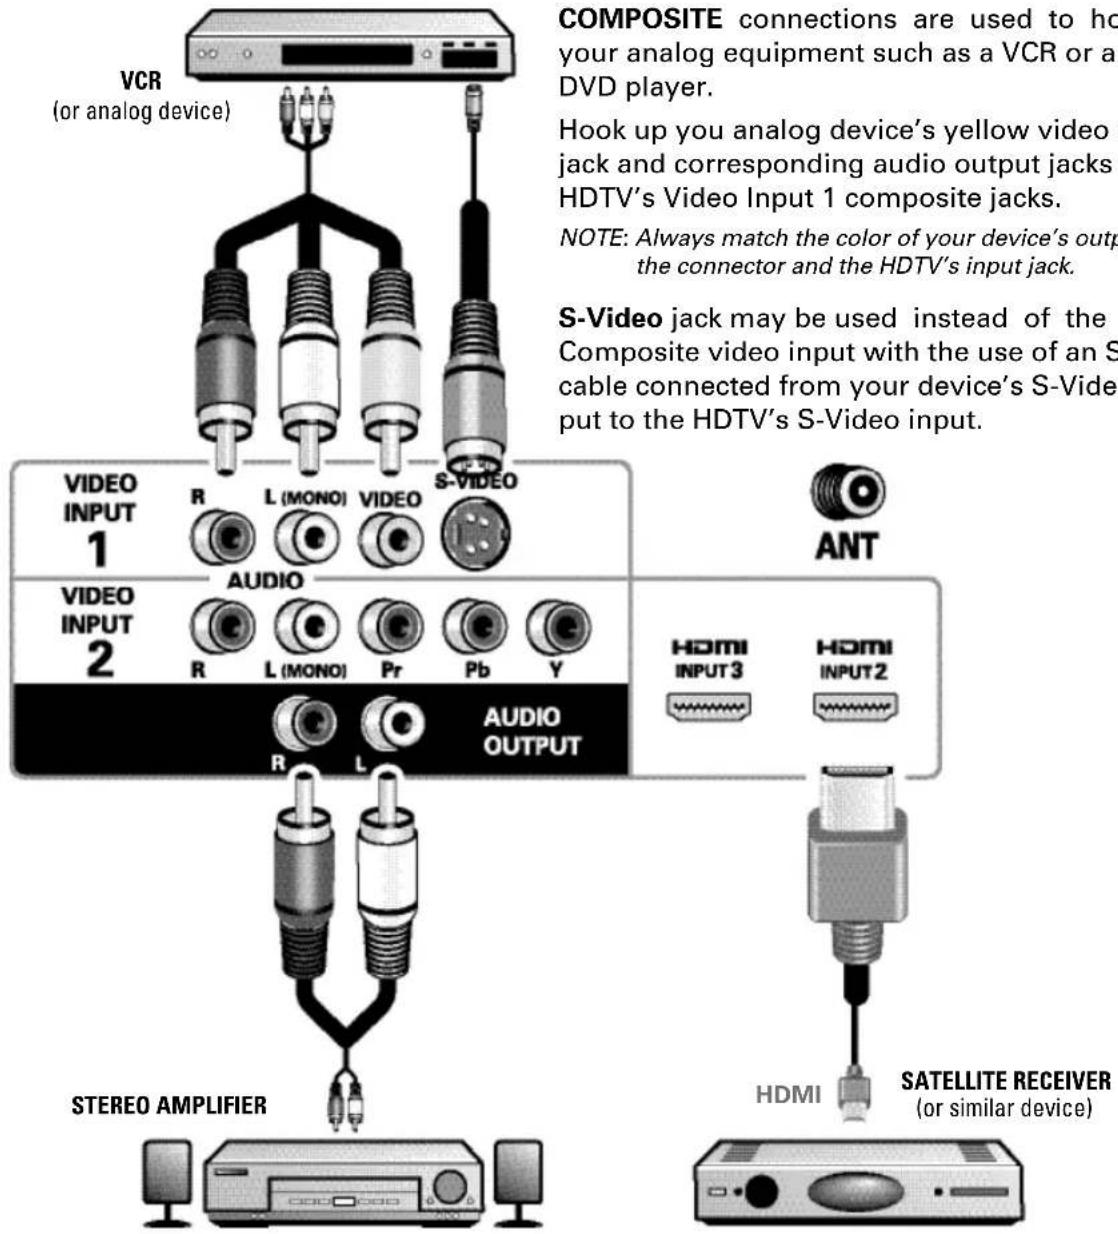
Audio Output L/R are used to hookup an external stereo Amplifier. Connect your home stereo's input jacks to the HDTV's Audio Output jacks with a pair of audio red and white connectors.
NOTE: Do not connect external speakers directly to the HDTV.
Use HDMI INPUT1, 2 & 3 to hookup HD digital devices such as a Blu-ray player, HD Cable Box, HD Satellite Receiver or Video-game System.
Connect your digital device's HDMI output to any of the three (3) HDMI inputs on your HDTV with the use of an HDMI cable.
GETTING STARTED (CONTINUED)

INITIAL CHANNEL SEARCH

Before proceeding, please make sure to hook up your antenna or cable connection and all AV equipment correctly to your HDTV.
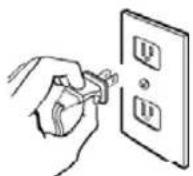
PLUG IN AC POWER CORD
120V AC, 60Hz

TURN ON TV (PRESS POWER BUTTON)
Wait for on-screen instructions to set an Initial Energy Saving Mode, and perform an Initial Channel/Signal Search.
TV SET LOCATION SELECTION:
Select "Home Mode" by pressing the CH▼key to set the HDTV's backlight to an Energy Star qualified level, or select "Store Mode" by pressing CH▲to set the backlight to a retail display level.
CHANNEL AND AV SIGNAL SEARCH:
Press the CH▲▼key to perform a channel search from an Antenna or a direct Cable connection, and a signal search from devices hooked up to the HDTV's AV input jacks.
ON SCREEN HELP (OPTIONAL)

Press the CH▼key if you wish to access an on screen trouble shooting guide.
NOTE: On screen help is also accessible via the main menu.
CHANNEL AND SIGNAL SETUP SCREEN
The final setup screen displays analog and digital channels found as well as AV inputs detected. Pressing the CH▲▼ key finalizes the setup process.
NOTE: To repeat the initial setup process press VOL▼.

AV INPUT SELECTION
Press the INPUT key to select the correct AV input for the video source you wish to watch.
Please select the proper location for your TV, the display will be adjusted for best results.
- Press Channel UP for Store Mode.
● Press Channel DOWN for Home Mode.
Store mode is for the retail display setup. Home mode qualifies for ENERGY STAR.
INITIAL ENERGY SAVING MODE SCREEN
Please connect all antennas* and signals to the jacks and terminals. Make sure all of your equipment is switched on.
- Press Channel UP or DOWN for Channel/Signal search.
● Press VOLUME DOWN for On Screen Help.
• To avoid signal interference when searching for channels using an Indoor Antenna, place the antenna at least 3 feet away from TV.
INITIAL CHANNEL/SIGNAL SEARCH SETUP SCREEN
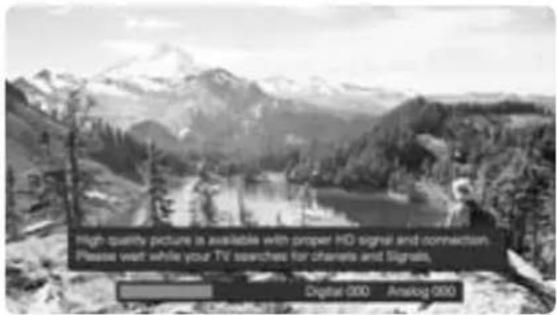
CHANNEL SEARCH PROGRESS SCREEN
Channel and Signal Setup:
Analog Channels...16
Video 1...Yes
Video 2...no
Video 3...no
Digital Channels...24
HDMI 1...Yes
HDMI 2...no
HDMI 3...no
Press Channel UP or DOWN to exit the Setup process. Press VOLUME DOWN to repeat the process.
If you are having problems, call us toll-free at 1-800-877-5032
CHANNEL/SIGNAL LIST SCREEN
Need help?

www.sanyoctv.com

1-877-864-9604
- POWER Key—Turns your HDTV On or Off.
- ECO Key—Modifies the Energy Saver level (see page 13.)
- AUDIO Key—Selects the desired Audio mode. Stereo, Mono, or SAP (when available.)
- ON TIMER Key—Displays the current switch on time (see Clock Timer on page 14.)
- CAPTION Key—Cycles through the available Caption modes.
- RESET Key—Pressing it twice restores your HDTV to its factory settings. All user customized settings will be cleared.
- SLEEP Key—Displays the "Off" Timer. While Off Timer is on-screen, press the "0" key to Set the amount of time (in 30 minute increments) at which the HDTV will turn off.
- PICTURE Key—Cycle through the picture modes.
- SOUND Key—Cycle through the sound modes.
• NUMERICAL Keys—Select channels directly.
NOTE: For channels 100 and up, press and hold the first number, then enter the remaining two numbers. - (sub ch) Key —Allows for the direct selection of digital subchannels. For example: to select channel 39.1 press the 3, 9, —and 1 keys.
- INPUT Key—Selects the video source to view. Holding down the key displays the Input List.
- Volume + -Keys—Increases or decreases the audio level.
- Channel ▲ ▼ Keys—Scan through the channels in the memory database.
- MUTE Key—Mute or restore the sound.
- NET@ Key—Opens the Sanyo Net Apps menu screen.
- PIX SHAPE Key—Cycles through the available aspect ratios. The different settings either stretch, zoom, or fill the image on your screen. Bars may appear on top and bottom of your screen (or on left and right sides) depending on the broadcasted signal or program. (See page 17)
- USB Key—Selects the USB input directly.
- RECALL Key—Switch between current channel and last selected channel.
- MENU Key—Displays or hides the on-screen menu.
- HELP Key—Displays on-screen Help menu.
- INFO Key—Displays the Channel Information banner.
- EXIT Key—Exits the on-screen menu. Return to the previous screen when navigating the Net input.
- Cursor ▲ (UP) ▼ (DOWN) keys—Move the on-screen cursor up and down.
- Cursor ◀ (LEFT) ▶ (RIGHT) keys—Move the on-screen cursor left and right.
- ENTER Key—Set or select the highlighted option on the screen.
The PLAY, PAUSE, STOP, REW, FF, W, T, CAMERA, and XACTI MENU keys control playback features on a Sanyo Xacti digital camera when the HDMI-CEC feature has been activated on both the HDTV and the Xacti camera (see HDMI Linking feature on page 12.)
NOTE: These playback keys may or may not react with other devices other than the Xacti camera.
Display the On Screen menu and use the CURSOR ▲▼ keys to select Channel / Input. Press ENTER.
Channel Search
Auto - Searches the detected mode, Cable or Air.
Cable - Searches for analog and unscrambled (ClearQAM) digital cable channels.
Air (Antenna) – Searches for analog and digital off-air channels.
Digital Add-On - Searches digital off-air channels adding newly found digital channels to the channel map database.
NOTE: Digital Add-On option is not available when the current mode is Cable.
Channel Scan Memory
Channel Scan Memory lists all Analog and Digital channels found. It also lists Analog channels that were not found, which can be added.
Use the CURSOR ▲▼keys to move the channel select bar through all enabled and disabled channels, or use the CH ▲▼ keys to skip all disabled channels.
Press ENTER to enable or disable the selected channel.
NOTE: For information on local digital channels, visit www.antennaweb.org
IMPORTANT FACT: This HDTV maintains only one database of digital channels. Therefore, when you search for cable channels, the database of antenna digital channels will be deleted. You will only be able to receive those ClearQAM channels your cable company provides.
Input Setting
Input Setting feature allows the removal of unused inputs from the AV input loop.
Use the CURSOR ▲▼ keys to select an AV input. Press ENTER to disable (uncheck) or enable (check) the highlighted input.
NOTE: At least one input must and will remain enabled.
☐:Skip is for reference only.
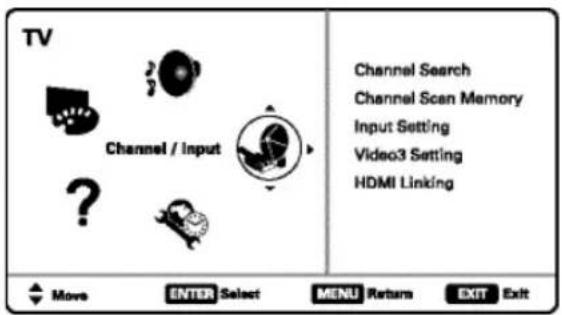
MAIN MENU SCREEN
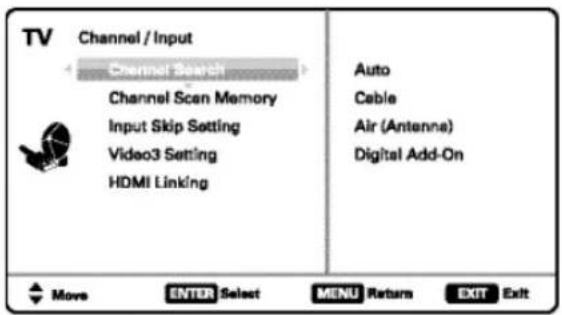
CHANNEL/INPUT SCREEN
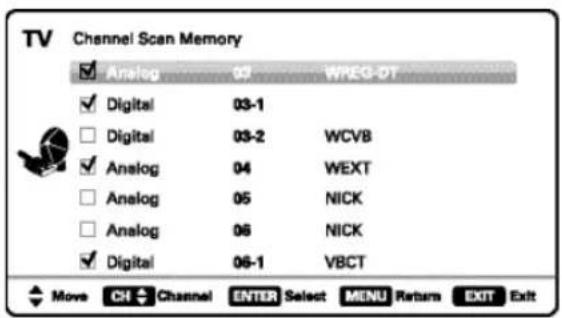
CHANNEL SCAN MEMORY SCREEN
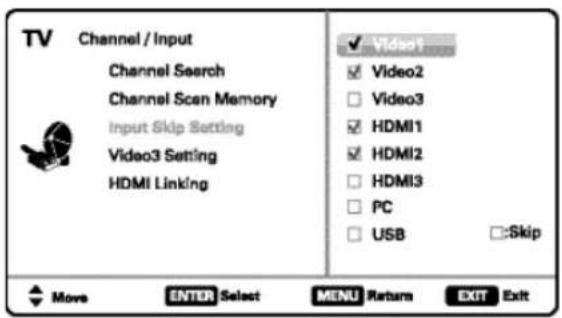
INPUT SETTING SCREEN
Need help?

www.sanyoctv.com

1-877-864-9604
Use this feature to establish either a Component or Composite connection to the VIDEO INPUT 3 jacks on your HDTV.
Use the CURSOR ▲▼ keys to select the type of hook up that will be used in the Video3 input.
Press ENTER, a blue mark will appear next to the selected option.
HDMI Linking
NOTE: Designed for use with a Sanyo Xacti Digital Video/Movie Camera, and may not support all HDMI-CEC functions of other equipment.
Use the HDMI-CEC Function to enable or disable all available CEC functions.
HDMI Power ON Sync and Power OFF Sync enable specific features including the automatic power ON process and power OFF process.
CEC (Consumer Electronics Control)
The CEC feature allows the control of multiple CEC-enabled devices with one remote control, and the interaction of devices with each other without user intervention.
Xacti-LINK
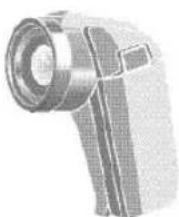
With a Sanyo Xacti Digital Video/Movie Camera hooked up to your HDTV's HDMI input, setting the HDMI-CEC Function to ON enables you the use of keys on your GXEC remote to operate your Xacti camera.
NOTE: The HDMI-CEC function of the Xacti camera must also be turned ON to enable the Xacti-Link.
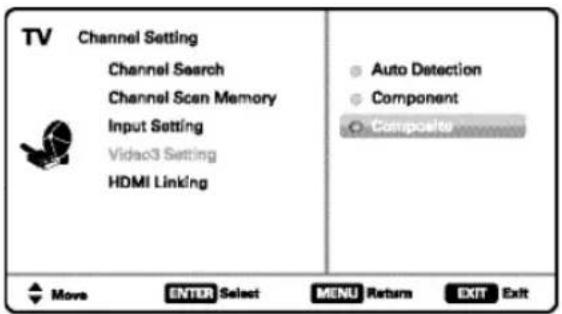
VIDEO3 SETTING SCREEN
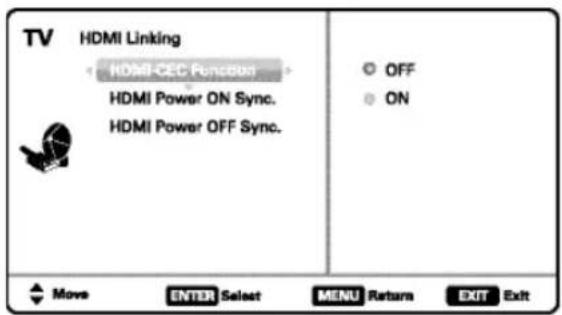
HDMI LINKING SCREEN
Display the On Screen menu and use the CURSOR ▲▼keys to select Setup. Press ENTER.
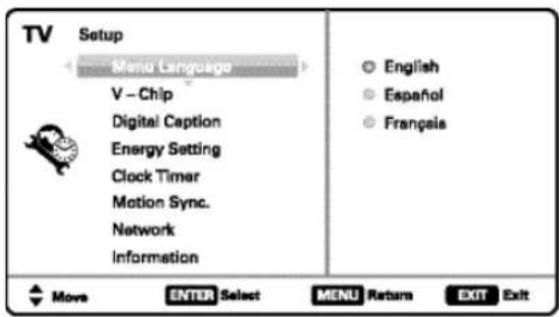
Menu Language
Choose the language in which the On Screen menus will be displayed.
- English
- Español
- Français
Press ENTER on the desired language.
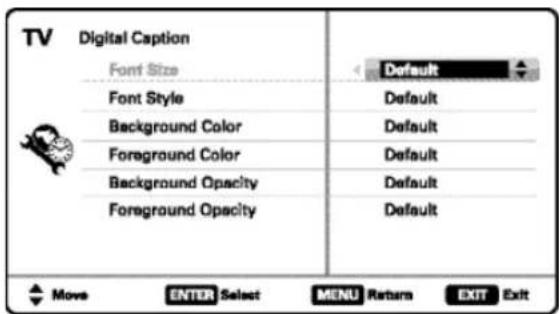
Digital Caption
Captioning is textual information transmitted along with the picture and sound. Turning Captioning ON (by pressing the CAPTION key during normal TV viewing) causes the HDTV to open these captions (digital or analog) and superimpose them on the screen.
NOTE: Local broadcasters decide which caption signals to transmit.
Use the CURSOR ▲▼ and ◀▶ keys to modify Font, Background, and Foreground of digital caption text.
Energy Setting
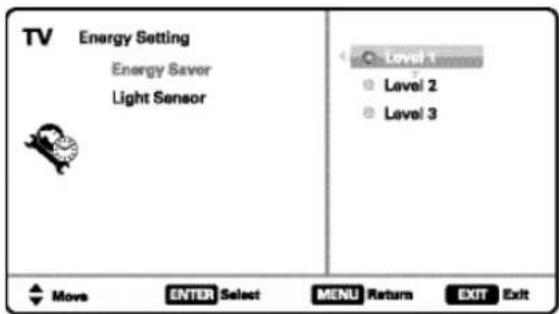
Use the Energy Saver and Light Sensor features found under Energy Setting to lower power consumption by controlling the LED backlight brightness levels.
Energy Saver – This settings control the LCD backlight brightness to reduce power consumption.
- Level 1: Energy Saver feature is off.
- Level 2: Low power consumption.
- Level 3: Lowest power consumption.
Press ENTER on the desired level.
NOTE: ECO key may also be used as a shortcut to modify the Energy Saver settings without accessing the menu.
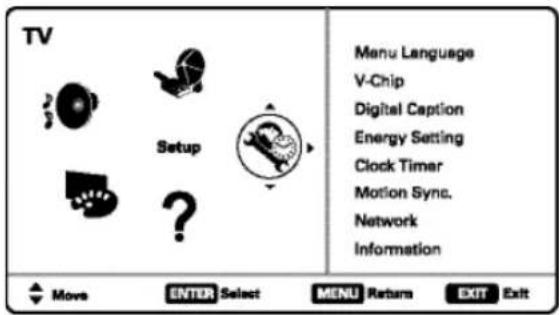
MAIN MENU SCREEN
MENU LANGUAGE SCREEN
DIGITAL CAPTION SCREEN
ENERGY SAVER SCREEN
Need help?

www.sanyoctv.com

1-877-864-9604
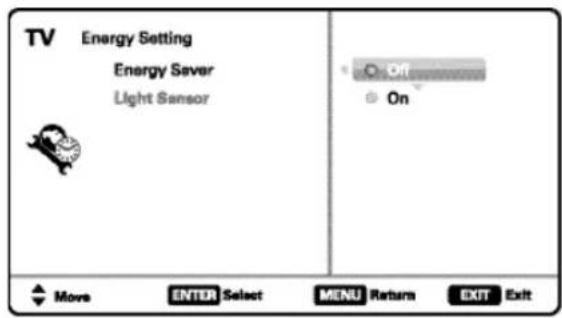
Light Sensor – Detects ambient room light brightness and uses that reading to control the panel brightness level and picture parameters to reduce the HDTV's power consumption.
NOTE: When room lighting is dark, the panel brightness and/or the picture setting parameters such as brightness and contrast are lowered. When room lighting is bright, parameters are affected opposite.
LIGHT SENSOR SCREEN
Clock Timer
This feature allows you to set a Current Time for your HDTV and enable a Switch On Time for the HDTV to turn on at a specific time of day.
When On Timer Function is set to ON, the TV will automatically turn on at the previously set Switch on Time.
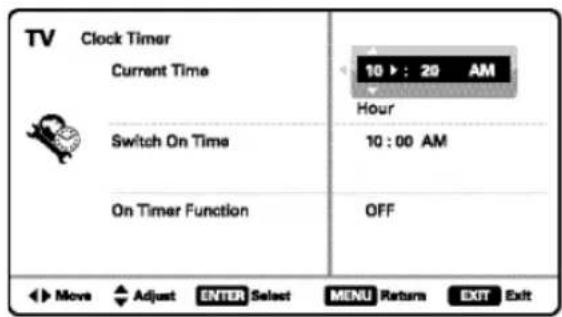
CLOCK TIMER SCREEN
Motion Sync
Your HDTV will display all signals at the refresh rate of 120Hz. Motion Sync is a special Frame Rate Converter feature that helps eliminate motion blur and film judder in scenes with fast action.
- On – Takes full advantage of your TV's refresh rate capabilities for the best picture quality.
- Off – Disables the Motion Sync feature.
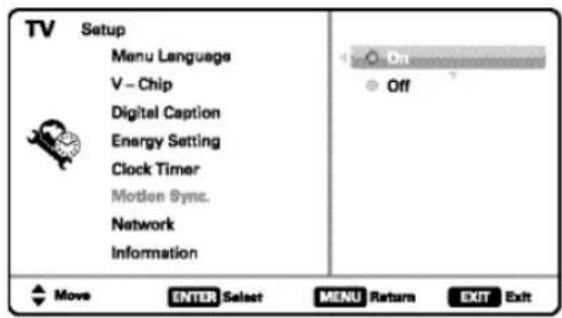
MOTION SYNC SCREEN
Use this feature to automatically block programs with content you deem as inappropriate for viewing by your children.
NOTE: This feature is designed to comply with the United States of America's FCC V-Chip regulations. Therefore, it may not function with broadcasts that originate in other countries.
ADJUSTING THE V-CHIP RATINGS
Select ON and press ENTER. Select Adjust (Standard) and press ENTER.
NOTE: Blocking a rating will automatically block all higher ratings. Unblocking a rating automatically unblocks all lower ratings.
For V-Chip (Movie) ratings select Movie and press ENTER, and then select the desired MPAA rating limit. Press the EXIT key to close the V-Chip menu.
For V-Chip (TV) ratings select TV and press ENTER. Use the CURSOR ▲▼ keys to select a rating and press ENTER. Use the CURSOR ▲▼ keys to set the rating's status as Blocked or Viewable. Once ratings are set, press the EXIT key to close the V-Chip menu.
NOTE: Some TV ratings offer more detailed settings such as Dialogue, Language, Sexual, and Violence.
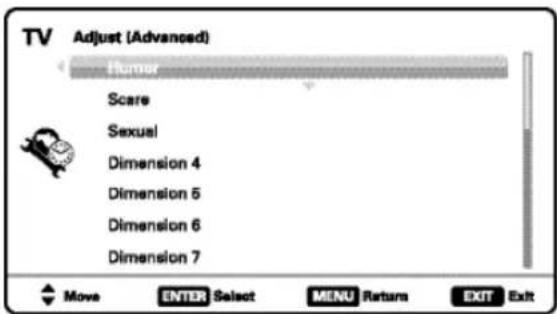
ADVANCED V-CHIP SYSTEM (RRT5)
RRT5 (V-Chip Regional Ratings 5) is an advanced V-Chip ratings system for over the air digital channels. When the HDTV detects compatible RRT5 data, it's downloaded & stored in memory, and the Setup V-Chip screen is then modified to show the Adjust (Advanced) option.
Use the CURSOR ▲▼ and ◀▶ keys to highlight the different options, and use the ENTER key to block or unblock the selected rating.
NOTE: When vertical scroll bars appear, press to gain access to the additional ratings.
CURSOR ▲▼
MORE INFORMATION
Additional information about MPAA (Motion Picture Association of America) and V-Chip rating can be found at: www.mpaa.org and www.v-chip.org, respectively.
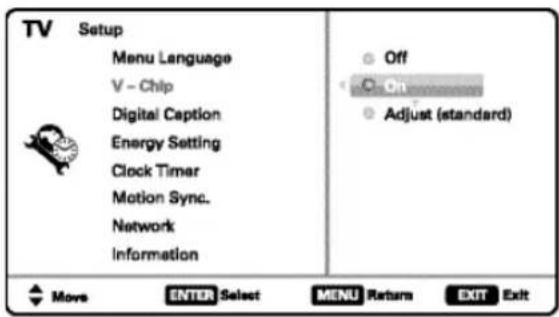
V-CHIP SETUP SCREEN
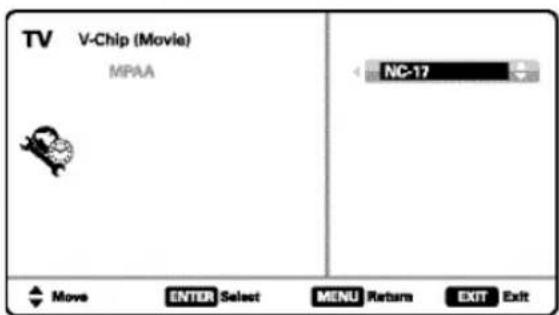
MOVIE RATING ADJUSTMENT SCREEN
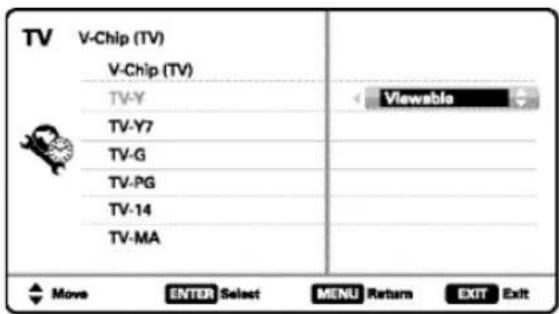
TV RATING ADJUSTMENT SCREEN
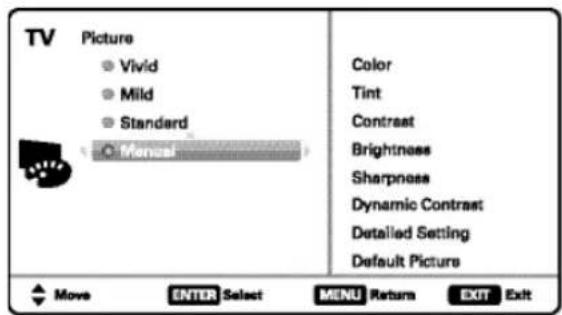
Display the On Screen menu and use the CURSOR ▲▼ keys to select Picture. Press ENTER.
You may choose between Vivid, Mild, and Standard, which have predetermined fixed picture parameter values, or choose the Manual option for customized personal settings.
NOTE: Each AV input can have its own picture mode (pre-determined or manual.) Current input's selected option is indicated by a blue marker.
MANUAL PICTURE SETTINGS
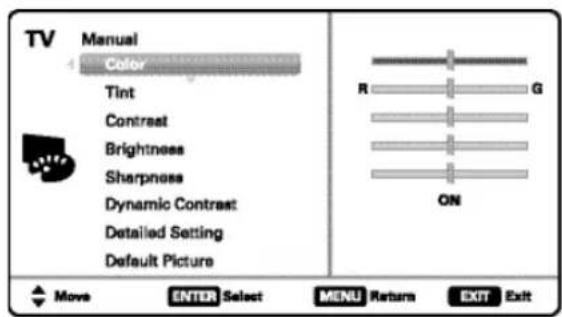
Manual parameters to adjust include:
• Color
- Tint
- Contrast
- Brightness
- Sharpness
• Dynamic Contrast
The Detailed Setting option allows for the adjustment of 7 additional parameters such as:
- Signal Balancer
- Noise Reduction
- White Balance
• Vertical Sharpness
- Edge Enhancer
• H-Size
- V-Size
NOTE: Default Picture option returns all picture parameters to their original factory settings.
ADJUSTING A PICTURE SETTING
Use the CURSOR ▲▼ keys to highlight the picture parameter you wish to adjust. Press the ENTER key to enter the value adjustment screen. Modify the selected parameter's value by pressing the CURSOR ◀▶ keys.
NOTE: CURSOR ▲▼ keys select the next/previous parameter without returning to the previous menu screen.
Once adjustments are complete, press the EXIT key to return to normal TV viewing.
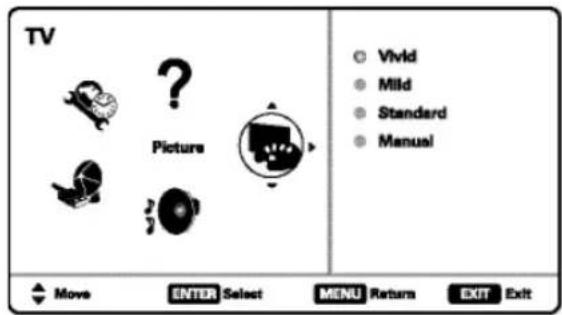
MAIN MENU SCREEN
PICTURE SCREEN (MANUAL)
PARAMETER SELECTION SCREEN


VALUE ADJUSTMENT SCREEN EXAMPLES
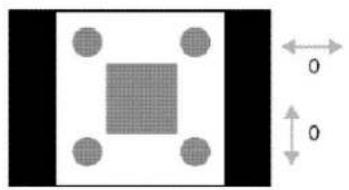
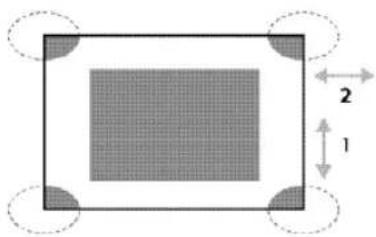
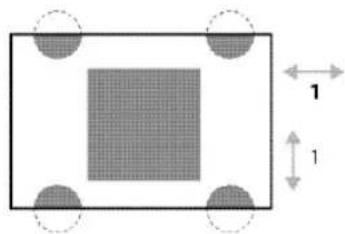
PIX SHAPE
4:3 TRANSMISSION 16:9 TRANSMISSION
Pix1
Shows a standard definition 4:3 image in its original format, a 16:9 wide image is slightly compressed horizontally.
NOTE: Vertical bars are "attached" to the sides of the screen.
Pix2
Fills the entire image on the screen.
NOTE: A standard definition 4:3 image is stretched horizontally.
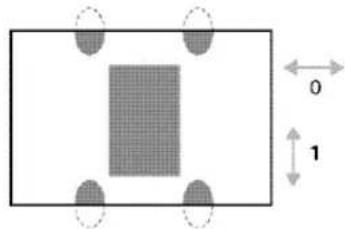
Pix3
Image is stretched vertically in comparison with Pix2.
NOTE: Shows a proportional Zoom for a 4:3 image.
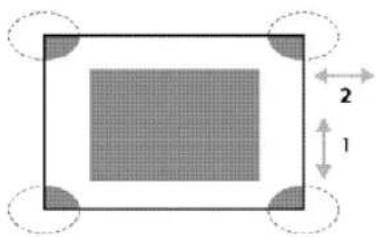
Pix4
Image is stretched horizontally in comparison with Pix3.
NOTE: Shows a proportional Zoom for a 16:9 image.
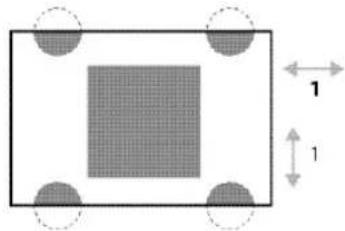
Pix5
Similar to Pix2, image is enlarged horizontally in a linear proportion in which center portion of screen is stretched less than the sides.
NOTE: Pix5 has almost no stretching effect on a 16:9 image.
natural_image
Geometric diagram with a central shaded square and surrounding circles, no text or symbols present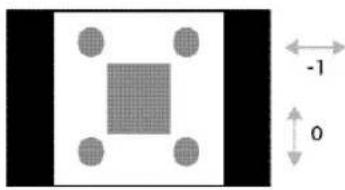
natural_image
Geometric diagram with a central square and surrounding circles, labeled with dimensions -1 and 0 (no text or symbols beyond basic geometry)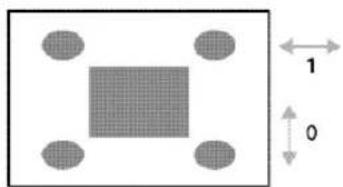
natural_image
Simple geometric diagram with a central shaded square and four surrounding circles, labeled with dimensions 1 and 0 (no text or symbols beyond labels)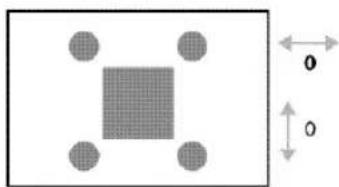
natural_image
Geometric diagram with a central square and surrounding circles, no text or symbols present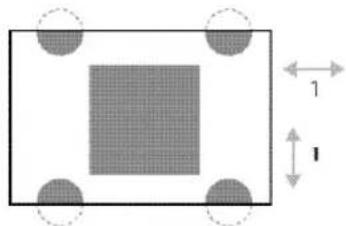
natural_image
Geometric diagram showing a square inscribed in a rectangle with four circular holes, each labeled with dimension '1' (no text or symbols beyond basic geometry)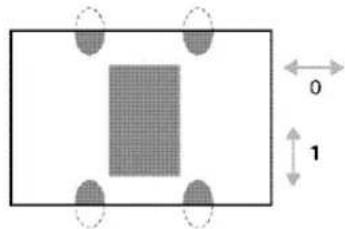
natural_image
Simple geometric diagram showing a rectangle with a shaded square and four corner circles, each labeled with dimension '1' (no text or symbols beyond basic geometry)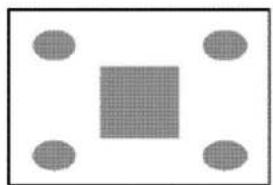
natural_image
Simple geometric diagram with a central square and four surrounding circles (no text or symbols)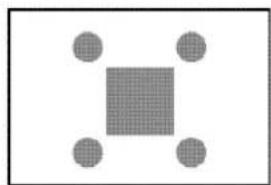
natural_image
Simple geometric diagram with a central square surrounded by four surrounding circles (no text or symbols)NOTE: There are other possible aspect ratios that may be transmitted besides the most common 4:3 and 16:9.
Pix6 Similar to Pix1 with no Overscan*.
Pix7 Similar to Pix2 with no Overscan*.
* Overscan permits the image to slightly exceed bottom and top edge limitations.
NOTE: Pix6 and Pix7 are not optimal for Standard Definition content (a thin white line may appear near edge of screen). Pix6 and Pix7 use is recommended only for PC signal through HDMI.
Pix-Auto (AFD) Active Format Description. Data carried in the video stream includes coded picture frame information of the actual image, allowing the TV to adjust the Pix-Shape automatically. NOTE: This Pix-Shape mode is available only for Digital-RF input.
Need help?

www.sanyoctv.com

1-877-864-9604
Display the On Screen menu and use the CURSOR ▲▼ keys to select Sound. Press ENTER.
Choose an option for your sound settings:
Auto – Sound settings are linked to the current Picture option and parameters are adjusted accordingly.
Dynamic, Mild, Standard - 3 different predetermined sound parameters not linked with any Picture option.
MANUAL SOUND SETTINGS
The Manual option provides different parameters that can be personally adjusted:
• Bass
- Treble
- Detailed Setting
- 4-Band Equalizer: Personalize audio highs and lows.
NOTE: Default Sound option returns all sound parameters to their original factory settings.
ADJUSTING A SOUND SETTING
Use the CURSOR ▲▼ keys to highlight the sound parameter you wish to adjust. Press the ENTER key to enter the value adjustment screen. Modify the selected parameter's value by pressing the CURSOR ◀▶ keys.
NOTE: CURSOR ▲▼ keys select the next/previous parameter without returning to the previous menu screen.
Once adjustments are complete, press the EXIT key to return to normal TV viewing.
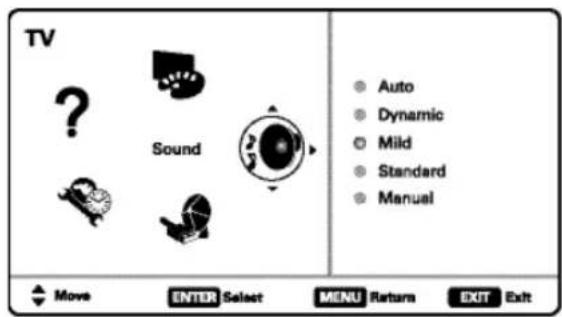
MAIN MENU SCREEN
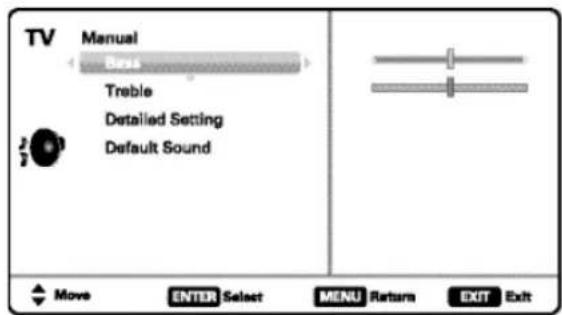
MANUAL PARAMETER SCREEN
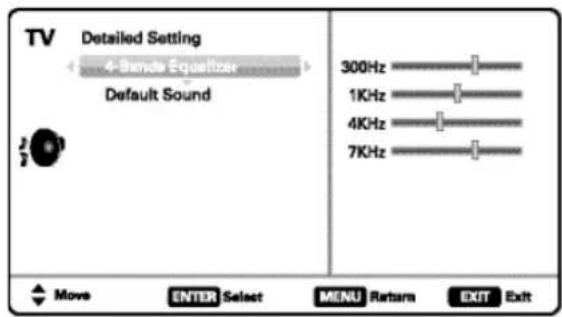
DETAILED SETTING SCREEN

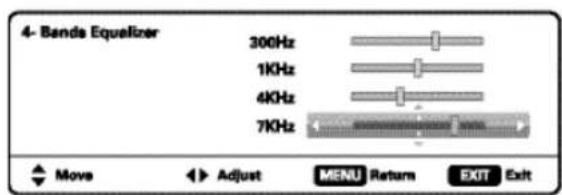
VALUE ADJUSTMENT SCREEN EXAMPLES
PC INPUT
Use your HDTV as a computer monitor by hooking up your PC or Laptop to the TV with the use of an appropriate monitor cable (not included.)

Before connecting any cables, disconnect the AC power cords of both the HDTV and PC from the AC outlets.

Power on the HDTV and any other peripheral equipment before powering on the computer.
To avoid an "Out of Range" condition please set your PC's output resolution to one compatible with your HDTV. See PC Resolution chart on page 3.
NOTE: If computer has only DVI Output, a DVI to RGB adapter will be required, or, a DVI to HDMI cable and RCA audio cables (see HDMI (DVI) INPUT1 on page 7.)
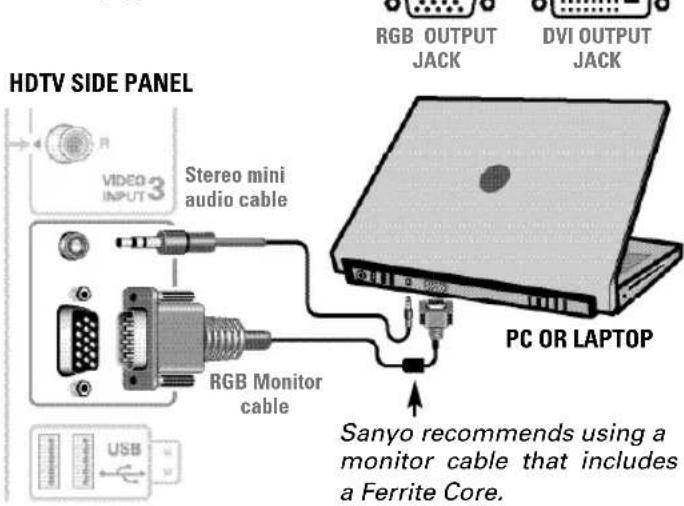
Laptop Display
When using your Sanyo HDTV to display a Laptop's screen display, holding down the Fn (or FN) key while pressing the appropriate function key (F5, F7, F8, etc) should cycle through different display modes between the laptop and the HDTV.
Modes may include displaying only on the laptop screen, on both the laptop and the HDTV, or displaying only on the HDTV.
Hold down and press

NOTE: Fn key and function key symbols on the laptop's keyboard may vary from one brand to another.
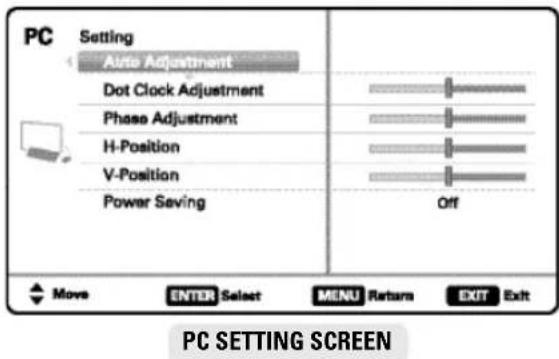
PC Setting
Auto Adjustment – Automatically adjusts display position, dot clock and phase.
Dot Clock - Adjust the Dot frequency to match your computer's Dot frequency.
Phase - Adjust this parameter when the picture appears to flicker or is blurred.
H-Position – Move the image horizontally
V-Position – Move the image vertically
Power Saving – Enable the HDTV to turn to Standby Mode when computer is not in use.
PC Picture and Sound
Standard - Sets predetermined values to the Picture or Sound parameters.
Manual - Adjust Contrast, Brightness, and Color Temperature screen settings, and the Bass and Treble audio settings.
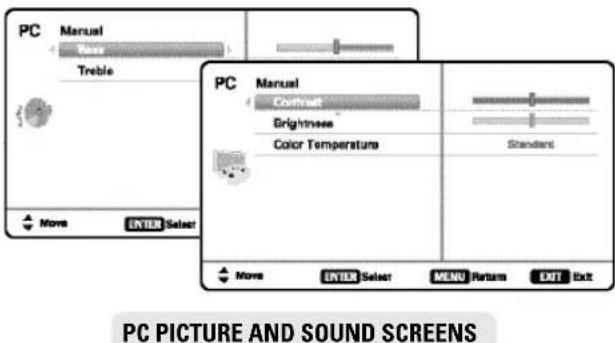
NOTE: These settings do not affect normal TV viewing.
USB INPUT
PHOTO VIEWER
View pictures on your HDTV with the use of a USB mass storage device (not included.)
Any of the two USB inputs on your HDTV may be used.
NOTE: When two mass storage devices are hooked up, only the first one is recognized and available as an input.
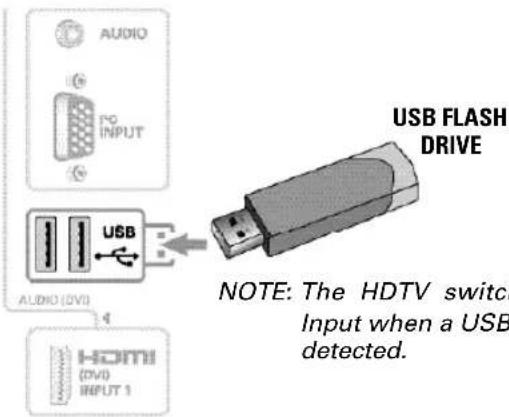
USING THE PHOTO VIEWER
Press ENTER on a thumbnail photo to enable the following menu options:
Rotate: Turns the picture 90°.
Full View: Displays the picture fully on the screen.
NOTE: Use the CURSOR ◀▶ keys to change the picture.
Once in Full View, press ENTER to access the Full View options menu, from where you may choose to Zoom In and Pan the displayed picture, Start Slideshow or return to the Thumbnail View screen.
Start Slideshow: Displays one picture after another automatically in a timed and sequential manner. Shuffle and Quick Change options may be turned ON or OFF from the Slide Show setup menu.
JPEG VIEWER USB MENU
Press MENU when in Full View or Slideshow mode to display the USB On screen menu.
Picture Setting - Adjust Color, Tint, Contrast, Brightness, Sharpness and Dynamic Contrast.
NOTE: Picture Settings are separate configurations from the settings in TV and AV inputs.
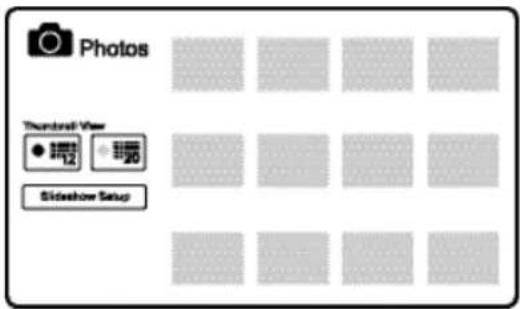
THUMBNAIL VIEW SCREEN
NOTE: A thumbnail hide icon will appear if a picture cannot be decoded or if no thumbnail data is available.
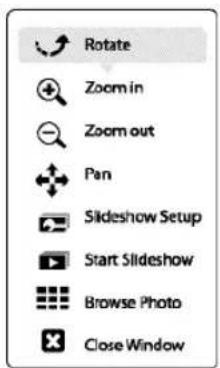
FULL VIEW OPTIONS MENU
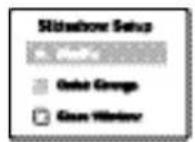
SLIDE SHOW
SETUP MENU
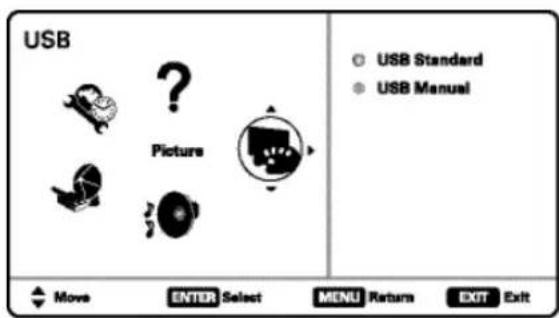
USB MAIN MENU SCREEN
ONE-YEAR LIMITED PARTS AND LABOR WARRANTY
THIS LIMITED PARTS AND LABOR WARRANTY IS VALID ONLY ON SANYO TELEVISIONS PURCHASED AND USED IN THE UNITED STATES OF AMERICA, CANADA, AND PUERTO RICO, EXCLUDING ALL OTHER U.S. TERRITORIES AND PROTECTORATES. THIS LIMITED WARRANTY APPLIES ONLY TO THE ORIGINAL RETAIL PURCHASER, AND DOES NOT APPLY TO PRODUCTS USED FOR INDUSTRIAL OR COMMERCIAL PURPOSES.
WARRANTY APPLICATION
FOR ONE YEAR from the date of original retail purchase Sanyo Manufacturing Corporation (SMC) warrants this TV to be free from manufacturing defects in materials and workmanship under normal use and conditions for parts and labor.
For the FIRST 90 DAYS from the date of original retail purchase, Sanyo Manufacturing Corporation will replace any defective TV via exchange at the retailer. To ensure proper warranty application, keep the original-dated-sales receipt for evidence of purchase. Return the defective TV to the retailer along with the receipt and the included accessories, such as the remote control. The defective TV will be exchanged for the same model, or a replacement model of equal value, if necessary. Replacement model will be contingent on availability and at the sole discretion of Sanyo Manufacturing Corporation.
THE FOREGOING WARRANTY IS EXCLUSIVE AND IN LIEU OF ALL OTHER WARRANTIES OF MERCHANTABILITY OR FITNESS FOR A PARTICULAR PURPOSE.
OBLIGATIONS
For one year from the date of purchase, Sanyo Manufacturing Corporation warrants this product to be free from defects in material and workmanship under normal use and conditions. During the first 90 days under this warranty for any manufacturing defect or malfunction Sanyo Manufacturing Corporation will provide a new TV via exchange at the retailer.
HOW TO MAKE A CLAIM UNDER THIS WARRANTY
Please call 1-877-864-9604. Please be prepared to give us the television's model number and serial number when you call. The model number and serial number are printed on a label attached to the back of the unit.
For customer assistance, call toll free 1-877-864-9604.
Hours of operation: Monday – Friday 7:30 AM - 7:00 PM CST
This warranty expresses specific contractual rights; retail purchasers may have additional statutory rights which vary from state to state.
(EFFECTIVE: March 1, 2007)
Your Sanyo HDTV is registered at the time of purchase, please keep sales receipt for future reference.
For your protection in the event of theft or loss of this product, please fill in the information requested below and KEEP IN A SAFE PLACE FOR YOUR OWN PERSONAL RECORDS.
Model No. Date of Purchase
Serial No. ____ Purchase Price ____
(Located on back of unit)
Where Purchased

Sanyo Manufacturing Corp.
3333 Sanyo Road, Forrest City, AR 72335
Need help?

www.sanyoctv.com

1-877-864-9604
This product incorporates the following software:
- the software developed independently by or for Sanyo Electric Co., Ltd.,
- the software owned by third party and licensed to Sanyo Electric Co., Ltd.,
- the software licensed under the GNU General Public License, Version 2 (GPL v2),
- the software licensed under the GNU LESSER General Public License (LGPL) and/or,
- sourced software other than the software licensed under the GPL and/or LGPL
For the software categorized as (3) and (4), please refer to the terms and conditions of GPL v2 and LGPL, as the case may be at:
http://www.gnu.org/licenses/old-licenses/gpl-2.0.html
http://www.gnu.org/licenses/old-licenses/lgpI-2.1.html
In addition, the software categorized as (3) and (4) are copyrighted by several individuals. The copyright notice of those individuals is written in the media to be provided upon request.
The GPL/LGPL software is distributed in the hope that it will be useful, but WITHOUT ANY WARRANTY, without even the implied warranty of MERCHANTABILITY or FITNESS FOR A PARTICULAR PURPOSE.
At least three (3) years from delivery of products, Sanyo Electric Co., Ltd. will give to any third party who contact us at the contact information provided below, for a charge no more than our cost of physically performing source code distribution, a complete machine-readable copy of the corresponding source code covered under GPL v2/LGPL.
Contact Information: GPL_Inquiries@SanyoTV.com
GNU GENERAL PUBLIC LICENSE
Version 2, June 1991
Copyright (C) 1989, 1991 Free Software Foundation, Inc., 51 Franklin Street, Fifth Floor, Boston, MA 02110-1301 USA
Everyone is permitted to copy and distribute verbatim copies of this license document, but changing it is not allowed.
Preamble
The licenses for most software are designed to takaway your freedom to share and change it. By contrast, the GNU General Public License is intended to guarantee your freedom to share and change free software--to make sure the software is free for all its users. This General Public License applies to most of the Free
Software
Foundation's software and to any other program whose authors commit to using it. (Some other Free Software Foundation software is covered by the GNU Lesser General Public License instead.) You can apply it to your programs, too.
When we speak of free software, we are referring to freedom, not price. Our General Public Licenses are designed to make sure that you have the freedom to distribute copies of free software (and charge for this service if you wish), that you receive source code or can get it if you want it, that you can change the software or use pieces of it in new free programs; and that you know you can do these things.
To protect your rights, we need to make restrictions that forbid anyone to deny you these rights or to ask you to surrender the rights. These restrictions translate to certain responsibilities for you if you distribute copies of the software, or if you modify it.
For example, if you distribute copies of such a program, whether free or for a fee, you must give the recipients all the rights that you have. You must make sure that they, too, receive or can get the source code. And you must show them these terms so they know their rights.
We protect your rights with two steps: (1) copyright the software, and (2) offer you this license which gives you legal permission to copy, distribute and/or modify the software.
Also, for each author's protection and ours, we want to make certain that everyone understands that there is no warranty for this free software. If the software is modified by someone else and passed on, we want its recipients to know that what they have is not the original, so that any problems introduced by others will not reflect on the original authors' reputations.
Finally, any free program is threatened constantly by software patents. We wish to avoid the danger that redistributors of a free program will individually obtain patent licenses, in effect making the program proprietary. To prevent this, we have made it clear that any patent must be licensed for everyone's free use or not licensed at all.
The precise terms and conditions for copying, distribution and modification follow.
GNU GENERAL PUBLIC LICENSE TERMS AND CONDITIONS FOR COPYING, DISTRIBUTION AND MODIFICATION
- This License applies to any program or other work which contains a notice placed by the copyright holder saying it may be distributed under the terms of this General Public License. The "Program", below, refers to any such program or work, and a "work based on the Program" means either the Program or any derivative work under copyright law: that is to say, a work containing the Program or a portion of it, either verbatim or with modifications and/or translated into another language. (Hereinafter, translation is included without limitation in the term "modification".) Each licensee is addressed as "you".
Activities other than copying, distribution and modification are not covered by this License; they are outside its scope. The act of running the Program is not restricted, and the output from the Program is covered only if its contents constitute a work based on the Program (independent of having been made by running the Program). Whether that is true depends on what the Program does.
- You may copy and distribute verbatim copies of the Program's source code as you receive it, in any medium, provided that you conspicuously and appropriately publish on each copy an appropriate copyright notice and disclaimer of warranty; keep intact all the notices that refer to this License and to the absence of any warranty; and give any other recipients of the Program a copy of this License along with the Program.
You may charge a fee for the physical act of transferring a copy, and you may at your option offer warranty protection in exchange for a fee.
- You may modify your copy or copies of the Program or any portion of it, thus forming a work based on the Program, and copy and distribute such modifications or work under the terms of Section 1 above, provided that you also meet all of these conditions:
a) You must cause the modified files to carry prominent notices stating that you changed the files and the date of any change.
b) You must cause any work that you distribute or publish, that in whole or in part contains or is derived from the Program or any part thereof, to be licensed as a whole at no charge to all third parties under the terms of this License.
c) If the modified program normally reads commands interactively when run, you must cause it, when started running for such interactive use in the most ordinary way, to print or display an announcement including an appropriate copyright notice and a notice that there is no warranty (or
else, saying that you provide a warranty) and that users may redistribute the program under these conditions, and telling the user how to view a copy of this License. (Exception: if the Program itself is interactive but does not normally print such an announcement, your work based on the Program is not required to print an announcement.)
These requirements apply to the modified work as a whole. If identifiable sections of that work are not derived from the Program, and can be reasonably considered independent and separate works in themselves, then this License, and its terms, do not apply to those sections when you distribute them as separate works. But when you distribute the same sections as part of a whole which is a work based on the Program, the distribution of the whole must be on the terms of this License, whose permissions for other licensees extend to the entire whole, and thus to each and every part regardless of who wrote it.
Thus, it is not the intent of this section to claim rights or contest your rights to work written entirely by you; rather, the intent is to exercise the right to control the distribution of derivative or collective works based on the Program.
In addition, mere aggregation of another work not based on the Program with the Program (or with a work based on the Program) on a volume of a storage or distribution medium does not bring the other work under the scope of this License.
- You may copy and distribute the Program (or a work based on it, under Section 2) in object code or executable form under the terms of Sections 1 and 2 above provided that you also do one of the following:
a) Accompany it with the complete corresponding machine-readable source code, which must be distributed under the terms of Sections 1 and 2 above
b) Accompany it with a written offer, valid for at least three years, to give any third party, for a charge no more than your cost of physically performing source distribution, a complete machine-readable copy of the corresponding source code, to be distributed under the terms of Sections 1 and 2 above on a medium customarily used for software interchange; or,
c) Accompany it with the information you received as to the offer to distribute corresponding source code. (This alternative is allowed only for noncommercial distribution and only if you received the program in object code or executable form with such an offer, in accord with Subsection b above.)
The source code for a work means the preferred form of the work for making modifications to it. For an executable work, complete source code means all the source code for all modules it contains, plus any associated interface definition files, plus the scripts used to control compilation and installation of the executable. However, as a special exception, the source code distributed need not include anything that is normally distributed (in either source or binary form) with the major components (compiler, kernel, and so on) of the operating system on which the executable runs, unless that component itself accompanies the executable.
If distribution of executable or object code is made by offering access to copy from a designated place, then offering equivalent access to copy the source code from the same place counts as distribution of the source code, even though third parties are not compelled to copy the source along with the object code.
- You may not copy, modify, sublicense, or distribute the Program except as expressly provided under this License. Any attempt otherwise to copy, modify, sublicense or distribute the Program is void, and will automatically terminate your rights under this License. However, parties who have received copies, or rights, from you under this License will not have their licenses terminated so long as such parties remain in full compliance.
- You are not required to accept this License, since you have not signed it. However, nothing else grants you permission to modify or distribute the Program or its derivative works. These actions are prohibited by law if you do not accept this License. Therefore, by modifying or distributing the Program (or any work based on the Program), you indicate your acceptance of this License to do so, and all its terms and conditions for copying, distributing or modifying the Program or works based on it.
- Each time you redistribute the Program (or any work based on the Program), the recipient automatically receives a license from the original licensor to copy, distribute or modify the Program subject to these terms and conditions. You may not impose any further restrictions on the recipients' exercise of the rights granted herein. You are not responsible for enforcing compliance by third parties to this License.
- If, as a consequence of a court judgment or allegation of patent infringement or for any other reason (not limited to patent issues), conditions are imposed on you (whether by court order, agreement or otherwise) that contradict the conditions of this License, they do not excuse you from the conditions of this License. If you cannot distribute so as to satisfy simultaneously your obligations under this License and any other pertinent obligations, then as a consequence you may not distribute the Program at all. For example, if a patent license
would not permit royalty-free redistribution of the Program by all those who receive copies directly or indirectly through you, then the only way you could satisfy both it and this License would be to refrain entirely from distribution of the Program.
If any portion of this section is held invalid or unenforceable under any particular circumstance, the balance of the section is intended to apply and the section as a whole is intended to apply in other circumstances.
It is not the purpose of this section to induce you to infringe any patents or other property right claims or to contest validity of any such claims; this section has the sole purpose of protecting the integrity of the free software distribution system, which is implemented by public license practices. Many people have made generous contributions to the wide range of software distributed through that system in reliance on consistent application of that system; it is up to the author/donor to decide if he or she is willing to distribute software through any other system and a licensee cannot impose that choice. This section is intended to make thoroughly clear what is believed to be a consequence of the rest of this License.
- If the distribution and/or use of the Program is restricted in certain countries either by patents or by copyrighted interfaces, the original copyright holder who places the Program under this License may add an explicit geographical distribution limitation excluding those countries, so that distribution is permitted only in or among countries not thus excluded. In such case, this License incorporates the limitation as if written in the body of this License.
- The Free Software Foundation may publish revised and/or new versions of the General Public License from time to time. Such new versions will be similar in spirit to the present version, but may differ in detail to address new problems or concerns.
Each version is given a distinguishing version number. If the Program specifies a version number of this License which applies to it and "any later version", you have the option of following the terms and conditions either of that version or of any later version published by the Free Software Foundation. If the Program does not specify a version number of this License, you may choose any version ever published by the Free Software Foundation.
- If you wish to incorporate parts of the Program into other free programs whose distribution conditions are different, write to the author to ask for permission. For software which is copyrighted by the Free Software Foundation, write to the Free Software Foundation; we sometimes make exceptions for this. Our decision will be guided by the two goals of preserving the free status of all derivatives of our free software and of promoting the sharing and reuse of software generally.
NO WARRANTY
-
BECAUSE THE PROGRAM IS LICENSED FREE OF CHARGE, THERE IS NO WARRANTY FOR THE PROGRAM, TO THE EXTENT PERMITTED BY APPLICABLE LAW. EXCEPT WHEN OTHERWISE STATED IN WRITING THE COPYRIGHT HOLDERS AND/OR OTHER PARTIES PROVIDE THE PROGRAM "AS IS" WITHOUT WARRANTY OF ANY KIND, EITHER EXPRESSED OR IMPLIED, INCLUDING, BUT NOT LIMITED TO, THE IMPLIED WARRANTIES OF MERCHANTABILITY AND FITNESS FOR A PARTICULAR PURPOSE. THE ENTIRE RISK AS TO THE QUALITY AND PERFORMANCE OF THE PROGRAM IS WITH YOU. SHOULD THE PROGRAM PROVE DEFECTIVE, YOU ASSUME THE COST OF ALL NECESSARY SERVICING, REPAIR OR CORRECTION.
-
IN NO EVENT UNLESS REQUIRED BY APPLICABLE LAW OR AGREED TO IN WRITING WILL ANY COPYRIGHT HOLDER, OR ANY OTHER PARTY WHO MAY MODIFY AND/OR REDISTRIBUTE THE PROGRAM AS PERMITTED ABOVE, BE LIABLE TO YOU FOR DAMAGES, INCLUDING ANY GENERAL, SPECIAL, INCIDENTAL OR CONSEQUENTIAL DAMAGES ARISING OUT OF THE USE OR INABILITY TO USE THE PROGRAM (INCLUDING BUT NOT LIMITED TO LOSS OF DATA OR DATA BEING RENDERED INACCURATE OR LOSSES SUSTAINED BY YOU OR THIRD PARTIES OR A FAILURE OF THE PROGRAM TO OPERATE WITH ANY OTHER PROGRAMS), EVEN IF SUCH HOLDER OR OTHER PARTY HAS BEEN ADVISED OF THE POSSIBILITY OF SUCH DAMAGES.
END OF TERMS AND CONDITIONS
How to Apply These Terms to Your New Programs
If you develop a new program, and you want it to be of the greatest possible use to the public, the best way to achieve this is to make it free software which everyone can redistribute and change under these terms. To do so, attach the following notices to the program. It is safest to attach them to the start of each source file to most effectively convey the exclusion of warranty; and each file should have at least the "copyright" line and a pointer to where the full notice is found.
Copyright (C)
This program is free software; you can redistribute it and/or modify it under the terms of the GNU General Public License as published by the Free Software Foundation; either version 2 of the License, or (at your option) any later version.
This program is distributed in the hope that it will be useful, but WITHOUT ANY WARRANTY; without even the implied warranty of MERCHANTABILITY or FITNESS FOR A PARTICULAR PURPOSE. See the GNU General Public License for more details. You should have received a copy of the GNU General Public License along with this program; if not, write to the Free Software Foundation, Inc., 51 Franklin Street, Fifth Floor, Boston, MA 02110-1301 USA.
Also add information on how to contact you by electronic and paper mail.
If the program is interactive, make it output a short notice like this when it starts in an interactive mode:
Gnomovision version 69, Copyright (C) year name of author Gnomovision comes with ABSOLUTELY NO WARRANTY; for details type `show w'. This is free software, and you are welcome to redistribute it under certain conditions; type `show c' for details.
The hypothetical commands `show w' and `show c' should show the appropriate parts of the General Public License. Of course, the commands you use may be called something other than `show w' and `show c'; they could even be mouse-clicks or menu items--whatever suits your program.
You should also get your employer (if you work as a programmer) or your school, if any, to sign a "copyright disclaimer" for the program, if necessary. Here is a sample; alter the names:
Yoyodyne, Inc., hereby disclaims all copyright interest in the program 'Gnomovision' (which makes passes at compilers) written by James Hacker.
Ty Coon, President of Vice
This General Public License does not permit incorporating your program into proprietary programs. If your program is a subroutine library, you may consider it more useful to permit linking proprietary applications with the library. If this is what you want to do, use the GNU Lesser General Public License instead of this License.
PRECAUCIÓN
PONER LA BASE
natural_image
Technical illustration of a cable connector with two views: one showing a conical tip and the other showing a threaded connector (no text or symbols)natural_image
Diagram of a network device with four connected audio and microphone ports (no text or labels)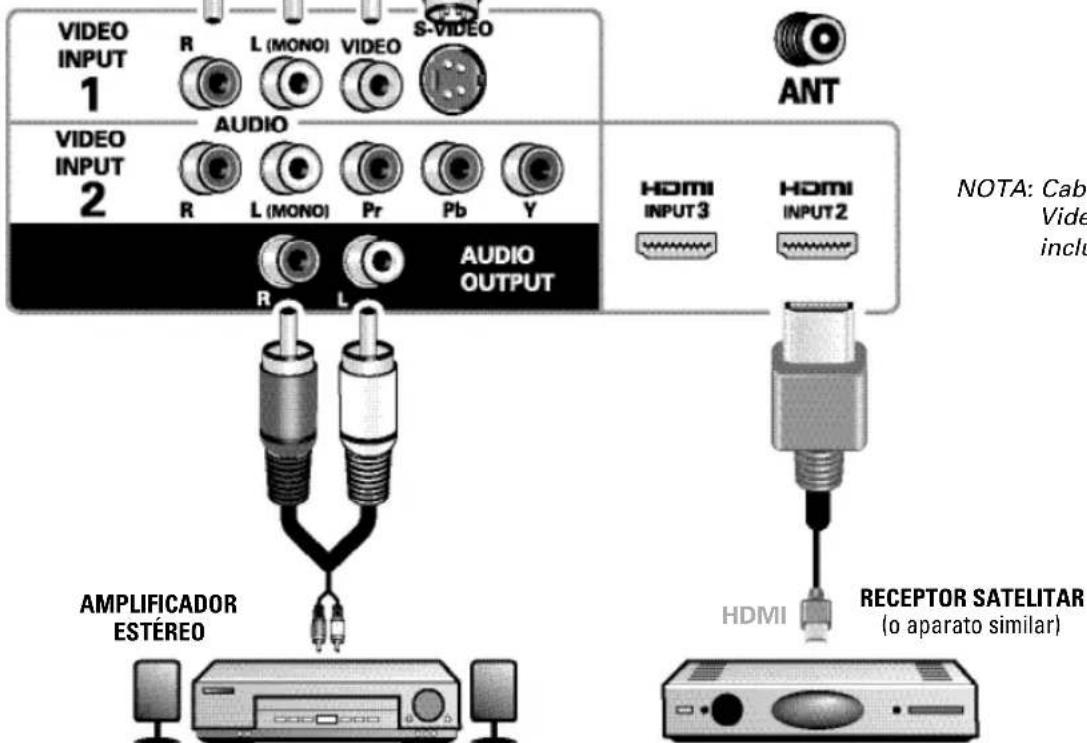
Please select the proper location for your TV, the display will be adjusted for best results.
- Press Channel UP for Store Mode.
- Press Channel DOWN for Home Mode.
Store mode is for the retail display setup. Home mode qualifies for ENERGY STAR.
Please connect all antennas* and signals to the jacks and terminals. Make sure all of your equipment is switched on.
- Press Channel UP or DOWN for Channel/Signal search.
- Press VOLUME DOWN for On Screen Help.
• To avoid signal interference when searching for channels using an Indoor Antenna, place the antenna at least 3 feet away from TV.
Channel and Signal Setup:
Analog Channels...16
Video 1...Yes
Video 2...no
Video 3...no
Digital Channels...24
HDMI 1...Yes
HDMI 2...no
HDMI 3...no
Press Channel UP or DOWN to exit the Setup process. Press Volume DOWN to repeat the process.
If you are having problems, call us toll-free at 1-800-877-5032
CEC (Consumer Electronics Control)
natural_image
Close-up of a metallic handheld device with a cylindrical lens (no visible text or symbols)V - Chip (Control paternal)
natural_image
Geometric diagram with a central shaded square and surrounding circles, no text or symbols present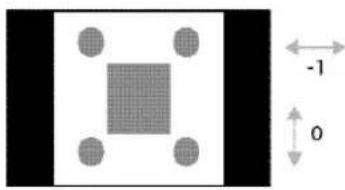
natural_image
Geometric diagram with a central square and surrounding circles, labeled with dimensions -1 and 0 (no text or symbols beyond basic geometry)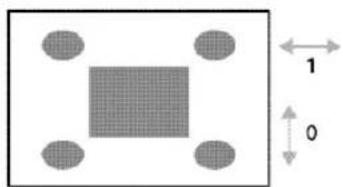
natural_image
Simple geometric diagram with a central shaded square and four surrounding circles, labeled with dimensions 1 and 0 (no text or symbols beyond labels)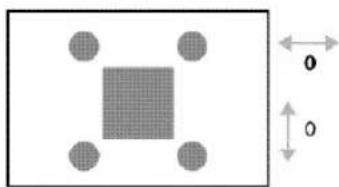
natural_image
Geometric diagram with a central square and surrounding circles, no text or symbols present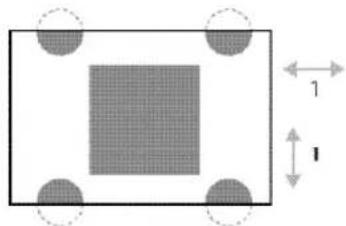
natural_image
Simple geometric diagram showing a rectangle with a shaded square and four circular holes, each labeled with dimension '1' (no text or symbols beyond basic geometry)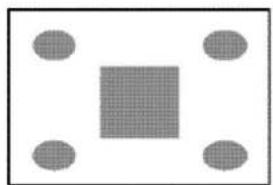
natural_image
Simple geometric diagram with a central square and four surrounding circles (no text or symbols)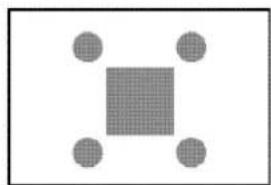
natural_image
Simple geometric diagram with a central square surrounded by four surrounding circles (no text or symbols)Sanyo Manufacturing Corp. 3333 Sanyo Road, Forrest City, AR 72335
¿Necesita ayuda?

www.sanyoctv.com

1-877-864-9604
NOTES / ANOTACIONES
NOTES / ANOTACIONES
For assistance:
Visit our Web site:
www.sanyoctv.com
or call toll free:
1-800-877-5032
We'll be glad to Help
SANYO
Sanyo Manufacturing Corp.
3333 Sanyo Road, Forrest City, AR 72335
Printed in Mexico SMC, October 2010
- CAUTION
- RISK OF ELECTRIC SHOCK DO NOT OPEN!
- IMPORTANT SAFETY INSTRUCTIONS
- FCC INFORMATION
- TRADEMARKS
- CONTENTS
- SPECIFICATIONS
- Please read before operating your HDTV!
- PROTECTING THE SCREEN
- HANDLING PRECAUTIONS
- POSITIONING THE HDTV
- STAND REMOVAL
- STAND ASSEMBLY
- WALL MOUNTING
- GETTING STARTED
- BATTERY INSTALLATION
- To ensure safe operation, please observe the following precautions:
- ANTENNA CONNECTION FOR OFF-AIR SIGNALS OR CABLE
- HDTV INPUT/OUTPUT REFERENCE
- S-Video Input (VIDEO1)
- PC Input and Stereo Audio (Mini)
- USB Input
- HDMI (INPUT1) – An all digital AV interface accepting uncompressed video signals up to 1080p for the very best picture possible.
- ETHERNET Port
- AUDIO / VIDEO CONNECTIONS (SIDE PANEL)
- AUDIO / VIDEO CONNECTIONS (BACK PANEL)
- GETTING STARTED (CONTINUED)
- INITIAL CHANNEL SEARCH
- PLUG IN AC POWER CORD
- TURN ON TV (PRESS POWER BUTTON)
- TV SET LOCATION SELECTION:
- CHANNEL AND AV SIGNAL SEARCH:
- ON SCREEN HELP (OPTIONAL)
- CHANNEL AND SIGNAL SETUP SCREEN
- AV INPUT SELECTION
- INITIAL ENERGY SAVING MODE SCREEN
- INITIAL CHANNEL/SIGNAL SEARCH SETUP SCREEN
- CHANNEL SEARCH PROGRESS SCREEN
- CHANNEL/SIGNAL LIST SCREEN
- Channel Search
- Channel Scan Memory
- Input Setting
- HDMI Linking
- CEC (Consumer Electronics Control)
- Xacti-LINK
- Menu Language
- Digital Caption
- Energy Setting
- Clock Timer
- Motion Sync
- ADJUSTING THE V-CHIP RATINGS
- ADVANCED V-CHIP SYSTEM (RRT5)
- MORE INFORMATION
- MANUAL PICTURE SETTINGS
- ADJUSTING A PICTURE SETTING
- PIX SHAPE
- Pix1
- Pix2
- Pix3
- Pix4
- Pix5
- MANUAL SOUND SETTINGS
- ADJUSTING A SOUND SETTING
- PC INPUT
- To avoid an "Out of Range" condition please set your PC's output resolution to one compatible with your HDTV. See PC Resolution chart on page 3.
- Laptop Display
- PC Setting
- PC Picture and Sound
- USB INPUT
- PHOTO VIEWER
- USING THE PHOTO VIEWER
- JPEG VIEWER USB MENU
- ONE-YEAR LIMITED PARTS AND LABOR WARRANTY
- WARRANTY APPLICATION
- OBLIGATIONS
- HOW TO MAKE A CLAIM UNDER THIS WARRANTY
- GNU GENERAL PUBLIC LICENSE
- Version 2, June 1991
- Preamble
- Software
- GNU GENERAL PUBLIC LICENSE TERMS AND CONDITIONS FOR COPYING, DISTRIBUTION AND MODIFICATION
- NO WARRANTY
- END OF TERMS AND CONDITIONS
- PRECAUCIÓN
- PONER LA BASE
- V - Chip (Control paternal)
- NOTES / ANOTACIONES
Brand : SANYO
Model : DP47460
Category : Television