FW65D25T - Television SANYO - Free user manual and instructions
Find the device manual for free FW65D25T SANYO in PDF.

User questions about FW65D25T SANYO
0 question about this device. Answer the ones you know or ask your own.
Ask a new question about this device
Download the instructions for your Television in PDF format for free! Find your manual FW65D25T - SANYO and take your electronic device back in hand. On this page are published all the documents necessary for the use of your device. FW65D25T by SANYO.
USER MANUAL FW65D25T SANYO
To obtain a more detail Electronic Copy of this Manual or much further contents, go to
Need help? Please Call Toll Free or visit our Web Site above:
This symbol indicates that this product incorporates double insulation between hazardous main voltage and user accessible parts. When servicing, use only identical replacement parts.
Caution: To reduce the risk of electric shock, do not remove cover (or back). No user serviceable parts inside. Refer servicing to qualified service personnel.

This symbol indicates "dangerous voltage" inside the product that presents a risk of electric shock or personal injury.

This symbol indicates important instructions accompanying the product.
WARNING
To reduce the risk of fire or electric shock, do not expose this product to rain or moisture. This product should not be exposed to dripping or splashing. No objects filled with liquids, such as vases, should be placed on the apparatus.
WARNING
The TV is unstable if it is not properly attached to the base or mounted to the wall. Please follow the base or wall mounting instructions provided in the User's Guide to ensure your safety.
WARNING The batteries shall not be exposed to excessive heat such as sunshine, fire or the like.
WARNING
The mains plug is used as disconnect device, the disconnect device shall remain readily operable.
Important Safety Instructions
- Read these instructions.
- Keep these instructions.
- Heed all warnings.
- Follow all instructions.
- Do not use this apparatus near water.
-
Clean only with dry cloth.
-
Do not block any ventilation openings. Install in accordance with the manufacture's instructions.
-
Do not install near any heat sources such as radiators, heat registers, stoves, or other apparatus (including amplifiers) that produce heat.
-
Do not defeat the safety purpose of the polarized or grounding plug. A polarized plug has two blades with one wider than the other. A grounding plug has two blades and a third grounding prong. The wide blade or the third prong is provided for your safety. If the provided plug does not fit into your outlet, consult an electrician for replacement of the obsolete outlet.
-
Protect the power cord from being walked on or pinched particularly at the plugs, convenience receptacles, and at the point where they exit from the apparatus.
-
Only use attachments/accessories specified by the manufacturer.
-
Use only with the cart, stand, tripod, bracket, or table specified by the manufacturer, or sold with the apparatus. When a cart or rack is used, use caution when moving the cart/apparatus combination to avoid injury from tip-over.

-
Unplug the apparatus during lightning storms or when unused for long periods of time.
-
Refer all servicing to qualified personnel. Servicing is required when the apparatus has been damaged in any way, such as power supply cord or plug is damaged, liquid has been spilled or objects have fallen into the apparatus has been exposed to rain or moisture, does not operate normally, or has been dropped.
-
WARNING: To prevent injury, this apparatus must be securely attached to the floor/wall in accordance with the installation instruction.
-
If an outside antenna or cable system is connected to the product, be sure the antenna or cable system is grounded so as to provide some protection against voltage surges and built-up static charges. Section 810 of the National Electrical Code, ANSI/NFPA No. 70-1984 (Section 54 of Canadian Electrical Code, Part 1) provides information with respect to proper grounding of the mast and supporting structure, grounding of the lead-in wire to an antenna-discharge unit, size of grounding conductors, location of antenna-discharge unit, connection to grounding electrodes, and requirements for the grounding electrode. See following example:
Need help? sanyo-av.com 1-800-877-5032
Important Safety Instructions
- An outside antenna system should not be located in the vicinity of overhead power lines or other electrical light or power circuits, or where it can fall into such power lines or circuits. When installing an outside antenna system, extreme care should be taken to keep from touching such power lines or circuits as contact with them might be fatal.
EXAMPLE OF ANTENNA GROUNDING ACCORDING TO NATIONAL ELECTRICAL CODE, ANSI/NFPA 70

- Wall or Ceiling Mounting – The product should be mounted to a wall or ceiling only as recommended by the manufacturer.
- Apparatus shall not be exposed to dripping or splashing, and no object filled with liquids, such as vases, shall be placed on it.
- When the MAINS plug is used as the disconnect device, the disconnect device shall remain readily operable.
Note to CATV system installer:
This reminder is provided to call CATV system installer's attention to Article 820-40 of the NEC that provides guideline for proper grounding and, in particular, specifies that the cable ground shall be connected to the grounding system of the building, as close to the point of cable entry as practical."
Important Information .... 1
Important Safety Instructions 2
Chapter 1: Connections and Setup
Before Initial Setup 5
Check Supplied Parts.... 5
Attaching Your TV to the Stand Base.... 6
Mounting Your TV to the Wall 7
Buttons on the TV 8
Explanation of jacks on TV 8
Choose Your Connections ....10
Remote Control Functions 12
Obtain the Signal 13
Switching On 13
Switching Off 13
Setup Wizard 14
Input List 16
Chapter 2: Menu Operation
Menu 16
Picture 16
Sound 17
Channel 18
Setup 19
Lock 20
Help 21
PC 22
VIDEO/HDMI 23
USB 23
Photo 23
Chapter 3: Other Information
Frequently Asked Questions (FAQS) 24
Troubleshooting 25
Care and Cleaning 27
Television Specifications ....27
Specification 27
Limited Warranty 28
Need help? sanyo-av.com 1-800-877-5032
Before Initial Setup
Protect Against Power Surges
- Connect all components before you plug any power cords into the wall outlet or power strip.
- NEVER plug your TV into an outlet that is controlled by a wall switch.
- Turn off the TV before you connect or disconnect any cables.
- Make sure all antennas and cables are properly grounded. Refer to the Important Safety Instructions.
Safety Information
- Protect components from overheating.
- Don't block ventilation holes on any of the components. Arrange the components so that air can circulate freely.
- Don't stack components.
- If you place the component in a stand, make sure you allow adequate ventilation.
- If you connect an audio receiver or amplifier, place it on the top shelf so the heated air from it won't harm other components.
Avoid Audio Interference
- Position cables properly; insert each cable firmly into the designated jack.
- If you place components above the TV, route all cables down one side of the back of the TV instead of straight down the middle.
- If your antenna uses 300-ohm twin lead cables, do not coil the cables.
- Keep twin lead cables away from audio/video cables.
Avoid Direct Light
Don't place the TV where sunlight or room lighting is directed toward the screen. Use soft or indirect lighting.
Check Supplied Parts
Check that the following parts were packed with your product.
- Remote Control
- Parts for Stand Base
- Owner's Manual
• QUICK'N EASY Setup Guide
Graphics contained within this publication are presentation only.
Need help? sanyo-av.com 1-800-877-5032
Attaching Your TV to the Stand Base
Your TV comes with the stand base unassembled table you can choose to mount your TV either to its stand or to a wall (wall mount sold separately). If you want to mount your TV to the wall, skip the stand assembly instructions and follow the Mounting Your TV to the Wall instructions.
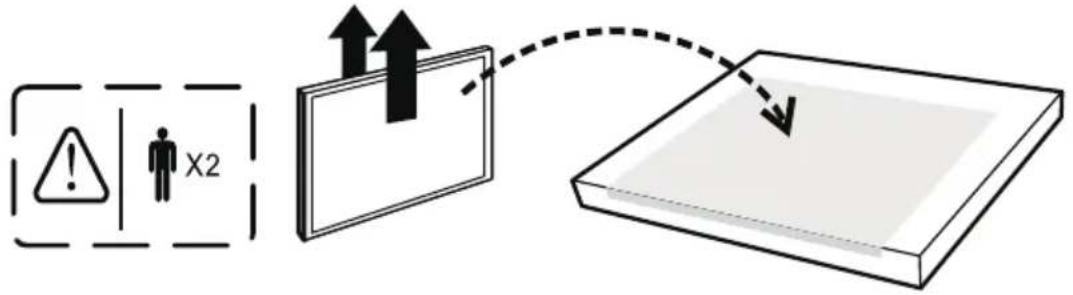
First, remove the TV bag and place it on a large, flat surface such as a table or countertop. Remove the TV from the carton and place it face down on the TV bag. Be sure that the TV is face down to avoid scratching the screen.
Then follow the steps below:
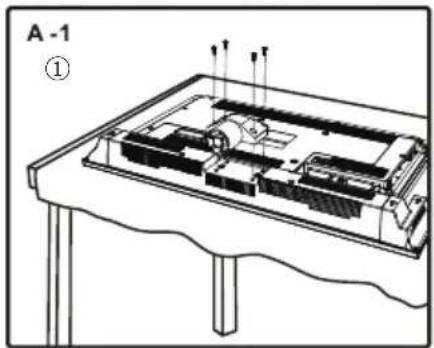
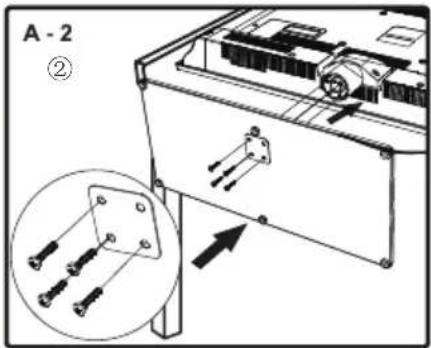
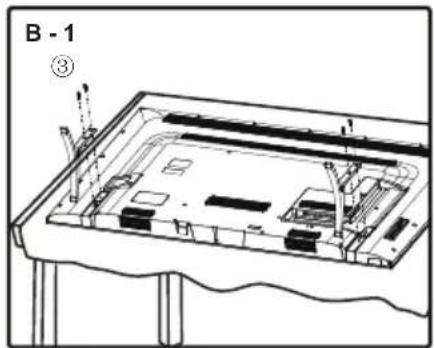
Note: The picture of stand installation is just for the reference, please base on the material object for the real sample.
For FW65D25T please see B -1.
| Model Mounting screws measurements | Note:Stand base screws are located in the literature package. | |
| FW32D25T | 1 M4 (4mm) Diameter, Length-12mm (maximum) x 4 | |
| 2 ST4 (4mm) Diameter, Length-20mm (maximum) x 4 | ||
| FW42D25T | 1 M5 (5mm) Diameter, Length-12mm (maximum) x 4 | |
| 2 ST4 (4mm) Diameter, Length-20mm (maximum) x 4 | ||
| FW65D25T | 3 M5 (5mm) Diameter, Length-20mm (maximum) x 4 | |
Mounting Your TV to the Wall
If you are mounting your TV to the wall, don't attach the table stand.
| To mount your TV to the wall, purchase a VESA compatible wall mount. | |
| For FW32D25T | Purchase a VESA 200 x 100, M4 screw |
| For FW42D25T | Purchase a VESA 200 x 200, M6 screw |
| For FW65D25T | Purchase a VESA 400 x 400, M6 screw |
The VESA number is the horizontal and vertical measurement of the mounting holes. For example, 400x200 refers to the fact that the mounting measurements are 400mm horizontally and 200mm vertically.
Recommendation to buy screws: FW32D25T M4X10.max(10mm)
FW42D25T M6X20.max(20mm)
FW65D25T M6X15.max(15mm)
Notes: Follow the directions included with the wall mount to mount the TV to the wall.
Caution: Your wall mount must be able to bear a minimum of five times the TV's net weight to avoid causing damage.
IMPORTANT:
Wall mount kit must comply with VESA standard hole pattern.
All four (4) screws must be threaded to the wall mount and HDTV's back cabinet.
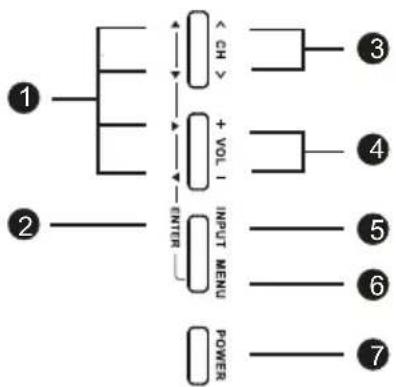
Buttons on the TV
Take a certain model for an example:


flowchart
graph TD
    A["①"] --> B["△"]
    B --> C["△"]
    C --> D["△"]
    D --> E["← CH >"]
    E --> F["③"]
    A --> G["△"]
    G --> H["+ VOL I"]
    H --> I["△"]
    I --> J["④"]
    A --> K["△"]
    K --> L["ENTER"]
    L --> M["○ INPUT MENU"]
    M --> N["⑤"]
    M --> O["⑥"]
    M --> P["⑦"]
    M --> Q["POWER"]
(Please base on the material object for the real sample.)
If you cannot locate your remote, you can use the TV panel buttons on your TV to operate many TV features.
1 ▲/▼◀/▶ (arrows) Highlights different items in the TV menu and adjusts the menu controls.
② ENTER When the TV is in the menu system, press to confirm your selection.
3 CHΛ/V Selects channels stored in the channel list.
4 VOL+/- Increases/decreases the volume.
5 INPUT Selects the signal source.
6 MENU Brings up the TV's main menu.
7 POWER Turns the TV on or to standby mode.
Explanation of Jacks on TV
This section describes the jacks on the backside of your TV. There are several ways to connect devices.
Need help? sanyo-av.com 1-800-877-5032

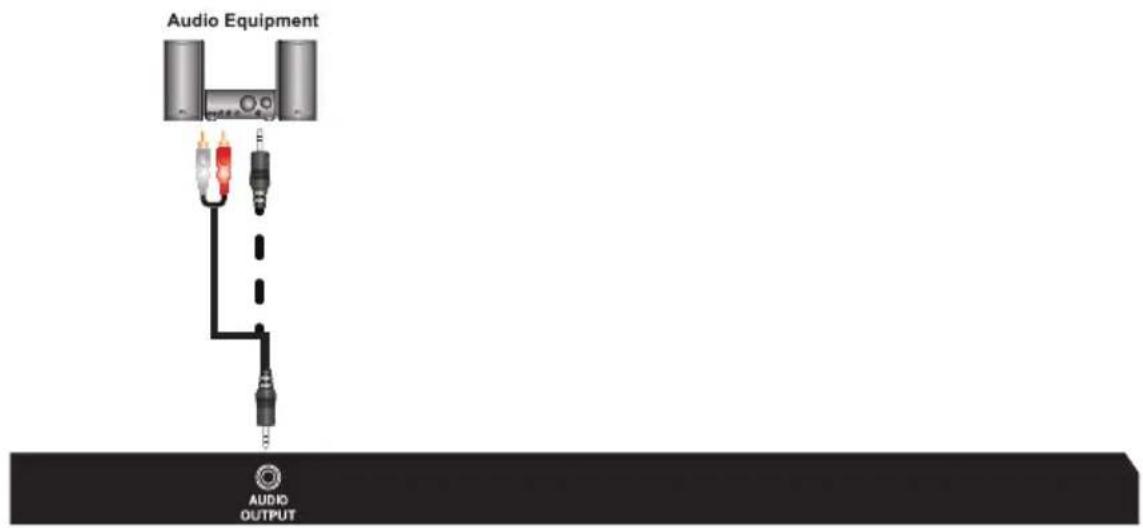
AUDIO OUTPUT the socket provides composite audio connection. The TV can support amplified high power audio equipment. Please adjust the volume directly on the external audio equipment. Please do not connect headphones directly to the TV.

OPTICAL OUTPUT: It is possible to output audio through the digital audio terminal.
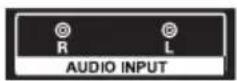
L/R AUDIO Provides left and right audio connection when using the component input. Red and white jacks for R AUDIO and L AUDIO connection.
(Note: AUDIO/VIDEO IN and COMPONENT IN share the same L/R AUDIO input jacks.)
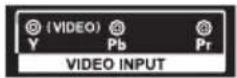
Y Pb Pr (Component Video) Provides good picture quality because the video is separated into three signals. Use component video cables for the connection.
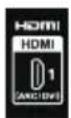
HDMI 1/DVI IN (High-Definition Multimedia Interface/Digital Visual Interface)
Provides an uncompressed digital connection that carries both video and audio data by way of an integrated mini-plug cable. Since HDMI technology is based on Digital Visual Interface (DVI), the jack on the side of your TV is also compatible with DVI devices.
(For DVI input, it's audio input is shared with PC audio input)
Note: For the audio receiver control ARC, firstly you must have a device which supports HDMI ARC, then connect it to the HDMI1 port. When the "ARC/CEC Setting" is enabled on your TV, the TV set's speakers will mute automatically and the audio will be outputted on your ARC sound device system.
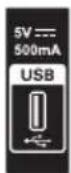
USB Allows you to connect a compatible mass storage device for the display of JPEG pictures on the TV.
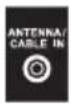
ANTENNA/CABLE IN this socket can be used to connect the outside aerial (including the analog signal and the digital signal)

DVI/PC AUDIO IN (used for DVI/PC only) Provides audio connection when using HDMI/DVI INPUT 1 jack for DVI or when using PC VIDEO IN.
Note: If using a DVI device, remember to connect the audio cable because the DVI cable carries only the picture signal, not the sound.
PC IN Connect your computer or other device with a VGA output to this jack using a 15-pin, D-sub cable.
HDMI 2 (High-Definition Multimedia Interface)
Provides an uncompressed digital connection that carries both video and audio data by way of an integrated mini-plug cable.
HDMI 3 IN Lets you connect a Device such as a Digitalcable box, with an HDMI output for the best picture quality.
Need help? sanyo-av.com 1-800-877-5032
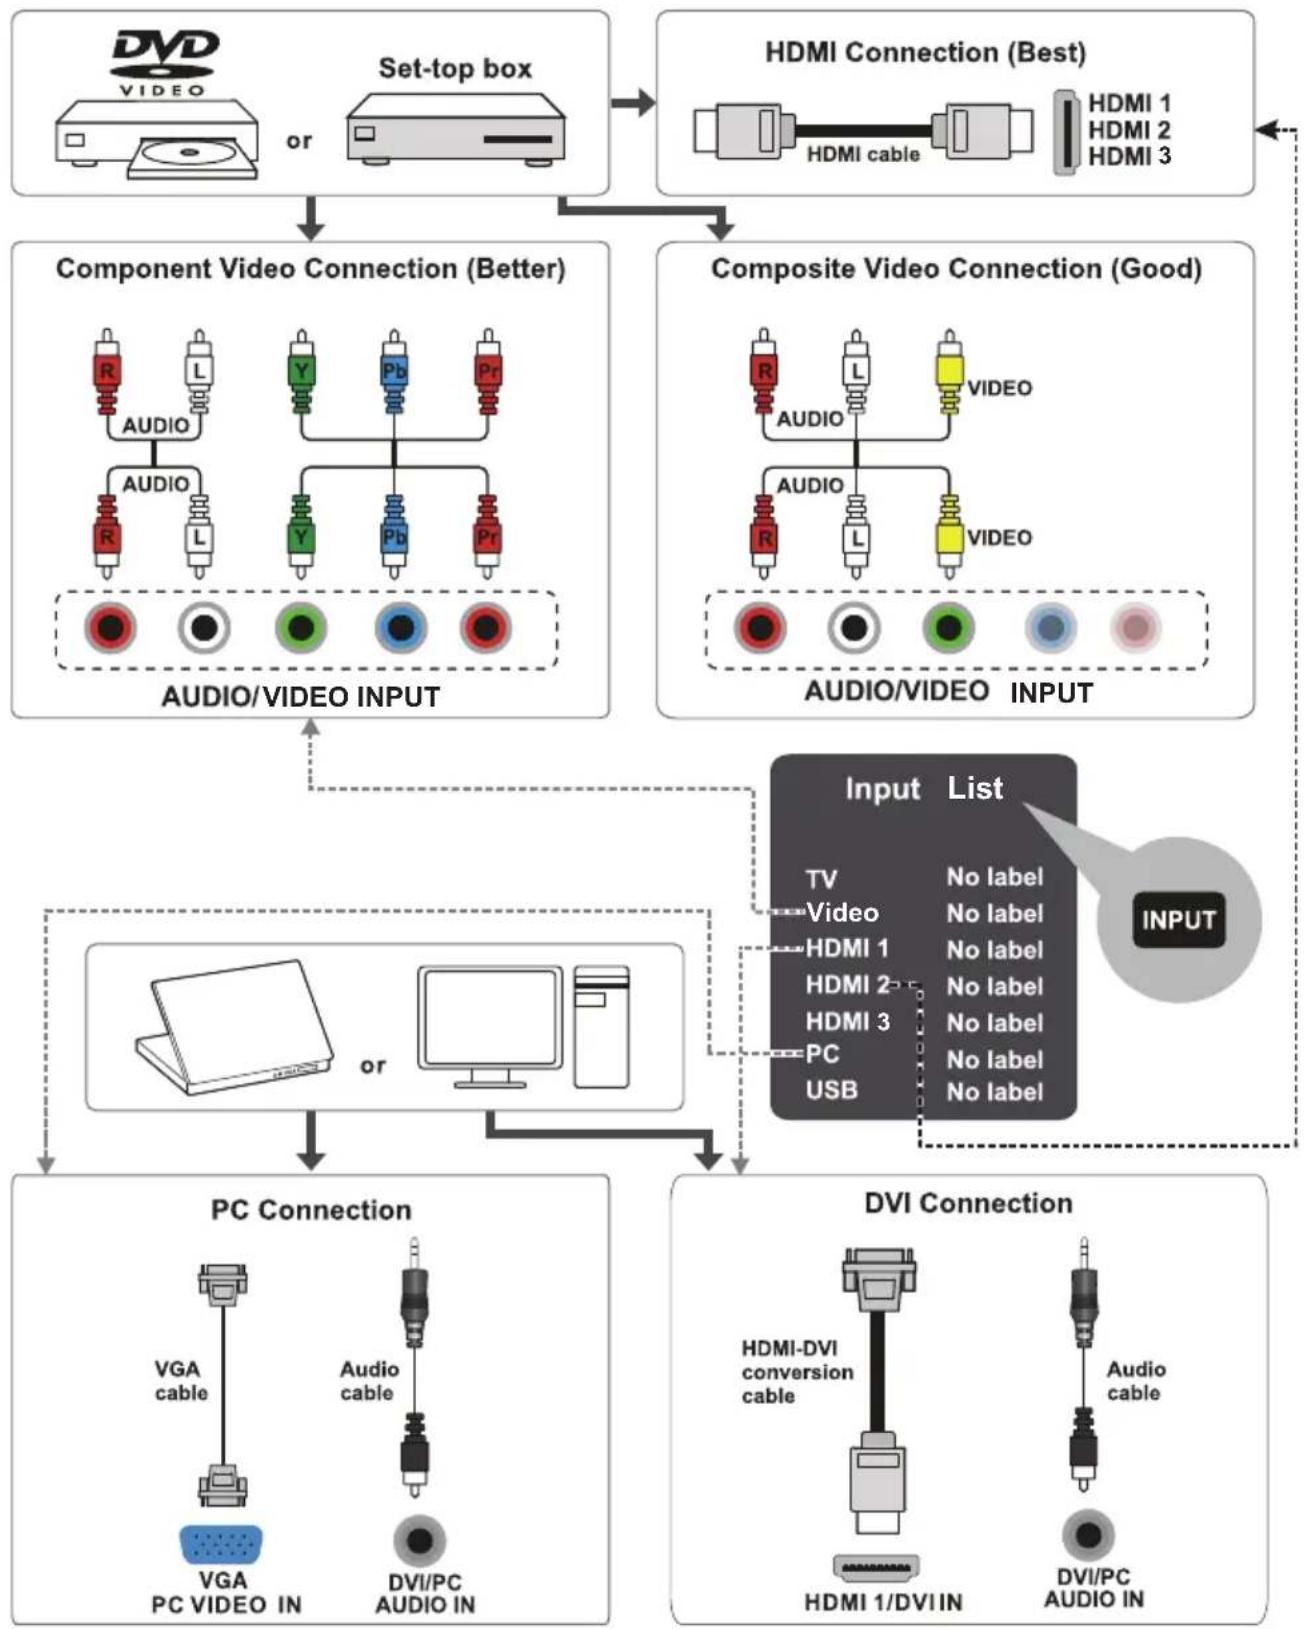
Choose Your Connections
There are several ways to connect devices, such as DVD players and set-top boxes, to your TV.
Note: No cables are supplied with this unit. Please purchase the necessary cables. A high-speed HDMI cable is recommended for better compatibility.
| Input | Signal Compatibility |
| Antenna/Cable | 480i, 480p, 720p, 1080i (NTSC, ATSC) |
| Composite Video | 480i |
| Component Video | 480i, 480p, 720p/60Hz, 1080i/60Hz, 1080p/60Hz |
| HDMI | 480i, 480p, 720p/60Hz, 1080i/60Hz, 1080p/60Hz |
| PC | VGA SVGA XGA WXGA |
flowchart
graph TD
    A["Set-top box"] --> B["Component Video Connection (Better)"]
    B --> C["Composite Video Connection (Good)"]
    C --> D["PC Connection"]
    C --> E["DVI Connection"]

    subgraph HDI_Beta Connections
        F1["HDMI 1"] --> G1["HDMI 2"] --> H1["HDMI 3"]
        F2["HDMI 1"] --> G2["HDMI 2"] --> H2["HDMI 3"]
    end

    subgraph Audio_Video_INPUT
        I1["AUDIO/VIDEO INPUT"] --> J1["AUDIO"]
        I2["AUDIO/VIDEO INPUT"] --> J2["AUDIO"]
        I3["AUDIO/VIDEO INPUT"] --> J3["AUDIO"]
    end

    subgraph PC_Conding
        K["PC VIDEO IN"] --> L1["VGA cable"]
        K --> L2["PC VIDEO IN"]
        K --> L3["DVI/PC AUDIO IN"]
    end

    subgraph DVI_Conding
        M["HDMI-DVI conversion cable"] --> N["HDMI 1/DVI IN"]
        O["Audio cable"] --> P["DVI/PC AUDIO IN"]
    end

    style HDI_Beta_Ceta fill:#f9f,stroke:#333
    style Audio_Video_INPUT fill:#ccf,stroke:#333
    style PC_Conding fill:#cfc,stroke:#333
    style DVI_Conding fill:#fcc,stroke:#333
Need help? sanyo-av.com 1-800-877-5032
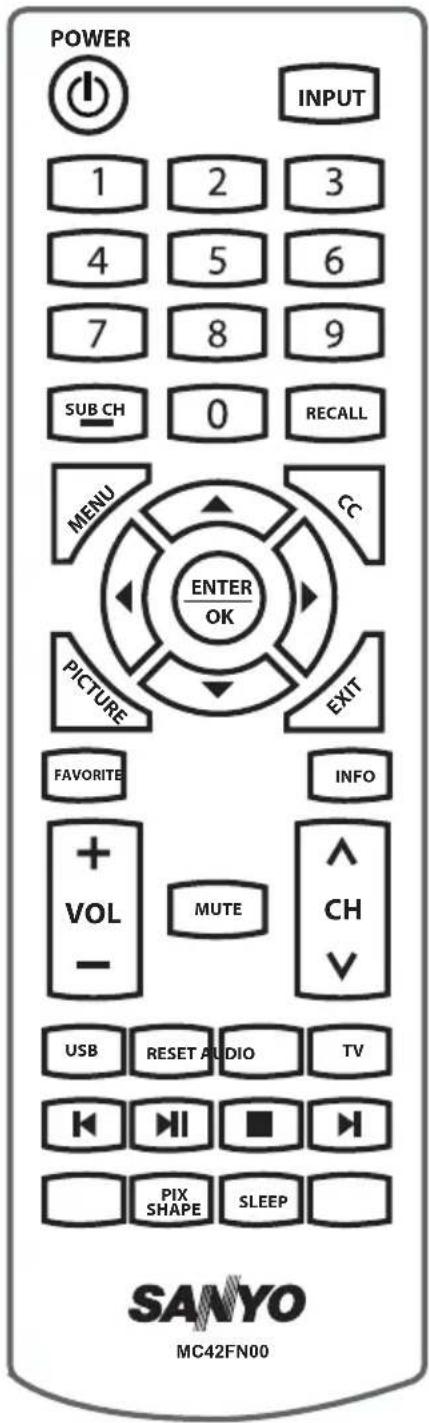
Remote Control Functions
POWER Turns the TV on or standby.
INPUT Press to open the Input list, then press ▲/▼ to select the desired option.
0-9 (Alphanumeric buttons) Enter a channel number, then press ENTER (or let the entry timeout).
SUB CH - (dash) To enter a digital channel with a sub-channel, enter the main channel, then press the dash button (-) followed by the sub-channel, and then press the ENTER button.
RECALL press the RECALL button return to the previously viewed channel.
MENU Brings up the main menu or press to return to the previous menu.
CC Displays the Audio portion of programming as text superimposed over the video.
▲/▼◄/► (arrows) Highlights different items in the TV menu and adjusts the menu.
ENTER/OK When the TV is in the menu system, press to confirm your selection.
PICTURE Selects picture mode.
EXIT Removes any menu or display from the screen and return to normal viewing.
FAVORITE Press the FAVORITE button to browse the channels in your favorite list. Use ▲/▼ to highlight options, then press ENTER to select.
INFO If no menus are currently active, press INFO to display the Channel information.
VOL+/- Increases or decreases the TV volume.
MUTE Turns the volume on and off.
CHA/V Selects channels.
USB Goes to the USB menu.
RESET Press to set factory setting.
AUDIO Press to select your desired audio mode.
TV Press to access to the TV mode.
Playing photos in the USB menu.
PIX Selects the desired screen format.
SHAPE SLEEP Sets the TV to turn off after a given amount of time.
Obtain the Signal
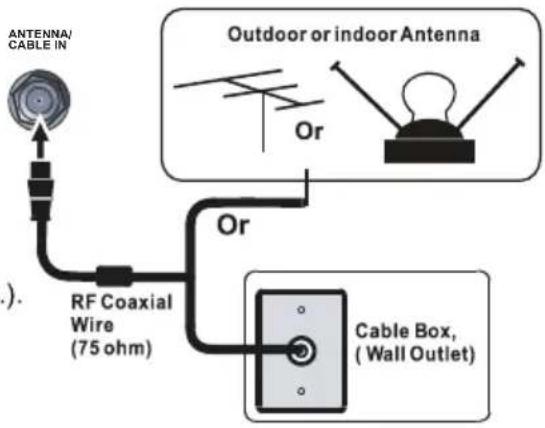
The first step in connecting your TV is obtaining the signal. The back panel of your TV allows you to receive analog and/or digital channels by using the ANTENNA/CABLE IN.
Connect the outside aerial or cable network to the ANTENNA/CABLE IN on the back of the TV set to receive off-air channels or cable channels.
- If you have a set-top box, you may need to call your cable company or satellite service provider. They may recommend special cables to allow you to view digital channels.
- The aerial socket (75 OHM - VHF / UHF / cable) can be used for connecting an external aerial or other equipment fitted with a modulator (video recorder, satellite receiver, etc.). We recommend that you do not connect other equipment (video recorder, satellite receiver, etc.) to your TV set to begin with, so as not to complicate the set-up procedure with the additional steps involved. Connect them when you have finished setting up the channels.
- Visit www.antennaweb.org for help in deciding what type of antenna to use in order to receive the local digital channels available to you. Enter your location, and the program will list local analog and digital stations available using your antenna.
Switching On
Follow the instructions on this page on how to switch on your TV set and use the remote control before going on to following pages describing how to use the channel scan procedure.
- Install two (2) "AAA" batteries (not included) in the remote control.
Precautions on using batteries:
- Only use the battery types specified.
- Make sure you use the correct polarity.
- Do not mix new and used batteries.
- Do not use rechargeable batteries.
- Do not expose batteries to excessive heat such as sunshine, fire or the like, throw them in a fire, recharge them or try to open them, as this could cause them to leak or explode.
- Remove the batteries from the remote control if you are not using it for a long period of time.
-
Connect the power cable to a mains socket. (If the power cable is not connected to the television, please first connect the power cable to the television.) Your TV set should only be connected to an AC supply. It must not be connected to a DC supply. If the plug is detached from the cable, do not, under any circumstances, connect it to a mains socket, as there is a risk of electric shock.
-
When powered on, if the TV set is in standby mode, press POWER on the remote control or on the TV set to turn on the TV.
Switching Off
To put the TV set into standby mode, press POWER on the remote control or on the TV, the TV set remains powered up, but with low energy consumption.
To switch off the TV set, unplug the mains socket from the mains outlet.
Need help? sanyo-av.com 1-800-877-5032
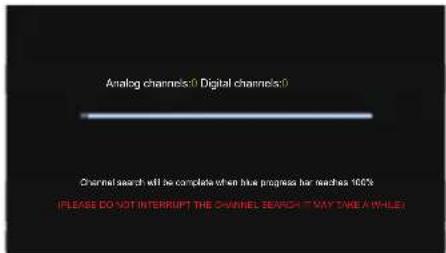
Setup Wizard
Connect an RF cable to the TV's ANTENNA/CABLE IN terminal.
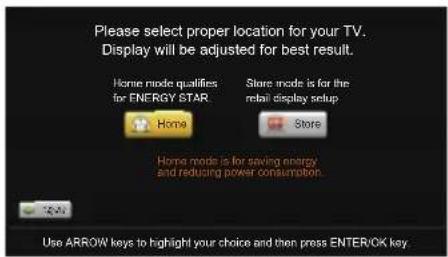
Select TV Location
-
Press ◀ / ▶ button on the remote control to select Home Mode or Store Mode.
-
Press ENTER button to go.
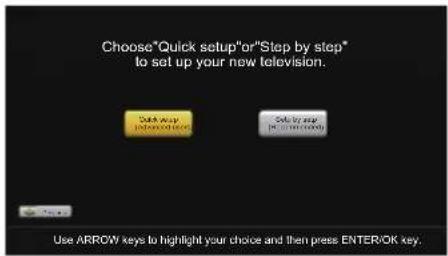
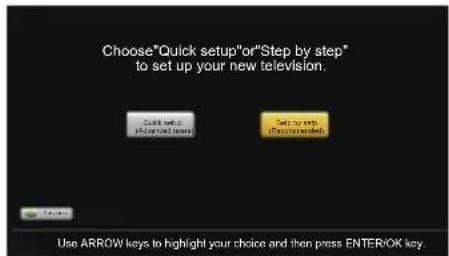
Choose Initial Setup method
-
Choose "Quick setup" or "Step by step" to setup your new television.
-
Press ENTER button to go.
If you choose "Please set project all equipment to the TV's inputs and switch them on. Then press ◀/▶ button to choose between an Air or Cable search.
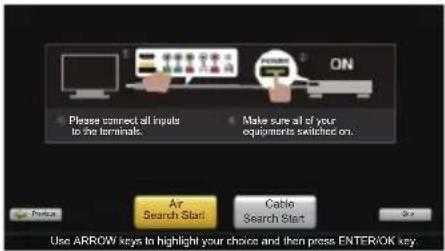
(Quick setup chosen)
【Air】
Search channels from an indoor or outdoor antenna.
【 】Cable
Search channels from the cable provider.
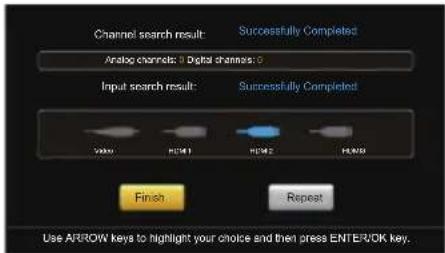
Press the Finish button to finalize the Initial Setup and enjoy watching TV.
NOTE: If you need to do the process again, please choose Repeat.
If "Step by step" is chosen, options will be more detailed. Press Continue button to advance.
(Setp by setp chosen)
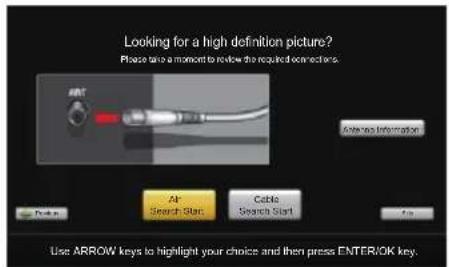
Choose Antenna Information to get a high definition picture, then press ◀/▶ button to choose between an Air or Cable search.
Need help? sanyo-av.com 1-800-877-5032
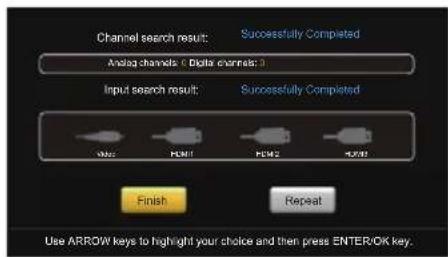
Press Next button to check connection in detail. Press Repeat button to do the process again.
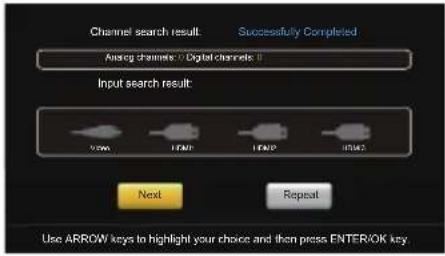
Press Continue button to go next.
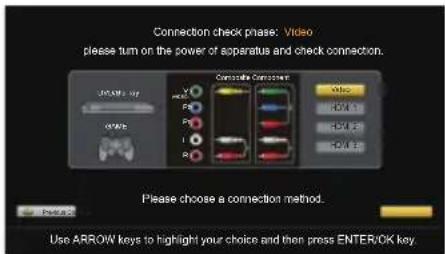
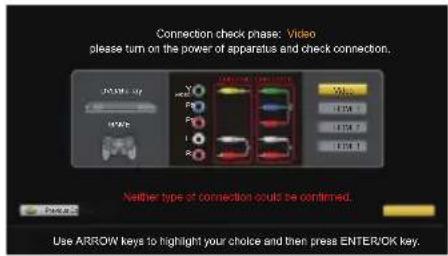
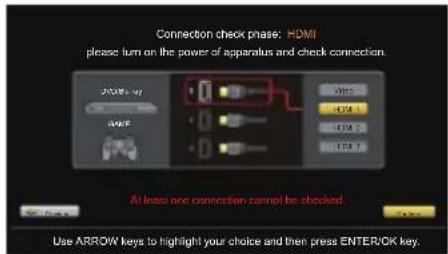
If any connection is found, then you can see "Connection was successful." with blue color.
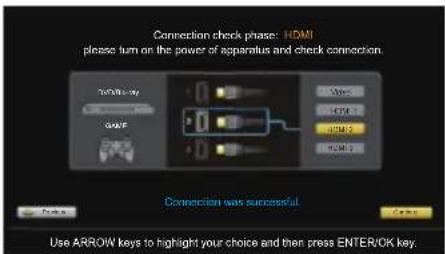
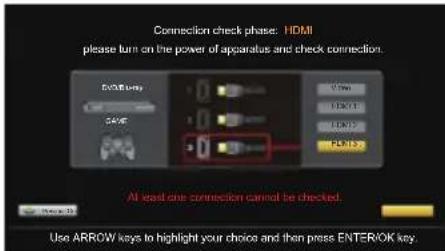
Connections that are found will be highlighted in blue color.
Press the Finish button to finalize the Initial Setup and enjoy watching TV.
NOTE: If you need to do the process again, please choose Repeat.

ENERGY STAR® is a set of power-saving guidelines issued by the U. S. Environmental Protection Agency (EPA).
ENERGY STAR® is a joint program of the U.S. Environmental Protection Agency and the U.S.Department of Energy helping us all save money and protect the environment through energy efficient products and practices.
Need help? sanyo-av.com 1-800-877-5032
Chapter 2
Menu Operation
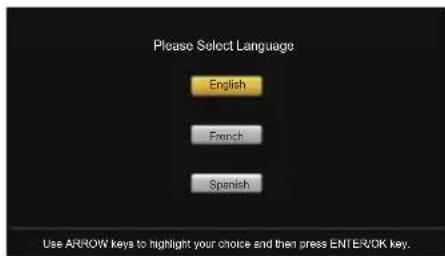
A menu screen asks you to select language among English, French and Spanish.
Hame
Store
Home mode is for saving energy and reducing power consumption.
Previous
A menu screen asks you to set the location for TV.
Choosing "Home Mode" for the TV assigns the optimal picture settings for most home environments.
Choosing "Store Mode", which is not ENERGY STAR compliant, sets the unit up with predefined settings for retail displays. In this setting, the power consumption may exceed the requirements of the
ENERGY STAR qualification. Use ◀/▶ to select the desired location setting( "Home Mode or "Store Mode"); then press ENTER /OK to continue to the next screen.
Input List
Press INPUT button to select among TV/VIDEO /HDMI 1/HDMI 2/HDMI 3/PC/USB
Menu
- Press MENU to display the main menu or return to the previous menu or close the main menu.
- Press / to highlight the desired menu icon, and press to .enter
Menu Operation
Picture
- Press MENU to enter the main menu, Press / button to select.
- Press to enter. (Press MENU again to exit or back to parent menu.)
| Picture | |||
| Picture Mode | |||
| Brightness | 50 | ||
| Contrast | 50 | ||
| Color | 50 | ||
| Tint | 50 | ||
| Sharpness | 50 | ||
| Color Temperature | |||
| Backlight | 90 | ||
| Detailed Setting | |||
| Move | Select | MENU | Return |
- While Picture Mode is "manual", Press / button to select among Picture Mode/Brightness/Contrast/Color / Tint / Sharpness / Color Temperature / Backlight/Detailed Settings.
- Press button to enter.
- Press / button to adjust.
- Press MENU to exit it.
【Picture Mode】
Adjust picture mode to change picture appearance. Press / button to select(Power Saving/Standard / Vivid / Mild / Manual).
Power Saving Select to power saving mode settings.
Standard Produces a highly defined image in a normally lit room.
Vivid Produces a highly defined image in a brightly lit room
Mild Produces a highly defined image in a soft lit room.
Manual Select to customize picture settings.
Note: "Power Saving" make this product qualify for ENERGY STAR, if you select some other options, the power consumption may change.
Items below are active while Picture mode set to Manual. otherwise, they are gray.
【Brightness】
Adjust darkness of black sections in the picture. Press / button to adjust.
Need help? sanyo-av.com 1-800-877-5032
【Contrast】
Adjust the white level of the picture.
Press ◀ /▶ button to adjust.
【Color】
Adjust the color intensity of the picture.
Press button to adjust. /
【Tint】
Adjust the hue (Red, Green, Blue) of the picture.
Press ◀ button to adjust. /
【Sharpness】
Object edges are enhanced for picture detail.
Press ◀ button to adjust. /
【Color Temperature】
Change the overall color cast of the picture.
Normal Produces a vivid image.
Warm Produces a red-hued image.
Cool Produces a gentle blue-hued image.
【Backlight】
Adjust the backlight brightness
Press button to adjust. /
【Detailed Setting】
Press ▶ button to enter.
- Pix Shape
Adjust how the picture fills the screen.
In PC mode, only "Full 100%" and "Point to Point" can be selected.
Wide Use to watch wide screen(16:9) content.
Zoom Expands image to fill screen. Top and button maybe cut off. Normal Automatic adjust Aspect Ratio based on TV size and TV program.
- Noise Reduction
Set options to reduce video noise.
Medium Detect and reduce moderate video noise.
High Detect and reduce enhanced video noise.
Off Select to turn off video noise detection.
Low Detect and reduce low video noise.
- Motion Sync
Press ◀ / ▶ button to select (Off/ Low/ Medium/ High) (Only available for model: FW65D25T)
Sound
- Press MENU to enter the main menu, Press ◀ / ▶
button to select.
- Press ▼ to enter. (Press MENU again to exit or back to parent menu.)
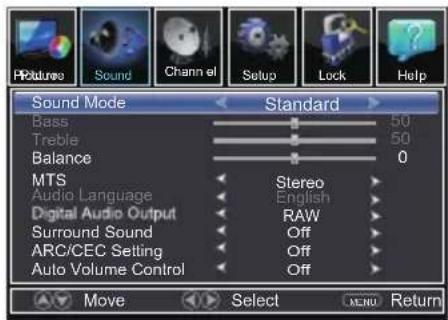
-
While Sound mode is "manual", Press ▲ / ▼ button to select among Sound Mode / Bass / Treble / Balance / MTS / Audio Language / Digital Audio Output / Surround Sound / ARC/CEC Setting / Auto Volume Control.
-
Press ◀ / ▶ button to adjust.
-
Press MENU again or back to parent menu.
【Sound Mode】
Choose a predetermined sound mode or the Manual option with features such as: Bass/ Treble/ Balance.
【MTS】
Configures the multi-track sound. It is only available in ATV. Press ◀ /▶ button to select (Stereo/SAP/Mono).
Stereo Sets the sound to stereo when stereo is not available, the sound is automatically switched to mono. SAP Sets the sound to the second audio program. Mono Sets the sound to mono.
【Audio Language】
Select the language supported by the chosen digital channel. It is available Only in DTV.
Press ◀ / ▶ button to select (English / French / Spanish).
Send digital audio to external audio system. Press ◀ / ▶ button to select.
Off Turn off the digital audio system. RAW Passes through RAW audio sound. PCM Select to output audio in 2-channel stereo.
【 】Surround sourd
Press ◀ / ▶ button to select (On / Off).
】ARC/CEC Setting
Press ◀ / ▶ button to select (On / Off).
Channel
- Press MENU to enter the main menu, Press ◀ / ▶ button to select.
- Press ▼toMntess(ENU again to exit or back to parent menu.)
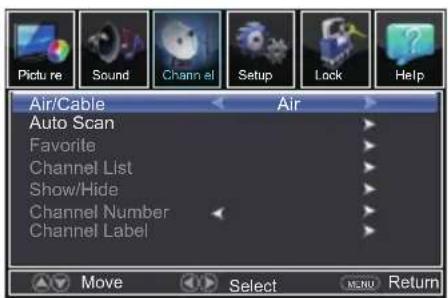
- If current source is TV, Press ▲ button to select among Air/Cable / Auto Scan/Favorite / Channel List/Show/Hide / Channel Number / Channel Label.
- Press ◀ button to adjust. /
- Press MENU again or back to parent menu.
【Air/Cable】
Select signal type.
Press ◀ button to select (Air/Cable). /
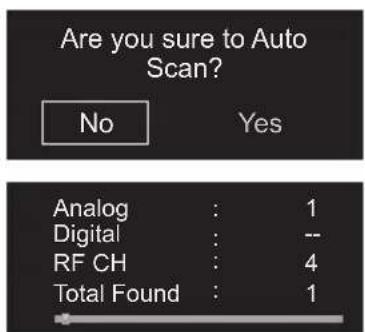
【Auto Scan】
Automatically search for channels. Press ENTER /▶ button to enter.
【Favorite】
Add channels to create a favorite list.
Press ENTER/ ▶ button to enter.
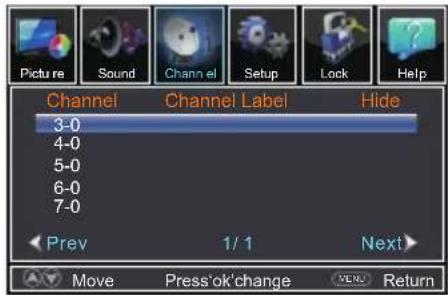
【Channel List】
Display list for channels
Press ENTER/ ▶ button to enter.
【Show/Hide】
Show or hide the channels in your program list. Press ENTER/▶ button to enter.
【Channel Number】
Show the channel number.
Press ◀ / ▶ button to adjust.
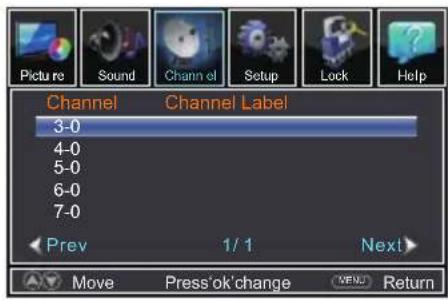
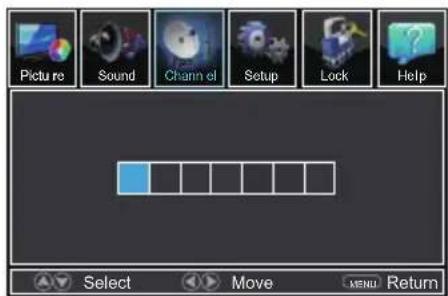
【Channel Label】
Create labels for channels, up to 7 characters.
Press ENTER/ ▶ button to enter.
Setup
- Press MENU to enter the main menu, Press Button to select.

- Press ▼ to enter. (Press MENU again to exit or back to parent menu.)
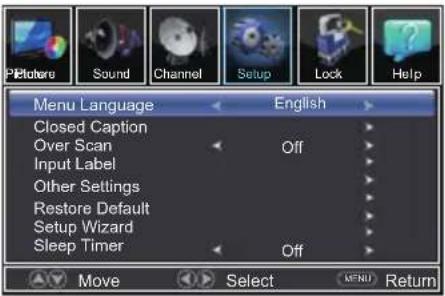
- Press ▲/ ▼button to select among Menu Language / Closed Caption / Over Scan/Input Label / Other settings / Restore Default / Setup Wizard / Sleep Timer.
- Press ◀ button to adjust. /
- Press MENU again or back to parent menu.
【Menu language】
Press ◀ button to select language (English / / Français / Español.)
【Closed Caption】
Adjust Closed Captioning settings. Only available under TV and AV source.
Press / button to enter. ENTER
- CC Mode
Turn Closed Captioning on/off. Press ◀ button to select (CC Off / CC On / CC / On Mute).
- Analog CC
Set Closed Captioning for standard(analog) program. Press ▶ button to select (CC1 / CC2 / CC3 / / CC4 / Text1 / Text2 / Text3 / Text4).
- Digital CC
Set Closed Captioning for digital program. Press ◀ button to select (Service1 / Service2 / / Service3 / Service4 / Service5 / Service6 / Off).
- Option
Adjust the digital Closed Captioning setting. Press ENTER/▶ button to enter.
Mode
Set the look of digital Closed Captioning.
Press ◀ button to select (Default / Custom).
Font Style
Select from 8 font styles.
Press ◀ button to select (Default / Font 0 / Font 1 / Font 2 / Font 3 / Font 4 / Font 5 / Font 6 / Font 7).
Font Size
Adjust the size of the digital Closed Captioning font. Press button to select (Default /Normal / Small /Large).
FG Color
Adjust the color of the digital Closed Captioning font. Press ◀ button to select (Default/ White /Red / Green / Blue / Yellow / Magenta / Cyan).
BG Color
Adjust the digital Closed Captioning background color. Press ◀ /▶ button to select (Default/ Black / Red / Green /Blue/ Yellow / Magenta / Cyan).
FG Opacity
Adjust the transparency of the digital Closed Captioning font. Press ◀/▶ button to select (Default / Solid / Flashing / Translucent / Transparent ).
BG Opacity
Adjust the digital Closed Captioning background transparency. Press ◀ / ▶ button to select (Default / Solid / Flashing / Translucent / Transparent).
*Note: All the options can be adjusted while the mode is Custom.
【Over Scan】
The setting of Over Scan on/off Press ◀ button to select (Off / On).
【Input Label】
Press ENTER / ▶ button to enter.
【Other Settings】
Press / button to enter. ENTER
- Blue Screen
The setting of Blue Screen on/off Press ◀ button to select(On / Off).
- Audio Only
Play the audio with the picture turned off. When you turn the Audio Only on and exit the OSD menu, the panel will be dark; and then press any key (except Mute key and VOL -/+ key) to exit the Audio Only status.
Press ◀ button to select(Off / On).
- Video Setting
To relevant settings for video. Press ◀ button to select. /
- Store Demo
About this TV set present ation. Press ◀ button to select(Off / On).
【Restore Default】
Returns user settings to factory mode.
【Setup Wizard】
Use this option to perform an initial channel and signal search.
【Sleep Timer】
Set a timer for the TV to turn off automatically. Press ◀/▶ button to select(Off / 5min / 10min / 15min / 30min / 60min / 90min / 120min / 180min /240min).
Lock
- Press MENU to enter the main menu, Press ▶ /▶ button to select.
- Press ▼ to enter. (Press MENU again to exit or back to parent menu.)

3.Enter your 4-digital password. Default password is 0000.
-
Press ▲/▼ button to select among Change Password / System Lock / Input Block / US Rating / Canada Rating / RRT Setting / Reset RRT.
-
Press ◀ button to adjust. /
-
Press MENU again or back to parent menu.
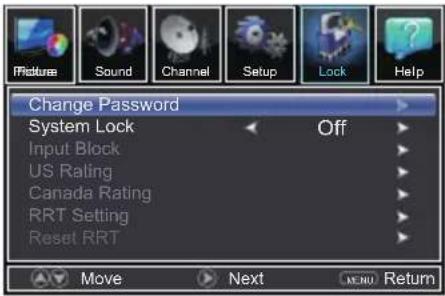
【Change Password】
Press the code the enter a new 4-digital password then re-enter it to confirm.
【System Lock】
Enable or disable system Lock. Press ◀ button to select(Off / On). /
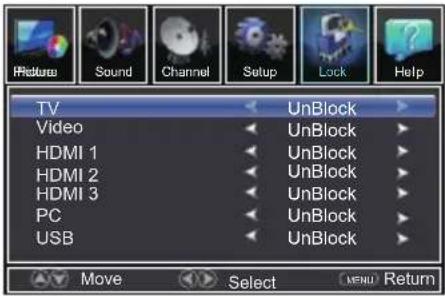
【Input Block】
Block or unblock the input sources. Press ENTER/▶ button to enter. Press ◀ button to select(UnBlock / Block).
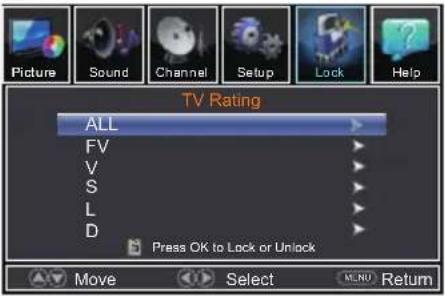
【US Rating】
Restrict movie and TV programs by US Ratings. Only available when "System Lock" is "on". Press ENTER/▶ button to enter.
• TV
The TV rating compose of two aspects: age-based and content-based.
| US Movie ratings | US TV ratings | Description |
| All | All Ratings Locked including No Rating | |
| NR | None | No Rating |
| - | TV-Y | Appropriate for All Children |
| - | TV-Y7 | Appropriate for All Children 7 and older |
| G | TV-G | General Audience |
| PG | TV-PG | Parental Guidance Suggested |
| PG-13 | - | Unsuitable for children under 13 |
| - | TV-14 | Unsuitable for children under 14 |
| R | - | Restricted under 17 Requires Accompanying Parent or Adult Guardian |
| NC-17 | - | No One under 17 Admitted |
| X | TV-MA | Mature audience only |
Note: The content ratings will increase depending on the level of the age-based rating.
For example, a program with a TV-PG V(violence) rating may contain moderate violence, while a TV-14 V (violence) rating may contain intense violence.
So locking a higher level option will automatically cause locking the options that has more sensitive level.
MPAA
This system defines the rating control which come from MPAA rules.
Rating Define as
G General a audience. All ages admitted. PG Parental guidance suggested. Some material may not be suitable for children. PG-13 Parents strongly cautioned. Some material may be inappropriate for children under 13.
R Restricted. Children under 17 require accompanying parent or adult guardian.
NC-17 No one 17 and under admitted.
X Adult audience only.
【Canada Rating】
Only available when "System Lock" is "on".
Press ENTER/ button to enter.
Restrict movie and TV programs by Canadian Ratings.
For Canada, the rating setting include the following options:
Canada English, Canada .French
- Canada English
These ratings are for programs which are using English rating system.
Rating Defined as
C Children
C8+ Children 8 years and older
G General programming
PG Parental guidance
14+ Viewers 14 and older
18+ Adult programming
- Canada French
The ratings are for programs which are using French rating system.
Rating Defined as
G General
8 ans+ Not recommended for children under age 8
13 ans+ Not recommended for children under age 13
16 ans+ Not recommended for children under age 16
18 ans+ This program is restricted to adults
RRT Setting】【
Display an advance V-Chip rating table for digital channels.
The item is available only When current stream has downloadable rating data.
【Reset RRT】
Reset the RRT to default.
The item is available only When current stream has downloadable rating data.
Help
-
Press MENU to enter the main menu, Press ◀ / ▶ button to select.
-
Press ▼toMPress(ENU again to exit or back to parent menu.)
Need help?
sanyo-av.com 1-800-877-5032
- Press ENTER / ▶ to enter.
- Press MENU to exit it
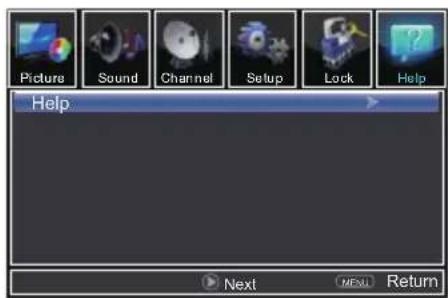
【Help】
Get help from the following choices.
Press ▲/▼ button to select(Auto Recovery/
Self Test /Connection Guide / Antenna Guide / Contact Us).
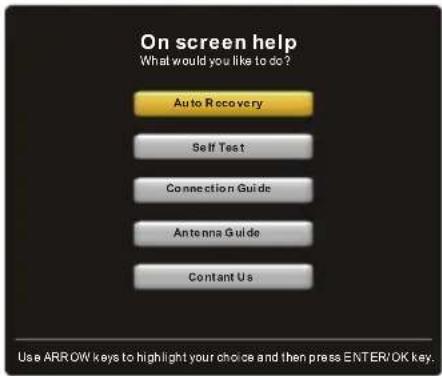
【Auto Recovery】
Quickly find which source has signal by auto recovery page.
【Self Test】
To test if the TV set is OK or not.
【Connection Guide】
To enter into a page for quick connection test.
【Antenna Guide】
To enter into antenna guide page, with the guide page, you can connect your antenna cable step by step.
【Contact Us】
Some ways to contact us.
PC
- Press to select PC source. INPUT
- Press MENU to enter the main menu, Press button to select Setup menu.
- Press ▼ to select PC Settings.

- Press ▲ / ▼ button to select among H-Pos / V-Pos / Clock / Phase / Auto.
- Press to enter.
- Press ◀ button to adjust. /
- Press MENU again or back to parent menu.
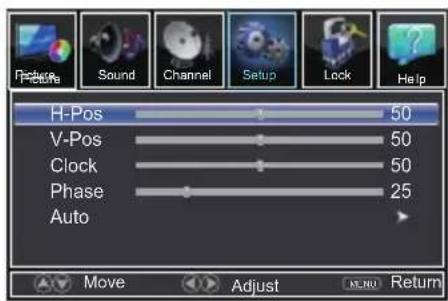
【H-Pos】
Adjust the horizontal position of the picture.
Press ◀ button to adjust. /
【V-Pos】
Adjust the vertical position of the picture.
Press ◀ button to adjust. /
【Clock】
Minimize vertical stripes in the screen image.
Press ◀ button to adjust. /
【Phase】
Minimize horizontal distortion.
Press ◀ button to adjust. /
【Auto】
Adjust to the PC signal timing automatically.
Press button to enter.
\*Note:
- PICTURE menu and description are different for TV mode.
- Audio Language and MTS in SOUND menu is invalid.
- Closed Caption and Overscan in SETUP menu is invalid.
- US, Canada, Overscan RRT Setting, and Reset RRT in LOCK menu is invalid.
- PC mode has no CHANNEL menu.
VIDEO / HDMI
- PICTURE menu and description are the same as that for TV mode.
- Audio Language in SOUND menu is invalid.
- The function of Closed Caption is available only in AV/TV mode.
4.US, Canada, RRT Setting and Reset RRT in LOCK menu is invalid. - Composite/ COMPONENT / HDMI mode has no CHANNEL menu.
USB
* Before operating Media menu, Plug in USB device, then press INPUT button to set the Input Source to USB.
Press ▲ / ▼ button to select USB in the Source menu, then press ENTER button to access.
natural_image
Pure graphical interface element with a horizontal bar and two blue icons, no text or symbols presentPress ENTER button to enter.
natural_image
Pure graphical interface element with no text, numbers, or symbolsPhoto
- Press INPUT button to display the input source list.
- Press ▲/▼ button to select USB.
- Press ENTER button to enter
- Press ◀ / ▶ button to select drive disk you want to watch, then press ENTER button to enter.
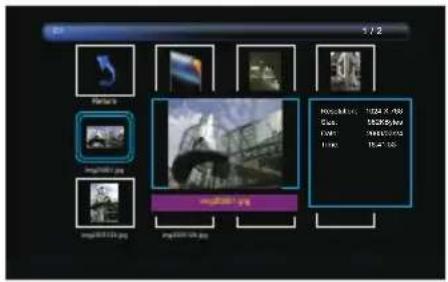
- Press ◀ / ▶ button to select the file you want to watch in the file selecting menu, then press ENTER button to display picture.

natural_image
Exterior view of a modern glass building with curved facade and balconies under cloudy sky (no signage or text visible)*Note: Only support JPG format
【Play/Pause】:Play or Pause the photo.
【Prev】:Scan the previous photo.
【Next】: Scan the next photo.
【Stop】: Stop play the photo.
【Repeat All/Repeat Off/Repeat 1】: Choose your favorite way to the repeat.
【Play list】:Display photo Play list.
【Info】: Display the information of the photo.
【Rotate】: Rotate the direction of the photo.
【Zoom In】: Make the size of the photo to smaller.
【Zoom Out】: Make the size of the photo to bigger.
Frequently Asked Questions (FAQs)
What's the quickest way to view High Definition (HD) video?
Connect an off-air antenna to the ANTENNA/CABLE IN to view free local digital channels. You may need to purchase an antenna.
Visit www.antennaweb.org for assistance in deciding what type of antenna to use to receive the local digital channels available to you. By entering your location, this mapping program tells you which local analog and digital stations are available using a certain antenna.
Are there other ways to view High Definition (HD) video?
Besides using an off-air antenna as mentioned above, you can also use a set-top box to receive digital video. Contact your cable company or satellite provider to purchase digital programming and have them connect the box to ensure you are viewing channels the best way.
Why are there bars on my screen and can I get rid of them?
Most digital video is sent in a 16/9 format which fills your screen, but is sometimes sent in 4/3 which does not fill your screen. It depends on how the station or device connected to your TV is formatting the video. If there are bars on the screen, press the PIX SHAPE button to try a different format that may eliminate the bars.
Some bars can't be removed because of the way the format is sent by the broadcaster. The format changes as you press the PIX SHAPE button and the format type is displayed at the bottom of the screen.
Why does channel search find a lot of channels, but when I try to tune to them, there's nothing there?
Some channels enabled by the cable company don't carry programming, such as video ondemand. When channels are unavailable, your TV screen is blank or appears like snow. You probably want to remove these channels from your Channel List. Remove these in the Show/Hide Menu.
Why does the first channel search take a long time?
If you have both analog and digital channels, the TV is looking for all available channels in the Channel List. If you do have digital channels, the TV is also searching for scrambled channels, non-scrambled channels, and each sub-channel of that digital channel.
Troubleshooting
Most problems you encounter with your TV can be corrected by consulting the following troubleshooting list.
TV Problems
The TV won't turn on.
• Make sure the TV is plugged in.
- Check the wall receptacle (or extension cord) to make sure it is "live" by plugging in another device.
There is no picture and no sound but the TV is on.
- You may be tuned to an input with no component connected to it. If you're trying to view a connected component, press INPUT until the picture from that component appears.
• The Signal Type option may be set incorrectly.
• The channel may be blank. Try changing channels. - If you're watching your VCR and it's connected with coaxial cable to the ANT.75Ω jack, tune the TV to channel 3 or 4 (whichever channel is selected on the 3/4 switch on the back of your VCR). Also make sure the TV/VCR button on the VCR is in the correct mode (press the TV/VCR button on your VCR).
The sound is fine, but the picture is poor quality.
- If you're getting a black and white picture from a component you've connected to your TV, you might have your video cables connected to the wrong jacks. A yellow video cable connects to the yellow VIDEO INPUT jack on the side or back of your TV; three video cables or bundled component video cables (red, blue, and green) connect to the corresponding VIDEO INPUT on the back of your TV.
- Check the antenna connections. Make sure all of the cables are firmly connected to the jacks.
There is no sound, but the picture is fine.
• The sound might be muted. Try pressing the volume up button to restore sound.
- If using Y, Pb, Pr, remember to also connect the device's left and right audio output jacks to the TV's L and R AUDIO INPUT jacks.
• If using DVI, connect the device's audio output to the TV's AUDIO (DVI) mini stereo input jack.
• The sound settings may not be set correctly.
- If your audio source has only one jack or is a (mono) audio source, make sure you have plugged the connection into the LAUDIO INPUT jack on the TV.
The screen is blank.
- Check your connections. If you used Composite yellow, red, and white cables to connect, make sure they're connected to the green VIDEO INPUT, and the red and white AUDIO INPUT jacks.
- If you're trying to watch something that's playing on a component connected to the TV (like a DVD), press INPUT until you get to the correct video input channel.
• Make sure the component connected to the TV is turned on. - Try another channel.
The TV turns off unexpectedly.
- The electronic protection circuit may have been activated because of a power surge. Wait 30 seconds, and then turn the TV on again. If this happens frequently, the voltage in your house may be abnormally high or low.
• Unplug. Wait 10 minutes. Plug in again.
Need help? sanyo-av.com 1-800-877-5032
You can't select a certain channel.
• The channel may be blocked or not approved in the Parental Control Menu.
- If using a VCR, check to make sure the TV/VCR button on the VCR is in the correct mode (press the TV/VCR button on your VCR).
- Press the TV button and then try to change channels.
The stereo reception is noisy.
- It may be a weak station. Use the Sound Menu and Analog TV Sound to choose mono.
A black box appears on the screen.
- Closed captioning might be on. Check Closed Caption in the Setup menu.
You are having problems with the HDMI Connection.
- Make sure the HDMI or DVI component is turned on and the cables are firmly connected. If problems still occur, turn off your component and reconnect it. Reset the power by unplugging the power cord and plugging it back in.
- If you tune to the HDMI 1, or other HDMI INPUT and you see snow, the video goes in and out, or the video takes a long time to appear, your HDMI or DVI component is having trouble sending video information to the TV. Reconnect your device. Reset the power by unplugging the power cord and plugging it back in. If problems persist, try connecting the Y Pb Pr jacks if they are available or contact the manufacturer of the HDMI or DVI component for further assistance.
- If you have black bars on each side of your picture, the component you connected might have a switch or a menu option allowing you to change the picture quality output that will fix this. Choose either 720p or 1080i.
The remote control doesn't work.
- Something might be between the remote and the remote light sensor on the front of the TV. Make sure there is a clear path.
• The remote may not be aimed directly at the TV.
• The batteries in the remote may be weak, dead, or installed incorrectly. Put new batteries in the remote.
The Universal Remote control doesn't work.
This TV utilizes new remote control signals and may not be compatible with your existing universal remote (e.g. satellite box remotes, cable box remotes, and generic universal remotes, etc.). Over time, newer universal remotes will become available that should pick up the new TV codes.
You are experiencing problems with V-Chip/Parental Controls.
If the rating limits don't work, you must lock the settings. Go to the Main Menu (press MENU on your remote), select Lock >Enter Password >System lock, System lock Rating Enable is highlighted. Press ▶/▶ to select On to have the rating limits take effect.
What else can I do?
If you've been through the Troubleshooting section and nothing has fixed your problem, try rebooting your TV. Note that after a reboot, you may need to run your TV through the setup process again. To do a reboot, unplug the power cord from the wall outlet or power strip. Keep your TV unplugged for about 5 minutes. Then plug in the TV and turn it on. See if the problem is fixed. If the problem remains, then please visit sanyo-av.com for updated FAQs or contact Customer Support at the support number provided in your QUICK'N EASY Setup Guide or the number shown at the bottom of the page.
Need help? sanyo-av.com 1-800-877-5032
Care and Cleaning
Caution: Turn OFF your TV before cleaning.
You can clean the TV as required, using a soft lint-free cloth. Be sure to occasionally dust the ventilation slots in the cabinet to help assure adequate ventilation.
IMPORTANT: Never use strong cleaning agents, such as ammonia-based cleaners, or abrasive powder. These types of cleaners will damage the TV. The TV's screen may be cleaned with a soft, lint-free cloth as well. Take care not to scratch or mar the screen. If necessary, you may use a cloth dampened with warm water. While cleaning, do not spray liquid directly on the screen, or allow liquid to run down the screen and inside the TV. Also, never place drinks or vases with water on top of the TV. This could increase the risk of fire, shock hazard or damage to the TV.
Television Specifications
| Broadcasting system | US System NTSC-M | |
| ATSC standard (8VSB) | ||
| Receiving Channels | VHF2-13 | |
| UHF14-69 | ||
| CATV | 14-36 (A)-(W) | |
| 37-59 (AA)-(WW) | ||
| 60-85 (AAA)-(ZZZ) | ||
| 86-94 (86)-(94)95-99 (A-5)-(A-1) | ||
| 100-135 (100)-(135) | ||
| 01 (4A) | ||
| Tuner type | Frequency synthesized | |
| Screen refresh rate | 60Hz | (For Model: FW32D25T, FW42D25T) |
| 120Hz | (For Model: FW65D25T) | |
Specification
| Model | Power Requirement | AC Power Consumption (watt) | WEIGHT w/stand (Ibs) | WIDTH HEIGHT DEPTH(inches) | |
| FW32D25T | Source: AC 120V, 60Hz | 45 12.6 | 29.1 19.3 6.3 | w/stand | |
| 29.1 17.5 3.7 | w/out stand | ||||
| FW42D25T | 70 23.9 | 38.1 24.3 7.3 | w/stand | ||
| 38.1 22.6 3.7 | w/out stand | ||||
| FW65D25T | 160 54.9 | 57.6 36.3 12.9 | w/stand | ||
| 57.6 33.4 3.1 | w/out stand | ||||
NOTE: Dimensions are in inches
Need help? sanyo-av.com 1-800-877-5032
LIMITED WARRANTY ONE (1) YEAR PARTS AND LABOR
WARRANTY COVERAGE:
This warranty obligation is limited to the terms as set forth below.
WHO IS COVERED:
This product warranty is issued to the original purchaser or the person receiving the product as a gift against defects in materials and workmanship as based on the date of original purchase (“Warranty Period”) from an Authorized Dealer. The original sales receipt showing the product name and the purchase date from an authorized retailer is considered such proof.
WHAT IS COVERED:
This warranty covers new products if a defect in material or workmanship occurs and a valid claim is received within the Warranty Period. At its option, the company will either (1) repair the product at no charge, using new or refurbished replacement parts, or (2) exchange the product with a new or refurbished product at company's option.
Replacement products or parts provided under this warranty are covered against defects in materials and workmanship from the date of the replacement or repair for ninety (90) days or for the remaining portion of the original product's warranty, whichever provides longer coverage for you. When a product or part is exchanged, any replacement item becomes your property and the replaced item becomes company property. When a refund is given, your product becomes company property.
Note: Any product sold and identified as refurbished or renewed carries a ninety (90) day limited warranty.
Replacement product can only be sent if all warranty requirements are met. Failure to follow all requirements can result in delay.
WHAT IS NOT COVERED - EXCLUSIONS AND LIMITATIONS:
This Limited Warranty applies only to new company manufactured products that can be identified by the trademark, trade name, or logo affixed to it. This Limited Warranty does not apply to any hardware product or any software, even if packaged or sold with the product, as manufacturers, suppliers, or publishers may provide a separate warranty for their own products packaged with the bundled product.
The company is not liable for any damage to or loss of any programs, data, or other information stored on any media contained within the product, or other additional product or part not covered by this warranty. Recovery or reinstallation of programs, data or other information is not covered under this Limited Warranty.
This warranty does not apply (a) to damage caused by accident, abuse, misuse, neglect, misapplication, or non-supplied product, (b) to damage caused by service performed by anyone other than company approved Authorized Service Location, (c) to a product or a part that has been modified without written company permission, or (d) if any serial number has been removed or defaced, or (e) product, accessories or consumables sold "AS IS" without warranty of any kind by including refurbished product sold "AS IS" by some retailers.
This Limited Warranty does not cover:
- Shipping costs for returning defective product.
- Labor charges for installation or setup of the product, adjustment of customer controls on the product, and installation or repair of antenna/signal source systems outside of the product.
- Product repair and/or part replacement because of improper installation or maintenance, connections to improper voltage supply, power line surge, lightning damage, retained images or screen markings resulting from viewing fixed stationary content for extended periods, product cosmetic appearance items due to normal wear and tear, unauthorized repair or other cause not within the control of the company.
- Damage or claims for products not being available for use, or for lost data or lost software.
- Damage from mishandled shipments or transit accidents when returning product.
- A product that requires modification or adaptation to enable it to operate in any country other than the country for which it was designed, manufactured, approved and/or authorized, or repair of products damaged by these modifications.
- A product used for commercial or institutional purposes (including but not limited to rental purposes).
- Product lost in shipment and no signature verification receipt can be provided.
- Failure to operate per Owner's Manual.
TO OBTAIN ASSISTANCE...
Contact the Customer Care Center at:
sanyo-av.com
1 800 877 5032
REPAIR OR REPLACEMENT AS PROVIDED UNDER THIS WARRANTY IS THE EXCLUSIVE REMEDY FOR THE CONSUMER, WITH THE ISSUING COMPANY NOT LIABLE FOR ANY INCIDENTAL OR CONSEQUENTIAL DAMAGES FOR BREACH OF ANY EXPRESS OR IMPLIED WARRANTY ON THIS PRODUCT. EXCEPT TO THE EXTENT PROHIBITED BY APPLICABLE LAW, ANY IMPLIED WARRANTY OF MERCHANTABILITY OR FITNESS FOR A PARTICULAR PURPOSE ON THIS PRODUCT IS LIMITED IN DURATION TO THE DURATION OF THIS WARRANTY.
Some states do not allow the exclusions or limitation of incidental or consequential damages, or allow limitations on how long an implied warranty lasts, so the above limitations or exclusions may not apply to you.
This warranty gives you specific legal rights. You may have other rights which vary from state/province to state/province.
FUNAI CORPORATION, Inc. 19900 Van Ness Avenue, Torrance, CA 90501
Need help? sanyo-av.com 1-800-877-5032
The terms HDMI and HDMI High-Definition Multimedia Interface, and the HDMI Logo are trademarks or registered trademarks of HDMI Licensing LLC in the United States and other countries.
Manufactured under license from Dolby Laboratories. Dolby and the double-D symbol are trademarks of Dolby Laboratories.
FCC Information
This equipment has been tested and found to comply with the limits for a Class B digital device, pursuant to Part 15 of the FCC Rules. These limits are designed to provide reasonable protection against harmful interference in a residential installation. This equipment generates, uses, and can radiate radio frequency energy and, if not installed and used in accordance with the instructions, may cause harmful interference to radio communications. However, there is no guarantee that interference will not occur in a particular installation. If this equipment does cause harmful interference to radio or television reception, which can be determined by turning the equipment off and on, the user is encouraged to try to correct the interference by one or more of the following measures:
• Reorient or relocate the receiving antenna.
- Increase the separation between the equipment and receiver.
- Connect the equipment into an outlet on a circuit different from that to which the receiver is connected.
- Consult the dealer or an experienced radio/TV technician for help.
This Class B digital apparatus complies with Canadian ICES-003.
This device complies with Part 15 of the FCC Rules. Operation is subject to the following two conditions: (1) this device may not cause harmful interference, and (2) this device must accept any interference received, including interference that may cause undesired operation.
Declaration of Conformity
Trade Name: SANYO
Responsible Party: FUNAI CORPORATION, Inc.
Model: FW32D25T, FW42D25T, FW65D25T
Address: 19900 Van Ness Avenue, Torrance, CA 90501 U.S.A
Telephone Number: 1-800-877-5032
Warning: Changes or modifications to this unit not expressly approved by the party responsible for compliance could void the user's authority to operate the equipment.
The packaging of this product is intended to be recycled.
Contact your local authorities for information about how to recycle the packaging.
For product recycling information, please visit - sanyo-av.com
Click on
SANYO is a registered trademark of SANYO Electric Co., Ltd. and is used by Funai Electric Co., Ltd. and Funai Corporation, Inc. under license from SANYO Electric Co., Ltd.
Any liability related to SANYO products, including design and quality, is the sole responsibility of Funai Electric Co., Ltd. and Funai Corporation, Inc. Please contact Funai Corporation, Inc. for any questions or claims related to SANYO products: sanyo-av.com
SANYO