LCD-32XA2 - Television SANYO - Free user manual and instructions
Find the device manual for free LCD-32XA2 SANYO in PDF.

| Product Type | Television |
| Brand | Sanyo |
| Model | LCD-32XA2 |
| Screen Size | 32 inches (81 cm) |
| Display Technology | LCD |
| Resolution | 1366 x 768 pixels |
| Aspect Ratio | 16:9 |
| Contrast Ratio | 800:1 (typical) |
| Brightness | 450 cd/m² (typical) |
| Viewing Angle | 178° horizontal and vertical |
| Audio Output | 2 x 10 W |
| Power Consumption | 120 W (typical), <1 W standby |
| Weight (with stand) | Approx. 12 kg |
| Dimensions (with stand) | 800 x 550 x 200 mm (WxHxD) |
| Inputs | HDMI, VGA, Component, Composite, USB |
| Tuner | Analog and DVB-T |
| Features | Teletext, Sleep Timer, Child Lock |
| Cleaning | Use a soft, dry cloth. Do not use liquids. |
| Safety | Do not expose to moisture or heat sources. |
| Spare Parts & Repairability | Contact Sanyo service center for parts. |
Frequently Asked Questions - LCD-32XA2 SANYO
User questions about LCD-32XA2 SANYO
0 question about this device. Answer the ones you know or ask your own.
Ask a new question about this device
Download the instructions for your Television in PDF format for free! Find your manual LCD-32XA2 - SANYO and take your electronic device back in hand. On this page are published all the documents necessary for the use of your device. LCD-32XA2 by SANYO.
USER MANUAL LCD-32XA2 SANYO
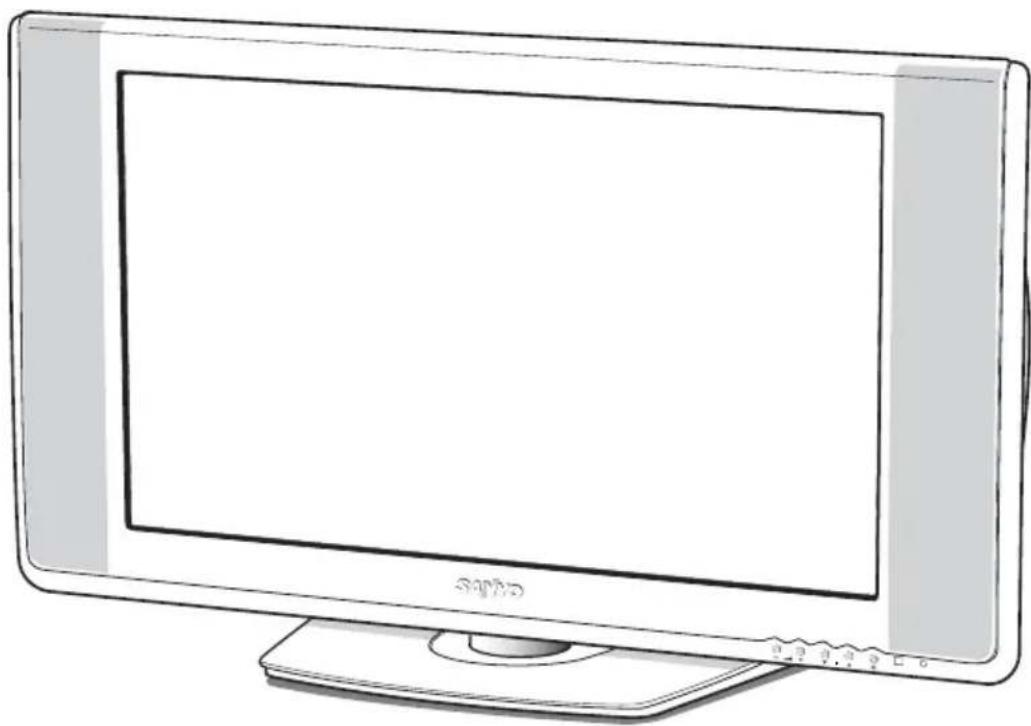
LCD Colour Television
natural_image
Line drawing of a flat-screen monitor with a blank screen and stand (no text or symbols)Please read this Instruction Manual before using your television. We wish you many hours of pleasure from your new television.

Warning
High voltages are used in the operation of this television receiver. Do not remove the cabinet back from your set. Refer servicing to qualified service personnel.
Do not drop or push objects into the television cabinet slots or openings.
Never spill any kind of liquid on the television receiver.
To prevent fire or electrical shock hazard, do not expose the television receiver to rain or moisture.

natural_image
Simple line drawing of a computer monitor with a falling screen and a hanging cloth (no text or symbols)If the LCD panel is broken and leaks liquid crystal, do not touch it. Moreover, never swallow or suck the liquid, or touch the liquid with your skin. In case the liquid drops in your mouth or eyes, clear it by water adequately at once and go to see a doctor. If not, there is a possibility causing poisoning. If the liquid drops on skin or clothes, also clear it by water adequately at once, if not, the skin or clothes will be damaged.

Caution
Avoid exposing the television receiver to direct sunlight and other source of the heat.

natural_image
Illustration of a sun streaming from a computer monitor and a speaker emitting sound waves (no text or symbols)Do not block the ventilation holes in the back cover. Adequate ventilation is essential to prevent failure of electrical components.
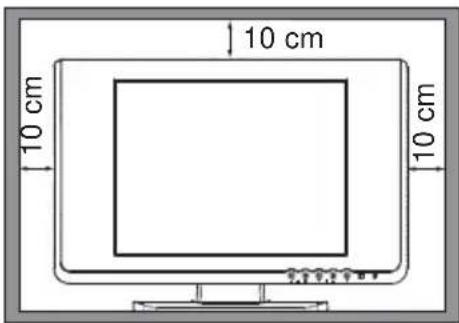
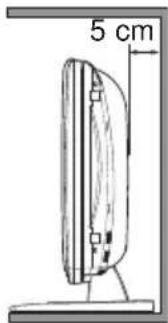
If the television is to be built into a compartment or similarly enclosed, the minimum distances must be maintained. Heat build-up can reduce the service life of your television, and can also be dangerous.
Minimum Distances
Care for Using TV Monitor
Screen likely damaged by external shock. When using the TV monitor, following precautions should be taken.
Do not press or hit the screen face.
Do not write, paint or affix anything on the screen.
Do not put anything on the TV monitor.

natural_image
Cartoon illustration of a hand pointing at a computer screen with a surprised expression (no text or symbols)Do not press

natural_image
Cartoon illustration of a hand pressing down on a computer monitor with a surprised face (no text or symbols)Do not hit
Cleaning the TV Monitor
Be sure to disconnect the AC Power Cord from AC outlet before cleaning the TV monitor.

natural_image
Illustration of a hand cleaning a computer monitor with a smiling face (no text or symbols)Gently wipe the screen and cabinet with dry soft cloth. Screen is likely damaged if it is not maintained properly. Do not use hard cloth or paper. Do not use solvents or abrasive.

natural_image
Simple line drawing of a computer monitor with a spray can and explosion effect (no text or symbols)Caution
Do not use benzene, thinner or any volatile substances to clean the TV monitor. These chemicals may damaged the cabinet finish.
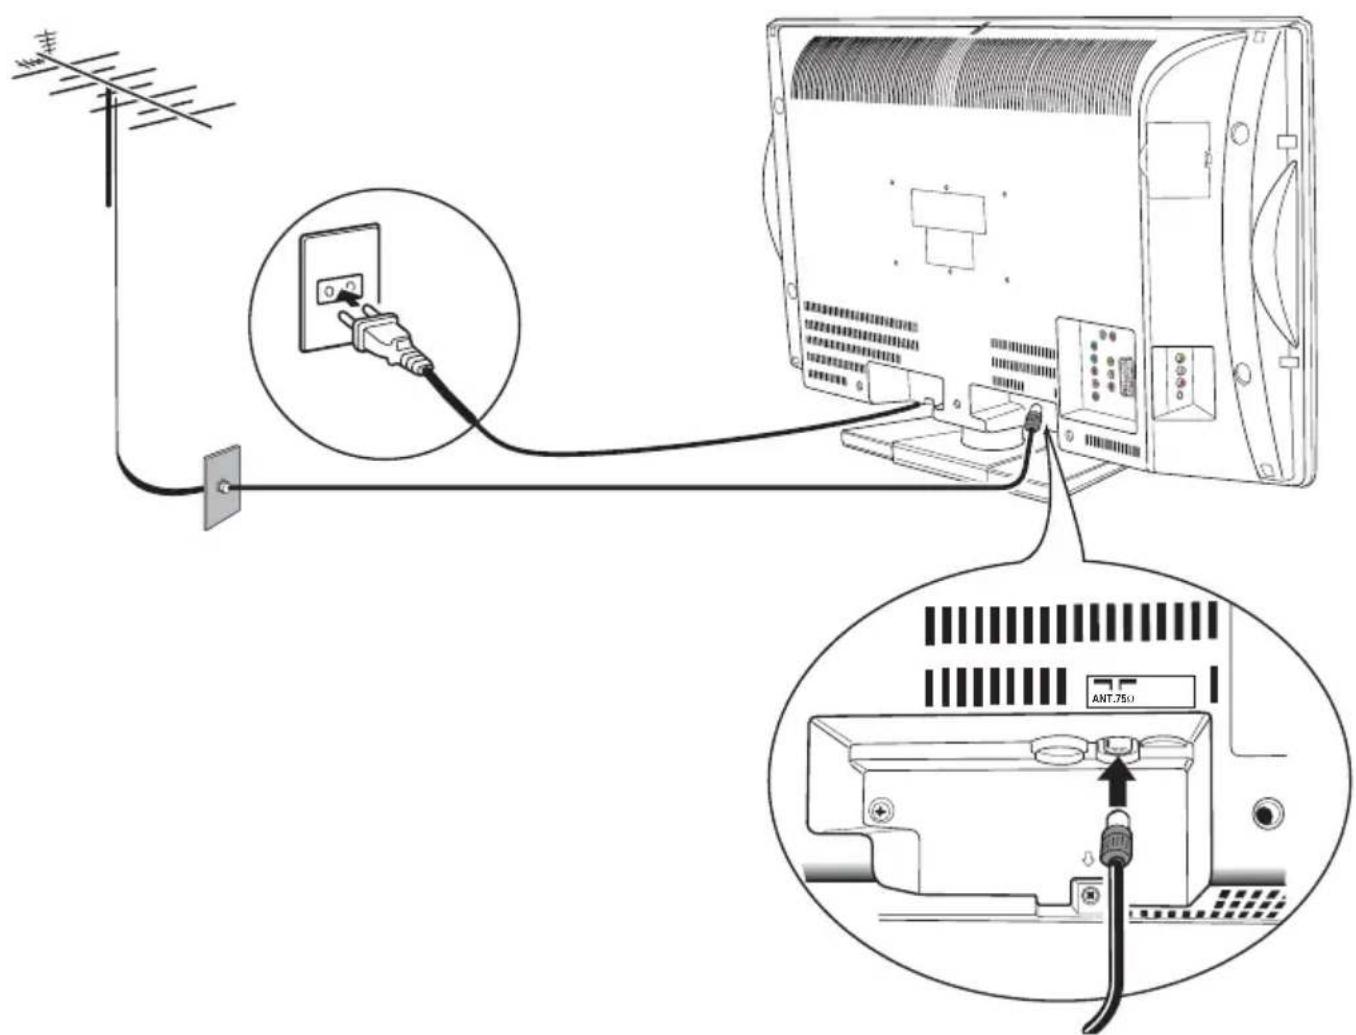
Step 1 : Connecting the Aerial and Power Supply
- Connect your aerial cable plug to the rear of the TV set. For further information please consult your local dealer.
- Connect the AC power plug to the wall socket (AC100-264 Volts, 50Hz/60Hz). Note: The form of the AC code and AC plug are different with each country.
Step 2 : Battery Installation of the Remote Control Transmitter
Use 2 "AAA" 1.5 volt batteries.
Be sure batteries are installed correctly.
Note: Do not mix old batteries with new ones or mix different type of batteries together.

natural_image
Diagram of a refrigerator internal mechanism showing battery arrangement and rotation arrows (no text or labels)Step 3: Switching on/ Plug & Play
Let's start!
This TV set provides a self-automatic tuning system function called "Plug & Play". It automatically begins searching and storing of all available channels when switching-on the TV set for the first time.
1 Press the Power ON/OFF button to turn the TV on, and the TV set will search and store of all available TV channels automatically.
2 After completing Plug & Play, press the MENU button to return to the normal TV mode.
This procedure only appears at the first switch-on time.
Now the installation is completed !
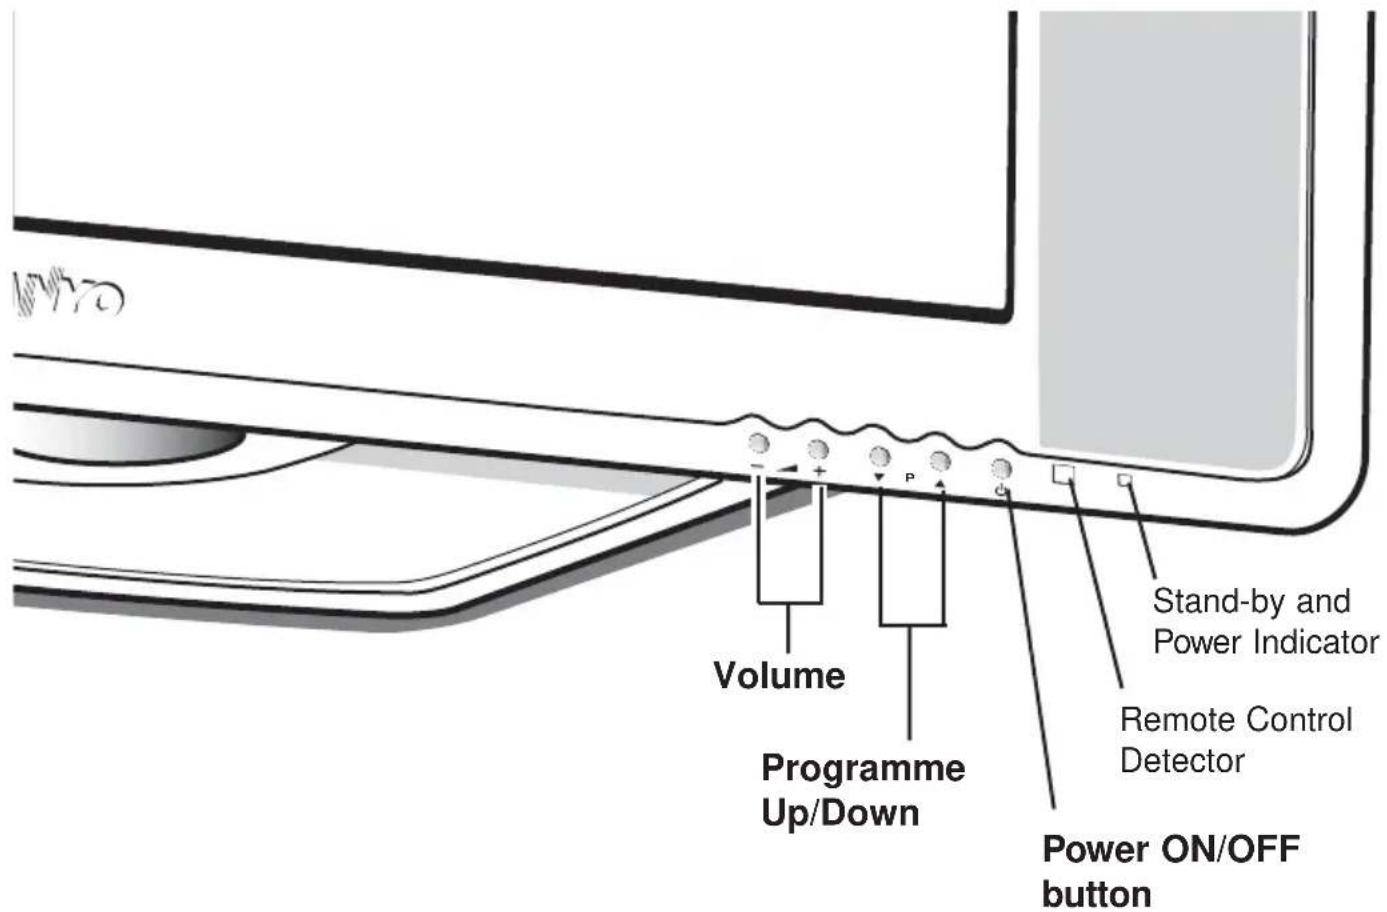
Each button listed this section has the same function as it's corresponding button on the Remote Control
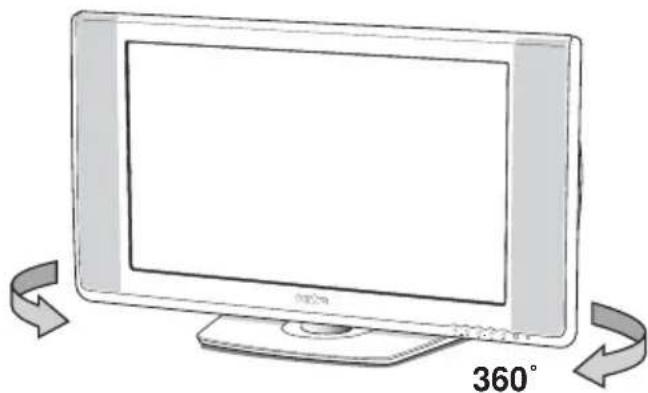
Viewing Angle Adjustment
Swivel stand is rotated 360° right and left.
natural_image
Illustration of a flat-screen monitor with 360° rotation indicator (no text or symbols on the device itself)
Caution


Do not position hand under the screen frame while rotating the TV.
Power ON/OFF(Stand by)

Press the Power ON/OFF button to turn on or off (Stand-by) the TV set.
Lighting of the Stand-by and Power Indicator shows that there is a power supply. For shutting off a power supply completely, disconnect the power cord from the power outlet.
You can turn on the TV in the standby mode by pressing the following buttons in addition to the Power ON/OFF button.
- Programme Up/Down button of the remote control transmitter or the TV set.
- 1 to 9, 0 button on the remote control transmitter.
Auto Shut Off Function
If the TV is left on after you have gone to sleep, the TV set changes to the standby mode within 10 minutes after all broadcasts have ended.
Direct Programme Selection
Example:
■ Press 6 button to select programme position 6.

■ To select programme position 27, press the Digit button, press 0, 2 then 7 button.


or
Press the Digit button, press 2, 7 button and wait for 5 seconds.


■ To select programme position 215, press the DIGIT button, press 2, 1 then 5 button.


Alternate

Press the Alternate button, and the programme position will alternately select the previous position and the present position.
Picture Mode Selection

Press the Picture Mode button repeatedly to select the following picture modes;
Personal : Your personal preference mode.
Standard: Normal viewing mode.
Dynamic: Suitable for brightly lit room.
Sound Mode Selection

Press the Sound Mode button repeatedly to select the following sound modes;
Personal: Your personal preference mode.
Music: Suitable for music programme.
Talk: Suitable for news programme.
Normal: Normal listening mode.
Bass Expander On/Off

Press the BASS button to get an emphasised bass sound.
Active 3D Surround

Press the SURROUND button to switch 3D Surround on (Active) and off.
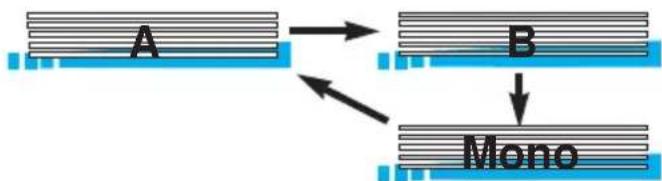
A2 Stereo, NICAM Stereo and Bilingual Broadcast Receiving
■A2 Stereo and NICAM Stereo sound reception
When receiving NICAM stereo broadcast, NICAM will be displayed on the screen. For A2 (German) stereo broadcasts, Stereo will be displayed. When a clear stereo sound can not be obtained during NICAM or A2 (German) stereo broadcast due to poor signal reception, press the Stereo/Mono button to select mono mode.

NICAM Stereo

A2 Stereo

■ Bilingual reception
If the TV receives bilingual programs, the TV initially selects language A and displays "A" on the screen briefly. If you want to switch to language B or Mono (only available in NICAM reception), press the Stereo/Mono button.

NICAM Bilingual
flowchart
graph TD
    A["A"] --> B["B"]
    B --> Mono["Mono"]
A2 Bilingual

Programme Information Call
To display the on screen indication, press the Recall/Colour System button.
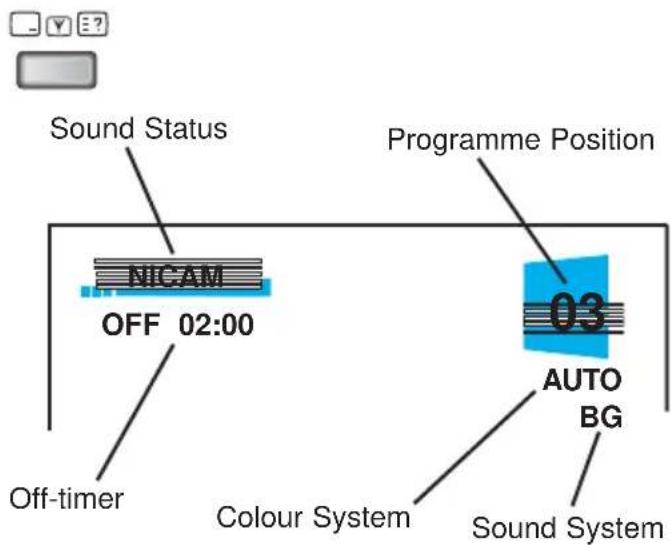
Colour System Selection
If the clear picture cannot be obtained, press the Recall/Colour System button repeatedly until optimum image can be produced.

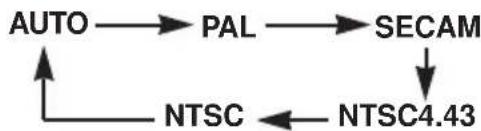
flowchart
graph TD
    AUTO --> PAL --> SECAM
    SECAM --> NTSC4.43
    NTSC4.43 -->|←| AUTO
A colour system entry to the memory can not be made during TV mode, make it during Semi-auto tuning mode.
Screen Mode Selection
Today there are various transmission formats with different size ratios, e.g. 4:3, 14:9, 16:9 and video format such as letterbox. 4:3 picture sometimes have a black band at the top and bottom of the screen. You can select a screen mode to optimise the picture display.
WIDE
Press the Wide button to select the following screen modes;

Auto / Natural / Zoom 14:9 / Title-in 14:9 / Zoom 16:9 / Title-in 16:9 / Full / Normal
Auto
It automatically switches to the optimum screen mode according to the WSS signal provided in the receiving signal source. If the signal does not have it, the TV keeps current screen mode. This setting may cause the picture to change when a different format is received e.g. when an advert is received.
WSS (Wide-Screen-Signalling)
This function is to be automatically set to the optimum screen mode for the wide screen television according to the aspect ratio bits of the picture format (16:9, 14:9, 4:3, etc.) on the receiving signal source. To use this function, the picture mode should be selected to the “Auto” mode. This function is also effective in the AV mode. When you connect AV equipment which has the WSS function, the screen mode is automatically selected to the optimum screen mode.
Natural
| 4:3 14:9 16:9 | Letterbox Video | ||
 |  |  |  |
| Stretches the picture horizontally to fill the screen, the picture is more stretched at the edges. | The height is expanded to fill the whole screen. | The picture fills the screen and is proportionally correct. | The black bars top and bottom remain and the height is compressed to fit into the picture area. |
Zoom 14:9
| 4:3 14:9 16:9 | Letterbox Video | ||
 |  |  |  |
| The correct picture width is maintained but the top and bottom are cropped. | Zooms in slightly cropping the top and bottom. | Zooms in slightly cropping the top and bottom. | The black bars top and bottom are smaller and the picture height is compressed slightly. |
Title-in 14:9
| 4:3 14:9 16:9 | Letterbox Video | ||
 |  |  |  |
| As zoom (14:9), but bottom is compressed even more to allow subtitles to be seen. | As zoom (14:9), but bottom is compressed even more to allow subtitles to be seen. | As zoom (14:9), but bottom is compressed even more to allow subtitles to be seen. | As zoom (14:9), but bottom is compressed even more to allow subtitles to be seen. |
Zoom 16:9
| 4:3 14:9 16:9 | Letterbox Video | ||
 |  |  |  |
| The correct picture width is maintained but the top and bot-tom are cropped. | Zooms in slightly cropping the top and bottom. | Zooms in slightly cropping the top and bottom. | The black bars top and bottom are small-er and the picture height is compressed slightly. |
Title-in 16:9
| 4:3 14:9 16:9 | Letterbox Video | ||
 |  |  |  |
| As Zoom (16:9), but bottom is compressed even more to allow subtitles to be seen. | As Zoom (16:9), but bottom is compressed even more to allow subtitles to be seen. | As Zoom (16:9), but bottom is compressed even more to allow subtitles to be seen. | As Zoom (16:9), but bottom is compressed even more to allow subtitles to be seen. |
Full
| 4:3 14:9 16:9 | Letterbox Video | ||
 |  |  |  |
| The whole screen is filled stretching the width. | The whole screen is filled stretching the height slightly at the edges. | The whole screen is filled with the correct picture ratio. | The black bars top and bottom are bot- tom are present and the height is compressed. |
Normal
| 4:3 14:9 16:9 | Letterbox Video | ||
 |  |  |  |
| The correct ratio is maintained with black bars on the left and right. | Black bars left and right, picture height is stretched. | Black bars left and right, picture height is stretched. | Black bars left, right, top and bottom. |
Digital Shot
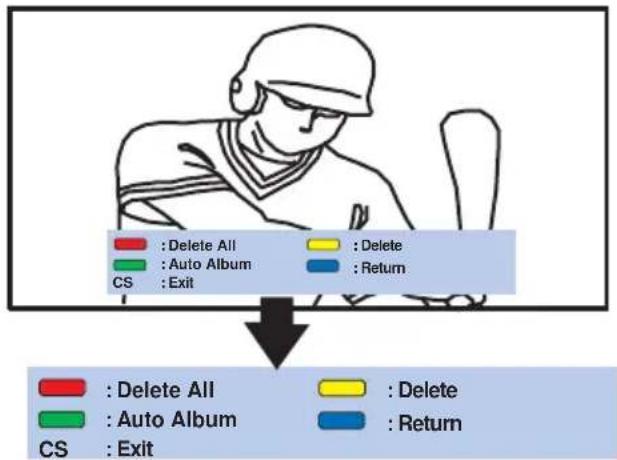
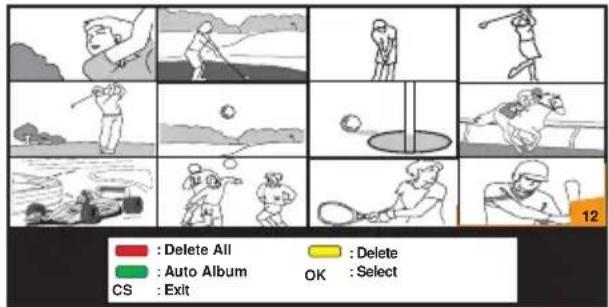
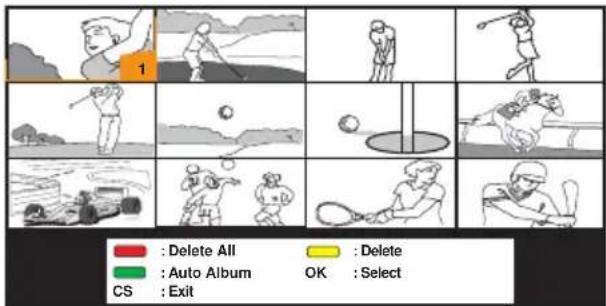
Use Digital Shot function to capture and save the up to 12 pictures and replay them in a list mode, full screen mode and automatic album mode.
How to capture the pictures
1 Press the Digital Shot button to capture a scene that you want to store. (The screen is not frozen at this time.)

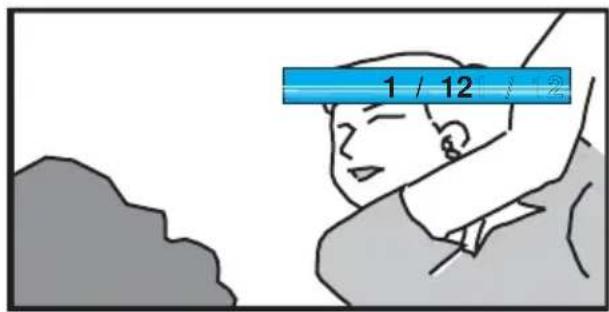
Up to 12 frozen pictures can be stored.

"Memory Full" will be displayed for a few seconds when 12 pictures are stored.

To replay only the selected picture
1 Press the CS button to display the screen of List mode.

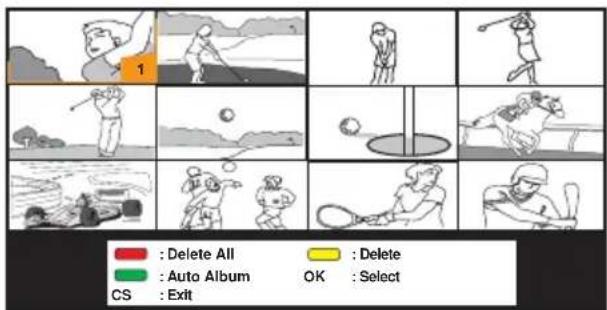
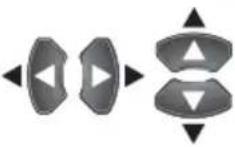
2 Select a picture that you want to display with the cursor / or / ▼ ◀ ▶ button.
3 Press the OK button to display.

To display guide menu:
Press the OK button. To erase guide menu, press the OK button again.
flowchart
graph TD
    A["User"] --> B{Delete All}
    A --> C{Auto Album}
    A --> D{CS Exit}
    B --> E["Delete"]
    B --> F["Delete"]
    B --> G["Return"]
    H["User"] --> I["Delete All"]
    H --> J["Auto Album"]
    H --> K["CS Exit"]
    I --> L["Delete"]
    I --> M["Return"]
To return to the List mode:
Press the Blue button.
4 To return to the normal TV mode, press the CS button.
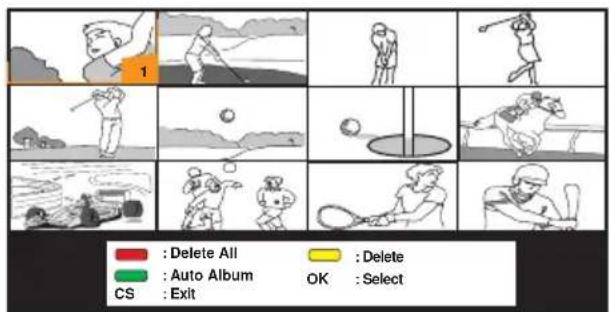
Auto Album
Use this function to display each picture continuously.
1 Press the CS button to display the screen of List mode.
CS

2 Press the Green button, and each picture is displayed continuously every three seconds.
To stop Auto Album on the way:
Press the Green button.
(To start Auto Album again, press the
Green button again.)
or
Press the OK button.
(To display guide menu, press the OK button again.)
To return to the List mode:
Press the Blue button.
To return to the normal TV mode:
Press the CS button.
(When the TV/AV Selector is pressed, TV return to the AV mode.)
Deletion of pictures
1 Press the CS button to display the screen of List mode.

2 Select a picture that you want to delete with the cursor / or / ▼ ◀ ▶ button. Then press the Yellow button.
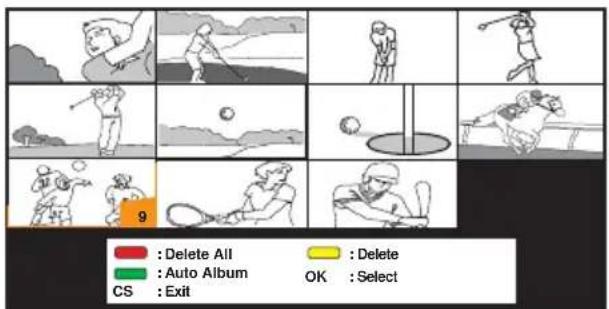
To delete all pictures at a time:
1) Press the Red button in the List mode.

2) Press the Red button again. (To cancel deletion, press the Blue button.)
No Image
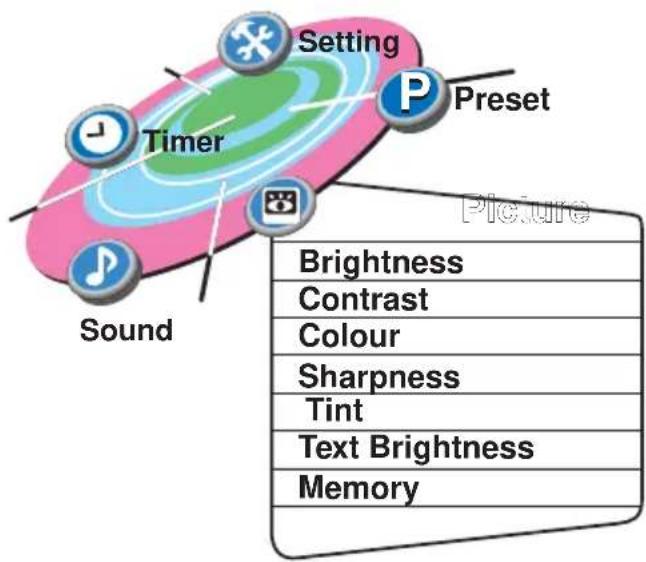
The on-screen menu provides the viewer with easy access to adjustments and settings. Follow the on-screen instruction at the bottom of the screen.
flowchart
graph TD
    A["Setting"] --> B["Timer"]
    B --> C["Sound"]
    B --> D["Preset"]
    D --> E["Picture"]
    F["Brightness"] --> G["Contrast"]
    G --> H["Colour"]
    H --> I["Sharpness"]
    I --> J["Tint"]
    J --> K["Text Brightness"]
    K --> L["Memory"]
◀ ▶ : Select
▼ : Contents
MENU : Exit
■ During the menu operation, the following buttons are used.
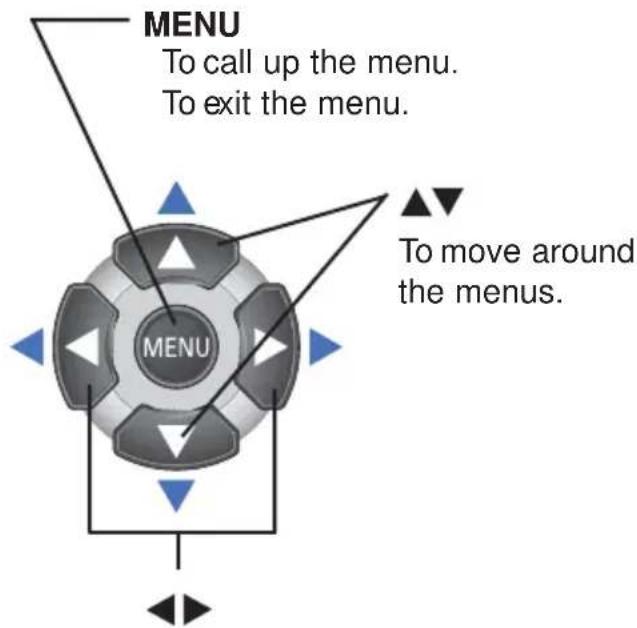
To move around the menus. To make adjustments.

OK button
To store the settings.
Picture Adjustments
1 Press the MENU button, and select "Picture" menu with ⬆.
2 Press to ▼elect a content.
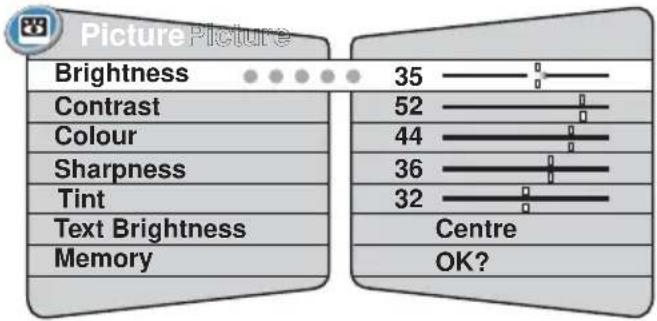
bar
| Category | Value | |---|---| | Brightness | 35 | | Contrast | 52 | | Colour | 44 | | Sharpness | 36 | | Tint | 32 | | Text Brightness | Centre | | Memory | OK? |3 Press or to adjust.
- Tint :
Adjust colour tints. (Displayed only on NTSC signal reception.)
- Text Brightness :
Brightness of teletext screen (Minimum, Centre, Maximum). You can not control the picture and the teletext brightness in the teletext mode. You must first switch back to the TV mode and then adjust the picture control or set the teletext brightness level.
4 Once the adjustments have been completed, select "Memory" and press OK button to store the settings. Press the MENU button to exit.
Note:
Your picture adjustment will be memorized to "Personal" of the Picture Mode automatically.
Sound Adjustments
1 Press the MENU button, and select "Sound" menu with ◄. ▶
2 Press to▼elect a content.

3 Press or to adjust.
- Balance :
Left and Right speaker volume balance adjustment.
- BBE (ON/OFF)
Enable to switch the BBE sound turn on and off. BBE High Definition Sound restores clarity and presence for better speech intelligibility and musical realism.
• Auto Volume (ON/OFF) :
This function automatically equates the sound volume of each position. It is used to prevent the sharp volume change when you change the channel.
4 Press the MENU button to exit.
Sound settings will be automatically stored when you exit the menu.
Timer Setting
■ Off timer setting
The Off timer will switch the TV set into the standby mode when the selected time has elapsed.
1 Press the MENU button, and select
"Timer" menu with ⬆.
(To display "TIMER" menu directly, press the TIMER button on the remote control.)
2 Select "OFF timer" with . ▼

flowchart
graph LR
    A["TimerTimer"] --> B["OFF Timer"]
    B --> C["Alarm Timer"]
    style A fill:#f9f,stroke:#333
    style B fill:#ccf,stroke:#333
    style C fill:#cfc,stroke:#333
3 Press or to select "---":--".
4 Press or to set OFF timer.
The time changes in 30 minutes steps. The maximum time is 2 hours.
5 Press or to make row of OFF timer complete yellow.
6 Press the OK button to store the setting. Press the MENU button to exit, or press ▼ to set alarm timer.
When the TV set is turned off, Off Timer setting will be cancelled.
■ Alarm timer setting
The alarm will ring for about 15 seconds when you are watching the television and it reaches at the set-up time. It may remind you to do something. (This only happens when the TV is switched on.)
1 Select "Alarm timer" with in the Timer menu.

3 Press or to set alarm timer.
The time changes in 5 minute steps. The maximum time period is 3 hours.
4 Press or to make row of Alarm timer complete yellow.
5 Press the OK button to store the setting. Press MENU button to exit.
When the time period is up, the time up sign will appear on the screen and the alarm will sound for about 15 seconds.

To stop the alarm sound and to erase alarm sign, press one of the buttons of the remote control or TV set.
When the TV set is turned off, Alarm timer will be cancelled.
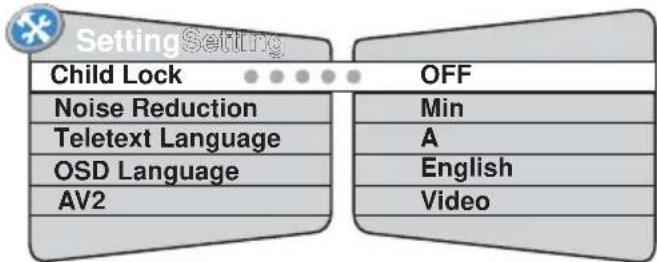
Setting Menu
This setting menu gives you several options to adjust.
1 Press the MENU then ◀ or ▶ button to select "Setting" menu.
2 Press ▼to select a content.
flowchart
graph LR
    A["Setting Setting"] --> B["Child Lock"]
    A --> C["OFF"]
    B --> D["Noise Reduction"]
    B --> E["Teletext Language"]
    B --> F["OSD Language"]
    B --> G["AV2"]
    C --> H["Min"]
    C --> I["A"]
    C --> J["English"]
    C --> K["Video"]
3 Press or to set each option.
- Child Lock (ON, OFF):
You can prevent that a small child operates television with the front control button of the TV set. When the power plug is pulled out, this function is cancelled.
- Noise Reduction :
(Displayed only on TV mode.) You can choose noise reduction mode; OFF, Min, Med or Max.
- Teletext Language :
You can choose your text language, select A or B.
A=English, Arabic and Cyrillic. B=English, Persian and Cyrillic.
- OSD Language :
This is useful if you wish to change the On-screen display language (English, Français, Dutch, Suomi, Deutsch, Hrvatski, Dansk, Greek, Magyar, Italiano, Polski, Português, Español, Svenska or Cesky).
- Setting of AV2 input mode :
When you use a S-VHS VCR, you should connect it to AV2 and change the AV2 menu to "S-Video".
4 Press the MENU button to exit.
These settings will be automatically stored when you exit the menu.
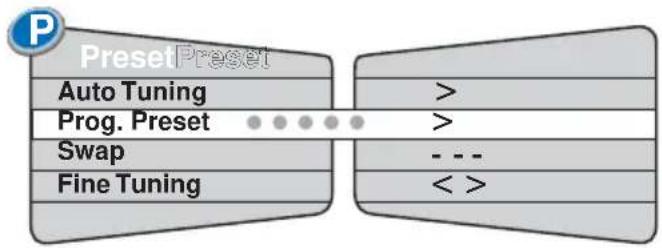
Preset Menu
Use Preset Menu to tune new channels, to re-order channels and their programme positions, and to make fine tuning. Up to 255 broadcast stations can be stored.
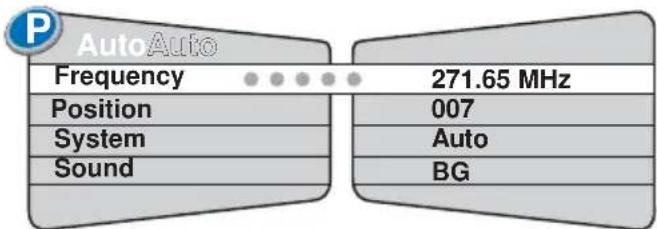
Auto Tuning
1 Press the MENU button, and select
"Preset" menu with ⬆.

2 Select "Auto Tuning" with

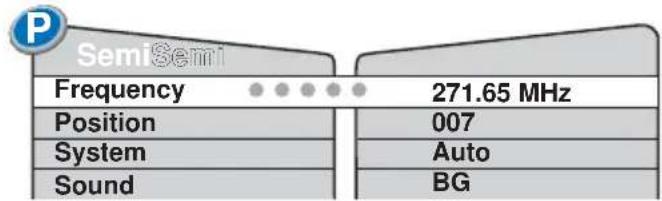
3 Press to enter the Auto Tuning mode, and "Frequency" will be selected first.
other
AutoAuto | Category | Value | |---|---| | Frequency | 271.65 MHz | | Position | 007 | | System | Auto | | Sound | BG |4 Press to start tuning.
All the available stations are automatically stored, starting from position 1. After completing this procedure, TV set returns to programme position "1".
• System (Colour System):
You can change the colour system with ⬆ ▶ (Auto, PAL, SECAM, NTSC4.43 or NTSC.)
• Sound (Sound System):
You can change the sound system with ⬆ ▶ (BG, DK, I or M.)
Auto Tuning can be cancelled at any time by pressing the MENU button.
5 Press the MENU button to exit.
Semi-auto Tuning
This is used to preset a channel in any programme position.
1 Select "Prog. Preset" with in the Preset menu.
flowchart
graph LR
    A["Auto Tuning"] --> B["Prog. Preset"]
    B --> C["Swap"]
    C --> D["Fine Tuning"]
    D --> E["Output Comparison"]
2 Press to enter the Semi-auto Tuning mode.
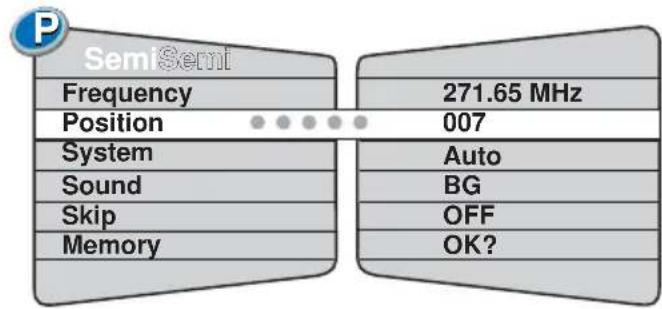
3 Select "Position" with . ▼ To select desired programme position: Press the Digit (-/-) button and enter the position number (000-254) using 0-9 buttons.
or Press to select programme position sequentially.
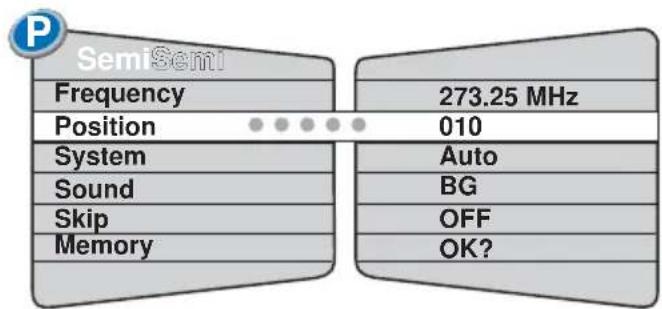
4 Select "Frequency" with ▲.
5 You can either...
a) Press the Digit (-/-) button, and enter the frequency (5 digits) using 0-9 buttons referring channel table.
b) Press and release (toward the lower frequency) or (toward the higher frequency) to search a TV station. Once a station is found, tuning will stop automatically. Repeat until desired station is found.
- If the clear picture cannot be obtained, change the colour system with c
- If the sound is not clear or no sound is produced, change the sound system with ⬆
6 Select "Memory" with ▼, and press the OK button to memorize.
Repeat steps 3-6 to store other channels in other programme positions.
7 Press the MENU button to exit.
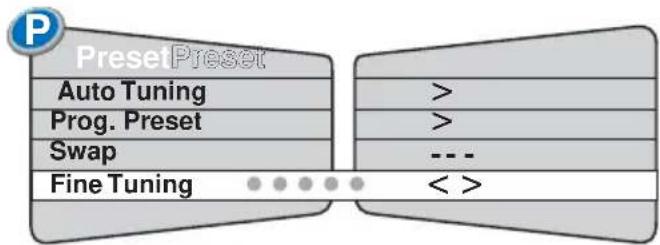
Fine Tuning
1 Select "Fine Tuning" with ▼ in the Preset menu.
flowchart
graph TD
    A["Auto Tuning"] --> B[">"]
    C["Prog. Preset"] --> D[">"]
    E["Swap"] --> F["---"]
    G["Fine Tuning"] --> H["< >"]
2 Press and hold or to fine-tune a channel.
3 Press the MENU button to exit. The tuning will be stored when you exit the menu.
Any changes made by fine tuning will remain even when the TV set is turned off.
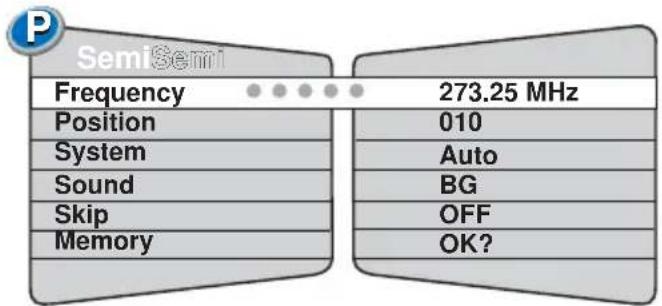
Setting of the Skip Channels
If there are positions you do not use, by setting skip channel function, it is possible to jump over any position when you are selecting a channel using the Programme Up/Down button.
1 Select "Position" in the Semi menu.
2 Select programme position you want to skip.
To select desired programme position:
Press the Digit (-/-) button and enter the position number (000-254) using 0-9 buttons.
or
Press to ◀el elect programme position sequentially.
3 Select "Skip" with, and set Skip "ON"
with or.
(To cancel skip channel, set Skip "OFF".)
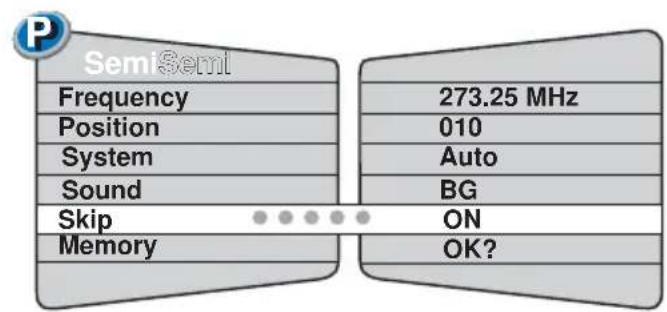
4 Select "Memory" with, and press the OK button to memorize.
5 Press the MENU button to exit.
Channel Swapping
Use this feature to swap the channels between two stored programme positions. This feature is particularly useful after automatic tuning.
First of all, you have to select a programme position you wish to swap. eg. swap programme position 3 and 12.
1 Select programme position eg. 3.

2 Call up the Menu display, and select "Swap" of the Preset menu with.
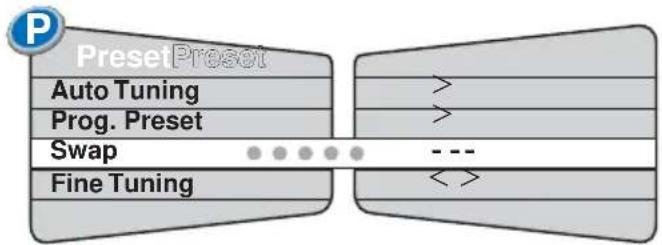
flowchart
graph LR
    A["Preset"] --> B["Auto Tuning"]
    A --> C["Prog. Preset"]
    A --> D["Swap"]
    A --> E["Fine Tuning"]
    B --> F[">"]
    C --> G[">"]
    D --> H["---"]
    E --> I["< >"]
3 Enter new programme position number eg. 12 by pressing 0,1 and 2 numeric buttons.
4 Press the OK button to memorize, and the programme number disappears.
The channels are now swapped.
5 Press the MENU button to exit.
Setting of the Hotel Mode
The Hotel Mode is a feature that might be needed by a hotel management to confine the TV that put in the hotel room, so it will not disturb other rooms.
Setting Procedure
1 Set the desired maximum sound volume by pressing the Volume + or - button.
2 Press and hold the Recall/Colour System button on the remote control and press the Programme Up button on the TV set.
3 Select desired item with ▲,▼nd set the option with ◀ or ▶.
Prohibition ON Start-Position OFF
• Prohibition (ON, OFF):
Current volume will be set as the maximum volume, and channel tuning is prohibited.
- Start-Position :
Setting of the start up programme position when the TV is turned on.
OFF: Last programme position start.
P1: Programme position "1" start.
P2: Programme position "2" start.
P3: Programme position "3" start.
P4: Programme position "4" start.
P5: Programme position "5" start.
P6: Programme position "6" start.
P7: Programme position "7" start.
P8: Programme position "8" start.
AV1: "AV1" start.
4 Press the Recall/Colour System button to exit.
Teletext language selection
You can select a teletext language. Please return to the TV mode. (See Setting menu.)
Teletext brightness level
You can change the teletext brightness level. Please return to the TV mode. (See Picture Adjustments.)
Sound volume control in teletext mode.
In teletext mode, sound volume and sound muting can be controlled. However they are not displayed on the screen
Teletext reception
If your aerial signal is poor, the teletext reception may be poor.
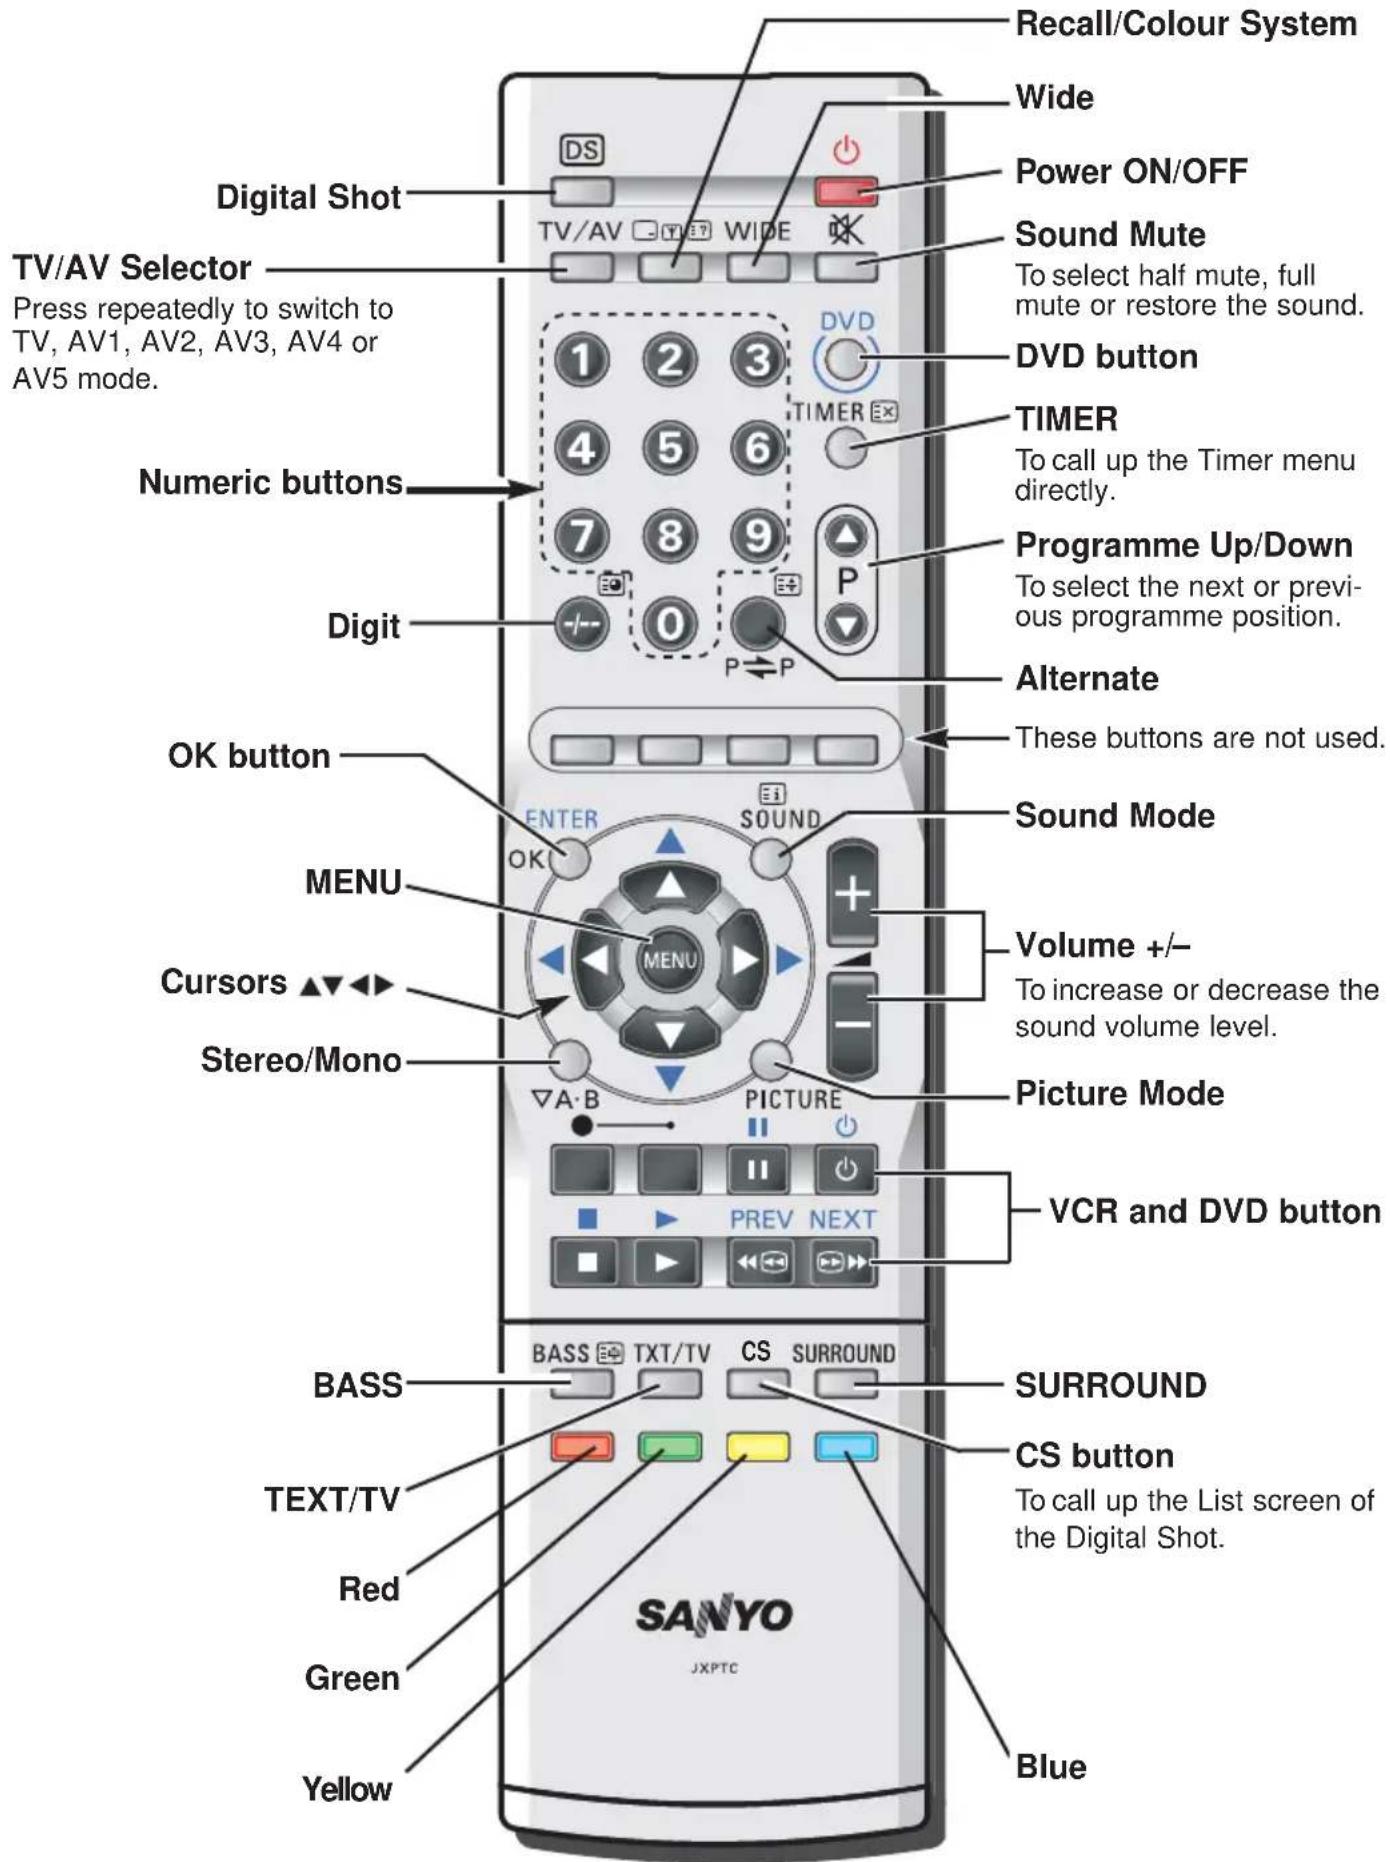
This remote control transmitter has been designed to be used in conjunction with selected SANYO VCR's and DVD players. Some SANYO VCR's and DVD players may have their own functions, so please refer to the individual instruction booklet when using this remote control to ensure compatibility. Some of the buttons are used for both the VCR and DVD player. The symbols indicated with blue are for the buttons to control the DVD player. When use the DVD player with this remote control, first press and hold the DVD button and then press your desired control button each time.
| VCR DVD | ||
 | Not used DVD command mode selection | |
 | Power Power | |
 | Play Play | |
 | pause Pause | |
 | Stop Stop | |
 | Fast/Cue Next chapter selection | |
 | Rewind/Review Previous chapter selection | |
 | Record, press both buttons Not used at the same time | |
 | Not used Enter | |
 | Not used Cursor selection | |

Connecting Other Equipment
You can connect a VCR, S-VHS VCR, Satellite Tuner, PAY TV Decoder, DVD or Camcoder to this TV via the AV terminals and the SCART terminal.
■ Depending on the type of video tape or connected AV equipment being used, it may be necessary to select colour system. In this case, press the Recall/Colour System button and select a suitable colour system. Colour system setting for AV position is automatically stored in the memory.
■ By pressing the Stereo/Mono button repeatedly, you can select the sound track L (left), R (right) or L/R.
■ You can select and return to a TV programme by selecting any of the TV position while watching a playback from a VCR, DVD, etc.
S-Video Connection through Scart Terminal Adaptor
When you use a S-VHS VCR not provided with the 21-pins scart terminal, connect it with the AV2 terminal using Scart Terminal Adaptor, and set AV2 status on "S-Video" (Refer to the Setting Menu on page 16).

■ Select "AV2" mode by pressing the TV/AV Selector for watching.
Important Note:
Do not input to both S-Video and RCA video input jack of the Scart Terminal Adaptor at the same time to avoid signal mix and distorted picture.
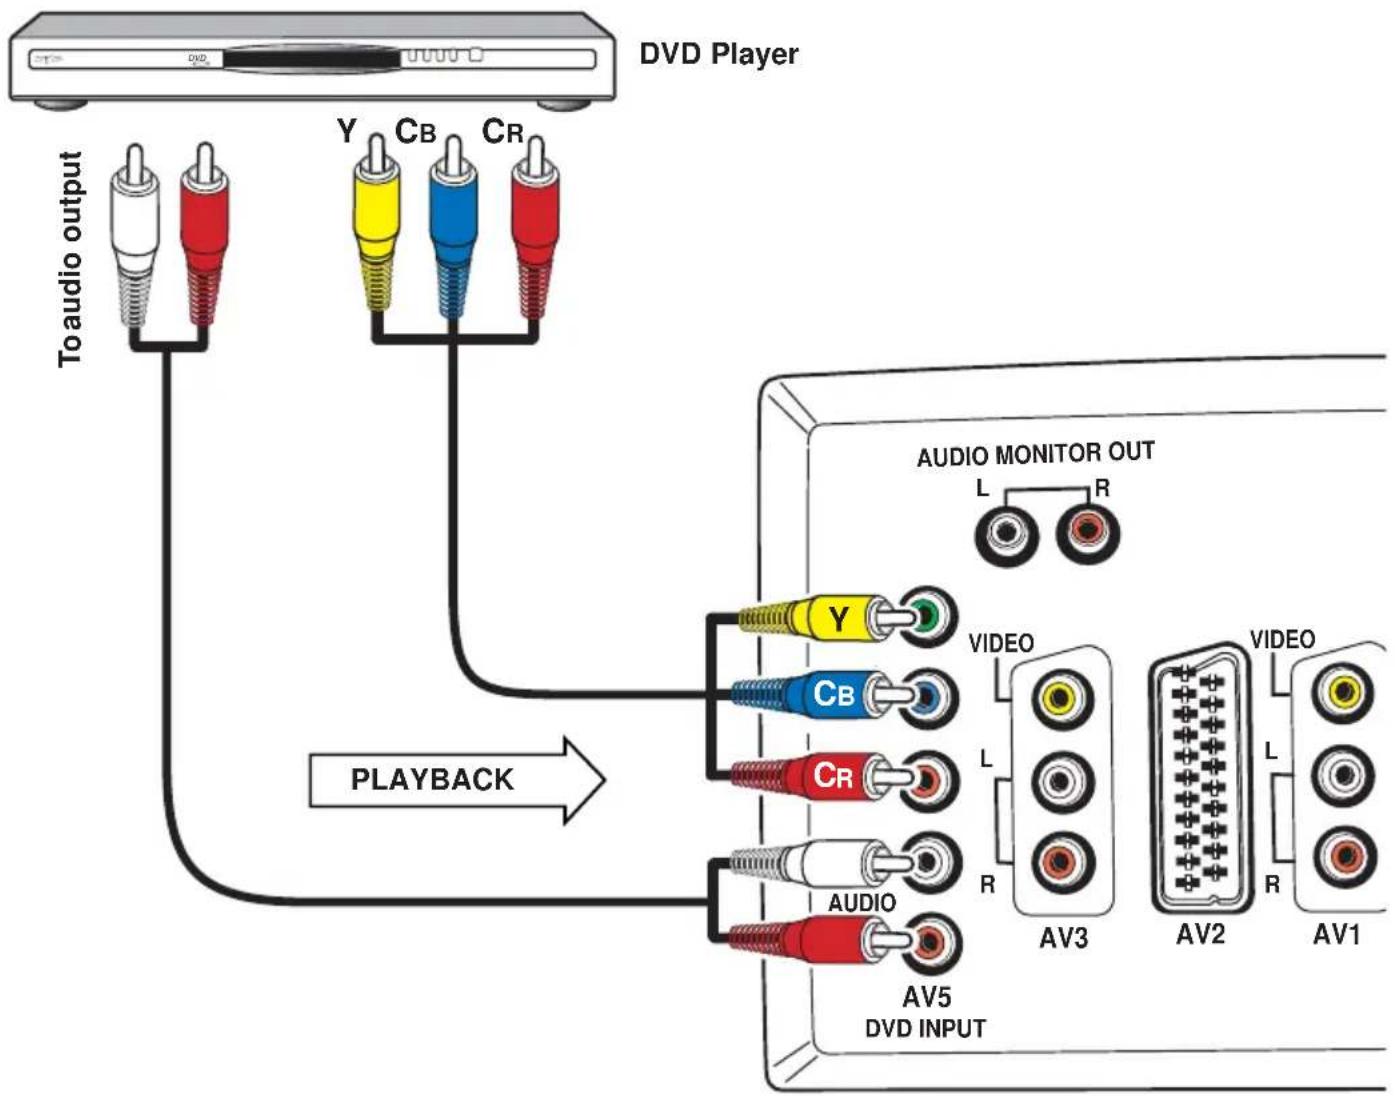
Connecting to the Rear AV5 Input Jacks
DVD Player Connection
If your DVD player has the component video output jacks, connect the TV to these jacks instead of the video input or S-VIDEO input jacks. You can enjoy high quality picture play-back.
flowchart
graph TD
    A["To audio output"] --> B["DVD Player"]
    B --> C["Playback"]
    C --> D["VIDEO OUT"]
    D --> E["AV3"]
    D --> F["AV2"]
    D --> G["AV1"]
    C --> H["VIDEO"]
    H --> I["AV5"]
    style A fill:#f9f,stroke:#333
    style B fill:#ccf,stroke:#333
    style C fill:#cfc,stroke:#333
    style D fill:#fcc,stroke:#333
    style E fill:#cff,stroke:#333
    style F fill:#ffc,stroke:#333
    style G fill:#fcc,stroke:#333
• Take care to ensure that the component video terminals (Y, CB and CR) are wired correctly.
- Video input to the component video terminals (Y, CB and CR) is not output on the video monitor output pin of the scart terminal.
■ Select "AV5" mode by pressing the TV/AV Selector for watching.
Connecting to the Side AV4 Input Jacks
It is convenient to use the AV4 input jack on the side panel for equipment that is often connected and disconnected.
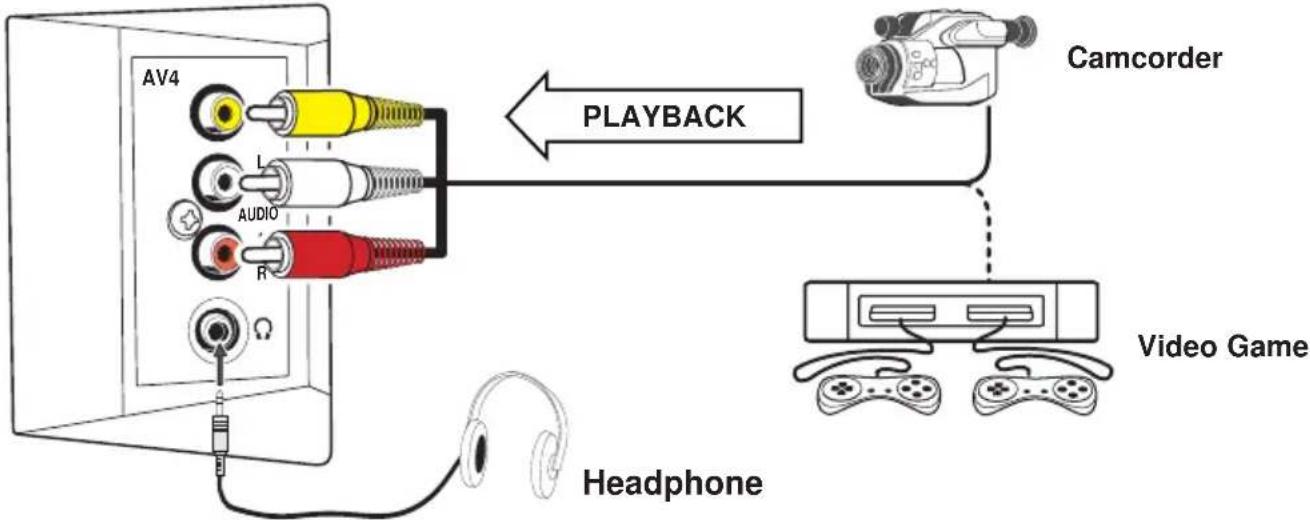
flowchart
graph TD
    A["AV4"] -->|PLAYBACK| B["Camcorder"]
    C["Audio"] -->|PLAYBACK| B
    D["Headphone"] -->|PLAYBACK| B
    E["Video Game"] -->|PLAYBACK| B
■ Select "AV4" mode by pressing the TV/AV Selector for watching.
Connecting a Stereo Amplifier to Audio Monitor Output Jacks
Connect Audio Monitor Out terminals (R/L) to the Stereo Amplifier Input (R/L). The audio signal being output from the TV speaker is output through the Audio Monitor Output jacks.

- Do not connect external speakers directly to the TV.
■ Helpful hints
- Check if TV is plugged in.
- Try a different channel, if OK, probably station trouble.
■ POOR PICTURE, SOUND OK
- Adjust BRIGHTNESS control.
- Adjust FINE TUNING control.
- Check aerial connections
■ NO COLOUR, PICTURE OK
- Adjust COLOUR control.
- Adjust FINE TUNING control.
• Is the programme in colour?
■ WEAK PICTURE
- Check aerial connections on back of set.
- Check aerial for broken wires.
- Re-orient aerial.
■ The following faults are not caused by the receiver:
"GHOSTS"
Reflections of signals from mountains or high buildings will cause multiple images, called "Ghosts". These abnormal conditions can be reduced to minimum by repositioning aerial or by installing a new one suited for your area.
"INTERFERENCE"
Interference may be caused by electrical appliances, car ignition systems, etc. This should normally be a temporary condition, but should this interference persist, contact your dealer.
BBE®
Manufactured under license from BBE Sound, Inc.
Licensed by BBE Sound, Inc. under USP5510752 and 5736897.
The word "BBE" and BBE symbol are registered trademarks of BBE Sound, Inc.
Power Source AC100-264 Volts, 50Hz/60Hz
Colour System PAL/SECAM/NTSC4.43/NTSC3.58/PAL-60Hz
Sound System B/G, D/K, I, M/M
Channel Coverage VHF: E2-E12, A2-A13, R1-R12, J1-J12, K1-K9 UHF: 21-69, A14-A69, J13-J62 CATV: S1-S41, X, Y, Z, Z+1, Z+2
Aerial Input Impedance 75 Ω
LCD Panel (Model LCD-27XA2)
Screen Size (Measured Diagonally): 27 inches
Picture Resolution: WXGA 1280 (Horiz.) x 720 (Vert.) pixels
Viewing Angles: Horiz. 176°, Vert. 176°
Contrast Ratio: 900:1
Brightness: 550 cd/m²
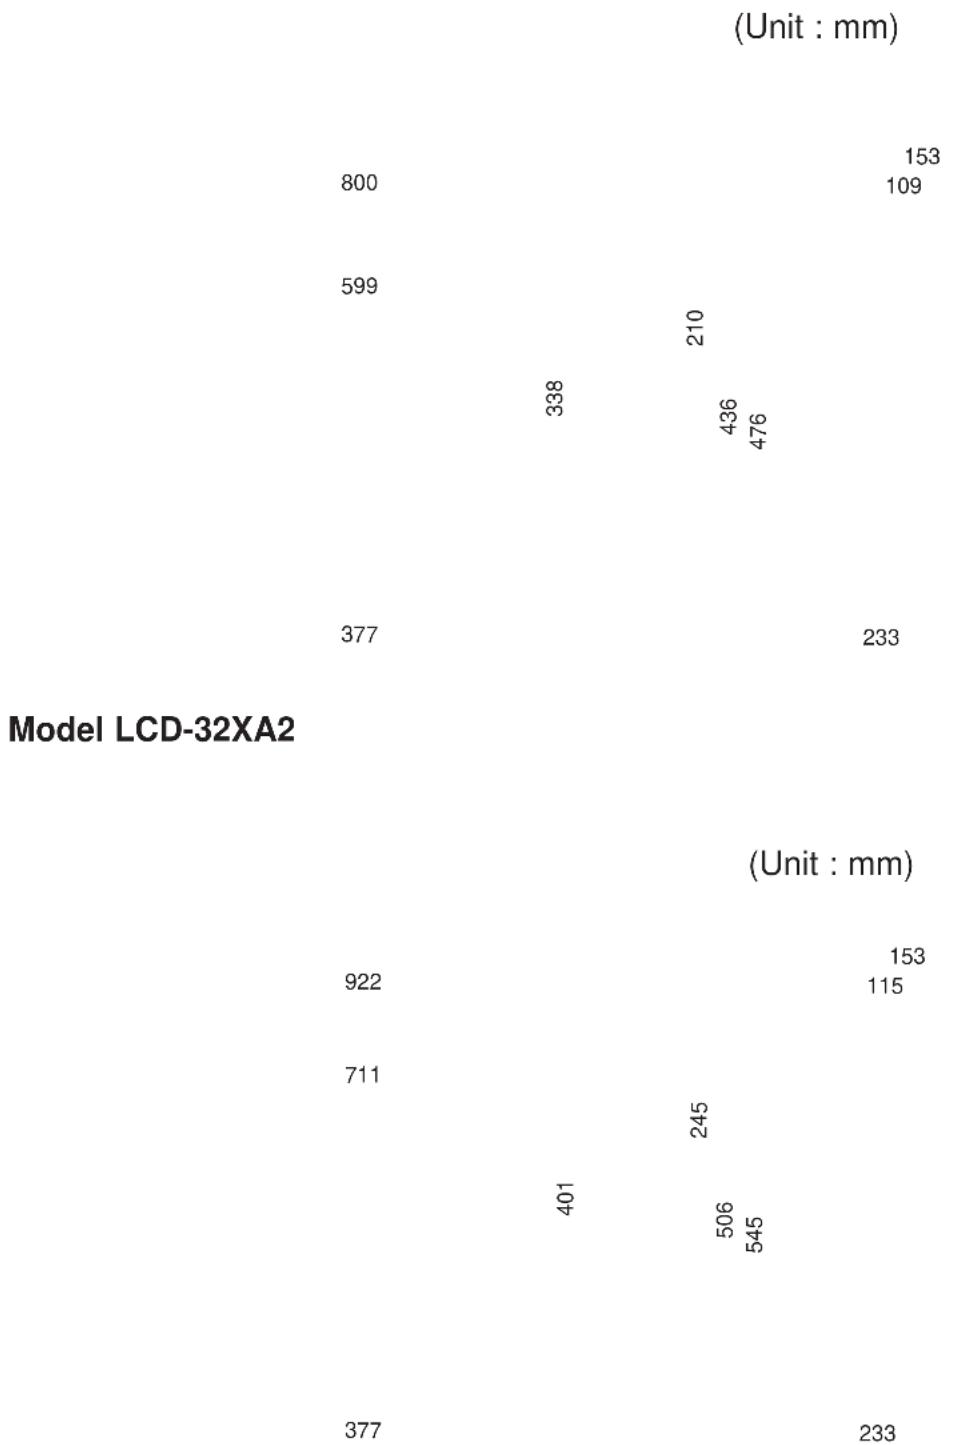
LCD Panel (Model LCD-32XA2)
Screen Size (Measured Diagonally): 32 inches
Picture Resolution: WXGA 1366 (Horiz.) x 768 (Vert.) pixels
Viewing Angles: Horiz. 176°, Vert. 176°
Contrast Ratio: 1000:1
Brightness: 550 cd/m²
Audio Output (RMS) 10W + 10W
Speaker 6 cm x 12 cm x 2 pcs.
AV Terminals
AV1 Video: Composite video (RCA Jack) x 1
Audio: L/R Stereo Input (RCA Jack) x 1 set
AV2 CENELEC Standard (Scart Terminal)
Input: Composite video, RGB, S-video and audio-L/R
Output: Monitor-output with composite video and audio-L/R
AV3 Video: Composite video (RCA Jack) x 1
Audio: L/R Stereo Input (RCA Jack) x 1 set
AV4 Video: Composite video (RCA Jack) x 1
Audio: L/R Stereo Input (RCA Jack) x 1 set
AV5 Video: Component Y, CB, CR Input (RCA Jack) x 1 set
Audio: L/R Stereo Input (RCA Jack) x 1 set
Audio Monitor Output: L/R Stereo Output (RCA Jack) x 1 set
Headphone Jack: Mini Stereo Jack x 1
Net weight Model LCD-27XA2: Approx. 14.1 Kg (Included Swivel Stand)
Model LCD-32XA2: Approx. 17.5 Kg (Included Swivel Stand)
Specifications
Dimensions
Model LCD-27XA2
scatter
Model LCD-32XA2 | X | Y (mm) | |---|---| | 800 | 153 | | 800 | 109 | | 599 | 210 | | 338 | 436 | | 476 | 476 | | 377 | 233 | | 922 | 153 | | 711 | 115 | | 401 | 245 | | 506 | 506 | | 545 | 545 | | 377 | 233 |Specification subject to change without notice