
Sonicare Power Flosser 7000 HX3904 - Oral irrigator PHILIPS - Free user manual and instructions
Find the device manual for free Sonicare Power Flosser 7000 HX3904 PHILIPS in PDF.


| Type de produit | Oral irrigator |
| Brand | Philips |
| Model | Sonicare Power Flosser 7000 HX3904 |
| Power supply | 100-240V, 50/60Hz (adapter model WAC1001) |
| Water reservoir capacity | Approximately 600 ml (max fill line) |
| Number of cleaning modes | 4 (Clean, Deep Clean, Sensitive, Massage) |
| Intensity levels | 10 |
| Nozzle types | Standard, Comfort, Quad Stream |
| Technology features | Pulse Wave technology (Deep Clean & Sensitive modes), Pacer (Clean & Massage modes) |
| Magnetic docking | Yes (auto-off pause switch when docked) |
| Pause switch on handle | Yes |
| Nozzle replacement interval | Every 6 months |
| Warranty | 2 years |
| Cleaning instructions | Reservoir, base, handle, nozzles, and storage case cleanable with warm soapy water or dishwasher (except handle and base) |
| Safety precautions | Keep adapter away from water; do not use with damaged parts; consult dentist if oral surgery in last 2 months |
| Compatible accessories | Only Philips Sonicare Power Flosser nozzles (Standard, Comfort, Quad Stream) |
| Max altitude use | 4420 meters |
| Children use | Ages 6+ with adult supervision |
| Intended use | Home use, at least once daily for cleaning teeth and gums |
Frequently Asked Questions - Sonicare Power Flosser 7000 HX3904 PHILIPS
User questions about Sonicare Power Flosser 7000 HX3904 PHILIPS
0 question about this device. Answer the ones you know or ask your own.
Ask a new question about this device
Download the instructions for your Oral irrigator in PDF format for free! Find your manual Sonicare Power Flosser 7000 HX3904 - PHILIPS and take your electronic device back in hand. On this page are published all the documents necessary for the use of your device. Sonicare Power Flosser 7000 HX3904 by PHILIPS.
USER MANUAL Sonicare Power Flosser 7000 HX3904 PHILIPS
natural_image
White electric toothbrush with 'PHILIPS SENSICARE' model, displayed on a modern appliance (no visible text or symbols on the device itself)
natural_image
Simple line drawing of an open book with a grid pattern on the left and a curved arrow pointing to the right page (no text or symbols)1
-1
1_
-1
1
English 6
Čeština 24
Hrvatski 42
Magyar 60
Slovenščina 79
Slovensky 96
Srpski 115
Български 131
Important safety information
Read this important information carefully before you use the appliance and save it for future reference.
DANGER
- Keep the power adapter away from water.
- Do not place or store product where it can fall or be pulled into a tub or sink.
- Do not reach for a product that has fallen into water. Unplug immediately.
- Do not immerse the power adapter or base in water or any other liquid.
- After cleaning, make sure the power adapter is completely dry before you connect it to the mains.
WARNINGS
To reduce the risk of burns, electrocution, fire or injury to persons:
- Only use the power adapter (WAC1001) provided with the Power Flosser.
- If the product is damaged in any way (power adapter, base, handle, hose or nozzle), stop using it.
- Always replace the power adapter with one of the original type in order to avoid a hazard.
- Keep cord away from heated surfaces
- This appliance contains no user serviceable parts. If the appliance is damaged, contact the Consumer Care Center in your country (see 'Warranty and support').
- Do not use the product outdoors
- The maximum altitude of use is 4420 meters.
- This product is not intended for use by persons (including children) with reduced physical, sensory, or mental capabilities, or lack of experience and knowledge, unless they have been given supervision or instruction concerning use of the product by a person responsible for their safety.
- Children (ages 6+) should be supervised to ensure that they do not play with the product.
- Do not fill the reservoir with hot water. Hot water may cause burns.
- Philips Sonicare Power Flosser is a personal care device and is not intended for use by multiple users.
- If you are not going to use the product for an extended period of time, unplug it from the electrical outlet, clean it and store it in a cool and dry place away from direct sunlight.
CAUTION
- To avoid damage to the product, do not place the product or parts in the dishwasher for cleaning unless otherwise instructed.
- If you have had oral or gum surgery in the previous 2 months, consult your dentist before you use the Philips Sonicare Power Flosser.
- Consult your dentist if excessive bleeding occurs after using this toothbrush or if bleeding continues to occur after 1 week of use.
- The Philips Sonicare Power Flosser complies with the safety standards for electromagnetic devices. If you have a pacemaker or other implanted device, contact your physician or the manufacturer of the implanted device prior to use.
- If you have medical concerns, consult your doctor before you use the Philips Sonicare Power Flosser.
- This product has only been designed for cleaning teeth and gums. Do not use it for any other purpose. (for e.g. eyes, nose and ears). Stop using the appliance and contact your doctor if you experience any discomfort or pain.
- Do not use other nozzles than the ones recommended by Philips Sonicare.
Electromagnetic fields (EMF)
This Philips appliance complies with all applicable standards and regulations regarding exposure to electromagnetic fields.
Introduction
Welcome to Philips! Congratulations on your new Sonicare Power Flosser. To fully benefit from the support that Philips offers, register your product at philips.com/welcome.
Intended Use
The Philips Sonicare Power Flosser is an oral irrigator intended to remove plaque and food debris between teeth and the tooth surface in order to reduce tooth decay and improve and maintain gum health. This product is intended for consumer home use, normally used at least once a day. Use by children (ages 6+) should be with adult supervision.
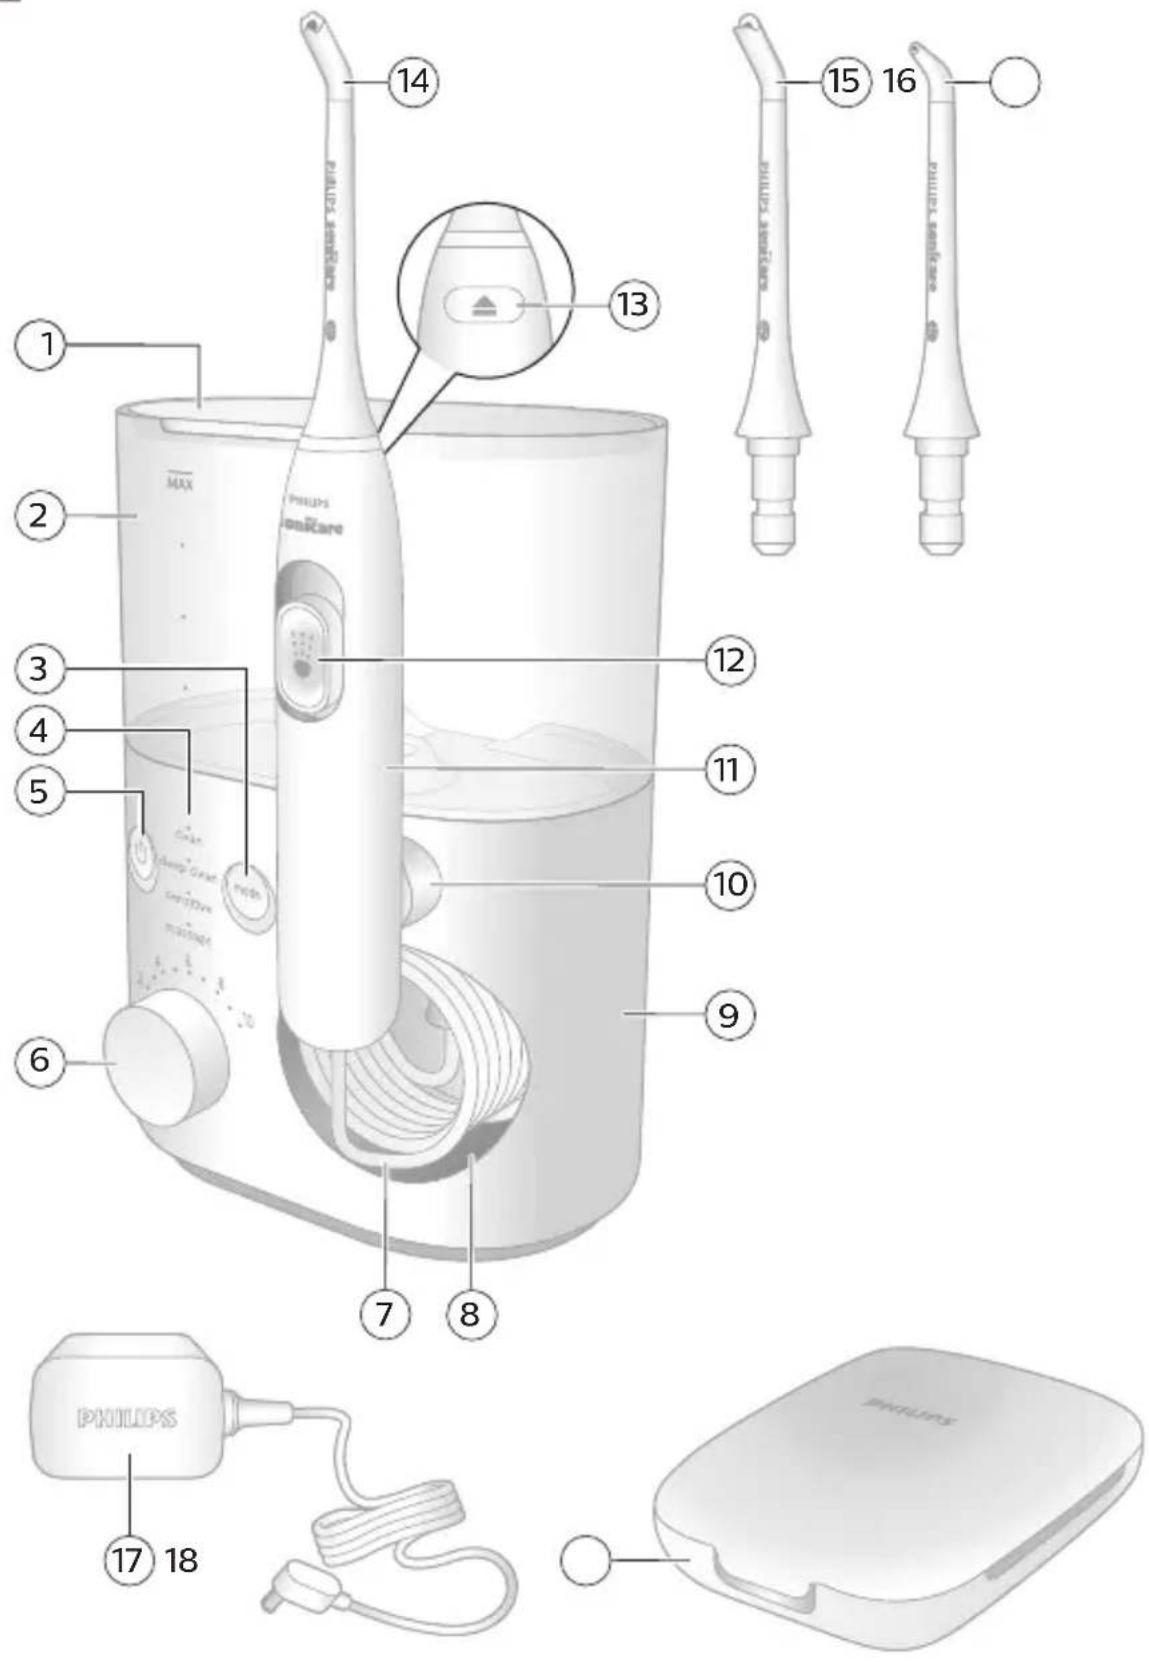
Your Philips Sonicare Power Flosser (Fig. 1)
1 Reservoir lid
2 Reservoir
3 Mode button
4 Mode indicator
5 On/off button
6 Intensity dial
7 Hose
8 Hose storage compartment
9 Base
10 Magnetic handle dock
11 Handle
12 Pause switch
13 Nozzle eject button
14 Quad Stream nozzle*
15 Comfort nozzle*
16 Standard nozzle*
17 Power adapter
18 Nozzle storage case
*Note: The contents of the box may not include all items shown depending on the product configuration purchased.
Nozzles
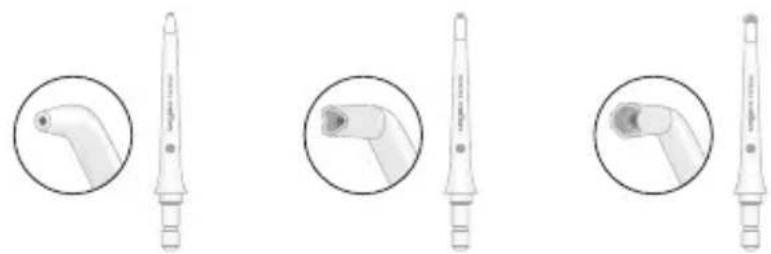
To see what type of nozzles you have, check the code at the base of the nozzle. Each nozzle type provides different benefits.
natural_image
Three technical illustrations of a dental implant tool, shown in circular views with no visible text or symbols.Nozzle label F1 F2 F3
| Nozzle Name Standard nozzle | Comfort nozzle Quad Stream nozzle | |
| Benefit Standard nozzle with a single stream of water for removing debris and plaque. | Soft rubber nozzle for comfort and ease of positioning for those with sensitive gums. | Soft rubber nozzle that directs water into a cross-shaped stream that gently removes plaque for an effortlessly thorough clean. |
Modes
Your Power Flosser is equipped with 4 different modes:
Clean
This mode, with pacer, provides standard water pressure for a great clean.
Deep clean
This mode, with Pulse Wave technology, provides strong and gentle pulses of water for a thorough clean.
Sensitive
This mode, with Pulse Wave technology, provides gentle pulses of water for beginners or those with sensitive gums.
12 English
Massage
This mode, with pacer, offers soothing pulses of water to massage your gums.
Note: For details on "Pulse Wave technology" and "pacer" (see 'Features').
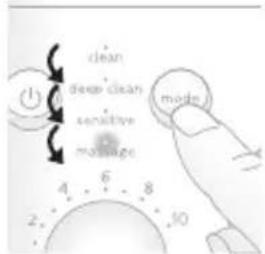
Selecting modes
1 Turn on the device by pressing the on/off button.
2 Press the mode button to select desired mode.
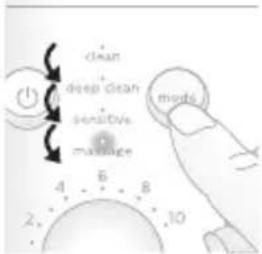
Intensity Settings
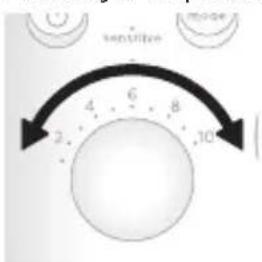
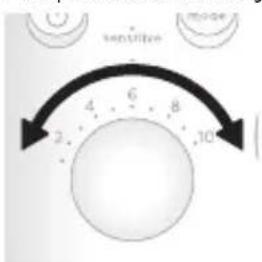
Your power flosser comes with 10 different intensity settings. To manually change the intensity, turn on the base and turn the intensity dial to the setting you prefer.
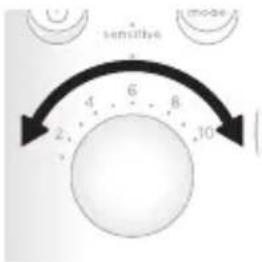
Note: For first time use, start the device from the lowest setting. It is recommended to increase the intensity you use over the course of a few weeks. This can give better cleaning benefits as you are able to tolerate higher settings.
Features
Pacer
The clean and massage modes have a pacer. This feature indicates when you are supposed to move to the next section of your mouth via a short pause in the waterflow.
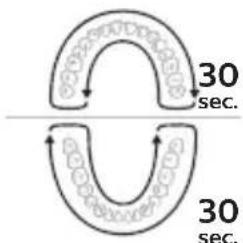
Note: This feature is on clean mode and massage modes only.
Activating or deactivating pacer
You can activate or deactivate the pacer feature by holding the on/off button and the mode button simultaneously for 5 seconds.
- When deactivated, all the lights will flash once.
- When activated, all the lights will flash twice.
Pulse Wave technology
The deep clean and sensitive modes have a "Pulse Wave technology" feature. The flow of the water increases and decreases in intensity, providing a brief pause during which you can move the nozzle to the next space between your teeth.
Magnetic Docking
If the pause switch on the handle was not turned to the off position, when the handle is docked back to the base after use, the magnetic dock will automatically set the pause switch back to off.
Getting started
1 Connect the small plug into the bottom of the base and connect the power plug in any 100-240V power outlet.
2 Remove the reservoir from the base.
Note: Make sure the product is powered off before you remove the reservoir.
3 Open the lid, fill the reservoir with lukewarm water to the MAX fill line.
14 English
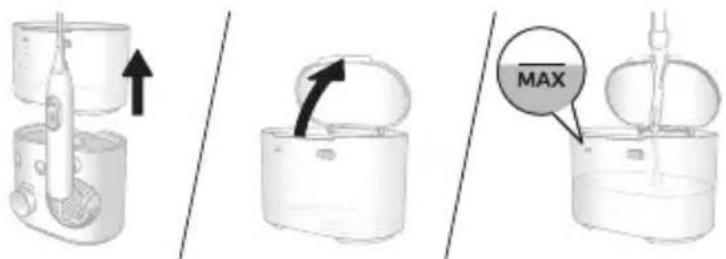
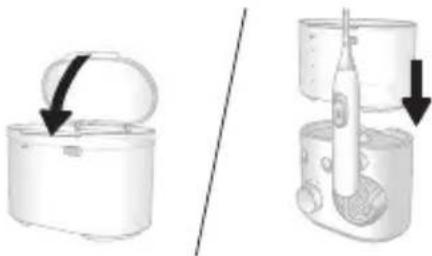
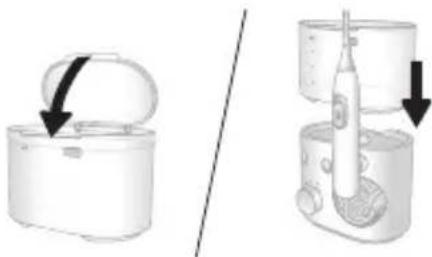
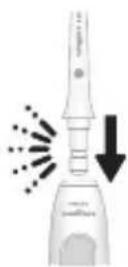
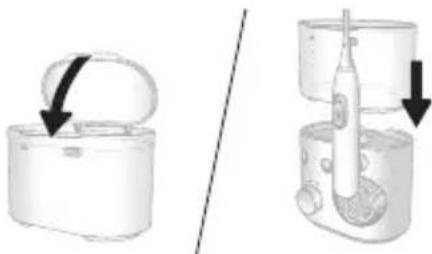
4 Close the lid. Place the reservoir back on the base.
Note: Press down firmly to ensure there is no gap between the reservoir and the base.
natural_image
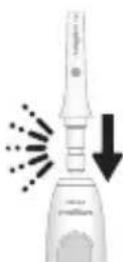
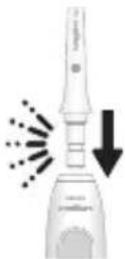
Diagram showing two steps of a handbag device: one open with a black arrow indicating direction, the other closed with a white brush and arrow indicating force (no text or symbols present)5 Insert your preferred nozzle into the handle. Press the nozzle down until you hear a "click".
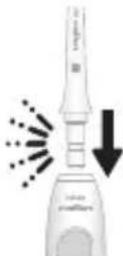
6 Press the on/off button on the base station to turn on the product. Select your desired mode (see 'Modes') and intensity (see 'Intensity Settings').
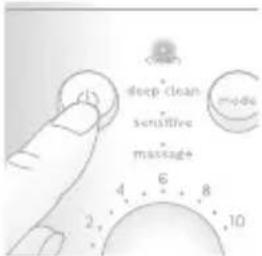
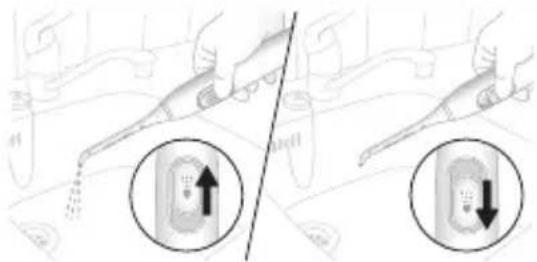
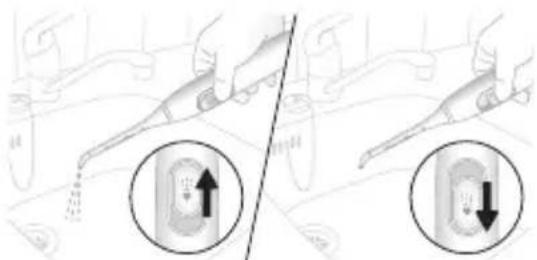
7 Remove the handle from the base and point the tip of the nozzle into the sink. Slide the pause switch on the handle to the 'on' (up) position and wait until the water stream comes out of the tip of the nozzle. Stop the flow of water by sliding the pause switch to the 'off' (down) position.
Note: This step is for fist time use after purchase only.
natural_image
Illustration of a hand using a tool to apply a component, with two circular insets showing internal structures (no text or symbols)8 Press the on/off button on the base again to turn off the product.
Using your Power Flosser
1 Make sure that the pause switch on the handle is in the 'off' position.
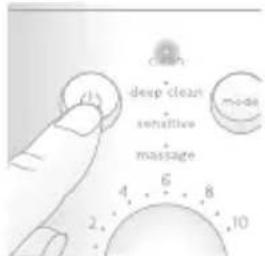
2 Press the on/off button on the base to turn on the product.
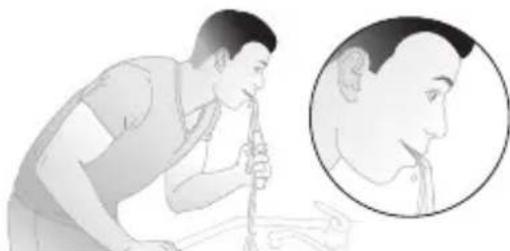
3 Place the nozzle tip in your mouth. Lean over the sink and partially close your lips over the nozzle to avoid splashing. Leave enough space to allow water to flow from your mouth into the sink.
natural_image
Illustration of a person using a tool to examine facial features, with an inset showing the same object (no text or symbols present)Standard and Comfort Nozzle
With the base station turned on:
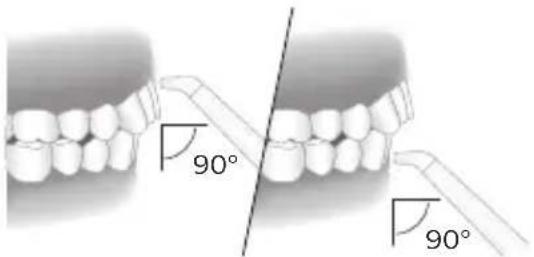
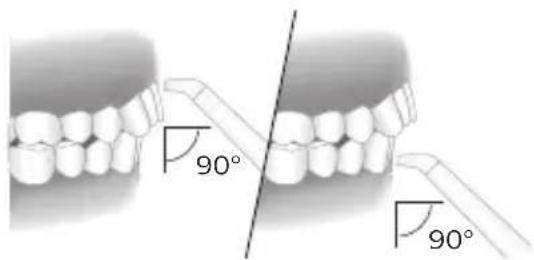
a Position the nozzle tip just above the gum line at a 90° angle.
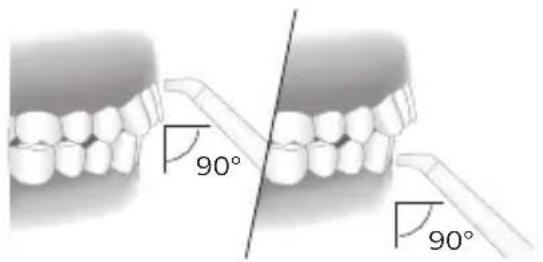
b Slide the pause switch on the handle to the 'on' position to start the water flow.
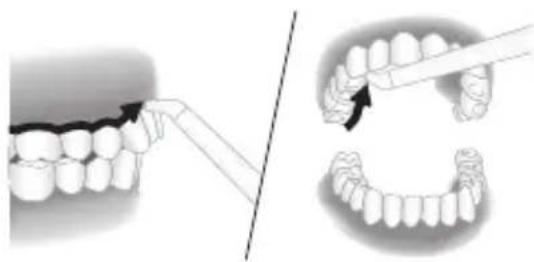
c Starting from your back teeth in your upper or lower jaw, slide the nozzle tip along the gum line and pause briefly between each tooth. Continue to clean both inside and outside of your teeth in one arch of your mouth for 30 seconds.
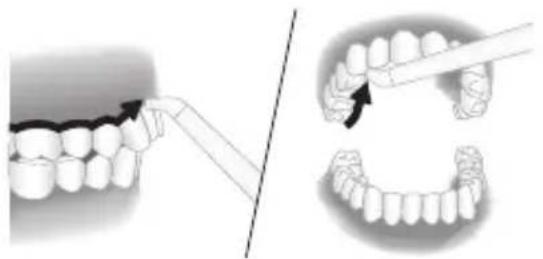
natural_image
Illustration showing dental procedure steps: before and after using a tool (no text or symbols present)Note: Remember to clean the inside of your teeth.
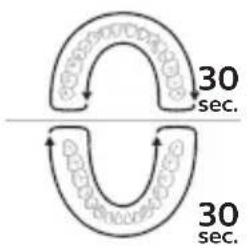
d Repeat in the other arch of your mouth for another 30 seconds until all spaces around and between your teeth have been cleaned for a total of at least one minute.
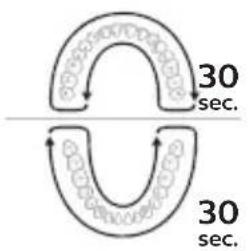
Note: You can stop the water flow during use by sliding the pause switch on the handle to the 'off' position (motor will pause).
Quad Stream Nozzle
With the base station turned on:
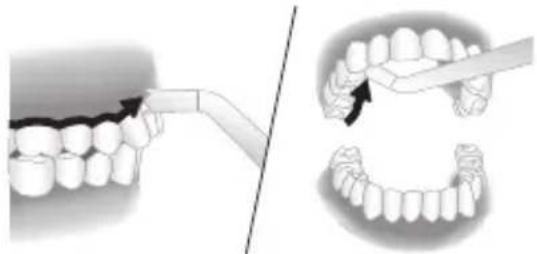
a Position the nozzle tip just above the gum line at a 90^ angle. Press gently so that the nozzle tip is in contact with the gum line and the teeth.
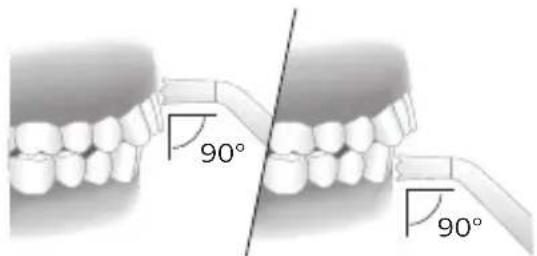
b Slide the pause switch on the handle to the 'on' position to start the water flow.
c Starting from your back teeth in your upper or lower jaw, slide the nozzle tip along the gum line and pause briefly between each tooth. Continue to clean both inside and outside of your teeth in one arch of your mouth for 30 seconds.
natural_image
Illustration showing dental procedure steps: before and after using a tool to adjust teeth (no text or symbols present)Note: Remember to clean the inside of your teeth.
d Repeat in the other arch of your mouth for another 30 seconds until all spaces around and between your teeth have been cleaned for a total of at least one minute.
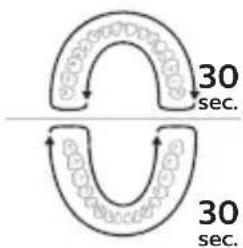
Note: You can stop the water flow during use by sliding the pause switch on the handle to the 'off' position (motor will pause).
Cleaning orthodontic brackets with the Quad Stream nozzle
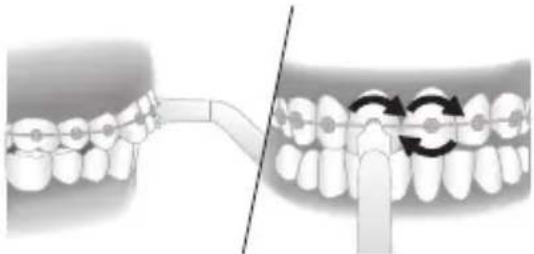
a To clean around orthodontic brackets, place the nozzle tip over each bracket.
18
English
b Gently rotate the nozzle tip around the bracket in a small circle before moving to the bracket on the next tooth.
natural_image
Diagram showing dental alignment with a toothbrush and a finger inserted into the arch (no text or symbols present)After each use
1 When you are finished, turn off the product.
2 Pick up and empty the reservoir.
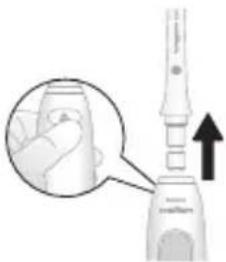
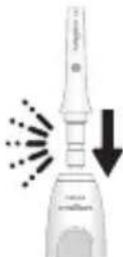
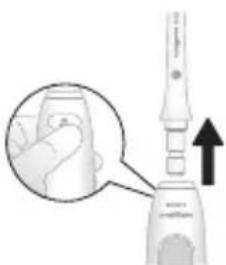
3 Remove the nozzle from the handle by pushing the eject button on the back of the handle.
natural_image
Illustration of a hand holding a small object next to a vertical tube, with an arrow indicating upward movement (no text or symbols present)4 Rinse the nozzle under the tap.
5 Insert the nozzle back into the handle.
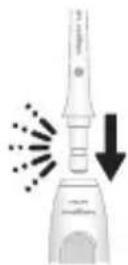
6 Dry any excess water off the tether and handle.
Cleaning
The product needs to be cleaned once a week. Clean the device and the accessories as follows:
Reservoir and lid
| ✓ | ✓ | ✓ |
Gently remove the reservoir from the unit. The reservoir can be hand washed with warm water and mild soap or cleaned in the dishwasher.
Base and handle
| ✓ | × | × |
When necessary, you can clean the outside of the base and the handle with a soft cloth and mild soap.
Nozzles
| ✓ | ✓ | ✓ |
Regular Cleaning:
Remove the nozzle from the handle. Rinse the tip under warm water.
Every few months, or if your nozzle becomes clogged:
Soak the nozzle in a container of 2 parts water and 1 part white vinegar for 5 minutes. Rinse the nozzle with warm water.
Nozzle storage case
| ✓ | ✓ | ✓ |
The storage case can be hand washed in warm water with mild soap or cleaned in the dishwasher.
Internal components, hose and handle
Fill the reservoir with warm water and add 1-2 tablespoons of white vinegar. Remove the handle, point the nozzle at the sink and turn on the product to run the solution through the unit until the reservoir is empty. Rinse by repeating with a full reservoir of clean warm water.
Storage
If you are not going to use the product for an extended period of time, unplug it from the electrical outlet, clean it and store it in a cool and dry place away from direct sunlight.
Replacement
Replace nozzles every 6 months or immediately when damaged. To buy accessories or spare parts, visit philips.com or go to your local Philips Sonicare dealer. You can also contact the Philips Consumer Care Center in your country (see the international warranty leaflet for contact details).
The following spare parts are available:
- Standard nozzle
- Comfort nozzle
- Quad Stream nozzle
Note: The availability of spare parts may differ by country.
Frequently asked questions
Question Answer
| Can I use mouthwash or essential oils in my reservoir? | It is not recommended to use essential oils in the reservoir. Mouthwash can be mixed with water and used in the reservoir. After using mouthwash, rinse the device to prevent clogging by partially filling reservoir with warm water and running product with tip pointed into sink until reservoir is empty. |
| Will other nozzles fit on my Philips Sonicare Power Flosser? | Only Philips Sonicare Power Flosser nozzles will work with this device. Nozzles from other brands and Philips AirFloss nozzles are not compatible with this product. |
Question Answer
| How often do I need to replace my nozzle? | We advise you to replace your nozzle after 6 months of use. You can find more information about buying replacement parts at philips.com |
Locating the model number
Look on the bottom of the base for the model number (HXxxxx).
Warranty and support
Philips warrants its products for two years after the date of purchase. Defects due to faulty materials and workmanship will be repaired or replaced at Philips' expense provided that convincing proof of purchase in the qualifying period is provided. Philips recommends use of genuine Sonicare Nozzles for optimal performance. Use of other Nozzles may damage your PowerFlosser and limit your warranty protection.
For product information, support and online user instructions, please visit: www.philips.com/support or read the international warranty leaflet.
Warranty restrictions
The terms of the international warranty do not cover the following:
- Reservoir
- Nozzles
- Damage caused by use of unauthorized replacement parts or unauthorized nozzles
- Damage caused by misuse, abuse, neglect, alterations or unauthorized repair
- Normal wear and tear, including chips, scratches, abrasions, discoloration or fading
Recycling
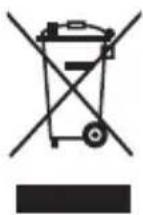
- This symbol means that this product shall not be disposed of with normal household waste (2012/19/EU).
- Follow your country's rules for the separate collection of electrical and electronic products. Correct disposal helps prevent negative consequences for the environment and human health.
natural_image
Three technical illustrations of dental prosthetic tools with circular insets showing different angles (no text or symbols present)Označení trysky
F1 F2 F3
natural_image
Illustration of two different food containers: one open with a lid, the other with an electric toothbrush (no text or symbols)natural_image
Illustration of a hand using a pipette to remove or apply a small object, with two circular insets showing upward and downward movement (no text or symbols)natural_image
Illustration of a person using a tool to examine facial features, with an inset showing the same face profile (no text or symbols present)Trysky Standard a Comfort
natural_image
Illustration showing dental procedure steps: before and after using a tool (no text or symbols present)natural_image
Illustration showing dental procedure steps: before and after using a tool to adjust teeth (no text or symbols present)natural_image
Diagram showing dental alignment with a toothbrush and a magnified view of teeth (no text or symbols)Po každém použití
natural_image
Illustration of a hand holding a small object next to a dental screwdriver, with an arrow indicating upward motion (no text or symbols present)natural_image
Three technical illustrations of dental prosthetic tools with circular insets showing different angles (no text or symbols present)Oznaka mlaznice
| Naziv mlaznice | Standardnausisna cijev | MlaznicaComfort | Mlaznica QuadStream |
| Korist | Standardna | Mekana | Mekana |
| mlaznica sjednim mlazomvode zauklanjanjeostataka hranei plaka. | gumenamlaznica zaugodno ilagano namještanje zaone sosjetljivimdesnima. | gumenamlaznica kojausmjerava voduu križnemlazove kojinježnouklanjaju plakza temeljitočišćenje beznapora. |
Načini rada
Postavke jačine
Uređaj Power Flosser ima 10 različitih postavki jačine. Kako biste ručno promijenili jačinu, uključite postolje i okrenite regulator jačine na željenu postavku.
4 Zatvorite poklopac. Postavite spremnik natrag na postolje.
natural_image
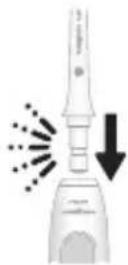
Illustration of two different types of household appliances: one open with a lid, the other with a brush and a toothbrush (no text or symbols present)5 Umetnite željenu mlaznicu u dršku. Pritišćite mlaznicu prema dolje dok ne začujete „klik”.
natural_image
Illustration of a hand using a tool to apply liquid droplets into a container, with two circular insets showing internal components (no text or symbols)natural_image
Illustration of a person using a tool to examine facial features, with an inset circular detail showing the same face (no text or symbols present)Standardna i Comfort mlaznica
natural_image
Illustration showing dental procedure steps: first step with tooth being adjusted, second step with tool insertion (no text or symbols)Mlaznica Quad Stream
natural_image
Illustration showing dental procedure steps: before and after using a tool to adjust teeth (no text or symbols present)54
Hrvatski
natural_image
Diagram showing dental alignment with a toothbrush and a bracket, no text or symbols presentnatural_image
Diagram of a dental implant with an arrow indicating upward motion (no text or symbols present)4 Isperite mlaznicu pod mlazom vode.
5 Umetnite mlaznicu natrag u dršku.
6 Osušite višak vode sa spone i drške.
Čišćenje
natural_image
Three identical medical or dental tool illustrations showing a pointed tool with a small protrusion, enclosed in circular views (no text or symbols)Fej kódja F1 F2 F3
natural_image
Illustration showing two steps of a handwashing or cleaning procedure: one with an open mouth, the other with a toothbrush (no text or symbols present)natural_image
Illustration of a hand using a tool to interact with a device, showing two views (up and down) of the device's internal structure (no text or symbols present)natural_image
Illustration of a person using a tool to examine teeth, with an inset showing the same tooth profile (no text or symbols)natural_image
Illustration showing dental procedure steps: before and after using a tool to adjust teeth (no text or symbols present)natural_image
Illustration showing dental procedure steps: before and after insertion of a tooth with a tool (no text or symbols present)natural_image
Illustration of dental braces with a toothbrush, showing alignment and alignment (no text or symbols)Használat után
natural_image
Illustration of a hand holding a small electronic device with a magnified inset showing the tip and handle (no text or symbols)natural_image
Three technical illustrations of a medical or dental implant tool, shown in circular views with no visible text or symbols.Oznaka nastavka
| Ime nastavka Standardni nastavek | Udobni nastavek | Nastavek za štirikratni tok |
4 Zaprite pokrov. Zbiralnik postavite nazaj na podstavek.
Opomba: Čvrsto pritisnite, da med zbiralnikom in podstavkom ne bo nobene reže.
natural_image
Diagram showing two steps of a handbag device: one with an open lid and arrow, the other with a brush and handle (no text or symbols)natural_image
Illustration showing two methods of using a tool to remove or remove a surface, with magnified insets highlighting the process (no text or symbols present)88
Slovenščina
8 Znova pritisnite gumb za vklop/izklop na podstavku, da izklopite izdelek.
natural_image
Illustration of a person using a tool to examine facial features, with an inset circular detail showing the same face (no text or symbols present)Standardni in udobni nastavek
Ko je podstavek polnilne postaje vklopljen: a Konico nastavka pod kotom 90 stopinj postavite tik nad dlesni.
natural_image
Illustration showing dental procedure steps: before and after using a tool to adjust teeth (no text or symbols present)Opomba: Ne pozabite očistiti notranje strani zob.
natural_image
Illustration showing dental procedure steps: before and after using a tool to adjust teeth (no text or symbols present)Opomba: Ne pozabite očistiti notranje strani zob.
natural_image
Illustration of dental arching technique showing tooth alignment before and after treatment (no text or symbols)Po vsaki uporabi
1 Ko končate, izdelek izklopite.
2 Dvignite zbiralnik vode in ga izpraznite.
3 Pritisnite gumb za izmet na hrbtnem delu ročaja, da z njega odstranite nastavek.
natural_image
Close-up of a hand holding a small object next to a vertical tube, with an arrow indicating upward motion (no text or symbols present)4 Nastavek izperite pod tekočo vodo.
5 Nato ga vstavite nazaj v ročaj.
6 Z nosilca in ročaja odstranite preostanek vode in počakajte, da se posušita.
Čiščenje
natural_image
Three technical illustrations of a dental implant tool with cross-sectional views (no text or symbols)Nastavenia intenzity
4 Zatvorte veko. Nádržku nasadte spät na podstavec.
natural_image
Diagram showing two steps of a handbag device: one open with a black arrow indicating direction, the other inserted into a container with an orange brush (no text or symbols)5 Do rukoväte vložte požadovaný nástavec. Nástavec zatlačte, aby sa ozvalo cvaknutie.
natural_image
Illustration of a hand using a tool to interact with a device, showing two views of the device (no text or symbols present)natural_image
Illustration of a person using a tool to examine facial features, with an inset circular detail showing the same face (no text or symbols present)natural_image
Illustration showing dental procedure steps: before and after using a tool to adjust teeth (no text or symbols present)natural_image
Illustration showing dental tool application on upper teeth (no text or symbols present)natural_image
Illustration of dental braces with a toothbrush, showing alignment and alignment (no text or symbols)Po každom použití
natural_image
Illustration of a hand holding a small electronic device with a magnified inset showing the device tip (no text or symbols)4 Nástavec opláchnite pod tečúcou vodou.
5 Nástavec vložte spät do rukoväte.
natural_image
Three identical medical or dental tool designs shown in circular views, no text or symbols present.Oznaka mlaznice
| Naziv mlaznice Standardna mlaznica | Mlaznica za ugodno pranje | Quad Stream mlaznica |
| Pogodnost Standardna mlaznica sa jednim mlazom vode za uklanjanje nečistoće i plaka. | Mekana gumena mlaznica za ugodno i lako pozicioniranje kod osoba sa osetljivim desnima. | Mekana gumena mlaznica koja usmerava vodu u mlaz u obliku krsta koji nežno uklanja plak i temeljno čisti bez napora. |
Režimi
Power Flosser ima četiri različita režima rada:
Čišćenje
Uz tajmer za dužinu pranja, ovaj režim rada nudi standardni pritisak vode za fantastično čišćenje.
Dubinsko čišćenje
Uz Pulse Wave tehnologiju, ovaj režim rada koristi snažne i nežne mlazove vode za temeljno čišćenje.
Osetljivi
Uz Pulse Wave tehnologiju, ovaj režim rada koristi nežne mlazove vode pogodne za početnike ili osobe sa osetljivim desnima.
Masaža
Uz tajmer za dužinu pranja, ovaj režim rada koristi umirujuće mlazove vode za masažu desni.
Napomena: Više informacija o „tehnologiji Pulse Wave“ i „tajmeru za dužinu pranja“ (pogledajte 'Karakteristike').
Odabir režima rada
1 Pritisnite dugme za uključivanje/isključivanje da biste uključili aparat.
2 Da biste izabrali željeni režim rada, pritisnite dugme za režim rada.
Postavke intenziteta
Power Flosser ima 10 različitih postavki za intenzitet. Da biste ručno promenili intenzitet, uključite postolje i okrenite regulator intenziteta na postavku koju želite.
Napomena: Ova funkcija je dostupna samo u režimima rada za čišćenje i masažu.
Aktiviranje ili deaktiviranje tajmera
Možete da aktivirate ili deaktivirate funkciju tajmera tako što ćete istovremeno držati pritisnutim dugme za uključivanje/isključivanje i dugme za određivanje režima rada tokom pet sekundi.
4 Zatvorite poklopac. Vratite rezervoar na postolje.
Napomena: Snažno ga pritisnite prema dole da sprečite pojavu praznog prozora između rezervoara i postolja.
natural_image
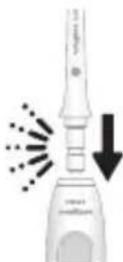
Two-step illustration showing a device being open and then inserted into a container, with no visible text or symbols.5 Umetnite željenu mlaznicu u dršku. Pritisnite mlaznicu prema dole sve dok ne čujete „klik“.
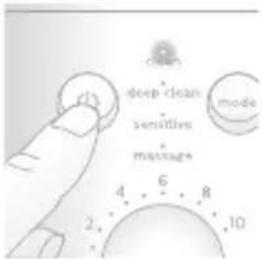
6 Pritisnite dugme za uključivanje/isključivanje na postolju stanice za uključivanje aparata. Odaberite željeni režim rada (pogledajte 'Režimi') i intenzitet (pogledajte 'Postavke intenziteta').
7 Izvadite dršku iz postolja i usmerite vrh mlaznice prema lavabou. Pomaknite prekidač za pauzu na dršci u položaj „uključeno“ (gore) i pričekajte da vodeni tok izade iz vrha mlaznice. Zaustavite protok vode pomeranjem prekidača za pauzu u položaj „isključeno“ (dole).
Napomena: Ovaj korak služi samo za prvu upotrebu nakon kupovine.
natural_image
Illustration of a hand using a tool to apply liquid to a surface, with two magnified insets showing upward and downward pressure zones (no text or symbols)natural_image
Illustration of a person using a tool to examine facial features, with an inset circular detail showing the same face (no text or symbols present)Standardna mlaznica i mlaznica za ugodno pranje
Kada je bazna stanica uključena:
a Postavite vrh mlaznice odmah iznad linije desni pod uglom od 90°.
b Pomerite prekidač za pauzu na dršci u položaj „uključeno“ da biste pokrenuli protok vode.
c Počnite od zadnjih zuba gornje ili donje vilice, pomerajte vrh mlaznice duž linije desni i kratko zastanite između svakog zuba. Nastavite da čistite unutrašnji i spoljašnji deo zuba u jednom luku u ustima 30 sekundi.
natural_image
Illustration showing dental procedure steps: before and after using a tool to adjust teeth (no text or symbols present)Napomena: Obavezno očistite unutrašnji deo zuba.
124 Srpski
d Ponovite postupak na svakom luku u ustima narednih 30 sekundi dok se sva područja okolo i između zuba ne očiste najmanje jedan minut.
Napomena: Tokom korišćenja možete da zaustavite protok vode pomeranjem prekidača za pauzu na dršci u položaj „isključeno“ (pauziraće se motor).
Quad Stream mlaznica
Kada je bazna stanica uključena:
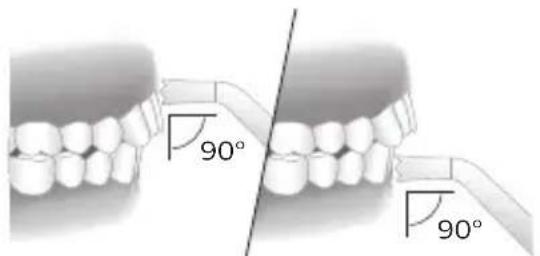
a Postavite vrh mlaznice odmah iznad linije desni pod uglom od 90°. Nežno pritisnite tako da vrh mlaznice dodirne liniju desni i zuba.
b Pomerite prekidač za pauzu na dršci u položaj „uključeno“ da biste pokrenuli protok vode.
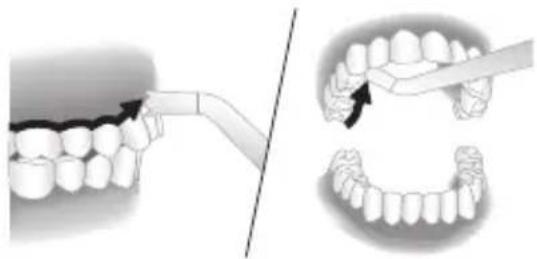
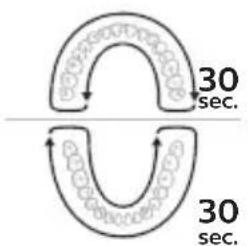
c Počnite od zadnjih zuba gornje ili donje vilice, pomerajte vrh mlaznice duž linije desni i kratko zastanite između svakog zuba. Nastavite da čistite unutrašnji i spoljašnji deo zuba u jednom luku u ustima 30 sekundi.
natural_image
Illustration showing dental procedure steps: before and after using a tool to adjust teeth (no text or symbols present)Napomena: Obavezno očistite unutrašnji deo zuba.
d Ponovite postupak na svakom luku u ustima narednih 30 sekundi dok se sva područja okolo i između zuba ne očiste najmanje jedan minut.
Napomena: Tokom korišćenja možete da zaustavite protok vode pomeranjem prekidača za pauzu na dršci u položaj „isključeno“ (pauziraće se motor).
Čišćenje zubnih proteza pomoću Quad Stream mlaznice
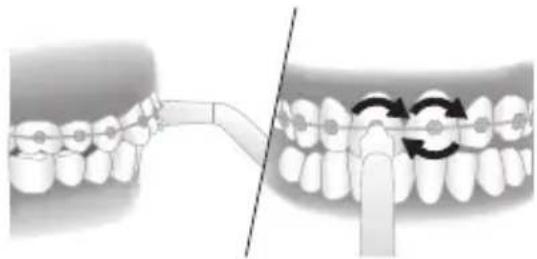
a Da biste čistili oko ortodontskih bravica, postavite vrh mlaznice na svaku bravicu.
b Nežno kružite vrhom mlaznice oko bravice praveći male krugove pre nego što predete na bravicu na sledećem zubu.
natural_image
Diagram showing dental alignment with a toothbrush and a finger inserted into the arch (no text or symbols)Nakon svake upotrebe
1 Kada završite, isključite proizvod.
2 Uzmite i ispraznite rezervoar.
3 Odvojite mlaznicu od drške pritiskom na dugme za otpuštanje na zadnjoj strani drške.
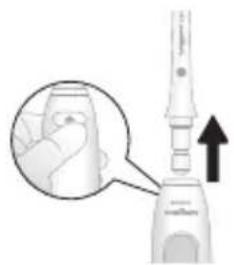
natural_image
Illustration of a hand holding a small object next to a dental tool, with an arrow indicating upward motion (no text or symbols present)126
Srpski
4 Isperite mlaznicu pod mlazom vode.
5 Postavite mlaznicu nazad na dršku.
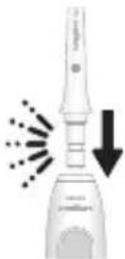
6 Osušite višak vode sa kabla i ručke.
Čišćenje
natural_image
Four technical illustrations of a dental implant tool, shown from different angles (no text or symbols present)Настройки за интензивност
natural_image
Diagram showing two steps of a handbag device: one opening with a lid, the other inserting a toothbrush into a container (no text or symbols present)natural_image
Illustration of a hand using a tool to interact with a device, showing two states of action (no text or symbols present)natural_image
Illustration of a person using a tool to examine facial features, with an inset circular detail showing the same face (no text or symbols present)natural_image
Illustration showing dental procedure steps: before and after using a tool to trim teeth (no text or symbols present)natural_image
Illustration showing dental procedure steps: before and after using a tool to adjust teeth (no text or symbols present)natural_image
Illustration of dental braces on upper and lower teeth, showing alignment and alignment (no text or symbols)След всяка употреба
natural_image
Diagram of a dental implant with an arrow indicating insertion or positioning (no text or symbols present)natural_image
Diagram showing a grid of squares being folded into an open book (no text or symbols)www.philips.com/Sonicare
©2021 Koninklijke Philips N.V. (KPNV). All rights reserved. Philips and the Philips shield are trademarks of KPNV. Sonicare and the Sonicare logo are trademarks of Philips Oral Healthcare, LLC and/or KPNV.
3000.054.3268.2 (30/3/2021)


75 % recycled paper
75 % papier recyclé


- Important safety information
- DANGER
- WARNINGS
- CAUTION
- Electromagnetic fields (EMF)
- Introduction
- Intended Use
- Your Philips Sonicare Power Flosser (Fig. 1)
- Nozzles
- Modes
- Clean
- Deep clean
- Sensitive
- English
- Massage
- Selecting modes
- Intensity Settings
- Features
- Pacer
- Activating or deactivating pacer
- Pulse Wave technology
- Magnetic Docking
- Getting started
- English
- Using your Power Flosser
- Standard and Comfort Nozzle
- Quad Stream Nozzle
- Cleaning orthodontic brackets with the Quad Stream nozzle
- English
- After each use
- Cleaning
- Reservoir and lid
- Base and handle
- Regular Cleaning:
- Every few months, or if your nozzle becomes clogged:
- Nozzle storage case
- Internal components, hose and handle
- Storage
- Replacement
- Frequently asked questions
- Locating the model number
- Warranty and support
- Warranty restrictions
- Recycling
- Označení trysky
- Trysky Standard a Comfort
- Po každém použití
- Načini rada
- Postavke jačine
- Standardna i Comfort mlaznica
- Mlaznica Quad Stream
- 54
- Hrvatski
- Čišćenje
- Fej kódja F1 F2 F3
- Használat után
- Slovenščina
- Standardni in udobni nastavek
- Po vsaki uporabi
- Čiščenje
- Nastavenia intenzity
- Po každom použití
- Režimi
- Dubinsko čišćenje
- Osetljivi
- Masaža
- Odabir režima rada
- Postavke intenziteta
- Aktiviranje ili deaktiviranje tajmera
- Standardna mlaznica i mlaznica za ugodno pranje
- Srpski
- Quad Stream mlaznica
- Čišćenje zubnih proteza pomoću Quad Stream mlaznice
- Nakon svake upotrebe
- Srpski
- Настройки за интензивност
- След всяка употреба
Brand : PHILIPS
Model : Sonicare Power Flosser 7000 HX3904
Category : Oral irrigator