
Satmeter HD 7 Combo - Measurement MEGASAT - Free user manual and instructions
Find the device manual for free Satmeter HD 7 Combo MEGASAT in PDF.


| Product Type | Satellite Signal Meter |
| Model | Satmeter HD 7 Combo |
| Brand | Megasat |
| Display | 7-inch high-resolution color LCD |
| Satellite Signal Detection | DVB-S/S2/S2X, DVB-T/T2, DVB-C |
| Frequency Range | 950-2150 MHz (LNB input) |
| Signal Level Measurement | Digital and analog, with spectrum analyzer |
| Constellation Diagram | Yes, for advanced analysis |
| Li-ion Battery | Rechargeable, capacity 5200 mAh |
| Operating Time | Up to 4 hours continuous use |
| Dimensions (H x W x D) | Approx. 180 x 110 x 40 mm |
| Weight | Approx. 500 g including battery |
| Input Connectors | F-type for LNB, Belling-Lee for terrestrial |
| Output Connectors | F-type loop-through, AV out (3.5mm) |
| DiSEqC Support | DiSEqC 1.0, 1.1, 1.2, USALS |
| LNB Power Supply | 13/18V, 22 kHz, selectable |
| Firmware Update | Via USB or microSD card |
| Storage | microSD slot (up to 32 GB) |
| Languages | Multilingual (including English) |
| Measurement Accuracy | ±1 dB typical |
| Operating Temperature | 0°C to 40°C |
| Included Accessories | Power adapter, F-adapter, AV cable, pouch |
Frequently Asked Questions - Satmeter HD 7 Combo MEGASAT
User questions about Satmeter HD 7 Combo MEGASAT
0 question about this device. Answer the ones you know or ask your own.
Ask a new question about this device
Download the instructions for your Measurement in PDF format for free! Find your manual Satmeter HD 7 Combo - MEGASAT and take your electronic device back in hand. On this page are published all the documents necessary for the use of your device. Satmeter HD 7 Combo by MEGASAT.
USER MANUAL Satmeter HD 7 Combo MEGASAT
 | Tap this icon to exit the menu and return to the previous menu. |
| Leistungspegel Shows the current power level of the input signal. | |
| MER Shows the signal quality of the modulation error rates measurement | |
| Signalstärke Shows the current signal strength of the transponder in %. | |
| Signalqualität Shows the current signal quality of the transponder in %. | |
 | Tap this icon to adjust the frequency. A new window will open where you can add or remove frequencies.Removes the frequencyAdds the frequency |
 | Tap this icon to export the current frequency list to an Excel spreadsheet. |
3. Hauptmenü
bar
| Frequency (MHz) | Value | |---|---| | 93.1 | 98.3 | | 96.0 | 98.3 | | 96.3 | 98.3 | | 98.3 | 98.3 | | 101.9 | 98.3 | | 103.3 | 98.3 | | 105.3 | 98.3 | | 107.9 | 98.3 |1.1 General features 03
1.2 Delivery....03
2. Designations and key assignment....04
3. Main menu 06
3.1 Satellite (DVB-S / -S2 07
3.1.1 Spectrum....10
3.1.2 Constellation 11
3.1.3 Antenna settings.... 12
3.1.4 Angle calculation.... 15
3.1.5 Transponder control 16
3.2 Terrestrial (DVB-T / -T2) 17
3.2.1 Spectrum 20
3.2.2 Constellation 21
3.2.3 Scope 22
3.3 Cable (DVB-C / -C2) 24
3.3.1 Spectrum 26
3.3.2 Constellation 27
3.3.3 Scope 28
3.4 DAB / DAB+ and FM 29
3.5 DiSEqC-Monitor 30
3.6 Settings.... 31
3.7 Help.... 32
3.8 Memory 32
4. Helpful functions ...... 33
4.1 Live-TV-playback....33
4.2 Info-button....34
4.3 Firmware-Update 34
4.4 Edit channel list 35
5. Specifications 36
1.1 Genaral features
• Measurement of the following reception signals:
DVB-S, DVB-S2, DVB-C, DVB-C2, DVB-T, DVB-T2, DAB and DAB+, FM.
- Integrated rechargeable battery with low power consumption (long standby operation).
- 8.9-inch touchscreen colour display with very good representation even in direct sunlight.
- With the integrated receiver, the meter can play back all free-to-air TV programmes.
- Internal memory for saving data and various channel lists.
- Large digital display for signal level and quality for quick calibration.
- DiSEqC control monitor for reading out the device switching commands.
- Constellation diagram for a graphic display of modulated signals.
• Automatic detection of the DiSEqC settings of the system.
- Automatic satellite detection (NIT) immediately shows you which satellite you are on.
- Storage of measurement data for customised documentation
• LED on the back for measuring the system even in low light conditions.
- Clear and easy to use on-screen menu.
• High-quality aluminium housing.
1.2 Delivery
- Satmeter HD 7 Combo
- Carrying bag with strap
- Carrying strap for measuring device
- Silicone protective cover
• 230 volt mains adapter
• 12 volt car charger - F-coaxial adapter
- User manual
2. Designations and key assignment
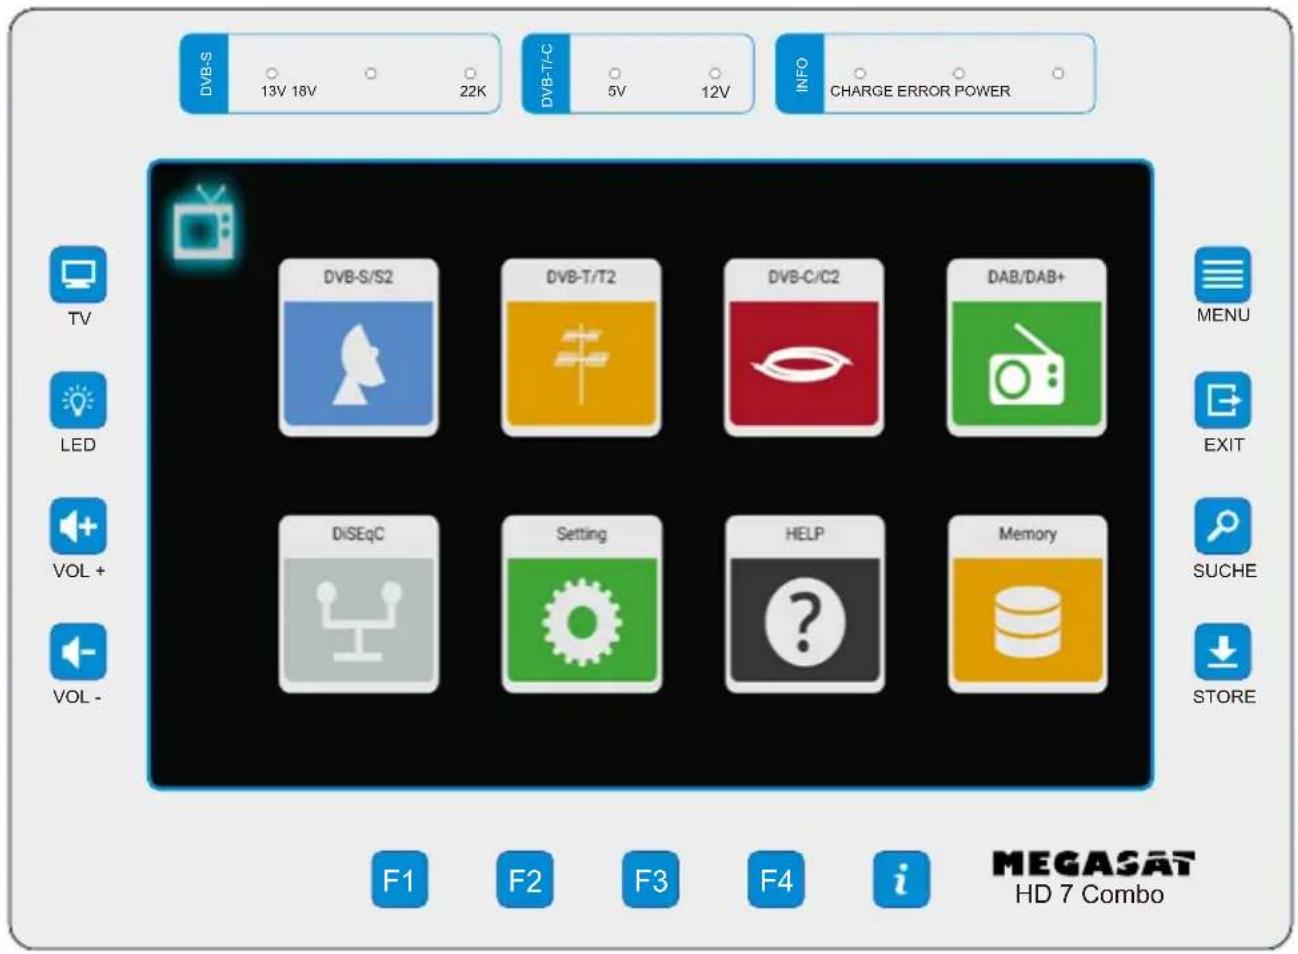
Front view
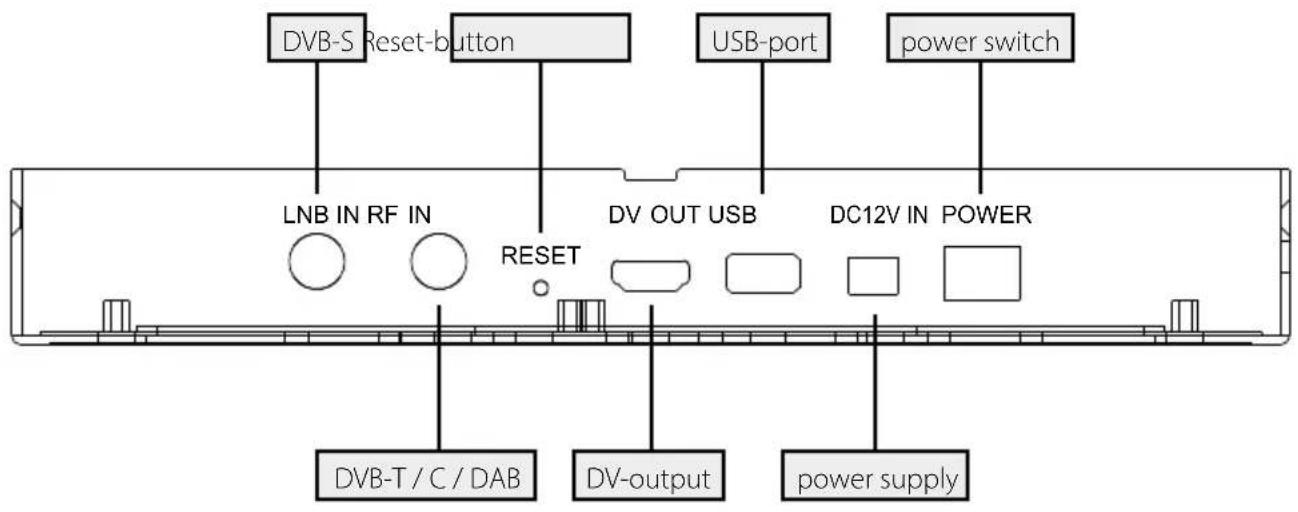
Connections
2. Designations and key assignment
-
Display 8,9 inch (22,6 cm) Touch-Screen-Colordisplay
-
DVB-S 13V: The LED lights up when the 13V LNB power supply for the vertical plane is switched on.
18V: The LED lights up when the 18V LNB power supply for the vertical plane is switched on.
22k: The LED lights up when the 22k supply for the LNB is switched on.
DVB-T/C 5V-T: The LED lights up yellow when the 5 volt power supply for DVB-T antennas is switched on.
12V-T: The LED lights up yellow when the 12 volt power supply for DVB-T antennas is switched on.
- INFO CHARGE: The LED lights up red when the unit is charging. The LED lights up green when the unit is charged.
ERROR: The LED lights up if a fault has occurred on the cable or on the LNB (e.g. short-circuit).
POWER: The LED lights up when the unit is ready for operation.
-
TV Switches to live TV playback.
-
LED Switches the LED light on the back on / off.
-
VOL + / - Increases or decreases the volume in playback mode.
-
MENU Switches to the main menu.
-
EXIT Exits the respective menu.
-
SEARCH Switches to the Satellite Finder.
-
STORE Saves a screenshot of the current screen.
-
F-buttons Function keys (depending on the menu item).
-
i Overview of the current function assignment of the F keys.
Swipe gestures with the touch screen:
- Swipe your finger up or down to change channels.
- Swipe from the top left to the bottom right to open the channel list.
- By swiping from the top right to the bottom left, you can enter a programme number directly.
- Swipe from right to left to exit Live TV mode.
3. Main menu
-
Connect the coaxial cable to the LNB or ANT input of the meter.
-
Switch on the meter. After booting, the main menu appears. The menu consists of various submenus.
-
Tap directly on the symbols in the display with your finger to enter the respective menus.
-
Press the EXIT button or TV to exit the respective submenus.
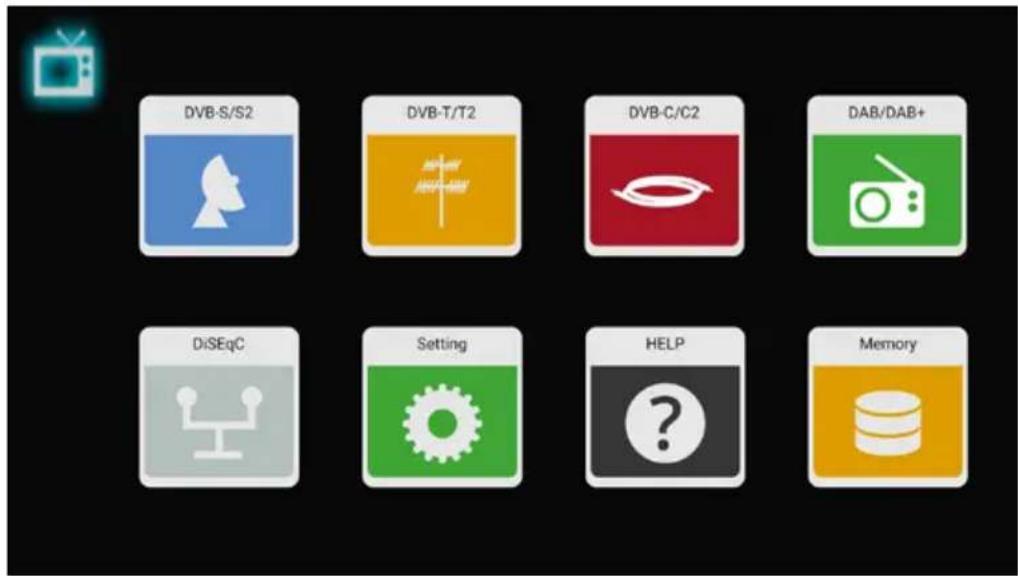
| DVB-S/S2 Menu for DVB-S / -S2 / signal search. | |
| DVB-T/T2 Menu for DVB-T / -T2 signal search. | |
| DVB-C/C2 Menu for DVB-C / -C2 signal search. | |
| DAB/DAB+ Menu for DAB / DAB+ and FM signal search. | |
| DiSEqC Menu for checking the DiSEqC commands of a device (e.g. receiver). | |
| Settings Menu for basic settings on the meter. | |
| Help Menu for help or instructions for the meter. | |
| Memory Menu for the stored data in the meter. | |
 | Tap the symbol to switch to the playback programme menu. (Live TV) |
3. Main menu
3.1 Satellite (DVB-S / -S2)
other
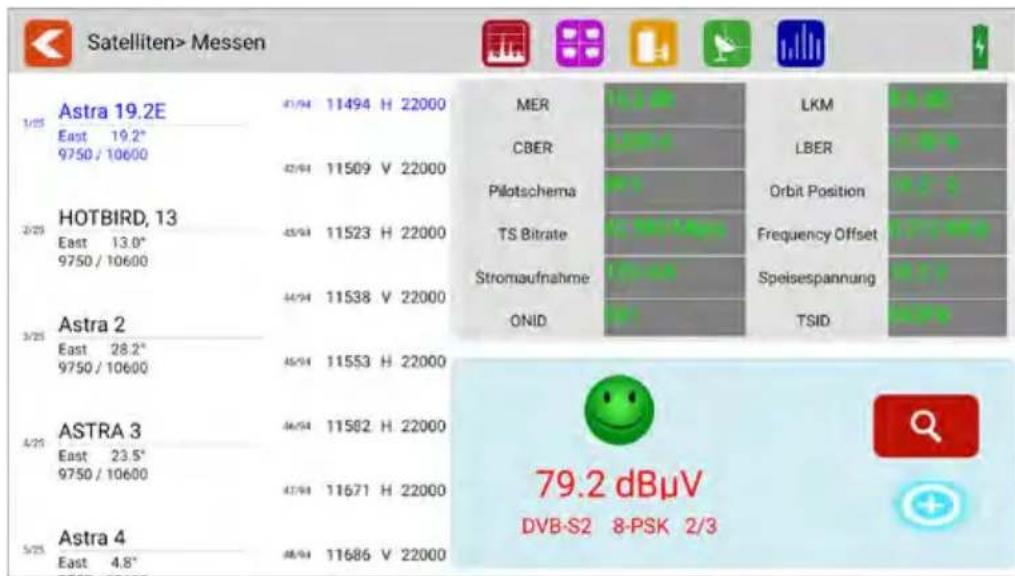
| Satellite Type | Frequency (dBμV) | | :--- | :--- | | Astra 19.2E East 19.2° 9750 / 10600 | 41/94 11494 H 22000 | | Astra 19.2E East 19.2° 9750 / 10600 | 42/94 11509 V 22000 | | HOTBIRD, 13 East 13.0° 9750 / 10600 | 43/94 11523 H 22000 | | Astra 2 East 28.2° 9750 / 10600 | 44/94 11538 V 22000 | | ASTRA 3 East 23.5° 9750 / 10600 | 46/94 11582 H 22000 | | Astra 4 East 4.8° | 48/94 11686 V 22000 | | MER | LKM | | CBER | LBER | | Pilotschema | Orbit Position | | TS Bitrate | Frequency Offset | | Stromaufnahme | Speisespannung | | ONiD | TSID | | 79.2 dBμV DVB-S2 8-PSK 2/3 | Q- All available satellites and the respective transponders are listed on the left side of the screen.
- Tap on the satellite range to switch to it. Tap and hold to open a pop-up dialogue. In this you can edit the satellite (name, direction and orbit).
- Tap the transponder area to switch to it. Tap and hold to open a pop-up dialogue. In this you can edit the transponder (frequency, polarisation and symbol rate).
Satellite search
To measure a satellite, select the desired satellite in the list. Additionally you can select a TP of your choice. Set the elevation angle of the mirror (Astra1 in Germany 30-33° depending on the location) and turn the mirror until the meter has detected a signal. You can see this by the green smily. Wait for the NIT (satellite detection) evaluation and check if the desired satellite is displayed. If the correct satellite position is displayed, you can start fine tuning, otherwise continue to turn the mirror until the correct satellite is displayed. For fine tuning, turn the mirror left/right until the best value is reached, do the same with the altitude setting. Finally you can turn the skew on the LNB to the optimal setting. Now you have aligned the mirror in the best possible way. By pressing the TV symbol, you can also perform a picture check.
3. Main menu
 | Tap this symbol to exit the current menu or to go back one menu step. |
 | Tap this symbol to enter the spectrum analysis. |
 | Tap this symbol to enter the constellation analysis. |
 | Tap this symbol to enter the antenna settings. |
 | Tap this symbol to access the angle calculation and alignment of the mirror. |
 | Tap this icon to enter the transponder control. (Allows you to control selected TP). |
 | Tap this icon to enter the zoom menu. |
 | This symbol is displayed when the signal of the selected satellite has been found. |
 | This symbol is displayed if no signal was found. |
 | Tap this symbol to enter the channel search parameter settings. |
3. Main menu
| CNR Shows the current C/N ratio of the signal. | |
| LKM Shows the current LKM value. | |
| CBER Shows the current CBER value. | |
| LBER Shows the current LBER value. | |
| Pilot Pattern Shows the current pilot pattern value of the signal. | |
| Orbit position Shows the current orbit position of the selected satellite. | |
| TS Bit rate Shows the current input bit rate of the signal. | |
| Frequency-Offset Shows the current offset value of the setting frequency and the live input signal. | |
| Feed current Shows the current feed current of the LNB port. | |
| Feed voltage Shows the current feed voltage of the LNB port. | |
| ONID Shows the original network identification of the signal. | |
| TSID Shows the transport stream identifier | |
| 38.4 dBμV Shows the current power level of the input signal. | |
| DVB-S2 8-PSK 5/6 | Shows the current DVB system (e.g. DVB-S2), demodulation type and FEC value. |
| i | Press the key to display the help bar. This shows you the current assignment of the F keys. |
| F1-button | Press the key to enter the "Antenna settings" menu. |
| F2-button | Press the key to enter the TP control. |
| F3-button | Press the key to switch the display between dBμV / dBm. |
| F4-button | Press the key to mute the display. |
| STORE | Press the key to save a screenshot. |
3. Main menu
3.1.1 Spectrum
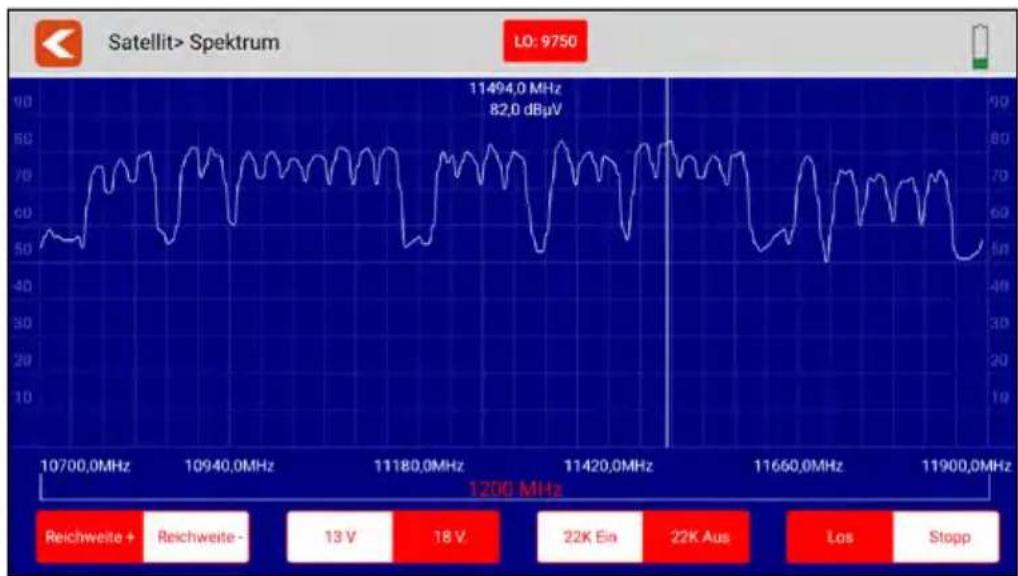
line
| Frequency (MHz) | Amplitude (dBµV) | | --------------- | ---------------- | | 11494.0 | 82.0 |This submenu analyses and displays the live spectrum from 950 MHz \~ 2150 MHz.
 | Tap this icon to exit the menu and return to the previous menu. |
 | Tap an area of the spectrum graph to display the detailed centre frequency and power level. |
 | Tap these icons to narrow the frequency search range of the spectrum. |
 | Tap the respective LNB output voltage to switch between 13 V and 18 V. |
 | Tap this symbol to switch the 22 K circuit on or off. |
 | Tap on "Go" to start the live spectrum analysis. Tap on "Stop" to stop it. |
3. Main menu
3.1.2 Constellation
heatmap
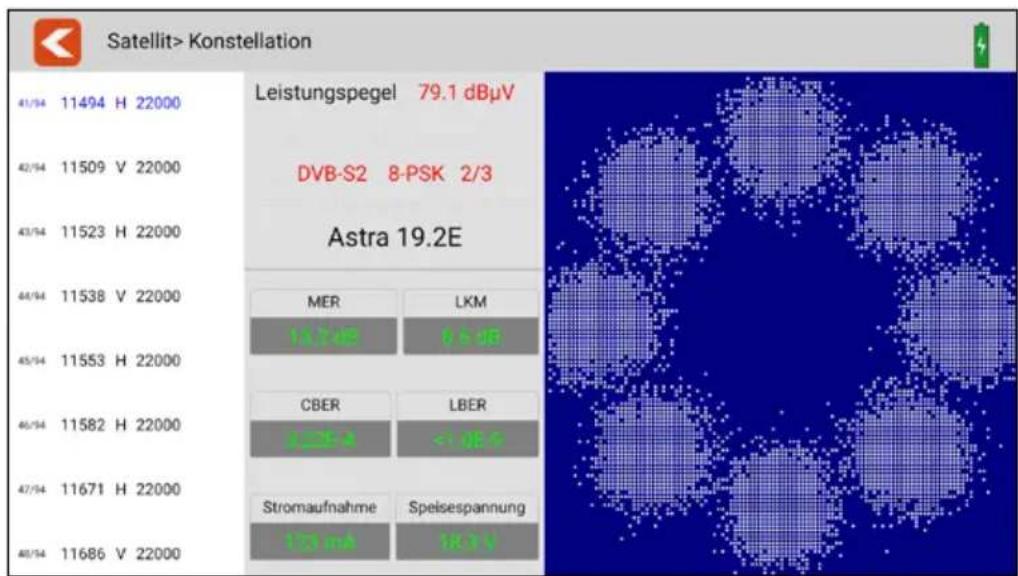
Satellit> Konstellation | Time (s) | 11494 H 22000 | Leistungspegel 79.1 dBμV | | :--- | :--- | :--- | | 42/14 | 11509 V 22000 | DVB-S2 8-PSK 2/3 | | 43/14 | 11523 H 22000 | Astra 19.2E | | 44/14 | 11538 V 22000 | MER LKM | | 45/14 | 11553 H 22000 | CBER LBER | | 46/14 | 11582 H 22000 | Stromaufnahme Spelsespannung | | 47/14 | 11671 H 22000 | 163 mV | | 48/14 | 11686 V 22000 | 163 mV |This submenu shows the constellation diagram of the live stream. All transponders are listed on the left side of the menu. Tap the display area of the transponder to switch to it.
 | Tap this icon to exit the menu and return to the previous menu. |
| Leistungspegel Shows the current power level of the input signal. | |
| DVB-S2 8-PSK 5/6 Shows the current DVB system (e.g. DVB-S2), demodulation type and FEC value. | |
| Astra 19.2E Shows the name of the current satellite. | |
| MER Shows the signal quality of the modulation error rates measurement. | |
| LKM Shows the current LKM value. | |
| CBER Shows the current CBER value. | |
| LBER Shows the current LBER value. | |
| Stromaufnahme Shows the current current consumption of the LNB port. | |
| Speisespannung Shows the current feed-in voltage of the LNB port. | |
3. Main menu
3.1.3 Antenna settings
other
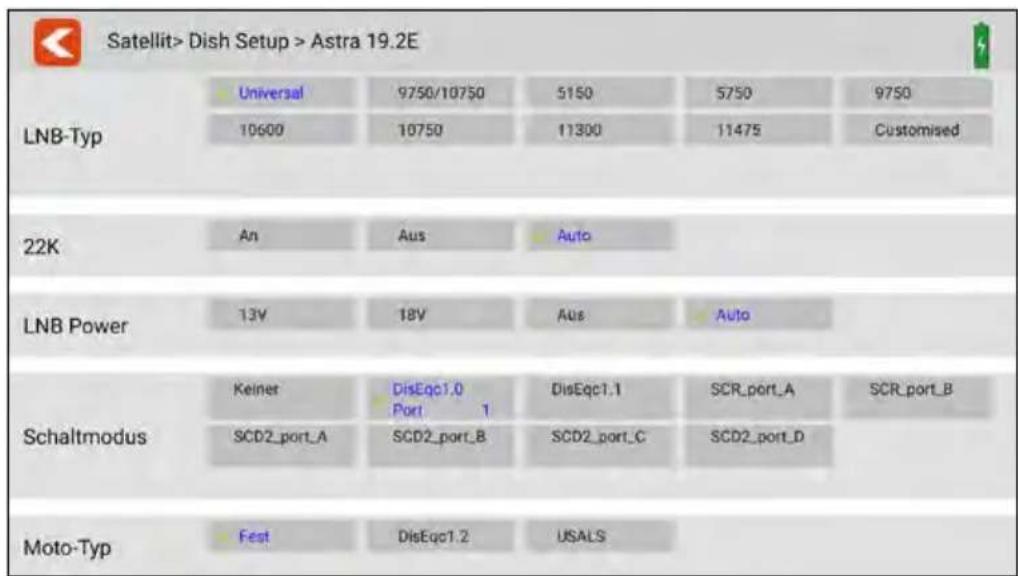
Satellit> Dish Setup > Astra 19.2E | Category | Value | | :--- | :--- | | LNB-Typ | Universal 9750/10750 5150 5750 9750 | LNB-Typ | 10600 10750 11300 11475 Customised | | 22K | An Aus Auto | | LNB Power | 13V 18V Aus Auto | | Schaltmodus | Keiner DisEqc1.0 Port 1 DisEqc1.1 SCR_port_A SCR_port_B | Schaltmodus | SCD2_port_A SCD2_port_B SCD2_port_C SCD2_port_D | | Moto-Typ | Fest DisEqc1.2 USALS |In this menu you can set the parameters of the satellite system.
 | Tap this symbol to exit the menu and return to the main menu. |
| LNB type Tap the | respective value, matching the LNB settings (default: Universal). |
| 22K Select whether 22K is to be switched on or off. | |
| LNB power Select | the LNB voltage (13 V, 18 V, off or automatic). |
| Switch type Select | „None“ if the LNB is connected directly to the receiver.Select DiSEqC 1.0 / 1.1 if a DiSEqC switch or multi-switch is in operation. A pop-up window then opens in which further settings can be adjusted.Select SCR (Unicable 1) or SCD2 (Unicable II) if the system is operated with a Unicable system. A pop-up window opens in which further settings can be adjusted. |
| Motor type Select | here whether the system is operated with a motor or whether the antenna is permanently installed. |
3. Main menu
Motor-Einstellungen
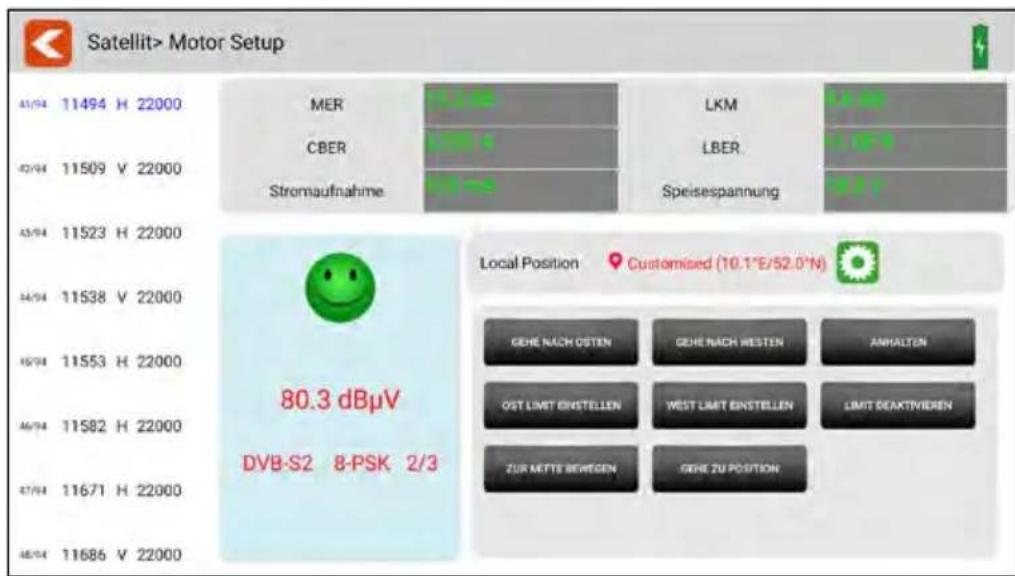
in this menu you can set all parameters of the motor.
| Tap this symbol to exit the menu and return to the main menu. | |
 | This symbol is displayed if the set signal was found. |
 | This symbol is displayed if no signal was found. |
 | Tap this icon to open the list of preset locations. Then select your location. |
 | You can use the position keys to turn the motor manually. (e.g. „Go to position“ automatically selects the location you have chosen. |
3. Main menu
All available transponders of the selected satellite are listed on the left side of the screen. Tap on a transponder to select it.
| dBμV Shows the current power level of the input signal. | |
| DVB-S2 8-PSK 5/6 Shows the current DVB system (e.g. DVB-S2), the demodulation type and the FEC value. | |
| Astra 19.2E (z.B.) Shows the name of the current satellite. | |
| CNR Shows the current C/N ratio of the signal. | |
| LKM Shows the current LKM value. | |
| CBER Shows the current CBER value. | |
| LBER Shows the current LBER value. | |
| Feed current Shows the current current consumption of the LNB port. | |
| Feed voltage Shows the current feed-in voltage of the LNB port. | |
| Longitude Shows the local longitude. Tap the value to edit it. | |
| Latitude Shows the local latitude. Tap the value to edit it. |
DiSEqC-commands
| TO THE EAST | Tap this area to send the command "Move East". |
| TO THE WEST | Tap this area to send the command "Move west". |
| STOP | Tap this area to send the command "Stop moving". |
| EAST LIMIT | Tap this area to send the command "Limit for movement to the east". |
| WEST LIMIT | Tap this area to send the command "Limit for movement to the west". |
| DEACTIVATE LIMIT | Tap this area to send the command "Deactivate limit". |
| MOVE TO CENTRE | Tap this area to send the command "Move to centre". |
| GO TO POSITION | Tap this area to send the command "Move to the right". |
| SAVE POSITION | Tap this area to send the command "Save position". |
3. Main menu
3.1.4 Angle calculation
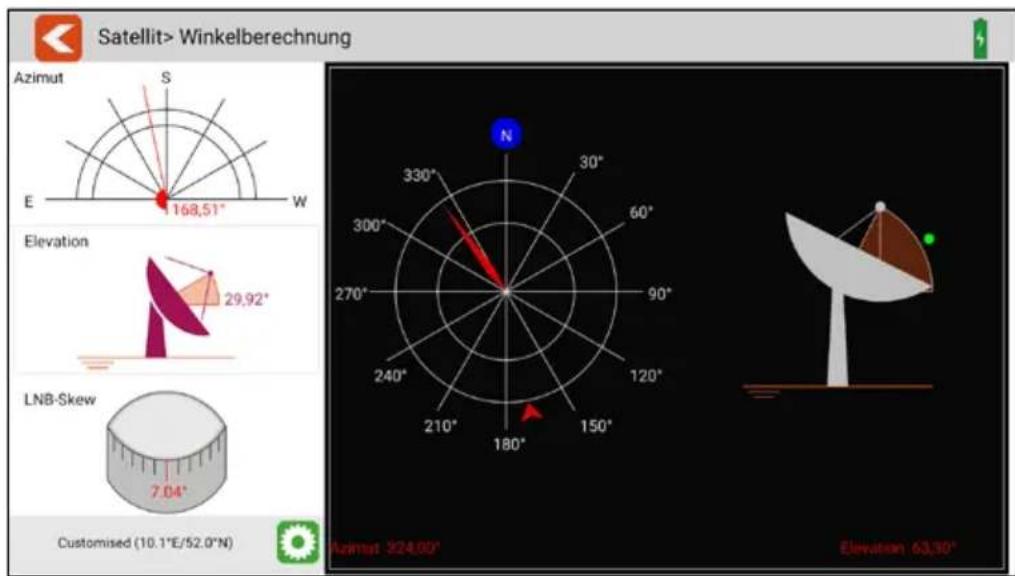
This menu calculates the azimuth and elevation of the satellite antenna based on the current satellite setting and local position check. At the same time, the meter monitors the alignment progress of the antenna to help you set the antenna to the correct azimuth and elevation.
 | Tap this icon to exit the menu and return to the previous menu. |
3. Main menu
3.1.5 Transponder control
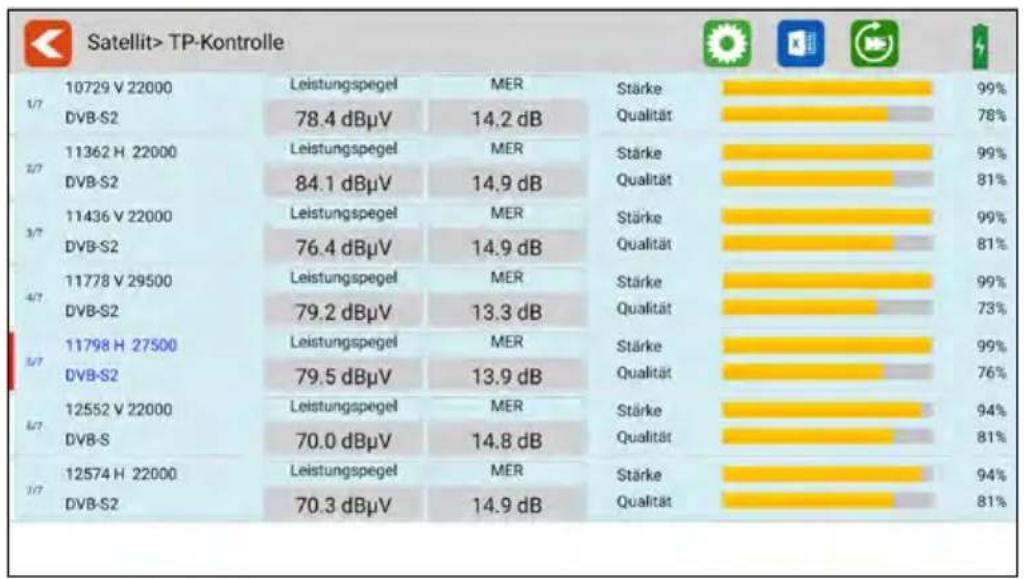
bar
Satellit> TP-Kontrolle | Model | 10729 V 22000 DVB-S2 | Leistungspegel | MER | Stärke | Qualität (%) | | :--- | :--- | :--- | :--- | :--- | :--- | | 1/7 | 11362 H 22000 DVB-S2 | 78.4 dBμV | 14.2 dB | 99% | 78% | | 1/7 | 11436 V 22000 DVB-S2 | 84.1 dBμV | 14.9 dB | 99% | 81% | | 3/7 | 11778 V 29500 DVB-S2 | 76.4 dBμV | 14.9 dB | 99% | 81% | | 4/7 | 11798 H 27500 DVB-S2 | 79.2 dBμV | 13.3 dB | 99% | 73% | | 5/7 | 12552 V 22000 DVB-S | 79.5 dBμV | 13.9 dB | 99% | 76% | | 6/7 | 12574 H 22000 DVB-S2 | 70.0 dBμV | 14.8 dB | 94% | 81% | | 7/7 | | 70.3 dBμV | 14.9 dB | 94% | 81% |This submenu shows you the current values of various transponders simultaneously. On the left side, the respective active transponders are displayed. Helpful tool for determining the levels. (Measuring the feed line multiswitch)
 | Tap this icon to exit the menu and return to the previous menu. |
| Leistungspegel Shows the current power level of the input signal. | |
| MER Shows the signal quality of the modulation error rates measurement | |
| Signalstärke Shows the current signal strength of the transponder in %. | |
| Signalqualität Shows the current signal quality of the transponder in %. | |
 | Tap this symbol to adjust the transponders. A new window opens in which you can add or remove transponders.Removes the transponderAdds the transponder |
 | Tap this icon to export the current transponder list to an Excel spreadsheet. |
 | Tap this icon to check the current transponders for signal in a quick run. |
3. Main menu
3.2 Terrestrial (DVB-T / -T2)
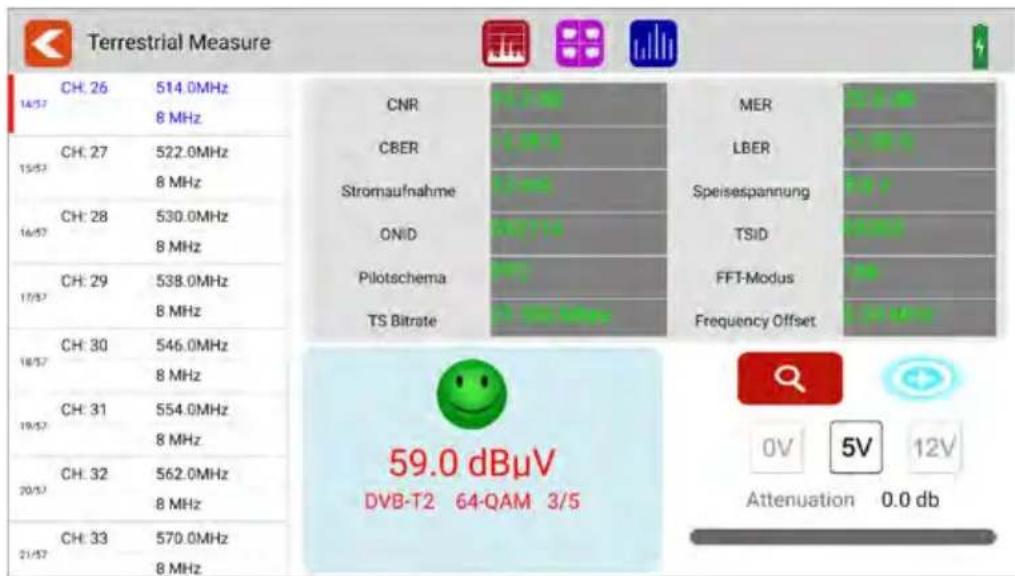
- All available frequency channels are listed on the left side of the screen.
- Tap the area of the frequency channel to switch to it. Tap and hold to open a pop-up dialogue. In this you can now edit the channel parameters (bandwidth, frequency and system type).
- Tap the SEARCH icon to go to the programme search settings:
| Search mode Select | whether you want to search only this one channel or all channels from the list. |
| Encrypted Select | whether you want to search all (incl. encrypted) or only free channels. |
| Service type Select | whether you want to search all channels, only TV channels or only radio channels. |
| Attenuation An additional attenuation of 0-31.5 db can be set here. | |
3. Main menu
 | Tap this symbol to exit the menu and return to the main menu. |
 | Tap this symbol to enter the spectrum analysis. |
 | Tap this symbol to enter the constellation analysis. |
 | Tap this symbol to enter the scope settings. |
 | This symbol is displayed when a signal has been found. |
 | This symbol is displayed if no signal was found. |
 | Tap this symbol to enter the channel search parameter settings. |
 | Tap the symbol to set the voltage output of the antenna to 0 V. |
 | Tap the symbol to set the voltage output of the antenna to 5 V. (active antenna) |
 | Tap the symbol to set the voltage output of the antenna to 12 V. (active antenna) |
3. Main menu
| CNR Shows the current C/N ratio of the signal. | |
| MER Shows the current MER value. | |
| CBER Shows the current CBER value. | |
| LBER Shows the current LBER value. | |
| Feed current Shows the current current consumption of the antenna. | |
| Feed voltage Shows the current feed voltage to the antenna. | |
| ONID Shows the original network identification of the signal. | |
| TSID Shows the transport stream identifier | |
| Pilot pattern Shows the current pilot pattern value of the signal. | |
| FFT mode Shows the current FFT mode of the signal. | |
| TS Bit rate Shows the bit rate of the transport stream. | |
| Frequency-Offset Shows the current FFT mode of the signal. | |
| dBμV Shows the current power level of the input signal. | |
| DVB-T2 x-QAM 5/6 Shows the current DVB system (e.g. DVB-T2), demodulation type and FEC value. | |
| i | Press the key to display the help bar. |
| F1-button | Press the key to enter the "Scope" menu. |
| F2-button | Press the key to enter the constellation analysis. |
| F3-button | Press the key to switch the unit of the power level between dBμV and dBm. |
| F4-button | Press the key to mute. |
| STORE | Press the key to save a screenshot. |
3. Main menu
3.2.1 Spectrum
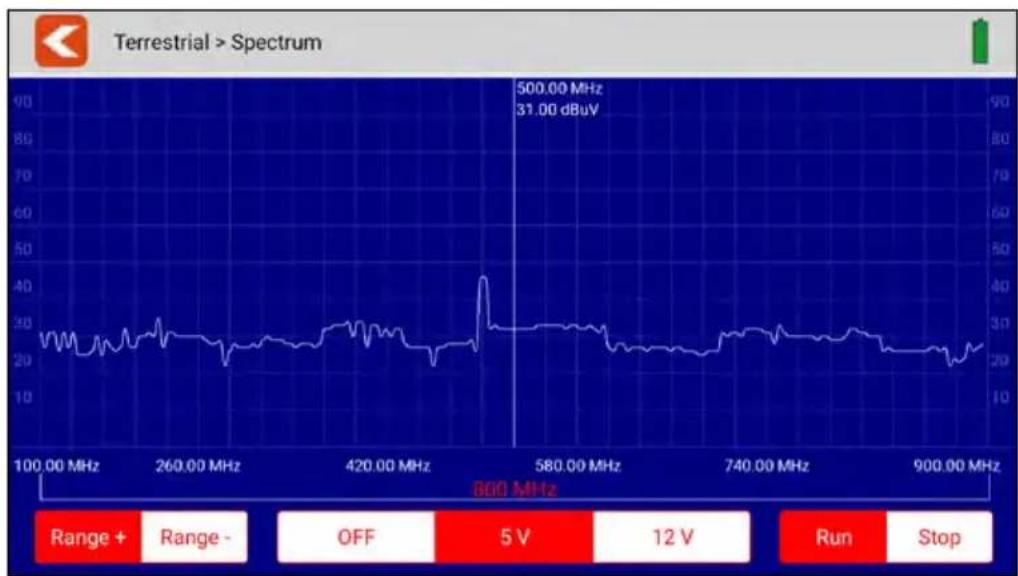
line
| Frequency (MHz) | Value (dBuV) | | --------------- | ------------ | | 500.00 | 31.00 |This submenu analyses and displays the live spectrum from 100 MHz \~ 900 MHz.
 | Tap this icon to exit the menu and return to the previous menu. |
 | Tap an area of the spectrum graph to display the detailed centre frequency and power level. |
 | Tap these icons to narrow the frequency search range of the spectrum. |
 | Set the correct antenna output voltage by tapping OFF, 5 V or 12 V. |
 | Tap "Go" to start the live spectrum analysis. Tap "Stop" to stop it. |
3. Main menu
3.2.2 Constellation
other
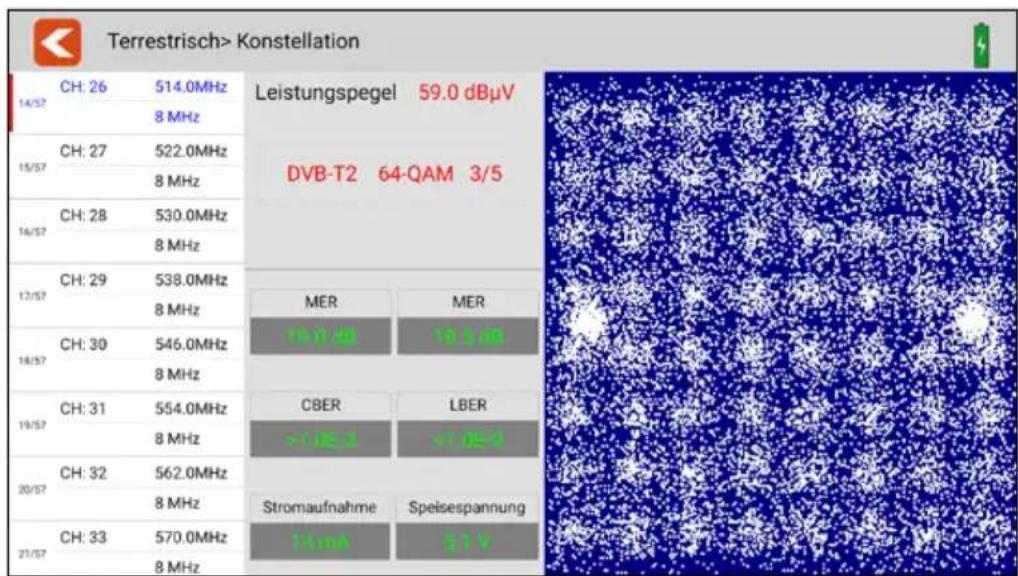
Terrestrisch> Konstellation | Frequency (MHz) | CH: 26 | 514.0MHz | Leistungspegel 59.0 dBμV | | :--- | :--- | :--- | :--- | | 8 MHz | 14/57 | | | | 522.0MHz | 15/57 | | | | 8 MHz | 15/57 | | | | 530.0MHz | 16/57 | | | | 8 MHz | 16/57 | | | | 538.0MHz | 17/57 | MER | MER | | 8 MHz | 18/57 | | | | 546.0MHz | 18/57 | | | | 8 MHz | 18/57 | | | | 554.0MHz | 19/57 | CBER | LBER | | 8 MHz | 19/57 | >TRE-1 | >TRE-1 | | 562.0MHz | 20/57 | | | | 8 MHz | 20/57 | Stromaufnahme | Spelisespannung | | 570.0MHz | 21/57 | Flora | Flora | | 8 MHz | 21/57 | | |This submenu shows the constellation diagram of the live stream. All frequencies are listed on the left side of the menu. Tap on the display area of the frequency to switch to it.
 | Tap this icon to exit the menu and return to the previous menu. |
| Power level Shows the current power level of the input signal. | |
| DVB-T2 x-QAM 5/6 Shows the current DVB system (e.g. DVB-T2), the demodulation type and the FEC value. | |
| CNR Shows the current C/N ratio of the signal. | |
| MER Shows the current MER value. | |
| CBER Shows the current CBER value. | |
| LBER Shows the current LBER value. | |
| Feed current Shows the current current consumption. | |
| Feed voltage Shows the current supply voltage. | |
3. Main menu
3.2.3 Scope
bar
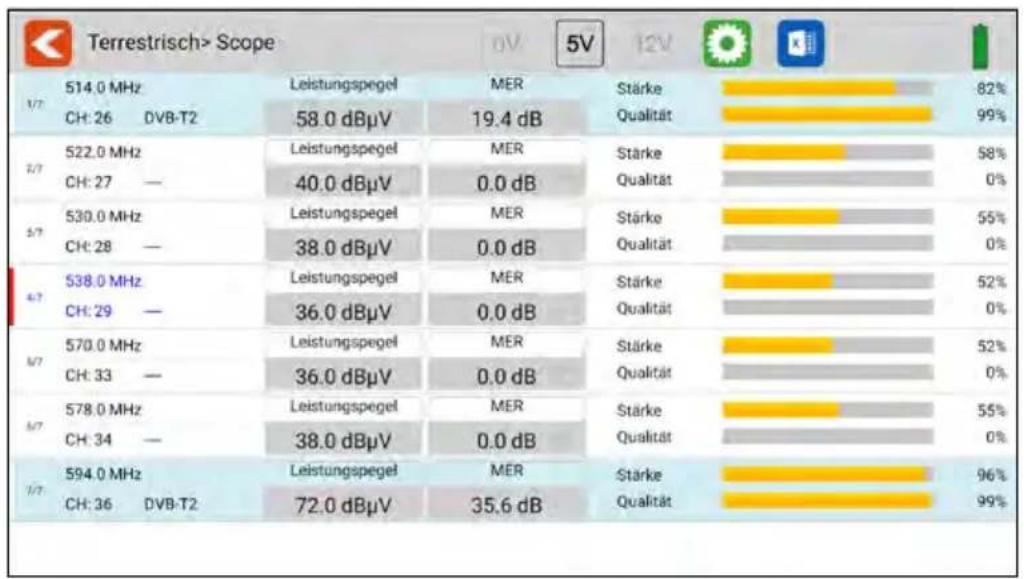
| Frequency Band | 514.0 MHz CH: 26 | 514.0 MHz DVB-T2 | Leistungspegel 58.0 dBμV | Mer 19.4 dB | Stärke Qualität | 82% | |---|---|---|---|---|---|---| | 1/7 | 522.0 MHz CH: 27 | — | 40.0 dBμV | MER 0.0 dB | Stärke Qualität | 58% 0% | | 1/7 | 530.0 MHz CH: 28 | — | 38.0 dBμV | MER 0.0 dB | Stärke Qualität | 55% 0% | | 1/7 | 538.0 MHz CH: 29 | — | 36.0 dBμV | MER 0.0 dB | Stärke Qualität | 52% 0% | | 1/7 | 570.0 MHz CH: 33 | — | 36.0 dBμV | MER 0.0 dB | Stärke Qualität | 52% 0% | | 1/7 | 578.0 MHz CH: 34 | — | 38.0 dBμV | MER 0.0 dB | Stärke Qualität | 55% 0% | | 1/7 | 594.0 MHz CH: 36 | DVB-T2 | Leistungspegel 72.0 dBμV | MER 35.6 dB | Stärke Qualität | 96% 99% |This submenu shows you the current values of different frequencies at the same time. On the left side, the active frequencies are displayed.
 | Tap this icon to exit the menu and return to the previous menu. |
| Leistungspegel Shows the current power level of the input signal. | |
| MER Shows the signal quality of the modulation error rates measurement | |
| Signalstärke Shows the current signal strength of the transponder in %. | |
| Signalqualität Shows the current signal quality of the transponder in %. | |
 | Tap this icon to adjust the frequency. A new window will open where you can add or remove frequencies.Removes the frequencyAdds the frequency |
 | Tap this icon to export the current frequency list to an Excel spreadsheet. |
3. Main menu
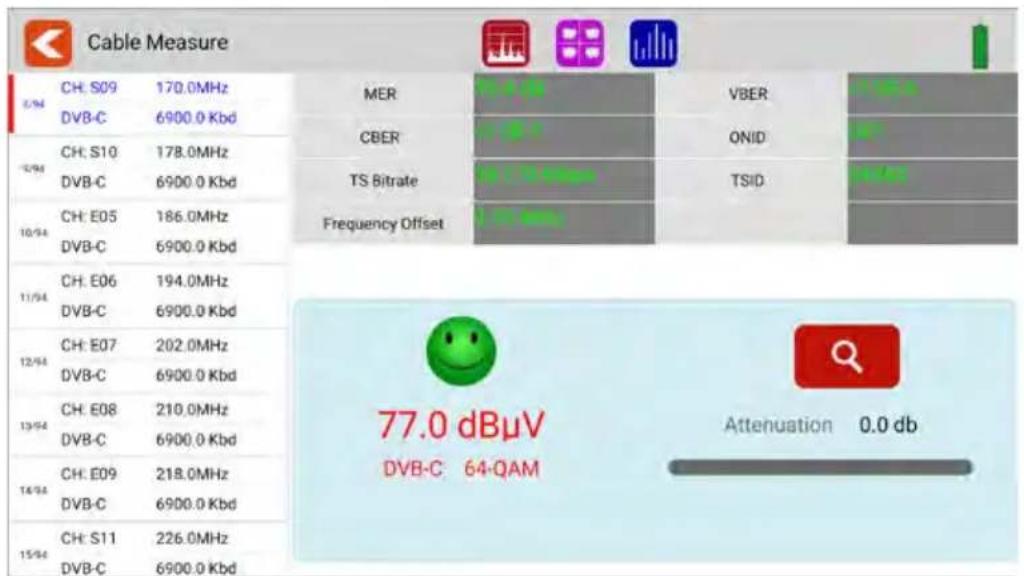
3.3 Cable (DVB-C / -C2)
other
Cable Measure | Channel | Measurement (MHz) | Frequency Offset (dB) | | :--- | :--- | :--- | | CH: S09 | 170.0 | 0.0 | | DVB-C | 6900.0 | 0.0 | | CH: S10 | 178.0 | 0.0 | | DVB-C | 6900.0 | 0.0 | | CH: E05 | 186.0 | 0.0 | | DVB-C | 6900.0 | 0.0 | | CH: E06 | 194.0 | 0.0 | | DVB-C | 6900.0 | 0.0 | | CH: E07 | 202.0 | 0.0 | | DVB-C | 6900.0 | 0.0 | | CH: E08 | 210.0 | 0.0 | | DVB-C | 6900.0 | 0.0 | | CH: E09 | 218.0 | 0.0 | | DVB-C | 6900.0 | 0.0 | | CH: S11 | 226.0 | 0.0 | | DVB-C | 6900.0 | 0.0 | MER: VBER: VBER CBER: ONID: ONID TS Bitrate: TSID: TSID Frequency Offset: 77.0 dBμV DVB-C 64-QAM: Attenuation 0.0 db- All available frequency channels are listed on the left side of the screen.
- Tap the area of the frequency channel to switch to it. Tap and hold to open a pop-up dialogue. In this you can now edit the channel parameters (bandwidth, frequency and system type).
- Tap the SEARCH icon to go to the programme search settings:
| Search mode Select | whether you want to search only this one channel or all channels from the list. |
| Encrypted Select | whether you want to search all (incl. encrypted) or only free channels. |
| Service type Select | whether you want to search all channels, only TV channels or only radio channels. |
| Attenuation An additional attenuation of 0-31.5 db can be set here. | |
3. Main menu
| Tap this symbol to exit the menu and return to the main menu. |
| Tap this symbol to enter the spectrum analysis. |
| Tap this symbol to enter the constellation analysis. |
| Tap this symbol to enter the scope setting. |
| This symbol is displayed when a signal is found. |
| This symbol is displayed if no signal was found. |
 | Tap this symbol to enter the channel search parameter settings. |
3. Main menu
| MER Displays the current MER value. | |
| CBER Shows the current CBER value. | |
| VBER Shows the current VBER value. | |
| ONID Shows the original network identification of the signal. | |
| TSID Shows the transport stream identifier. | |
| TS Bit rate Shows the bit rate of the transport stream. | |
| Frequency-Offset Shows the current FFT mode of the signal. | |
| dBμV Shows the current power level of the input signal. | |
| DVB-C x-QAM 5/6 Shows the current DVB system (e.g. DVB-T2), demodulation type and FEC value. | |
| i | Press the key to display the help bar. |
| F1-button Press the key to enter the "Scope" menu. | |
| F2-button Press the key to enter the constellation analysis. | |
| F3-button no function | |
| F4-button Press the key to mute the sound. | |
| STORE Press the key to save a screenshot. | |
3. Main menu
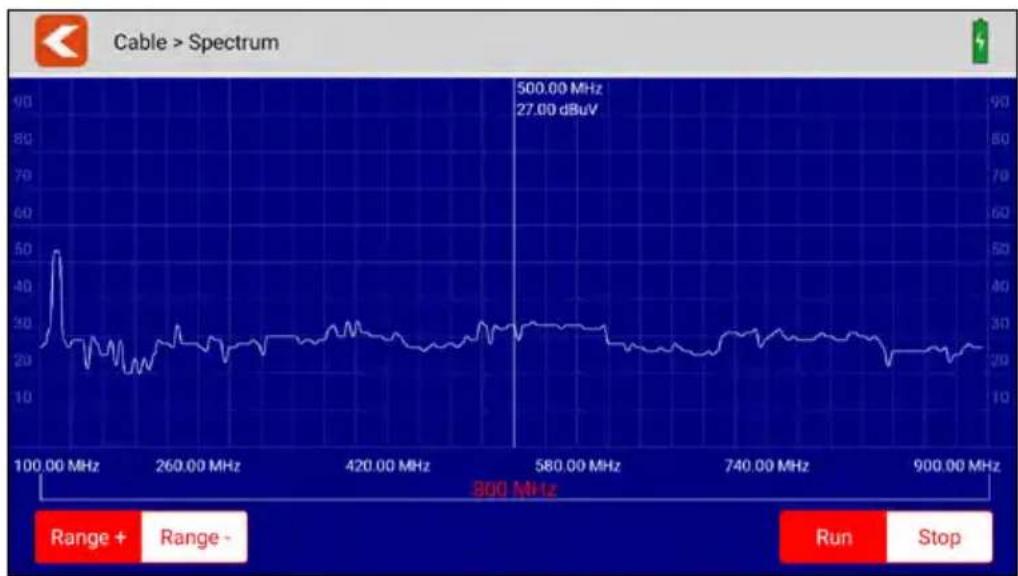
3.3.1 Spectrum
line
| Frequency (MHz) | Value (dBuV) | | --------------- | ------------ | | 500.00 | 27.00 |This submenu analyses and displays the live spectrum from 100 MHz \~ 900 MHz.
 | Tap this icon to exit the menu and return to the previous menu. |
 | Tap an area of the spectrum graph to display the detailed centre frequency and power level. |
 | Tap these icons to narrow the frequency search range of the spectrum. |
 | Tap „Go“ to start the live spectrum analysis. Tap on „Stop“ to stop it. |
3. Main menu
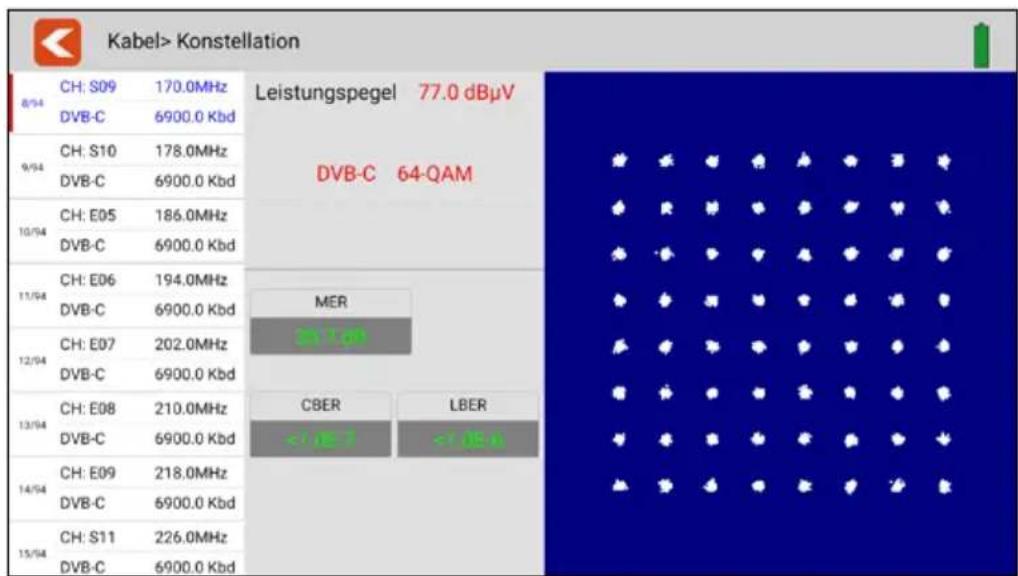
3.3.2 Constellation
other
Kabel> Konstellation | Channel | Frequency (MHz) | Value | | :--- | :--- | :--- | | CH: S09 | 170.0 | 77.0 dBμV | | DVB-C | 6900.0 | Kbd | | CH: S10 | 178.0 | MHz | | DVB-C | 6900.0 | Kbd | | CH: E05 | 186.0 | MHz | | DVB-C | 6900.0 | Kbd | | CH: E06 | 194.0 | MHz | | DVB-C | 6900.0 | Kbd | | CH: E07 | 202.0 | MHz | | DVB-C | 6900.0 | Kbd | | CH: E08 | 210.0 | MHz | | DVB-C | 6900.0 | Kbd | | CH: E09 | 218.0 | MHz | | DVB-C | 6900.0 | Kbd | | CH: S11 | 226.0 | MHz | | DVB-C | 6900.0 | Kbd | Leistungspegel 77.0 dBμV DVB-C 64-QAM MER CBER LBERThis submenu shows the constellation diagram of the live stream. All frequencies are listed on the left side of the menu. Tap on the display area of the frequency to switch to it.
| Tap this icon to exit the menu and return to the previous menu. | |
| Power level Shows the current power level of the input signal. | |
| DVB-C 64-QAM Shows the current DVB system (e.g. DVB-C2), the demodulation type and the FEC value. | |
| MER Displays the current MER value. | |
| CBER Shows the current CBER value. | |
| LBER Shows the current LBER value. | |
3. Main menu
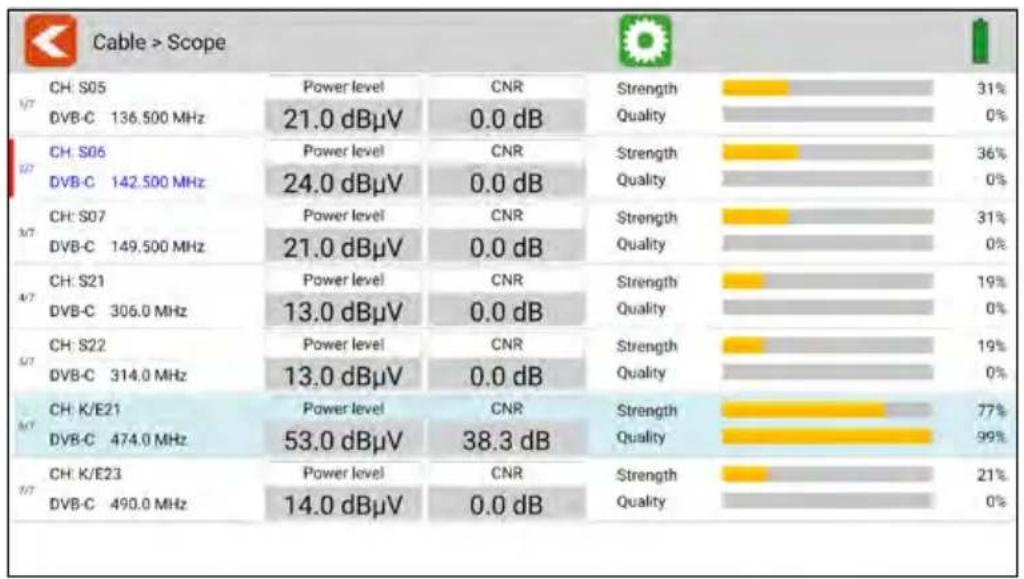
3.3.3 Scope
other
Cable > Scope | Category | Power level (dBμV) | CNR | Strength | Quality (%) | | :--- | :--- | :--- | :--- | :--- | | CH: S05 | 136.500 MHz | 21.0 dBμV | 0.0 dB | 31 | | DVB-C | 142.500 MHz | 24.0 dBμV | 0.0 dB | 0 | | CH: S06 | 149.500 MHz | 21.0 dBμV | 0.0 dB | 36 | | DVB-C | 306.0 MHz | 13.0 dBμV | 0.0 dB | 0 | | CH: S07 | 314.0 MHz | 13.0 dBμV | 0.0 dB | 31 | | DVB-C | 474.0 MHz | 53.0 dBμV | 38.3 dB | 0 | | CH: S21 | 490.0 MHz | 14.0 dBμV | 0.0 dB | 19 | | DVB-C | 314.0 MHz | 13.0 dBμV | 0.0 dB | 0 | | CH: S22 | 474.0 MHz | 53.0 dBμV | 38.3 dB | 77 | | DVB-C | 490.0 MHz | 14.0 dBμV | 0.0 dB | 99 | | CH: K/E23 | 490.0 MHz | 14.0 dBμV | 0.0 dB | 21 | The chart displays a single column of values representing power levels and CNR for different cable specifications.This submenu shows you the current values of different frequencies at the same time. On the left side, the active frequencies are displayed.
 | Tap this icon to exit the menu and return to the previous menu. |
| Power level Shows the current power level of the input signal. | |
| CNR Shows the current C/N ratio of the signal. | |
| Signal strength Shows the current signal strength of the transponder in %. | |
| Signal quality Shows the current signal quality of the transponder in %. | |
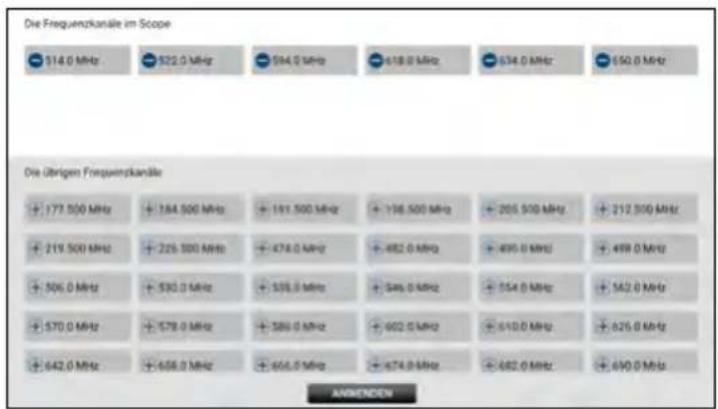
 | Tap this symbol to adjust the transponders. A new window opens in which you can add or remove transponders. |
Frequency list:
The currently selected frequencies are displayed at the top of the screen. The lower list shows the frequencies that are still available.

Removes a frequency

Adds a frequency
3. Main menu
This menu can test the DAB and DAB+ signals. Display the test results and play DAB and DAB+ programmes.
- Tap RESCAN to restart the search of all frequency channels.
- You can set the output voltage of the antenna power according to voltage segments (OFF, 5 V or 12 V).
- All available channels are listed at the top of the table. The text colour is set to BLUE when the current channel is playing.
- Tap on another channel to play it.
- All available frequency channels are listed in the middle of the screen. The power level is displayed for each frequency channel. Tap a frequency channel to switch to it. The meter plays the first programme of the currently selected frequency channel.
- Using the button (small picture) you can display the found programs by frequency and program name.
3. Main menu
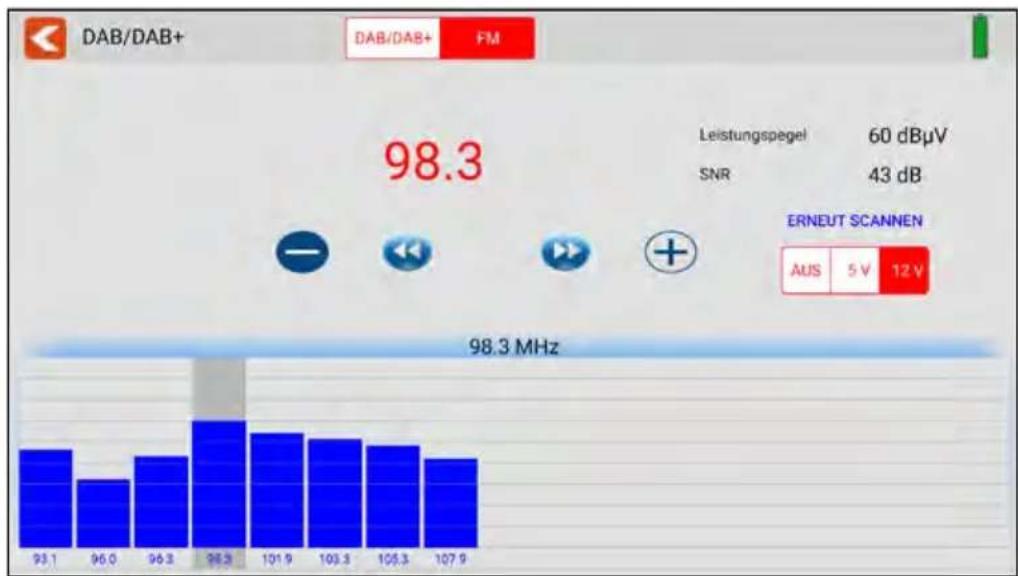
FM
bar
| Frequency (MHz) | Value | |---|---| | 93.1 | 98.3 | | 96.0 | 98.3 | | 96.2 | 98.3 | | 98.3 | 98.3 | | 101.9 | 98.3 | | 103.3 | 98.3 | | 105.3 | 98.3 | | 107.9 | 98.3 |This menu can test FM signals and display and also play the power level of each frequency. The main frequencies are scanned. Others must be selected manually to measure them.
3.5 DiSEqC-Monitor
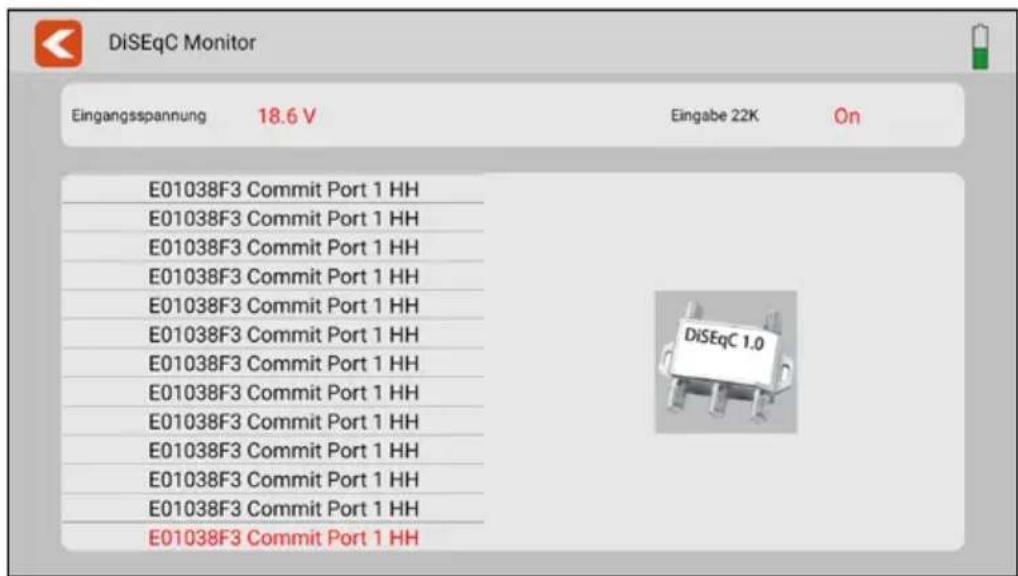
This submenu shows you the DiSEqC settings or DiSEqC commands of a connected device (e.g. receiver). Connect the DVB-S output of the device to the DVB-S port of the meter. The meter analyzes the output signals and displays them on the screen.
3. Main menu
3.6 Settings
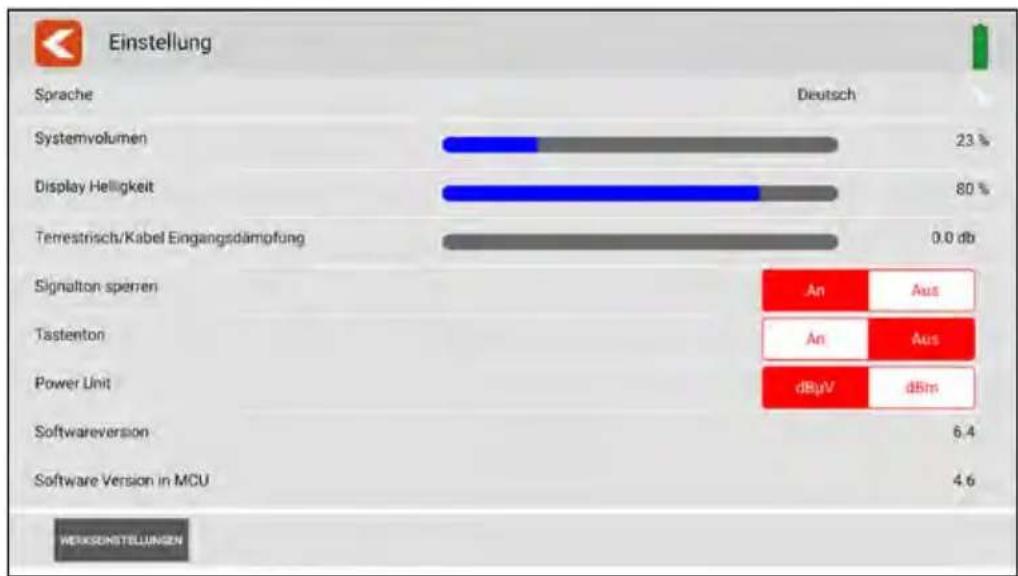
bar
Einstellung | Sprache | Deutschland (%) | Country | | :--- | :--- | :--- | | Systemvolumen | 23 | An | | Display Helligkeit | 80 | An | | Terrestrisch/Kabel Eingangsdämpfung | 0.0 db | dByV | | Signalton sperten | An | Aus | | Tastenton | An | Aus | | Power Unit | dBuV | dBm | | Softwareversion | 6.4 | | | Software Version in MCU | 4.6 | | WERKSONSTELLUNGEN | Tap this icon to exit the menu and return to the previous menu. |
| Language Press | the Language field. A submenu opens and you can select the desired language. |
| System volume Adjust | just the system volume higher or lower. |
| Display brightness Adjust | Adjust the brightness of the display. |
| Terrest./Cable In. Adjust | the input attenuation of the terrestrial measurement and the cable measurement. (0 - 31,5 dB). |
| Signal tone Activate | or deactivate the signal tone. |
| Key tone Activate | or deactivate the key tones. |
| Power Unit Switches | the display value between dBμV and dBm. |
| Softwareversion Shows | the current software version of the unit. |
| Software Ver. in MCU Shows | the current software version of the device in MCU. |
| Factory settings Resets | the device to the delivery state.ATTENTION: All data that you have set will be lost! |
3. Main menu
3.7 Help
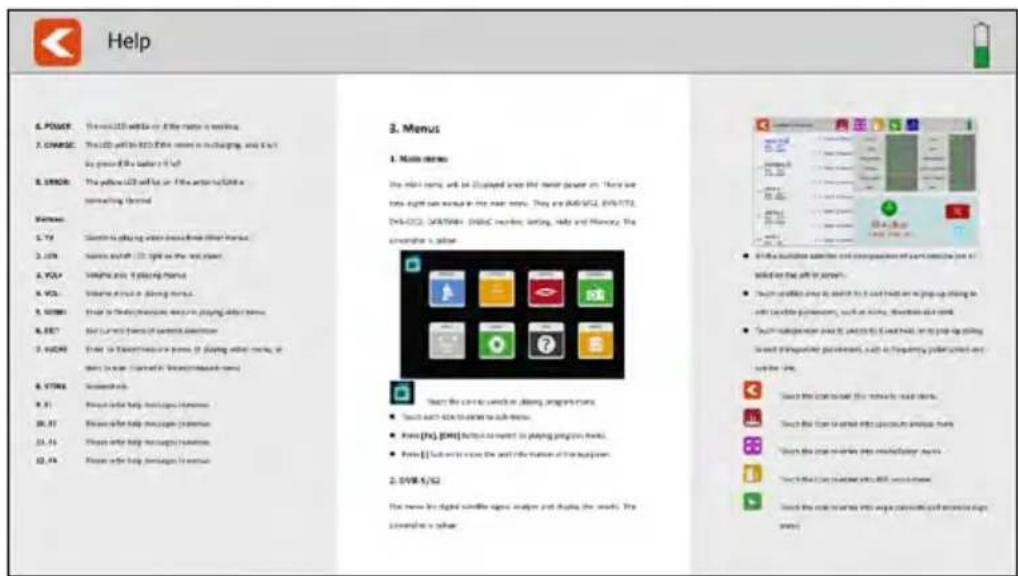
This menu shows you the operating instructions for the meter. Swipe your finger to the left or right to scroll through the pages. Spread two fingers apart to enlarge the view.
3.8 Memory
The screenshots are saved in this menu.
Create a screenshot
To take a screenshot, simply press the STORE button on the meter. The current image on the display is then automatically loaded into the STORE menu.
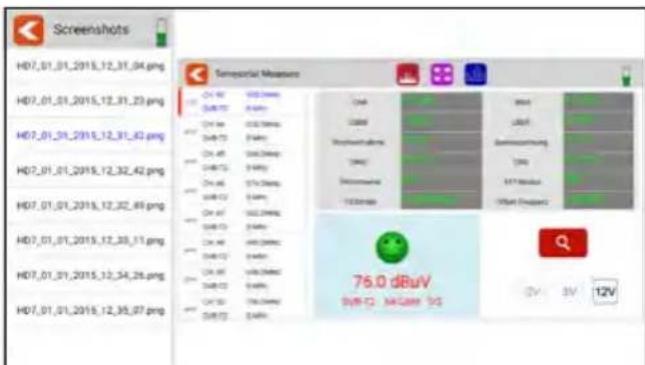
Copy a screenshot to a USB stick
To copy a screenshot to a USB stick, tap the desired file in the left column. Keep your finger pressed. A pop-up window then opens in which you can copy the file to a USB stick. Make sure that a suitable USB stick is inserted in the unit beforehand.
4. Helpful functions
4.1 Live TV-playback
Press the TV key on the meter or tap the TV symbol on the display to switch to live TV playback. You will then see the current TV programme on the display. Make sure that a suitable channel list has been created in the meter beforehand.
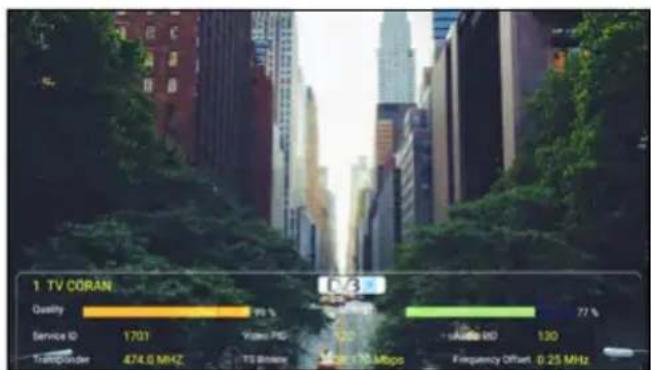
To open a channel list, swipe your finger from top left to bottom right to open the channel list menu. By swiping your finger up or down, you can move the channel list and select the desired channel.
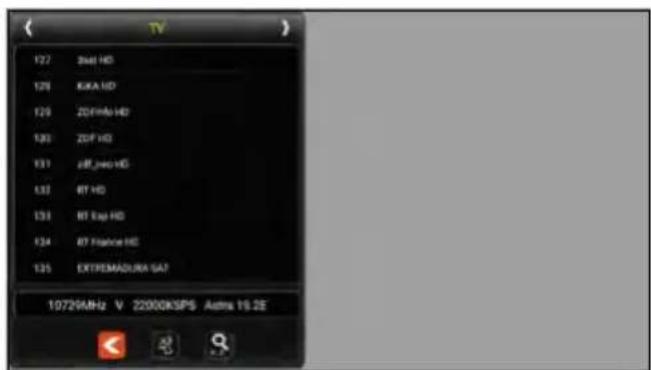
Press the Info key in Live TV mode to get information about the current channel. In Live TV mode, you can open the channel list with F1. With F2 you have the option of entering channel numbers.
- Press the < symbol to exit the channel list.
- Press the satellite icon to select a satellite.
- By pressing the magnifying glass, you can search for channel names.
- By pressing the right/left arrows, you can switch between TV/radio.
- Swipe from the top right to the bottom left to enter the programme position.
- By swiping from top to bottom or from bottom to top, you can change the program.
- Swipe from right to left to exit Live TV mode.
4. Helpful functions
4.2 Info-button
Press the Info key on the meter to display the functions in the respective menus. Depending on the menu, the F keys, for example, have a different function.
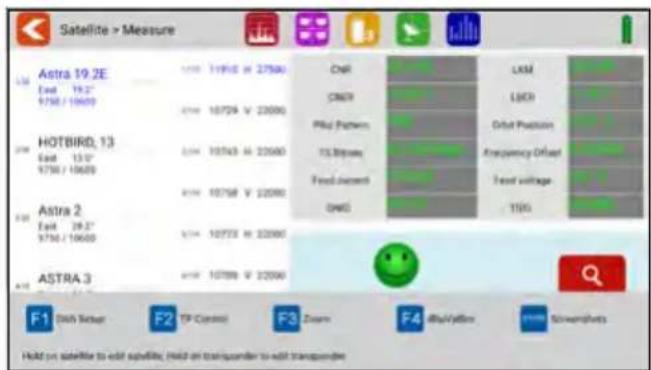
4.3 Firmware-Update
If there is a new firmware for the meter, you have to copy it to the root directory (without subfolders) of a USB stick. Switch on the measuring device. After booting the device, insert the USB stick. Open the menu Settings and press 10x on the area Software Version. Another menu opens. Confirm with „Yes“ if you want to start the update, with „No“ if you want to cancel.
IMPORTANT: DO NOT turn off the meter until the update is complete. Depending on the software version, the instrument may restart several times until all updates are installed. After the update is complete, turn the instrument off and then on again. The instrument will now restart. After restarting, please perform a factory reset to apply all changes.
Note:
You can always find the latest firmware on our homepage: www.megasat.tv
For the update please use a USB3.0 stick with max 32GB stick and FAT32 format. NTFS formats are not supported during the update. However, these can be used for data transfer.
4. Helpful functions
4.4 Edit channel list
Please refer to the current operating instructions on our homepage for this function.
5. Specifications
Genaral features
■ 8.9 inch (22.6 cm) touch screen colour display
■ Video Output SD/HD/FHD: 480i/p,576i/p,720p,1080i/p,4Kx2K
■ Measurement of all reception types DVB-S/S2/C/C2/T/T2 H.264/H.265/DAB/DAB+
■ Live TV playback
■ Visual and audible signal level indicator
■ Spectrum and Constellation
■ DiSEqC switching command control
■ Integrated loudspeaker for TV playback
■ LED light on the back for poor visibility
■ High-quality and stable aluminium housing
■ USB port for firmware updates and storage of channel list and measurement data
■ Screw connectors for easy changing of F-connectors
■ Power switch and auto-standby
- Reset button
■ Digital user manual on the unit
■ Power supply: AC 100-240 V / DC 12 V, 2 A
■ Li-Ion battery (7.4 V / 5000 mA/h)
Connections
■ 1x USB connection
■ 1x DV output
■ 1x F-connector
■ 1x RF connector
■ 1x 12VDC input
Other
■ Dimensions (W/H/D): 278 x 200 x 36 mm
■ Weight: 1245 g
Delivery
■ Satmeter HD 7 Combo
■ Carrying case with strap
■ Silicone protective cover
■ 230 volt mains adapter
■ 12 volt car charger
■ F-coaxial adapter
■ User manual
5. Specifications
DVB-S / S2
■ Frequency range: 950 - 2150 MHz
■ Input level range: 35 \~ 100 dBμV
■ LNB voltage: 13/18 V, max. 300 mA
■ LNB current consumption measurement in mA
■ LNB short-circuit indication and protection
■ Displays: MER/LKM/CBER/LBER/quality dBμV/dBm
■ DiSEqC 1.0 / 1.1 / 1.2 / USALS / Auto-DiSEqC
■ Unicable I & II (EN 50494 / EN 50607)
■ TV search mode: Auto, Blindscan, Manual
■ Transponder control (identification of reception planes)
■ Calculation of rotation and inclination angle incl. compass
■ NIT control and satellite evaluation
DVB-T / T2 / C- / -C2
■ Frequency range: 42 - 1002 MHz
■ DVB-T Displays: PWR/CBER/LBER/MER/TS Bitrate/TSID/ONID
■ DVB-C Displays: PWR/MER/LBER/CBER/ONID/TSID/TS Bitrate
■ Level range: 30 \~ 100 dBμV
■ Scope display / Tilt display
■ Automatic and manual program search
DAB / DAB+
■ FM signal measuring and testing
■ Play FM programs
■ Measured values for Level dBμV, SNR
DiSEqC Monitor
■ Measurement and control of DiSEqC switching commands
Conformity information
Hereby, Megasat Werke GmbH declares that the following product is in compliance with the essential requirements and other relevant provisions of directives 2014/30/EU (EMC), 2014/35/EU (LVD) and 2014/53/EU (RED):
Megasat Meter HD 7 Combo (Art.-No. 2600020)
The declaration of conformity for this product is located at the company: Megasat Werke GmbH, Brückenstraße 2a, D-97618 Niederlauer
The declaration of conformity can be downloaded from our homepage: www.megasat.tv/support/downloads
PRODUCT REGISTRATION
Registering your Megasat product gives you access to our automatic e-mail notifications. If your product requires new firmware, you will be notified by e-mail.
For registration please visit our homepage www.megasat.tv
You can find the form in Support → Product registration
Notes

- Hauptmenü
- Designations and key assignment....04
- Main menu 06
- Helpful functions ...... 33
- Specifications 36
- Genaral features
- Delivery
- Designations and key assignment
- Swipe gestures with the touch screen:
- Main menu
- Satellite (DVB-S / -S2)
- Satellite search
- Constellation
- Antenna settings
- Motor-Einstellungen
- Angle calculation
- Transponder control
- Terrestrial (DVB-T / -T2)
- Constellation
- Scope
- Constellation
- Scope
- Frequency list:
- FM
- DiSEqC-Monitor
- Settings
- Help
- Memory
- Create a screenshot
- Copy a screenshot to a USB stick
- Helpful functions
- Live TV-playback
- Info-button
- Firmware-Update
- Note:
- Edit channel list
- Specifications
- Genaral features
- Connections
- Other
- Delivery
- DVB-S / S2
- DVB-T / T2 / C- / -C2
- DAB / DAB+
- DiSEqC Monitor
- Conformity information
- PRODUCT REGISTRATION
- Notes
Brand : MEGASAT
Model : Satmeter HD 7 Combo
Category : Measurement