
HD 3 Combo - Measurement MEGASAT - Free user manual and instructions
Find the device manual for free HD 3 Combo MEGASAT in PDF.


| Product Type | Satellite, Terrestrial, and Cable TV Signal Meter (DVB-S/S2, DVB-T/T2, DVB-C) |
| Display | 2.3-inch TFT LCD color display, 320 x 240 pixels |
| Dimensions (H/W/D) | 177 x 80 x 34 mm |
| Weight | 225 g |
| Power Supply | AC 100-240V (adapter) or DC 12V car charger; internal Li-Ion battery 7.4V / 1400 mAh |
| Battery Life | Up to 3 hours operating time |
| Satellite Frequency Range | 950 - 2150 MHz |
| Satellite Demodulation | QPSK, 8PSK, 16APSK, 32APSK (DVB-S2) |
| Satellite Code Rates | 1/2, 2/3, 3/4, 5/6, 7/8 (DVB-S); 1/4, 1/3, 2/5, 1/2, 3/5, 2/3, 3/4, 5/6, 8/9, 9/10 (DVB-S2) |
| DiSEqC Support | 1.0, 1.1, 1.2, USALS, Unicable |
| Terrestrial Frequency Range | 44 - 870 MHz (DVB-T/T2); bandwidth 6, 7, 8 MHz |
| Cable Frequency Range | 44 - 870 MHz; symbol rate 1-7.9 MS/s |
| Measurements | dBμV, CNR, BER, MER, signal strength and quality (percentage), spectrum, constellation, tilt angle |
| Integrated Compass and Motion Sensor | For alignment of satellite dish: azimuth and elevation calculation |
| Audio | Integrated speaker |
| USB Port | Mini USB for firmware updates and satellite/transponder list upload |
| LNB Power | 13/18V, max. 500 mA |
| Input Impedance | 75 Ω |
| Input Level Range | Satellite: min. 35 dBμV; Cable: 30-100 dBμV |
| Menu Languages | English, German |
| Accessories Included | 230V charging adapter, 12V car charger, cover with strap, user manual |
Frequently Asked Questions - HD 3 Combo MEGASAT
User questions about HD 3 Combo MEGASAT
0 question about this device. Answer the ones you know or ask your own.
Ask a new question about this device
Download the instructions for your Measurement in PDF format for free! Find your manual HD 3 Combo - MEGASAT and take your electronic device back in hand. On this page are published all the documents necessary for the use of your device. HD 3 Combo by MEGASAT.
USER MANUAL HD 3 Combo MEGASAT
4. DVB-S / S2 (Satellitensuche)
5. DVB-T / T2 (Terrestrische Suche)
5.6 Einstellungen
6.1 Messung
1.1 General features 03
1.2 Delivery....03
2. Descriptions and key assignment 04
3. Home menu
3.1 Connect and power on 06
4. DVB-S / S2 (Satellite search)
4.1 Search....07
4.2 LNB settings....08
4.3 Edit satellite....10
4.4 Spectrum....11
4.5 Constellation 12
4.6 Calculate angle 13
4.6.1 Alignment mode.... 14
4.6.2 Compass-Mode....15
5. DVB-T / T2 (Terrestrial Search)
5.1 Measurement.... 16
5.2 Auto Scan 17
5.3 Spectrum....17
5.4 Scope 18
5.5 RF Channel list....18
5.6 Settings....19
6. DVB-C (Kabel TV Suche)
6.1 Measurement....20
6.2 Signal evaluation 21
6.3 Spectrum....21
7. Settings....22
8. Specifications 23
1. Reference
1.1 General features
- Satellite meter for measuring DVB-S/S2 signals
• Pre-programmed satellite and transponder list
• 2.3 inch TFT LCD display with 320 x 240 pixels. - Unicable fit
- Konstellation- and spectrum analysis
• Automatic calculation of turn and tilt angle of the antenna - Integrated compass for location analysis
- Displaying dBμV, CNR, BER, signal strength and quality in percent
- Integrated power battery with up to 3 hrs. operating time
- Firmware updates via mini USB (USB to mini USB adapter sold separately)
- Comes complete the included power adapter or car charger
• A clear and well self-explanatory menu
1.2 Delivery
• Megasat Satmeter HD 3 Combo V2
• 230 Volt charging adapter
• 12 Volt car charger adapter
- Cover incl. Strap
- User manual
2. Descriptions and key assignment
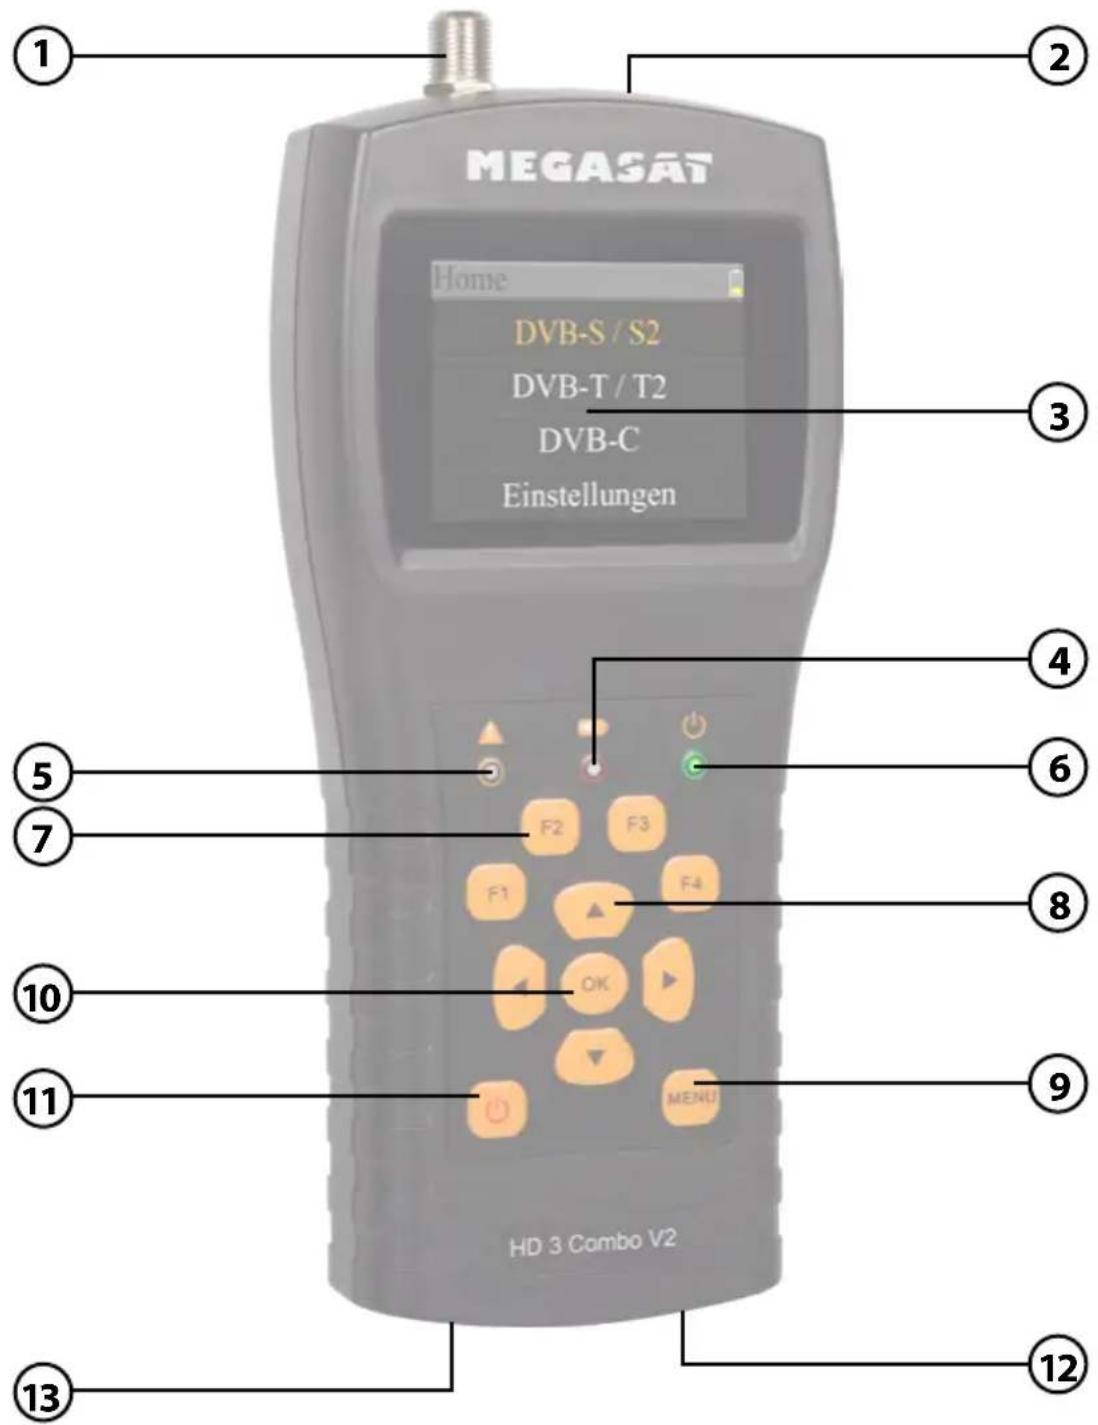
2. Descriptions and key assignment
- LNB In Satellite signal input (DVB-S)
- ANT In Antenna signal input (DVB-T or DVB-C)
- LCD Display Show the Menu
- Red: the battery is being charged / Blue: battery is full.
- The light will blink once the antenna connects shortly.
-
Power indicator: Indicate the device is power on or off.
-
Funktionstasten F1: Adjust the brightness of the screen
F2: Activates / deactivates the key tones
(DVB-S: Measurement of consumption / supply voltage)
F3: Function key in various menus
(DVB-S: Transponder Control / measure the levels)
(DVB-S/-T/-C: Selection of the spectrum measuring range)
F4: (DVB-S: Auto DiSEqC Function)
Note: The functions of the F-keys depend on the sub-menu you are. (See point 11: Power button)
8. Navigation
▲▼ Navigation through the menu / change values
◀▶ Navigation through the menu / change values
-
Menu Enter or exit main menu.
-
OK In the menu, press OK to confirm selection.
-
Power Turn the unit on or off. Press and hold the switch for 2 seconds to turn the unit on. Press the switch briefly to display the functions of the F keys on the screen.
-
DC Connect with the charger cord for charging the equipment.
-
Reset Reset the device to factory settings.
3. Home menu
-
Connect the coaxial cable to the LNB or ANT input of the instrument.
-
Turn on the meter. After booting the Home menu appears. The menu consists of Satellite, Terrestrial, Cable TV and System Setting. Use the pq buttons to change between the individual points.
-
Press the OK button to enter the menu. Use the MENU button to exit the respective menu.
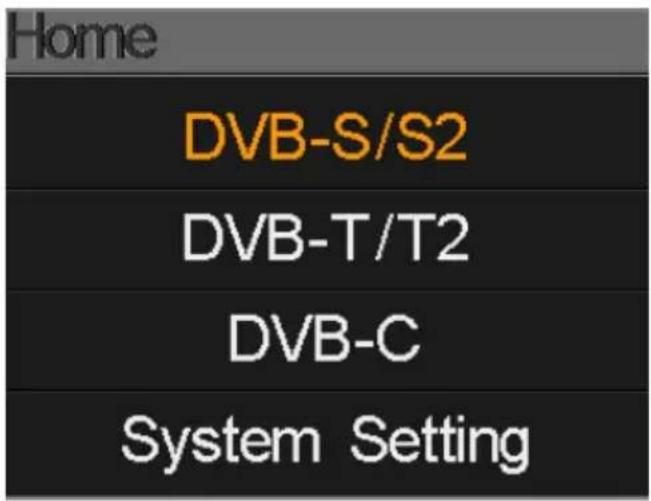
Satellite Submenu for DVB-S/S2 signal search.
Terrestrial Submenu for DVB-T/T2 signal search.
Cable TV Submenu for DVB-C signal search.
System Setting Submenu to set system settings (Language, Auto standby, ...)
4. DVB-S / S2 (Satellite search)
Use the ▲▼ buttons to select Satellit and press OK to confirm. Then you can access more sub-menus:
- Search
• LNB Settings - Edit Satellite
- Spectrum
- Constellation
- Calculate Angles
4. DVB-S / S2 (Satellite search)
4.1 Search
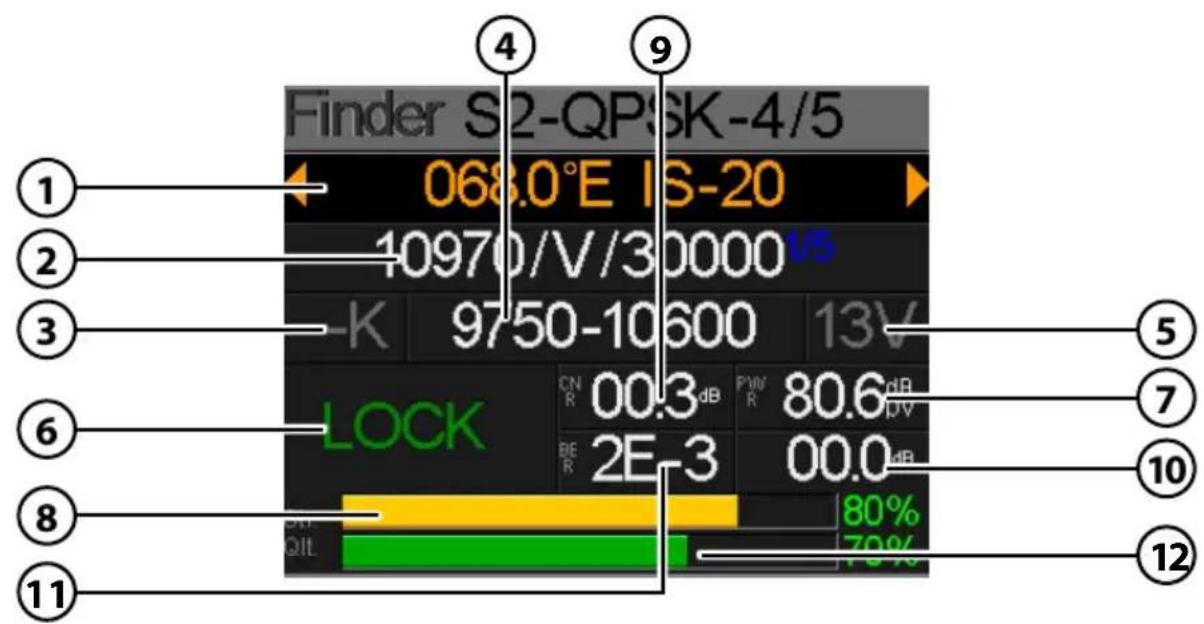
1. Satellite
Displays the current satellite. Use the ◀▶ keys to change the satellite. Press OK to enter the Satellite list. Use the ▲▼ buttons to the desired, and click OK to confirm.
-
Transponder Displays the current transponder. Use the ◀▶ keys to switch the transponder. With OK you can have a Transponder manually enter (use this the change ▲▼ buttons to the value). Click OK to confirm.
-
22K Displays the current 22 K status.
-
LNB Typ Displays the current LNB type. Use the ◀▶ keys to change the LNB type. Press OK to enter the LNB list. Use the ▲▼ buttons to select type, and click OK to confirm.
-
LNB Power Status Displays the current status of the LNB (18 V = horizontal / 13 V = Vertical)
-
Lock Status Displays that the selected satellite is found.
-
PWR Displays the current level of the signal in dBμV.
-
STR Displays the current signal strength.
-
CNR Displays the current CNR value of the signal.
-
MER Displays the current MER value of the signal.
-
BER Displays the current BER value of the signal.
-
QLT Displays the current signal quality.
4. DVB-S / S2 (Satellite search)
4.2 LNB Settings
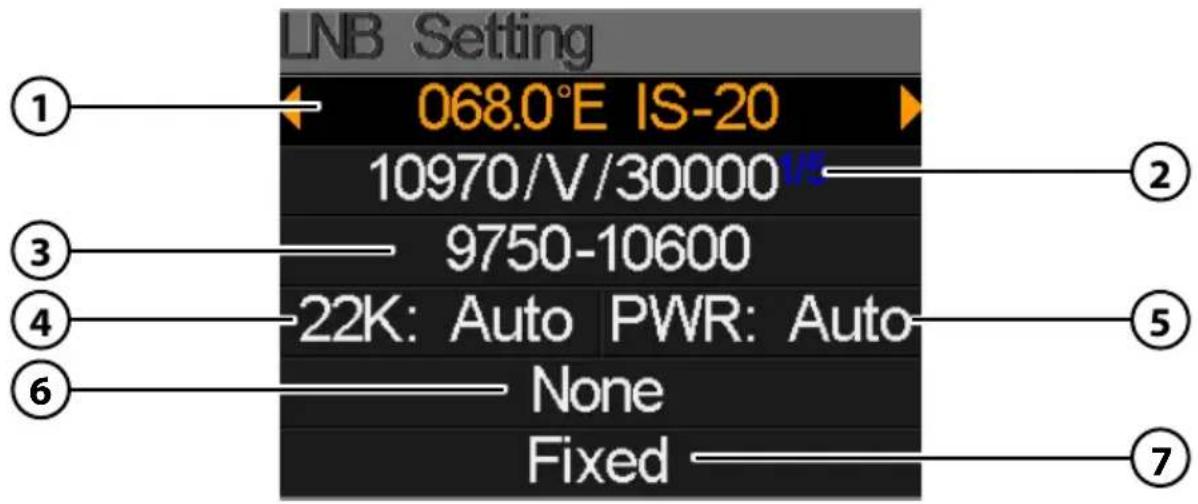
- Satellite Displays the current satellite. Use the ◀▶ keys to change the satellite. Press OK to enter the Satellite list. Use the ▲▼ buttons to desired, and click OK to confirm.
- Transponder Displays the current transponder. Use the ◀▶ keys to switch the transponder. With OK you can have a transponder manually enter (use this the change ▲▼ buttons to the value). Click OK to confirm.
- LNB Typ Displays the current LNB type. Use the ◀▶ keys to change the LNB type. Press OK to enter the LNB list. Use the ▲▼ buttons to select type, and click OK to confirm.
- 22K Displays the current 22 K status. Use the ◀▶ keys to the switch between ON and OFF.
- PWR Displays the current status of the LNB. Use the ◀▶ keys to switch between the AUTO, 18V and 13V. (18 V = Horizontal / 13 V = Vertical)
- DiSEqC / Unicable Use the ◀▶ buttons to change the desired DiSEqC port or between Unicable 1 and 2. If you select Unicable, confirm with OK and then select the port assignment and frequency.
- Motor Typ Use the ◀▶ buttons to select the type of engines. Choose between fixed antenna, USALS and DiSEqC 1.2.
4. DVB-S / S2 (Satellite search)
USALS Settings
Press OK when you have found the type of engines on USALS to enter settings in the USALS.
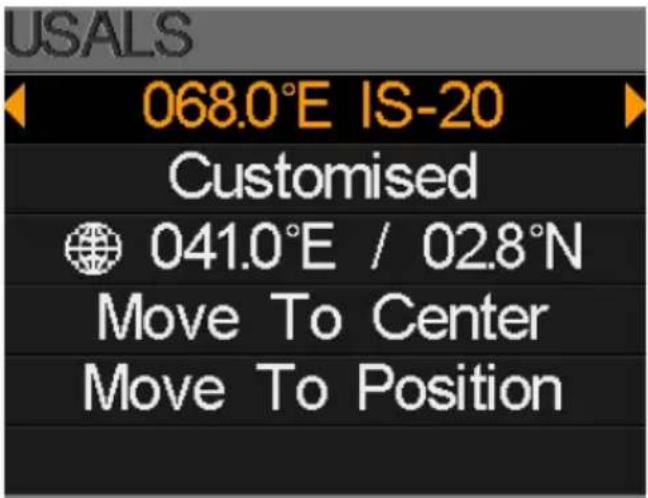
- Satellite Use the ◀▶ keys to select the desired satellite.
- Longitude Press OK to change the longitude. Use the navigation buttons to change the value.
- Latitude Press OK to change the latitude. Use the navigation buttons to change the value.
- Go to center Rotates the antenna to the center position.
- Go to position Rotates the antenna to the desired position.
DiSEqC 1.2 Settings
Press OK when you have found the type of engines on DiSEqC 1.2 to reach Settings in the DiSEqC 1.2.
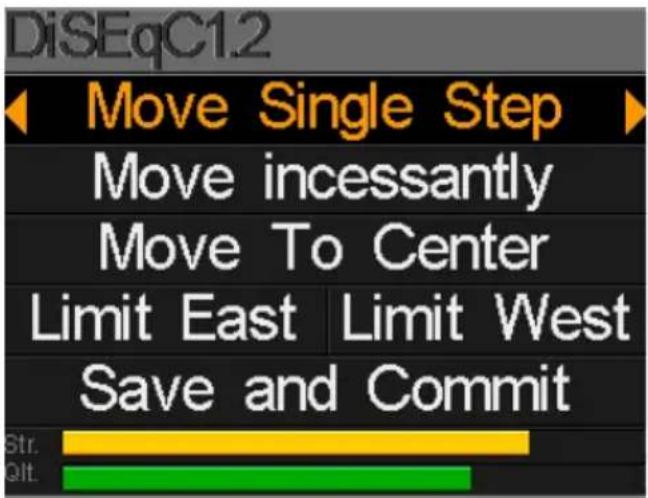
- Single steps Press the ◀▶ buttons to rotate the motor step by step.
- Permanent Press the ◀▶ buttons to rotate the motor continuously.
- Go to center Press OK to move the antenna to the center position.
- East/West Limit Set the East, or West limit.
- Save Save the settings.
4. DVB-S / S2 (Satellite search)
4.3 Edit Satellite
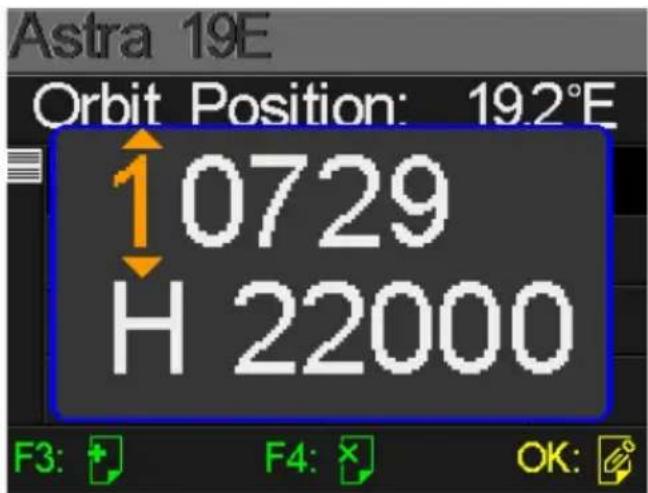
- Select a satellite with the ▲▼ buttons and press OK to edit it.
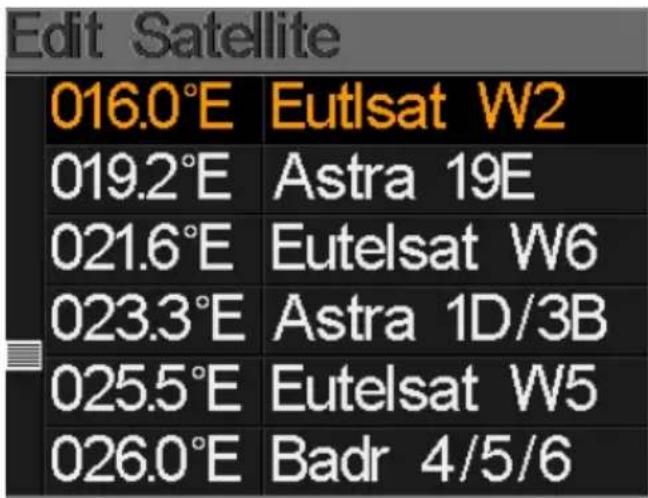
- Press OK to edit the name of the satellite. Use the navigation buttons and confirm with OK.
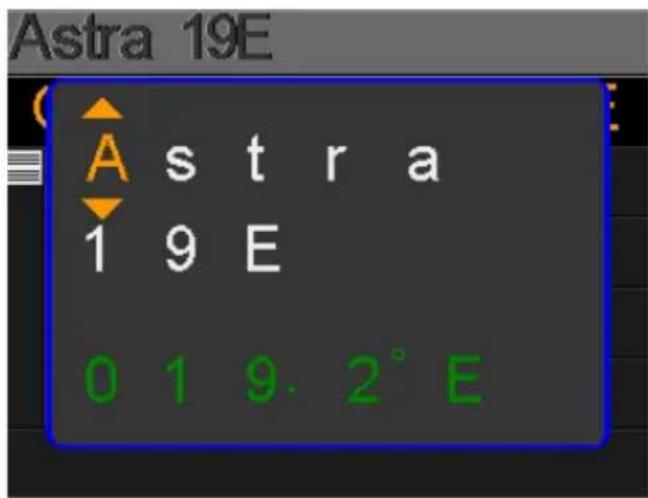
- Use the ▲▼ buttons to select a transponder from the list and press OK to change the selected. This can be noted with the navigation buttons and confirm with OK.
4. DVB-S / S2 (Satellite search)
4.4 Spectrum
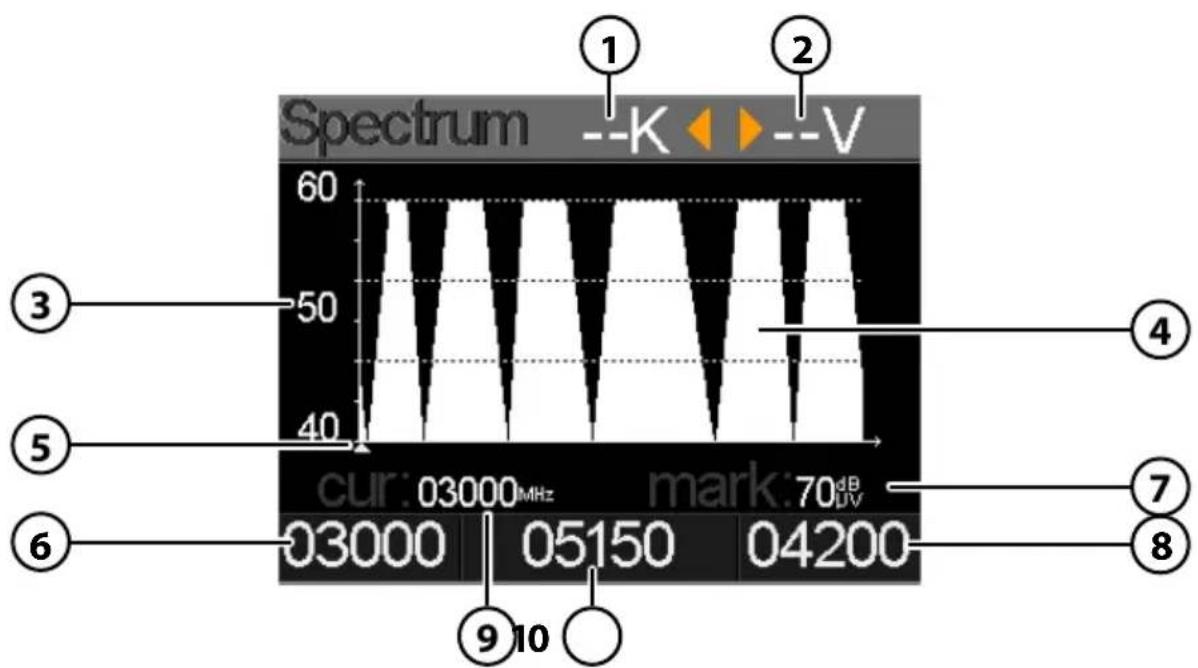
- Displays the current status of 22 K (--- = K off / 22 K = on).
- Displays the current voltage to LNBs. The values are: 13 V, 18 V or OFF.
- Displays the range of power levels (0 \~ 100).
- Displays the graphical portion of the spectrum.
- Displays the current frequency. Go with the ◀▶ buttons.
- Displays the initial frequency of the spectrum.
- Displays the power level value of the LNB voltage.
- Displays the final frequency of the spectrum.
- Displays the current frequency.
- Displays the current LNB type mode.
Use the ▲▼ buttons to navigate up and down the Spectrum menu. Use the ◀▶ buttons to change the respective values, or move through the frequency band (5).
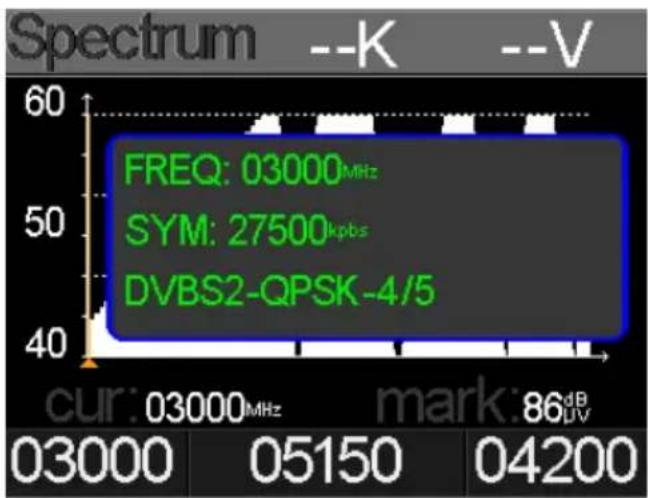
Press the OK button to display the frequency data.
To change the range of the power level, press the F3 key.
line
| Metric | Value | |--------|-------| | FREQ | 03000MHz | | SYM | 27500kbps | | DVBS2-QPSK-4/5 | 86dB | | current | 03000MHz | | mark | 86dB | | voltage | -V |4. DVB-S / S2 (Satellite search)
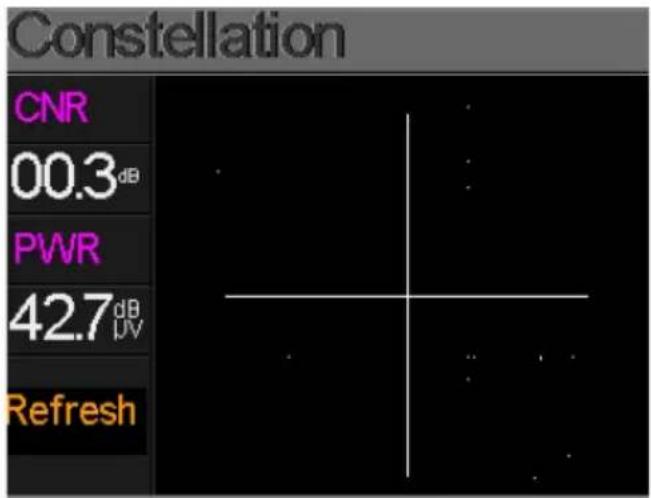
4.5 Constellation
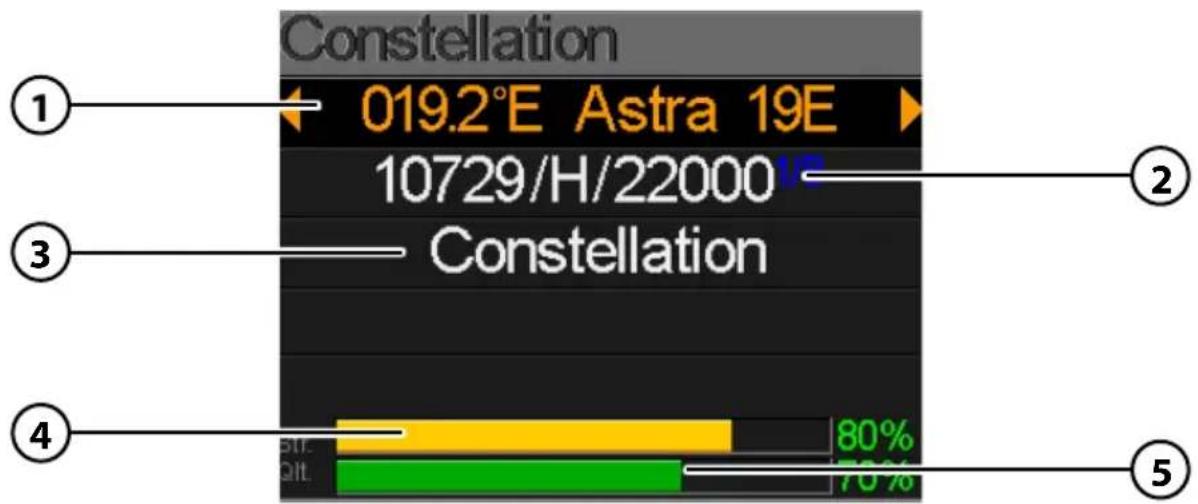
- Displays the current satellite. Use the ◀▶ buttons to change the satellite. Press OK to enter the Satellite list. Use the ▲▼ buttons to select from, and click OK to confirm.
- Displays the current transponder. Use the ◀▶ buttons to switch the transponder. With OK you can enter a transponder manually (use this the ▲▼ buttons to set the value to change). Click OK to confirm.
- Press OK to display the constellation.
- Displays the current signal strength.
- Displays the current signal quality.
CNR, power level and the Constellation diagram is in Menu appears. Press OK to upgrade.
4. DVB-S / S2 (Satellite search)
4.6 Calculate Angles
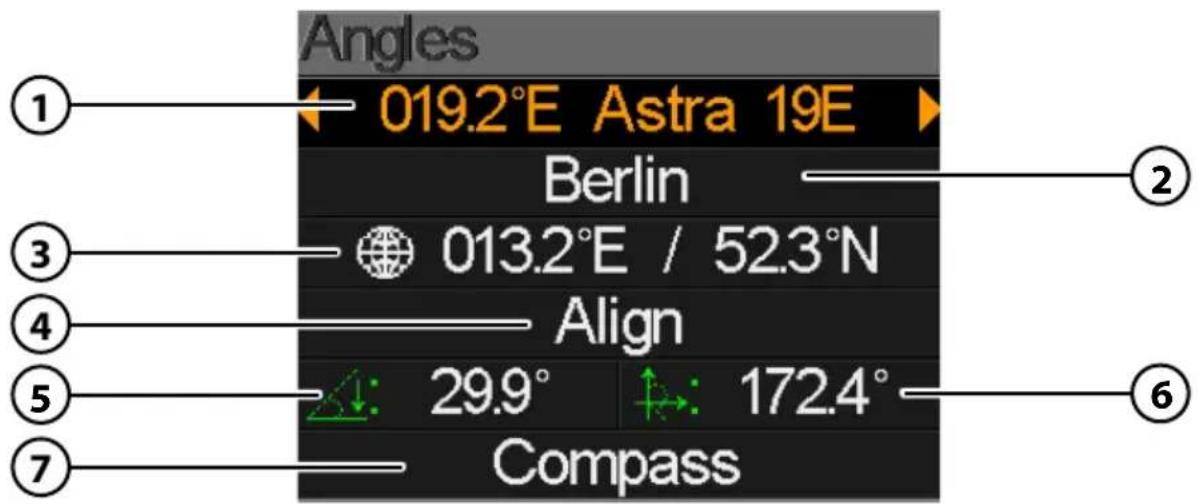
- Displays the current satellite. Use the ◀▶ buttons to change the satellite. Click OK to go to the satellite list. Use the ▲▼ buttons to select the desired one and confirm with OK.
- Select your location or geographic location from the list (eg Berlin). If you want to define your own location, select „individual“.
- Shows the length and latitude of your location.
- Switches to graphical alignment mode (see page 13).
- Displays the vertical angle to the antenna.
- Shows you the horizontal angle to the antenna.
- Switches to graphical compass mode (see page 14).
4. DVB-S / S2 (Satellite search)
4.6.1 Alignment mode
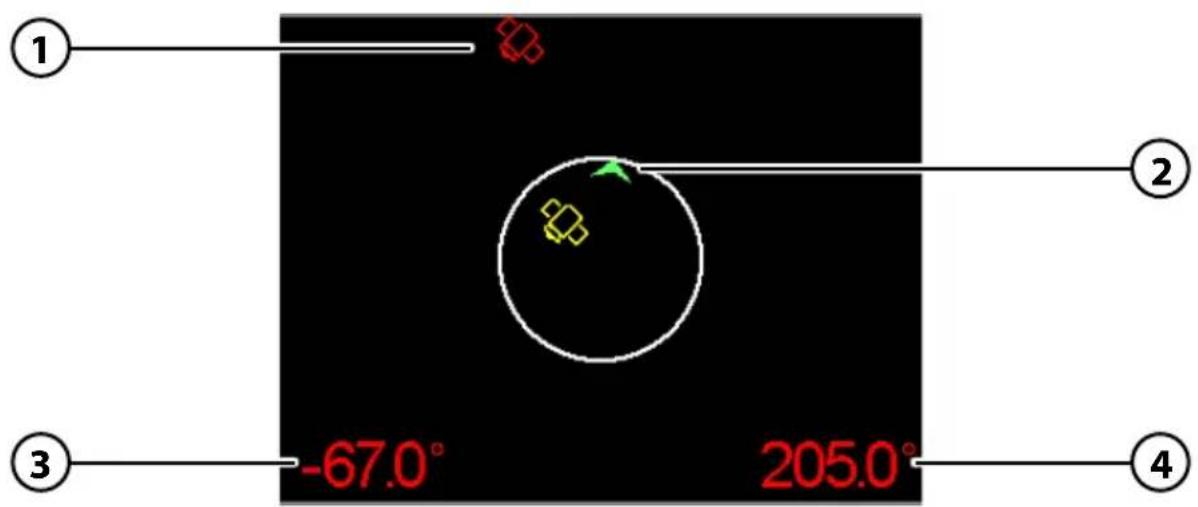
- Displays the position of the selected satellite.
- Displays the direction of the meter.
- Displays the vertical angle of the meter.
- Displays the horizontal angle of the meter.
How to measure
The measuring instrument is equipped with a motion sensor. As soon as you turn or tilt the meter, the values are displayed in real time.
- Place or hold the meter horizontally.
- Use the green arrow (2), which shows you the current direction in which the meter is pointing.
- Rotate the meter towards the satellite (1) until the green indicator points to the satellite. Now you have the rough direction in which the dish must point.
- Now tilt the meter until the angle of inclination has reached the specified number of degrees (the angle of inclination varies according to geographical location). Now you have to adjust the rough inclination as the dish.
4. DVB-S / S2 (Satellite search)
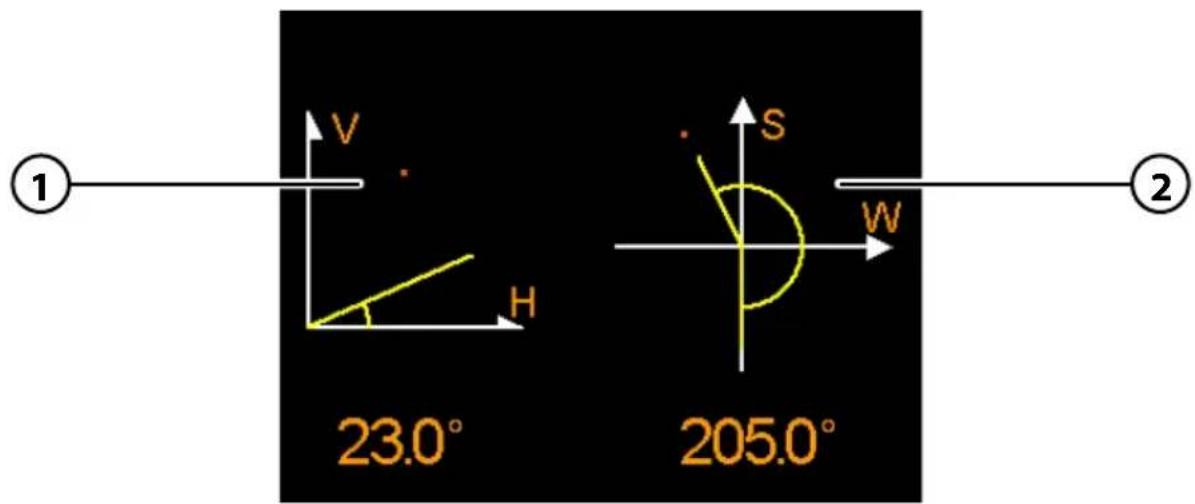
4.6.2 Compass-Mode
-
Displays the current tilt angle. Tilt the meter by the value of the predetermined angle adjust.
-
Rotate the meter to adjust the horizontal angle.
Example:
You are in Berlin and want to set the satellite „Astra 19,2° East“. The values you need to adjust the dish are:
- 29.2^ tilt angle (vertical)
• 19.2° east of south (horizontal)
Imagine the meter to the south. Turn it to the east direction (to the left). Pay attention to the degree (2) displayed by the meter. The angle must be 19.2^ .
Now tilt the measuring instrument until the angle of inclination (1) is at 29.2°. The position as you hold the meter now must be transferred to the mirror.
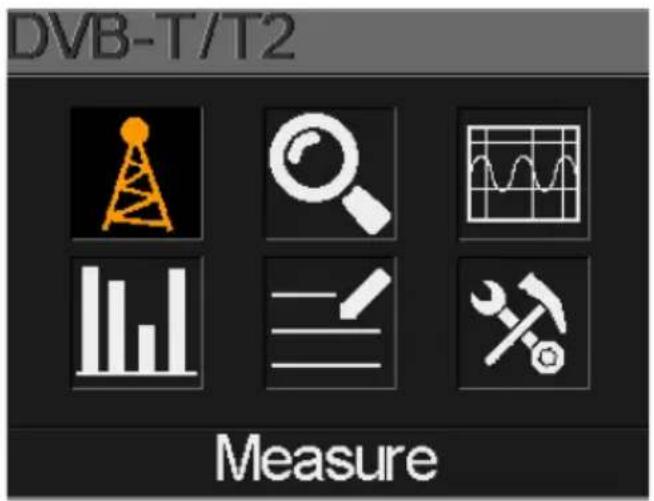
5. DVB-T / T2 (Terrestrial search)
- Measure
- Auto Scan
- Spectrum
- Scope
- RF Channel list
- Settings
5.1 Measure
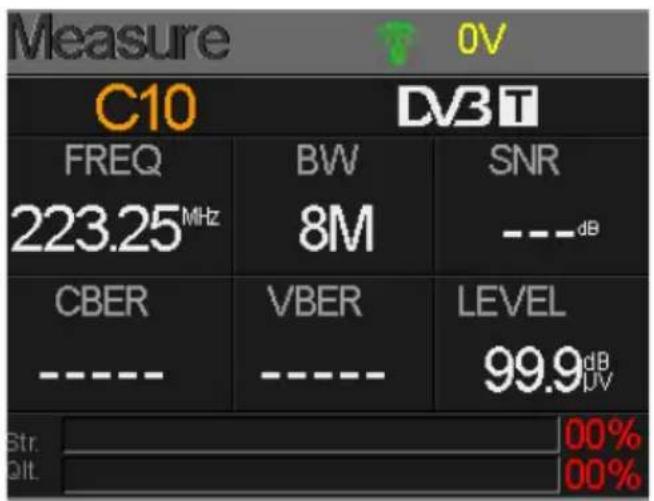
The meter shows the following values during the live signal:
- The lock status. The signal is locking if the icon is green or the color of the icon is red.
• C04-C68 Channel selection
• 0V Antenna voltage (0 V / 5 V / 12 V)
- DVB-T/T2 Measurement of DVB-T or DVB-T2. Use the ◀▶ keys to switch between the two variants.
- FREQ The current frequency. Press ◀▶ to change the frequency or press OK to edit it.
- BW The bandwidth of the live signal. Press ◀▶ to switch between 6M, 7M and 8M.
• SNR The signal noise rate value of the live signal.
• CBER The CBER (BER before FEC) value of the live signal.
• LBER The LBER (BER before FEC) value of the live signal.
• POWER The power level value of the live signal.
• Str The strength of the live signal in percent.
• Qlt The quality of the live signal in percent.
5. DVB-T / T2 (Terrestrial search)
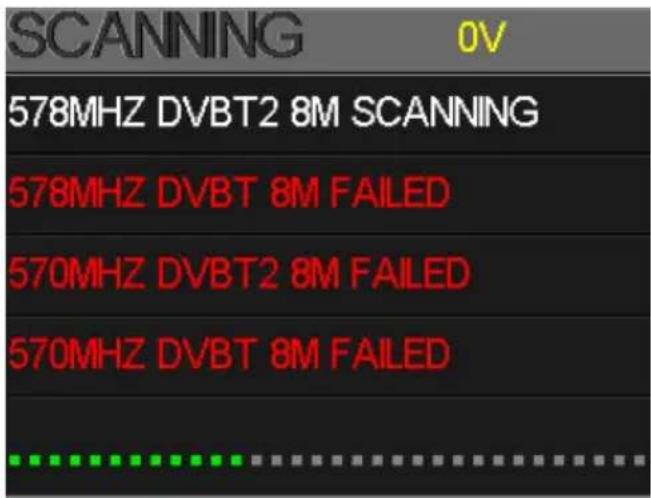
5.2 Auto Scan
Performs an automatic search of the various frequencies. If many frequencies are displayed in red, the signal may be too weak.
5.3 Spectrum
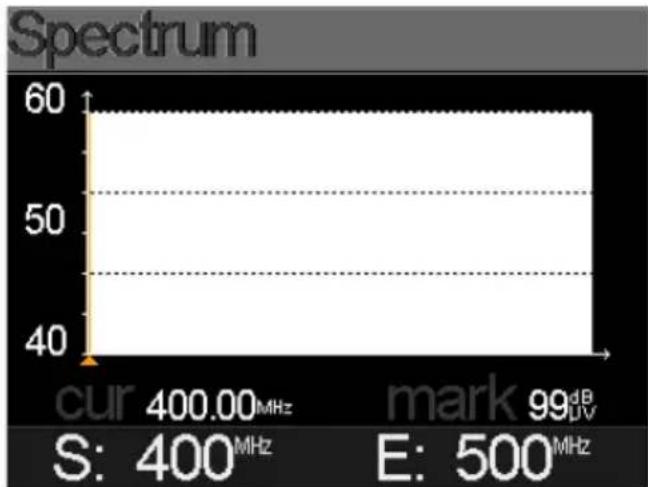
This menu shows the spectrum chart of the setting frequency range. Please see below screenshot.
line
| Metric | Value | | ------------ | --------- | | S | 400 MHz | | E | 500 MHz |- 40\~80\~100 The range of the level value. To change the range of the power level, press the F3 key.
• ▲ The curse of the current frequency. Press ◀▶ to change the value.
• cur The current selected frequency.
- mark The power level of the current frequency in the spectrum chart.
- S The start frequency of the spectrum chart.
• E The end frequency of the spectrum chat.
5. DVB-T / T2 (Terrestrial search)
5.4 Scope
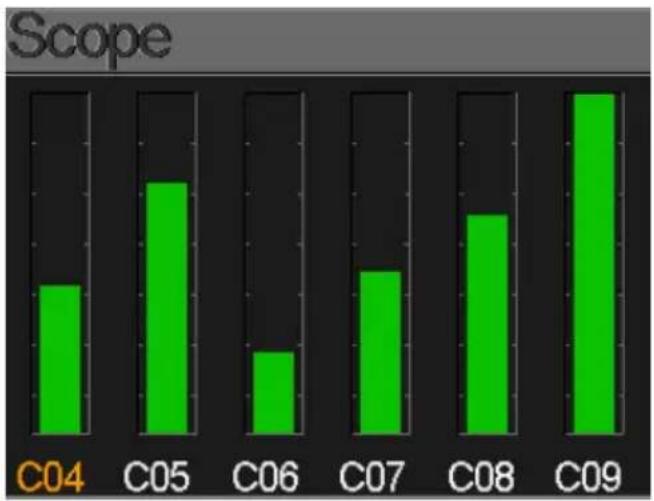
This screen show 6 channels level (dBμV) in one page, use ◀▶ to move focus on channel number and press OK to change channel number.
bar
Scope | Category | Value | |---|---| | C04 | 1.2 | | C05 | 2.3 | | C06 | 0.7 | | C07 | 1.5 | | C08 | 2.1 | | C09 | 2.8 |5.5 RF Channel list
In this list are found frequencies of the car search.
5. DVB-T / T2 (Terrestrial search)
5.6 Settings
In this menu item, you can make various settings.
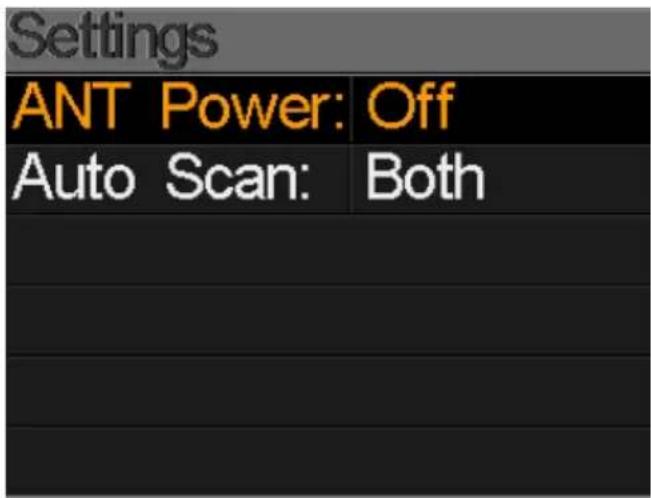
- ANT Power Depending on what you are using for a DVB-T antenna, you must set the power supply here. If you are using an active DVB-T antenna with its own power supply, select OFF. If you are using an antenna without your own power supply, select 5V or 12V depending on the antenna to be supplied with power.
- Auto Scan Select here which DVB-T signals should be included in the auto search. Choose between DVB-T, DVB-T2 or both.
6. DVB-C (Cable TV search)
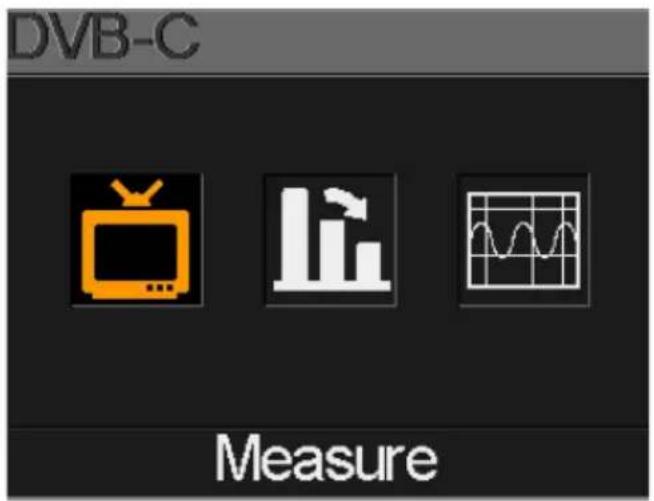
Use the ▲▼ buttons to select Cable TV and press OK to confirm. Then you can access more sub-menus:
- Cable TV measure
- Tilt
- Spectrum
6.1 Measure
The meter shows the following values during the live signal:
• The lock status. The signal is locking if the icon is green or the color of the icon is red.
• FREQ The current frequency.
Press
the frequency or press OK to edit it.

to cha
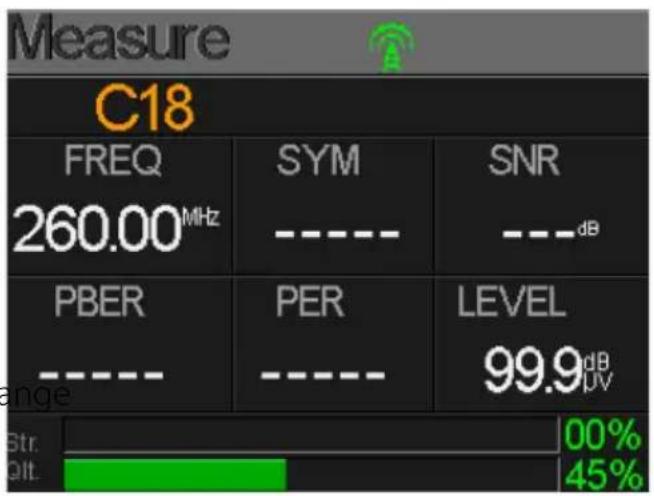
• SYM The symbol rate of the current signal.
The device will get it automatically once the signal is locking.
• SNR The signal noise rate value of the live signal.
• PBER The pre-bit error rate of the live signal.
• PER The packet error rate of the live signal.
• POWER The power level value of the live signal.
• Str The strength of the live signal in percent.
• QIt The quality of the live signal in percent.
6. DVB-C (Cable TV search)
6.2 Tilt
This screen show 3 channels level (dB V) in one page, use ◀▶ to move focus on channel number and press OK to change channel number.
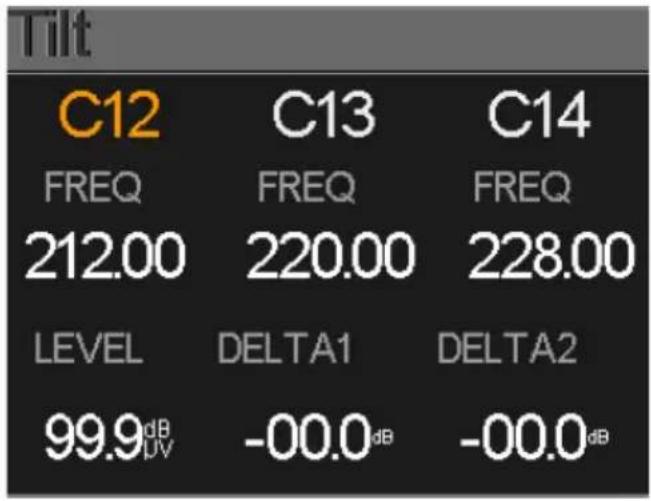
• C12, C13, C14 The channel number. Press ▲▼ to switch between them. Press ▲▼ to change the channel number and press OK to out the channel list to select.
• FREQ The frequency of each channel
• LEVEL The power level of the first channel
• DELTA 1 The delta of power level to the first channel
• DELTA 2 The delta of power level to the first channel
6.3 Spectrum
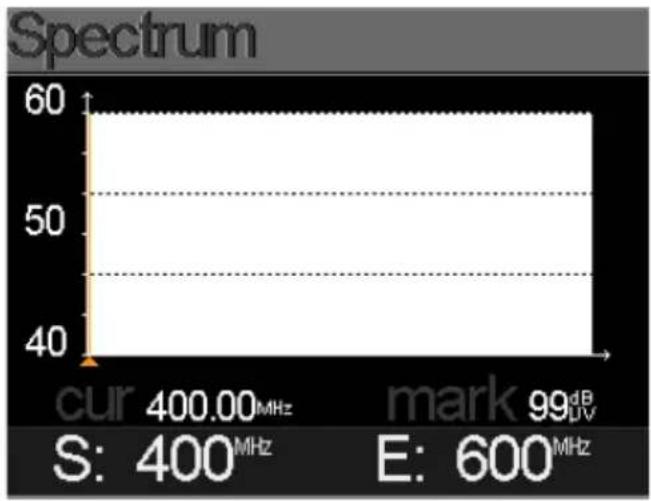
This menu shows the spectrum diagram of the frequency range.
The meaning of the displays, please refer to item 5.3 Spectrum Analysis on page 17.
To change the range of the power level, press the F3 key.
line
| Metric | Value | | ------------ | --------- | | S | 400 MHz | | E | 600 MHz | | mark | 99 dB UV |7. System Settings
| System Setting | |
| Beep: | On |
| Auto Standby: | 10min |
| Language: | Eng |
| Factory Reset: | |
| Hardware Ver: | 1.1 |
| Software Ver: | 4.1 |
• Sound signal Activate or deactivate the key tones.
• Auto Standby Set the auto standby time. Select between OFF, 10 min., 20 min. or 30 min.
• Language Set the language of the menu.
- Factory reset To set the device to the factory settings, click OK to confirm. NOTE: All data you have entered are hereby deleted!
- Hardware Ver. Displays the current hardware version of the device.
- Software Ver. Displays the current firmware version of the device.
8. Specifications
| General | ||
| Display 2,3" (6 cm) TFT LCD Color | Display | |
| Measurement DVB-S/-S2/-T/-T2 | /-C | |
| Analysator Constellation and Spectrum | ||
| Speaker integrated | ||
| Accu Li-Ion (7.4 V / 1400 mA/h) up to 3 hrs. use / 3 hrs. standby | ||
| USB port Mini USB (Update the satellite and station list / Firmware updates) | ||
| Menu languages german, english | ||
| Power supply AC 100 - 240 V / DC 12 V, 1 A | ||
| Dimensions (H/W/D) 177 x 80 x 34 mm | ||
| Weight 225 g | ||
| Satellit DVB-S DVB-S2 | ||
| Frequency range 950 - 2150 MHz | ||
| Demodulation QPSK | QPSK, 8QPSK, 16APSK, 32APSK | |
| Code Rate | 1/2, 2/3, 3/4, 5/6, 7/8 | 1/4, 1/3, 2/5, 1/2, 3/5, 2/3, 3/4, 5/6, 8/9, 9/10 |
| DiSEqC 1.0 / 1.1 / 1.2 / USALS | ||
| Unicable fit | yes | |
| LNB power | 13/18 V, max. 500 mA | |
| Input level min. 35 dBμV | ||
| Output level | max. 90 dBμV | |
| Impedance | 75Ω | |
| Azimuth / Elevation | Calculation of rotation and tilt angle of the antenna | |
| Listings | dBμV / CNR / BER / Signal strength and quality as a bar graph | |
| Terrestrial | DVB-T | DVB-T2 |
| Carrier | 2k, 4k, 8k | 1k, 2k, 4k, 8k, 8k+E, 16k, 16k+EXT, 32k, 32k+EXT |
| Guard interval | 1/4, 1/8, 1/16, 1/32 1/4, 19/256, 1/8 | 19/128, 1/16, 1/32, 1/128 |
| Code Rate | 1/2, 2/3, 3/4, 5/6, 7/8 | 1/2, 3/5, 2/3, 3/4, 4/5, 5/6 |
| Modulation | QPSK, 16-QAM, 64-QAM | QPSK, 16QAM, 64QAM, 256QAM |
| Bandwidth | 6, 7 and 8 MHz | 6, 7 and 8 MHz |
| Cable | DVB-C | |
| Frequency range 44 MHz ~ 870 MHz | ||
| Symbol rate | 1 MS/S ~ 7.9 MS/S | |
| QAM mode | 16 / 32 / 64 / 128 / 256 QAM | |
| Input RF level range | 30 dBμV ~ 100 dBμV | |
| Input RF level accuracy | +/- 2dB | |
| SNR | 20 dB ~ 40 dB, +/- 2 dB | |
| BER | 1.0E-3 ~ 1.0E-9 | |
| Impedance | 75Ω | |
Note:
Weight and dimensions are not absolutely exact values.
Technical details are subject to change at any time without notice.
Hereby the company Megasat Werke GmbH declares, that the device
is in compliance with the essential requirements and other relevant provisions in compliance with:
EC EMC directive 2014/30/EU with amendments EC LVD directive 2014/35/EU with amendments
The Declaration of Conformity for these products is located at the company: Megasat Werke GmbH, Industriestraße 4a, D-97618 Niederlauer
Notes

- DVB-S / S2 (Satellitensuche)
- DVB-T / T2 (Terrestrische Suche)
- Einstellungen
- Messung
- Descriptions and key assignment 04
- Home menu
- DVB-S / S2 (Satellite search)
- DVB-T / T2 (Terrestrial Search)
- DVB-C (Kabel TV Suche)
- Settings....22
- Specifications 23
- Reference
- General features
- Delivery
- Descriptions and key assignment
- Navigation
- Search
- Satellite
- LNB Settings
- USALS Settings
- DiSEqC 1.2 Settings
- Edit Satellite
- Spectrum
- Constellation
- Calculate Angles
- Alignment mode
- How to measure
- Compass-Mode
- Example:
- Measure
- Auto Scan
- Spectrum
- Scope
- RF Channel list
- Settings
- DVB-C (Cable TV search)
- Measure
- Tilt
- Spectrum
- System Settings
- Specifications
- Note:
- Notes
Brand : MEGASAT
Model : HD 3 Combo
Category : Measurement