
Satmeter HD 1 Camping - Measurement MEGASAT - Free user manual and instructions
Find the device manual for free Satmeter HD 1 Camping MEGASAT in PDF.


| Product Type | Satellite Signal Meter |
| Brand | Megasat |
| Model | Satmeter HD 1 Camping |
| Category | Measurement |
| Dimensions (approx.) | 150 x 80 x 30 mm |
| Weight (approx.) | 300 g |
| Power Supply | 4 x AA batteries or rechargeable |
| Display | LCD with signal strength and quality |
| Frequency Range | 950-2150 MHz |
| Input Level Range | -40 to -10 dBm |
| Main Functions | Satellite alignment, signal strength & quality measurement, spectrum display |
| Target Use | Camping and mobile satellite dish setup |
| Maintenance | Clean with a soft dry cloth; avoid moisture |
| Safety Warnings | Do not expose to extreme temperatures or direct sunlight for prolonged periods |
| Spare Parts | Battery compartment cover, carrying case |
| Reparability | Consumer replaceable batteries; professional repair for other issues |
| General Information | User manual available in multiple languages; 60-page PDF |
Frequently Asked Questions - Satmeter HD 1 Camping MEGASAT
User questions about Satmeter HD 1 Camping MEGASAT
0 question about this device. Answer the ones you know or ask your own.
Ask a new question about this device
Download the instructions for your Measurement in PDF format for free! Find your manual Satmeter HD 1 Camping - MEGASAT and take your electronic device back in hand. On this page are published all the documents necessary for the use of your device. Satmeter HD 1 Camping by MEGASAT.
USER MANUAL Satmeter HD 1 Camping MEGASAT
natural_image
Close-up of a metallic threaded connector with a blue 'RECEIVER' label (no other text or symbols visible)natural_image
Illustration of a satellite dish antenna inside a red circle (no text or symbols)
natural_image
Illustration of a satellite dish antenna against a solid orange circular background (no text or symbols)bar
Satellit bearbeiten | Category | Value | |---|---| | Name: Astra19E | 8 / 11 | | Position: 19.2 | E W | | LÖSCHEN OK | | The chart displays a single bar for 'Astra19E' at the top, with a blue bar for 'E' and a darker bar for 'W' at the bottom. No trend or comparison is present due to absence of data series.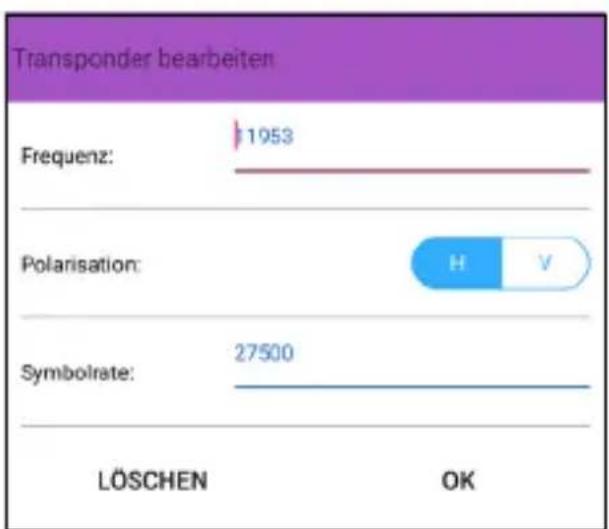
bar
Transponder bearbeiten | Category | Value | |---|---| | Frequenz: | 1953 | | Polarisation: | H V | | Symbolrate: | 27500 | | LÖSCHEN | OK | OKHinweis:
Spektrum Low-Band
Hinweis:
z. B. Megasat Monoblock LNB = Astra1 (Port 1) / Hotbird (Port 2)
natural_image
Hand holding a smartphone displaying a web interface with blue circular arrows indicating rotation (no text or symbols on the device)bar
| Category | Value | |---|---| | CNR: 14.30dB / PWR: 73.4dBUV | 84% | | CNR: 14.60dB / PWR: 63.3dBUV | 92% | | CNR: 14.30dB / PWR: 58.8dBUV | 78% | | CNR: 14.60dB / PWR: 62.8dBUV | 95% | | Astra19E (19.2°E) | 76% | | Hotbird 13E (13.0°E) | 92% | | Astra19E (19.2°E) | 78% | | Hotbird 13E (13.0°E) | 94% | | Astra19E (19.2°E) | 11953 H 27500 | | Hotbird 13E (13.0°E) | 12324 V 29700 | | Hotbird 13E (13.0°E) | 11494 H 22000 | | Hotbird 13E (13.0°E) | 11347 V 22000 | | Astra19E (19.2°E) | 12544 H 22000 | | Hotbird 13E (13.0°E) | 11934 V 29700 | | Astra19E (19.2°E) | 11566 H 22000 | | Hotbird 13E (13.0°E) | 10729 V 22000 |natural_image
Close-up of a red, glowing object with a bright circular spot, possibly a lens or aperture (no text or symbols visible)LED Taschenlampe
Version: 1.1 (August 2020)
1.1 Safety instructions....03
1.2 General features....03
1.3 Delivery....03
-
Description and key assignment....04
-
Instructions for measuring without a mobile device..07
-
Instructions for measuring with a mobile device
4.1 Download the App....08
4.2 Main menu....09
4.3 Satellit....11
4.4 Spectrum....12
4.5 Angel....14
4.6 Constellation....15
4.7 LNB settings....16
4.7.1 Unicable settings (EN 50494)....17
4.7.2 Unicable settings (EN 50607)....17
4.7.3 DiSEqC 1.0 settings....18
4.7.4 DiSEqC 1.1 settings....18
4.7.5 USALS settings....19
4.7.6 DiSEqC 1.2 settings....19
4.8 Alignment....20
4.9 Compass....21
4.10 Scope....22
4.11 Settings....23
5. Powerbank
5.1 Connections and designations....24
5.2 Operation of the power bank 25
- Specifications....26
- Troubleshooting ......27
- Informations......28
1.1 Safety instructions
- Never spill liquids of any kind on the device. Liquid increases the risk of electric shock and damage to the product.
- The device is not shockproof. Make sure that it can not fall down from great heights.
- Do not immerse the device in the water. Avoid moisture and store the product in a dry place.
- Turn off the device when not in use.
- Pay attention to the specified power supply. Use only the included power bank to power the device.
1.2 General features
- Easy measurement of DVB-S / S2 signals through an LED display with signal level and quality.
- Selection of up to 8 satellites and 8 transponders per satellite (freely editable).
- Power supply via set-top box or external USB device (eg power bank)
- 13 volts, 18 volts, 22 kHz switching as well as the found satellite are indicated by LEDs (found signal is also played acoustically).
- Integrated Bluetooth® module for connection to a smartphone / tablet.
- App for iOS and Android with additional features:
- spectrum and constellation diagram
- Angle calculation to align the mirror
- Satellite and transponder editing via the app
- Integrated compass function with motion sensor that automatically represents the current angle on the display. Turn and tilt the smartphone to determine the correct position.
• DiSEqC 1.0, 1.1, 1.2, USALS, Unicable (EN 50494 and EN 50607).
1.3 Delivery
- Satmeter HD 1 Camping
- Strap
- Micro USB cable
- 12 V car-USB adapter
• F-connection cable (20 cm)
- Powerbank
- User manual
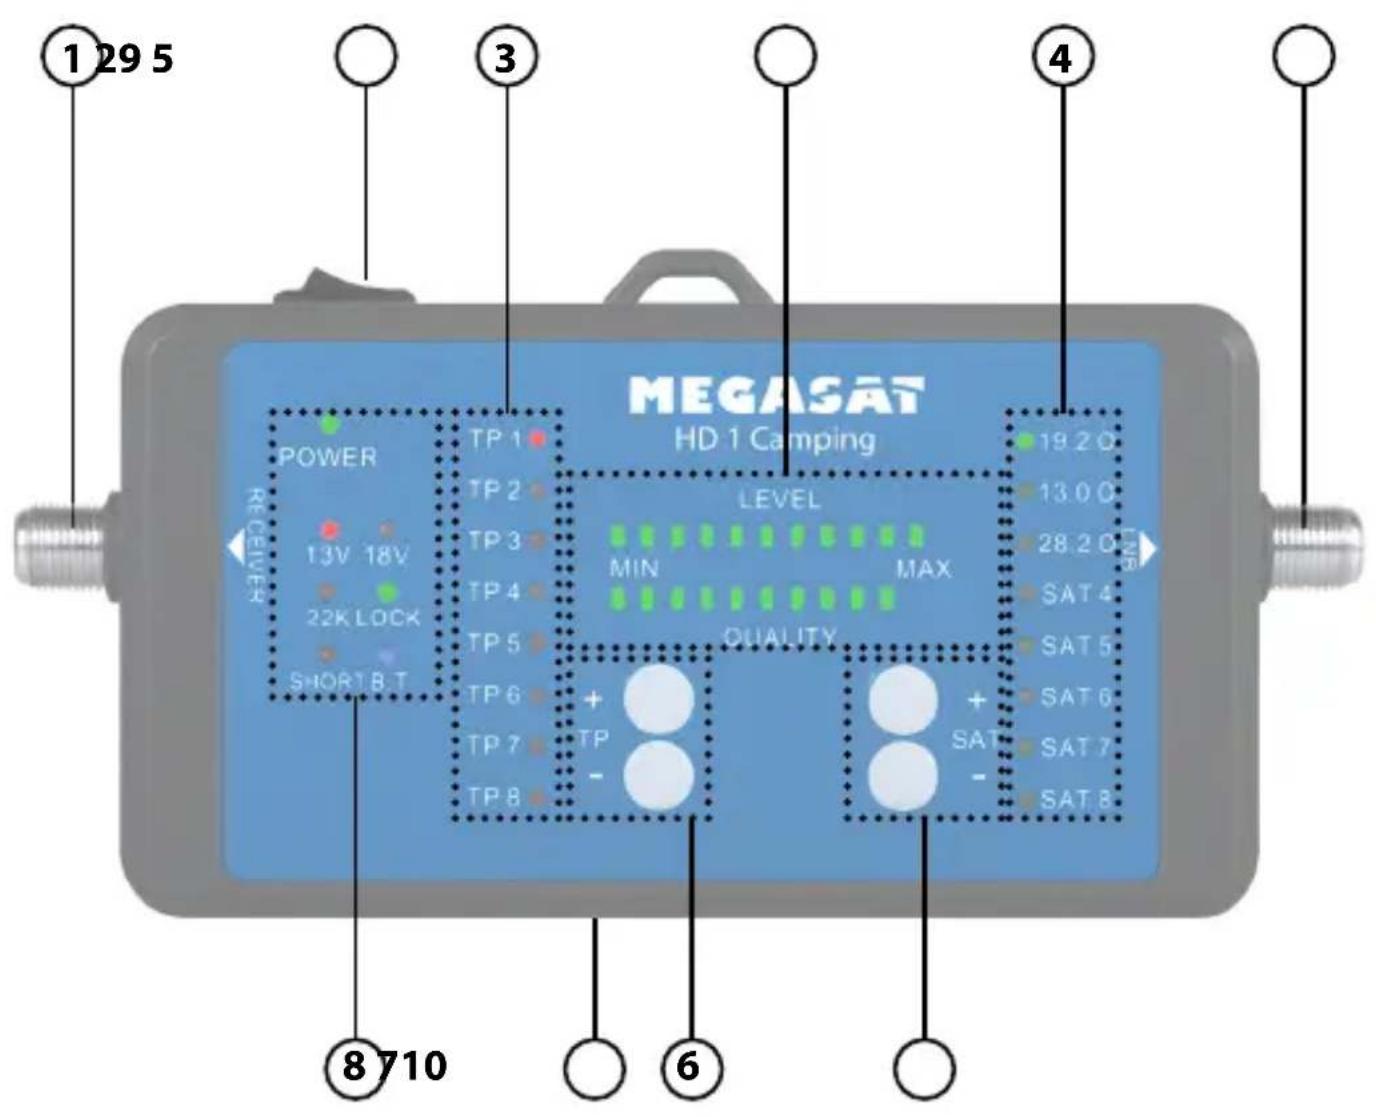
2. Description and key assignment
2. Description and key assignment
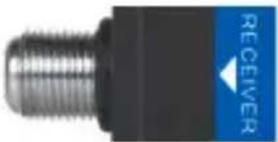
1. Receiver
natural_image
Close-up of a metallic threaded connector with a blue 'RECEIVER' label on the side (no other text or symbols visible)Connection to a set-top box (DC 12-20 V / max. 10 W) or an external power supply with DC 18 V, min. 1.2 A (optionally available).
2. LNB
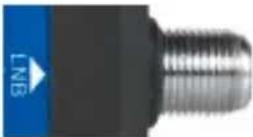
Connection to the LNB
3. Transponder
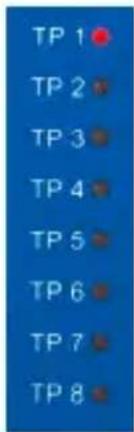
Shows the currently selected transponder of the satellite. There are 8 different pre-programmed transponders for each satellite. The selected transponder (1-8) is marked with a red LED. The preprogrammed Transponder can be viewed via the app and adjust as necessary.
4. Satelliten
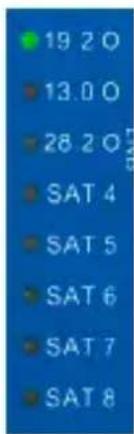
Shows the currently selected satellite. There are 8 pre-programmed satellites. The selected satellite (1-8) is marked with a green LED. The pre-programmed satellites can be viewed via the app and adjust as necessary. The first three of the most used satellites are labeled with the orbit position.
19,2° O (for Astra1)
13,0° O (for Hotbird)
28,2° O (for Astra 2)
5. Level / Qualität
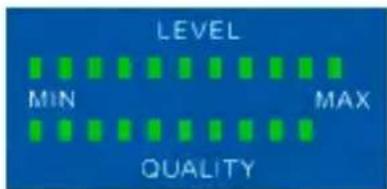
Displays the signal quality and strength in 12 steps. These are displayed with green LEDs.
2. Description and key assignment
6. TP (+/-)
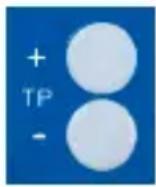
Press the TP +/- buttons to switch between the transponders of the currently selected satellite.
7. SAT (+/-)
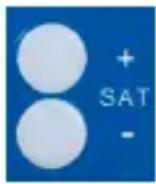
Press the SAT +/- buttons to switch between satellites.
Note:
Press the (TP -) and (SAT -) buttons simultaneously to turn the beep on or off.
8. Status indicators
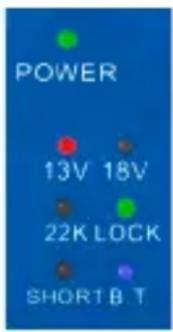
POWER Status display for the operation of the device. (green = device is switched on and ready for operation)
13V 13 volt supply voltage for the LNB (red = 13 V power supply from the device to the LNB)
18V 18 volt supply voltage for the LNB (red = 18 V power supply from the device to the LNB)
22K 22 KHz status indicator (red = Active 22 KHz switching to LNB „Highband“)
LOCK Status display satellite search (green = device has found the selected satellite)
SHORT Short circuit status display (red = suspected short circuit, please check connections, cables and connections)
B.T Bluetooth status display (blue = active Bluetooth connection to the device)
9. Power switch
Turns the unit on or off.
10. USB port
To connect an external power source such Powerbank (4.8 - 6.0 Volt / max 10 Watt)
Note: If the meter restarts after switching on again and again, the supply voltage is insufficient for the LNB. In this case, use the receiver or a power adapter for power.
3. Instructions for measuring without a mobile device
- Connect „LNB“ on the measuring device to the connection of the LNB of the satellite system.
- Connect „Receiver“ on the measuring device to the coaxial cable leading to your satellite set-top box and then switch it on. Alternatively, a suitable power supply or other external power source (such as power bank) can be used via the USB port.
- Turn on the meter at the power switch. All LEDs light up briefly and then display the currently set parameters. Note: If the meter restarts again and again, check the connection for a short circuit or the power consumption of the LNB is too high. If the power consumption is too high, connect the LNB after the meter has started to reduce the starting load. Alternatively, connect the meter to a receiver or power supply as the power source.
- Use the SAT +/- buttons to select the desired satellite (eg Astra1 19.2° East).
- If necessary, you can change the transponder. Usually you start with TP1.
- Adjust the elevation required for your area and turn the system slowly, step by step, until the „LOCK“ LED lights up. Now use the TP +/- button to check further transponders of the satellite, if they are also displayed with the indication „LOCK“ to exclude a reflection or a wrong satellite.
- When you have found the right satellite, you will do the fine tuning. Carefully move the dish left, right, up, down until you reach the highest value on the 12-digit LED display. Tighten the fixing screws of the dish evenly.
- If necessary, you can use the app on the mobile device to get more information and make settings.
- Turn off the device and power sources and remove the meter.
- Connect your coaxial cable to the LNB and turn on your set-top box again. The set satellite should now be received with your TV.
Note:
If you use satellite systems or LNBs with special reception types (eg Unicable, DiSEqC circuits, ...), first you must set this via the app. By default, the satellites „Astra 1“ with DiSEqC 1.0 port 1 and „Hotbird“ with port 2 are occupied.
4. Instructions for measuring with a mobile device
4.1 Download the App
To connect the HD 1 Camping with a smartphone or tablet, you need the app BT Satmeter. You can download it for free from the AppStore or GooglePlay Store.
natural_image
Illustration of a satellite dish antenna inside a red circle (no text or symbols)
natural_image
Illustration of a satellite dish antenna against an orange circular background (no text or symbols)- Please allow the app to use Bluetooth during operation so that the data can be transferred between the app and the mobile device.
- Allow the app to find your local location so that the app can calculate the azimuth angle and elevation of the antenna.
- Before you use the app, you have to turn on the HD 1 Camping meter. Only then can a Bluetooth connection be set up and data exchanged between the devices.
- The instructions for the operation of the app was created on the basis of the Android version. A slight deviation to the operation of the iOS app may be possible.
Important note:
If the mobile device enters standby mode, it may cause disconnections and errors. You may need to restart the app or the meter. It is usually sufficient to change a satellite or transponder to synchronize the devices again.
4. Instructions for measuring with a mobile device
4.2 Main menu
Quality: Shows the signal quality in percent.
Strength: Shows the signal Strength in percent.
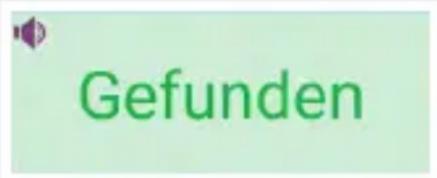
Lock: Indicates whether the selected satellite was found or not.
CNR: Shows the CNR value of the signal.
PWR: Shows the level of the signal in dBμV.
22K: Shows the current 22k status.
Universal 9750-10600: Shows the LNB type of the current satellite.
18V: Shows the current supply voltage. The values are 13V, 18V and off.
Astra 19 E: Shows the currently selected satellite. Swipe left or right to switch between satellites.
11953 H27500: Shows the currently selected transponder. Swipe left or right to switch between the transponders.
Satellit: Submenu to customize the satellites and transponders.
Spectrum: Opens the live spectrum for error analysis.
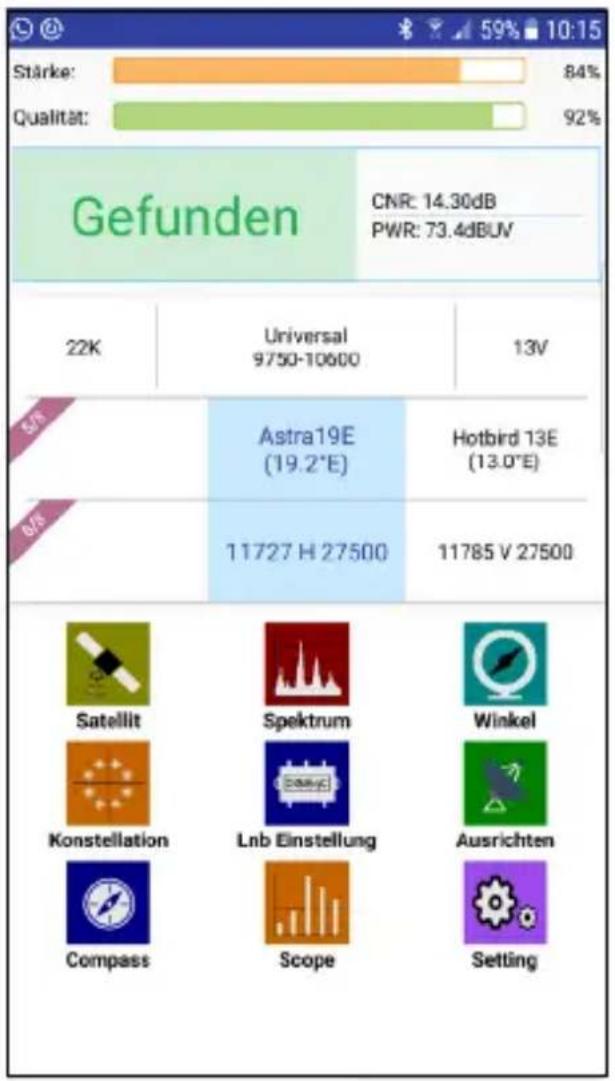
Angel: Calculation and display of azimuth and elevation of the antenna, according to your local position.
Constellation: Opens the live constellation diagram.
LNB setting: Submenu for editing the LNB parameters for satellite and antenna.
Alignment: View of azimuth / elevation of the antenna by turning the mobile device.
Compass: Opens the compass function for coarse alignment.
Scope: Simultaneously displays signal information from 4 transponders on one screen.
Setting: Submenu for further system settings.
4. Instructions for measuring with a mobile device
Turn on the meter and start the app. If Bluetooth is enabled on the mobile device, both devices connect automatically. On some mobile devices, you must first confirm the Bluetooth connection with the meter.
The further procedure can be found in the instructions on page 7.
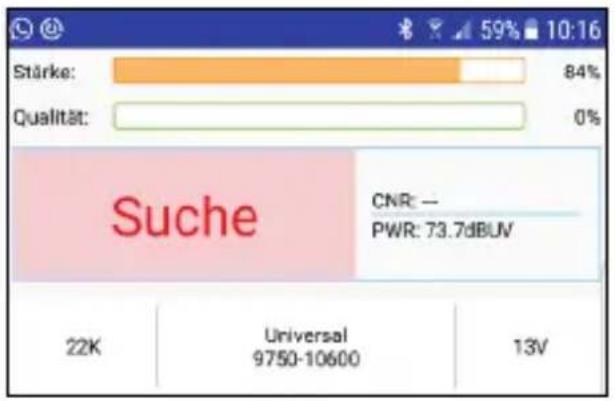
While aligning the antenna, the „Search“ indicator appears. The signal strength dictates how close you are to a satellite.
Once you are on the selected satellite, "Lock" is displayed and the signal quality indicator turns off.
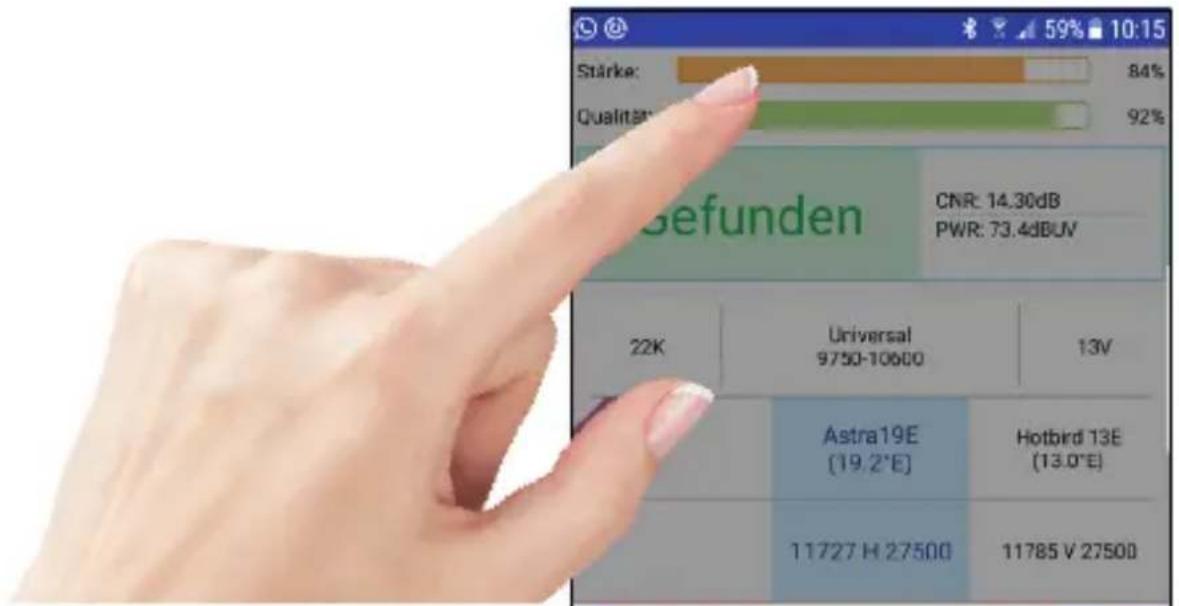
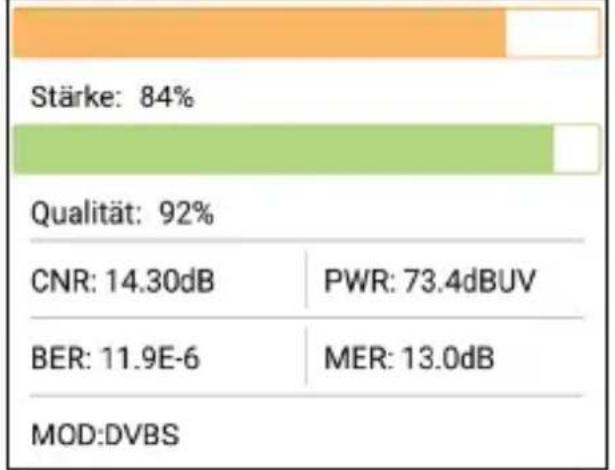
Touch the signal quality and strength field to enlarge it.
Furthermore, the values CNR, dBμV, BER and MER as well as the modulation type DVB-S or DVB-S2 are displayed.
bar
| Metric | Value | | :--- | :--- | | Stärke | 84% | | Qualität | 92% | | CNR | 14.30dB | | PWR | 73.4dBUV | | BER | 11.9E-6 | | MER | 13.0dB | | MOD:DVBS | |4. Instructions for measuring with a mobile device
4.3 Satellite
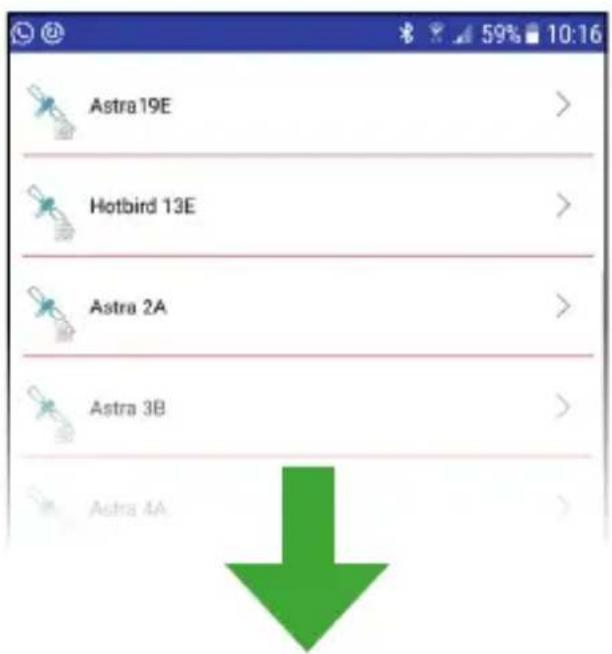
Press the icon in front of the satellite name to change the name and the number of degrees of the satellite.
Press on the satellite name to change the preset transponder.
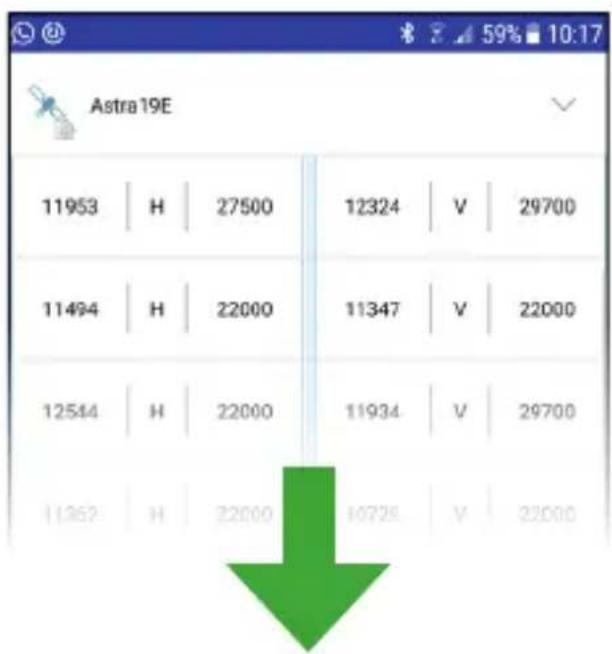
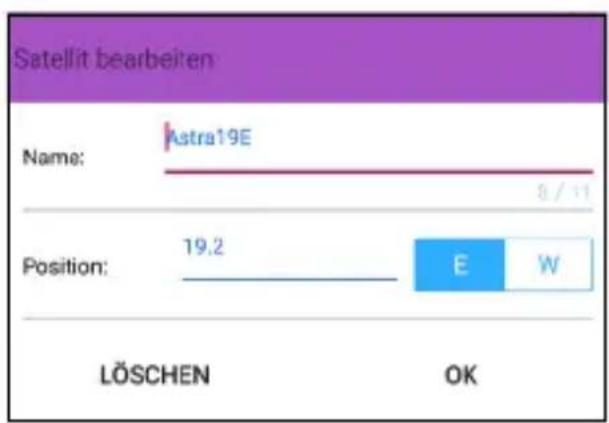
bar
Satellit bearbeiten | Name | Value | | :--- | :--- | | Astra19E | 8 / 11 | | Position: | 19.2 | | E | W | | LÖSCHEN | OK |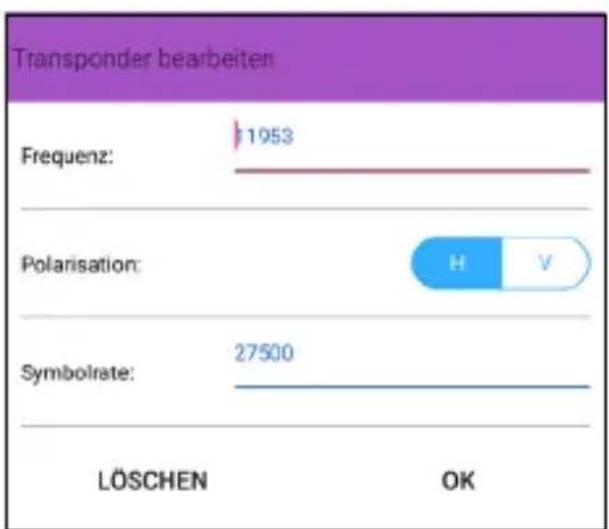
bar
Transponder bearbeiten | Category | Value | |---|---| | Frequenz: | 1953 | | Polarisation: | H V | | Symbolrate: | 27500 | | LÖSCHEN | OK | OKNote:
The modified data is automatically transferred and stored by pressing the back button on your mobile device. Note that the distance between the devices must not be too large. A Bluetooth transmission between two devices is usually only up to max. 10 meters possible.
4. Instructions for measuring with a mobile device
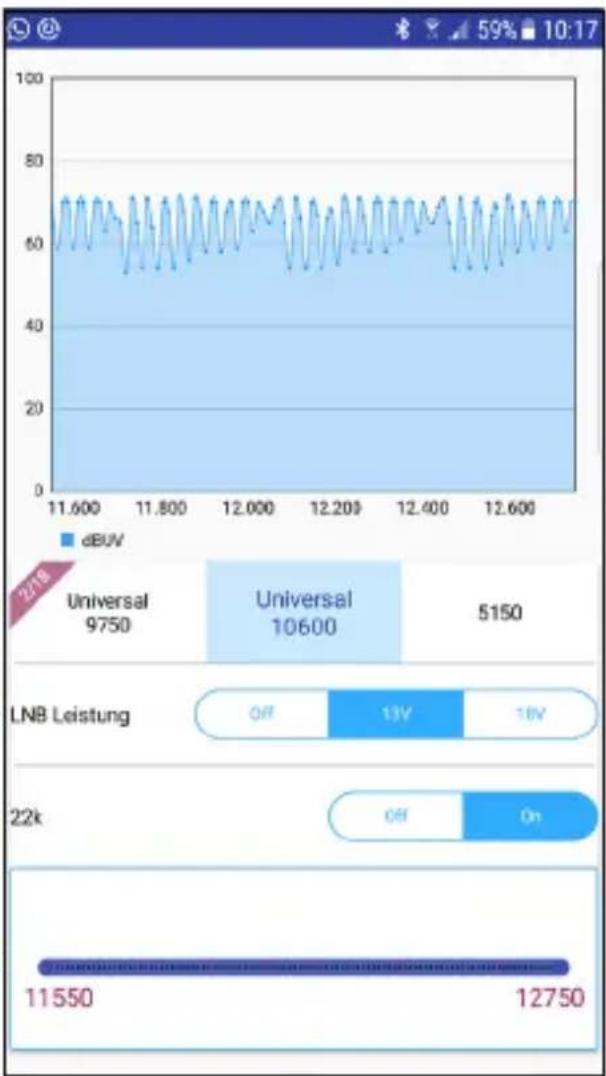
4.4 Spectrum
This submenu displays the spectrum of the current live signal on the mobile device.
Swipe left or right to change the LNB values.
You can set the LNB supply manually. The values are Off, 13V and 18V.
You can set the 22k status manually. The values are Off and On.
You can also set the beginning and the end of the frequency for the spectrum range. Press and hold and drag the slider until the desired frequency is limited.
line
| Metric | Value | | ------------------ | ----- | | Universal | 9750 | | Universal | 10600 | | Universal | 5150 | | LNB Leistung | OFF | | LNB Leistung | 13V | | LNB Leistung | 18V | | LNB Leistung | Off | | LNB Leistung | On | | Total | 11550 | | Total | 12750 |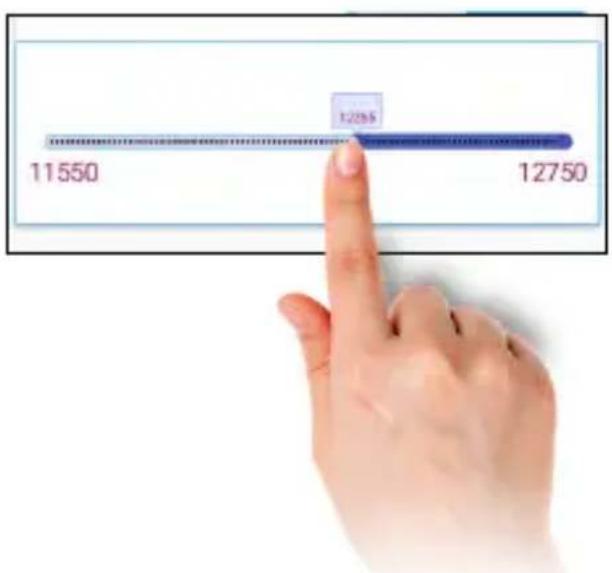
Note:
The LNB value „Universal 10600“ is for measuring the high band, „Universal 9750“ for the low band. The values of the LNB power and the 22K circuit are adjusted automatically when changing.
4. Instructions for measuring with a mobile device
Spectrum High-Band
To display the frequencies of the high band in the spectrum, select „Universal 10600“ in the selection box.
(Frequency range: 10.6 - 12.75 GHz)
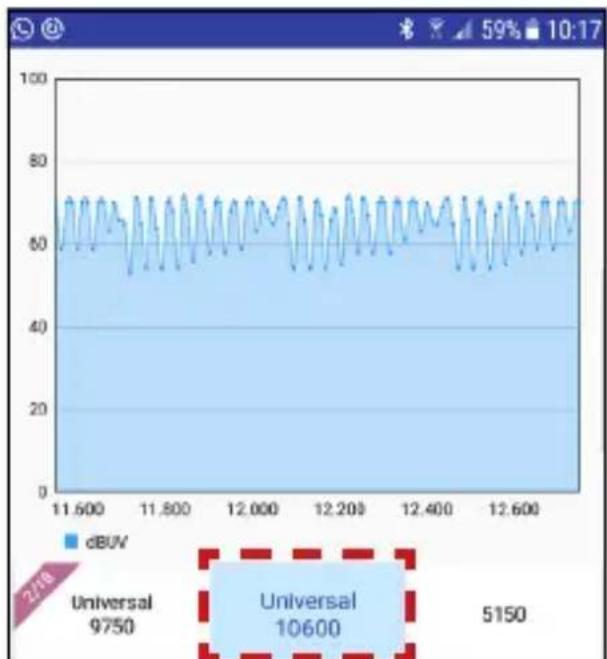
line
| Time | dBUV | | ------- | ---- | | 2/18 | 9750 | | Universal | 10600 | | 5150 | |Zoom Spectrum
You can magnify the spectrum display by zooming in on the display with the two-finger gesture.
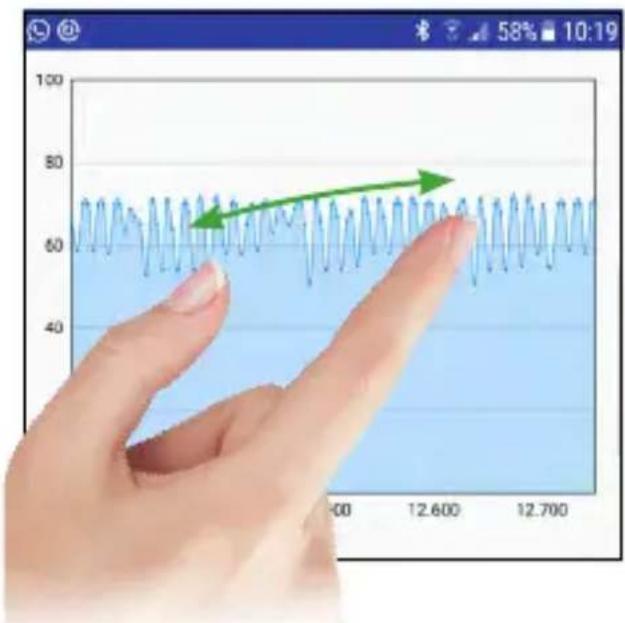
Spectrum Low-Band
To display the frequencies of the low band in the spectrum, select „Universal 9750“ in the selection box.
(Frequency range: 9.75 - 11.70 GHz)
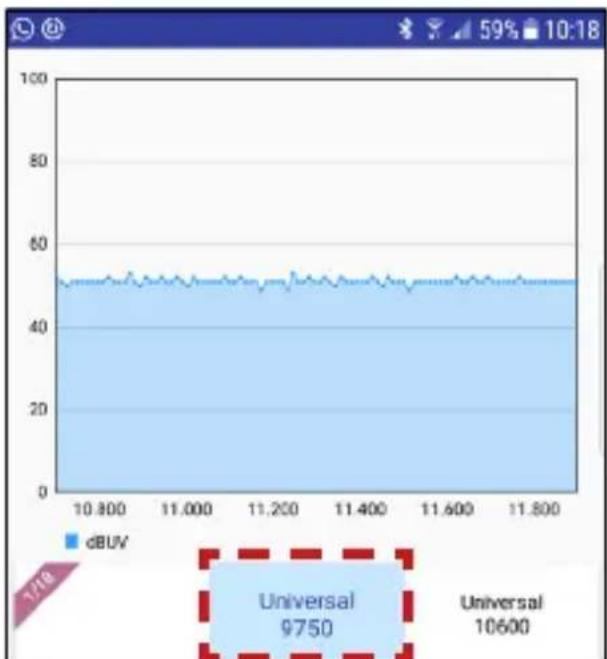
line
| Time | dBUV | | -------- | ---- | | 10.800 | 50 | | 11.000 | 50 | | 11.200 | 50 | | 11.400 | 50 | | 11.600 | 50 | | 11.800 | 50 |Analyze individual frequencies
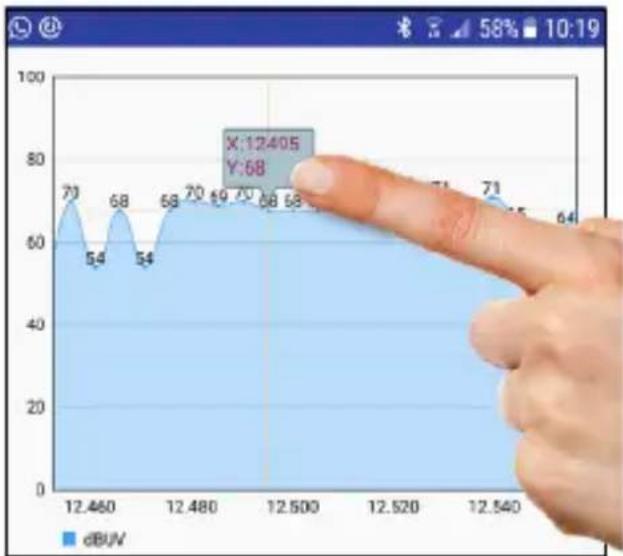
Tap and hold a finger on the spectrum to see a single frequency. Swipe left or right for other frequencies.
area
| X-axis Label | Y-axis Value | | :--- | :--- | | 12.460 | 70 | | 12.460 | 54 | | 12.480 | 68 | | 12.480 | 54 | | 12.500 | 68 | | 12.500 | 70 | | 12.500 | 69 | | 12.500 | 67 | | 12.500 | 68 | | 12.540 | 71 | | 12.540 | 71 | | 12.540 | 64 | X:12405 Y:684. Instructions for measuring with a mobile device
4.5 Angle
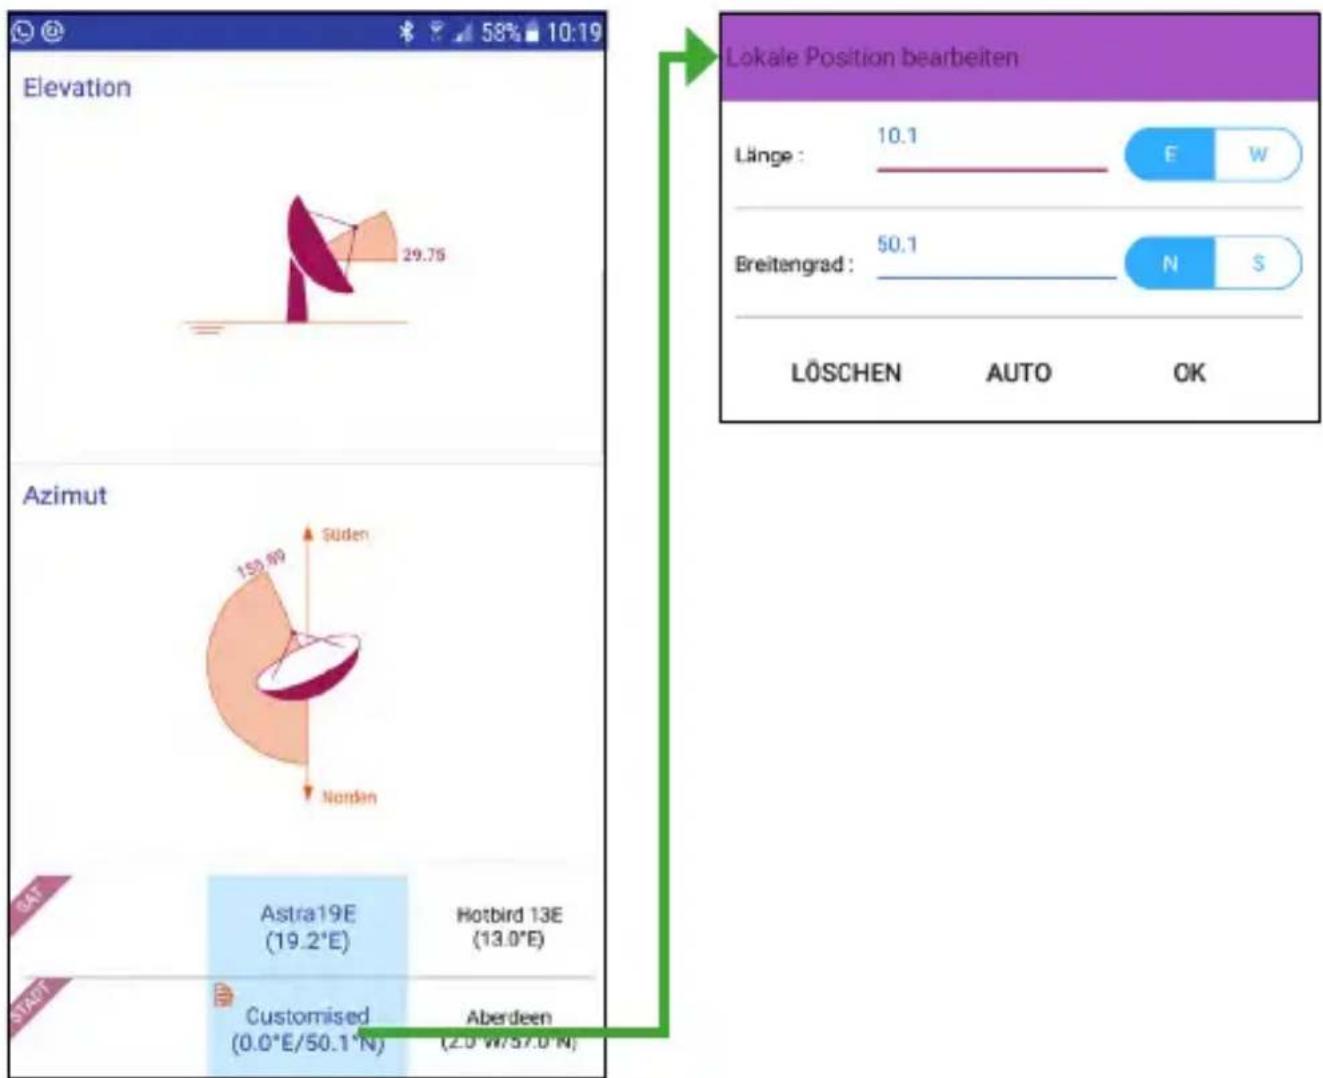
This submenu shows the correctazimuth and elevation of the antenna for the selected satellite.
Select a city near you to get the local longitude and latitude. These values are preset.
Select „Customize“ to enter the values manually.
Press AUTO to get the data automatically. This information is retrieved based on the local data of the mobile device.
4. Instructions for measuring with a mobile device
4.6 Constellation
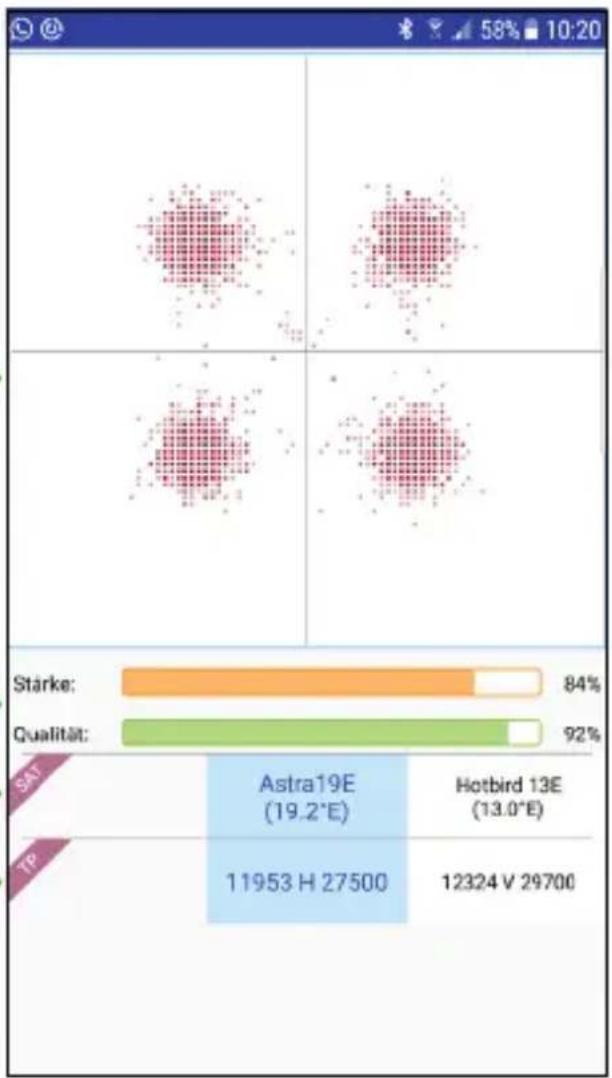
In this submenu, the constellation diagram is displayed as shown.
Shows the representation of the signal to a digital modulation scheme (such as QAM, QPSK or PSK.
Shows you the current signal quality or strength of the current satellite/transponder. Swipe left or right to switch satellites.
Swipe left or right to switch the transponder.

bar
| Company | Metric | Value | | :--- | :--- | :--- | | Astra19E | 84% | 19.2°E | | Hotbird 13E | 92% | 13.0°E | | TP | 11953 H | 27500 | | TP | 12324 V | 29700 |4. Instructions for measuring with a mobile device
4.7 LNB settings
In this submenu you can set the reference parameters for the LNB settings. Swipe left or right to toggle between the values of each item.
The default values are set to Universal LNBs and only need to be adjusted in special cases. In general, you only need to adjust your DiSEqC circuit.
SAT: Change the satellite
TP: Changes the respective transponder
LNB Typ: Depending on the LNB type, you must set the appropriate frequency here. In general, use „Universal 9750-10600“. If you want to calibrate the system with Unicable, read the description „Unicable settings“ on the next pages.
22K: Enable or disable the 22K circuit here.
LNB power: Select the desired LNB voltage (13V, Auto or Off).
Switch: Select "NONE" if the satellite system is operated without DiSEqC switch. If you
| SAT | Astra19E (19.2°E) | Hotbird 13E (13.0°E) |
| TP | 11953 H 27500 | 12324 V 29700 |
| LWB TYP | Universal 9750-10600 | 5150-5750 |
| 2K | Auto | |
| NB LASTUN | Auto | Off |
| SWITCH | None | DiSEqC1.0 |
| PORT | -- | -- |
| BAND | -- | -- |
| POSITION | FIXED | USALS |
want to calibrate the system with DiSEqC circuit or Unicable LNBs, read the description „DiSEqC“ or „Unicable“ on the following pages.
Port: If you use DiSEqC, you can set the appropriate port here.
Band: Here you can set the respective frequency band if you want to set up a Unicable system. Please read the description „Unicable Settings“ on the following pages.
Position: Select „FIXED“ if you want to set a fixed antenna. If you would like to measure the system with DiSEqC 1.2 or USALS, please read the respective description on the following pages.
4. Instructions for measuring with a mobile device
4.7.1 Unicable settings (EN 50494)
Under the „Switch“ option, select SCD if you are operating the system with a Unicable system or LNB (EN 50494).

Then, under the Band option, select the band you want to measure. If the correct frequencies are not listed, you can manually enter the frequency by tapping on the respective band.

Unicable (SCD) can be manage max. 8 frequency bands (set-top boxes). For measurements on special unicabledockets, an additional receiver in the Unicable network may be necessary.
4.7.2 Unicable settings (EN 50607)
Under the „Switch“ option, select SCD2 if you are operating the system with a Unicable system or LNB (EN 50607).

Then, under the Band option, select the band you want to measure. If the correct frequencies are not listed, you can manually enter the frequency by tapping on the respective band.

Unicable (SCD2) can be manage max. 32 frequency bands (set-top boxes). For measurements on special unicabledockets, an additional receiver in the Unicable network may be necessary.
4. Instructions for measuring with a mobile device
4.7.3 DiSEqC 1.0 settings
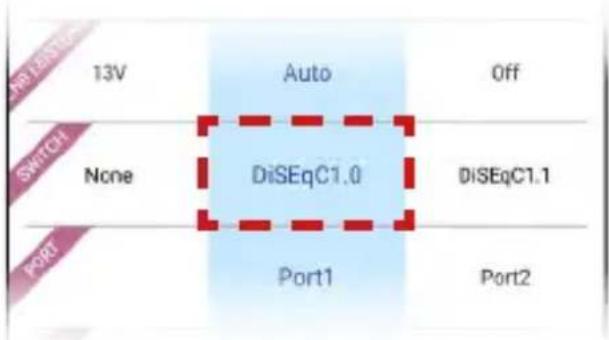
Under the „Switch“ menu item, select DiSEqC 1.0 if the system is operated with a DiSEqC switch.
With the DiSEqC 1.0 version max. 4 satellites can be managed.
Note:
For Monoblock LNBs, make sure to match the occupancy specified by the manufacturer and set this for both satellites.
z. B. Megasat Monoblock LNB = Astra1 (Port 1) / Hotbird (Port 2)
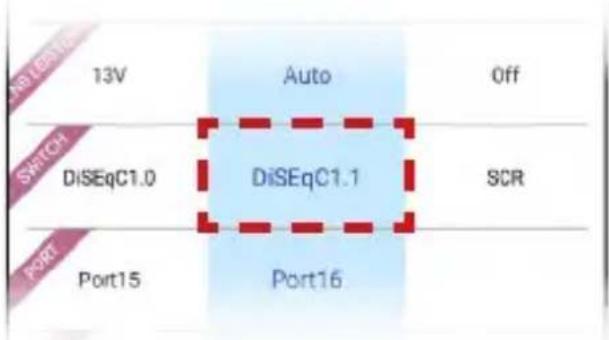
4.7.4 DiSEqC 1.1 settings
Under the „Switch“ menu item, select DiSEqC 1.1 if the system is operated with a DiSEqC switch.
With the DiSEqC 1.1 version max. 16 satellites can be managed.
4. Instructions for measuring with a mobile device
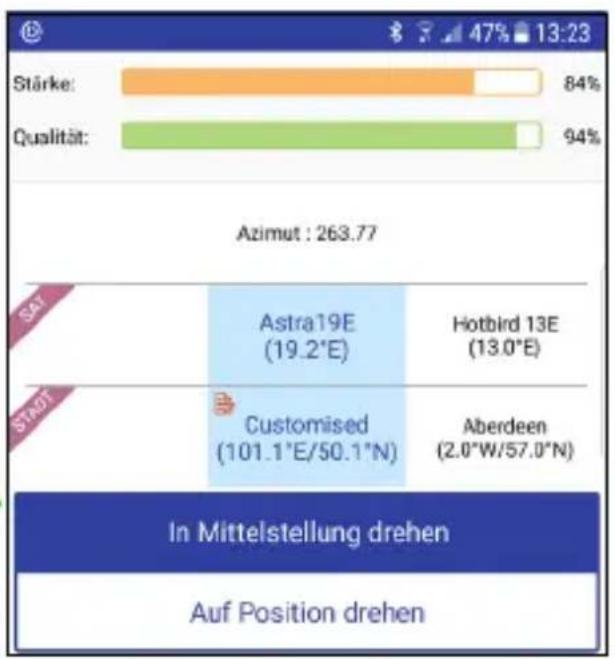
4.7.5 USALS settings
Select „USALS“ under the „Position“ option if you are operating the system with a USALS motor.
Please refer to the manual of the USALS motor for how to make the settings for it.
bar
| Category | Value (%) | |---|---| | Stärke: | 84 | | Qualität: | 94 | Azimut : 263.77 Astra19E (19.2°E) Hotbird 13E (13.0°E) Customised (101.1°E/50.1°N) Aberdeen (2.0°W/57.0°N) In Mittelstellung drehen Auf Position drehen4.7.6 DiSEqC 1.2 settings
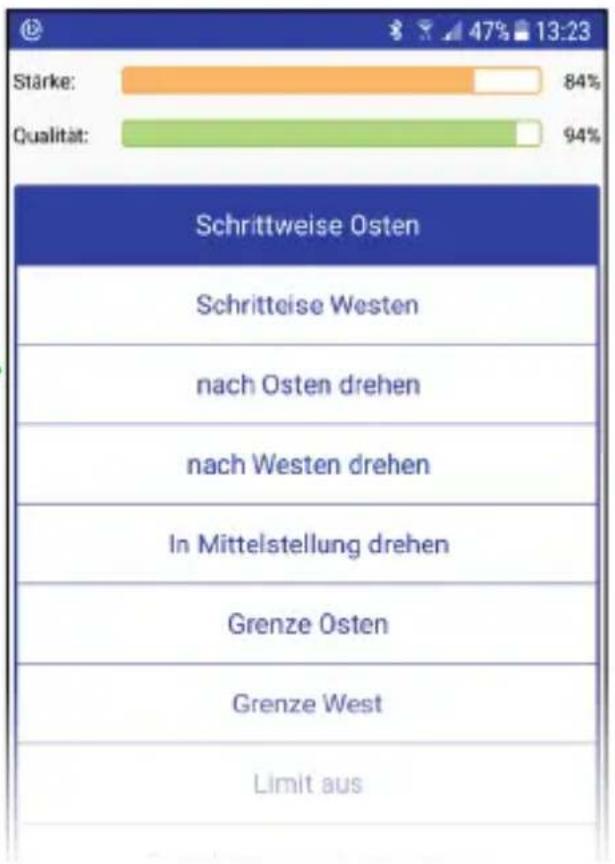
Under the „Position“ option, select DiSEqC 1.2 when operating the system with a DiSEqC 1.2 motor.
Please refer to the manual of the DiSEqC 1.2 motor for how to make the settings for it.
bar
| Category | Value (%) | |---|---| | Stärke: | 84 | | Qualität: | 94 |4. Instructions for measuring with a mobile device
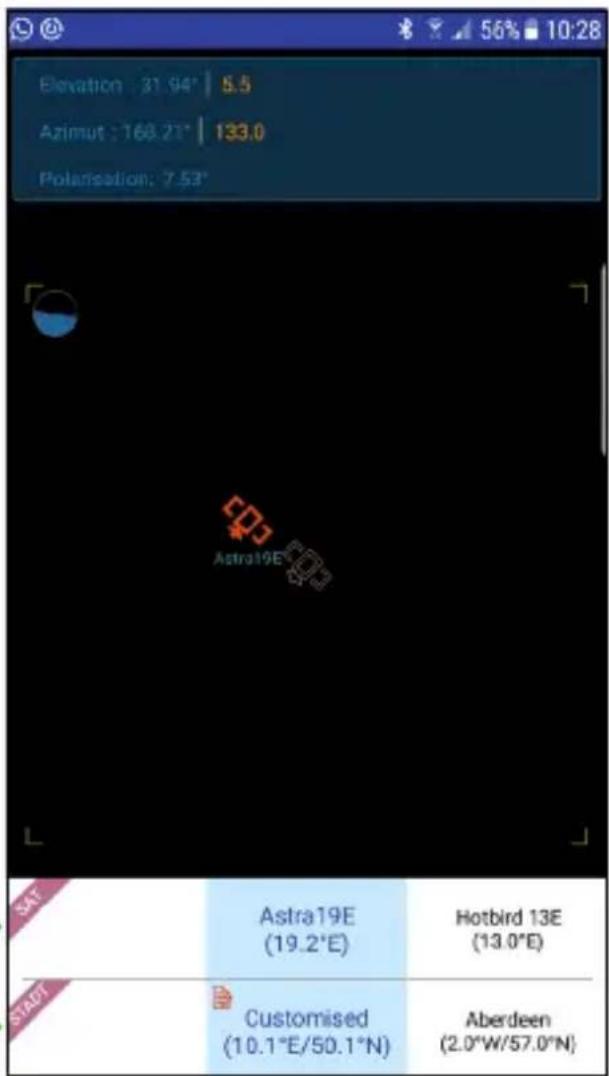
4.8 Alignment
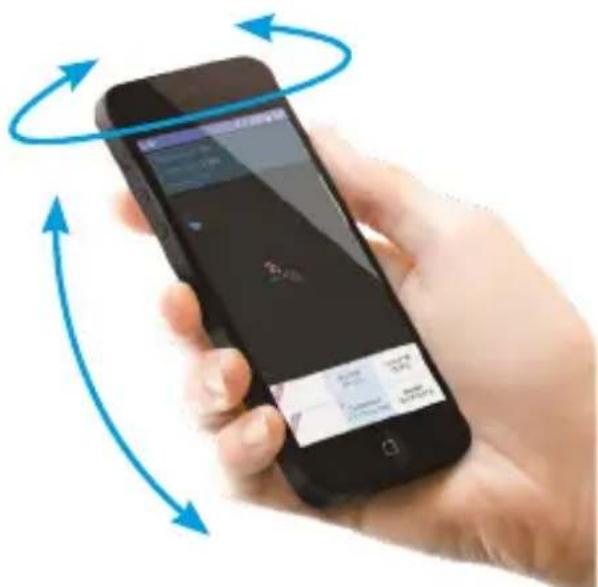
In this submenu you can turn the mobile device (eg smartphone) to find the right angle to the selected satellite.
- First select a satellite and your location (see bottom of the screen).
-
The satellite symbol in the middle shows the selected satellite, the second symbol with the satellite name shows the current position.
-
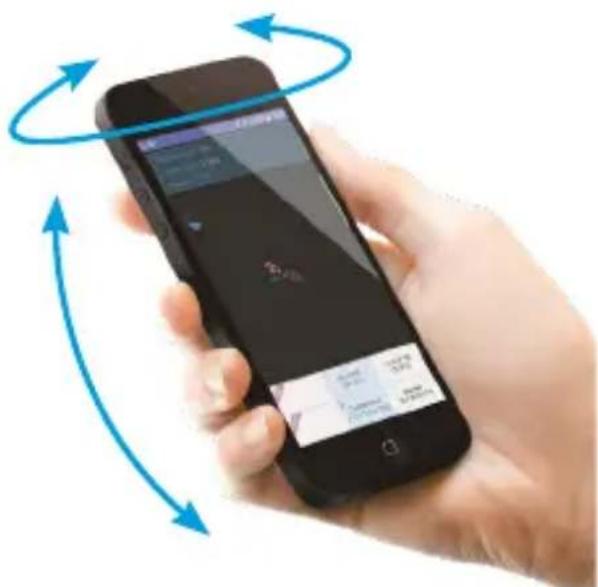
Turn and tilt the mobile device until the two satellite icons are on top of each other.
-
The now held direction and the angle of the mobile device shows you how to roughly align the antenna.
Swipe left or right to select another satellite.
Swipe left or right to select another city (alternatively you can enter the data manually).
Tip:
Hold the mobile device against the back of the dish and adjust it until both icons are aligned. You can then carry out a fine adjustment via the satellite search.
4. Instructions for measuring with a mobile device
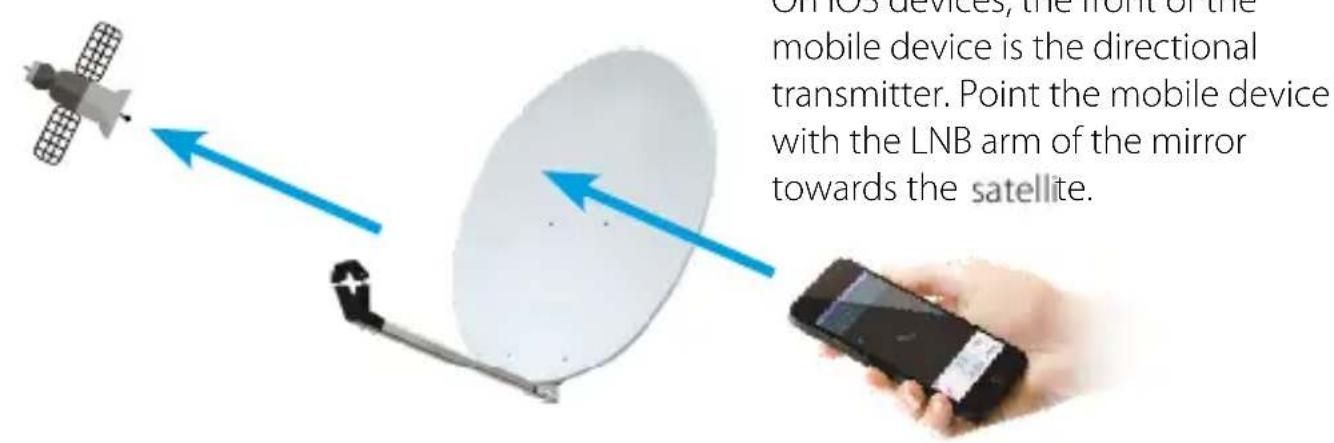
Alignment with iOS devices
Alignment with Android devices
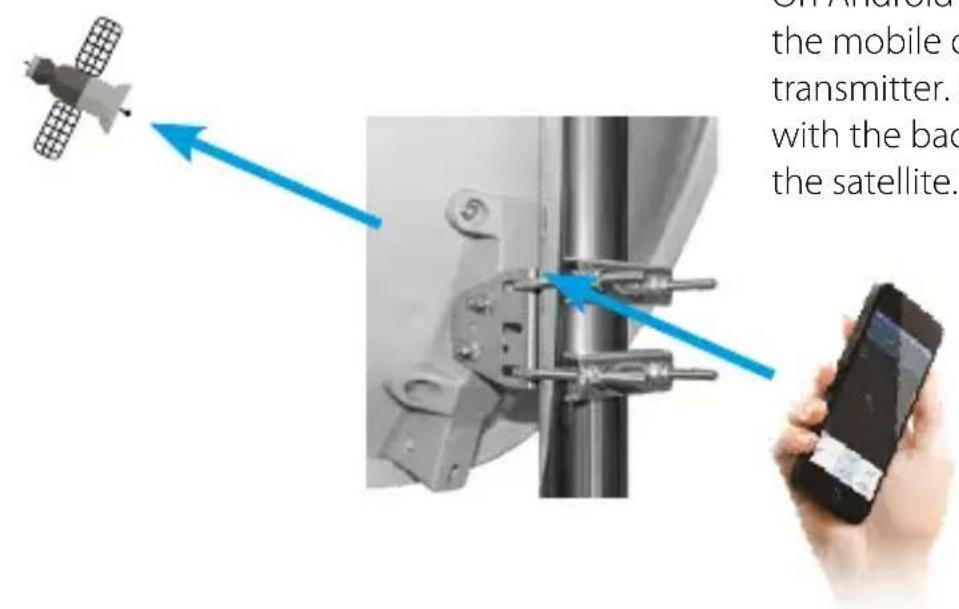
On Android devices, the back of the mobile device is the directional transmitter. Point the mobile device with the back of the mirror towards the satellite.
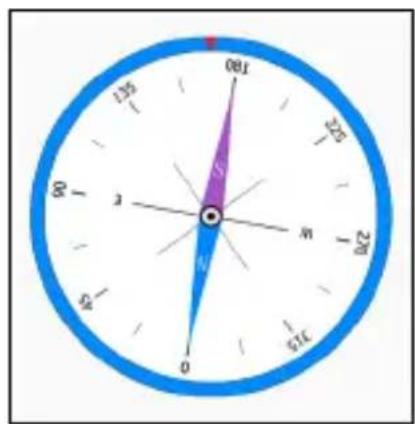
4.9 Compass
In this submenu you will find the compass. This function helps you to determine the cardinal directions.
The satellite antennas usually have to be aligned to the south. Thus, you can specify in advance the rough direction for mounting the dish.
4. Instructions for measuring with a mobile device
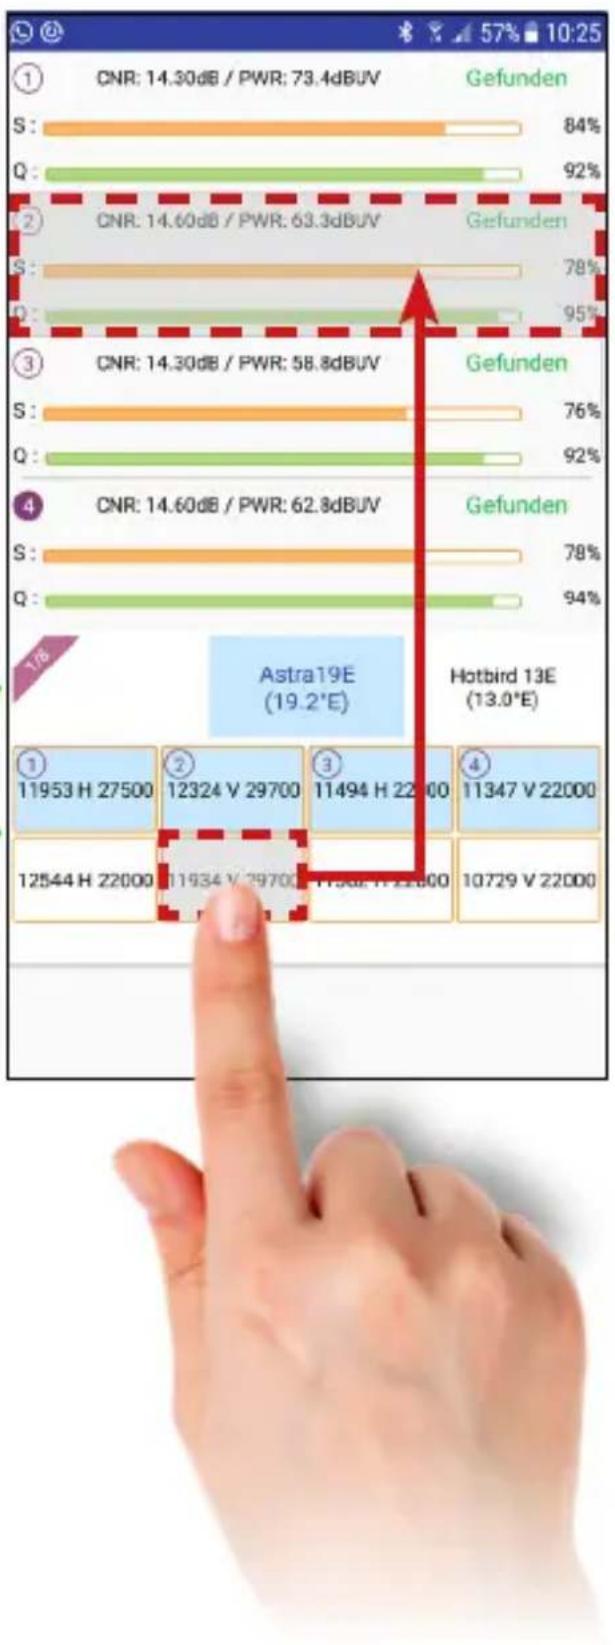
4.10 Scope
This feature shows you the live signal information for four transponders on a screen of the selected satellite.
Note:
The Scope function is very useful for determining the antenna assignment of Quattro LNB cables.
Swipe left or right to select another satellite.
Touch and hold a transponder and pull it to the correct position to change the transponder.
bar
| Code | CNR (dB) / PWR (%) | | :--- | :--- | | S | 84 | | Q | 92 | | S | 78 | | Q | 95 | | S | 76 | | Q | 92 | | S | 78 | | Q | 94 | Astra19E (19.2°E) Hotbird 13E (13.0°E) 11953 H 27500 12324 V 29700 11494 H 22000 11347 V 22000 12544 H 22000 11934 V 29700 11562 H 22000 10729 V 220004. Instructions for measuring with a mobile device
4.11 Settings
In this submenu you can make settings of the app.
Language
Adjust the language of the app. (German or English)
Beep
Activate or deactivate the beep of the app (eg acoustic beep when the satellite is found)
Note:
You can also enable or disable the beep on the home screen in the app. To do this, press the speaker symbol on the "Lock" field.
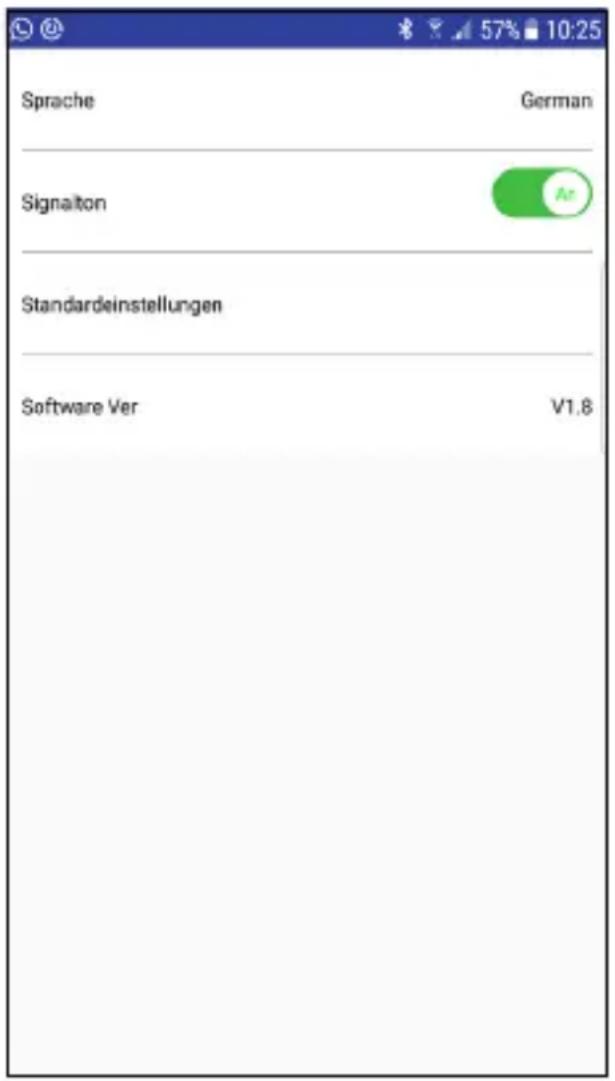
Default settings
Reset the app to the factory settings.
Important: All data you have made will be lost!
Software version
Shows the current software version of the app.
5. Powerbank
5.1 Connections and designations
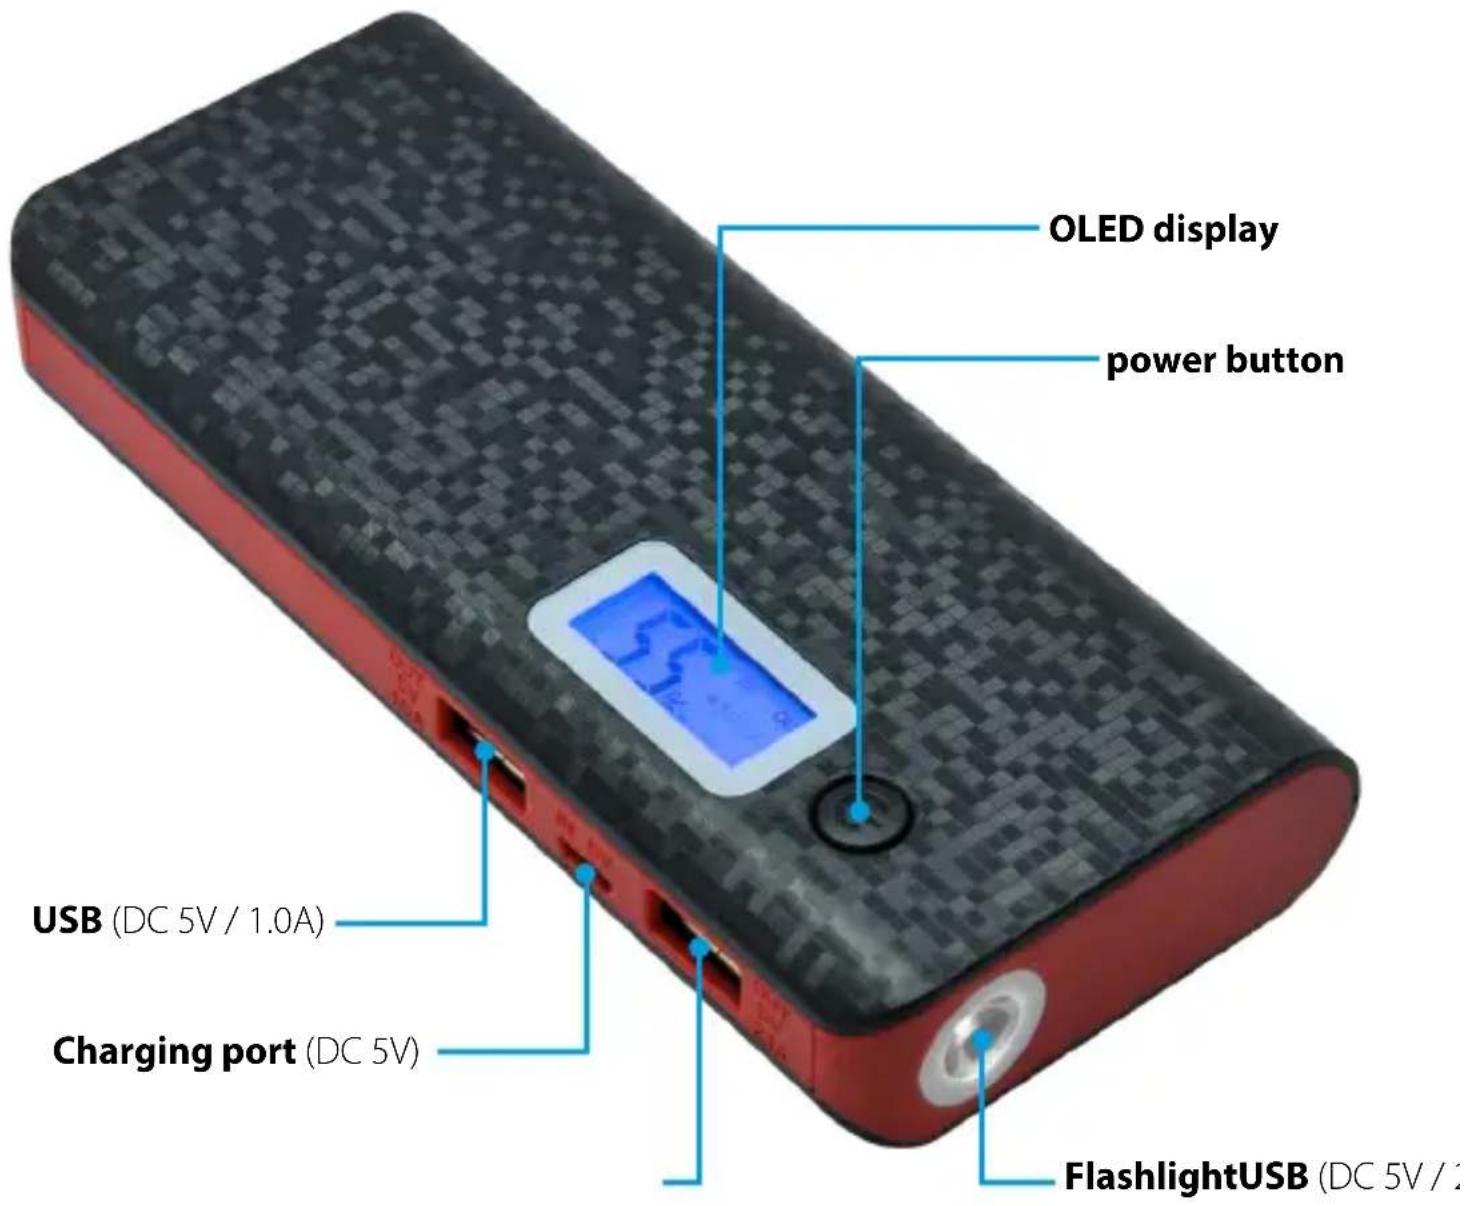
Note:
USB (DC 5V / 2.1 A) = For the power supply of the meter HD 1 Camping or other devices with higher power consumption.
USB (DC 5V / 1.0 A) = For charging other devices such as smartphone.
5. Powerbank
5.2 Operation of the powerbank
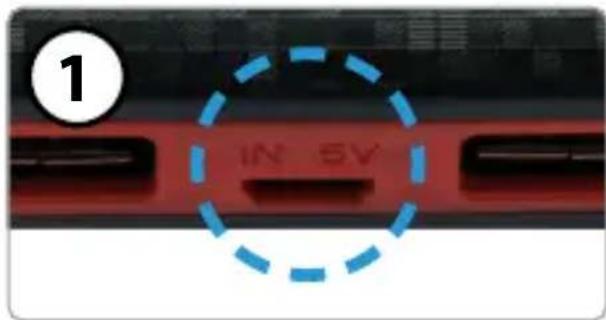
Charge the powerbank
Connect the included Micro-USB cable to the powerbank and a power source (eg notebook, USB power adapter, ...). The charging process takes about 3 hours.
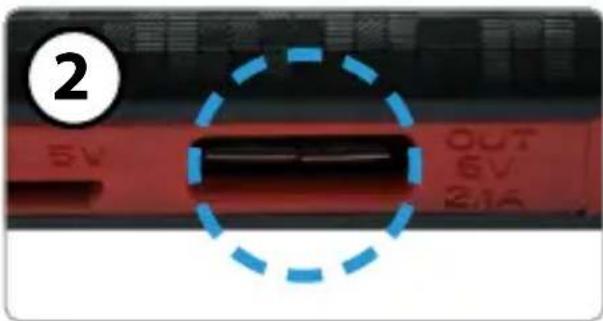
Connect to the HD 1 Camping
Connect the included Micro-USB cable to the Powerbank and the HD 1 Camping.
Note: Be sure to use the correct USB port (DC 5V / 2.1A).
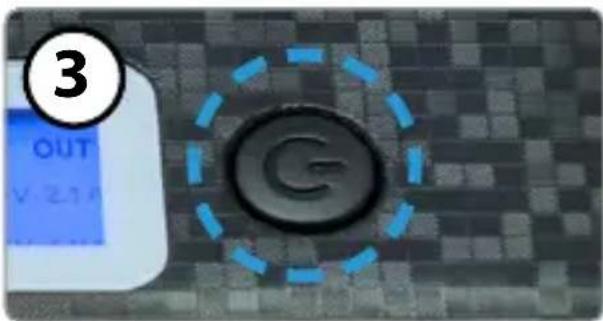
Turn on powerbank
Press and hold the power button until the blue LEDs above the solar panel light up. The power bank is now ready for use and can supply power to connected USB devices.
natural_image
Close-up of a red, circular object with a bright center and radiating lines, labeled with circled number 4 (no text or symbols on the object itself)LED flashlight
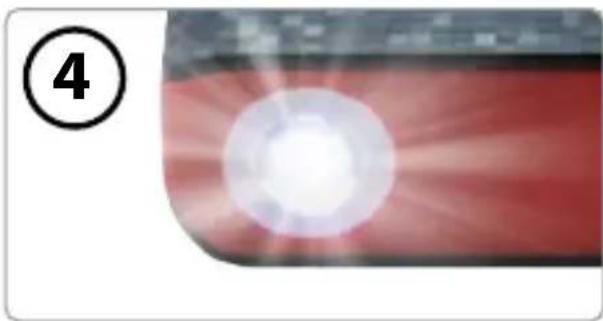
When switched on, press the power button twice in succession to switch on the LED. Press 1x briefly on the power button to turn off the LED again.
6. Specifications
| Hardware (HD 1 Camping) | |
| LED displays 13V, 18V, 22kHz, Lock | Bluetooth®, satellite selection, transponder selection, power, signal strength and quality |
| Mechanical selection buttons Signal strength / quality | |
| Pre-programmed satellites 8 | |
| Pre-programmed transponder 8 (per satellite) | |
| Integrated Bluetooth® module Version 4.0 | |
| Acoustic beep at found satellite | |
| Micro USB port for power supply (eg power bank) | |
| Power supply via set-top box, power bank or optional power supply (DC 18 V, min. 1.2 A) | |
| Mechanical power switch yes | |
| Dimensions 140 x 69 x 26 mm | |
| Weight 100 g | |
| Software (App for iOS and Android) | |
| DiSEqC 1.0, 1.1, 1.2, USALS yes | |
| Unicable support EN 50494 und EN 50607 | |
| Analyzers | Constellation diagram / Spectrum |
| Compass function | yes |
| Angle calculation | Rotation and tilt angle of the antenna |
| Displays | dBμV, CNR, BER, MER, signal strength and quality |
| Editing | Satellite and transponder list |
| Powerbank | |
| Battery | Lithium Polymer battery (10.000 mAh) |
| USB ports | 2x USB output (DC 5 V, 1.0 A and DC 5 V, 2.1 A) |
| Micro USB port 1x Micro USB input | (DC 5 V, 1.5 A) |
| Flashlight | LED |
| Display OLED display with capacity indicator | |
| Power button | yes |
| Dimensions 140 x 22 x 62 mm | |
| Weight 278 g | |
7. Troubleshooting
| Type Failure Solution | ||
| Angle calculation An incorrect angle is displayed. | Wrong custom location. Location sharing on „Auto" is not enabled. | |
| Bluetooth connection The Bluetooth connection is aborted. | Deactivate standby mode, update app, switch device off / on. | |
| LNB setting No reception possible. Check LNB setting according to the connected LNB (Unicable, DiSEqC circuit, ...) | ||
| Software version Different displays and functions. | Check the device software and the version of the app. If necessary, update both to always be up-to-date. | |
| User manual Different displays and functions. | Download the current user manual from our home-page. | |
| Powerbank Device starts constantly new. | Check the charge status of the battery. Only LNBs with a current consumption up to max. 200mAh can be powered by the power bank. If necessary, use the receiver or a power adapter for the power supply. | |
| LED flashlight does not work as described. | ||
| Meter Device starts constantly new. | Only connect the LNB after starting the meter to reduce the switch-on load. If necessary, use the receiver or a power adapter for the power supply. | |
8. Informations
Conformity information
Hereby, Megasat Werke GmbH declares that the following equipment is in compliance with the essential requirements and other relevant provisions of Directive 2014/30/EU and 2014/35/EU and Radio Equipment Directive 2014/53/EU:
Megasat Satmeter HD 1 Camping (incl. Powerbank) (Art.-No. 2600018)
The Declaration of Conformity for this product is located at the company: Megasat Werke GmbH, Industriestraße 4a, D-97618 Niederlauer
The declaration of conformity can be downloaded from our homepage: www.megasat.tv/downloads
Battery Regulation
Batteries do not belong in household waste. As a consumer, you are legally obliged to return used batteries and rechargeable batteries. You can return your old batteries and rechargeable batteries to the public collection points in your community or wherever batteries and rechargeable batteries of that type are sold. You can return free of charge your batteries in the shipment. If you want to make use of the last-mentioned option, please send your old batteries and rechargeable batteries to our address with sufficient franking.
These signs can be found on harmful batteries and rechargeable batteries:
Pb = battery / battery contains lead
Cd = battery / battery contains cadmium
Hg = battery / rechargeable battery contains mercury
Note:
Due to continuous development of our products, points described in this manual may differ. On our homepage www.megasat.tv you will always find the current version of the manual and software updates.
Version: 1.1 (August 2020)
Technical changes, misprints and errors reserved.

- Hinweis:
- Spektrum Low-Band
- LED Taschenlampe
- Powerbank
- Safety instructions
- General features
- Delivery
- Description and key assignment
- Receiver
- LNB
- Transponder
- Satelliten
- Level / Qualität
- TP (+/-)
- SAT (+/-)
- Note:
- Status indicators
- Power switch
- USB port
- Instructions for measuring without a mobile device
- Instructions for measuring with a mobile device
- Download the App
- Important note:
- Main menu
- Satellite
- Spectrum
- Spectrum High-Band
- Zoom Spectrum
- Spectrum Low-Band
- Analyze individual frequencies
- Angle
- Constellation
- LNB settings
- Unicable settings (EN 50494)
- Unicable settings (EN 50607)
- DiSEqC 1.0 settings
- DiSEqC 1.1 settings
- USALS settings
- DiSEqC 1.2 settings
- Alignment
- Tip:
- Compass
- Scope
- Settings
- Language
- Beep
- Default settings
- Software version
- Connections and designations
- Operation of the powerbank
- Charge the powerbank
- Connect to the HD 1 Camping
- Turn on powerbank
- LED flashlight
- Specifications
- Troubleshooting
- Informations
- Conformity information
- Megasat Satmeter HD 1 Camping (incl. Powerbank) (Art.-No. 2600018)
- Battery Regulation
Brand : MEGASAT
Model : Satmeter HD 1 Camping
Category : Measurement