
ST. LOUIS MP56 - Car stereo BLAUPUNKT - Free user manual and instructions
Find the device manual for free ST. LOUIS MP56 BLAUPUNKT in PDF.

| Brand | Blaupunkt |
| Model | ST. LOUIS MP56 |
| Product type | Car radio |
| Weight | Approx. 1.5 kg |
| Power supply | 10.5 - 14.4 V |
| Current consumption | 10 A max during operation |
| Amplifier output power | 4 x 25 W RMS at 4 Ω (1% THD) |
| Preamp output | 4 channels, 3 V |
| Tuner frequency range | FM: 87.5-108 MHz (Europe), AM: 531-1602 kHz |
| CD player frequency response | 20 - 20,000 Hz |
| Supported audio formats | CD audio, CD-R/RW (MP3/WMA), MMC/SD, USB |
| Display | LCD with spectrum analyzer and screensaver |
| Equalizer | Digital 6-band parametric (DEQ) |
| Special features | RDS, XBass, Subout, Random play, Repeat |
| Safety | Removable faceplate, Class 1 laser |
| Cleaning | Dry or slightly damp cloth, no solvent |
| Included accessories | RC 12H remote control, faceplate case, cables |
| Warranty | According to local distributor conditions |
Frequently Asked Questions - ST. LOUIS MP56 BLAUPUNKT
User questions about ST. LOUIS MP56 BLAUPUNKT
0 question about this device. Answer the ones you know or ask your own.
Ask a new question about this device
Download the instructions for your Car stereo in PDF format for free! Find your manual ST. LOUIS MP56 - BLAUPUNKT and take your electronic device back in hand. On this page are published all the documents necessary for the use of your device. ST. LOUIS MP56 by BLAUPUNKT.
USER MANUAL ST. LOUIS MP56 BLAUPUNKT
About these instructions. 6
For your safety. 6
Scope of delivery. 7
Warranty 7
Device overview. 8
Controls. 8
Placing the device in operation.....10
Detaching/attaching the control panel 10
Switching the device on/off. 10
Replacing the battery of the handheld remote control. 12
Inserting a CD. 12
Inserting an MMC/SD card 12
Connecting the USB medium.13
Adjusting the volume. 13
Muting the device 14
Operation with telephone. 14
Selecting an audio source 14
The tuner display. 16
The audio CD display 16
The CD changer display 17
The MP3 display. 17
Overview of the operation.18
Overview of the buttons. 18
Overview of the functions
MIX and RPT 19
Switching random track play on/off (MIX) 19
Switching Repeat title on/off (REPEAT) 20
Scanning titles (SCAN) 20
Buttons for menu operation 20
Example of a menu operation. 21
Calling up a menu. 21
Selecting a menu item in the settings menu. 21
Changing and saving a setting....22
Exiting a menu item. 22
Operating the tuner. 23
Searching for stations. 23
Manually searching for stations....23
Automatically searching for stations 24
Storing stations 24
Listening to stored stations 25
Scanning all receivable stations (SCAN) 25
Set the device to the region Europe, USA or Thailand 26
Changing the tuner settings ("TUNER" MENU) 27
Allowing alternative frequencies (RDS) 28
Searching FM stations automatically and storing them in the FMT memory bank (T-STORE) 28
Changing the seek tuning sensitivity (SENS) 28
Activating/deactivating improved reception (HIGH CUT) 29
Restricting station seek tuning to certain programme contents (PROG TYP) 29
Toggle between mono and stereo operation (MONO) 29
Operating the integrated
CD player. 30
What features do MP3 or WMA CDs have to have? 30
Functions of the integrated CD player if an audio CD is inserted..31
Switching the CD text display on/off (TEXT) 32
Switching the scrolling text for CD text on/off (SCROLL) 32
Operating the MP3/WMA player....33
Switching scrolling text on/off (SCROLL) 34
Selecting the title information to be displayed (INFO) 34
Selecting a title from a list (Browser mode/playlist) 35
Operating the optional
CD changer. 37
Selecting a CD from the CD magazine (CD overview) 38
Changing the name of a CD in the magazine of the CD changer (CD NAME) 38
Changing basic settings in the settings menu 39
Adjusting sound and balance (Audio) 40
Changing the volume distribution (BALANCE/FADER) 40
Changing the equalizer setting (Deq) 41
Creating/changing a user-defined equalizer setting (ADJUST) 42
Which equalizer setting is the correct one? 44
Selecting a sound presetting (PRESET). 44
Setting the speed-dependent volume increase (AUTO SND)....45
Setting the bass increase (XBASS) 45
Configuring the preamplifier output for the subwoofer (SUBOUT) 45
Switching the equalizer off (OFF)..46
Changing display settings (Display) ...47
Changing the colour of the display (COLOR) 47
Changing the user-defined colour (USER) 48
Adjusting the display viewing angle (ANGLE). 48
Inverting the display (INVERT) ....49
Switching the spectrum analyser on/off (SPECTRUM) 49
Activating/deactivating the screen saver (SCREEN S) 49
Changing volume presettings (VOLUME) 50
Changing the volume presetting of the telephone (PHONE) 50
Changing the volume presetting of the signal tone (BEEP) 50
Changing the presetting of the power-on volume (ON VOL) .....51
Restoring the volume at switch-on (LAST VOL) 51
Changing clock settings (CLOCK)...52
Setting the time (TIME) 52
Switching the time display on/off with switched-off device (OFFCLOCK) 52
Switching the 24-hour time display on/off (24H Mode)........53
Configuring audio inputs (AUX) 53
Activating/deactivating audio inputs (AUX1/2). 54
Renaming audio inputs (EDIT) ....54
Changing special settings (VARIOUS) 55
Changing the welcome text (ON MSG) 55
Switching the internal amplifier on/off (AMP ON) 56
Resetting the device to factory settings (NORMSET) 56
Changing the scan time (SCANTIME) 56
Displaying the serial number (SER NUM) 57
Error table. 57
Technical data. 58
Glossary 59
Keyword index 61
Installation instructions. 379
Blaupunkt stands for technical know-how in mobile radio reception, for precise navigation systems and first-class sound. The blue dot made its debut in 1923 as a seal of quality that was assigned after rigorous functional – and it still applies today. At that time as well as today, the blue dot identifies products of extraordinary quality.
About these instructions
Please read these instructions and, in particular, the following chapter, "For your safety", before using the device! Please also observe the following instructions:
- CD Changer, if available
- Remote Control, if available
The software and hardware designations used in these instructions are trademarks or registered trademarks and, as such, are subject to legal regulations.
For your safety
The device was manufactured according to the state of the art and established safety guidelines. Even so, dangers may occur if you do not observe these safety information:
Read these instructions carefully and completely before using the device.
Keep the instructions at a location so that they are always accessible to all users.
→ Always pass on the device to third parties together with these instructions.
Use as directed
The device is designed for operation in a vehicle with 12V vehicle system voltage and must be installed in a DIN slot.
If you are installing device yourself
You may only install the device yourself if you are experienced in installing car sound systems and are very familiar with the electrical system of the vehicle.
Observe the following!

Danger of injuries!
Do not open or modify the device! The device
contains a Class 1 laser that emits invisible laser radiation which can cause injuries to your eyes. The warranty is void if the device has been opened.

Danger of accidents!
Operate the device only if traffic situation permits it!

Danger of hearing damage!
Always listen at moderate volume so that you can always hear acoustic warning signals! This will also help to protect your hearing. The device briefly switches to mute, e.g. while the CD changer changes the CD or if you
are switching the audio source. Do not increase the volume during this mute phase

Danger to the device!
Do not insert any mini CDs (8 cm diameter) and
shape CDs since they destroy the drive!
Theft protection
Carry the control panel with you in the supplied case whenever you leave the vehicle.
Cleaning
Clean the device with a dry or slightly moistened cloth. Do not use any solvents, cleaning agents or cleansers and no cockpit spray and care product for plastic materials.
Scope of delivery
1 St. Louis MP56
1 Remote control RC 12 H
1 Case for the control panel
1 Operating instructions
1 Support frame
2 Disassembly bar
1 Guide pin
1 USB connecting cable
1 Preamplifier cable
1 Loudspeaker connecting cable
1 Cable for voltage supply and signal transmission
Warranty
The warranty terms issued by our respective responsible domestic agency are valid.
The warranty terms can be called up under www.blaupunkt.com or requested directly from:
Blaupunkt GmbH
Hotline
Robert-Bosch-Str. 200
D-31139 Hildesheim
Germany
Device overview
Controls
1 button for detaching the control panel
② TUNER button Selecting the tuner as audio source Opening the "TUNER" menu
③ Rocker switch Tuner: Start the station seek tuning Settings menu: Change settings
On/Off button Press short: Switch on/mute Press long: Switch off
⑤ Volume control
NEXT button
Tuner: Select memory bank (FM1, FM2, FM3, FMT)
Settings menu: Go to the next menu page
MP3/WMA: Switch between "PLAY", "BROWSER" and "PLAYLIST"
7 to 12 Softkeys to select the function shown on the display next to the respective button
13 button to eject/insert a CD
14 Display (see page 16 and 17)
15 MENU button to call up the settings menu
16 ESC button Settings menu: Confirm menu item and change to the display of the audio source Scan/Travelstore: Cancel
OK button Press short: Confirm menu item and change to the next higher menu level Press long: Start scan/station seek tuning
18 SRC button consecutively switching between the available audio sources
CD drive
20 MMC/SD card slot
Handheld remote control
The RC 12H handheld remote control contained in the scope of delivery allows you to safely
and conveniently operate the basic functions of your device. For this purpose, a direct line of sight must exist between the handheld remote control and the device. Switching the device on/off is not possible with the handheld remote control.
21 Select buttons same function as the rocker switch ③
^22 Loudspeaker buttons
23 SRC button same function as the SRC button 18 on the device
Mute button
muting
25 Battery holder contains a CR 2025 3-V coin cell (for changing the battery, see page 12)
Placing the device in operation
Detaching/attaching the control panel
You can detach the control panel to protect against theft.

CAUTION!
Danger of theft!
The device is worthless to a thief without the control panel.
Never keep the control panel in the vehicle, not even in a hidden place; instead, carry it with you in its case when you leave the vehicle!

CAUTION!
Damage to the control panel!
The control panel can be damaged or malfunction if the following is not observed:
Never drop the control panel.
Do not expose the control panel to direct sunlight or another heat source.
Transport it exclusively in the supplied case.
Never touch the contacts on the rear side with your fingers.
Clean the contacts of the control panel regularly using a soft cloth moistened with cleaning alcohol.
To detach the control panel:
Press the button ①.
The control panel opens to the front on the left. The device switches off automatically.
Detach the control panel.
To attach the control panel:
Place the control panel in the slot with the right side first.
Next, carefully push the left side to the back until the control panel engages.
The device can now be switched on.
Switching the device on/off
To switch on the device:
Press the On/Off button ④.
The device plays the audio source you previously listened to.
Note:
If you switch on the device without first switching on the vehicle ignition, the device automatically switches off after one hour to save the vehicle battery.
To switch off the device:
Press and hold the On/Off button 4 for approx. two seconds. In addition, the device is automatically switched off as soon as you switch of the vehicle ignition. If you switch on the ignition again, it also automatically switches on the device again.
General functions
Replacing the battery of the handheld remote control
Press the lock of the battery holder 25 in the direction of the arrow and pull out the battery holder 25 at the same time.
Replace the battery with a 3-V coin cell of type CR 2025.
Insert the battery so that the positive side points to the rear side of the handheld remote control.
Inserting a CD

CAUTION!
Damage to CD drive from unsuitable CDs!
Mini CDs (8 cm diameter) or shape CDs damage the drive!
Insert only circular CDs with a 12-cm diameter into the CD drive.
To insert an MP3, WMA or audio CD, the device must be switched on.
Press the button ⑬.
The control panel opens. If a CD is in the drive, it is ejected.
If you do not remove this CD, it is automatically pulled in again after approx. 10 seconds.
Insert the CD with its printed side uppermost into the CD drive until you feel some resistance.
The CD is automatically drawn in and the control panel closes. This CD can now be selected as audio source.
Note:
As long as the CD is in the drive, the device stores track and playing time of the CD played last, and after calling up the audio source, the playback starts at the position where it was interrupted.
Inserting an MMC/SD card
Note:
Blaupunkt cannot guarantee the correct functioning of all MMC/ SD card available on the market and, for this reason, recommends the use of MMC/ SD cards manufactured by SanDisk® or Panasonic®. The cards must be formatted using the FAT16 or FAT32 file system and contain MP3 or WMA files.
Remove the control panel as described on page 10.
Insert the MMC/SD card in the card slot 20 until it engages. The contacts of the card must point down and to the rear.
Attach the control panel as described on page 10.
This MMC/SD card can now be selected as audio source.
To remove the MMC/SD card:
Remove the control panel as described on page 10.
Push on the MMC/SD card until it disengages.
Pull the MMC/SD card out of the card slot (20).
Connecting the USB medium
To be able to connect a USB stick or a USB hard disk, the supplied USB cable must be connected to the rear side of the device before the installation as described in the installation instructions. This cable can be routed, for example, to the glove compartment or a suitable place of the center console.
Note:
Always switch off the device before connecting or disconnecting your USB medium!
Connect the USB medium to the USB cable that is routed from the rear side of the device.
The USB medium can now be selected as audio source.
For the device to recognise the USB medium, it must be specified as mass storage device and formatted using the FAT16 or FAT32 file system and contain MP3 or WMA files. Blaupunkt cannot guarantee the proper functioning of all USB media available on the market. If extensive files are stored on your USB medium, the file search (see page 35) can be slow.
Adjusting the volume

WARNING!
Danger from excessive volume!
Excessive volume can damage your hearing and you may fail to hear acoustic warning signals!
Do not change the volume while the device changes the CD in the CD changer or the audio source.
→ Always set the device to a moderate volume.
Turn the volume control 5. The current volume is shown in the central area (B) of the display and used for all audio sources.
Note:
To preset the volume of a connected telephone (PHONE) or the signal tone (BEEP), see page 51.
Muting the device
The device can be muted as follows:
→ Briefly press the On/Off button ④.
The display shows "MUTE".
To cancel the mute function:
→ Briefly press the On/Off button ④ again or turn the volume control ⑤.
Operation with telephone
If a hands-free system is installed in your vehicle or your cell phone is connected to the device via a Bluetooth adapter, the device responds as follows to incoming or outgoing telephone calls:
- The voice of the person calling you is played back via the loud-speakers of the vehicle,
- The display shows "PHONE CALL".
- The currently playing audio source is muted.
During the telephone call, you change the volume of the telephone call by means of the volume control ⑤.
Selecting an audio source
The device features the following audio sources:
- Tuner
- Integrated CD player (can play audio CDs as well as CDs with MP3 or WMA files)
- MMC/SD card with MP3 or WMA files
In addition, the following external audio sources can be connected:
Either an optional CD changer or AUX1
- AUX2 (e.g. MiniDisc or external MP3 player)
- USB stick with MP3 or WMA files
To be able to select an external audio source, it must be connected and contain audio data.
Press the SRC button ⑧ repeatedly until the display briefly shows the desired audio source.
The tuner display
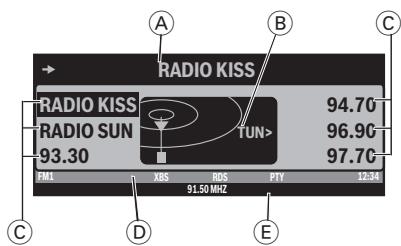
A Main line
Left:Arrow
Middle: Station name or frequency
(8) Central area
Audio source
() Memory location for radio stations which can be selected using the six softkeys ⑦ to ⑫
Info line 1
Left: Memory bank
In between: XBS 1), RDS 2), PTY 3)
Right:Clock
E Info line 2
Frequency
The audio CD display
A Main line
Left:Arrow
Middle: Track number
Central area
Audio source
Functions which can be selected using the softkeys 7 to 12
D Info line 1
Left: Audio source
In between: XBS 1), RDS 2), PTY 3),
RPT4),MIX5)
Right:Clock
E Info line 2
Left: Playing time
Middle: CD text
1) XBS appears if XBass is switched on (see page 46).
2) RDS appears if changing to alternative frequencies is permitted (see page 28).
3) PTY appears if the station seek tuning was restricted to a specific programme type (see page 29).
4) RPT appears if a repeat function is switched on (see page 20).
5) MIX appears if the random playback is switched on (see page 19).
The CD changer display
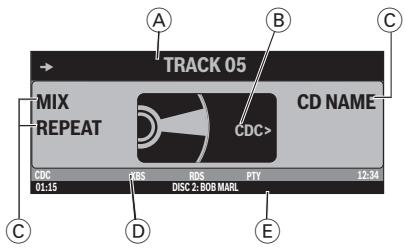
A Main line
Left:Arrow
Middle: Track number
Central area
Audio source
Functions which can be selected using the softkeys 7 to 12
D Info line 1
Left: Audio source
In between: XBS 1), RDS 2), PTY 3),
RPT 4), MIX 5)
Right:Clock
E Info line 2
Left: Playing time
Middle: CD text or CD name
The MP3 display
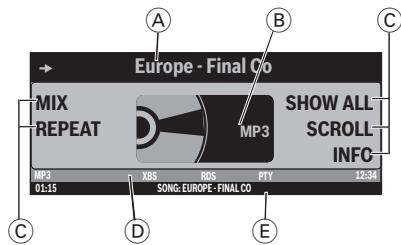
A Main line
Left:Arrow
Middle: Track number
(8) Central area
Audio source
C Functions which can be selected using the softkeys 7 to 12
D Info line 1
Left: Audio source
In between: XBS 1), RDS 2), PTY 3),
RPT4),MIX5)
Right:Clock
E Info line 2
Left: Playing time
Middle: Title information
(e.g. ID3 or file names)
The MP3 display appears if a CD, SD/MMC card or USB stick with MP3 or WMA files is inserted and selected as audio source. The corresponding MP3 medium is displayed left on info line 1 (E).
Overview of the operation
This chapter first presents the buttons on the device.
It is followed by a description of the audio functions MIX, REPEAT and SCAN since their operation is identical for all audio sources.
The operation of the device menus is described starting on page 20.
Overview of the buttons
Many basic functions during the playback of music, such as forwarding and reversing music, are performed using the rocker switch (3) (using the four functions >, <, , and ), the OK button (17) or the six softkeys (7) to (12).
Note:
These functions are not shown on the display!
The following table shows the functions that can be performed by these buttons.
| What do you want to do? | Selectable audio sources | ||||
| Tuner | CD | MP3/WMA | CDC | AUX | |
| Forward | - | Hold > pressed | No operation possible of St. Louis | ||
| Reverse | - | Hold < pressed | |||
| Title forward | - | > Press short | |||
| Title reverse | - | < Press short | |||
| Previous CD/folder | - | - | \Press short | ||
| Next CD/folder | - | - | \Press short | ||
| Scan track/station (SCAN) (see also page 20) | Press OK for 2 seconds | ||||
| Play radio station | Press short | - | - | - | |
| Store radio station | Press for 2 s | - | - | - | |
Overview of the functions MIX and RPT
The display of the active audio source can show up to six functions F at the left and right edge of the display which you always operate using the same six softkeys ⑦ to ⑫ independent of the audio source.
The different settings of a function are selected by repeatedly pressing the same softkey.
The following table shows which settings are available for the functions MIX and REPEAT.
| Softkey next to the audio function | Selectable audio sources | |||||
| Tuner | CD | MP3 CD | USB/SD/MMC | CDC | AUX | |
| MIX (random track play) (see also page 19) | - | OFFCD | DIRCD OFF | ALLOFF FOLDER | OFFALLCD | No operation possible of St. Louis |
| RPT (repeat mode) (see also page 20) | - | OFFTRACK | OFFDIR TRACK | OFFDIR TRACK | OFFCD TRACK | |
Switching random track play on/off (MIX)
Press the softmax (7) (next to "MIX").
The random track play mode is displayed on the main line .
- "MIX CD": All tracks on the current audio CD are played in random order.
- "MIX ALL": All tracks on all CDs in the magazine of the CD changer are played in random order.
"MIX FOLDER"/"MIX DIR": Up to 99 MP3 or WMA titles in the current folder are played in random order.
- "MIX MEDIUM": All MP3 or WMA titles on the current data carrier (CD, MMC/SD card or USB stick) are played in random order.
- "MIX OFF": The random track play is switched off. All titles are played in the order in which they are found on the data carrier.
If you switched on random track play, the selected random track play mode is displayed on info line 1 ① and indicated by "MIX" at the side of the display.
Switching Repeat title on/off (REPEAT)
Press the softmax (next to "REPEAT").
The repeat mode is displayed on the main line (A).
- "REPEAT TRACK": The current track is repeated until you quit repeat.
- "REPEAT DIR"/"REPEAT FOLDER": All titles in the current folder are repeated until you quit repeat.
- "REPEAT CD": All tracks on the CD are repeated until you quit repeat.
- "REPEAT OFF": The repeat mode is switched off. However, the playback does not stop with the last track. After the last title in the last folder, the playback is continued with the first title in the first folder.
The selected repeat mode is displayed on info line 1 (D) and indicated by "REPEAT" at the side of the display.
Scanning titles (SCAN)
You can scan all the titles of a data carrier. The scan time is selected in the settings menu ("SCANTIME", see page 55 and 57).
Press and hold the OK button ⑦ for approx. two seconds. All tracks are scanned. The main line of the display alternately shows "SCAN" and the track number or the file name.
To cancel the scan:
Press the OK button ⑦. The playback of the current title is continued.
Buttons for menu operation
The device features menus which allow you to change the preset-tings or make a selection. The display shows up to six menu items. Each menu item is assigned to one of the six softkeys ⑦ to ⑫
The following buttons are required to operate the menus:
- The MENU button ⑤ is used to call up the settings menu ("USER MENU") at any time.
-
If a menu consists of several pages, you can consecutively scroll them using the NEXT button ⑥ .
-
If "TUNER" is selected as the audio source, the TUNER button ② calls up the "TUNER" menu.
- If the current menu features several pages, the left side of the main line shows an arrow () . This means, you can use the NEXT button to consecutively scroll the different pages.
- The softkeys ⑦ to ⑫ are used to select the menu items that are shown on the display next to the corresponding button.
- In some menus, the rocker switch ③ is used to change the setting of a menu item. This setting is immediately effective and automatically stored.
- You confirm the setting with the OK button ⑦ and go back one higher menu level.
If you are navigating in a menu, the right side of the main line A shows the ESC symbol (T). This means that you can exit the menu using the ESC button 16. You also confirm the displayed setting with the ESC button 16, but you are leaving the menu and return to the display of the active audio source.
If you do not press any button, the display of the active audio source automatically appears after approx. 16 seconds.
Example of a menu operation
The following example from the settings menu (changing the display brightness) shows how to operate the menus in general.
Calling up a menu
Press the MENU button 15. The settings menu ("USER MENU") is displayed.
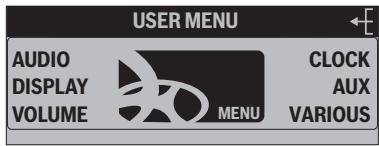
Selecting a menu item in the settings menu
Press the softmax (next to "DISPLAY").
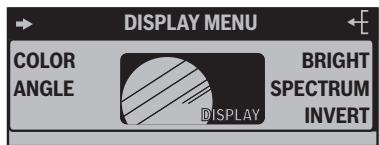
The "DISPLAY" menu appears.
Press the softmax (next to "BRIGHT").
The "BRIGHT" menu item is flashing. This means that you can now change the corresponding setting. In addition, the main line A displays the current settings for the display brightness at night ("NIGHT") and during the day ("DAY"). The "Night" menu item is flashing.
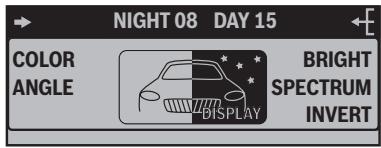
Since you can adjust the display brightness separately for night and day, you must switch between the menu items "NIGHT" and "DAY".
For this purpose, press the rocker switch ③ for or < < 1 until the desired menu item is highlighted.
Changing and saving a setting
To change the display brightness:
On the rocker switch ③, press on or .
The setting takes effect immediately (the display becomes brighter or darker). The setting is saved. If you do not press another button, the display of the
active audio source automatically appears after approx. 16 seconds.
Exiting a menu item
Press the OK button 17 to go up one menu level.
Or press the ESC button to exit the menu and return to the display of the active audio source.
Operating the tuner
After selecting "TUNER" as the audio source, the tuner display appears (see page 16). The playback starts immediately with the previously played station if the vehicle is within the reception area of this station.
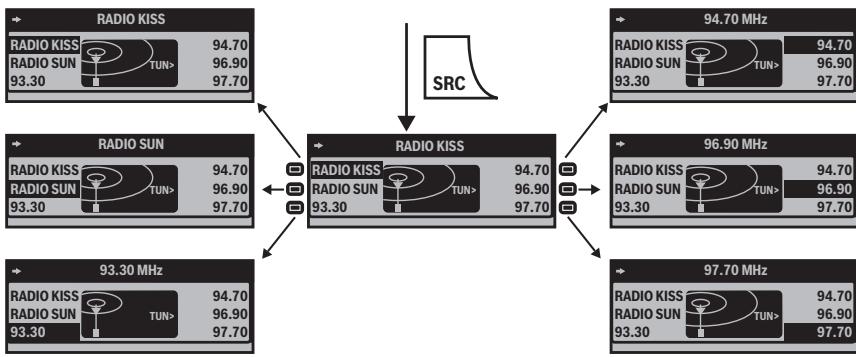
Selecting the memory bank
The device features four memory banks (FM1, FM2, FM3, and FMT). You can store or call up six stations at every memory bank.
Press the NEXT button ⑥ repeatedly until the desired memory bank appears on the level display of the tuner display.
Searching for stations
You can search for stations manually or automatically.
Note:
To automatically search for FM stations and store them in the FMT memory bank, see "T-STORE" on page 28.
Manually searching for stations
While the tuner display appears, press on > or < on the rocker switch ③.
The response of the tuner depends upon the settings in the menus "RDS" (page 28) and "PROG TYP" (page 29).
- If you selected a specific program type (PTY, e.g. news, sports, classic, etc.) in the "PROG TYP" menu, the tuner automatically searches the next station broadcasting this program type in the selected direction. For this purpose, the station must be broadcasting the corresponding PTY identification as RDS service.
- If you activated the automatic change to alternative frequencies in the "RDS" menu, the tuner searches for the same station on a different frequency.
- If you selected the "PTY OFF" option in the "PROG TYP" menu and deactivated the automatic change to alternative frequencies in the "RDS" menu, you can manually adjust the tuner in increments of 200kHz .
As soon as a station has been located, it is played. The station name appears on the main line (A) after a few seconds if the station provides this RDS information.
You can now store this station (see page 25) or restart the manual station seek tuning.
Automatically searching for stations
While the tuner display appears, press on or on the rocker switch ③.
The tuner searches for the next station in the current waveband in the selected direction. The settings in the menus "SENS" (see page 28) and "PROG TYP" (see page 29) are incorporated.
As soon as a station is located, the seek tuning stops and the located station is played. The station name appears on the main line A after a few seconds if the station provides this RDS information.
You can now store this station (see page 25) or restart the automatic station seek tuning.
Note:
If you press and hold or on the rocker switch ③, the automatically seek tuning skips the stations found until you release the rocker switch again.
Storing stations
After locating a station, you can store it as follows:
Select the desired memory bank (see page 23).
Press the softmax for approx. two seconds to which you want to assign the station.
The station is stored. A signal tone confirms that the station has been stored. The frequency or the name of the station is displayed next to the softkey. The current station is highlighted.
Note:
To automatically search for FM stations and store them in the FMT memory bank, see "T-STORE" on page 28.
Listening to stored stations
Select the desired memory bank (see page 23).
The tuner display displays the frequencies or names of the six stations ⑥ assigned to the softkeys ⑦ to ⑫ in this memory bank.
Briefly press the softkey which is assigned to the station you want to set up.
The frequency or the name of the current station is indicated. The selected station is played back provided that it can be received at the current vehicle position.
The frequency or name of this station appears on the main
line A if the station provides this RDS information. In addition, the memory location of the radio station C is highlighted.
Scanning all receivable stations (SCAN)
Select the waveband (FM, AM) whose receivable stations you want to scan (see page 27).
Press and hold the OK button for approx. two seconds.
The tuner searches for stations in the current waveband. The main line displays "SCAN" every two seconds.
As soon as the tuner has located a station, it is played and the station name or the station frequency appears on the main line A. The scan time can be set as described on page 55 and 57 under "SCANTIME".
After the frequency band has been completely searched once, the search stops and the station located last is played back.
You can do the following at any time:
- Store the currently scanned station (see page 25).
- Cancel the scan by briefly pressing the OK button ⑰.
Set the device to the region Europe, USA or Thailand
The device is factory set to the frequency ranges and station technologies of the region in which it was purchased. If this setting is not correct, you can adjust the device as follows to the different frequency ranges and station technologies of Europe, the United States or Thailand.
Switch off the device.
Hold the two softkeys 9 and 12 pressed while switching on the radio.
The "AREA" menu opens.
Press the softmax next to the region in which you are using the device.
Press the OK button ⑰.
Changing the tuner settings ("TUNER" menu)
The "TUNER" menu allows you to change the basic settings of the tuner.
To open the "TUNER" menu:
Press the TUNER button ②.
The menu consists of two pages ("FM TUNER MENU1" and "FM TUNER MENU2") which can be toggled with the NEXT button ⑥.
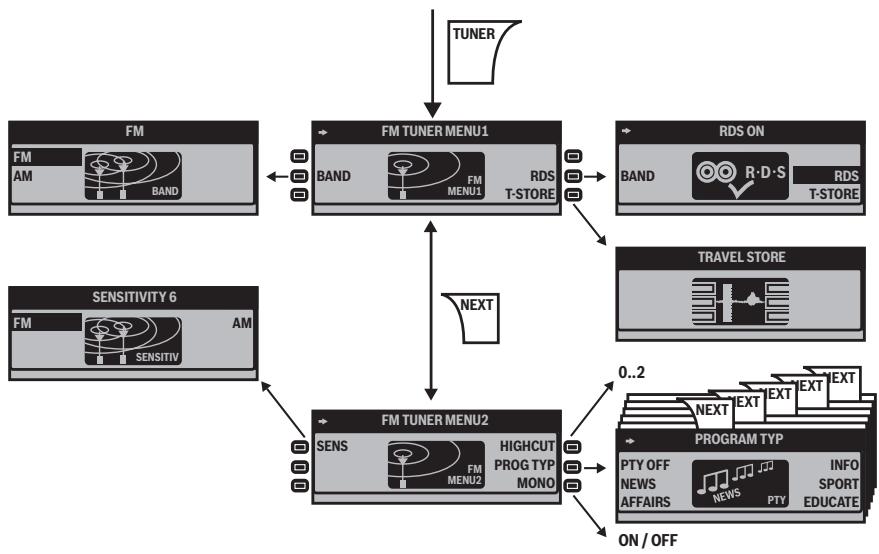
Changing the waveband (BAND)
The tuner can receive FM and AM. To switch between these wavebands:
In the "TUNER" menu, press the softkey ⑦ (next to "BAND").
Select the desired band by pressing the corresponding softkey.
FM
AM
You can now do the following in this waveband:
- Searching stations (page 23).
- Storing stations (page 25).
- Calling up stored stations (page 25).
Allowing alternative frequencies (RDS)
The device can automatically switch to an alternative frequency (AF) of the same station if the reception becomes poor.
Press the softmax in the "TUNER" menu (next to "RDS").
- "RDS ON": The device automatically adjusts the best receivable frequency of the station, provided that the station supports the "AF" RDS function.
- "RDS OFF": The device does not change the frequency.
Searching FM stations automatically and storing them in the FMT memory bank (T-STORE)
You can automatically store the six FM stations offering the strongest reception in the region in the FMT memory bank.
In the "TUNER" menu, press the softkey (10) (next to "T-STORE")
The main line A displays "TRAVEL STORE...". The tuner automatically searches the six strongest FM stations and stores them in the FMT memory bank. After the storing is completed, the radio plays the station at memory location 1 of the FMT level. Stations that were previously stored in the
FMT memory bank are automatically deleted.
Changing the seek tuning sensitivity (SENS)
The seek tuning sensitivity determines whether the automatic station seek tuning locates only strong stations or also weaker stations, which may be degraded by a high noise level.
Change to the second page of the "TUNER" menu by pressing the NEXT button 6.
In the "TUNER" menu, repeatedly press the softkey (next to "SENS").
The "SENSITIVITY" menu appears.
Press the softmax (7) (next to "FM") to set the seek tuning sensitivity for FM stations or press the softmax (12) (next to "AM") to set the seek tuning sensitivity for AM stations.
Each seek tuning sensitivity can be adjusted in six increments.
- "1": Low seek tuning sensitivity. During a station seek tuning (see page 23), only local strong stations are found.
- "6": High seek tuning sensitivity. Poor, remote stations are also found.
Activating/deactivating improved reception (HIGH CUT)
The High Cut function results in an improved reception in case of weak radio reception (FM only).
Change to the second page of the "TUNER" menu by pressing the NEXT button (6).
In the "TUNER" menu, repeatedly press the softkey ⑦ (next to "HIGH CUT").
- "1": The High Cut function is switched on and has a low response sensitivity. If the reception is very poor, the interference level is automatically decreased.
- "2": The High Cut function is switched on and has a high response sensitivity. If the reception is poor, the interference level is automatically decreased.
- "0": The High cut function is switched off.
Restricting station seek tuning to certain programme contents (PROG TYP)
Change to the second page of the "TUNER" menu by pressing the NEXT button ⑥.
In the "TUNER" menu, press the softkey (next to "PROG TYP").
Scroll through the pages of the programme types with the NEXT button ⑥.
Press the softkey next to the desired programme type.
Next, start a station seek tuning (see page 23).
Toggle between mono and stereo operation (MONO)
If you selected the "FM" waveband, you can toggle between mono and stereo operation.
Change to the second page of the "TUNER" menu by pressing the NEXT button ⑥.
Press the softmax in the "TUNER" menu (next to "MONO").
- "MONO ON": The mono operation is activated. Weak, noisy stations are played back more clearly.
- "MONO OFF": The stereo operation is activated. You are listening in stereo if the station broadcasts in stereo.
Note:
If you switch on the device, this setting is automatically set to stereo operation.
Operating the integrated CD player
The device can play the following CD formats:
- CD audio (some CDs with copy protection cannot be played)
- CD-R or CD-RW with MP3 or WMA files (without DRM copy protection only)
Note:
The quality of self-burnt CDs fluctuates due to different CD blanks, CD burner software, and burn speeds. For this reason, it is possible that the device cannot play some self-burnt CDs.
If you cannot play a CD-R/CD-RW:
- Use blanks from a different manufacturer or a different colour.
- Burn CD-Rs at a lower speed.
What features do MP3 or WMA CDs have to have?
The device can only play and display MP3 or WMA CDs with the following features:
- The CD-ROM may contain only MP3 or only WMA files as well as folders, but no other files (including no CD audio files).
-
CD format: ISO 9660 (Level 1 or 2) or Joliet
-
Bit rate: MP3: max. 320 kbit/s WMA: max. 768 kbit/s
File extension: Must be ".MP3" or ".WMA" - ID3 tags: Version 1 or 2
Max. 252 folders per CD with max. 999 MP3 files per folder (fewer in case of long file names: approx. 700 at 20 characters per file name) - File names may not contain an umlaut or special character and may not be longer than 32 characters.
- WMA files with DRM (Digital Rights Management, copy protection/playback restrictions), which are offered for download, for example, by music providers on the Internet, cannot be played by the device. WMA files which you create yourself, e.g. from CD audio files, can be played.
Functions of the integrated CD player if an audio CD is inserted
After inserting an audio CD (see page 12) and selecting "CD" as the audio source for the first time (see page 14), "CD Reading" briefly appears on the main line A. Next, the audio CD display appears (see page 16). The playback starts.
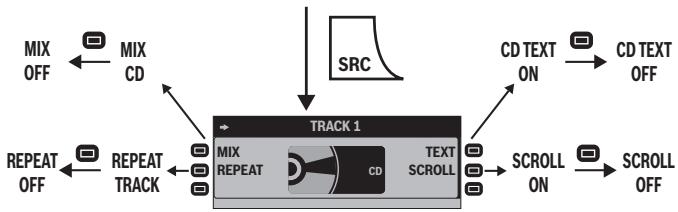
| Menu item | Abbr. | Softkey | Setting option | See also |
| Random track play | MIX | 7 | Switch-on (MIX CD) | Page 19 |
| Switch-off (MIX OFF) | ||||
| Repeat title | REPEAT | 8 | Switch-on (MIX OFF) | Page 20 |
| Switch-off (REPEAT OFF) | ||||
| Display CD text | TEXT | 12 | Switch-on (CD TEXT ON) | Page 32 |
| Switch-off (CD TEXT OFF) | ||||
| Scrolling text | SCROLL | 11 | Switch-on (SCROLL ON) | Page 32 |
| Switch-off (SCROLL OFF) |
Switching the CD text display on/off (TEXT)
Some CDs support the display of text information about artist, album, track, etc. To switch the display of CD text on/off:
Press the softmax (next to "TEXT").
The CD text status is briefly displayed on the main line
- "CD TEXT ON": The CD text is displayed on info line 2 (E).
- "CD TEXT OFF": The CD text is not displayed.
Switching the scrolling text for CD text on/off (SCROLL)
The device can display CD text statically or as scrolling text (scroll). To change the display of CD text:
Press the softmax (11) (next to "SCROLL").
The CD text display status is briefly displayed on the main line () ..
-
"SCROLL ON": CD text is displayed as scrolling text, provided that the CD supports CD text, the display of CD text is switched on (see the previous section), and the CD text does not fit on info line 2 (E) of the display.
-
"SCROLL OFF": CD text is not displayed as scrolling text. If the CD text does not fit on info line 2 (E) of the display, it appears incomplete.
Operating the MP3/WMA player
After inserting a medium with MP3 or WMA files (CD, MMC/SD card, or USB stick) (see pages 12 and 13) and selecting them as audio source for the first time (see page 14), "CD/MMC/USB Reading" appears on the main line A. Next, the MP3 display appears (see page 17). The playback starts.
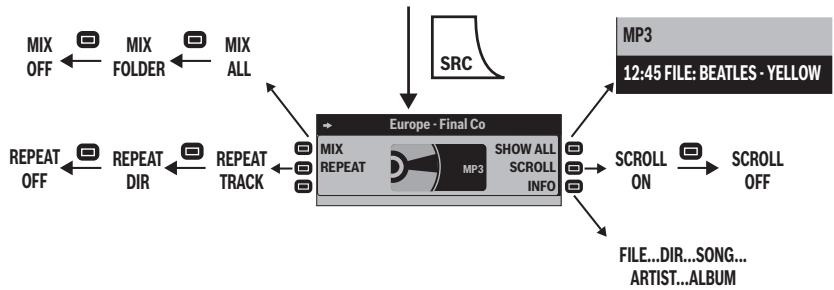
| Menu item | Abbr. | Softkey | Setting option | See |
| Random track play | MIX | 7 | Playing files of the folder (MIX FOLDER) or data carrier (MIX ALL) in random order | Page 19 |
| Switch-off (MIX OFF) | ||||
| Repeat title | REPEAT | 8 | Repeating the current file (REPEAT TRACK) or files of the folder (REPEAT DIR) | Page 20 |
| Switch-off (REPEAT OFF) | ||||
| Showing infos | SHOW ALL | 12 | All available information for the current title scrolls once on info line 2 E | Page 34 |
| Scrolling text | SCROLL | 11 | Switch-on (SCROLL ON) | Page 34 |
| Switch-off (SCROLL OFF) | ||||
| Selecting info | INFO | 10 | Switching between DIR, SONG, ARTIST, ALBUM, and FILE | Page 34 |
Showing all the information of the current title (SHOW ALL)
To show all the available information about the current title (e.g. from ID3 tags) on the info line 2 (E):
Press the softmax (next to "SHOW ALL").
All available information for the current title scrolls once on info line 2 (E)
Switching scrolling text on/off (SCROLL)
The device can display the title information selected in the "INFO" menu item (see next section), either statically or as scrolling text.
To toggle between static display and scrolling text:
Press the softmax (11) (next to "SCROLL").
- If the scrolling text display is switched on, the text scrolls without interruption from right to left on info line 2 (E).
- If the scrolling text display is switched off, the text scrolls once from right to left on info line 2 (E). Afterwards, up to the first 13 characters are displayed.
Selecting the title information to be displayed (INFO)
The device can display the following title information on info line 2 (E):
- Either information from embedded data or ID3 tags (artist, title, album, genre, year), if available
- or file and folder name.
To select the title information to be displayed:
Press the softmax repeatedly (next to "INFO").
The type of information to be displayed is shown:
- "DIR": Name of the folder in which the currently playing file is located
- "SONG": Name of the current title
"ARTIST": Name of artist - "ALBUM": Name of album
- "FILE": File name of current title
Selecting a title from a list (Browser mode/playlist)
During the MP3 or WMA playback, you can always switch between the following modes using the NEXT button:
- MP3 display (left part of the figure)
- Browser mode (center part of the figure)
- Playlist mode (right part of the figure)
Note:
The device can play playlists that were created with an MP3 manager, such as WinAmp® or Windows Media Player®. These playlists must be present in the format M3U, PLS or RMP and stored in the root directory of the data carrier!
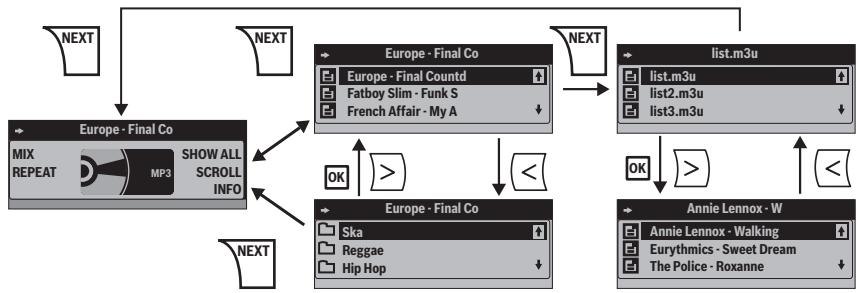
The browser mode or the playlist shows:
- The currently playing file on the main line
- The next three files to be played below it.
- Two arrows on the right side which appear if you can scroll in the corresponding direction.
Note:
The files are not played in alphabetical order, but in the order in which they were physically stored on the data carrier. This order is also displayed in the browser mode.
In the browser mode and the playlist mode, you can select files or folders from the list as follows:
On the rocker switch 3, press or to scroll up or down.
On the rocker switch ③ ,press < to change up to a higher-level folder.
Press the OK button to change down to a selected subfolder.
Press the OK button to play a selected file.
Operating the optional CD changer
After inserting at least one CD in the CD changer magazine and selecting "CDC" as the audio source for the first time (see page 14), "Magazine Scan" briefly appears on the display. The CD overview appears next. The playback starts.
You can toggle between the CD overview (top part of the figure) and the CD changer display (center part of the figure) by using the NEXT button ⑥.
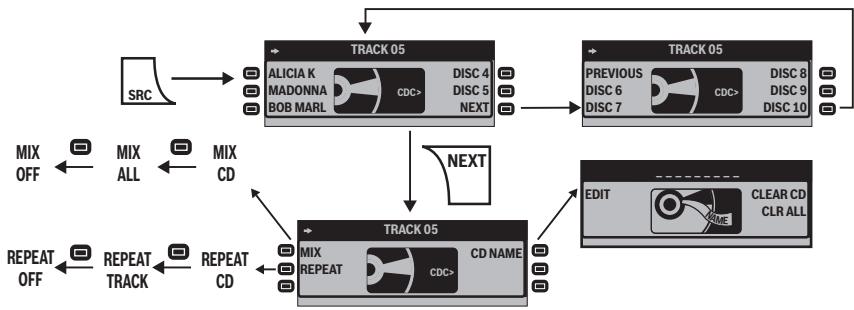
| Menu item | Abbr. | Softkey | Setting option | See |
| Random track play | MIX | 7 | Playing all the titles of the CD (MIX CD) or the magazine (MIX ALL) in random orderSwitch-off (MIX OFF) | Page 19 |
| Repeat title | REPEAT | 8 | Repeating the current title (REPEAT TRACK) or the current CD (REPEAT CD)Switch-off (REPEAT OFF) | Page 20 |
| Editing CD names | CD NAME | 12 | Entering, changing, deleting names for CDs located in the changer magazine | Page 38 |
Selecting a CD from the CD magazine (CD overview)
The CD overview shows:
Either the CD number (e.g. "DISC 01")
- or the name of the CD (you can enter it as described in the next section)
- or an empty position if the corresponding position of the magazine is without a CD.
If necessary, press the NEXT button 6 to display the CD overview.
Press the softkey located next to the number or next to the name of the desired CD.
The main line briefly displays "LOADING CD". The playback starts next with the first track of the CD.
Note:
If there are more than five CDs in the magazine of your CD changer, press softkey ⑩ , which is also located next to the menu items "NEXT" and "PREVIOUS", to toggle between the display of the first and last five CDs.
Changing the name of a CD in the magazine of the CD changer (CD NAME)
You can assign a name to every CD located in the CD changer. The name can have up to seven characters.
Select the CD to which you want to assign a name in the CD overview as described in the preceding section.
Press the NEXT button 6 to show the CD changer display.
Press the softmax(12) (next to "CD NAME").
Press the softmax (7) (next to "EDIT").
The text input appears. The first character of the name is flashing.
On the rocker switch ③ ,repeatedly press or to change the flashing character.
On the rocker switch ③ , press > to change to the next character.
Press the OK button to finish the text input and to store the name entered.
Note:
To quit the text input without changing the name, press the ESC button 16.
To delete the name of the current CD:
Press and hold the softmax (12) (next to "CLEAR CD") for longer than two seconds.
The main line briefly displays "CLEARING".
To delete the names of all the CDs located in the magazine of the CD changer:
Press and hold the softmax (10) (next to "CLR ALL") for longer than two seconds.
The main line () briefly displays "CLEARING".
Changing basic settings in the settings menu
The settings menu allows you to adjust basic device functions, such as sound, power-on volume or display brightness, to your specific needs.
To open the settings menu:
Press the MENU button 15. The settings menu appears.
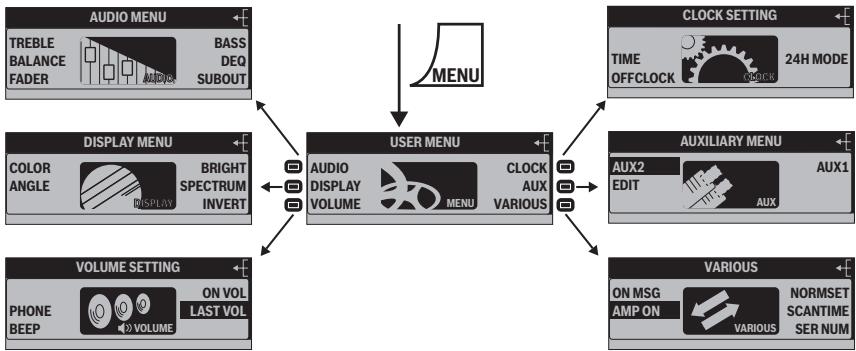
Adjusting sound and balance (Audio)
The "AUDIO" menu provides extensive possibilities for adjusting the sound to your specific needs.
Press the MENU button 15. The settings menu appears.
Press the softmax (NEXT TO "AUDIO").
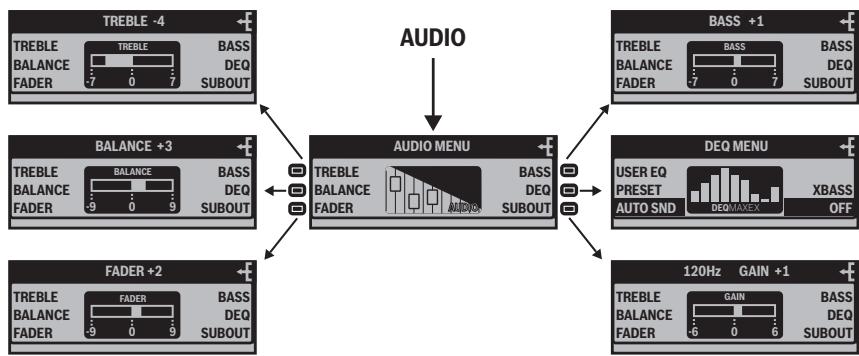
Changing treble or bass (TREBLE/BASS)
Press the softmax (7) (next to "TREBLE") or the softmax (12) (next to "BASS").
The corresponding sound control is displayed.
On the rocker switch ③ ,press or to increase treble or bass.
On the rocker switch ③ ,press or < to decrease treble or bass.
Changing the volume distribution (BALANCE/FADER)
The balance controls the volume distribution between left and right, the fader between front and rear.
Press the softmax (next to "BALANCE") or softmax (next to "FADER").
The volume distribution is displayed.
On the rocker switch ③ , press on the desired direction.
The volume distribution changes. The display shows the new volume distribution.
Changing the equalizer setting (Deq)
Your device features a digital 6-band equalizer. On the "DEQ" menu, you can adjust the sound to your vehicle and your specific needs and eliminate problems, such as droning or poor voice comprehension.
Press the MENU button ⑤. The settings menu appears.
Press the softkey ⑦ (next to "AUDIO SETTINGS"). The "AUDIO" menu appears.
Press the softmax (next to "DEQ").
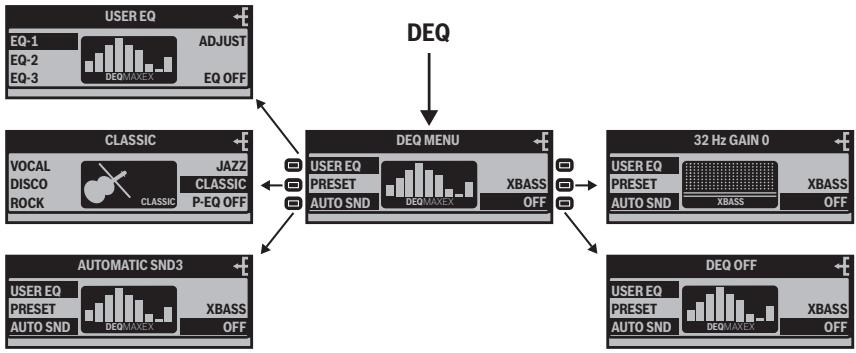
Calling up a user-defined equalizer setting (DEQ)
In the "DEQ" menu, you can create, store and call up up to three user-defined equalizer settings ("EQ-1" to "EQ-3").
To call up one of the three user-defined equalizer settings:
Press the softkey (next to "USER EQ").
The "USER EQ" menu appears.
Press one of the three softkeys ⑦ to ⑨ (next to "EQ-1", "EQ-2" or "EQ-3").
The selected user-defined equalizer setting is highlighted. The sound changes accordingly.
To turn the equalizer off, press the softmax next to "P-EQ OFF").
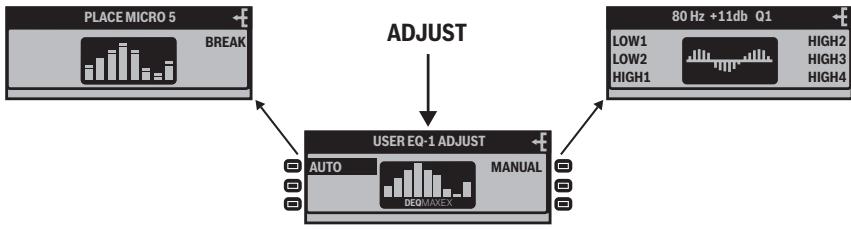
Creating/changing a user-defined equalizer setting (ADJUST)
You can adjust the three different user-defined equalizer settings to different situations, e.g. for the driver alone, for driver and passenger or for passengers in the front and the rear.
Select the user-defined equalizer setting which you want to create/ change as described in the preceding section.
Press the softkey ⑫ (next to ""ADJUST"). The "USER EQ ADJUST" menu opens.
AUTO:
You can automatically create one of the three equalizer settings using a measurement microphone (available as an accessory).
Before starting, ensure the following:
- The measurement microphone must be connected before installing the device as described in the installation instructions of the measurement microphone.
- There must be true silence during the measurement since external noise falsify the measurement. For this reason, close all windows, doors, and the sliding sunroof. Switch off the
engine, but leave the ignition switched on.
- The temperature inside the vehicle must be below 55^ C .
- All the loudspeakers must be connected. The sound radiating from the loudspeakers must not be obstructed by any objects.
Position the measurement microphone
- for the driver only - 10 cm next to the right ear of the driver,
-
for driver and passenger - exactly between both at the head level,
-
for passengers in the front and rear - at the head level in the center of the vehicle.
Ensure that all passengers in the vehicle are sitting and remaining quiet.
Change to the "DEQ" menu and call up one of the user-defined equalizer settings ("EQ-1" to "EQ-3") as described in the preceding section.
Open the "USER EQ ADJUST" menu as described on page 42.
Press the softmax (7) (next to "AUTO") and follow the instructions on the display.
After a 5-second countdown, you hear the test noise and the main line (A) intermittently shows "SILENCE PLEASE" and "ADJUSTING".
The automatic equalizer setting finishes successfully if "ADJUSTMENT OK" appears on the main line (A). The equalizer setting is saved. Any previously stored setting under this equalizer setting is overwritten. The new setting can now be called up under the corresponding equalizer setting ("EQ-1" to "EQ-3").
MANUAL:
As an alternative, you can manually create the equalizer setting without measurement microphone. In each of the six frequency bands, you can select one specific individual centre frequency and finely adjust its level and quality factor Q.
Insert a CD with which you are very familiar.
Adjust bass, treble, balance, and fader to zero.
Open the "USER EQ ADJUST" menu as described on page 42.
Press the softmax (next to "MANUAL").
First, select a frequency band to be changed. First, change the centre, then the treble, followed by the bass.
- "LOW1" to "2": To change the bass (20 to 250 Hz).
"HIGH1" to "4": To change the centre or treble (320 to 20,000 Hz).
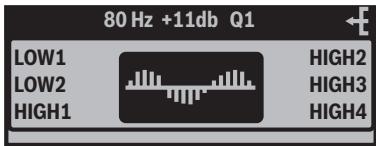
The frequency spectrum is displayed. if you already changed the level in another frequency band, this change is visible in the frequency spectrum. The current centre frequency (Hz) is highlighted.
Select the centre frequency to be changed by pressing on or on the rocker switch ③. In the two frequency bands "LOW1" and "2", you can select one centre frequency each from 20 to 250Hz . In the four frequency bands "HIGH1" to "4", you can select one centre frequency each from 320 to 20,000Hz .
On the rocker switch 3, press >.
The level display (dB) is highlighted.
Select the level of the previously set centre frequency by pressing on or on the rocker switch ③.
The level change is displayed in the frequency spectrum. The sound changes accordingly.
On the rocker switch 3, press >.
The quality factor Q is highlighted.
Select the desired quality factor Q by pressing on or on the rocker switch ③.
"Q1": Low edge steepness, wide filter bandwidth
- "Q2": Medium edge steepness and filter bandwidth
- "Q3": High edge steepness, narrow filter bandwidth
The change is displayed in the frequency spectrum. The sound changes accordingly.
Press the OK button 17.
Your user-defined equalizer setting is saved.
Which equalizer setting is the correct one?
| Sound impression or problem | Measure | |
| Centre frequency (Hz) | Level (dB) | |
| Unclean bass, droning, unpleasant pressure | 125–400 | approx. -4 |
| Very transparent, aggressive sound, no stereo effect | 1000–2500 | approx. -4 to -6 |
| Muffled sound, low transparency, instruments do not excel | 8000–12500 | approx. +4 to +6 |
| Insufficient bass | 50–100 | approx. +4 to +6 |
Selecting a sound presetting (PRESET)
This menu item allows you to select one of the following sound presettings: VOCAL, DISCO, ROCK, JAZZ or CLASSIC.
Press the softkey located next to the desired sound preset. The selected sound preset is highlighted and shown on the main line () .
To turn the equalizer off, press the softkey (10) (next to "P-EQ OFF").
Setting the speed-dependent volume increase (AUTO SND)
When you are driving faster, the device can automatically increase the volume to compensate for the driving noise. In order for this to work, the speedometer signal must be connected as described in the installation instructions. You can adjust this volume increase from 0 (no increase) to 5 (maximum increase).
Repeatedly press the softmax (next to "AUTO SND").
The current speed-dependent volume increase is shown on the main line (A).
Note:
If no increase is set, the main line A shows "AUTO SND OFF".
On the rocker switch ③ ,press or to raise the volume increase.
On the rocker switch ③ ,press or < to lower the volume increase.
Setting the bass increase (XBASS)
XBASS is a bass increase at low volume. This bass increase can be set in increments from 0 (no increase) to 6 (maximum increase) for the following frequencies: 32Hz , 40Hz , 50Hz , 63Hz , or 80Hz .
Press the softmax (next to "XBASS").
The "XBASS" menu item is flashing. The frequency (Hz) and bass increase (GAIN) are shown on the main line A.
On the rocker switch ③ ,press <or to select the desired frequency.
On the rocker switch ③ ,press or to set the desired bass increase.
Configuring the preamplifier output for the subwoofer (SUBOUT)
If you want to use an additional subwoofer, it can be adjusted to the other loudspeakers.
You can adjust the level of the Subout preamplifier output in 13 increments from -6dB (maximum decrease) to +6dB (maximum increase) for one of the following cut-off frequencies: 80Hz , 120Hz , or 160Hz .
In the "AUDIO" menu, press the softkey (next to "SUBOUT").
The "SUBOUT" menu item is flashing. The current cut-off frequency (HZ) and the current level (GAIN) are shown on the main line A.
On the rocker switch ③, press < or > to select the desired cutoff frequency.
On the rocker switch ③ ,press or to set the desired level of the preamplifier output.
Switching the equalizer off (OFF)
In the "DEQ" menu, press the softkey ⑩ (next to "OFF").
Changing display settings (Display)
In the "DISPLAY" menu, you can adjust the display brightness, colour and contrast, among other things.
Press the MENU button ⑤. The settings menu appears.
Press the softmax (next to "DISPLAY"). The "DISPLAY" menu appears.
The "DISPLAY" menu consists of two pages which can be toggled with the NEXT button.
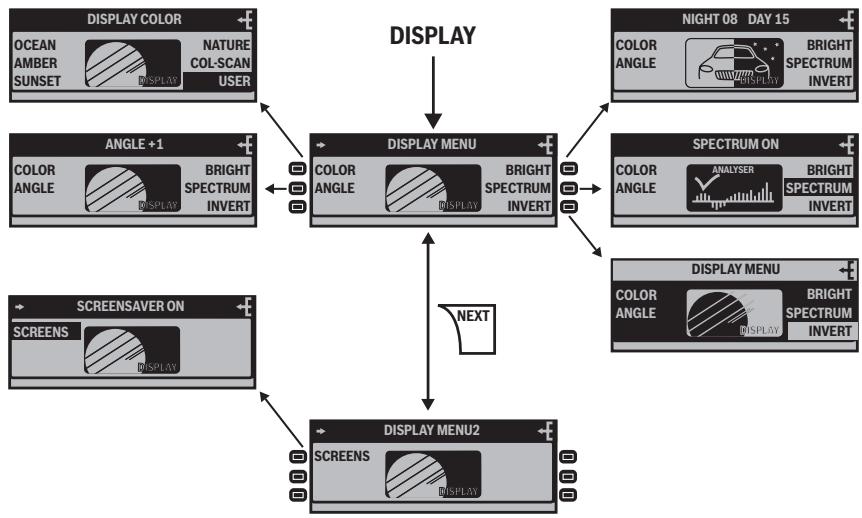
Changing the colour of the display (COLOR)
You can change the colour of the display by selecting one of the four presettings ("OCEAN", "AMBER", "SUNSET" or "NATURE") or the user-defined colour ("USER").
To select one of the four preset-tings:
Press the corresponding softkey (next to "OCEAN", "AMBER", "SUNSET", "NATURE" or "USER"). The colour of the display changes accordingly.
Changing the user-defined colour (USER)
Two options are available to change the user-defined colour. Option 1:
Press the softmax (next to "USER").
Set the desired colour using the softkeys ⑦ to ⑫.
- "RED-": Reduces the red portion.
- "GREEN-": Reduces the green portion.
- "BLUE-": Reduces the blue portion.
- "RED+": Increases the red portion.
"GREEN+": Increases the green portion. - "BLUE+": Increases the blue portion.
The colour of the display changes accordingly.
Option 2:
Press the softmax (11) (next to "COL-SCAN").
The display sequentially shows all colours that can be displayed.
Press the softmax (7) (next to "SAVE") or the OK button (17) to select the colour currently displayed.
Press the softmax (12) (next to "BREAK") or the ESC button (16) instead to exit the "COL-SCAN" menu item without changing the colour.
Adjusting the display viewing angle (ANGLE)
The angle at which the driver looks at the display is dependent upon, among other things, the installation position of the device, the seating position, and the physical size of the driver. You can adjust the display contrast to your viewing angle as follows.
Press the softmax (next to "ANGLE").
The "ANGLE" menu item is flashing. The current display contrast is shown on the main line (A).
On the rocker switch ③ ,press or > to increase the display contrast.
On the rocker switch ③ ,press or < to decrease the display contrast.
You can adjust the display contrast in 13 increments from -6 to +6.
Changing the brightness of the display for day/night (BRIGHT)
See page 21.
Inverting the display (INVERT)
Press the softmax (next to "INVERT").
Bright portions of the display are displayed as dark, dark portions as bright.
Switching the spectrum analyser on/off (SPECTRUM)
Instead of displaying the audio source, the device can display a 5-band spectrum analyser. For this purpose, the screen saver must be deactivated (see next section) and you must activate the display of the spectrum analyser as follows.
Press the softmax (next to "SPECTRUM").
- "SPECTRUM ON": The spectrum analyser can be displayed.
- "SPECTRUM OFF": The spectrum analyser cannot be displayed.
The spectrum analyser automatically appears 16 seconds after the last button is pushed instead of the display of the audio source. You can also display the spectrum analyser manually:
To do so, press the ESC button while the display of the audio source is shown.
Press any button to switch the spectrum analyser off.
Activating/deactivating the screen saver (SCREEN S)
Instead of displaying the audio source, the device can display a screen saver. For this purpose, the display of the spectrum analyser must be deactivated (see previous section) and you must activate the display of the screen saver as follows.
Press the NEXT button ⑥ to change to the second page of the "DISPLAY" menu.
Press the softkey ⑦ (next to "SCREEN S").
- "SCREEN Saver ON": The screen saver starts immediately.
- "SCREEN Saver OFF": The screen saver is not shown.
The screen saver automatically appears 16 seconds after the last button is pushed instead of the display of the audio source. You cannot display the screen saver manually:
Press any button to interrupt the screen saver and show the display of the active audio source again.
Changing volume presettings (VOLUME)
In the "VOLUME SETTING" menu, select the volume presettings for the telephone, the signal tones, etc.
Press the MENU button 15. The settings menu appears.
Press the softmax (next to "VOLUME").
The "VOLUME SETTING" menu appears. The volume presettings are displayed as two-digit numbers. One of the two menu items "ON VOL" or "LAST VOL" is highlighted.
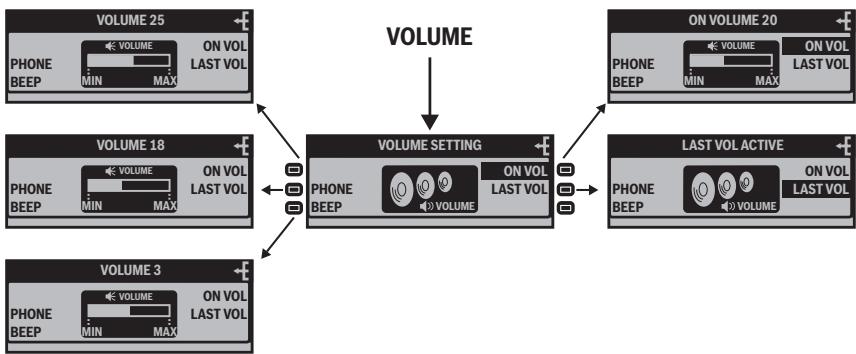
Changing the volume presetting of the telephone (PHONE)
If the device puts a phone call through, it always starts at the preset volume.
Press the softmax (next to "PHONE").
The "PHONE" menu item is flashing. The presetting for the telephone volume is shown on the main line
Adjust the desired volume using the volume control 5 or the rocker switch 3 (increments 1 to 50).
During the phone call, you can always change the volume by means of the volume control ⑤.
Changing the volume presetting of the signal tone (BEEP)
If a signal tone sounds, you always hear it at the preset volume.
Press the softmax (next to "BEEP").
The "BEEP" menu item is flashing. The presetting for the signal tone is shown on the main line (A).
Adjust the desired volume using the volume control 5 or the rocker switch 3 (increments 0 to 6).
You hear a signal tone at the selected volume.
If you do not want to hear any signal tones, set the volume to zero.
"BEEP OFF" appears on the main line
Changing the presetting of the power-on volume (ON VOL)
You can configure the device so that the playback after switch-on always starts with the volume set here. For this purpose, the "ON VOL" menu item must be highlighted.
Press the softmax (next to "ON VOL").
The presetting for the power-on volume is shown on the main line (A).
Adjust the desired volume using the volume control ⑤ or the rocker switch ③ (Increments 1 to 50).
The "ON VOL" menu item is highlighted.
Restoring the volume at switch-on (LAST VOL)
You can configure the device so that the playback after switch-on always starts with the previously selected volume. For this purpose, the "LAST VOL" menu item must be highlighted.
Press the softmax (next to "LAST VOL").
The main line briefly displays "LAST VOL ACTIVE". The "LAST VOL" menu item is highlighted.
Changing clock settings (CLOCK)
In the "CLOCK SETTING" menu, you can set the clock of the device as well as change the display options of the clock.
Press the MENU button 15. The settings menu appears.
Press the softmax (next to "CLOCK").
The "CLOCK SETTING" menu appears.
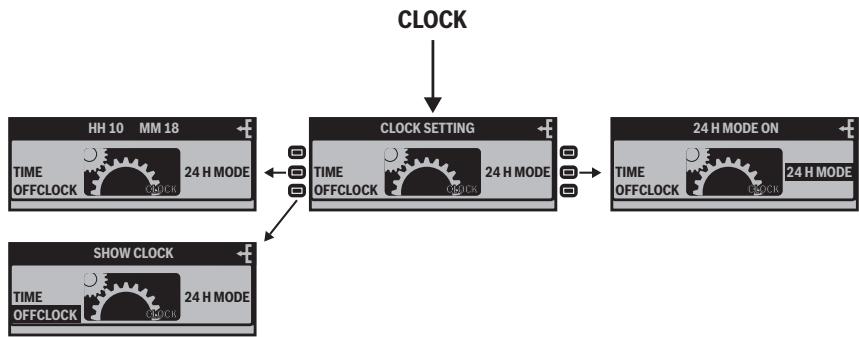
Setting the time (TIME)
Press the softmax (7) (next to "TIME").
The current time is shown on the main line (A). The hours flash.
On the rocker switch ③ ,press or to change the hours.
On the rocker switch ③ , press > to change to the minutes.
The minutes flash.
On the rocker switch ③ ,press or to change the minutes.
Press the OK button to finish the input and to save the time.
Note:
To quit the input without changing the time, press the ESC button 16.
Switching the time display on/off with switched-off device (OFFCLOCK)
The time can be displayed while the device is switched off, if the vehicle ignition is switched on. To switch this time display on/off:
Press the softmax (next to "OFFCLOCK").
- "SHOW CLOCK": The time display is switched on.
- "HIDE CLOCK": The time display is switched off.
Switching the 24-hour time display on/off (24H Mode)
The time can be displayed using the 12-hour or 24-hour format. To switch between these two formats:
Press the softkey ⑪ (next to "24H MODE").
- "24H MODE ON": The 24-hour format is switched on.
- "24H MODE OFF": The 12-hour format (AM/PM) is switched on.
Configuring audio inputs (AUX)
Up to two external audio source, such as MiniDisc player or external MP3 player, can be connected to the audio inputs AUX1 and AUX2. If you are connecting a CD changer, it occupies audio input AUX1 and you can also connect AUX2.
The audio sources AUX1 and AUX2 cannot be operated using the St. Louis. Only the volume can be changed.
Press the MENU button 15. The settings menu appears.
Press the softmax (11) (next to "AUX").
The "AUXILIARY" menu appears. The audio input "AUX1" is displayed only if no CD changer is connected.

Activating/deactivating audio inputs (AUX1/2)
Audio inputs, to which you are connecting external audio sources, must be activated as follows.
Press the softmax (next to "AUX1") and/or the softmax (7) (next to "AUX2").
The status of the audio input is shown on the main line
"AUXILIARY ON": The corresponding audio input is activated and can be selected as audio source using the SRC button 18.
"AUXILIARY OFF": The corresponding audio input is deactivated. It cannot even be selected as audio source if an external audio source is connected.
Renaming audio inputs (EDIT)
If you select an audio input as audio source, "AUXILIARY 1" or "AUXILIARY 2" appears on the main line (A). To change this name:
Note:
The "EDIT" menu item appears only if you activated the corresponding audio input as described in the preceding section.
Press the softmax 8 for AUX2 or the softmax 11 for AUX (each next to "EDIT").
The text input for the selected audio source is shown on the main line (A). The first character of the name is flashing.
On the rocker switch ③ repeatedly press or to change the flashing character.
On the rocker switch ③ , press > to change to the next character. The name can have up to 16 characters.
Press the OK button ⑰ to finish the text input and to store the name entered.
Note:
To quit the text input without changing the name, press the ESC button 16.
Changing special settings (VARIOUS)
In the "VARIOUS MENU" menu, you can change the scan time for the scan function and the welcome text.
Press the MENU button 15. The settings menu appears.
Press the softmax (next to "VARIOUS").
The "VARIOUS" menu appears.
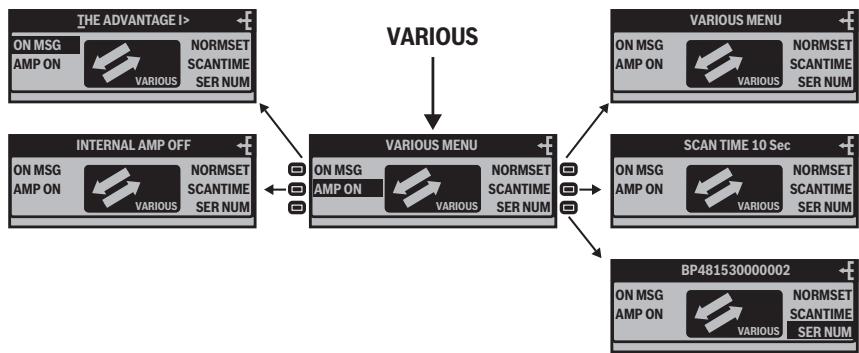
Changing the welcome text (ON MSG)
When you switch on the device, a welcome text appears. This text is factory set to "THE ADVANTAGE IN YOUR CAR!". To change this text:
Press the softmax (next to "ON MSG").
The "ON MSG" menu item is flashing. The text input is shown on the main line . The first character of the welcome text is flashing.
On the rocker switch ③ ,repeatedly press or to change the highlighted character.
On the rocker switch ③ , press > to change to the next character. The welcome text can have up to 35 characters.
Press the OK button to finish the text input and to store the welcome text entered.
Note:
To quit the text input without changing the welcome text, press the ESC button 16.
Switching the internal amplifier on/off (AMP ON)
If you connected the device to an external power amplifier via the preamplifier outputs (Preamp), you can switch off the internal amplifier of the device as follows:

CAUTION!
No sound with switched-off internal amplifier!
If you switch off the internal amplifier, you do not hear a sound from the loudspeakers connected to the device!
Switch off the internal amplifier only if you connected an external power amplifier to the preamplifier outputs (Preamp) of the device and you connected your loudspeakers to this power amplifier:
Press the softmax (next to "AMP ON").
The status of the internal amplifier is shown on the main line (A):
-
"INTERNAL AMP ON": The internal amplifier is switched on. Loudspeakers connected to the device play back the selected audio source.
-
"INTERNAL AMP OFF": The internal amplifier is switched off. Loudspeakers connected to the device always remain mute. The loudspeakers must be connected to the external amplifier.
Resetting the device to factory settings (NORMSET)
Press and hold the softmax (12) (next to "NORMSET") for approx. two seconds.
The main line briefly displays "NORMSET ON". The device is reset to the factory settings.
Changing the scan time (SCANTIME)
Press the softkey ⑪ (next to "SCANTIME").
The "SCANTIME" menu item is flashing. The current scan time is shown on the main line
On the rocker switch ③ repeatedly press or > to increase the scan time.
On the rocker switch ③ repeatedly press or < to decrease the scan time.
You can adjust scan times in increments of 5 seconds form 5 to 30 seconds.
Displaying the serial number (SER NUM)
Every device has a separate serial number. To display this number:
Press the softmax (next to "SER NUM").
The serial number is shown on the main line ()
Error table
If the device does not function properly, switch the device off and on again.
If problems still persist, you can easily correct the following problems.
| Problem | Possible cause | Possible remedy |
| The menus do not appear as shown in these instruc-tions. The tuner cannot be adjust-ed to the frequencies listed in the technical data. | The device is not set to your region. | Set the device to your region as described on page 26. |
| The display shows informa-tion about the device. | The demo mode is activ-ated. | Briefly press the MENU but-ton (15). Press and hold this button again for four sec-onds. |
| The device is always silent, even though it is correctly connected. | The internal amplifier is switched off. | Switch on the internal amplifier as described on page 56. |
If problems still persist, please contact an authorised workshop or the Blaupunkt customer service (see the last page).
Technical data
| Weight | approx. 1.5 kg | ||
| Voltage supply | |||
| Operating voltage: | 10.5–14.4 V | ||
| Current consumption | |||
| In operation:10 seconds after switch-off: | max. 10 A< 3.5 mA | ||
| Amplifier | |||
| Output power: | 25 W RMS x 4 ch @ 14.4 V @ 4 ohm @ 1 %THD | ||
| Preamplifier output (Preamp Out) | |||
| 4 channels: | 3 V | ||
| Input sensitivity | |||
| AUX inputs:Telephone input: | 2 V / 6 kΩ10 V / 1 kΩ | ||
| Tuner | |||
| US frequency range | FM:AM: | 87.5–107.9 MHz530–1,710 kHz | (increments of 200 kHz)(increments of 10 kHz) |
| Europe frequency range | FM:LMW:AM: | 87.5–108 MHzkHz,manual: increments of 50kHz153–279 kHz | (increments of 9 kHz) |
| 531–1,602kHz | (increments of9 kHz) | ||
| Thailand frequency range | FM:AM: | 87.5–108 MHzkHz,manual: increments of 50kHz531–1,602 kHz | (increments of 9 kHz) |
| FM frequency response: | 35–16,000 Hz | ||
| FM mono sensitivity: | < 17 dBf | ||
Glossary
AF - Alternative frequency
The range of FM stations is limited. For this reason, FM programmes are distributed to different frequencies. The AF RDS service sends these frequencies to the tuner. If the reception deteriorates because the vehicle leaves the reception area of a frequency, the tuner can automatically change to the best receivable frequency.
DEQmaxEx - Digital parametric equalizer with variable filter quality
This function allows for a maximum of exact frequency optimisation, so that the sound spectrum can be adjusted to the vehicle or your individual taste.
Quality factor Q
It determines the filter quality of the equalizer, i.e. the edge steepness and filter bandwidth, dependent upon the characteristic frequency.
ID3 tags
ID3 tags contain additional information for MP3 files (e.g. artist, title, album, genre, year).
Mass storage device
Format for storage media that can permanently store large amounts of data, such as USB removable storage devices (USB stick or USB hard disk).
MMC/SD card (Multimedia Card/ Secure Digital Card)
MMC/SD cards are memory card formats that can be inserted in card slot ② of the device. The device can play MP3 and WMA files stored on the memory cards.
MP3, WMA
MP3 and WMA are audio data formats that allow for high compression with little loss in quality.
Playlist
Playback list for MP3 or WMA files In playlists, you determine the order in which certain titles should be played. They are created with an MP3 manager, such as WinAmp® or Windows Media Player®.
PTY - Program Type
The device searches only for stations with preselectable programme content (e.g. news, rock, pop, sports, etc.).
The device automatically switches through emergency and disaster announcements (PTY 31).
Root directory
Main directory of a data carrier. The root directory contains all other directories.
Subwoofer, Subout
Separate low-bass loudspeaker. The device has a Subout preamplifier output. You can connect either an active subwoofer or a separate power amplifier with subwoofer.
Automatic searching and storing of the six strongest radio stations received of the region.
Tuner
Receiving unit of the radio.
USB - Universal Serial Bus
USB is an interface for connecting external removable storage devices to the device.
XBASS
XBASS means raising the bass at low volume. This renders the sound richer even at a low volume.
Keyword index
Symbole
24 h Mode 53
A
ADJUST 42
Alternative frequencies
Allowing 28
Amplifier 56
AMP ON 56
ANGLE 48
AREA 26
AUDIO 40
Audio inputs
Activating 54
Configuring 53
Renaming 54
Audio source 14
Tuner 23
AUTO 42
AUTO SND 45
AUX 53
B
BALANCE 40
BAND 27
BAND button 8,21
BASS 40
Bass increase 45
BEEP 50
Browser 35
Button for detaching the control
panel 8
Buttons 8
Button to eject/insert a CD 8
C
CD
Changing the name of a CD in the
CD changer magazine 38
Inserting 12
Removing 12
Selecting from the CD changer
magazine 38
CD changer 37
Changing the name of a CD in the
magazine 38
Display 17
Functions 37
CD changer display 17
CD display 16
CD overview 38
CD player 30
Display 16
Functions 31
CD text 32
Central area 16, 17
CLOCK 52
Clock 52
24-hour time display 53
Display with switched-off device 52
Setting 52
COLOR 47
Control panel 10
Correcting errors
57
Correcting malfunctions 57
Country code 26
D
DEQ 41
DISPLAY 47
Display
Brightness 21
Changing the colour 47
Inverting 49
Note:
Keywords in capital letters refer to menu items.
Viewing angle 48
E
EDIT 54
Equalizer 42, 46
Calling up a user-defined setting 41
Creating a user-defined setting 42
Settings recommendations 44
ESC button 9,21
F
Factory settings 56
FADER 40
FM1, FM2, FM3, and FMT 23
Forward 18
H
Handheld remote control
Replacing the battery 12
HIGH CUT 29
1
Improved reception 29
INFO 34
Info line 16, 17
INVERT 49
L
LAST VOL 51
M
Main line 16, 17
MANUAL 43
Memory bank 23
Memory card
Card slot 9
Inserting 12
Removing 12
Menu
Calling 21
Changing and saving a setting 22
Exiting 22
Operate 20
Operating example 21
Settings menu 39
Tuner menu 27
MENUButton9,20
MIX 16, 19
MMC card: See memory card
MONO 29
Mono operation 29
MP3
Files on CD 30
MP3 display 17
MP3 player 33
Display 17
Functions 33
MUTE 14
Muting 14
N
NEXT button 8, 20, 21
NORMSET 56
0
OFFCLOCK 52
OK button 9,18,21
On/Off button 8
ONMSG55
ON VOL 51
P
PHONE 50
Playlist 35
PRESET 44
PROG TYP 29
PTY 16, 29
R
Random track play 19
RDS 16,28
Remote control
Replacing the battery 12
Repeat 19, 20
Repeat mode 19
Repeat title 20
Replacing the battery of the remote
control 12
Reverse 18
Rocker switch 8,9,18
RPT 16, 19
S
Safety 6
SCAN 20
Scanning 20
SCANTIME 56
Scan time 56
SCREEN S 49
Screen saver 49
SCROLL 32, 34
SD card: see memory card
Seek tuning sensitivity 28
SENS 28
Serial number 57
SER NUM 57
Settings menu 39
Setting the region 26
SHOW ALL 34
Skip title 18
Softkey 8,18
Sound 40
SPECTRUM 49
Spectrum analyser 49
SRC button 9
Station
Calling 25
Scanning 25
Storing 24
Stereo operation 29
SUBOUT 45
Subwoofer 45
Switch-off 11
Switch-on 10
T
T-STORE 28
Telephone 14
TIME 52
Title information 34
Travelstore 28
TREBLE 40
Tuner
Display 16
Functions 23
Menu 27
Tuner display 16
U
USB medium
Connecting 13
USER 48
V
VARIOUS 55
VOLUME 50
Volume 13
At switch-on 51
Muting 14
Presetting 50
Speed-dependent increase 45
Volume control 8, 9
Volume distribution 40
W
Warranty 7
Waveband 27
Welcome text 55
WMA
Files on CD 30
WMA player 33
Functions 33
X
XBASS 45
XBS 16
Sommaire
Touched'éjection/introduction
du CD 70
Las condiñaciones de esta garantíaSEOSEOSEOSEOSEOSEOSEOSEOSEOSEOSEOSEOSEOSEOSEOSEOSEOSEOSEOSEOSEOSEOSEOSEOSEOSEOSEOSEOSEOSEOSEOSEOSEOSEOSEOSEOSEOSEOSEOSEOSEOSEOSEOSEOSEOSEOSEOSEOSEOSEOSEOSEOSEOSEOSEOSEOSEOSEOSEOSEOSEOSEOSEOSEOSEOSEOSEOSEOSEOSEOSEOSEOSEOSEOSEOSEOSEOSEOSEOSEOSEOSEOSEOSEOSEOSEOSEOSEOSEOSEOSEOSEOSEOSEOSEOSEOSEOSEOSEOSEO SEO solicitarse directamente a:
Blaupunkt GmbH
Hotline
Robert-Bosch-Str. 200
D-31139 Hildesheim
Alemania