
GTA 450 - Audio Amplifier BLAUPUNKT - Free user manual and instructions
Find the device manual for free GTA 450 BLAUPUNKT in PDF.
| Product type | 4-channel audio amplifier |
| Brand | BLAUPUNKT |
| Model | GTA 450 |
| Max power (Quad mode) | 4 x 100 W / 4 Ω or 4 x 160 W / 2 Ω |
| Max power (Stereo mode) | 2 x 320 W / 4 Ω |
| RMS power (Quad mode) | 4 x 50 W / 4 Ω or 4 x 80 W / 2 Ω |
| RMS power (Stereo mode) | 2 x 160 W / 4 Ω |
| Frequency response | 10 Hz – 30 000 Hz |
| Signal-to-noise ratio | > 90 dB |
| Impedance stability | 2 Ω |
| Dimensions (W x H x D) | 332 x 49,5 x 232 mm |
| Power supply | 12 V DC (vehicle battery) |
| Input sensitivity | 0,1 – 8 V |
| Low-pass filter (Low Pass) | 40 – 450 Hz |
| High-pass filter (High Pass) | 65 – 450 Hz |
| Bass Boost | 0 – +18 dB |
| Built-in fuses | Yes (protect the amplifier) |
| Recommended cable gauge (+/-) | 6 mm² minimum |
| Operation indicator | Green (on) / Red (protection) |
| Audio input | Cinch (RCA) socket |
| Car radio compatibility | Cinch output or ISO-Cinch adapter |
| Bridged connection (mono) | Possible, minimum load 4 Ω |
Frequently Asked Questions - GTA 450 BLAUPUNKT
User questions about GTA 450 BLAUPUNKT
0 question about this device. Answer the ones you know or ask your own.
Ask a new question about this device
Download the instructions for your Audio Amplifier in PDF format for free! Find your manual GTA 450 - BLAUPUNKT and take your electronic device back in hand. On this page are published all the documents necessary for the use of your device. GTA 450 by BLAUPUNKT.
USER MANUAL GTA 450 BLAUPUNKT
natural_image
Exterior view of a G7A 450 industrial amplifier device (no visible text or symbols on body)http://www.blaupunkt.com
DEUTSCH 3
Fig. 1 - Fig. 5 ...... 35
ENGLISH 7
Fig. 1 - Fig. 5 ...... 35
FRANÇAIS...... 11
Fig. 1 - Fig. 5 ...... 35
ITALIANO 15
Fig. 1 - Fig. 5 ...... 35
NEDERLANDS 19
Fig. 1 - Fig. 5 ...... 35
SVENSKA 23
Fig. 1 - Fig. 5 ...... 35
ESPAÑOL 27
Fig. 1 - Fig. 5 ...... 35
PORTUGUÊS 31
Fig. 1 - Fig. 5 ...... 35
DEUTSCH
Einführung
Congratulations on your purchase of a high-quality GTA power amplifier. By selecting the GTA 450 you have chosen a product which delivers superlative reproduction quality. Whether you are upgrading an existing system or using the GTA power amplifier in a new system, you are certain to notice immediate performance benefits!
The Blaupunkt editors are constantly working on making the operating instructions clearer and easier to understand. However, if you still have any questions on how to operate the equipment, please contact your dealer or the telephone hotline for your country. You will find the hotline telephone numbers printed at the back of this booklet.
We provide a manufacturer guarantee for our products bought within the European Union. You can view the guarantee conditions at www.blaupunkt.de or ask for them directly at:
Blaupunkt GmbH
Hotline
Robert Bosch Str. 200
D-31139 Hildesheim
Germany
Recommendation:
A power amplifier's performance is only as good as its installation. Proper installation will maximise the overall performance of your audio system. We recommend that you have our product installed professionally. Should you decide to install the amplifier yourself, however, please read through these instructions carefully, and take your time over the installation.
Finally, a word about your health: please bear in mind when playing music in your car that sustained sound levels above 100 dB can damage your hearing and may even result in total hearing loss. Modern high-performance systems and high-quality loudspeaker configurations are quite capable of generating noise levels above 130 dB.
Safety precautions Instructions for installation and connection
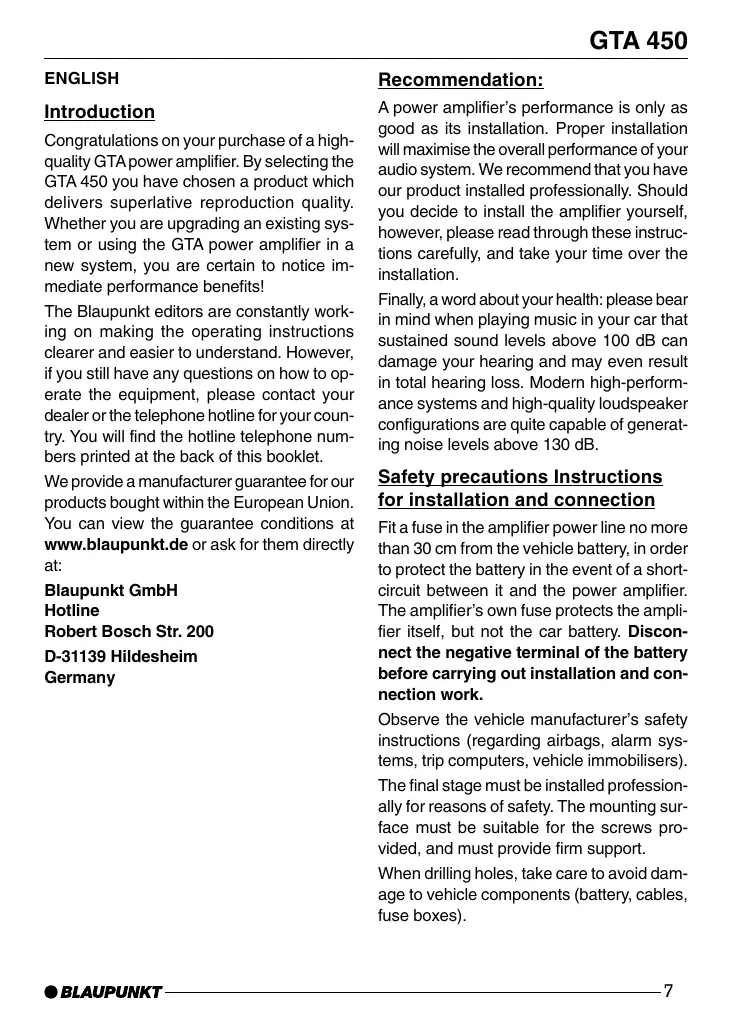
Fit a fuse in the amplifier power line no more than 30 cm from the vehicle battery, in order to protect the battery in the event of a short-circuit between it and the power amplifier. The amplifier's own fuse protects the amplifier itself, but not the car battery. Disconnect the negative terminal of the battery before carrying out installation and connection work.
Observe the vehicle manufacturer's safety instructions (regarding airbags, alarm systems, trip computers, vehicle immobilisers).
The final stage must be installed professionally for reasons of safety. The mounting surface must be suitable for the screws provided, and must provide firm support.
When drilling holes, take care to avoid damage to vehicle components (battery, cables, fuse boxes).
Fit the amplifier in a suitable location, e.g. beneath the seats or in the trunk (Fig. 1). The mounting location must also be dry, and provide sufficient ventilation for cooling of the amplifier. Use cable grommets when passing cables through holes with sharp edges. Use loudspeakers with an impedance of 2 to 4 Ω (see table or installation drawing). Observe the max. power handling specifications (music output). Do not connect the loudspeakers to ground; only use the terminals provided. The cross-section of the positive and negative cable must be at least 6 mm².
GTA 450 amplifier
The amplifier is suitable for connection to car radios with Cinch connector. Use the Blaupunkt ISO Cinch adapter to connect the amplifier to car radios with ISO connector (7 607 893 093/7 607 855 094).
Applications and loudspeaker connection
| Quadro-Mode Max Power | 4 x 100 Watt / 4 Ω | Fig. 3 |
| Stereo-Mode Max Power | 2 x 320 Watt / 4 Ω | Fig. 5 |
| Quadro-Mode Max Power | 4 x 160 Watt / 2 Ω | Fig. 3 |
| Quadro-Mode RMS Power | 4 x 50 Watt / 4 Ω | Fig. 3 |
| Stereo-Mode RMS Power | 2 x 160 Watt / 4 Ω | Fig. 5 |
| Quadro-Mode RMS Power | 4 x 80 Watt / 2 Ω | Fig. 3 |
| Frequency response | 10 Hz - 30.000 Hz | |
| Signal-to-noise ratio | >90 dB | |
| Stability | 2 Ω | |
| Input-sensitivity | 0,1 - 8 V | |
| Low-pass filter | 40 - 450 Hz | |
| High-pass filter | 65 - 450 Hz | |
| Bass Boost | 0-18 dB | |
| Dimensions W x H x D (mm) | 332 x 49,5 x 232 |
Positive/negative connection
We recommend a cable cross-section of not less than 6 mm ^2 . Run a standard commercial positive cable to the battery and connect to the fuse holder. Use cable grommets when passing cables through holes with sharp edges. Bolt a standard commercial negative cable to a ground point free of induced noise (car body bolt, body panel) - not to the negative battery pole. Clean the contact surface of the ground point down to bare metal and coat with antiseize graphite petroleum.
Integral fuses
The integral fuses within the amplifier protect the final stage and the entire electrical system in the event of a fault. Never bridge fuses or replace fuses with a higher current rating.
Example connections
Power supply connection Fig. 2.
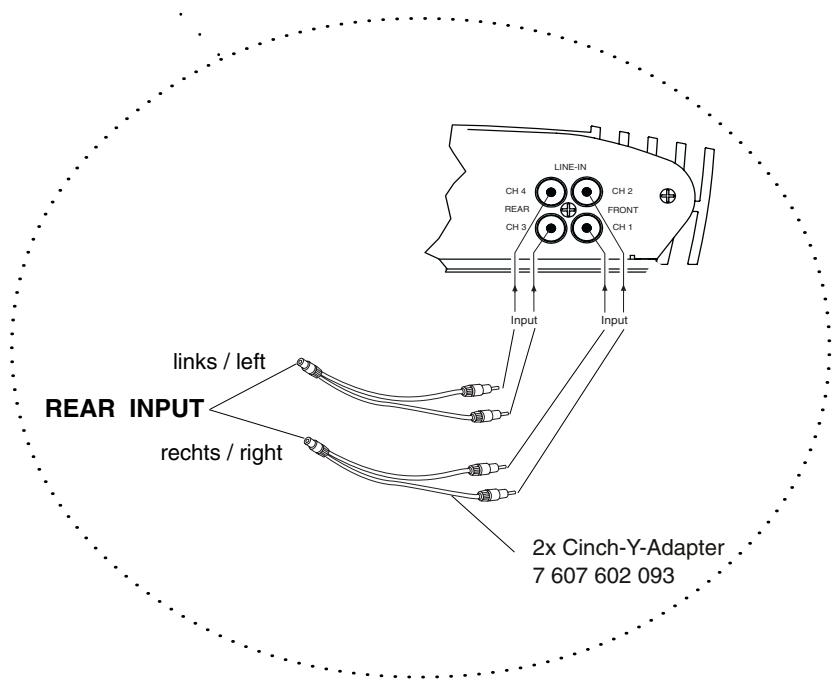
Connection of car radio with cinch output Fig. 2a.
Loudspeaker connections Fig. 3/4/5.

Connect remote amplifier connection to switchable +12 V power source
This enables the amplifier to be switched on and off with the radio's On/Off switch.
Level control
The Level control enables the input sensitivity of the final stage to be matched to the output voltage of your car radio preamp output.
The range of adjustment extends from 0.1 V to 8 V.
Adjust the input sensitivity in accordance with the manufacturer's specifications when connecting the amplifier to other radios.
Important: Turning the Level control clockwise increases the input sensitivity of the amplifier, and thereby also the volume. The Level control is however not a volume control; an increase in volume is not achieved in the maximum position, even if this subjectively appears to be the case. The system merely increases the volume more quickly when the volume is turned up on the radio.
Loudspeaker connections
(If the amplifier is to be connected in a bridged mode, proceed with the section "Bridged loudspeaker connections".)
As with any audio component, connection of the amplifier and speakers with the correct polarity is essential for good bass reproduction. Ensure therefore when connecting that the positive (+) amplifier terminal is connected to the positive (+) loudspeaker terminal. The same applies to the negative (-) terminals. The left-hand amplifier chan-
nel must also be connected to the left-hand loudspeaker and the right-hand amplifier channel to the right-hand loudspeaker.
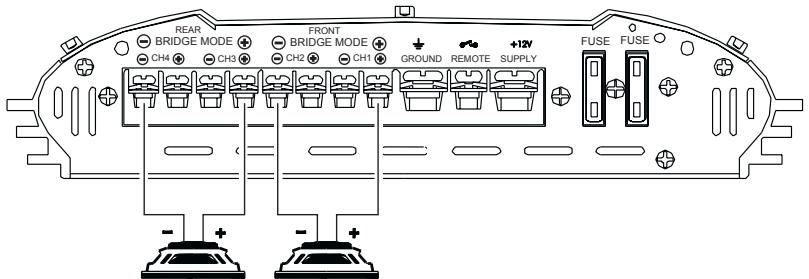
Bridged loudspeaker connections
The GTA can also be bridged in a mono configuration. This enables you to use the amplifier for one or more subwoofer(s) or a mid-range speaker. In this configuration the amplifier sums the right-hand and left-hand channels, delivering a single channel (mono) output.
Note:
The amplifier can sum the right- and left-hand signal information only if both the right- and left-hand RCA connections have been made.
CAUTION:
The amplifier must be presented with a load of 4 Ohms or higher in bridged mode. A lower load will cause the amplifier to overheat or switch off. This can lead to permanent damage of the unit.
Adjustment of the type and range of the cross-over frequencies
The type of crossover (i.e. “low-pass” or “hipass”) and the desired crossover frequency can be selected on the GTA 450. If, for example, you wish to drive a pair of subwoofers, connect in accordance with the low-pass diagram (fig. 2a). The crossover frequency is dependent upon the loudspeaker frequency range (consult the loudspeaker manufacturer’s data for the recommended frequency range).
"High- Pass" frequency control
This control is active when the switch is in the “Hi-pass” position, and permits selection of the desired crossover frequency. Example: at a of 40 Hz, the loudspeaker has a frequency range of 40 Hz to 30.000 Hz.
"Low-pass" frequency control
This control is active when the switch is set to “Low-pass” and permits selection of the desired crossover frequency. Example: at a setting of 150 Hz, the loudspeaker has a frequency range of 10 Hz to 150 Hz.
Bass boost
You can adjust the bass output of the amplifier using the bass boost control. The settings range covers 0 dB to +18 dB.
Operating indicator (POWER / PROTECTION)
Green lamp: Power amp on, regular operating condition
Red lamp: Power amp has been switched off electronically, due to a fault or failure.
FRANÇAIS
Introduction
"High pass"-frequentieregeling
Fig. 2
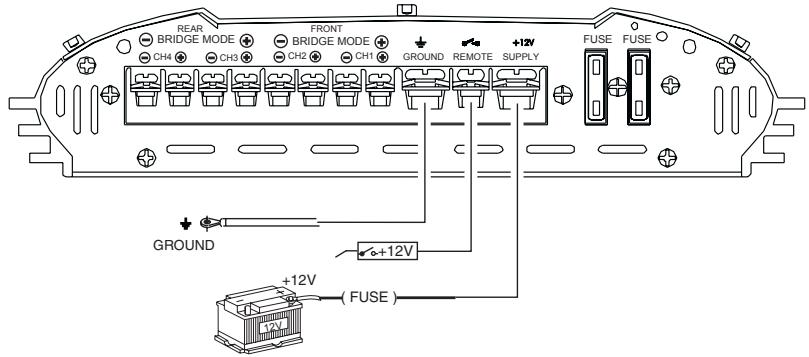
Fig. 2a
Fig. 3
min. 2 Ohm x4
4 Kanal / Channel Mode (Quadro-Mode)
Fig. 4
min. 4 Ohm
min. 2 Ohm x2
3 Kanal / Channel Mode
Fig. 5
min. 4 Ohm x2
2 Kanal / Channel Mode (Stereo-Bridged Mode)
This information is subject to change without notice!
- DEUTSCH
- Einführung
- Recommendation:
- Safety precautions Instructions for installation and connection
- GTA 450 amplifier
- Positive/negative connection
- Integral fuses
- Example connections
- Connect remote amplifier connection to switchable +12 V power source
- Level control
- Loudspeaker connections
- Bridged loudspeaker connections
- Note:
- CAUTION:
- Adjustment of the type and range of the cross-over frequencies
- "High- Pass" frequency control
- "Low-pass" frequency control
- Bass boost
- Operating indicator (POWER / PROTECTION)
- FRANÇAIS
- Introduction
- "High pass"-frequentieregeling
Brand : BLAUPUNKT
Model : GTA 450
Category : Audio Amplifier