USER MANUAL BUENOS AIRES 200 BLAUPUNKT
Buenos Aires 200 Stockholm 100
7649026110
7649020110

www.blaupunkt.com
Bedienungs- und Einbauanleitung
Operating and installation instructions
Mode d'emploi et de montage
Istruzioni d'uso e di installment
Gebruiksaanwijzing en inboundwhandleiding
Bruks- och monteringsanvising
Käytö- ja asennusohje
Odbyicç Λειουρίας και Evkataστασης
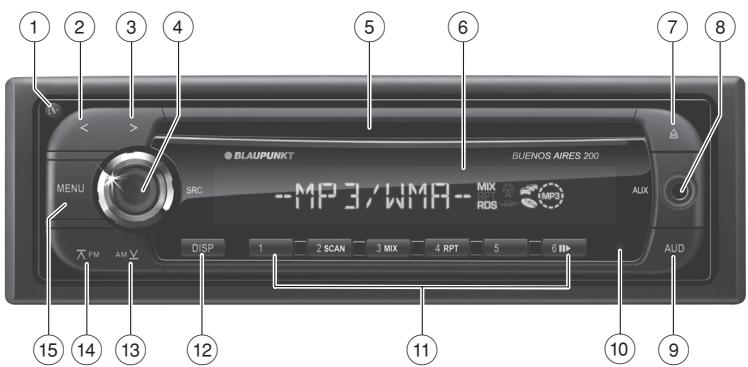
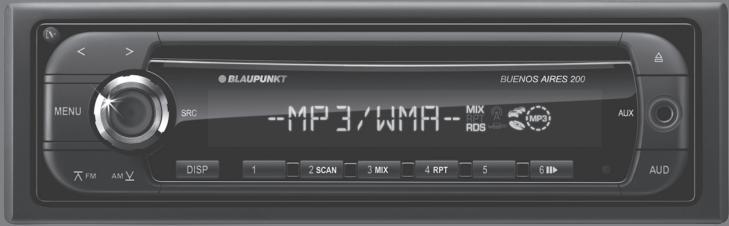
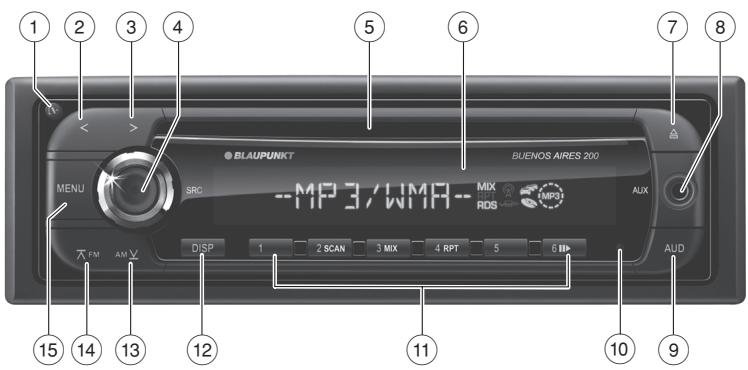
①【】-Taste
11 Tastenblock 1-6
12 DISP-Taste
Radio mode: Adjust the stations
CD/MP3/WMA mode: Track selection
③>button
In the menu: Change settings
Radio mode: Adjust the stations
CD/MP3/WMA mode: Track selection
④ On/Off button
Short press: Switch on switched off device, select audio source/"NO SRC" mode
Long press: Switches the device off
Turn: Adjust volume, change settings in Audio menu
⑤ CD tray
⑥ Display
⑦ ▲button (Eject)
Eject a CD
⑧ Front AUX-IN socket
⑨ AUD button
Call up the Audio menu
⑩ Reset button
Reset the device to the factory settings
11 Keys 1-6
(12) DISP button
Short press: Switch display
Long press: Display text as scrolling text
⑬ AM button
In the menu: Call up menu item
Radio mode: Select MW waveband
MP3/WMA mode: Change to previous folder
(4) A FM button
In the menu: Call up menu item
Radio mode: Select FM waveband, change between FM memory banks
MP3/WMA mode: Change to next folder
(15) MENU button
Long press: Call up user menu
Short press: Call up PTY menu, exit menus
About these instructions 20
For your safety. 20
Cleaning instructions 21
Disposal of old unit. 21
Scope of delivery 21
Optional equipment (not part of the scope of delivery) 21
Warranty. 21
Placing the device in operation 22
Detaching/attaching the control panel.....22
Switching on/off 22
Adjusting the volume 22
"NO SRC" mode (muted) 22
Preamplifier output (Buenos Aires 200 only) 23
Radio mode 23
RDS 23
Changing to radio mode 23
Selecting the memory bank (FM1, FM2, FM3, MW) 23
Tuning into a station. 24
PTY 24
Storing stations/Calling stored stations.....25
Storing stations automatically (Travelstore) 25
Switching traffic information priority on/off 25
Configuring the display. 25
CD/MP3/WMA mode. 26
Basic information 26
Changing to CD/MP3/WMA mode 26
Inserting a CD 26
Ejecting a CD 26
Selecting tracks 26
Selecting a folder (in MP3/WMA mode only). 27
Direct track search 27
Fast searching. 27
Interrupting playback 27
Scanning all tracks. 27
Playing tracks in random order 27
Repeatedly playing individual tracks or directories. 27
Configuring the display. 28
Sound settings 28
Calling and exiting the audio menu. 28
Performing settings in the audio menu.....28
Adjusting the level for an audio source.....29
Adjusting the low-pass filter for the subwoofer (Buenos Aires 200 only) .........29
Adjusting the loudspeaker type 29
User settings 30
Calling and exiting the user menu. 30
Performing settings in the user menu 30
Setting the time manually 32
Additional functions 33
External audio sources 33
Restoring factory settings 33
Technical data 33
Installation instructions 130
About these instructions
These instructions contain important information to easily and safely install and operate the device.
- Read these instructions carefully and completely before using the device.
- Keep the instructions at a location so that they are always accessible to all users.
- Always pass on the device to third parties together with these instructions.
In addition, observe the instructions of the devices used in conjunction with this device.
Symbols used
These instructions employ the following symbols:

CAUTION!
Warns about laser beam

CAUTION!
Warns about damaging the CD drive

The CE mark confirms the compliance with EU directives.
Identifies a sequencing step
- Identifies a listing
Use as directed
This device is intended for installation and operation in a vehicle with 12V vehicle system voltage and must be installed in a DIN slot. Observe the performance limits in the technical data. Repairs and installation, if necessary, should be performed by a specialist.
The Blaupunkt GmbH declares that the devices Buenos Aires 200 and Stockholm 100 comply with the basic requirements and the other relevant regulations of the directive 89/336/EWG.
For your safety
The device was manufactured according to the state of the art and established safety guidelines. Even so, dangers may occur if you do not observe the safety notes in these instructions.
If you are installing device yourself
You may only install the device yourself if you are experienced in installing car sound systems and are very familiar with the electrical system of the vehicle. For this purpose, observe the installation instructions at the end of these instructions.
Observe the following!

CAUTION!
The device contains a Class 1 laser that can cause injuries to your eyes.
Do not open the device and do not perform any modifications.
In operation:
- Operate the device only if traffic situation permits it! Stop at a suitable location to perform more extensive operations.
- Remove or attach the control panel only while the vehicle is standing an.
- Always listen at a moderate volume to protect your hearing and to be able to hear acoustic warning signals (e.g. police sirens). During mute phases (e.g. when changing the audio source), changing the volume is not audible. Do not increase the volume during this mute phase.
After operation:
- The device is worthless to a thief without the control panel. Always remove the control panel whenever you leave the vehicle.
- Transport the control panel so that it is protected against impacts and the contacts cannot become dirty.
Cleaning instructions
Solvents, cleaning and scouring agents as well as dashboard spray and plastics care product may contain ingredients that will damage the surface of the device.
Use only a dry or slightly moistened cloth for cleaning the device.
If necessary, clean the contacts of the control panel regularly using a soft cloth moistened with cleaning alcohol.
Disposal of old unit

Do not dispose of your old unit in the household trash!
Use the return and collection systems available to dispose of the old device.
Scope of delivery
The scope of delivery includes:
1 Car sound system
1 Operating instructions
1 Cloth case for the control panel
1 Support frame
1 Set of small parts
2 Disassembly tools
1 Connector cable
Optional equipment (not part of the scope of delivery)
Use only optional equipment approved by Blaupunkt, such as:
- Blaupunkt or Velocity amplifier
Information is available from your Blaupunkt specialised dealer or on the Internet under www.blaupunkt.com.
Warranty
We provide a manufacturer's warranty for products bought within the European Union. Devices purchased outside the European Union are subject to the warranty terms published by our respective regional agency.
The warranty terms can be called up under www.blaupunkt.com or requested directly from:
Blaupunkt GmbH
Hotline
Robert-Bosch-Str. 200
D-31139 Hildesheim
Service
In some countries, Blaupunkt offers a repair and pick-up service.
Information about the availability of this service in your country can be found at www.blaupunkt.com.
If you want to take advantage of this service, you may request a pick-up service for your device via the Internet.
Placing the device in operation
Detaching/attaching the control panel
The device is equipped with a detachable control panel (flip-release panel) as a way of protecting your equipment against theft. Always take the control panel with you when leaving the vehicle. The device is worthless to a thief without this control panel.
Caution
Damage to the control panel
Never drop the control panel.
Do not expose the control panel to direct sunlight or another heat source.
Avoid direct skin contact with the control panel's electrical contacts.
Removing the control panel
Press the button ① to unlock the control panel.
Grasp the control panel at the left side and first pull it straight out of the bracket and then to the left.
Attaching the control panel
Push the control panel into the bracket at the right edge of the device.
Push the control panel carefully into the left bracket until it clicks into place.
Switching on/off
With the vehicle ignition switched on, briefly press the On/Off button 4 to switch on the device.
-or-
Press the On/Off button 4 for approx. 2 seconds to switch off the device.
The device remembers the audio source played last for the next switch-on. Any CD already inserted in the device remains there.
Notes:
- If the vehicle ignition is switched off, the device cannot be switched on with the On/Off button ④.
- The device is switched off and on again with the vehicle ignition if it is connected with the ignition (see the installation instructions).
Adjusting the volume
You can adjust the volume in increments from 0 (off) to 66 (maximum).
Turn the On/Off button 4 to change the volume.
Note:
If a telephone or navigation system is connected with the device as described in the installation instructions, the device is muted with every telephone call or a navigation announcement. The display then shows "PHONE".
"NO SRC" mode (muted)
Instead of an audio source, you can select the "NO SRC" mode ("No Source": no audio source).
In the "NO SRC" mode, no audio source is selected. The device is muted and may automatically switch off after a predefined time, if set (see the chapter "User settings", section "Performing settings in the user menu", menu item "OFF").
Certain user settings can be performed only in the "NO SRC" mode.
Changing to "NO SRC" mode
Press the On/Off button 4 repeatedly until "NO SRC" appears.
Preamplifier output (Buenos Aires 200 only)
This device features a preamplifier output.
Settings for the preamplifier output:
- Chapter "User settings", section "Performing settings in the user menu", menu item "SWPRE"
- Chapter "Sound settings", section "Adjusting low-pass filter for subwoofer".
Radio mode
RDS
Many FM stations broadcast an RDS (Radio Data System) signal in addition to their programme that allows the following additional functions:
- The station name is shown on the display.
- The device recognises traffic announcements and news broadcasts and can automatically switch them through in any operating mode (e.g. in CD mode).
- Alternate frequency (AF): If RDS is activated, the device automatically selects the best receivable frequency for the station that is currently set.
Regional (REG): At certain times, some radio stations divide their programme into regional programmes providing different content. If the REG function is activated, the device changes only to those alternate frequencies on which the same regional programme is being broadcast.
To switch the RDS or REG function on or off, please read the section "Performing settings in the user menu" in the chapter "User settings" (menu items "AF", "REG").
Changing to radio mode
Press the On/Off button 4 repeatedly until "FM"/"AM" appears.
Selecting the memory bank (FM1, FM2, FM3, MW)
Press the AFM button 14 repeatedly until the desired FM memory bank (FM1, FM2, FM3) appears.
-or-
Press the AMV button 13 to select the MW memory bank.
Note:
Up to six stations can be stored in each memory bank.
Tuning into a station
The buttons < ② / > 3 allows tuning into stations manually or by using automatic seek tuning or changing between stored stations. First, adjust the desired function in the user menu (see the chapter "User settings", section "Performing settings in the user menu", menu item "AUTO1 / AUTO2 / MANUAL").
Starting station seek tuning (setting "AUTO1")
Press the button < 2 / >3 briefly to tune into the next receivable station.
Notes:
- If the priority for traffic information is activated (→), only traffic information stations are tuned into.
- The sensitivity of seek tuning can be adjusted (see the chapter "User settings", section "Performing settings in the user menu", menu item "LO.S").
Adjusting stations manually (setting "MANUAL")
Press the button < ② / > ③ briefly once or several times to change the frequency in increments.
Press and hold down the button < 2> to quickly change the frequency.
Changing between stored stations (setting "AUTO2")
Press the button < 2 / > 3 briefly to tune to the station at the next memory location.
PTY
An FM station can transmit its current programme type, e.g. CULTURE, POP, JAZZ, ROCK, SPORT or KNOWLEDGE. Hence, the PTY function allows a targeted search for broadcasts of a certain programme type, e.g. for rock or sports broadcasts. Note that PTY is not supported by all stations.
Selecting programme type and searching for stations
You can select a random or a previously stored programme type (see the section "Storing a programme type").
Briefly press the MENU button 15. The PTY menu is displayed.
If necessary, press the button AMX13/ AFM14 repeatedly until the desired programme type is displayed.
-or-
Press the station button 1-6 ⑪ where the desired programme type is stored.
Briefly press the button < 2 / >3 to start seek tuning for the next station of the selected programme type.
If necessary, briefly press the MENU button 15 to exit the PTY menu or cancel seek tuning.
Notes:
- If no stations with the selected programme type is found, "NOPTY" is briefly displayed. The radio will then retune to the station that it played last.
- The display language for the display of the programme types can be adjusted (see the section "Setting the language for programme types").
Storing programme types
You can store programme types under the station buttons and select them for the search.
- Briefly press the MENU button ⑤ to open the PTY menu.
If necessary, press the button AMX 13 / FM repeatedly until the desired programme type is displayed.
Press the desired station button 1-6 for approx. 2 seconds to store the programme type.
- Briefly press the MENU button ⑤ to exit the PTY menu.
Setting the language for programme types
You can select the language in which the programme types should be displayed.
- Briefly press the MENU button ⑤ to open the PTY menu.
- Briefly press the DISP button (12) to open the language menu.
If necessary, press the button AMY(13)/AFM(14) repeatedly until the desired language (ENGLISH/FRENCH/GERMAN) is displayed.
Briefly press the DISP button 12
- Briefly press the MENU button ⑤ to exit the PTY menu.
Storing stations/Calling stored stations
Select the desired memory bank.
If necessary, set the desired station.
Press the station button 1-6 for approx. 2 seconds to store the current station under the button.
-or-
Briefly press the station button 1-6 to call up the stored station.
Storing stations automatically (Travelstore)
With Travelstore, 6 stations each of the region are stored in the current memory bank. Any previously stored stations in this memory bank are deleted in the process.
To start the Travelstore function, select the "A-MEMORY" menu item in the user menu (see the chapter "User settings", section "Performing settings in the user menu").
Note:
If the priority for traffic information is activated (一) , only traffic information stations are stored.
Press the AFM button 14 for approx. 2 seconds to switch the priority on or off.
If priority is switched on, the display shows the traffic jam symbol (一) . "TRAFFIC" is displayed during a switched-through traffic announcement.
Notes:
- The volume that you adjust during a traffic announcement is automatically set for subsequent announcements.
- To cancel a switched-through traffic announcement, press the AFM button 14 for approx. 2 seconds.
Configuring the display
Press the DISP button 12 once or twice to change between these displays:
| Display | Meaning |
| FREQ/PS | Frequency/station name |
| R-TEXT | Radio text |
| CLOCK | Time |
Press the DISP button 12 for approx. 2 seconds to show the displayed text once as scrolling text.
CD/MP3/WMA mode
This car sound system can be used to play audio CDs (CDDA) as well as CD-R/RWs with audio, MP3 or WMA files.

Risk of damage to the CD drive!
Noncircular contoured CDs (shape CDs) and CDs with a diameter of 8cm (mini CDs) must not be used.
We accept no responsibility for any damage to the CD drive that may occur as a result of the use of unsuitable CDs.
Notes:
- To ensure proper functioning, use only CDs with the Compact-Disc logo.
- Blaupunkt cannot guarantee the flawless function of copy-protected CDs and all CD blanks available on the market.
Note the following information when preparing an MP3/WMA CD:
-
Naming of tracks and directories:
-
Max. 16 characters incl. the file extension ".mp3" or ".wma" (the use of more characters reduces the number of tracks and folders that the device can recognise)
-
No umlauts or special characters
-
CD formats: Audio CD (CDDA), CD-R/RW, 0:12 cm
- CD data formats: ISO 9669 Level 1 and 2, Joliet
CD burn speed:Max.16x (recommended)
-
File extension of audio files:
-
.MP3 for MP3 files
WMA for WMA files
-
WMA files only without Digital Rights Management (DRM) and created with Windows Media Player version 8 or later
-
MP3 ID3 tags: Version 1 and 2
-
Bitrate for creating audio files:
-
MP3: 32 to 320 kbps
WMA: 32 to 192 kbps
Max. number of tracks and folders: 999 tracks, 99 folders
Changing to CD/MP3/WMA mode
Press the On/Off button 4 repeatedly until "CD" appears.
Note:
The CD/MP3/WMA mode can be selected only if a corresponding CD is inserted.
Inserting a CD
Note:
You must not hinder or assist the drive as it automatically draws in the CD.
Push the CD into the CD tray ⑤ until you feel a resistance.
The CD is automatically drawn in and playback starts. If a CD is inserted, the display shows the CD symbol.
Ejecting a CD
Notes:
- If a CD is ejected and not removed, the drive will automatically draw it back in again after approx. 10 seconds.
- You can also eject CDs whilst the device is switched off or whilst another audio source is activated.
Press the button ⑦ to eject an inserted CD.
Selecting tracks
Briefly press the button < 2> / >3 to change to the previous/next track.
Note:
Pressing < 2 once starts the current track again.
Selecting a folder (in MP3/WMA mode only)
Press the button AMY/ FM to change to the previous/next folder.
Direct track search
You can also select a track directly without interrupting the current playback.
Briefly press the MENU button 15. "FLD SEL" briefly appears on the display.
In MP3/WMA mode, press the <button ② to change from the current to the next higher-level folder.
Press the button AMY(13)/FM(14) once or several times or turn the On/Off button (4) to select a track or, in MP3/WMA mode, a subfolder in the current folder.
Press the AUD button ⑨ to start the selected track or open the subfolder.
Note:
Pressing the MENU button ⑤ cancels the direct selection without starting a new track.
Fast searching
Press and hold down the button < ② / > ③ until the desired position has been reached.
Interrupting playback
Press the 6 button to interrupt the playback ("PAUSE") or to continue it.
Scanning all tracks
The Scan function scans every track of the CD for approx. 10 seconds.
Press the 2 SCAN button (1) to start the scan ("SCN TRCK") or to continue listening to the currently scanned track ("SCN OFF").
Playing tracks in random order
Press the 3 MIX button ① to activate the MIX function (audio CD:"MIX CD"; MP3:"MIX FLDR") or to switch it off ("MIX OFF").
If the MIX function is active, the MIX symbol appears on the display.
Repeatedly playing individual tracks or directories
Press the 4 RPT button once or twice to change between playback modes:
| Opera-
tion | Display | Meaning |
| CD | RPT TRCK | Repeating tracks |
| MP3/WMA | RPT FILE | Repeating tracks |
| RPT FLDR | Repeating folders |
| Gen. | RPT OFF | Regular playback |
If the RPT function is active, the RPT symbol appears on the display.
Configuring the display
Press the DISP button 12 once or several times to change between these displays:
| Opera-
tion | Display | Meaning |
| CD | D-TITLE | CD name |
| T-TITLE | Track name |
| P-TIME | Playing time/track
number |
| CLOCK | Time |
| MP3/WMA | TITLE | Track name* |
| ALBUM | Album name* |
| FOLDER | Folder name |
| FILE | File name |
| P-TIME | Playing time/track
number |
| CLOCK | Time |
- Only if stored as ID3 tag
Press the DISP button 12 for approx. 2 seconds to show the displayed text once as scrolling text.
Sound settings
The settings in the audio menu and the adjustment of the level each apply to the current audio source.
Calling and exiting the audio menu
If necessary, press the On/Off button ④ repeatedly until the desired audio source is selected.
Briefly press the AUD button 9 to open the audio menu.
Press the AUD button ⑨ repeatedly until the desired menu item is selected.
Perform the setting (see the next section).
- Briefly press the MENU button ⑤ to exit the audio menu.
SW L (Buenos Aires 200 only)
Subwoofer level. Settings: -15 to +15.
Turn the On/Off button 4 to perform the setting.
X-BASS
Increase of bass at low volume. Settings: OFF, 1, 2 (highest increase).
Turn the On/Off button 4 to change between the settings.
NATURAL/ROCK/POPS/EASY/TOP40/JAZZ/GAME/USER
Equaliser presettings: NATURAL, ROCK, POPS, EASY, TOP40, JAZZ, GAME.
"USER" is not an equaliser presetting and appears as a menu item only if you manually adjusted the bass, treble or middle level the last time. As soon as you select an equaliser presetting, your manually performed settings are replaced by the presetting.
Turn the On/Off button 4 to change between the settings.
BAS L
Bass level. Settings: -7 to +7.
Turn the On/Off button 4 to perform the setting.
MIDL
Middle level. Settings: -7 to +7.
Turn the On/Off button 4 to perform the setting.
TREL
Treble. Settings: -7 to +7.
Turn the On/Off button 4 to perform the setting.
BAL
Left/right volume distribution (balance). Settings: L 9 (left) to R 9 (right).
Turn the On/Off button 4 to perform the setting.
FAD
Front/rear volume distribution (fader). Settings: F 9(front) to R 9 (rear).
Turn the On/Off button 4 to perform the setting.
Adjusting the level for an audio source
You can separately adjust the level for any audio source, e.g. to achieve a uniform playback level for all audio sources. Settings: For AUX -8 to +8, for all other audio sources -8 to 0.
If necessary, press the On/Off button ④ repeatedly until the desired audio source is selected.
Press the AUD button 9 for approx. 2 seconds.
If necessary, briefly press the AUD button to select the "V-OFF" menu item.
Turn the On/Off button 4 to perform the setting.
- Briefly press the MENU button 15 to exit the menu.
Adjusting the low-pass filter for the subwoofer (Buenos Aires 200 only)
This is possible only if the setting SWPRE SW is selected in the user menu. Settings: THRU (no low-pass filter), 80H (Hz), 120H (Hz), 160H (Hz).
Press the AUD button 9 for approx. 2 seconds.
The "LPF" menu item is selected.
Turn the On/Off button 4 to perform the setting.
- Briefly press the MENU button ⑤ to exit the menu.
Adjusting the loudspeaker type
Adjust the loudspeaker type connected to the device to optimise the sound. Settings: SP OFF (no type selected), SP 5/4 (loudspeaker with 4 or 5 inch diameter), SP 6*9/6 (loudspeaker with 6 or 6x9 inch diameter), SP OEM (original Blaupunkt loudspeaker).
If necessary, press the On/Off button ④ repeatedly until "NO SRC" is selected.
Briefly press the AUD button (9).
Turn the On/Off button 4 to change between the settings.
Briefly press the AUD button 9 to exit the menu.
User settings
Calling and exiting the user menu
Press the MENU button (15) for approx. 2 seconds to open the menu.
Press the button AMX13/AFM14 repeatedly until the desired menu item is selected.
Perform the setting (see the next section).
Briefly press the MENU button to exit the menu.
L0.S
Only possible in FM radio mode: Switching low sensitivity for station seek tuning on or off. Settings: ON, OFF.
Press the button < 2 / >3 to change between the settings.
NEWS
It is possible only if an audio source is selected: Switching the priority for news broadcasts on or off in CD, MP3, WMA and AUX mode and adjusting the minimum time difference between two switched-through news broadcasts. Settings: OFF, 00M (no minimum time difference), 10M - 90M (minimum time difference 10 to 90 minutes in 10-minute increments).
Press the button < 2 / >3 to change between the settings.
Note:
News broadcasts are switched through correctly only if they are identified by the "NEWS" PTY signal.
AUTO1 / AUTO2 / MANUAL
Possible only in radio mode: Select the mode for setting stations. Settings: AUTO1 (station seek tuning), AUTO2 (changing between stored stations), MANUAL (adjusting the frequency manually).
Press the button < 2 / >3 to change between the settings.
A-MEMORY
Only possible in radio mode: Searching and storing stations automatically (Travelstore function).
Press the AUD button 9 for approx. 2 seconds.
6 stations are stored for the current memory bank under the station buttons 1 - 6 ⑪ . In FM mode, you can store additional stations after changing to another memory bank if you start the automatic station store again.
AF
Only possible if an audio source is selected: Switching the alternate frequency (RDS function) on or off. Settings: ON, OFF.
Press the button < 2 / >3 to change between the settings.
If the AF function (RDS) is activated, the device automatically switches to a station broadcasting the same programme in case of poor reception.
REG
Only possible if an audio source is selected: Switching the regional function on or off. Settings: ON, OFF.
Press the button < 2 / > 3 to change between the settings.
If the regional function is activated, the device changes only to an alternate frequency of the station that broadcasts the same regional programme.
ATPS
Only possible if an audio source is selected: Switching automatic seek tuning for traffic information stations on or off. Settings: ON, OFF.
Press the button < 2 / >3 to change between the settings.
If ATPS is activated and the reception of the current traffic information station is lost in CD, MP3, WMA or AUX mode while the priority for traffic announcements is activated, the device automatically searches for another traffic information station in the background.
MONO
Only possible in FM radio mode: Switching mono playback for radio stations on or off. Settings: ON, OFF.
Press the button < 2 / >3 to change between the settings.
SCL
Switching automatic display of text as scrolling text on or off. Settings: AUTO (On), MANU (Off).
Press the button < 2 / >3 to change between the settings.
DEMO
Switching demo mode on or off. Settings: ON, OFF.
Press the AUD button 9 for approx. 2 seconds to change between the settings.
DIM
Switching automatic adjustment of display brightness ti the ambient lighting on or off. Settings: ON, OFF.
Press the button < 2 / >3 to change between the settings.
SPRM
Only possible in MP3 and WMA mode: Switching the Supreme function on or off. Settings: ON, OFF.
Press the button < 2 / >3 to change between the settings.
The Supreme function results in a sound improvement for tracks coded at a low bitrate. The low bitrate results in capping the upper frequency range during the coding. For playback, the Supreme function recalculates the upper frequency range
and subsequently expands the sound spectrum. For tracks with high or variable bitrate or with little salient upper frequency range, the Supreme function allows only minor sound improvement.
NAME SET
Possible only in AUX mode: Selecting names for the AUX input. Settings: AUX, TV,VIDEO,GAME, PORTABLE,DVD.
Press the AUD button 9 for approx. 2 seconds.
Press the button < 2 / >3 to change between the settings.
Note:
The menu is automatically exited 10 seconds after the last button press.
The AUX mode is selected under the defined name.
SYNC
Possible only if the "NO SRC" mode is selected: Switching the automatic synchronisation of the time between device and received RDS station on or off. Settings: ON, OFF.
Press the button < 2 / >3 to change between the settings.
Note:
As long as the automatic synchronisation is activated, no manual setting of the time is possible.
SWPRE
(Buenos Aires 200 only)
Possible only if the "NO SRC" mode is selected: Adjusting the preamplifier output. Settings: R (for external amplifier), SW (for subwoofer).
Press the button < 2 / >3 to change between the settings.
With the setting "R", the full frequency spectrum is available at the preamplifier output. With the setting "SW", you can adjust a low-pass filter for a connected subwoofer (see the chapter "Sound settings", section "Adjusting the low-pass filter for the subwoofer").
AUX
Possible only if the "NO SRC" mode is selected: Adjusting the AUX input. Settings: OFF (AUX mode is not selectable), ON1 (AUX mode is selectable), ON2 (AUX mode is selectable, volume reduction on; see below).
Press the button < 2 / >3 to change between the settings.
For the setting "ON2": If the device is switched off in AUX mode, it is initially at low volume when it is switched on again ("ATT ON", volume reduction on). Turn the On/Off button 4 clockwise by one increment to reactivate the previously adjusted volume ("ATT OFF", volume reduction off).
OFF
Possible only if the "NO SRC" mode is selected: Adjusting the time after which the device is automatically switched off in the "NO SRC" mode. Settings: OFF, 20M (minutes), 40M (minutes), 60M (minutes).
Press the button < 2 / >3 to change between the settings.
Note:
If automatic switch-off is activated (setting 20M, 40M or 60M), the demo mode is automatically switched off.
CD READ
Possible only if the "NO SRC" mode is selected: Adjusting the CD playback. Settings: 1 (for audio CDs and MP3/WMA CDs), 2 (for audio CDs only).
Press the button < 2 / >3 to change between the settings.
With the setting "1", the device recognises audio CDs as well as MP3/WMA CDs and plays them. With this setting, copy-protected CDs can frequently not be played. With the setting "2", the device recognises only audio CDs and does not play any MP3/WMA CDs. With this setting, many copy-protected CDs can also be played.
Setting the time manually
This is possible only if the "SYNC OFF" setting selected in the user menu.
If necessary, press the DISP button repeatedly until the time is displayed.
Press the DISP button (12) for approx. 2 seconds.
Press the button AMV(13)/FM(14) to adjust the hours.
Press the button < 2 / >3 to adjust the minutes.
Briefly press the DISP button 12.
Additional functions
External audio sources
Connecting external audio sources
You can connect external audio sources, such as portable CD players, MiniDisc players, MP3 players, via the FRONT-AUX-IN socket (AUX input) and play them back in AUX mode via the loudspeakers of the car sound system.
Changing to AUX mode
Press the On/Off button 4 repeatedly until "AUX" appears.
Notes:
- You can switch off the AUX input if no other external audio source is connected (see the chapter "User settings", section "Performing settings in the user menu", menu item "AUX").
- You can select a different name for the AUX input than "AUX" (see the chapter "User settings", section "Performing settings in the user menu", menu item "NAME SET").
Restoring factory settings
Press the reset button 10 with a pointed object (e.g. a pin or the tip of a ball-point pen).
Factory settings in the user menu:
| SYNC | ON | AF | ON |
| DIM | OFF | REG | ON |
| SWPRE | R | ATPS | ON |
| SPRM | ON | MONO | OFF |
| NEWS | OFF | SCL | OFF |
| LO.S | OFF | AUX | ON1 |
| DEMO | OFF | CD READ | 1 |
Technical data
Amplifier
Output power: 4 x 30 watts sine in accordance with DIN 45324 at 14.4 V at 4 ohms. 4 x 50 watts max. power
Tuner
Wavebands (Europe):
FM: 87.5 - 108 MHz
MW: 531-1,611 kHz
LW: 153-281 kHz
FM frequency response: 30 - 15,000 Hz
CD
Frequency response: 20 - 20,000 Hz
Pre-amp out (Buenos Aires 200 only)
2 channels: 2 V
AUX input: 1.2V / 10k
Dimensions and weight
Weight: approx. 1.30kg
① Touche
Entree AUX: 1,2V/10kΩ
Dimensions et poids
IxHxp(mm) 182x53x155
Poids: env. 1,30 kg
Radiolage: stall in station
Radiolage: stall in station
Välj minnesnivå (FM1, FM2, FM3, MW) ....87
Stalla in stationer 88
PTY. 88
Spara station/kalla fram en sparad station...89
Spara stationer automatiskt (Travelstore) ..89
Aktivera/avaktivera prioritet for trafikmeddelanden .89
Visningsalternativ. 89
CD-/MP3-/WMA-lage 90
Välj minnesnivå (FM1, FM2, FM3, MW)
Tryck på knappen AFM 14 ev. flera ganger tills onskad FM-minnesniva visas (FM1, FM2, FM3).
Tryck pa knappen AMY 13, for att valja minnesivva MW.
Observera!
Upp till 6 stationer kan sparas på varje minnesniva.
Stalla in stationer
(11) Nappainryhma 1-6
DISP-nappain
Etupaneelin irrottaminen
UKW (FM): 87,5-108 MHz
MW: 531-1611 kHz
LW: 153-281 kHz
FM-tajuusvaste: 30-15000Hz
CD
Taajusvaste:
20-20000Hz
Aetoupyia "NO SRC" (oiyaon)
Avti miaac nynic hou, mnpoeite va eniEeTe Tn Ieioupyia "NO SRC" ("No Source": kaiia nyn hou).
Tn aleitoupyia "NO SRC" dev unapxie e naiyeveynnyhou. H ouakeun biipaketai e katotaan atync kai npoei vaanepeyoanthee ieta an o evapoakopiaevxoovikoi diatma (beite to kepaλaio "Puθioeiic xhoŋnt", evotni "Puθian ao to mevou xhoŋnt", otoieo mevo "OFF").
Opiouvec puoiieic npoov va npayatooi- oov mvo tIoupyia "NO SRC".
Platnate to nAnktpo evepyoiniOnc/aanepepyoiniOnC 4 apKeTeC opoeC meXpi va epaVioTei n evdeEIN "NO SRC".
'E\xoboc npoe\nuoxutn (movo sto movteLo Buenos Aires 200)
H ouakeun autn diaotei muia eoo npoeviuxutn. Puoiieic yia tnyeoo npoeviuxutn:
Kepalaio "PuOmuoicxpnotn",evotntra "PuOmuan to mevou xpnoTn",toixcio mevou SWPRE"
Kepalaio "PuOeiic nou", evoteta "Pooion xaunonepatou piatou yia subwoofer".
Aetoupyia paodiopovou
RDS
Tolaio paioopwviokoi oatogoi eknemouv nepa ano to npoyapua touc kai eva onma RDS (Radio Data System), to onio napexi eninAevov tic eicn6duvaTOTNTEC:
To ovoua tou oTaOu eMphiavicetai otv oOoVn.
H ouokeun avaywpiéi avakoivwoei ocetikα μe tnv kukloopia kai eioeneovapika npoypμata kai μopei va μetae i autómuata oe autec ano kaθε λeitoupyia (π.x. ano tn λeitoupyia CD).
Evaalakriok ouxovotna (AF): Otav eival evep yonouevn n leioupyia RDS, n ouakeun meta- baive autouata otn ouxovotna tou puohmué-vou otaoue pe Tt BAtiotn Ayn.
Toikia npoypmaata (REG): Opiajevoi otao-oi kataevouv ae ouykkeipvec opec to npoypaumouc oe tonikia npoypmaata diaopotikou nepieoxeouv. Me eveyponioevn tn leiouyia REG, n oukeun metaBaiveu movo e evaalaktukec ouxovotntec o onoiek ekneimouv to idio toniknpoypma.
Tia tvn evpyoioiok kai anevepyoioian tnc aeIoupiac RDS n TNC aeIOUpyiac REG avatpeETo Kepalao "PuOmuic xphotn", evotnta "PuoMion ao to evoov xphotn" (toxieia mevou "AF", "REG").
Mertabaaon otn leitoupyia paodiopovou
Pnntote to nAnktpo evepyoinanc/anvepepyoinanC 4 apketec opoec mexvi Ea paVioTei n evdeiF "FM"/"AM".
Enlouyiprananeac pvnhnc (FM1, FM2, FM3, MW)
PiTjote To nIhKtpo FM A 14 apKeTec ofopecmu va eupavioei n eIthountnToanea mnuHmuc (FM1, FM2, FM3).
PiarratoTPOAMV ③ yia va eniueEe-Te TnV tpaneca pvnc MW.
Yn#eEi:
Avanapaywyn titawv me tuxaiaeip
Parijate to nnktpo 3 MIX 11 yia va evepyoyoioueTe nI aeioupyia MIX (CD hyou:"MIX CD", MP3: "MIXFLDR") nya va tny anevpeyoioiogeT ("MIX OFF").
Eav evpyoioiuev n aeioupyia MIX, 0tny oovn ephiavietai to uboMIX.
Enavaanituk avanapaywyn titawv n kataLoyw
Piatnate ia n duo oopc to nktpo 4 RPT 11 yia va npaypatonoiote evaalayn metaTuV eniepouc aeitoupyiw avanapaywncy;
YtkeitalaeTponoiouoeic.
GB - Installation instructions

Safety instructions
When carrying out installation work and making connections please observe the following safety instructions:
- Do not connect the vehicle's plug connectors to the radio!
- Disconnect the negative terminal of the battery! When doing so, please observe the vehicle manufacturer's safety instructions.
Make sure you do not damage vehicle components when drilling any holes.
- The cross sections of the positive and negative cables must not be less than 1.5 mm^2 .
You can obtain the adapter cable required for your vehicle type from any BLAUPUNKT dealer.
Depending on the model, your vehicle may differ from the description provided here. We accept no responsibility for any damages due to incorrect installation or connection or for any consequential damages.
If the information provided here is not suitable for your specific installation requirements, please contact your Blaupunkt dealer, your vehicle manufacturer or our telephone hotline.
When installing an amplifier or changer, you must first connect the device earth connections before connecting the plugs for the line-in or line-out jacks.
Earth connection of external devices may not be connected to earth of car sound system (housing).
Available as an optional accessory
Disponible en option
© 2008 All rights reserved by Blaupunkt. This material may be reproduced, copied or distributed for personal use only.
This product is protected by certain intellectual property rights of Microsoft. Use or distribution of such technology outside of this product is prohibited without a license from Microsoft.
| Country: | Phone: | Fax: | WWW: |
| Germany | (D) | 0180-5000225 | 05121-49 4002 | http://www.blaupunkt.com |
| Austria | (A) | 01-610 39 0 | 01-610 39 391 | |
| Denmark | (DK) | 44 898 360 | 44-898 644 | |
| Finland | (FIN) | 09-435 991 | 09-435 99236 | |
| Great Britain | (GB) | 01-89583 8880 | 01-89583 8394 | |
| Greece | (GR) | 210 94 27 337 | 210 94 12 711 | |
| Ireland | (IRL) | 01-46 66 700 | 01-46 66 706 | |
| Italy | (I) | 02-369 62331 | 02-369 62464 | |
| Luxembourg | (L) | 40 4078 | 40 2085 | |
| Norway | (N) | +47 64 87 89 60 | +47 64 87 89 02 | |
| Portugal | (P) | 2185 00144 | 2185 00165 | |
| Spain | (E) | 902 52 77 70 | 91 410 4078 | |
| Sweden | (S) | 08-7501850 | 08-7501810 | |
| Switzerland | (CH) | 01-8471644 | 01-8471650 | |
| Czech. Rep. | (CZ) | 02-6130 0446 | 02-6130 0514 | |
| Hungary | (H) | 76 889 704 | - | |
| Poland | (PL) | 0800-118922 | 022-8771260 | |
| Turkey | (TR) | 0212-335 07 23 | 0212-346 00 40 | |
| USA | (USA) | 800-950-2528 | 708-6817188 | |
| Brasil (Mercosur) | (BR) | 0800 7045446 | +55-19 3745 2773 | |
| Malaysia (Asia Pacific) | (MAL) | +604-6382 474 | +604-6413 640 | |
Passport
Name:
Type: 7649...
Serial no.: BP

BLAUPUNKT
864-307-10