
TRD6F49W - Range hood VOX - Free user manual and instructions
Find the device manual for free TRD6F49W VOX in PDF.


| Product Type | Range Hood (Cooker Hood) |
| Brand | VOX |
| Model | TRD6F49W |
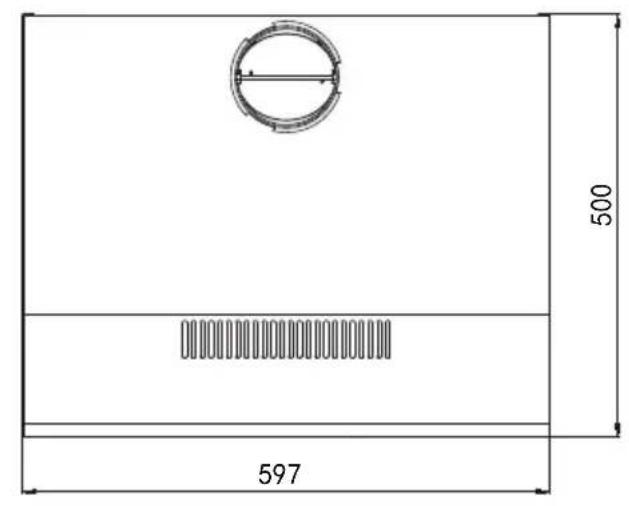
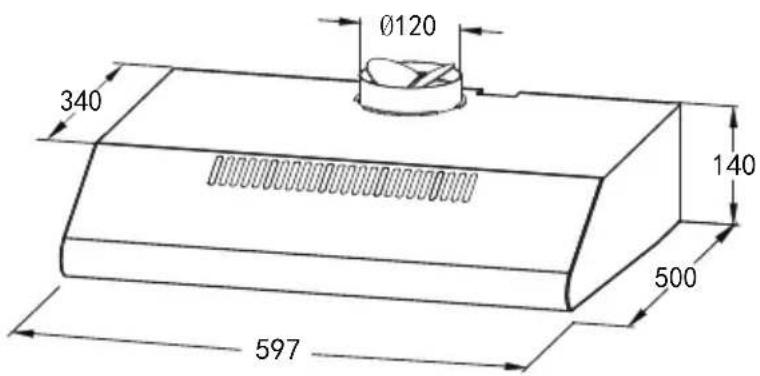
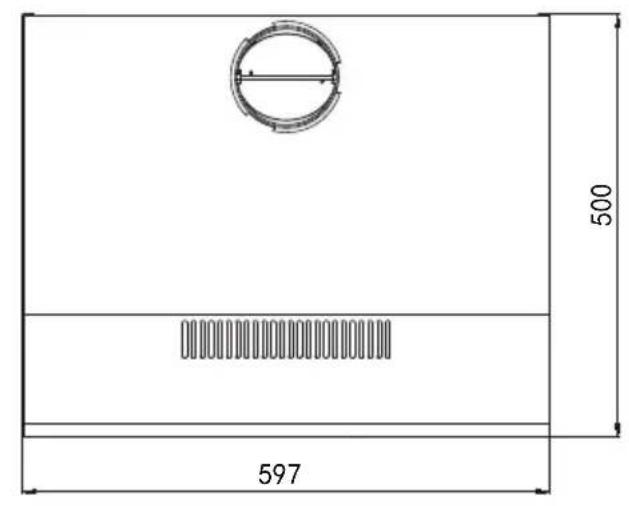
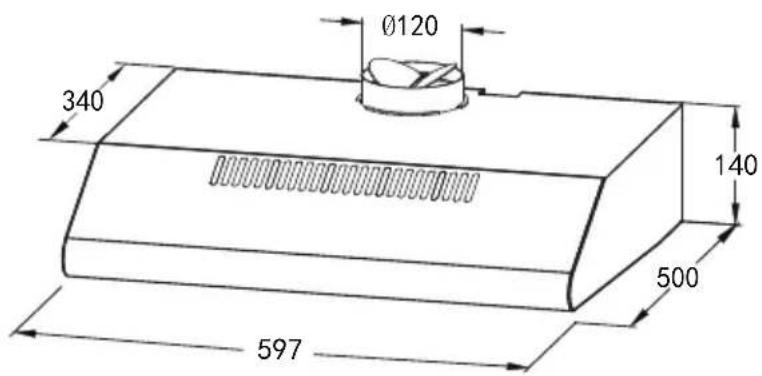
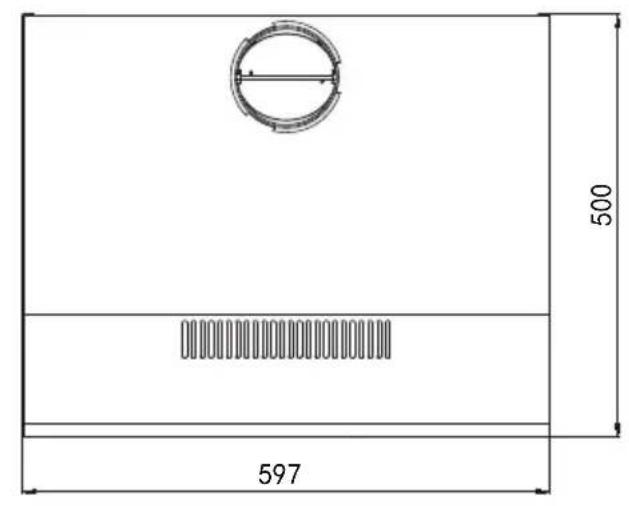
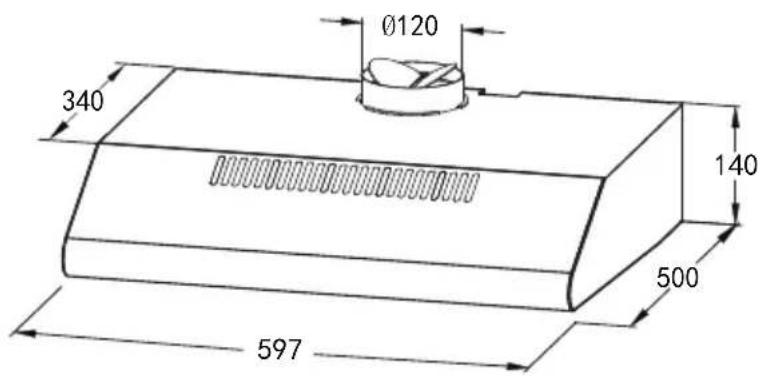
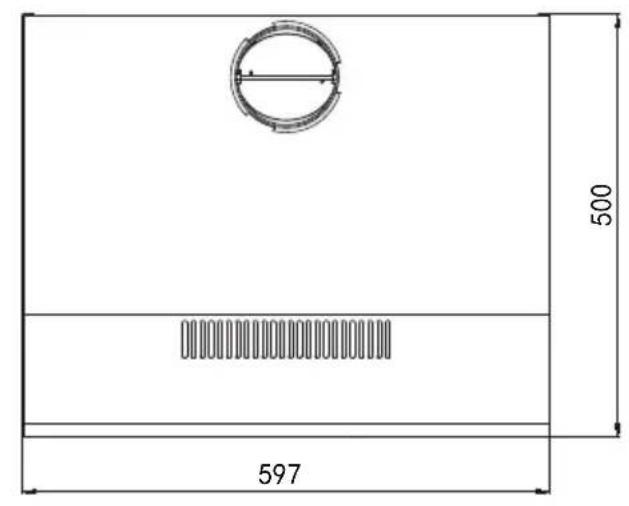
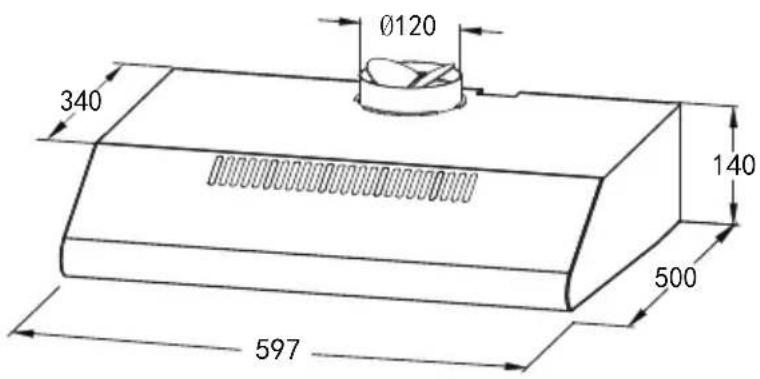
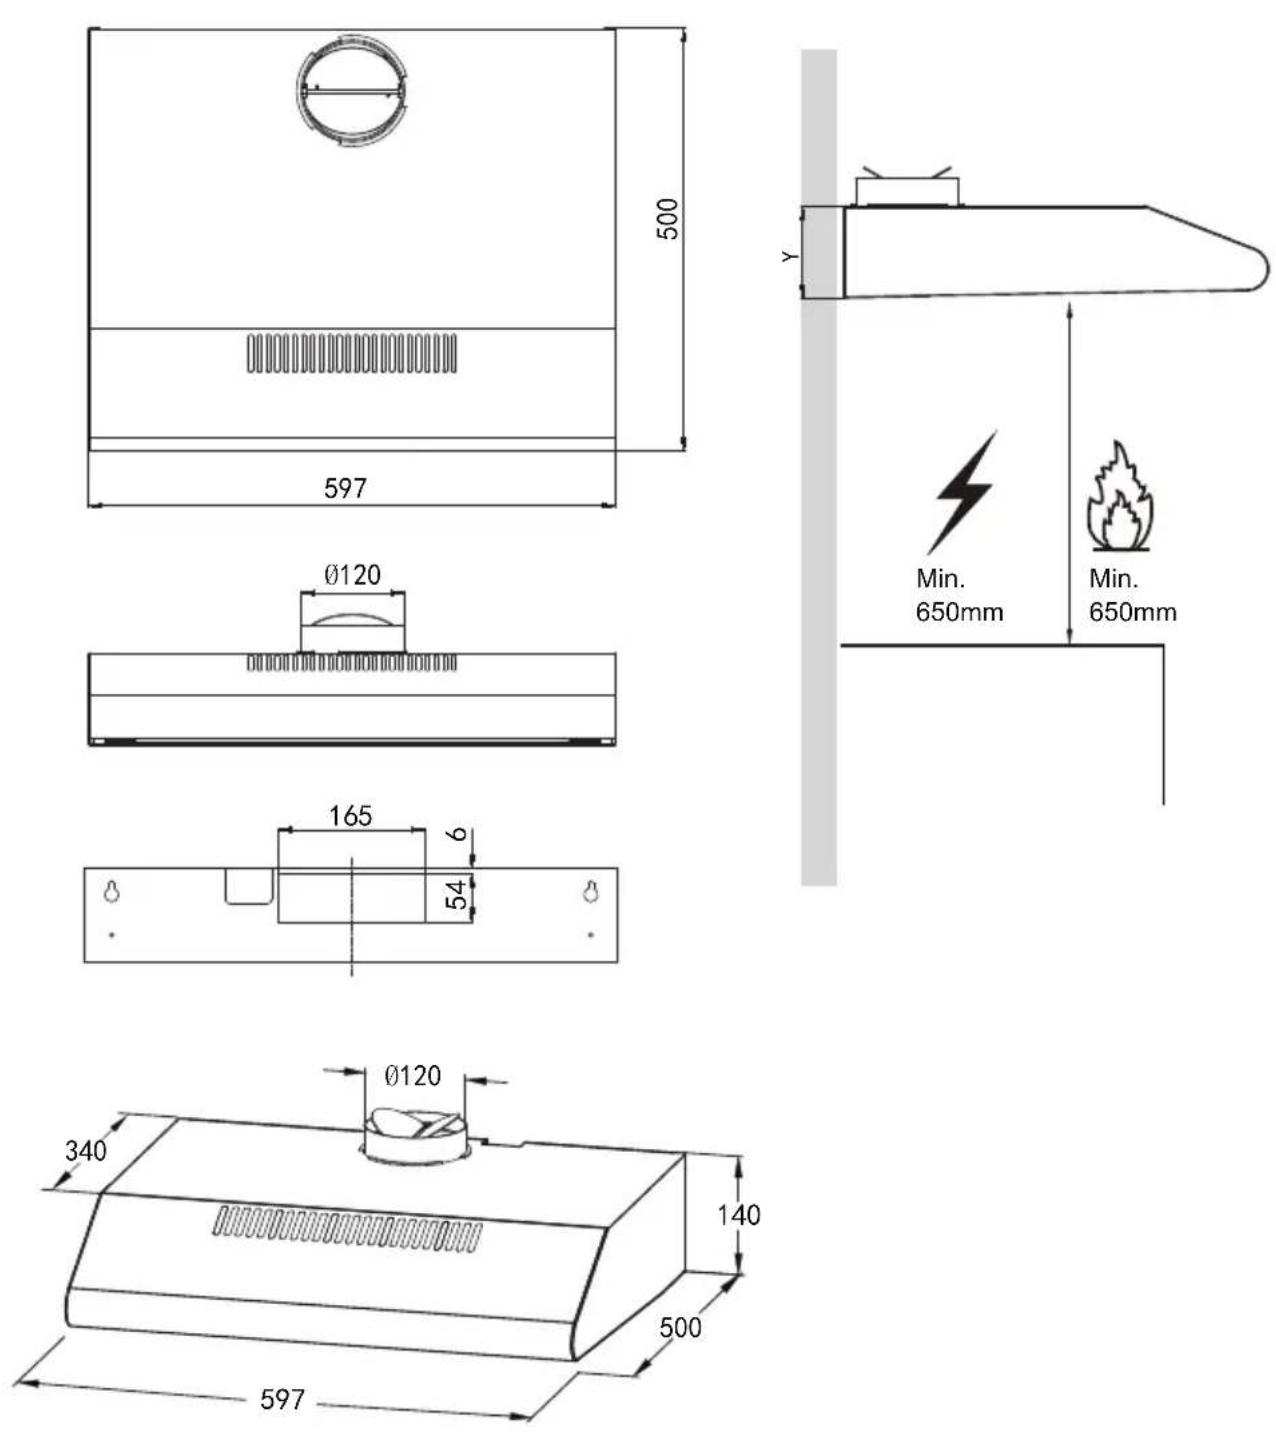
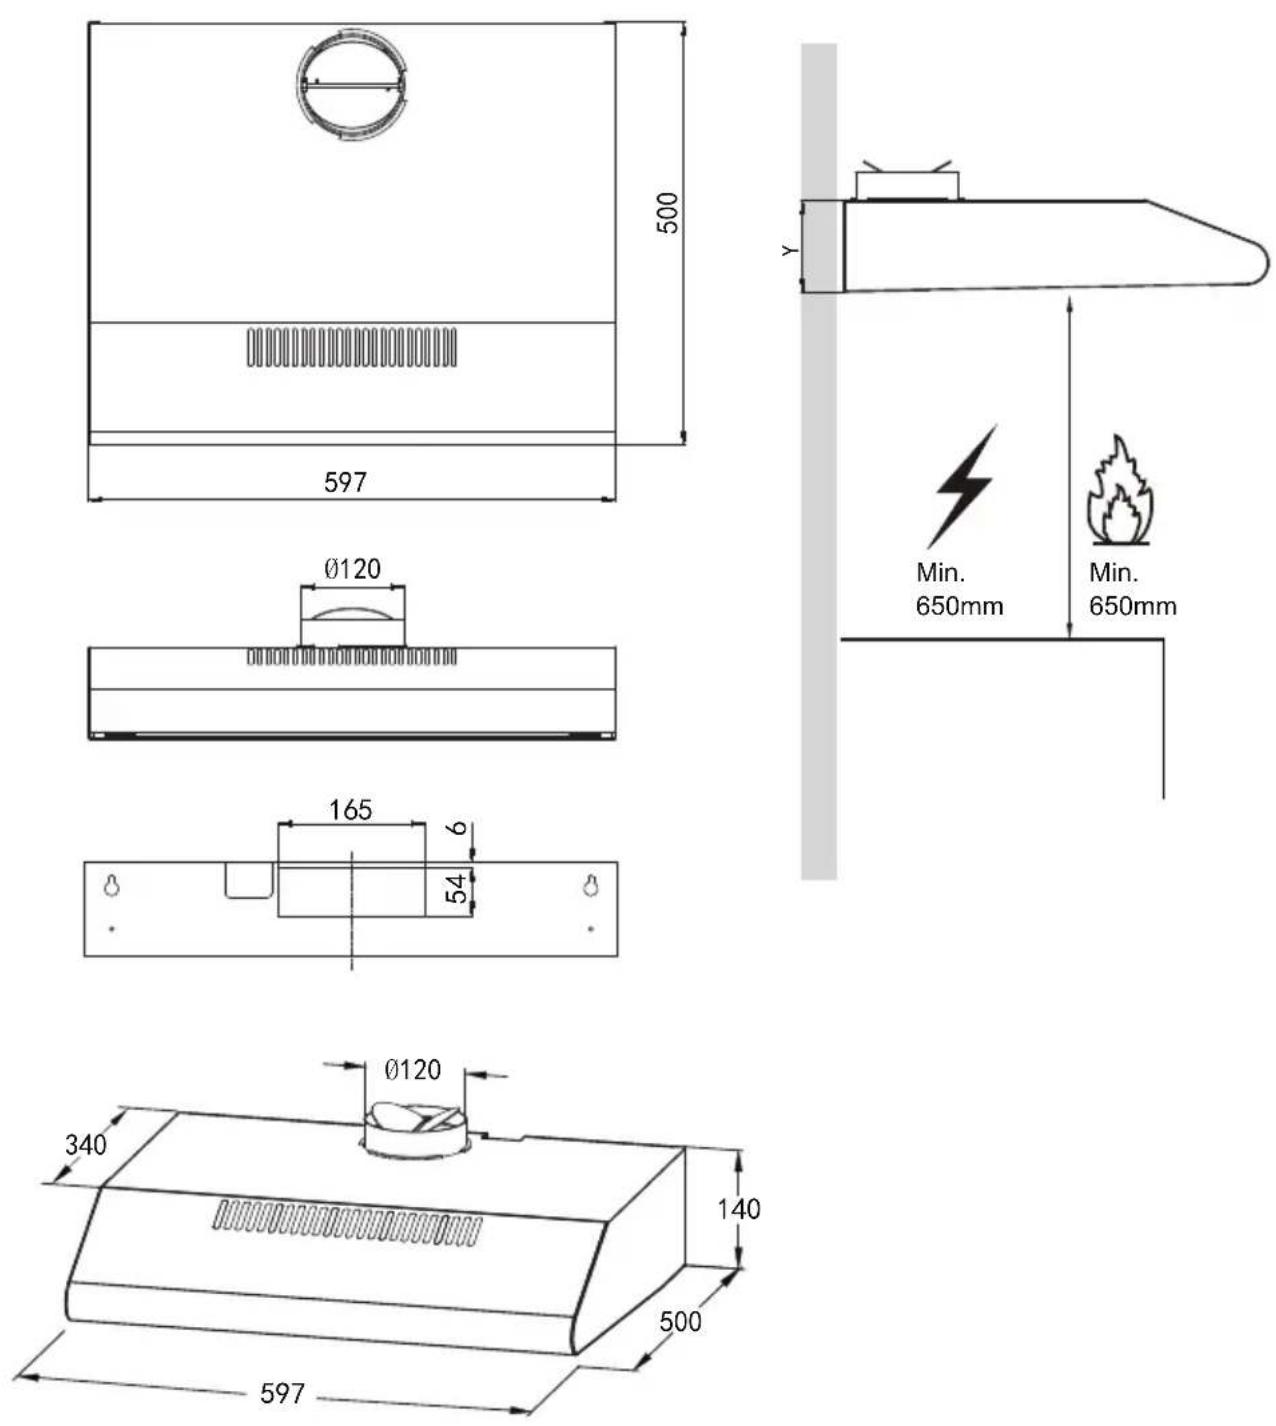
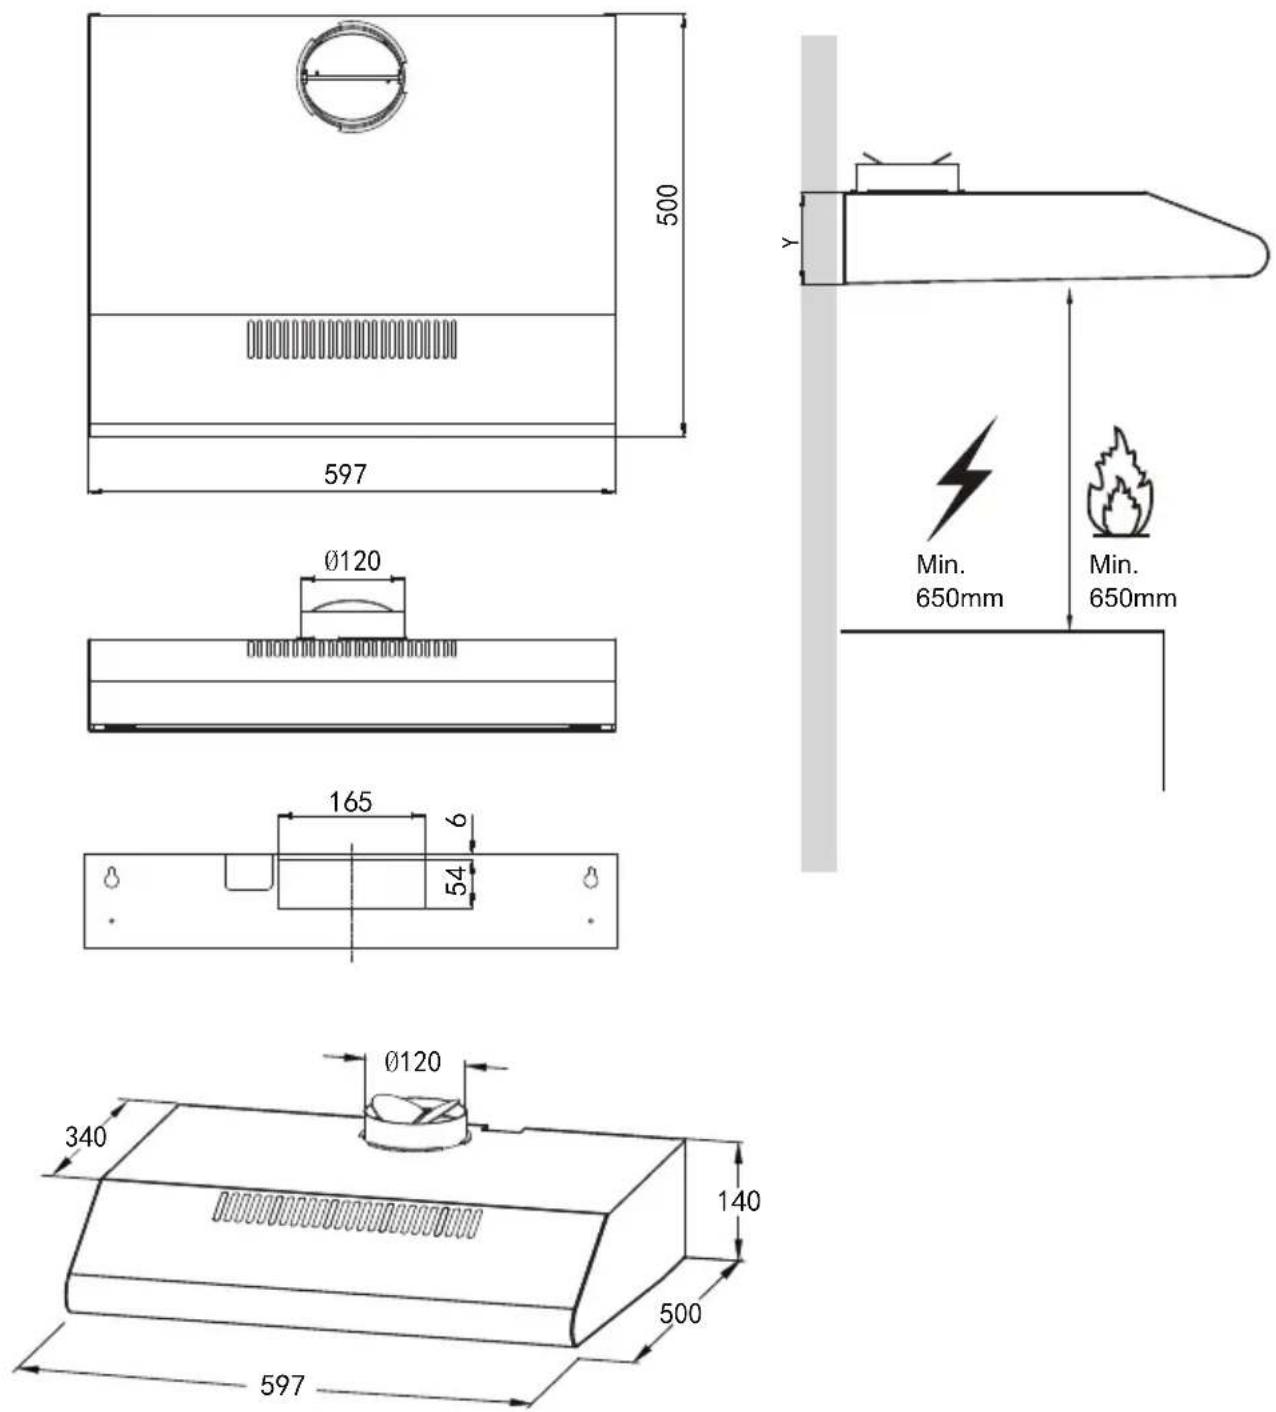
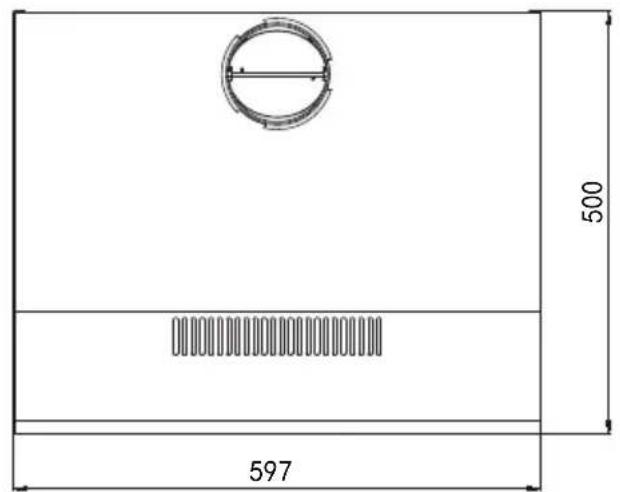
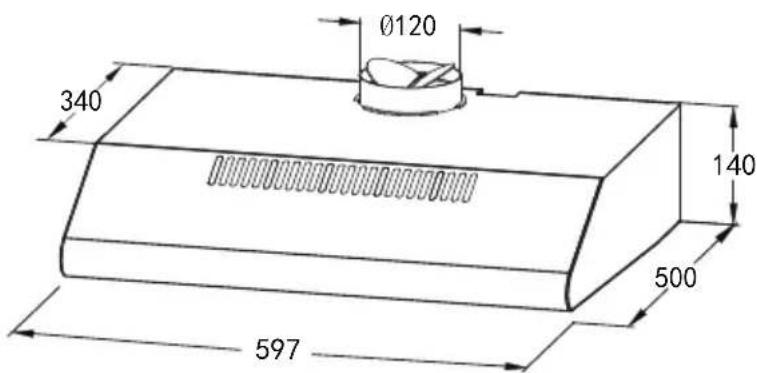
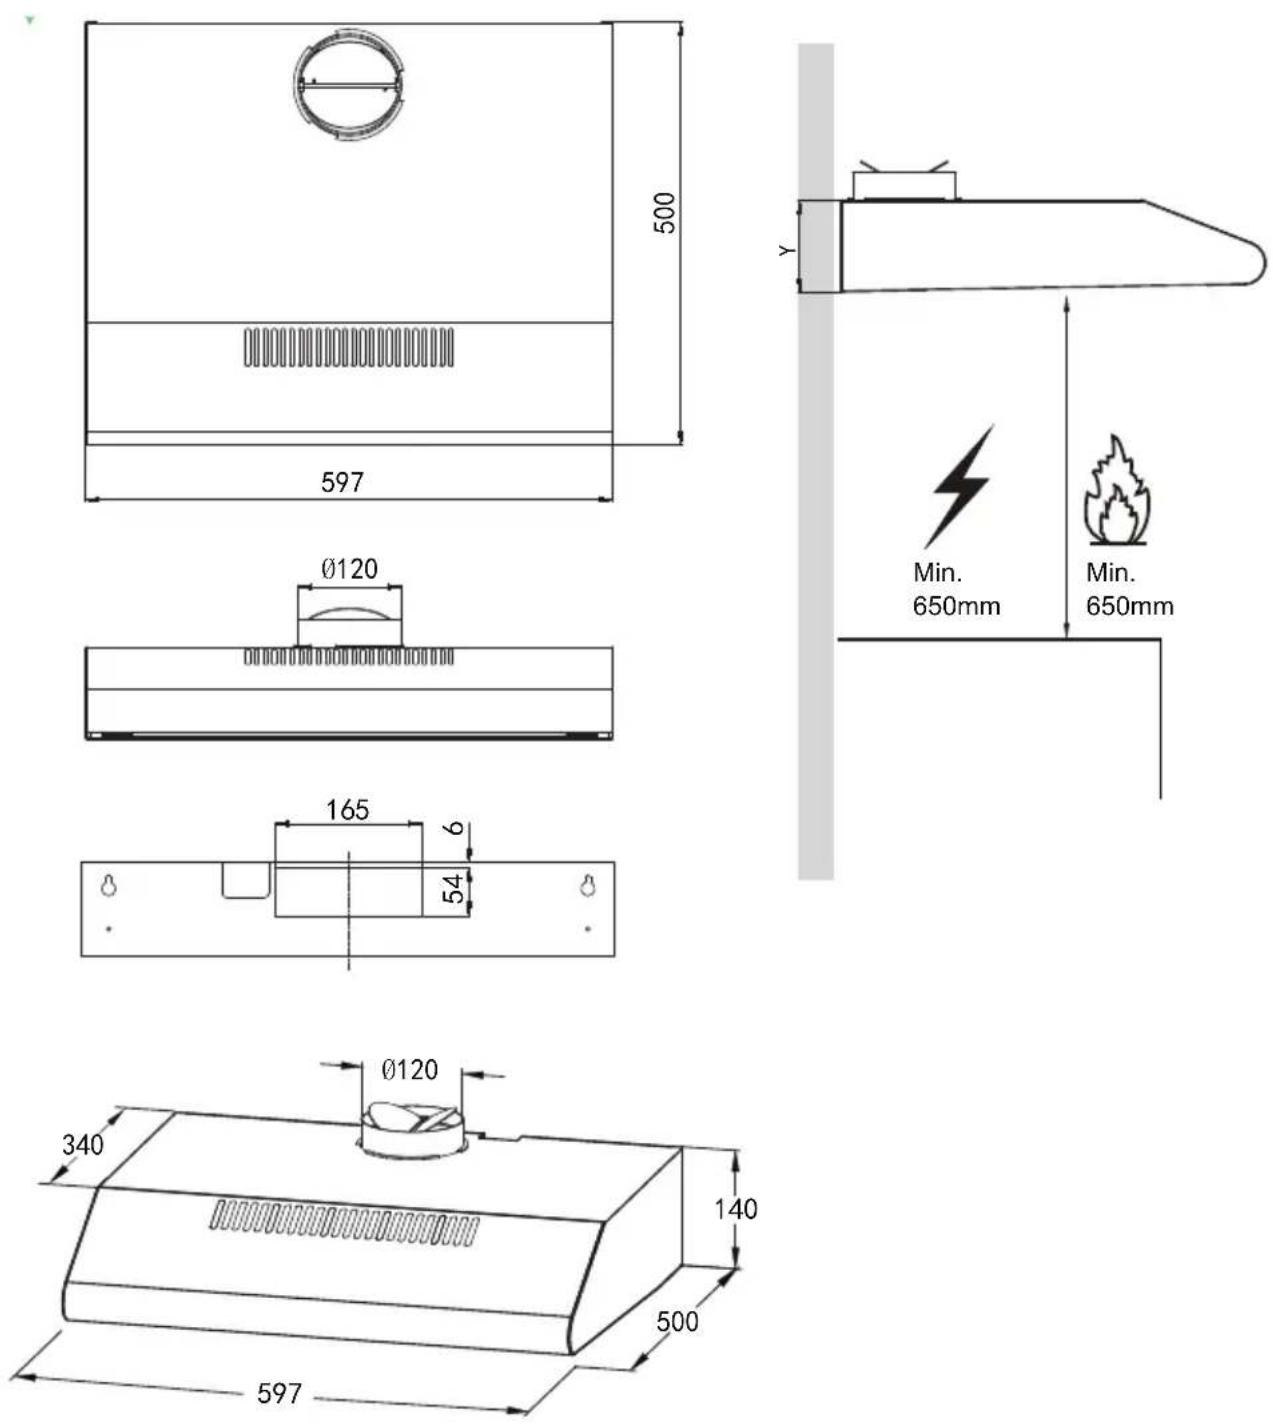
| Width | 597 mm |
| Depth | 500 mm |
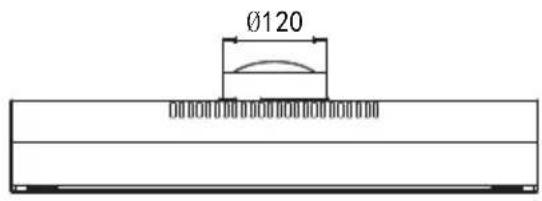
| Height (approx.) | 165 mm |
| Rated Voltage | 220-240 V ~ 50/60 Hz |
| Motor Input Power | 38 W |
| Lighting Power | 1.5 W (LED module) |
| Lighting Type | Self-ballasted LED, Square/Diameter 33.2 mm x 120 mm, ILCOS D: DBS-1.5-H-33.2/120 |
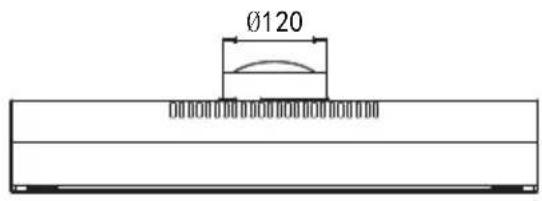
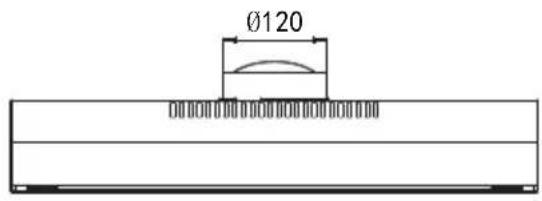
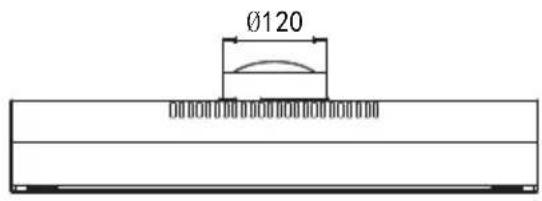
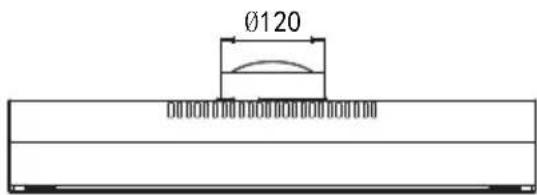
| Air Outlet Diameter | 120 mm |
| Number of Speeds | 3 (Low, Medium, High) + Off |
| Control Type | 5 Push Buttons (Off, Low, Medium, High, Light) |
| Venting Modes | Extraction-air mode (ducting outside) or Recirculation mode (with carbon filter) |
| Grease Filter Type | Metal mesh (washable) |
| Carbon Filter Type | Filter cotton (optional, replaceable, non-washable) |
| Minimum Installation Height | 650 mm above hob |
| Maximum Installation Height | 750 mm above hob |
| Installation Type | Wall-mounted or under-cabinet (bracket fixing) |
| Power Cord | Detachable (plug) |
| Safety Features | Class I (earthing), thermal overload protection (assumed), minimum distance requirement |
| Cleaning Recommendation | Clean surface with mild detergent; wash grease filter every 3 months; replace carbon filter every 2-3 months |
| Compliance | EU WEEE Directive 2012/19/EU |
| Country | Multiple languages (EN, BG, EL, ES, MK, PT, etc.) |
Frequently Asked Questions - TRD6F49W VOX
User questions about TRD6F49W VOX
0 question about this device. Answer the ones you know or ask your own.
Ask a new question about this device
Download the instructions for your Range hood in PDF format for free! Find your manual TRD6F49W - VOX and take your electronic device back in hand. On this page are published all the documents necessary for the use of your device. TRD6F49W by VOX.
USER MANUAL TRD6F49W VOX
natural_image
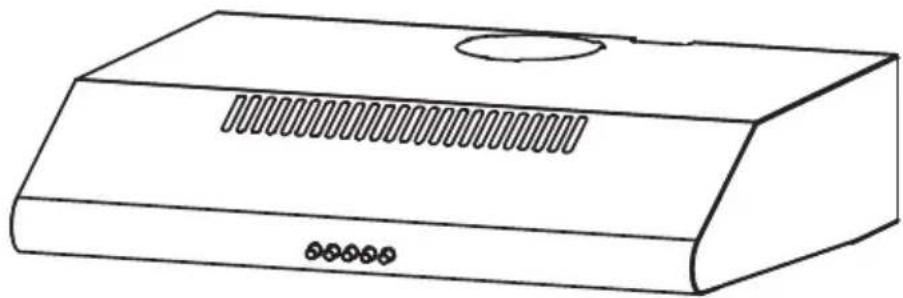
Line drawing of a standard air duct box with ventilation slots and a circular vent (no text or symbols)COOKER HOOD
INSTRUCTION MANUAL
Read this manual carefully before operation.
Pictures in this manual are for reference only, the product in kind prevail.

The instructions for Use apply to several versions of this appliance. Accordingly, you may
find descriptions of individual features that do not apply to your specific appliance.
INSTALLATION
- The manufacturer will not be held liable for any damages resulting from incorrect or improper installation.
- Check that the mains voltage corresponds to that indicated on the rating plate fixed to the inside of the hood.
- For Class I appliances, check that the domestic power supply guarantees adequate earthing.
- Connect the extractor to the exhaust flue through a pipe of minimum diameter 120 mm.
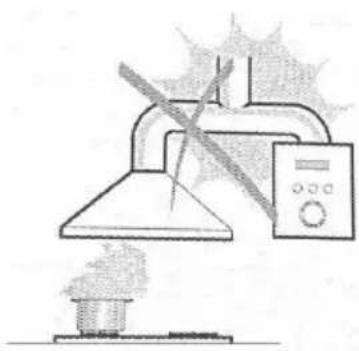
● The route of the flue must be as short as possible. - Do not connect the extractor hood to exhaust ducts carrying combustion flumes (boilers, fireplaces, etc.).
- If the instructions for installation for the gas hob specify a greater distance specified above, this has to be taken into account.
- If the supply cord is damaged, it must be replaced by the manufacturer or its service agent or a similarly qualified person in order to avoid a hazard.
- The air must not be discharged into a flue that is used for exhausting fumes from appliances burning gas or other fuels(notapplicable to appliances that only discharge the air back into the room).
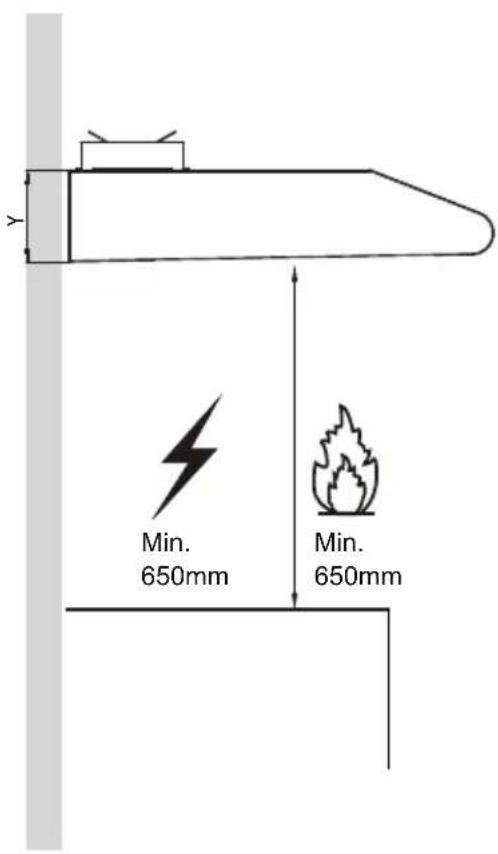
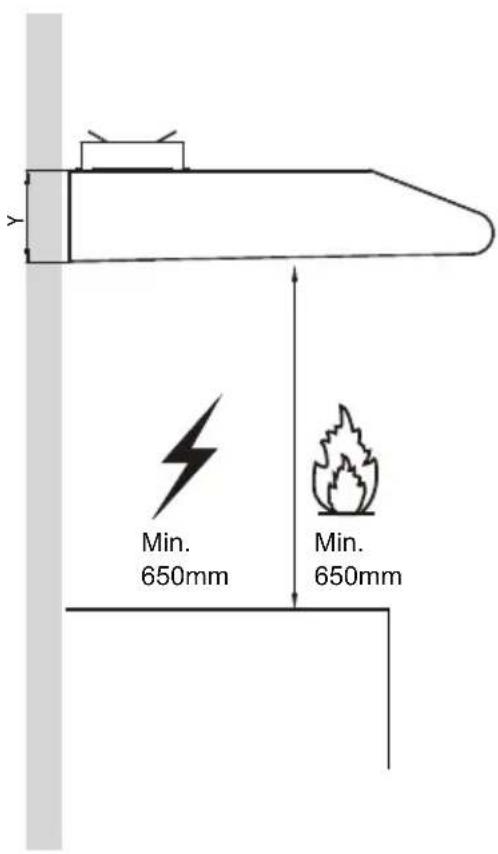
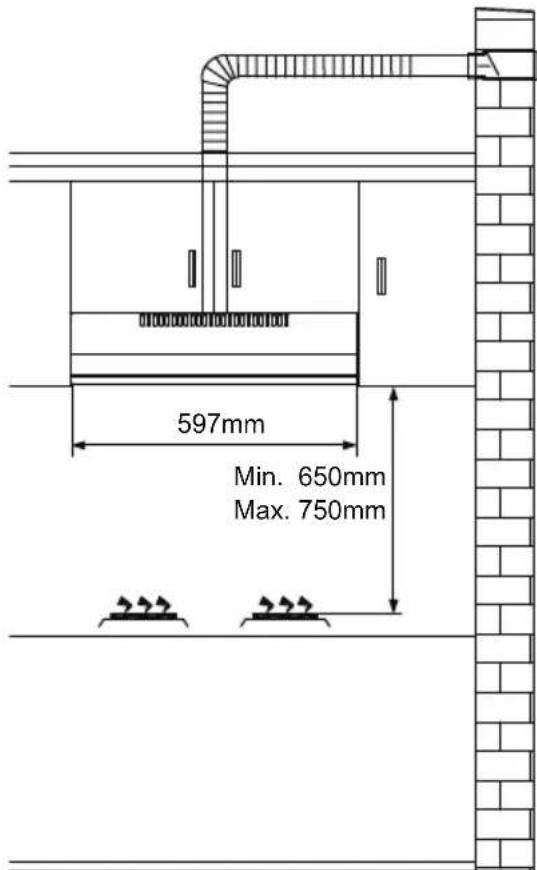
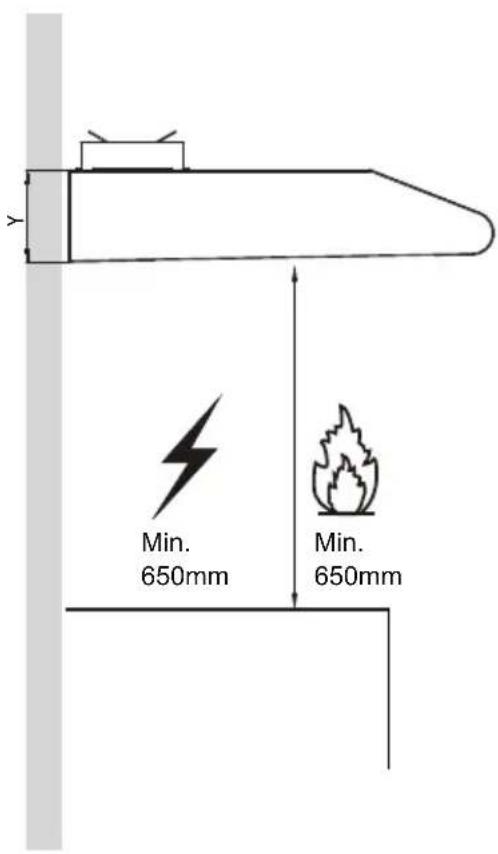
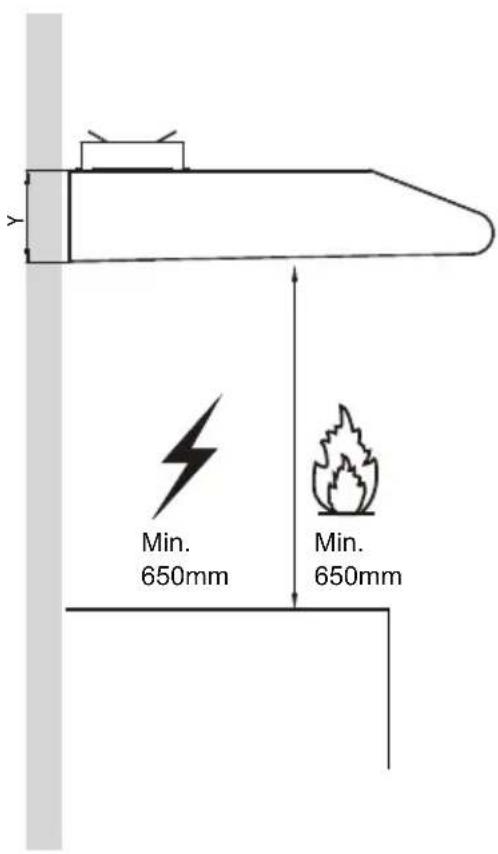
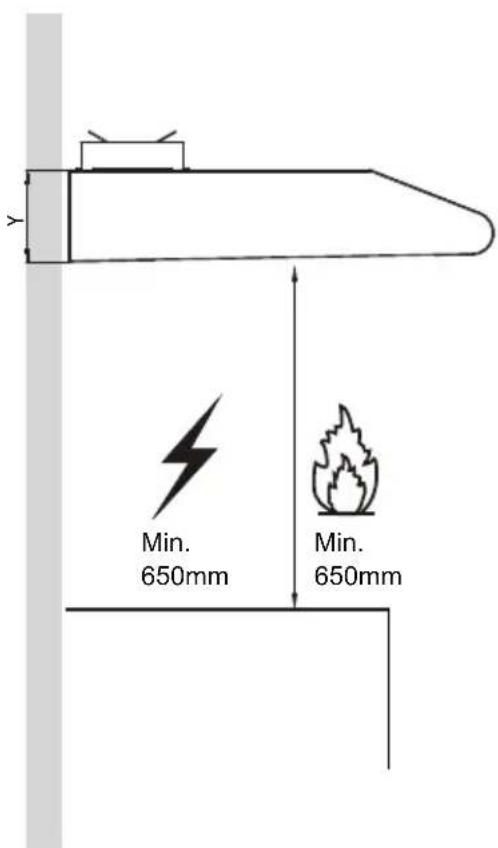
- The minimum distance between the supporting surface for the cooking vessels on the hob and the lowest part of the range hood is 650 mm.
● Regulations concerning the discharge of air have to be fulfilled.
USE
- The extractor hood has been designed exclusively for domestic use to eliminate kitchen smells.
● Never use the hood for purposes other than for which it has been designed.
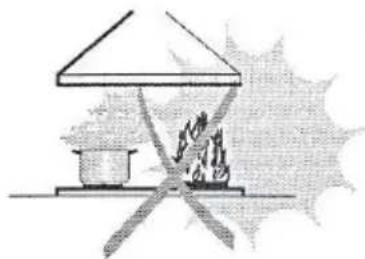
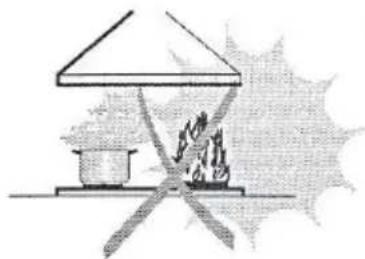
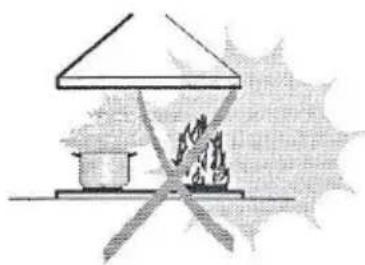
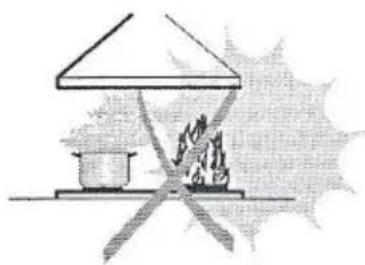
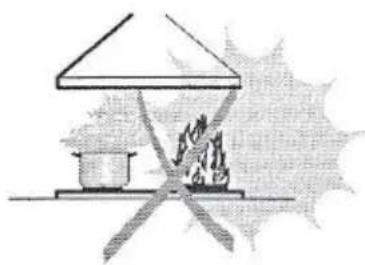
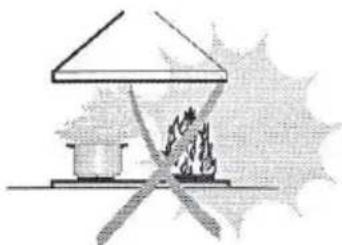
● Never leave high naked flames under the hood when it is in operation. - Adjust the flame intensity to direct it onto the bottom of the pan only, making sure that it does not engulf the sides.
- Deep fat fryers must be continuously monitored during use: overheated oil can burst into flames.
- This appliance is not intended for use by persons (including children) with reduced physical, sensory or mental capabilities, or lack of experience and knowledge, unless they have been given supervision or instruction concerning use of the appliance by a person responsible for their safety.
● Children should be supervised to ensure that they do not play with the appliance. - There shall be adequate ventilation of the room when the range hood is used at the same time as appliances burning gas or otherfuels (not applicable to appliances that only discharge the air back into the room).
- There is a fire risk if cleaning is not carried out in accordance with the instructions.
- Do not flame under the range hood.
- "CAUTION: Accessible parts may become hot when used with cooking appliances".
MAINTENANCE
● The cooker hood and its filter should be cleaned regularly according to the instruction.
- Switch off or unplug the appliance from the mains supply before carrying out any maintenance work.
● Clean the hood using a damp cloth and a neutral liquid detergent.
● The appliance uses 4 hob elements at most.

The symbol ■ is packaging indicates that this product may not be treated as household waste. Instead it shall be handed over to the applicable collection point for the recycling of electrical and electronic equipment. By ensuring this product is disposed of correctly, you will help prevent potential negative consequences for the environment and human health, which could otherwise be caused by inappropriate waste handling of this product. For more detailed information about recycling of this product, please contact your local city office, your household waste disposal service or the shop where you purchased the product.
natural_image
Simple line drawing of a laboratory setup with a lamp, condenser, and control panel (no text or symbols)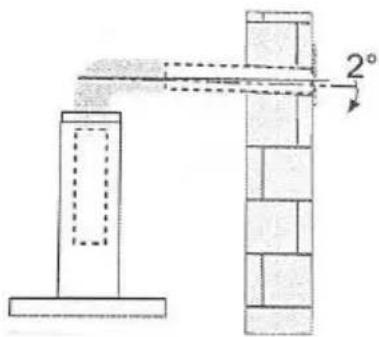
natural_image
Simple line drawing of a house with a pot and steam rising, no text or symbols presentRated Voltage and Frequency
220-240V\~ 50/60Hz Motor Input Power:38W
In certain circumstances electrical appliance may be a danger hazard.
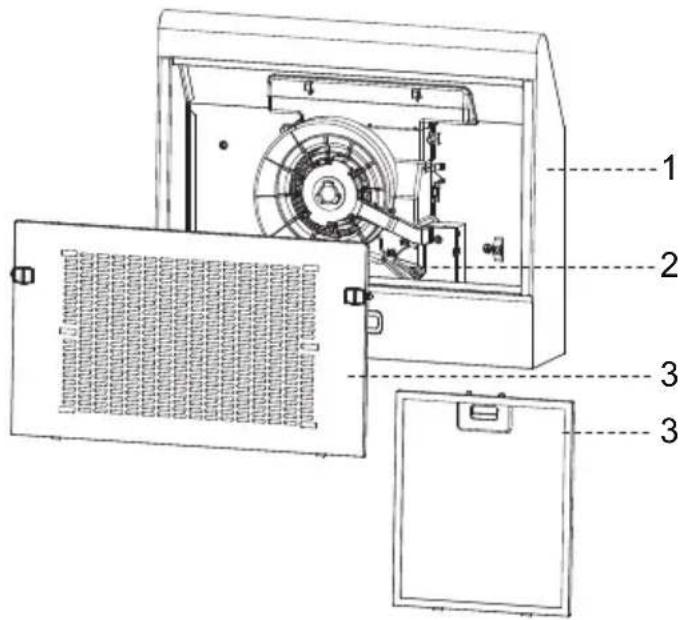
COMPONENTS
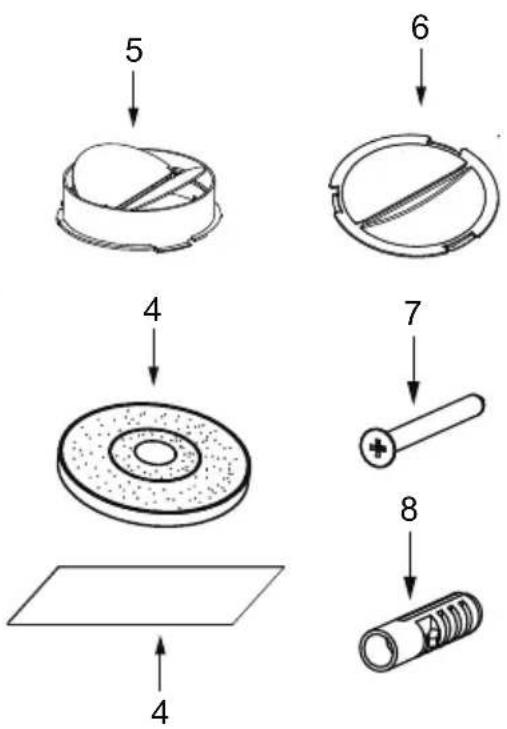
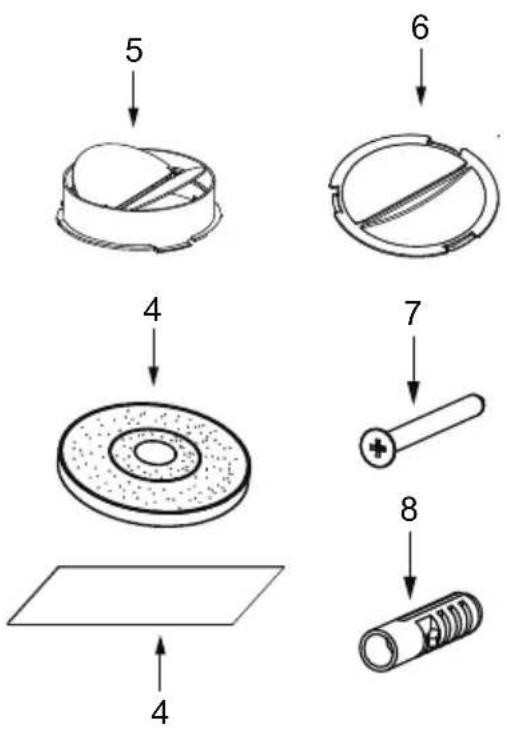
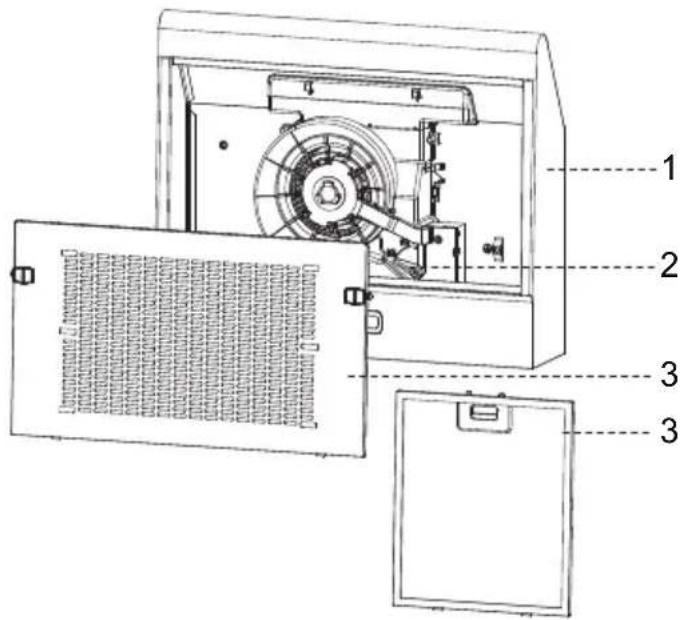
| Ref. | Qty. | Product Components |
| 1 | 1 | Main Body |
| 2 | 1 | Venting Knob |
| 3 | 1 | Filter Assembly (optional 2 or 3) |
| Ref. | Qty. | Installation Components |
| 4 | 1 | Carbon Filter(optional) |
| 5 | 1 | Check Valve |
| 6 | 1 | Air Outlet Cap |
| 7 | 4 | Screws 5mm x 49mm |
| 8 | 4 | Plastic Wall Plugs |
unit: mm
WALL DRILLING AND BRACKET FIXING
- Please read the instructions carefully.
- Unpack the canopy and check that all functions are working. Ensure that the voltage (V) and the frequency (Hz) indicated on the serial plate match the voltage and frequency at the installation site.
- Check that the area behind the installation surface to be drilled is clear of any electrical cables or pipes, etc.
- The stainless steel and glass surfaces of the canopy are very easily damaged during installation if grazed or knocked by tools. Please take care to protect the surfaces during installation.
- Protect the cooktop surface below with cardboard, or the like, to prevent damage occurring whilst the wall canopy is being installed above.
- The manufacturer shall not be liable for failure to observe all safety regulations in force for the correct and normal operation of electrical parts.
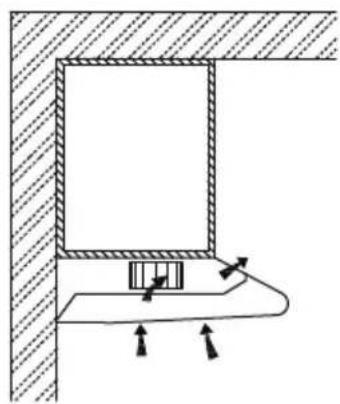
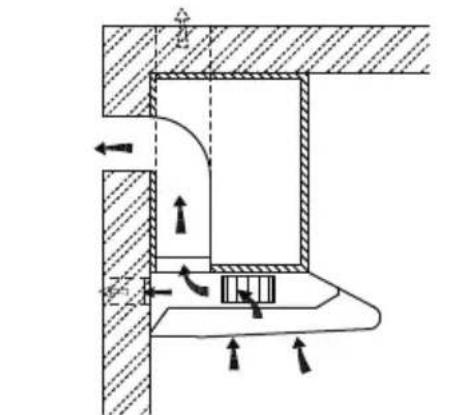
Choose a venting mode:
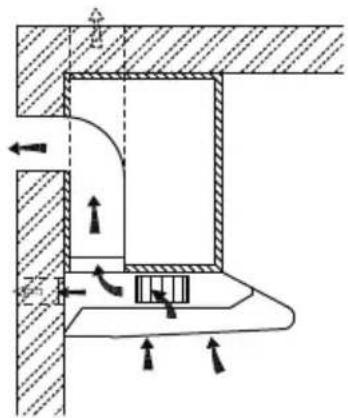
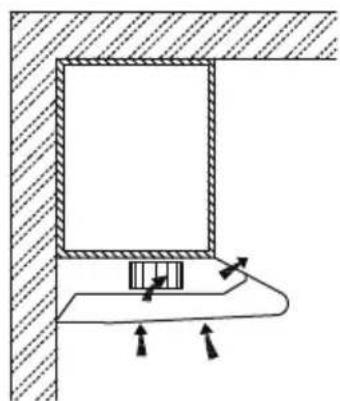
Extraction-air mode
natural_image
Technical diagram of a mechanical assembly with hatched walls and a central component, showing directional arrows (no text or symbols)Recirculation mode
flowchart
graph TD
    A["House"] --> B["Pulley"]
    B --> C["Balance"]
    C --> D["Arrow to House"]
    style A fill:#f9f,stroke:#333
    style D fill:#bbf,stroke:#333
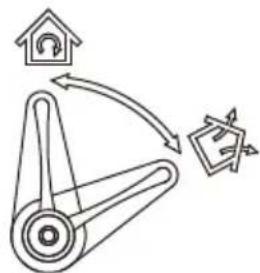
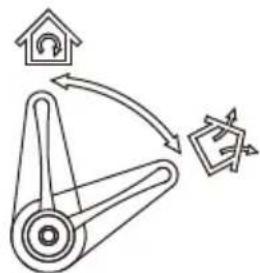
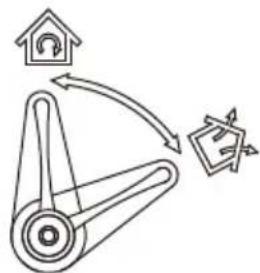
Venting knob position
 | Extraction-air mode: Turn the venting knob here means venting outside |
 | Circulating-air mode: Turn the venting knob here means recirculation |

Information
- Sufficient air is needed for proper combustion and exhaustion of gases through the flue (chimney) of fuel burning equipment to prevent back drafting. Ductless fans must always be vented to the outdoors.
- When assessing the air pressure, the entire ventilation system in the house/apartment must be taken into account, e.g. hob and/or gas cooker, this rule does not apply.
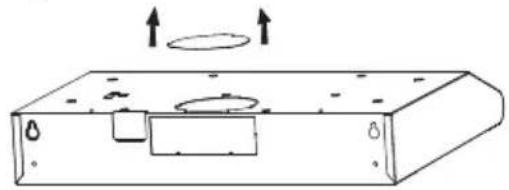
● Government regulations must be observed for the conveyance of exhaust air. If the extractor hood is used in circulating air mode with activated carbon filter, there are no operating restrictions. - If you choose extraction-air mode, there are two methods for ventilation, including 'horizontal ventilation' and 'vertical ventilation'. Please use tool take out the cover before using and install check valve on the hole.
● The square air check valve for horizontal ventilation is not supplied.
natural_image
Simple line drawing of a rectangular device with internal components and two upward arrows indicating motion (no text or symbols)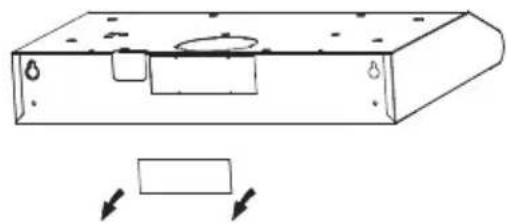
natural_image
Technical line drawing of a rectangular electronic component with mounting holes and internal compartments, showing directional arrows (no text or symbols)Prepare the installation :
Ensure the power has been turned off before beginning this installation. Plug must be assembled in places easy to drag and insert.
To install this hood you will require two assistants. You will need following tools and material to complete this installation.
Tools you will need:
● Drill appropriate to your wall
- Phillips Screwdriver
- Tape Measure
● Hand Saw or Jig Saw
● Installation work and electrical wiring must be done by qualified person(s) in accordance with all applicable codes and standards, including fire rated construction.
- Do not discharge the exhaust air into a flue from other appliances burning gas or other fuels.
● Regulations concerning the discharge of air have to be fulfilled.
- The cooker hood must be placed at a minimum distance of 65cm above the cooking surface of a hob.
- The cooker hood must be placed at a maximum distance of 75cm above the cooking surface of a hob.
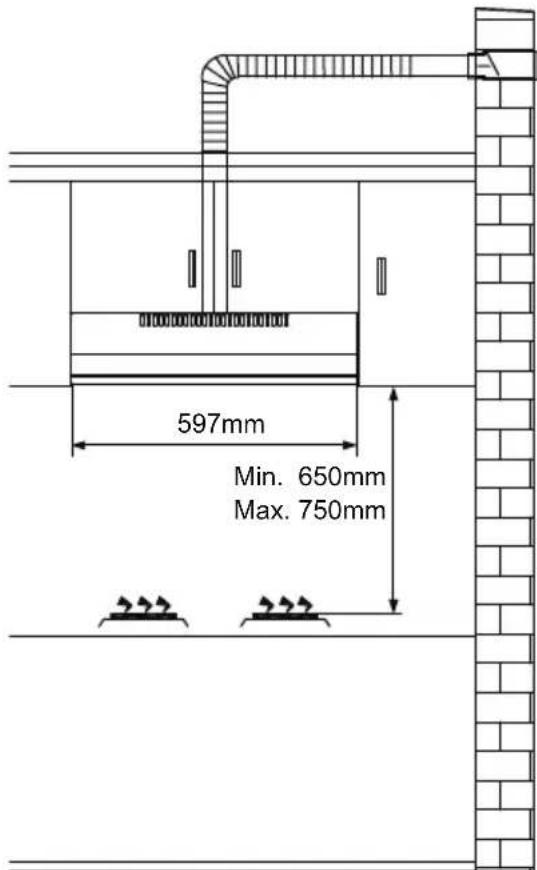
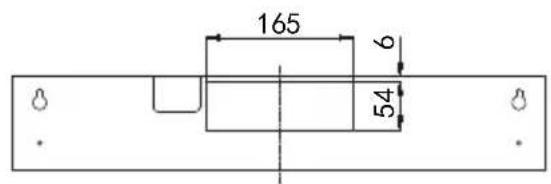
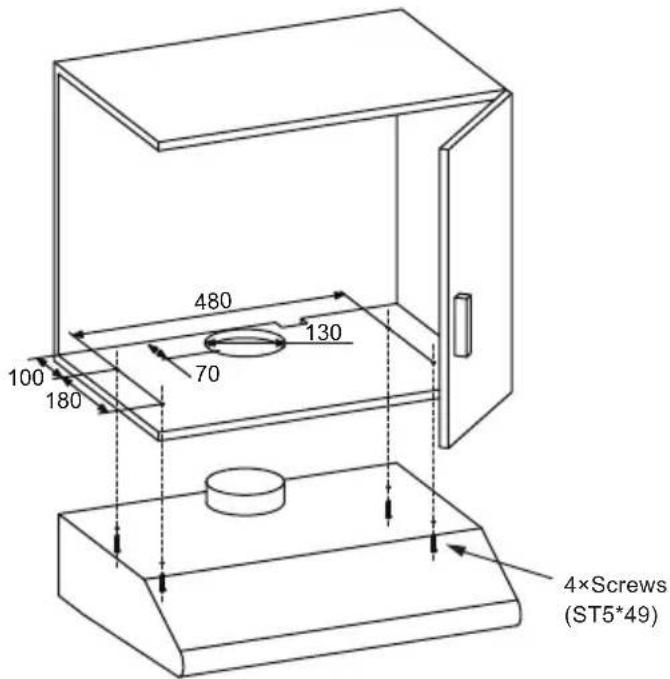
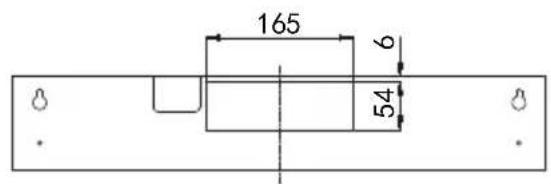
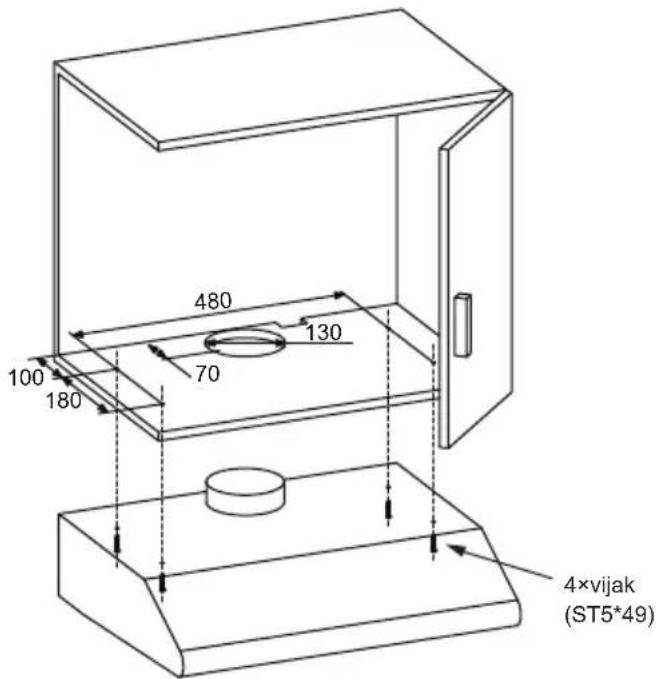
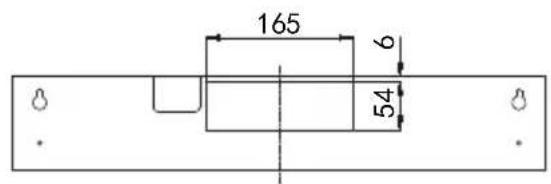
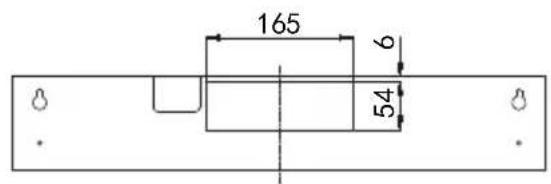
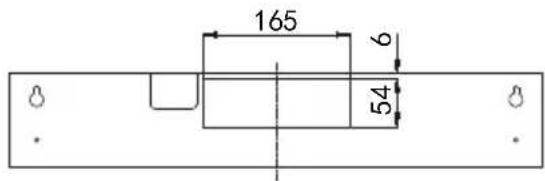
● Drill a 130mm diameter and four 3.5mm diameter hole as below picture.
- ATTENTION: If your cooker hood works at circulating-air mode, it is not necessary to drill 130mm diameter hole.
- Use the 4 screws to fix the cooker hood to a kitchen cupboard. Check that your fixings are correctly located, by temporarily fitting the cooker hood. If correct, fit the unit into position. Tighten the screws if necessary.
WALL MOU NTING INSTALLATION
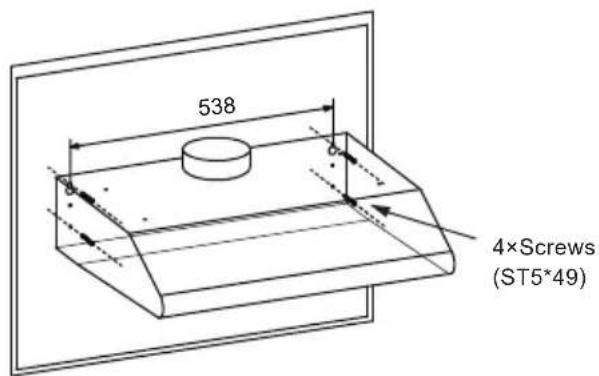
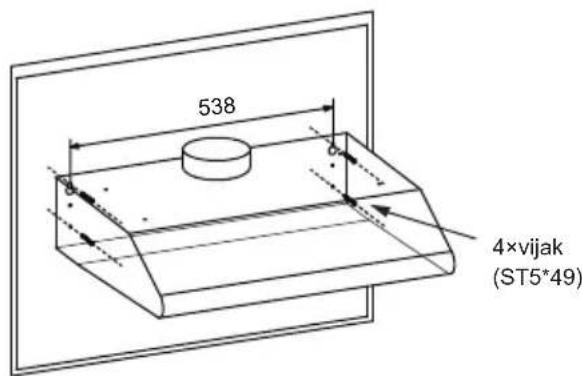
- To mount on the wall, drill two10mm diameter holes 538mm with the vent hole on the top of the cooker hood in the middle as below picture. Make sure the hood is aligned directly over the hob.
- Insert two plastics wall plugs(supplied) into the holes.
- Insert two screws into the upper two plastic wall plugs and tighten them leaving 3mm protruding from the wall.
- Mount the cooker hood onto the two screws and mark the bottom two screw positions.
- Remove the hood and drill the bottom two screw holes and Insert the plastic wall plugs.
- Mount the hood on the top screws, Insert the bottom screws and fully tighten all the screws.
The air must not be discharged into a flue that is used for exhausting fumes from appliances burning gas or other fuels.
OPERATION
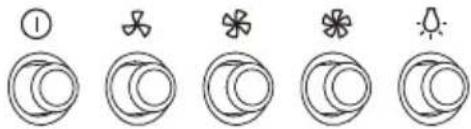
| 1 | OFF MOTOR SWITCH: Press on this switch to stop the motor operation. |
| SPEED SWITCH: Press on this switch, the motor runs at LOW speed. | |
| SPEED SWITCH: Press on this switch, the motor runs at MEDIUM speed. | |
| SPEED SWITCH: Press on this switch, the motor runs at HIGH speed. | |
| ON/OFF LIGHTING SWITCH: Press on this switch to turn on the lights, and press again to turn them off. |
LIGHTING
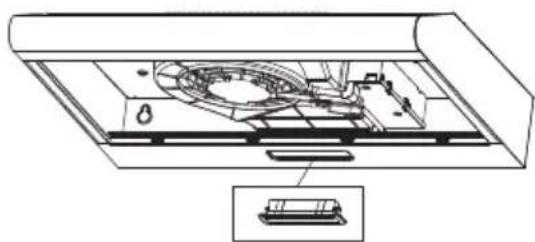
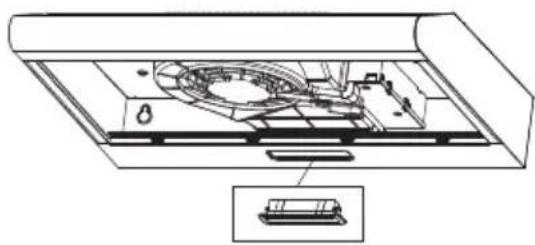
LIGHT REPLACEMENT
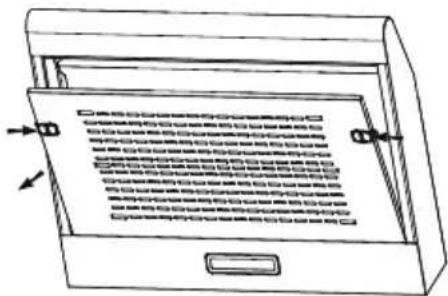
- Switch off the extractor hood and isolate the extractor hood by pulling out the mains plug or switching off the fuse.
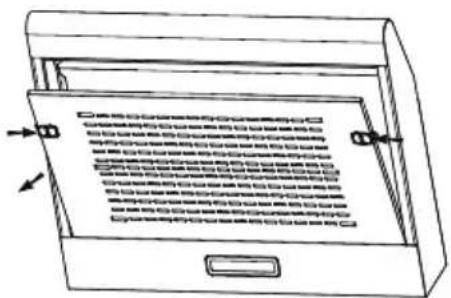
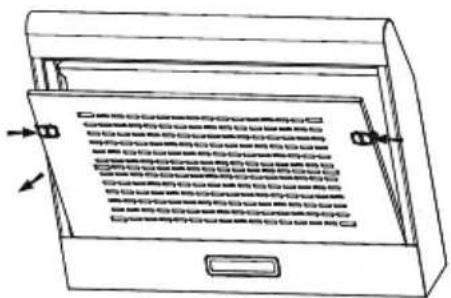
- Remove the grease filter.
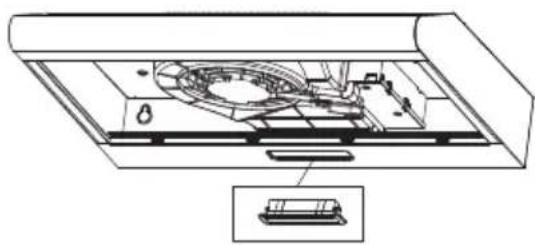
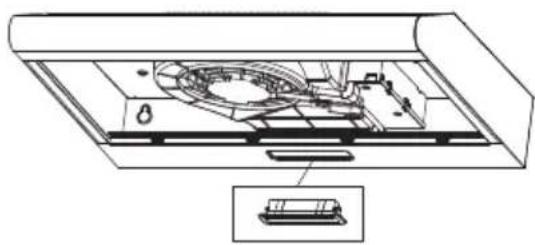
- Remove the light by levering its fitting from the hood body (this may require pressure or force to be applied).
- Disconnect the connector of the light.
- Replace the light with a new one of the same type, making sure that you connect the light with the light cable correctly.
● Reconnect the power by inserting the mains plug or by switching on the fuse.
natural_image
Technical line drawing of a mechanical assembly inside a transparent housing, showing internal components and a close-up inset (no text or symbols)| Max power | Voltage | Picture | Lamp Cap | LCOS D code | |
| Self-ballasted LED modules | 1.5W | 220V-240V | 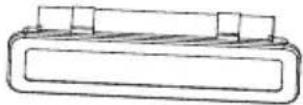 Square/Diameter:33.2mmx120mm Square/Diameter:33.2mmx120mm | / | DBS-1.5-H-33.2/120 |
CLEANING AND MAINTENANCE
Disconnect range hood from power supply before cleaning or servicing.
● Cleaning the surface of hood frequently. Use mild soap or detergent to clean the hood.
- Do not use harsh alkalis or abrasives.
- Avoid the use of scouring powers or dishwasher compounds.
- Grease filter may be washed using mild soap or detergent. (Heavy grease build-up may not be cleaned easily and the filter may require replacement).
- Charcoal filter cannot be cleaned and must be replaced regularly.

Information
Cleaning water must not inter into motor, control switch etc. electrical parts.
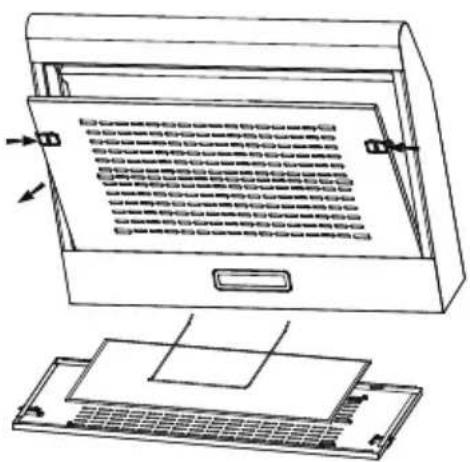
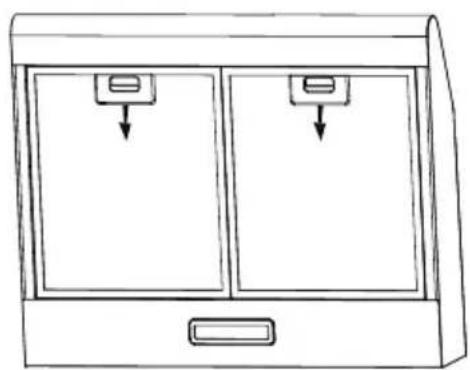
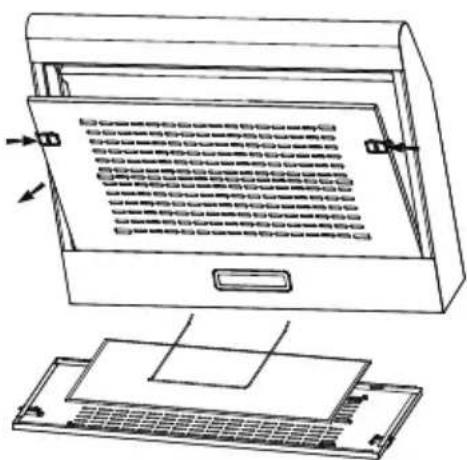
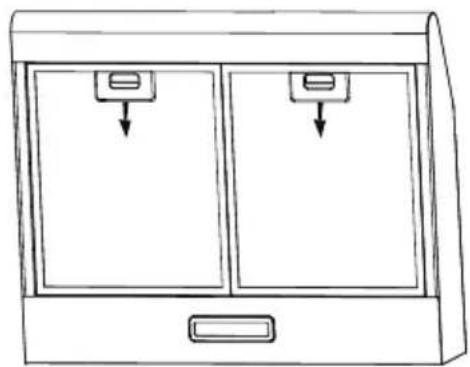
It is recommendable to clean the metallic filter every three months by carrying out the following instruction:
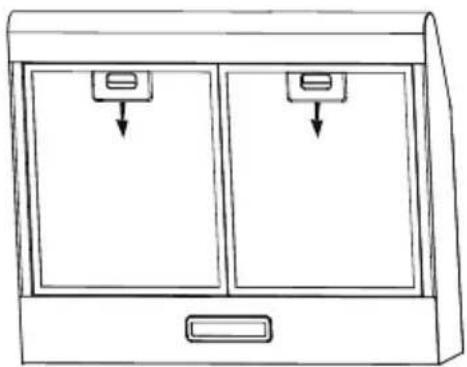
- Remove the metallic filter from the cooker hood and wash it in asolution of water and neutral liquid detergent, leaving to soak.
● Rinse thoroughly with warm water and leave to dry. - The metallic filter may alter in color after several washes. This is not cause for customer complaint or replacement of metallic filter.
natural_image
Line drawing of a two-panel cabinet with two doors and two drawers, no text or symbols present
Information
There is a fire risk if cleaning is not carried out in accordance with the instructions.
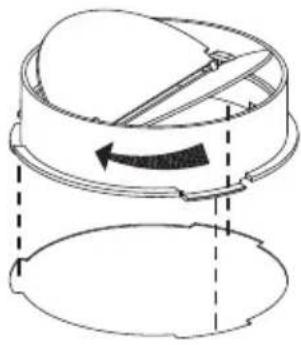
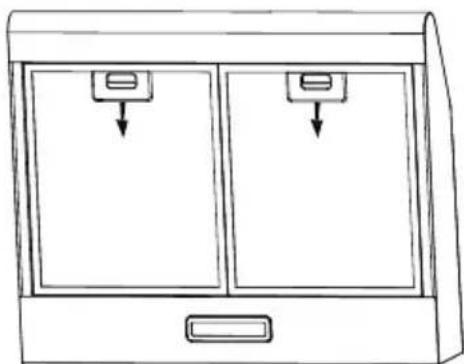
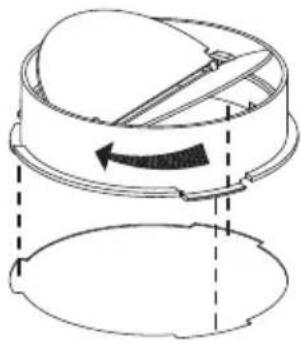
Hold on check valve with your hands, align the box gap, put in the check valve, and then spin to a certain angle until three angles of the valve are stuck. Installation is complete. The fixing type for external air-guides and check valve shall comply with the requirement of standard IEC/EN 60335-1.
natural_image
Diagram of a mechanical component with arrows indicating rotation or movement, no text or symbols presentINSTALLING THE CARBON FILTER
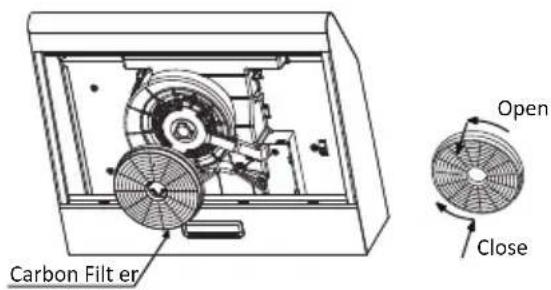
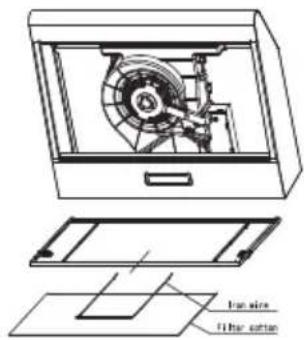
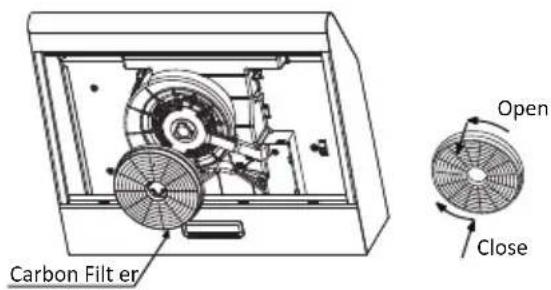
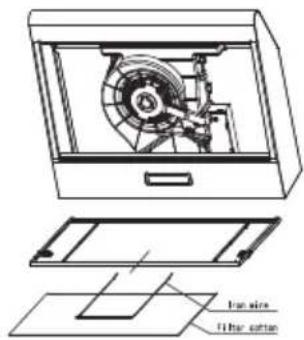
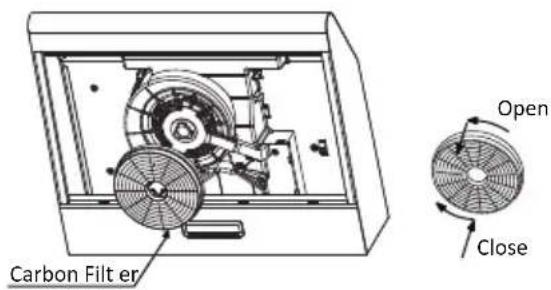
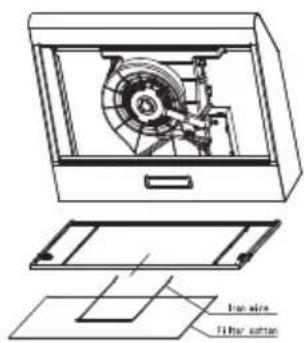
- Remove the grease filter, and remove the iron wire.
● The filter cotton is located on the metal mesh and fixed by iron wire. - Replace a new filter cotton, apply reverse procedure for reinstallaiton.
Warning: the filter cotton cannot be washed or recycled. It should be replaced after approximately 2-3 months of use.
Remark: Filter cotton is not supplied with your appliance(optional).
DISPOSAL
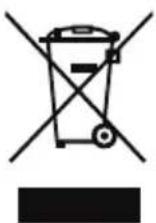
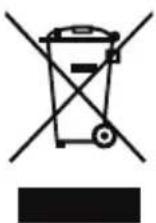
The European directive 2012/19/EU on Waste Electrical and Electronic Equipment (WEEE), requires that old household electrical appliances must not be disposed of in the normal unsorted municipal waste stream. Old appliances must be collected separately in order to optimize the recovery and recycling of the materials they contain, and reduce the impact on human health and the environment.
The crossed out "wheeled bin" symbol on the product reminds you of your obligation, that when you dispose of the appliance, it must be separately collected. Consumers should contact their local authority or retailer for information concerning the correct disposal of their old appliance.
| Fault | Cause | Solution |
| Light on, but motor does not work | The blades are blocked. Check the blade. | |
| The capacitor is damaged. | Replace capacitor. | |
| The motor is damaged. | Replace motor. | |
| The internal wiring of motor is cut off/disconnected. An unpleasant smell may be produced. | Replace motor. | |
| Both light and motor do not work | Apart from the above mentioned, check the following: | |
| Light damaged. | Replace lights. | |
| Power cord loose. | Connect the wires as per the electric diagram. | |
| Oil leakage | Outlet and the air ventilation entrance are not tightly sealed. | Take down the outlet and seal with glue. |
| Vibration | The blade, if damaged, can cause vibrating. | Replace the blade. |
| The motor is not tightly fastened. | Fasten the motor tightly. | |
| The cooker hood is not tightly fixed. | Fixed the cooker hood tightly. | |
| Insufficient suction | The distance between the cooker hood and the cooker top is too large. | Readjust the distance. |
| Too much ventilation from open doors or windows. | Choose a new place to install the appliance or close some doors / windows. | |
| The machine inclines | The fixing screws are not tight enough. | Tighten the fixing screw and make it horizontal. |
| The hanging screws are not tight enough. | Tighten the hanging screw and make it horizontal. | |

TRD6F49IX
TRD6F49W
natural_image
Line drawing of a standard air duct with ventilation slots and a circular vent (no text or symbols)ASPIRATOR
UPUTSTVO ZA UPOTREBU
Pre upotrebe proizvoda pažljivo pročitajte uputstvo
Slike u ovom uputstvu su samo za referencu, stvarni izgled proizvoda ima prednost.

natural_image
Simple line drawing of a lamp emitting steam from a heated source (no text or symbols)UPOTREBA
ODRŽAVANJE
- Aspirator i filter treba redovno čistiti prema uputstvima.
- Isključite utikač uređaja iz električne utičnice pre čišćenja uređaja.
- Očistite haubu aspiratora koristeći vlažnu krpu i neutralni tečni deterdžent.
- Uređaj koristi maksimalno 4 grejne zone na šporetu.
natural_image
Simple line drawing of a house with a stove and a chimney, no text or symbols present
Simbol na ambalaži ukazuje na to da se ovaj proizvod ne sme tretirati kao kućni otpad. Umesto toga, treba ga predati odgovarajućem sakupljalištu za recikliranje električne i elektronske opreme. Osiguravajući pravilno odlaganje ovog proizvoda, pomažete sprečavanju potencijalno negativnih posledica po životnu sredinu i ljudsko zdravlje, koje bi inače mogle nastati usled neadekvatnog rukovanja otpadom ovog proizvoda. Za detaljnije informacije o reciklaži ovog proizvoda, obratite se lokalnoj gradskoj upravi, službi za odlaganje kućnog otpada ili prodavnici u kojoj ste kupili proizvod.
Napon i frekvencija: 220-240V\~ 50/60Hz
Ulazna snaga motora: 38W
U određenim okolnostima električni uređaj može biti opasan.
KOMPONENTE
| Br. | Kol. | Delovi proizvoda |
| 1 | 1 | Glavno telo |
| 2 | 1 | Ventilaciono dugme |
| 3 | 1 | Sklop filtera (opciono 2 ili 3) |
| Br. | Kol. | Delovi za instalaciju |
| 4 | 1 | Ugljeni filter (opciono) |
| 5 | 1 | Ventil za protok vazduha |
| 6 | 1 | Poklopac za izlaz vazduha |
| 7 | 4 | Vijci 5mm x 49mm |
| 8 | 4 | Plastični tiplovi za zid |
jedinica: mm
BUŠENJE ZIDA I MONTAŽA NOSAČA
- Molimo vas da pažljivo pročitate uputstvo.
- Raspakujte kućište i proverite da li sve funkcije rade. Obezbedite da napon (V) i frekvencija (Hz) naznačeni na serijskoj tablici odgovaraju naponu i frekvenciji na mestu instalacije.
- Proverite da je područje iza površine na koju će se vršiti bušenje slobodno od električnih kablova ili cevi, itd.
- Nerđajući čelik i staklene površine kućišta se lako mogu oštetiti tokom instalacije ako se dodiruju ili udaraju alatima. Molimo vas da pazite i zaštitite površine tokom instalacije.
- Zaštite površinu šporeta ispod kućišta kartonom ili sličnim materijalom kako bi se sprečilo oštećenje tokom instalacije zidne nape.
- Proizvođač neće biti odgovoran za nepoštovanje svih važećih sigurnosnih propisa za ispravan i normalan rad električnih delova.
Izaberite režim ventilacije:
natural_image
Technical diagram of a mechanical assembly with directional arrows indicating motion or force (no text or labels)natural_image
Technical diagram showing a mechanical assembly with arrows indicating motion or force direction (no text or symbols present)Režim recirkulacije
flowchart
graph TD
    A["House"] --> B["Pulley"]
    B --> C["Gear Mechanism"]
    C --> D["Return Line"]
    D --> E["Return Line"]
    E --> F["Return Line"]
    F --> G["Return Line"]
    G --> H["Return Line"]
    H --> I["Return Line"]
    I --> J["Return Line"]
    J --> K["Return Line"]
natural_image
Simple line drawing of a rectangular device with internal components and upward arrows indicating motion (no text or symbols)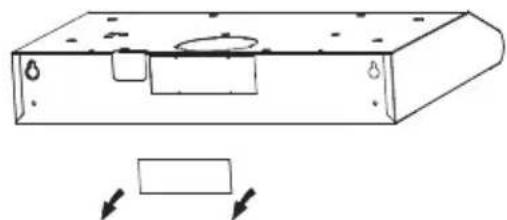
natural_image
Technical line drawing of a rectangular electronic component with mounting holes and internal compartments, showing directional arrows (no text or symbols)Priprema za instalaciju:
Napajanje mora biti isključeno pre početka instalacije. Utikač mora da se montira na mestima koja su lako dostupna za vuču i umetanje.
Za instalaciju ovog aspiratora potrebna su vam dva pomoćnika. Za instaliranje su vam potrebni sledeći alati i materijali.
Potreban alat:
- Odgovarajuća bušilica za zid
- Phillips odvijač
- Merna traka
• Ručna ili ubodna testera - Radovi na instalaciji i električnoj instalaciji moraju biti obavljeni od strane kvalifikovanih lica u skladu sa svim primenljivim propisima i standardima, uključujući konstrukciju otpornu na požar.
- Nemojte da ispuštate izduvni vazduh u dimnjak iz drugih uređaja koji koriste gas ili druge materijale kao gorivo.
- Propisi vezani za ispuštanje vazduha moraju biti ispunjeni.
- Aspirator se mora postaviti na minimalnoj udaljenosti od 65 cm iznad radne površine šporeta.
- Aspirator se mora postaviti na maksimalnoj udaljenosti od 75cm iznad radne površine šporeta.
● Bušite rupe prečnika 130 mm i četiri rupe prečnika 3.5 mm kao što je prikazano na slici ispod.
- PAŽNJA: Ako vaš aspirator funkcioniše u režimu recirkulacije vazduha, nije potrebno bušiti rupu prečnika 130 mm.
- Upotrebite 4 šrafa da fiksirate aspirator na kuhinjski ormarić. Proverite da su fiksacije pravilno postavljene probnim kratkim postavljanjem aspiratora. Ako je sve ispravno, postavite uređaj na krajnje odredište. Po potrebi zategnite šrafove.
MONTAŽA NA ZID
- Da biste montirali na zid, probušite dve rupe prečnika 10 mm udaljene 538 mm od otvora za ventilaciju na vrhu aspiratora, kao na slici ispod. Vodite računa da aspirator bude postavlien direktno iznad šporeta.
- Umetnite dva plastična tipla (isporučena) u rupe.
- Umetnite dva vijka u gornja dva plastična tipla i zategnite ih tako da iz zida viri 3 mm.
- Postavite aspirator na ova dva vijka i označite pozicije donja dva vijka.
- Pomerite aspirator i probušite rupe za donja dva vijka, zatim umetnite plastične zidne tiplove.
- Montirajte aspirator na gornje vijke, umetnite donje vijke i potpuno zategnite sve vijke.
| 1 | PREKIDAČ ZA ISKLJUČIVANJE MOTORA: Pritisnite ovaj prekidač da zaustavite rad motora. |
| PREKIDAČ BRZINE: Pritisnite ovaj prekidač, motor će raditi na NISKOJ brzini. | |
| PREKIDAČ BRZINE: Pritisnite ovaj prekidač, motor će raditi na SREDNJOJ brzini. | |
| PREKIDAČ BRZINE: Pritisnite ovaj prekidač, motor će raditi na VISOKOJ brzini. | |
| PREKIDAČ ZA UKLJUČIVANJE/ISKLJUČIVANJE SVETLA: Pritisnite ovaj prekidač da uključite svetla i ponovo pritisnite da ih isključite. |
OSVETLJENJE
ZAMENA SIJALICE
- Isključite aspirator i izvadite utikač iz utičnice ili isključite osigurač.
- Uklonite filter za masnoću.
- Uklonite sijalicu tako što cete je izvuci iz kućišta aspiratora (ovo može zahtevati pritisak ili silu).
- Isključite konektor svetla.
- Zamenite sijalicu novpm istog tipa, pazeci da pravilno povežete sijalicu sa kablom za svetlo.
- Ponovo priključite napajanje umetanjem utikača ili uključivanjem osigurača.
natural_image
Technical line drawing of a mechanical assembly inside a device casing, showing internal components and a zoomed-in detail (no text or symbols)| Max snaga | Napon | Slika | Poklopac lampice | ILCOS D kod | |
| LED moduli sa sopstvenim balastom | 1.5W | 220V-240V | 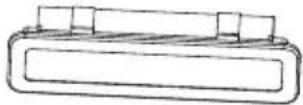 Kvadrat/Prečnik; 33.2mmx120mm Kvadrat/Prečnik; 33.2mmx120mm | / | DBS-1.5-H-33.2/120 |
ČIŠĆENJE I ODRŽAVANJE
Isključite aspirator iz napajanja pre nego što ga očistite ili servisirate.
- Redovno čistite površinu aspiratora. Koristite blagi sapun ili deterdžent za čišćenje aspiratora.
• Nemojte koristiti jake alkale ili abrazive. - Izbegavajte upotrebu sredstava za čišćenje sa abrazivnim delićima ili sredstava za mašinsko pranje posuđa.
- Filter za masnoću se može prati blagim sapunom ili deterdžentom. (Značajna nakupljanja masnoće se mogu teže očistiti i filter može zahtevati zamenu).
- Ugljeni filter ne može da se pere i treba redovno da se menja.

Informacije
Prilikom čišćenja, voda ne sme dospevati u motor, kontrolni prekidač i ostale električne delove. Preporučljivo je čistiti metalni filter svaka tri meseca, prateći sledeće instrukcije:
- Uklonite metalni filter sa aspiratora i operite ga u rastvoru vode i neutralnog tečnog deterdženta, ostavljajući ga da odstoji.
- Dobro isperite toplom vodom i ostavite da se osuši.
- Metalni filter može promeniti boju nakon nekoliko pranja. Ovo nije razlog za reklamaciju ili zamenu.
natural_image
Line drawing of a two-panel cabinet with two doors and arrows indicating direction (no text or symbols)
Informacije
natural_image
Diagram of a mechanical component with arrows indicating rotation or movement, no text or symbols presentINSTALIRANJE UGLJENOG FILTERA
- Uklonite filter za masnoću i izvadite gvozdenu žicu.
- Pamučni filter se nalazi na metalnoj mreži i fiksiran je gvozdenom žicom.
- Zamenite pamučni filter novim, primenjujući obrnuti postupak za ponovno postavljanje.
Upozorenje: pamučni filter se ne može prati ili reciklirati. Treba ga zameniti nakon otprilike 2-3 meseca upotrebe.
natural_image
Line drawing of a standard air duct box with ventilation slots and a circular vent (no text or symbols)KUHINJSKA NAPA
NAVODILA ZA UPORABO
natural_image
Simple line drawing of a heating setup with a lamp, control panel, and smokestack (no text or symbols)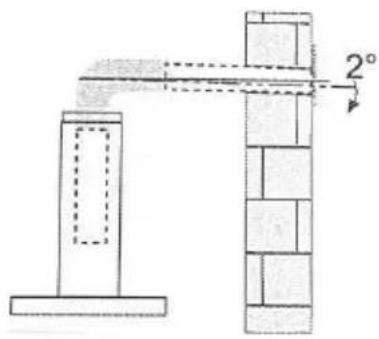
natural_image
Simple line drawing of a house with a stove and fire, no text or symbols presentNazivna napetost in frekvenca 220-240 V \~ 50/60 Hz
enota: mm
VRTANJE V STENE IN PRITRDITEV NOSILCEV
natural_image
Technical diagram showing a mechanical assembly with arrows indicating motion or force direction (no text or symbols present)flowchart
graph TD
    A["House"] --> B["Device"]
    B --> C["Pulley"]
    C --> D["Arrow to Device"]
    D --> E["Arrow to House"]
    E --> F["Arrow to House"]
    F --> G["Arrow to House"]
    G --> H["Arrow to House"]
Položaj gumba za odzračevanje
natural_image
Simple line drawing of a rectangular device with internal components and two upward arrows indicating motion (no text or symbols)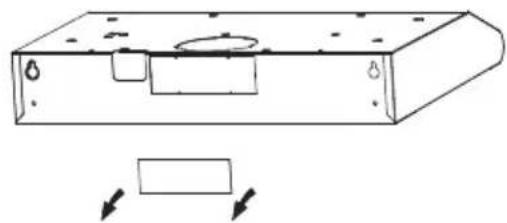
natural_image
Technical line drawing of a rectangular electronic component with mounting holes and internal compartments, showing directional arrows (no text or symbols)| 1 | STIKALO ZA IZKLOP MOTORJA: Pritisnite to stikalo, da zaustavite delovanje motorja. |
| STIKALO ZA HITROST: Pritisnite na to stikalo, motor deluje z NIZKO hitrostjo. | |
| STIKALO ZA HITROST: Pritisnite na to stikalo, motor deluje pri SREDNJI hitrosti. | |
| STIKALO ZA HITROST: Pritisnite na to stikalo, motor deluje z VISOKO hitrostjo. | |
| STIKALO ZA VKLOP/IZKLOP LUČI: pritisnite na to stikalo, da vklopite luči, in ponovno pritisnite, da jih ugasnete. |
RAZSVETLJAVA
ZAMENJAVA ŽARNICE
- Izklopite napo in jo izolirajte, tako da izvlečete električni vtikač iz omrežne ali izklopite varovalko.
- Odstranite maščobni filter.
- Odstranite nosilec žarnice, tako da ga izvlečete iz ohišja nape (morda boste morali uporabiti pritisk ali silo).
- Odklopite konektor žarnice.
- Zamenjajte žarnico z novo iste vrste in pri tem pazite, da pravilno priključite žarnico in žico žarnice.
- Ponovno priključite napajanje tako, da vstavite omrežni vtič ali vklopite varovalko.
natural_image
Technical line drawing of a mechanical assembly inside a device casing, showing internal components and a close-up inset (no text or symbols)| Najv. moč | Napetost | Slika | Pokrov svetilke | Koda ILCOS D | |
| LED moduli z ločenim balastom | 1.5W 220V-240V | 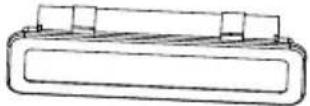 Kvadrat/premer:33.2mmx120mm Kvadrat/premer:33.2mmx120mm | / | DBS-1.5-H-33.2/120 | |
ČIŠČENJE IN VZDRŽEVANJE
natural_image
Line drawing of a two-panel cabinet with two doors and a handle, no text or symbols present
Informacija
natural_image
Diagram of a mechanical component with arrows indicating rotation, no text or symbols presentNAMESTITEV OGLJENEGA FILTRA
Opozorilo: the filter cotton cannot be washed or recycled. It should be replaced after approximately 2-3 months of use.
Opomba: Filtrirna vata ni priložena vašemu aparatu (izbirno)
ODLAGANJE
natural_image
Line drawing of a standard air duct box with ventilation slots and a circular vent (no text or symbols)KUHINJSKA NAPA
UPUTE ZA UPORABU
Pažljivo pročitajte ove upute prije uporabe.
natural_image
Simple line drawing of a laboratory setup with a conical flask, thermometer, and gas stove (no text or symbols)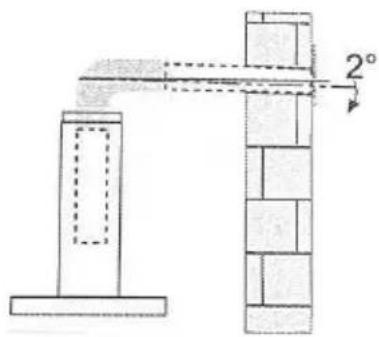
natural_image
Simple line drawing of a house with a stove and fire, no text or symbols presentjedinica: mm
BUŠENJE ZIDA I UČVRŠĆIVANJE NOSAČA
natural_image
Technical diagram of a mechanical assembly with directional arrows indicating motion or force (no text or symbols present)Način ekstrakcije zraka
natural_image
Technical diagram showing a mechanical assembly with arrows indicating motion or force direction (no text or symbols)Način recirkulacije
flowchart
graph TD
    A["House"] --> B["Pulley"]
    B --> C["Gear Mechanism"]
    C --> D["Return Line"]
    D --> E["Return Line"]
    E --> F["Return Line"]
    F --> G["Return Line"]
    G --> H["Return Line"]
    H --> I["Return Line"]
    I --> J["Return Line"]
    J --> K["Return Line"]
natural_image
Simple line drawing of a rectangular device with internal components and upward arrows indicating motion (no text or symbols)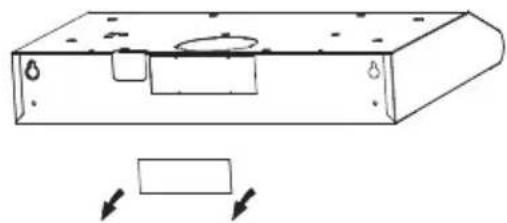
natural_image
Technical line drawing of a rectangular electronic component with mounting holes and internal compartments, showing directional arrows (no text or symbols)Pripremite se za instalaciju:
| 1 | PREKIDAČ ZA ISKLJUČIVANJE MOTORA: Pritisnite ovaj prekidač za zaustavljanje rada motora. |
| PREKIDAČ BRZINE: Pritisnite ovaj prekidač, motor radi NISKOM brzinom. | |
| PREKIDAČ BRZINE: Pritisnite ovaj prekidač, motor radi SREDNJOM brzinom. | |
| PREKIDAČ BRZINE: Pritisnite ovaj prekidač, motor radi VELIKOM brzinom. | |
| PREKIDAČ ZA UKLJUČIVANJE/ISKLJUČIVANJE SVJETLA: Pritisnite ovaj prekidač da biste uključili svjetla, I pritisnite ga ponovo da biste ih ugasili. |
RASVJETA
ZAMJENA ŽARULJE
natural_image
Technical line drawing of a mechanical assembly inside a housing, showing internal components and a close-up inset (no text or symbols)| Maks. snaga | Napon | Slika | Pokopac svjetla | ILCOS D kod | |
| LED moduli s vlastitim balastom | 1.5W | 220V-240V | Kvadrat/promjer:33,2mmx120mm | / | DBS-1.5-H-33.2/120 |
ČIŠĆENJE I ODRŽAVANJE
natural_image
Line drawing of a two-door cabinet with two doors and a handle, no text or symbols present
Informacija
Postoji opasnost od požara ako se čišćenje ne provodi u skladu s uputama.
Rukama držite kontrolni ventil, poravnajte razmak kutije, stavite kontrolni ventil, a zatim ga okrećite pod određenim kutom dok se tri kuta ventila ne zaglave. Instalacija je dovršena. Tip pričvršćivanja za vanjske vodilice zraka i kontrolni ventil mora biti u skladu sa zahtjevima standarda IEC/EN 60335-1.
natural_image
Diagram of a mechanical component with arrows indicating rotation or movement, no text or symbols presentUGRADNJA UGLJENOG FILTRA
- Uklonite filtar za masnoću i uklonite željeznu žicu.
- Filtarska vata nalazi se na metalnoj mrežici i pričvršćena željeznom žicom.
- Zamijenite novu vatu filtera, primijenite obrnuti postupak za ponovnu ugradnju.
Upozorenje: filter pamuk se ne može prati niti reciklirati. Treba ga zamijeniti nakon otprilike 2-3 mjeseca korištenja.
Napomena: Filtarska vata se ne isporučuje uz vaš uređaj (opcija).
ODLAGANJE
Europska Direktiva 2012/19/EU o otpadnoj električnoj i elektroničkoj opremi (WEEE) zahtijeva da se stari električni kućanski uređaji ne smiju odlagati u uobičajeni nerazvrstani gradski otpad. Stari uređaji moraju se prikupljati odvojeno kako bi se optimizirala oporaba i recikliranje materijala koje sadrže i smanjio utjecaj na ljudsko zdravlje i okoliš. Simbol prekrižene "kante za otpad" na proizvodu podsjeća vas na vašu obvezu da kada želite zbrinuti uređaj, mora se skupljati odvojeno. Potrošači bi se trebali obratiti svojim lokalnim vlastima ili trgovcu za informacije o pravilnom odlaganju svojih starih uređaja.
natural_image
Line drawing of a standard air duct with ventilation slots and a circular vent (no text or symbols)АСПИРАТОР
natural_image
Simple line drawing of a laboratory setup with a conical flask, thermometer, and gas stove (no text or symbols)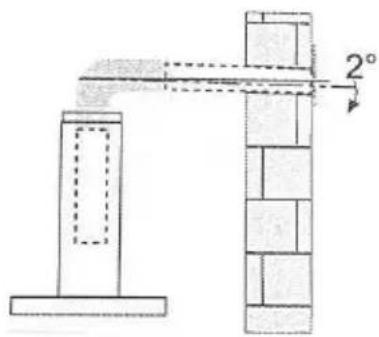
natural_image
Simple line drawing of a house with a stove and fire, no text or symbols presentНоминален напон и фреквенција 220-240V\~ 50/60Hz
Влезна моїност на моторот: 38 W
единица: mm
natural_image
Technical diagram of a mechanical assembly with directional arrows indicating motion or force (no text or symbols present)natural_image
Technical diagram showing a mechanical assembly with arrows indicating motion or force direction (no text or symbols)natural_image
Technical line drawing of a rectangular electronic component with mounting holes and internal cavity (no text or symbols)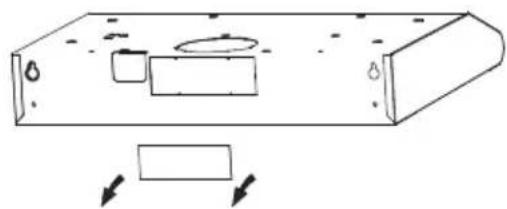
natural_image
Simple line drawing of a rectangular container with internal compartments and water droplets, no text or symbols presentnatural_image
Five circular icons with different symbols and colors, arranged horizontally (no text or labels)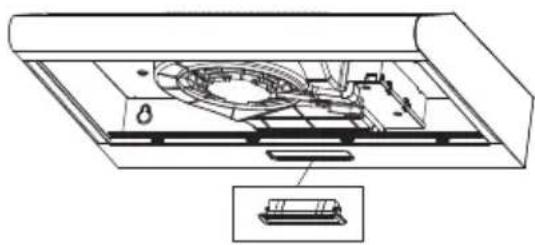
natural_image
Technical line drawing of a mechanical assembly inside a device casing, showing internal components and a zoomed-in detail (no text or symbols)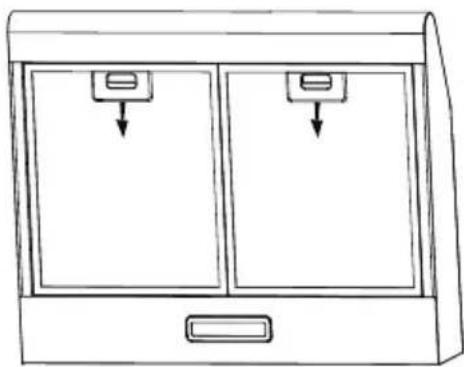
natural_image
Line drawing of a two-panel cabinet with two doors and two drawers, no text or symbols present
Информација
natural_image
Diagram of a mechanical component with arrows indicating rotation or movement, no text or symbols presentnatural_image
Line drawing of a standard air duct box with ventilation slots and a circular vent (no text or symbols)EXAUSTOR DE COZINHA
MANUAL DE INSTRUÇÕES
natural_image
Illustration of a laboratory setup with a conical flask, heating a lamp, and a control panel (no text or symbols)UTILIZAÇÃO
natural_image
Simple line drawing of a house with a chimney and a cooking pot, emitting steam from a chimney (no text or symbols)
unidade: mm
natural_image
Technical diagram of a mechanical assembly with directional arrows indicating motion (no text or labels)natural_image
Technical diagram showing a mechanical assembly with arrows indicating force or movement (no text or symbols present)natural_image
Simple line drawing of a rectangular electronic device with mounting holes and a circular component, no text or symbols present.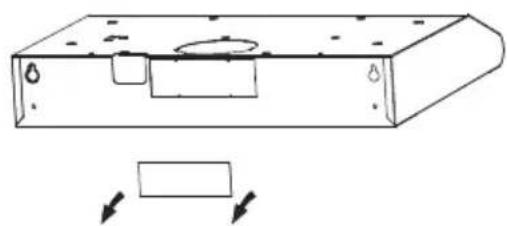
natural_image
Technical line drawing of a rectangular electronic component with mounting holes and internal compartments, showing directional arrows indicating movement (no text or symbols)natural_image
Five circular icons with different symbols: one with a leaf and one with a sun, arranged horizontally (no text or labels)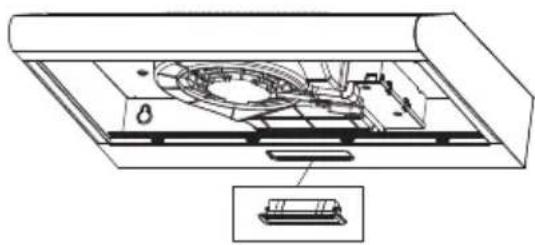
natural_image
Technical line drawing of a mechanical assembly inside a device casing, showing internal components and a zoomed-in detail (no text or symbols)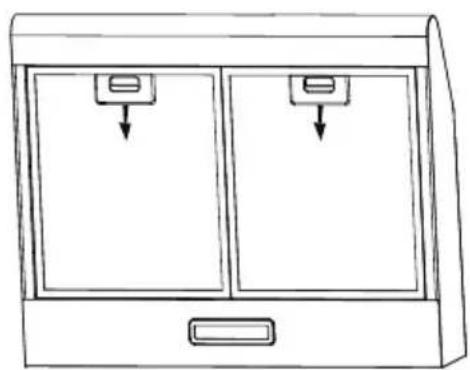
natural_image
Line drawing of a two-panel cabinet with two doors and two drawers, no text or symbols present
Informações
natural_image
Diagram of a mechanical component with arrows indicating rotation, no text or symbols presentnatural_image
Line drawing of a standard air duct box with ventilation slots and a circular vent (no text or symbols)АСПИРАТОР
РЪКОВОДСТВО ЗА УПОТРЕБА
natural_image
Simple line drawing of a laboratory setup with a conical flask, heating a test tube, and a control panel (no text or symbols)УПОТРЕБА
ПОДДРЪЖКА
natural_image
Simple line drawing of a house with a pot and fire, no text or symbols present
единица: mm
ПРОБИВАНЕ НА СТЕНА И ФИКСИРАНЕ НА ОКАЧВАНЕТО
natural_image
Technical diagram of a mechanical assembly with directional arrows indicating motion or force (no text or symbols present)natural_image
Technical diagram of a mechanical assembly with hatched walls and a central component, showing directional arrows (no text or symbols)natural_image
Simple line drawing of a rectangular device with internal components and upward arrows indicating motion (no text or symbols)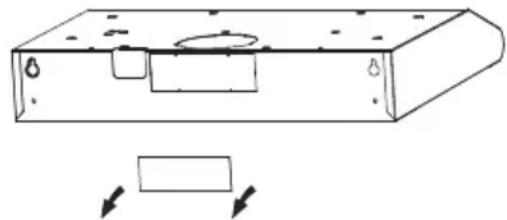
natural_image
Technical line drawing of a rectangular electronic component with mounting holes and internal compartments, showing directional arrows (no text or symbols)Подгответе монтажа:
natural_image
Five hand-drawn circular symbols with leaf, flower, and star-like shapes arranged horizontally (no text or labels)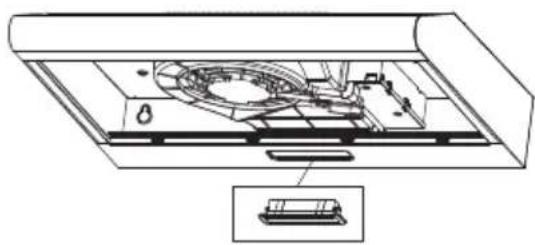
natural_image
Technical diagram of a mechanical device with internal components and an inset view of a component (no text or labels)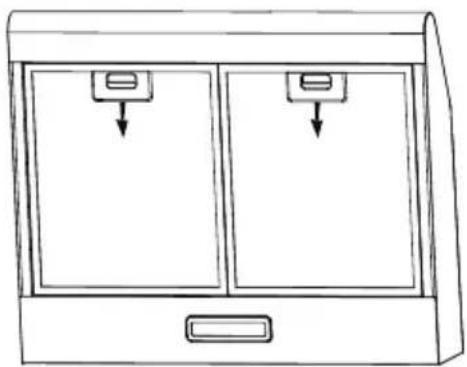
natural_image
Line drawing of a two-door cabinet with two doors and one drawer, no text or symbols present
Информация
natural_image
Diagram of a mechanical component with arrows indicating rotational motion (no text or symbols)natural_image
Line drawing of a standard air duct box with ventilation slots and a circular vent (no text or symbols)ΑΠΟΡΡΟΦΗΤΗΡΑΣ
ΕΓΧΕΙΡΙΔΙΟ ΧΡΗΣΗΣ
natural_image
Simple line drawing of a house with a stove and a person standing on a platform, no text or symbols present.μονάδα: mm
natural_image
Technical diagram of a mechanical assembly with directional arrows indicating motion or force (no text or symbols present)natural_image
Technical diagram showing a mechanical assembly with arrows indicating motion or force direction (no text or symbols)natural_image
Simple line drawing of a rectangular electronic device with internal components and two upward arrows indicating motion (no text or symbols)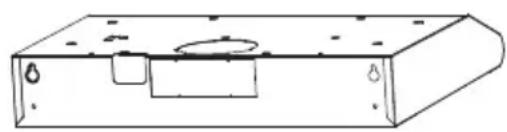
natural_image
Technical line drawing of a rectangular mechanical component with mounting holes and internal cavity (no text or symbols)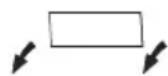
natural_image
Five circular icons with different symbols (circle, crescent, flower, sun) arranged horizontally, no text or labels present.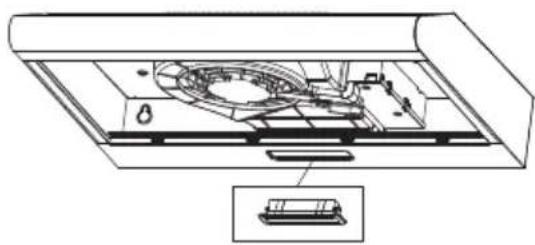
natural_image
Technical line drawing of a mechanical assembly inside a device casing, showing internal components and a zoomed-in detail (no text or symbols)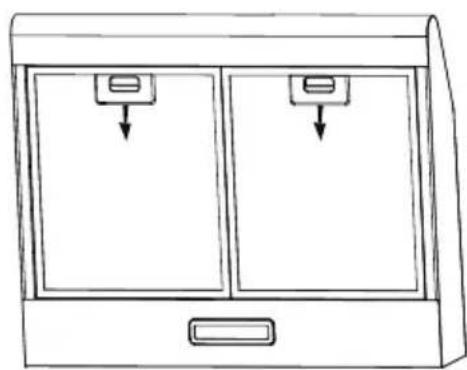
natural_image
Line drawing of a two-door cabinet with two doors and two drawers, no text or symbols present
Πληροφορίες
natural_image
Diagram of a mechanical component with arrows indicating rotation or movement (no text or symbols)natural_image
Line drawing of a standard air duct box with ventilation slots and a circular vent (no text or symbols)CAMPANA EXTRACTORA
natural_image
Simple line drawing of a laboratory setup with a conical flask, thermometer, and gas stove (no text or symbols)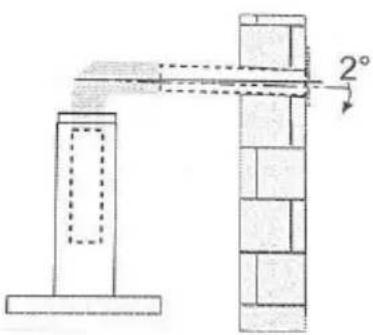
natural_image
Simple line drawing of a house with a chimney and fire, no text or symbols presentunidad: mm
natural_image
Technical diagram of a mechanical assembly with directional arrows indicating motion or force (no text or symbols present)natural_image
Technical diagram showing a mechanical assembly with arrows indicating force or movement (no text or symbols present)natural_image
Simple line drawing of a rectangular device with internal components and two upward arrows indicating motion (no text or symbols)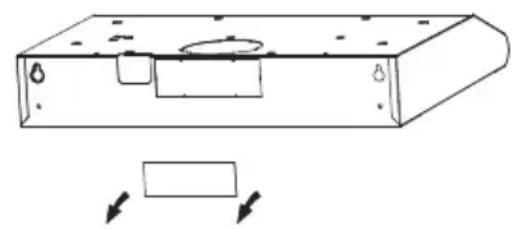
natural_image
Technical line drawing of a rectangular electronic component with mounting holes and internal compartments, showing directional arrows (no text or symbols)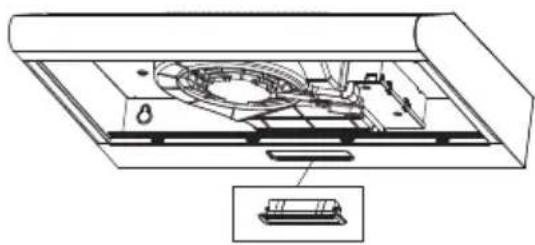
natural_image
Technical line drawing of a mechanical assembly inside a device casing, showing internal components and a zoomed-in detail (no text or symbols)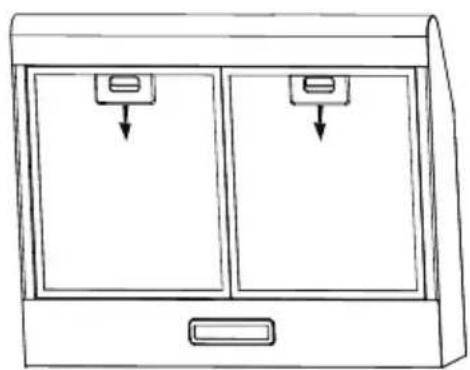
natural_image
Line drawing of a two-panel cabinet with two doors and a handle, no text or symbols present
Información
natural_image
Diagram of a mechanical component with arrows indicating rotational motion (no text or symbols)- INSTRUCTION MANUAL
- INSTALLATION
- USE
- MAINTENANCE
- WALL DRILLING AND BRACKET FIXING
- Choose a venting mode:
- Information
- Prepare the installation :
- WALL MOU NTING INSTALLATION
- OPERATION
- LIGHTING
- LIGHT REPLACEMENT
- CLEANING AND MAINTENANCE
- INSTALLING THE CARBON FILTER
- DISPOSAL
- ASPIRATOR
- UPUTSTVO ZA UPOTREBU
- UPOTREBA
- ODRŽAVANJE
- BUŠENJE ZIDA I MONTAŽA NOSAČA
- Izaberite režim ventilacije:
- Priprema za instalaciju:
- MONTAŽA NA ZID
- OSVETLJENJE
- ZAMENA SIJALICE
- ČIŠĆENJE I ODRŽAVANJE
- Informacije
- INSTALIRANJE UGLJENOG FILTERA
- NAVODILA ZA UPORABO
- VRTANJE V STENE IN PRITRDITEV NOSILCEV
- RAZSVETLJAVA
- ZAMENJAVA ŽARNICE
- ČIŠČENJE IN VZDRŽEVANJE
- Informacija
- NAMESTITEV OGLJENEGA FILTRA
- ODLAGANJE
- KUHINJSKA NAPA
- UPUTE ZA UPORABU
- BUŠENJE ZIDA I UČVRŠĆIVANJE NOSAČA
- Pripremite se za instalaciju:
- RASVJETA
- ZAMJENA ŽARULJE
- UGRADNJA UGLJENOG FILTRA
- Информација
- MANUAL DE INSTRUÇÕES
- UTILIZAÇÃO
- Informações
- РЪКОВОДСТВО ЗА УПОТРЕБА
- УПОТРЕБА
- ПОДДРЪЖКА
- ПРОБИВАНЕ НА СТЕНА И ФИКСИРАНЕ НА ОКАЧВАНЕТО
- Подгответе монтажа:
- Информация
- ΕΓΧΕΙΡΙΔΙΟ ΧΡΗΣΗΣ
- Πληροφορίες
- CAMPANA EXTRACTORA
- Información
Brand : VOX
Model : TRD6F49W
Category : Range hood