
TI 6312 - Hob SCHOLTES - Free user manual and instructions
Find the device manual for free TI 6312 SCHOLTES in PDF.
| Product type | Induction hob |
| Brand | SCHOLTES |
| Model | TI 6312 |
| Number of cooking zones | 2 (front right 1200 W, front left 1800 W boostable to 3000 W) |
| Total power | 3600 W |
| Electrical supply | 230 V, 50 Hz, 16 A |
| Connection type | Single-phase 1+N~ |
| Boost function | Yes, up to 3000 W on front left zone for max 4 minutes |
| Programmable timer | Yes, up to 99 minutes, automatic zone shut-off |
| Control lock | Yes, via dedicated key |
| Pan detection | Yes, requires ferromagnetic bottom |
| Residual heat indicator | Yes, displays "H" if zone > 60 °C |
| Automatic safety shut-off | Yes, according to power level (1 h to 10 h) |
| Thermal protection | Yes, shut-off in case of overheating |
| Surface material | Ceramic glass |
| Installation | Built-in, worktop cut-out required |
| Care and cleaning | Clean with scraper and specific ceramic glass products |
Frequently Asked Questions - TI 6312 SCHOLTES
User questions about TI 6312 SCHOLTES
0 question about this device. Answer the ones you know or ask your own.
Ask a new question about this device
Download the instructions for your Hob in PDF format for free! Find your manual TI 6312 - SCHOLTES and take your electronic device back in hand. On this page are published all the documents necessary for the use of your device. TI 6312 by SCHOLTES.
USER MANUAL TI 6312 SCHOLTES
natural_image
Simple line drawing of a house interior with a stove, air ducts, and directional arrows indicating airflow or ventilation (no text or symbols)natural_image
Simple line drawing of a house interior with a stove, air ducts, and directional arrows indicating airflow or ventilation (no text or symbols)natural_image
Line drawing of a room interior with door, lamp, and steam pipe (no text or symbols)natural_image
Technical line drawing of a mechanical assembly with a central shaft and flange (no text or symbols)- This appliance was designed for non-professional, household use.
- Before using the appliance, read the instructions in the owner's manual carefully since it contains all the instructions you require to ensure safe installation, use and maintenance. Keep this owner's manual in a safe place for future reference.
- When you have removed the packing, check whether the appliance is intact. If you have any doubts, contact a qualified professional before using the appliance.
- Never leave the packing components (plastic bags, polystyrene foam, nails, etc.) within the reach of children since these are a source of potential danger.
- The appliance must be installed by a qualified technician in compliance with the instructions provided by the manufacturer.
- The latter denies all responsibility for improper installation which may harm persons and animals and damage property.
- The electrical safety of this appliance can only be guaranteed if the latter is correctly and efficiently earthed, in compliance with regulations on electrical safety. Always ensure that this vital safety measure has been taken. If you have any doubts, call in a qualified technician to check the electrical system thoroughly.
- The manufacturer denies all responsibility for damage resulting from a system which has not been earthed correctly.
- Before powering the appliance, check whether the technical characteristics featured on the appliance data plate correspond with those of the mains electrical system.
- Check that the current load of the mains supply and of the power sockets is suitable for the maximum power of the appliance, indicated on the appliance data plate. If in doubt, contact a qualified professional.
- This appliance must only be used for the purpose for which it was expressly designed. Any other use (such as heating a room for example) is considered to be improper and consequently dangerous.
-
The manufacturer denies all responsibility for damage resulting from improper or incorrect use of the appliance.
-
Certain fundamental rules must be followed when using electrical appliances. The following are of particular importance:
- do not touch the appliance with wet or damp hands,
- never use the appliance when barefoot,
- never use extensions,
- never pull on the power supply cable or the appliance itself to unplug it from the mains socket,
- never leave the appliance exposed to atmospheric agents (rain, sun, etc.),
- do not allow children or persons who are not familiar with the appliance to use it without supervision.
- Always unplug the appliance from the mains or switch off the main switch before cleaning or performing any cleaning or maintenance operations.
- If the surface of the glass cracks, unplug the appliance immediately. For any repairs, contact only an authorised after-sales service centre and demand original spare parts. Failure to comply with the above may compromise the safety of the appliance.
- Cut the power supply cable after disconnecting it from the power mains when you decide not to use the appliance any longer. Also make all potentially dangerous parts of the appliance safe, above all for children who could play with the appliance.
- The glass ceramic hob is resistant to thermal and mechanical shocks. However, it may break due to a shock caused by a sharp object, such as a tool for example. In this case, unplug the appliance immediately and contact an authorised after-sales service centre to have it repaired.
- If the surface of the hob is cracked, switch off the appliance to prevent electric shocks from occurring.
- Remember that the heating area stays hot for at least half an hour after being turned off; please refrain from placing any cookware or other items on the cooking zone while still hot.
- Do not turn on the heating zones if aluminium foil or plastic items have been placed on the hob surface.
- Do not go near the heating zones when these are still hot.
- If you use small electric appliances near the hob, make sure their power supply cable does not come into contact with the hot parts of the hob.
- Make sure all pan handles are always pointing inwards towards the centre of the hob to prevent any accidental spills.
- Make sure that the air inlet behind the fan grille is never obstructed. The built-in hob should, in fact, be provided with suitable ventilation for the cooling of the electronic components used in the appliance.
- We advise against the installation of an induction hob above an under-the-counter refrigerator (heat) or above a washing machine (vibrations). In fact, there would be insufficient space for the ventilation of electronic components.
First use: the glue used on the hob seals may leave greasy traces on the glass surface. We recommend you wipe these off before using the appliance, with the aid of a non abrasive cleaner. During the first few hours of use, you may detect a smell of rubber, which will disappear quickly.
Installation and fastening
The following instructions are intended for a qualified fitter to guide him/her along the installation, adjustment and technical maintenance procedures as correctly as possible and in full compliance with the applicable norms in force.
Important : unplug the hob before all operations.
Installation
- This hob can be built into a worktop simply by cutting out the corresponding slot.
- The worktop must be made with a material designed to withstand a temperature of approximately 100°C.
- The hob must be positioned at a minimum distance of 40 mm from the back wall and 600 mm from any other vertical surfaces, in order to allow adequate ventilation and to prevent the surfaces around the appliance from overheating.
- If you wish to install the hob on top of an oven, the latter must be fitted with a cooling fan.
- Try to avoid installing the hob on top of a dishwasher; if this is unavoidable, place a watertight separating element between the two appliances.
Fastening
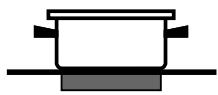
Very important: It is vital that you ensure the glass ceramic hob is built into a perfectly flat supporting surface. Deformations due to improper fastening could alter the characteristics of the hob and compromise its performance.
The fastening springs are fastened by screws (see diagram).
It is vital that these screws be kept accessible at all times.
Insert the hob into the cut-out slot, applying pressure all along the perimeter of the hob frame so that the latter adheres fully to the worktop.
REAR SPRING ASSEMBLY

The following instructions are intended for the installer so that the installation and maintenance procedures may be followed in the most professional and expert manner possible. Important: Disconnect the appliance from the electrical supply before performing any maintenance or regulation upkeep work.
Positioning the Cooktop
Important: this unit may be installed and used only in permanently ventilated rooms in accordance with British Standard Codes Of Practice: B.S. 6172 / B.S. 5440, Par. 2 and B.S. 6891 Current Editions. The following requirements must be observed:
a) The room must be fitted with a ventilation system which vents smoke and gases from combustion to the outside. This must be done by means of a hood or electric ventilator that turns on automatically each time the hood is operated.

natural_image
Simple line drawing of a house interior with a stove, air ducts, and ventilation system (no text or symbols)In a chimney stack or branched flue. (exclusively for cooking appliances)

natural_image
Simple line drawing of a house interior with a stove, air ducts, and airflow indicators (no text or symbols)Directly to the Outside
b) The room must also allow for the influx of the air needed for proper combustion. The flow of air for combustion purposes must not be less than 2 m^3/h per kW of installed capacity. The supply of said air can be effected by means of direct influx from the outside through a duct with a inner cross section of at least 100 cm^2 which must not be able to be accidentally blocked. Those appliances which are not fitted with a safety device to prevent the flame from accidentally going out must have a ventilation opening twice the size otherwise required, i.e. a minimum of 200 cm^2 (Fig. A). Otherwise, the room can be vented indirectly through adjacent rooms fitted with ventilation ducts to the outside as described above, as long as the adjacent rooms are not shared areas, bedrooms or present the risk of fire (Fig. B).
Detail A
Adjacent Room
Room to be
Vented

natural_image
Technical diagram showing a door frame and a vertical structural component with an arrow indicating rotation (no text or symbols present)Examples of ventilation holes for comburant air.
Fig. A
natural_image
Line drawing of a room interior with door, lamp, and fan (no text or symbols)Enlarging the ventilation slot between window and floor.
Fig. B
c) Intensive and prolonged use of the appliance may necessitate supplemental ventilation, e.g. opening a window or increasing the power of the air intake system (if present).
d) Liquidified petroleum gases are heavier than air and, as a result, settle downwards. Rooms in which LPG tanks are installed must be fitted with ventilation openings to the outside in order to allow the gas to escape in the event of a leak. Therefore, LPG tanks, whether empty or partially full, must not be installed or stored in rooms or spaces below ground level (cellars, ect.). It is also a good idea to keep only the tank currently being used in the room, making sure that it is not near sources of heat (ovens, fireplaces, stoves, etc.) that could raise the internal temperature of the tank above 50°C.
Installation of Built-in Cooktops
The gas cooktops are equipped with type X degree protection against overheating. Therefore, the appliance can be installed next to cabinets, provided the height of the cabinet does not exceed that of the hob. For proper installation of the cooktop, the following guidelines must be followed:
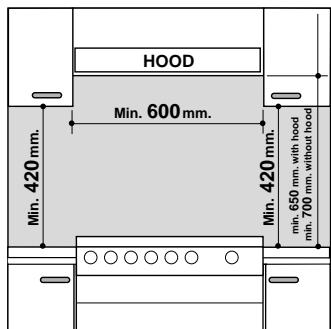
a) If the cabinet(s) located next to the cooktop are higher than the cooktop itself, the cabinet(s) must be installed at least 600 mm from the edge cooktop;
b) Hoods must be installed in accordance with the instructions contained in the installation manual for the hoods themselves, and no less than 650 mm from the cooktop;
c) The cabinets installed next to the hood must be located at a height of at least 420 mm from the top.
d) Should the cooktop be installed directly under a cupboard, the latter should be at least 700 mm (millimetres) from the top.
Gas Connection for Cooktop
The cooktop should be connected to the gas supply by an authorized installer. During installation of this product it is essential to fit an approved gas tap to isolate the supply from the appliance for the convenience of any subsequent removal or servicing. Connection of the appliance to the gas mains or liquid gas tanks must be carried out according to the safety standards currently in force, and only after it is ascertained that it is suitable for the type of gas to be used. If not, follow the instructions indicated in the section entitled, “Adapting the Cooktop for Different Types of Gas”. If the cooktop is to be connected to tanks containing liquid gas, use pressure regulators that comply
with current safety standards.
Important: To insure that the appliance operates safety, the gas is regulated correctly and your appliance lasts over time, make sure that gas pressure levels comply with the indications given in Table 1, “Nozzle and Burner Specifications”.
Gas Connection to Non-flexible Pipe
(copper or steel)
Connection to the gas source must be done in such a way as to not create any stress points at any part of the appliance.
The appliance is fitted with an adjustable, "L" shaped connector and a gasket for the attachment to the gas supply. Should this connector have to be turned, the gasket must be replaced (supplied with the appliance).
The gas feed connector to the appliance is a threaded, male 1/2" connector for round gas pipe.
Gas Connection to Flexible Steel Pipe
The gas feed connector to the appliance is a threaded, male 1/2" connector for round gas pipe. Only use pipes, tubes and gaskets that comply with current safety codes. The maximum length of the flexible pipes must not exceed 2000 mm. Once the connection has been made, ensure that the flexible metal tube does not touch any moving parts and is not crushed.
Check the Seal
Once the appliance has been installed, make sure all the connections are properly sealed, using a soapy water solution. Never use a flame.
Adapting the Cooktop for Different Types of Gas
To adapt the cooktop to a different type of gas than that for which it was designed, (see the sticker under the hob or on the packaging), the burner nozzles must be changed, as follows:
- Remove the pan supports and slide the burners out of the cooktop.
- Unscrew the nozzles using a 7mm socket wrench and replace them with those for the new type of gas. (See table 1, "Burner and Nozzle Specifications").
- Reassemble the parts following the instructions in reverse order.
- On completing the operation, replace the old rating label with the one showing the new type of gas; the sticker is available from our Service Centres.
If the gas pressure is different than that prescribed, a pressure regulator must be installed at the source, in compliance with national standards governing the use of piped gas regulators.
Regulation of Air Supply to the Burner
The burners do not need a primary air regulator.
Minimum Regulation
- Turn the gas valve to minimum.
- Remove the knob and turn the regulator screw (positioned either on the side of the top or inside the shaft) clockwise until the flame becomes small but regular.
N.B.: In the case of liquid gas, the regulation screw must be fully screwed in (clockwise).
- Make sure that, when the knob is turned rapidly high to low, the flame does not go out.
- In the event of a malfunction on appliances with the security device (thermocouple) when the gas supply is set at minimum, increase the minimum supply levels using the regulator screw.
Once the adjustment has been made, apply sealing wax, or a suitable substitute, to the old seals on the by-pass.

natural_image
Technical line drawing of a mechanical testing setup with a central cylindrical component and a flanged base (no text or symbols)| Modification | Stamp of the service centre | Date |
| Attach one of the stickers in the injector bag here | ||
Table 1
| Burner | Diameter (mm) | Thermal power kW (p.c.s.*)Ridot. | By-Pass 1/100 (mm) | Thermal power kW (p.c.s.*)Nomin | Nozzle 1/100 (mm) | Flow*g/h | Thermal power kW (p.c.s.*)Nomin | Nozzle 1/100 (mm) | Flow*l/h | |
| *** | ** | |||||||||
| Fast (R) | 100 | 0,70 | 39 | 3,00 | 86 | 218 | 214 | 3,30 | 123 | 314 |
| Semi Fast (S) | 75 | 0,40 | 28 | 1,80 | 67 | 138 | 136 | 1,80 | 102 | 171 |
| SupplyPressures | Nominal (mbar)Minimum (mbar)Maximum (mbar) | 28-302035 | 372545 | 201725 | ||||||
* At 15°C and 1013 mbar-dry gas
** Propane P.C.S. = 50.37 MJ/kg.
*** Butane P.C.S. = 49.47 MJ/kg.
Natural P.C.S. = 37.78 MJ/m ^4
Electrical connection
- The electrical safety of this appliance can only be guaranteed if the latter is correctly and efficiently earthed, in compliance with regulations on electrical safety. Always ensure that this vital safety measure has been taken. If you have any doubts, call in a qualified technician to check the electrical system thoroughly.
- The manufacturer denies all responsibility for damage resulting from a system which has not been earthed correctly.
- Before powering the appliance, check whether the technical characteristics featured on the appliance data plate correspond with those of the mains electrical system.
- Check that the current load of the mains supply and of the power sockets is suitable for the maximum power of the appliance, indicated on the appliance data plate. If in doubt, contact a qualified professional.
Disconnect the appliance from the electricity supply before all operations.
Connect your hob to the electrical system by means of a junction box: if the appliance is connected permanently to the mains, an omnipolar circuit breaker, accessible if necessary, with a minimum contact opening of 3 mm should be installed.
Valid only for models with a power supply cable
Some models are supplied with a single-phase power supply cable, and should consequently only be connected to the single-phase mains. Observe the wire colours, as indicated in the diagram attached.

This appliance conforms with the following European Community Directives:
- 73/23/EEC of 19/02/73 (Low Voltage) and subsequent amendments;
- 89/336/EEC of 03/05/89 (Electromagnetic compatibility) and subsequent amendments;
- 93/68/EEC of 22/07/93 and subsequent amendments;
- 2002/96/EC
The European Directive 2002/96/EC on Waste Electrical and Electronic Equipment (WEEE), requires that old household electrical appliances must not be disposed of in the normal unsorted municipal waste stream. Old appliances must be collected separately in order to optimise the recovery and recycling of the materials they contain and reduce the impact on human health and the environment. The crossed out “wheeled bin” symbol on the product reminds you of your obligation, that when you dispose of the appliance it must be separately collected. Consumers should contact their local authority or retailer for information concerning the correct disposal of their old appliance.
Warning: If the hob is fitted above a built-in oven, the hob and the oven must be connected to the mains separately for safety reasons and to simplify operations when it is necessary to pull the oven out for some reason.
| Electrical connections | Voltage, Frequency | Fuses, Sections |
| FR-BE-AT-DE-GR-ES-IL-IT-NZ-PT-GP-CH-MA-LU-IE-FI-SE-IS-GB-NL-DK230V - 1+N~ 50HzCY-MT-AU-NZ-KW240V - 1+N~ 50Hz | 16A * 1,5 mm^2 | |
| FR-BE-NO230V - 2 ~ 50Hz | ||
| BR=BRUN,BL=BLEUBR=BRUIN, BL=BLAUW | BR=BRAUN, BL=BLAUBR=BROWN, BL=BLUE | |
| * Application of the simultaneity coefficient in accordance with cei 60335-2-6 norm | ||
Cooking zone description
Induction is the fastest cooking method available.
Unlike traditional cooking zones, the induction zone does not heat up the glass surface. The pan itself is the heating element: the pan evenly transfers heat to its contents as long as it is made of ferromagnetic material.
Each zone is controlled:
- by a selector key whose silk screen printing reproduces the cooking zone drawing,
- and by a power adjustment set comprising two parts (+, -) .
As long as the temperature of the cooking zones remains above 60^ C, even after use, the residual heat indicators stay on (the power display indicates H) to prevent the risk of burns.
| HOBS | TI 6312 |
| Cooking zones | Power (in W) |
| Front Right (FR) | I 1200 – 600 if FL* |
| Front Left (FL) | I 1800 – B 3000* |
| Overall power | 3600 |
I → single induction zone
B 3000* → the zone can be boosted to 3000 W
600 if FL* → the power of the cooking zone is reduced to 600 W as long as the FL zone is boosted (for example)
The hob
Use of the "all gas" burners
The gradual adjustment of the gas flame makes it easy to set the desired heat level and to adapt to cooking vessels of different sizes.
Adjustment is done by pressing and turning the control knob counter-clockwise so that the knob's marker points to the desired symbol:
dot: closed
large flame: full open
small flame: reduced flame.
Ignition burners with security measure
You can ignite the burners on your hob with "one hand". All you need do is push in the control knob and, maintaining pressure, turn the knob anticlockwise: a flow of sparks ignites the burner. After the burner is lit, maintain sufficient pressure on the knob to engage the security measure. If the flame accidentally goes out whilst the burner is turned on, the security measure comes into play. The gas flow is automatically cut. To reignite the burner, follow the above instructions.
Note : If the flame is accidentally extinguished, turn the control knob to the closed position and do not try to reignite the burner for at least one minute.
The controls
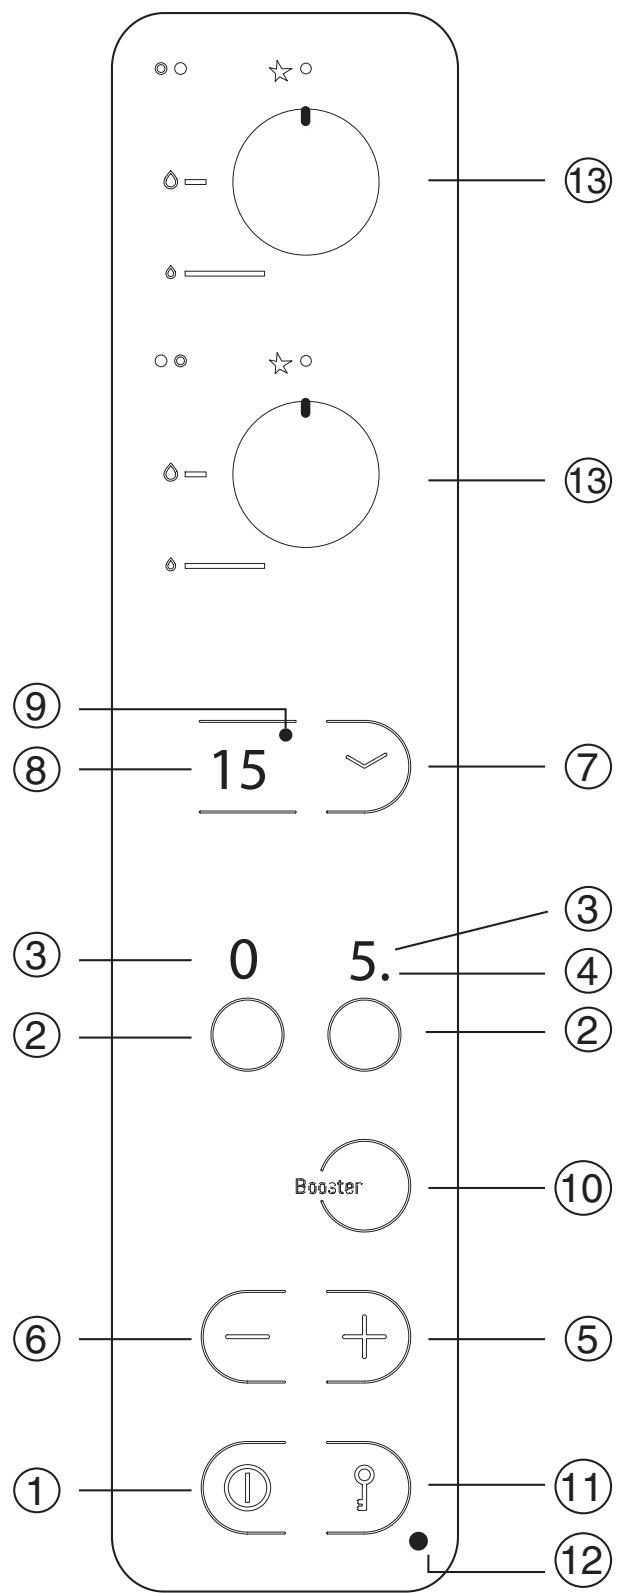
- ON/OFF key
- Cooking zone selector keys
- Power (from 0 to 9) and residual heat indicators (H)
-
Zone selection indicator:
-
on: the corresponding zone is selected and can be modified,
-
off: the corresponding zone is not selected, no modification can be made.
-
Power increase key
- Power decrease key
- Timer control key for cooking time programming (only on hobs fitted with a timer)
- Programmed cooking time indicator
- Indicator light corresponding to the programmed cooking zone
- Booster key
- Controls lock key
- Lock indicator light
- The control knobs for the burners
When you connect the hob to the power supply, a beep will sound after a few seconds: you can now turn the hob on.
Turning on the hob
Press key Ⓘ to turn the hob on.
Cooking zone control
Each cooking zone is operated by a control key and by a power adjustment set (+ and -).
Turning on a cooking zone
- To turn a cooking zone on, press the corresponding control key and set the desired heating power (from 0 to 9) using the “+” and “-” keys.
- To set the maximum power directly (9), press key “-” briefly.
Turning off a cooking zone
To turn off a cooking zone, press the corresponding control key and:
- press both “+” and “-” simultaneously: the cooking zone power drops immediately to zero and the zone is turned off.
- or press the “-” key: the heating power drops progressively until the zone eventually turns off.
Turning off the hob
Press the Ⓐ key; the appliance has been turned off.
If you have locked the hob controls (see paragraph below), the same will still be locked when you turn the hob back on. Unlock the controls in order to operate the cooking zones.
The booster
The booster is only on a few hobs.
To speed up the rise in temperature of the cooking zones (see cooking zone table on the previous page), press the
Booster key.
The power display will indicate "P". The booster function comes to an automatic stop after 4 minutes.
When the booster function is on, certain cooking zones (see the cooking zone table on the previous page) are limited to a maximum power of 600W.
Controls lock
When the hob is in use, you can lock the controls to avoid any accidental changes to the settings (by children or when cleaning, for example).
Just press the ⬆ key, the indicator light next to the key lights up and the controls are locked.
To change the power level setting or stop cooking, the controls have to be unlocked: press the O—n key, the indicator light turns off and the controls are unlocked.
To access the setting of a cooking zone again, select the zone by pressing the corresponding control key.
Cooking time programming
You may programme all the cooking zones simultaneously for a maximum cooking time of 99 minutes.
Proceed as follows:
- select the cooking zone by pressing the corresponding control key,
- set the desired heating power using the “+” and “-” keys,
- press the programming key ↙,
- set the desired cooking time using the “+” and “-” keys,
- confirm your programming by pressing the programming key ↩ again.
The countdown begins immediately.
The end of programmed cooking is signalled by a beep (one minute long) and the cooking zone concerned is turned off.
The safety devices
Pan recognition
Each induction cooking zone is fitted with a pan recognition device. The cooking zone only provides heat in the presence of a pan which is suitable for the cooking zone.
A blinking pan recognition indicator could signal:
- that the pan is made of unsuitable material, which is not ferromagnetic,
• that the diameter of the pan is too small,
• that the pan has been removed.
Always match the diameter of the pan with that of the cooking zones.
Warning: oval cooking zones
Oval cooking zones can only be boosted if the full oval is enabled.
Do not place two small saucepans on oval cooking zones.
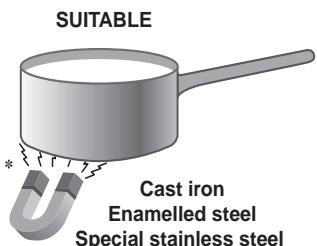
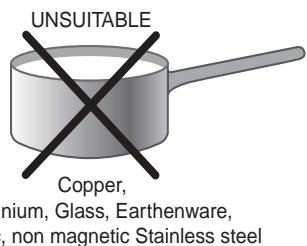
What cookware to use
Given that induction only exists when the magnetic field is sealed by a metallic recipient, the pan stops being heated as soon as it is taken off the cooking zone.
Use cookware made of material which is compatible with induction (ferromagnetic material).
Cast iron, enamelled steel or special induction stainless steel saucepans are ideal.
Copper, ceramic, earthenware, glass, terracotta, aluminium and non magnetic stainless steel cookware is incompatible with induction cooking.
The easiest way to find out whether the pan is suitable is with a magnet. If the magnet is attracted by the pan bottom and stays “stuck” to the same, the pan is made of ferromagnetic material and can be used on your induction hob.
We recommend you use pans with a very flat and thick bottom and avoid at all costs all cookware with irregular rough bases which could scratch the glass surface.
For the attention of wearers of pacemakers or other active implants:
The hob complies with all current standards on electromagnetic interference.
Your induction hob is therefore perfectly in keeping with legal requirements (89/336/CEE directives). It is designed not to create interference on any other electrical apparatus being used on condition that the apparatus in question also complies with this legislation. Your induction hob generates short-range magnetic fields. To avoid any interference between your induction hob and a pacemaker, the latter must be designed to comply with relevant regulations. In this respect, we can only guarantee our own product conformity. Please consult the pacemaker manufacturer or your doctor concerning its conformity or any possible incompatibility.
Acoustic signal
Anomalies such as:
- an object (such as a saucepan or a lid, etc.) placed for more than 10 seconds on the control zone,
- boiled-over liquids or food spilled on the control zone,
• prolonged pressure on a key,...
could cause a beep to sound and the hob to turn off.
To stop the beep from sounding, remove the cause of the malfunction.
To use the hob, turn it back on and re-select the cooking zone(s) you wish to use. Set the desired heating power.
Safety cut out
Your appliance is fitted with a safety cut out which intervenes after a certain amount of time (see table below) depending on the power setting. When the safety cut out has intervened, the power display indicates "0".
for example: the back right cooking zone is set to 5 and the front left zone is set to 2. The back right zone will turn off after 3 hours of operation and the front left zone will turn off after 10 hours of operation.
To unlock the controls, turn the hob off by pressing the
① key.
| Power level | Maximum duration of operation |
| 1-2 | 10 hours |
| 3 | 5 hours |
| 4 | 4 hours |
| 5-6 | 3 hours |
| 7-8 | 2 hours |
| 9 | 1 hour |
Overheating protection device
Should your appliance's electronic components overheat, the hob will turn off automatically and “—” will come up on the power level display.
The letter will disappear as soon as the temperature drops back down to an acceptable level.
Advice on using your appliance
To get the best from your hob, it is vital that you follow a few fundamental rules during cooking and when preparing food.
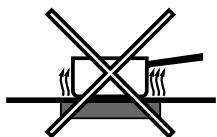
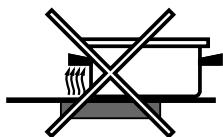
- Use pans with a flat bottom so they adhere fully to the heating zone.
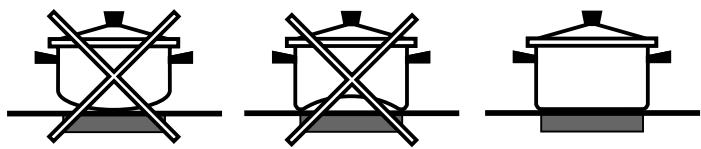
- Always use pans whose diameter covers the cooking zone fully so that all the available heat can be used.
- Make sure the pan base is always clean and dry, to guarantee good contact and long life for the cooking zones and pans alike.
- Avoid using pans used normally on gas burners. The concentration of heat on gas burners can warp the bottom of the pan, consequently you would never obtain the desired result when using the pan on the glass ceramic hob.
- Never leave a cooking zone on without a pan on it as the maximum heat level would be reached very quickly, which could damage the heating elements.
- The glass ceramic hob is resistant to thermal and mechanical shocks. However, it may break due to a shock caused by a sharp object. In this case, unplug the appliance immediately and contact an authorised after-sales service centre to have it repaired.
Always keep your hob clean. Before proceeding with maintenance operations, check that all the cooking zones are turned off and have cooled down completely.
| Burner | ø Cookware Diameter (cm) |
| Fast (R) | 24 - 26 |
| Semi Fast (S) | 16 - 20 |
Stainless steel frame (only on some models)
Stainless steel can stain as an effect of enduring contact with limescale in water or as an effect of highly aggressive detergents (containing phosphorus). We recommend you rinse and dry it thoroughly after maintenance. It is preferable to remove any water spills immediately.
Hob care
The vitroceramic glass used for the heating surface is smooth and poreless and it is also resistant to thermal shocks and to mechanical shocks under normal conditions of use. In order to preserve these properties, we recommend you care for your hob as follows:
- for ordinary maintenance, just wipe it with a damp sponge and dry it thoroughly using paper towels.
- If the hob is dirty, rub clean using a special cleaner suitable for vitroceramic glass, rinse off and dry thoroughly.
- food residue and dirt can be removed using a special scraper. Do this as soon as possible, do not wait for the hob to cool down in order to avoid incrustations. For excellent results, use a special stainless steel wool pad for vitroceramic glass cleaning soaked in soapy water.
- When the hob is clean, you can apply a special product for the care and protection of the same: this type of product leaves an invisible film on the surface of the hob to protect the same against any spills and boiled-over food. It is best if you do this when the hob is lukewarm or cold.
- Make sure you always rinse the hob with clean water and dry it thoroughly: otherwise the cleaning products could become encrusted onto the hob during subsequent cooking.
Recommendations
- Never use abrasive or corrosive substances, such as aerosol cleaners for grills and ovens, stain removers or rust removers, scouring powders and abrasive sponges: even the delicate ones could scratch the hob surface irreversibly.
- We recommend you keep all items which could melt away from the hob, such as plastic utensils, sugar or products with a high sugar content. Should liquid boil over onto the hob surface, remove it immediately (while the hob is still hot) using a razor blade scraper, in order to avoid damaging the surface.
- Use this hob exclusively for cooking. Do not place items on the hob when the same is not in use. Do not use the hob as a work surface (by placing lids, sauce-pans or dishcloths on it, for example), nor as a chopping board.
- Never leave aluminium wrappers, aluminium foil and plastic cookware on the hob when hot or still warm.
- Do not use steam cleaners or high pressure cleaners to clean your appliance.
- Do not place metal objects (knives, spoons, pan lids, etc.) on the hob as they may become hot.
- Never heat up unopened tins: they could burst.
The guarantee does not cover damage to the hob caused by incorrect use.
Greasing the Taps
The taps may jam in time or they may become difficult to turn. If so, the tap itself must be replaced.
N.B.: This operation must be performed by a technician authorised by the manufacturer.
natural_image
Two schematic diagrams of a greenhouse with steamers and air ducts, no text or symbols present.Raccordement gaz (Pour la France)
natural_image
Technical line drawing of a mechanical testing setup with a cylindrical component and flange (no text or symbols)I → foyer induction simple
Attention: foyers ovales
natural_image
Three identical line-drawn cooking pots with crossed x marks, placed on a surface (no text or symbols)natural_image
Three diagrams showing crossed-out electrical lines and a cooking pot, no text or symbols presentnatural_image
Diagram of a greenhouse with steam rising from a stove, air intake, and cooling system (no text or labels)natural_image
Simple line drawing of a house interior with a stove, air ducts, and heating elements (no text or symbols)natural_image
Simple line drawing of a room interior with doors, lamps, and a steaming cup (no text or symbols)natural_image
Technical line drawing of a mechanical testing setup with a cylindrical component and flange (no text or symbols)natural_image
Three identical cooking pots with crossed x marks on their bases, no text or symbols presentnatural_image
Three diagrams showing crossed-out electrical symbols: a box, a pot, and a cylinder (no text or labels)natural_image
Diagram of a steam furnace with cooling fans and heating elements, no text or symbols presentnatural_image
Simple line drawing of a house interior with a stove, air ducts, and airflow indicators (no text or symbols)Direkt ins Freie
natural_image
Technical line drawing of a mechanical testing setup with a cylindrical component and flange (no text or symbols)natural_image
Simple illustration of a cooking pan with a crossed-out black mark (no text or symbols)natural_image
Simple line drawing of a heating furnace with cooling tower and steam rising (no text or symbols)natural_image
Simple line drawing of a house interior with a stove, air ducts, and airflow indicators (no text or symbols)Directamente para o exterior
(reservada para os aparelhos de cozedura)
natural_image
Technical line drawing of a mechanical assembly with a central cylindrical component and a flanged base (no text or symbols)natural_image
Simple illustration of a cooking pan with a crossed-out black X mark (no text or symbols)natural_image
Three identical cooking pot symbols with crossed x marks, no text or labels presentnatural_image
Three diagrams showing crossed-out electrical symbols: a pot, a stove, and a pot (no text or labels)natural_image
Technical line drawing of a mechanical assembly with a central shaft and flange (no text or symbols)- Installation and fastening
- Installation
- Fastening
- Positioning the Cooktop
- Installation of Built-in Cooktops
- Gas Connection for Cooktop
- Gas Connection to Non-flexible Pipe
- (copper or steel)
- Gas Connection to Flexible Steel Pipe
- Check the Seal
- Adapting the Cooktop for Different Types of Gas
- Regulation of Air Supply to the Burner
- Minimum Regulation
- Electrical connection
- Disconnect the appliance from the electricity supply before all operations.
- Valid only for models with a power supply cable
- This appliance conforms with the following European Community Directives:
- Cooking zone description
- The hob
- Use of the "all gas" burners
- Ignition burners with security measure
- The controls
- Turning on the hob
- Cooking zone control
- Turning on a cooking zone
- Turning off a cooking zone
- Turning off the hob
- The booster
- Controls lock
- Cooking time programming
- The safety devices
- Pan recognition
- Warning: oval cooking zones
- What cookware to use
- For the attention of wearers of pacemakers or other active implants:
- Acoustic signal
- Safety cut out
- Overheating protection device
- Advice on using your appliance
- Stainless steel frame (only on some models)
- Hob care
- Recommendations
- Greasing the Taps
- Raccordement gaz (Pour la France)
- Attention: foyers ovales
Brand : SCHOLTES
Model : TI 6312
Category : Hob