AG820B3AT-P0CE40 - Microwaves Hanseatic - Free user manual and instructions
Find the device manual for free AG820B3AT-P0CE40 Hanseatic in PDF.


| Product Type | Microwave with Grill |
| Capacity | 20 liters |
| Microwave Power | 800 W |
| Grill Power | 1000 W |
| Dimensions (W x H x D) | 45.5 x 26.2 x 34.0 cm |
| Weight | 11.5 kg |
| Power Supply | 230 V, 50 Hz |
| Control Type | Dial and Buttons |
| Display | LED Digital Display |
| Defrost Function | By weight or time |
| Auto Cook Programs | 8 preset menus |
| Timer | Up to 95 minutes |
| Child Lock | Yes |
| Interior Light | Yes |
| Turntable | Yes, 27 cm diameter |
| Cleaning | Wipe with damp cloth; avoid abrasive cleaners |
| Safety | Overheat protection, door interlock |
| Spare Parts Availability | Available via Hanseatic service center |
| Repairability Index | 7.5/10 (based on typical design) |
| Color | Stainless Steel / Black |
| Energy Consumption | 0.9 kWh / cycle (estimated) |
Frequently Asked Questions - AG820B3AT-P0CE40 Hanseatic
User questions about AG820B3AT-P0CE40 Hanseatic
0 question about this device. Answer the ones you know or ask your own.
Ask a new question about this device
Download the instructions for your Microwaves in PDF format for free! Find your manual AG820B3AT-P0CE40 - Hanseatic and take your electronic device back in hand. On this page are published all the documents necessary for the use of your device. AG820B3AT-P0CE40 by Hanseatic.
USER MANUAL AG820B3AT-P0CE40 Hanseatic
natural_image
Illustration of a microwave oven with control panel and mounted door (no text or symbols visible)Gebrauchsanleitung
Inhaltsverzeichnis
natural_image
Line drawing of a simple outdoor table with horizontal slats and legs, labeled (34) at the base (no text or symbols on the diagram itself)natural_image
Line drawing of a microwave oven with various interior components including a lid, pan, and control knob (no text or symbols present)Lieferumfang
natural_image
Illustration of a microwave oven with control panel and mounted door (no text or symbols visible)User manual
Table of contents
Explanation of terms and symbols,
definitions ....EN-3
Explanation of terms .....EN-3
Explanation of symbols....EN-3
Definitions .....EN-3
Safety ....EN-4
Intended use ....EN-4
Safety notices ....EN-5
Appliance parts and control elements ... EN-12
Information about microwaves ..... EN-14
Suitable dishware ..... EN-15
For microwave and microwave-combi mode ..... EN-15
For grill heating method ..... EN-16
Size and shape ...... EN-16
Using the accessories ..... EN-17
The turntable.... EN-17
Grill rack.... EN-17
General operating instructions ..... EN-18
Before getting started ..... EN-18
Setting the time ..... EN-18
Starting, pausing and ending the cooking process. EN-18
Setting the cooking time ..... EN-19
Extending the cooking time ..... EN-19
Cooking chamber light ..... EN-19
Modes ...... EN-20
Microwave mode ..... EN-20
Microwave power levels ..... EN-21
Selecting and starting microwave mode EN-21
Microwave quick start ..... EN-21
Grill mode.... EN-22
Microwave-combi mode ..... EN-22
Defrosting..... EN-23
Automatic programmes ..... EN-24
Using the automatic programmes ..... EN-24
Automatic programme table ..... EN-25
Additional functions ..... EN-26
Timer EN-26
Safety lock (child safety lock) ..... EN-26
Practical tips for microwaving ..... EN-27
The correct cooking temperature ..... EN-27
The correct quantity ..... EN-27
Order of dishes EN-27
Piercing and scoring ..... EN-27
Stir and turn.... EN-28
Care and maintenance ..... EN-29
Delivery.... EN-31
Package contents ...... EN-31
Check the delivery ..... EN-31
Start-up EN-32
Moving and unpacking ..... EN-32
Installing the appliance ..... EN-32
Installation requirements ..... EN-32
Connection requirements..... EN-33
Connecting/installing the appliance .... EN-33
Cleaning before use ..... EN-34
Heating up the appliance for the first time EN-34
Troubleshooting table ..... EN-35
Service EN-37
General customer service ..... EN-37
Spare parts ...... EN-37
Waste prevention, free return
and disposal.... EN-38
Waste prevention EN-38
Free return of old electrical appliances. . . . . . . . . . . . . EN-38
Disposal.... EN-38
Packaging EN-39
Appendix.... EN-40
Technical specifications ..... EN-40
Explanation of terms and symbols, definitions
Read the important safety instructions carefully and keep these for future use. Please read through the safety instructions and user manual carefully before using the appliance. This is the only way you can use all the functions reliably and safely.
Be sure to also observe the national regulations in your country, which are valid in addition to the regulations specified in this user manual.
Keep all safety notices and instructions for future reference. Pass all safety notices and instructions on to the subsequent user of the product.
Explanation of terms
The following signal terms can be found in this user manual.

WARNING
This signal term indicates a hazard with a medium level of risk which, if not avoided, could result in death or serious injury.

CAUTION
This signal term indicates a hazard with a low level of risk which, if not avoided, could result in minor or moderate injury.

NOTICE
This signal term warns against possible damage to property.
Explanation of symbols
The following symbols can be found in this user manual or on the appliance.
This symbol warns of a hot surface.

This symbol refers to useful additional information.
Definitions
“Microwave mode”: In microwave mode, food is exclusively heated using microwaves.
“Microwave-combi mode” means that food is heated by microwaves as well as heat, like a typical oven. The same risks and safety precautions apply as for microwave mode.
“Oven mode” means that food is heated by grills or top/bottom heat.
Safety
Intended use
The appliance is designed for warming, cooking, defrosting and grilling food.
The appliance is designed for use in private households and is not designed for commercial use or multiple use (e.g.: use by several parties in a block of flats).
It is not suitable for use outdoors or on non-stationary sites (e.g. ships).
The appliance is designed for installation in suitable built-in furniture units. It may not be used as a freestanding appliance. It may only be operated with the built-in unit door open.
Ensure that the appliance is properly fixed in place. Never use adhesives or glue to fix the appliance in place.
Use the cooking chamber light only for illuminating the inside of the appliance. It is not suitable for lighting a room.
The appliance is not suitable
– for heating a room.
– for drying or storing food, clothes or other items.
– for heating up hot water bottles, slippers, sponges, moist cleaning cloths or similar items.
Persons who are unable to operate the appliance safely due to their physical, sensory or mental abilities or lack of knowledge must be supervised during use.
Do not make any technical changes to the appliance.
If the supply cord is damaged, it must be replaced by the manufacturer, its service agent or similarly qualified persons in order to avoid a hazard.
Use the appliance exclusively as described in this user manual. Any other use is deemed improper and may result in damage to property or even personal injury. The manufacturer accepts no liability for damage caused by improper use.
Safety notices
In this chapter you will find general safety notices which you must always observe for your own protection and that of third parties. Please also observe the warning notices in the individual chapters on operation, setup etc.
Risks to children and certain groups of individuals

WARNING
Risk of suffocation for children!
Children can become entangled in the packaging fi lm or swallow small parts and suffocate.
■ Do not allow children to play with the packaging fi lm.
■ Prevent children from pulling small parts off the appliance or putting them in their mouths.

CAUTION
Danger of burns for children!
The door glass can become very hot during operation and cause burns.
- Keepchildrenawayfromthedoorglass!
The appliance and its accessible parts become hot during use. Care should be taken to avoid touching heating elements.
■ Children less than 8 years of age shall be kept away unless continuously supervised.

CAUTION
Risk of injury!
Children and certain groups of people have a higher risk of being injured when handling the appliance.
■ This appliance can be used by children aged from 8 years and above and persons with reduced physical, sensory or mental capabilities or lack of experience and knowledge if they have been given supervision or instruction concerning use of the appliance in a safe way and understand the hazards involved.
■ Children shall not play with the appliance.
■ Cleaning and user maintenance shall not be made by children without supervision.
Risks in handling household electrical appliances

WARNING
Risk of electric shock!
Touching live parts may result in severe injury or death.
■ Only use the appliance indoors. Do not use in wet rooms or in the rain.
■ Do not operate or continue to use the appliance, if it
– shows visible signs of damage, e.g. the power cord is defective,
- starts smoking or there is a smell of burning,
– makes unfamiliar noises.
In such cases, remove the mains plug from the socket or switch off/unscrew the fuse and contact a professional..
■ The appliance corresponds to protection class I and may only be connected to a socket with a protective conductor that has been installed properly. When connecting the appliance, make sure that the voltage is correct. More detailed information
about this can be found on the type plate.
■ To disconnect this appliance from the power supply, pull the mains plug out of the socket. The appliance must, therefore, be connected to an easily accessible socket so that it can be quickly disconnected from the power supply in the event of malfunction.
■ Since all poles of the appliance cannot be disconnected from the mains via an accessible disconnecting device, an all-pole disconnecting device in accordance with overvoltage category III must be connected within the house installation with at least 3 mm contact clearance; consult a qualified professional if necessary.
■ When positioning the appliance, ensure the supply cord is not trapped or damaged. Do not kink the supply cord or lay it over sharp edges.
■ Do not locate multiple portable socket- outlets or portable power supplies at the rear of the appliance.
- Keep the supply cord away from naked flames and hot surfaces.
■ Always pull on the mains plug and not the mains cable.
■ Never touch the mains plug with wet hands.
■ Never immerse the mains cable or plug in water or any other liquids.
If the supply cord is damaged, it must be replaced by the manufacturer, its service agent or similarly qualified persons in order to avoid a hazard.
■ Independent or improper repairs made to the appliance may cause damage to property and personal injury; any liability and warranty claims
will be forfeited. Never try to repair the appliance yourself.
■ Inspections and repairs to the appliance may only be carried out by authorised specialists.
■ Only parts corresponding to the original appliance specifications may be used for repairs.
In the event of a fault, as well as before extensive cleaning, pull out the mains plug or switch off/unscrew the fuse.
■ Do not put any objects in or through the housing openings, and also ensure that children cannot insert any objects into them.
■ Do not remove the covers from the interior light. Do not attempt to replace the interior light.
- Check the appliance regularly for damage.

WARNING
Fire hazard!
Improper handling of the appliance can lead to fire, injury and damage to property.
■ Do not connect to a timer or a separate remote-controlled system for distance monitoring and control.
- Do not locate multiple portable socket- outlets or portable power supplies at the rear of the appliance.

NOTICE
Risk of damage to property!
Improper handling of the appliance may result in damage.
■ If a trolley is used to move the appliance, the appliance must be lifted as shown on the packaging.
■ Do not use the appliance door handle to lift the entire oven! The handle is not designed to carry the whole weight of the appliance.
■ Do not use sharp objects to unpack the appliance.
When cleaning, please note:
- Under no circumstances should sharp, coarse, sodium carbonate-based, acidic, solvent-based or abrasive cleaning agents be used. All-purpose cleaners with a neutral pH are recommended.
- The door seals can be damaged by unsuitable cleaning agents. Use care products only on the outer surfaces.
- Use only soft cloths.
- Ensure that water does not enter the ventilation slits or enter into the electrical components.
■ The lighting in the appliance is exclusively for lighting the cooking chamber. It is not suitable for lighting a room.
Risks when handling heat-generating appliances

CAUTION
Risk of burns!
The appliance and its accessible parts become hot during use. Care should be taken to avoid touching heating elements.
■ Children less than 8 years of age shall be kept away unless continuously supervised.
■ Do not touch the parts of the housing!
■ Do not touch hot parts. Always protect hands with oven gloves or pot holders when working on the hot appliance. Only use dry oven gloves or potholders. Wet textiles are better heat conductors and can cause steam burns.
■ Allow the appliance to cool completely before cleaning.
Fire hazard!
Improper handling of the appliance may result in fire and damage to property.
■ Do not operate the appliance unattended.
■ To ensure sufficient air circulation, it is imperative that the instructions in the “Start-up” chapter are followed.
■ Do not cover the appliance with blankets, cloths or similar, as these objects may become hot and catch fi re.
■ When heating food in plastic or paper containers, keep an eye on the oven due to the possibility of ignition.
■ The microwave oven is intended for heating food and beverages. Drying of food or clothing and heating of warming pads, slippers, sponges, damp cloth and similar may lead to risk of injury, ignition, or fi re.
■ Do not place any objects in the cooking chamber (recipe book, oven gloves, etc.). Accidentally switching on the appliance can cause damage
or even ignition. Do not use the cooking chamber for storage purposes.
■ Never heat fl ammable objects or dishes containing alcohol.
■ Never deep-fry or heat oil! The oil temperature cannot be monitored.
■ If smoke is emitted, switch off or unplug the appliance and keep the door closed in order to stifl e any fl ames.
If a fire starts, keep the cooking chamber door closed, immediately pull the mains plug out of the socket or switch off the automatic circuit breakers and/or unscrew the fuses.
■ Never extinguish burning oil or fat with water. To extinguish the fire, use a suitable fire extinguisher with the designation "F" or a fire blanket.
■ Once the fire has been extinguished, have the appliance checked by a qualified professional.
■ Appliance must not be installed behind a decorative door in order to avoid overheating.
Opening the cooking chamber door creates a draught. Baking paper could touch the heating elements and catch fire.
■ Never place loose baking paper on the accessories. Always secure baking paper with a piece of dishware or a baking dish.
■ Only line the required area with baking paper. Baking paper must not protrude over the accessory edges.
General risks when cooking food
CAUTION
Health hazard!
Improper use of this appliance can lead to damage to health.
■ Clean the appliance regularly and remove any traces of food leftovers immediately.
■ Particularly with poultry and dishes containing fresh egg, and when warming up meals, ensure that the food is fully cooked through to kill off all pathogens (e.g. salmonella).
Acrylamide may be carcinogenic. Acrylamide is produced when starch is exposed to excessive heat, e.g. in potatoes (fries, chips), biscuits, toast, bread etc.
- Keep cooking times as short as possible.
■ Only brown the food slightly, do not allow it to brown too much.
■ Cut larger-sized fries and then bake at maximum of 180 °C.
Defrosting meat, poultry or fish in the oven can cause dangerous microorganisms (e.g. salmonella) to multiply rapidly. This increases the risk of food poisoning.
■ Do not defrost meat and fish in the appliance.
■ Only use the defrosting function to defrost vegetables, pre-cooked food, etc.
■ Take the frozen food out of the freezer ahead of time and let it defrost in
the refrigerator. The fluid from the frozen food must be able to properly drain, otherwise harmful microorganisms can form.
The water that melts during defrosting can contain harmful bacteria, especially with meat and poultry.
■ Avoid any physical contact.
■ Pour defrost water away. Do not use it for any other purpose.
■ Thoroughly clean the crockery you have used.
Risks in microwave and microwave-combi mode

WARNING
Microwave hazard!
The cover in the cooking chamber serves to protect the magnetron, which emits the microwaves.
■ Never remove the cover inside the cooking chamber!
Microwaves can be emitted if the cooking chamber door is insufficiently sealed when closed. Under such circumstances, the appliance may not be used.
■ If the door or door seals are damaged, the oven must not be operated until it has been repaired by a competent person.
■ It is hazardous for anyone other than a competent person to carry out any service or repair operation that involves the removal of a cover which gives protection against exposure to microwave energy.
■ Pay particular attention to the cleanliness of the door seals and door seal faces along with all adjacent parts.
Danger of explosion!
Improper handling of the appliance may result in damage or explosions.
■ Only use utensils that are suitable for use in microwave ovens. Containers that become hotter than the food inside them are not suitable for microwave cooking. Do not use such containers.
■ Metallic containers for food and beverages are not allowed during microwave cooking. Metal in the cooking chamber may cause sparks during operation! This can damage the viewing window or the entire appliance! Do not use metal pots, metal pans and metal lids or dishware with metal parts such as gold edges under any circumstances.
■ Do not use any aluminium foil, due to the fact that this can also cause sparks when coming into contact with the cooking chamber walls.
■ Never place a mixture of water and oil or fat into the appliance. This can explode.
■ Liquids and other foods must not be heated in sealed containers since they are liable to explode.
■ Eggs in their shell and whole hard-boiled eggs should not be heated in microwave ovens since they may explode, even after microwave heating has ended. Prick holes in tomatoes, sausages, aubergines or similar food with a closed skin before cooking to prevent bursting.

CAUTION
Risk of scalding!
Microwave heating of beverages can result in delayed and eruptive boiling, therefore care must be taken when handling the container. The liquid then reaches boiling temperature without any outward visible sign of boiling. Even a small vibration can cause the liquid to squirt out suddenly, e.g. when being taken out of the appliance.
■ To avoid a boiling delay, place a plastic or glass spoon in the container. The spoon must always maintain a minimum distance of 2 cm from the inner walls.
■ Do not use tall, thin containers with a narrow top section.
■ Please ensure you stir the food before eating and after half the cooking time has elapsed.
■ Please wait a short moment after heating up; carefully tip the dish and stir before removing the container from the cooking chamber.
Risk of burns!
Improper handling of the appliance can lead to burns. Accessible parts, accessories and dishes become very hot during operation.
■ Do not touch the parts of the housing!
■ Food is sometimes heated unevenly. The containers should not get as hot as the food inside. Please therefore ensure to check the temperature of any food thoroughly and carefully, especially for children.
■ Before heating up baby food, please remove the screw cap and suction teat from the feed bottle.
■ The contents of feeding bottles and baby food jars shall be stirred or shaken and the temperature checked before consumption, in order to avoid burns.
■ Set the power level and time exactly in accordance with the packaging instructions.

NOTICE
Risk of damage to property!
Improper handling of the appliance can lead to property damage.
■ The appliance must never be operated without the turntable and roller ring and never without food in it.
■ Always place cooking containers on the turntable. This prevents liquid from seeping into the appliance if it should boil over.
■ Care should be taken not to displace the turntable when removing containers from the appliance.
■ Do not exceed a weight of 4 kg on the turntable. Risk of breakage!
■ Do not place the hot turntable on a cold surface such as, for example, a work surface made of granite or tile. Otherwise, the turntable could shatter. Always place it on top of a suitable mat.
■ Only heat plastic containers from the freezer for as long as is needed until the food can be decanted into another container.
■ Do not use any damaged containers! They could break and the leaked contents could damage the inside of the microwave.
If accessories such as the turntable are not completely inside the cooking chamber, the viewing panel may become scratched when closing the cooking chamber door. For this reason, always push accessories all the way into the cooking chamber.
■ The oven should be cleaned regularly and any food deposits removed.
■ Failure to maintain the oven in a clean condition could lead to deterioration of the surface that could adversely affect the life of the appliance and possibly result in a hazardous situation.
■ The appliance must not be installed behind a decorative door in order to avoid overheating.
Appliance parts and control elements
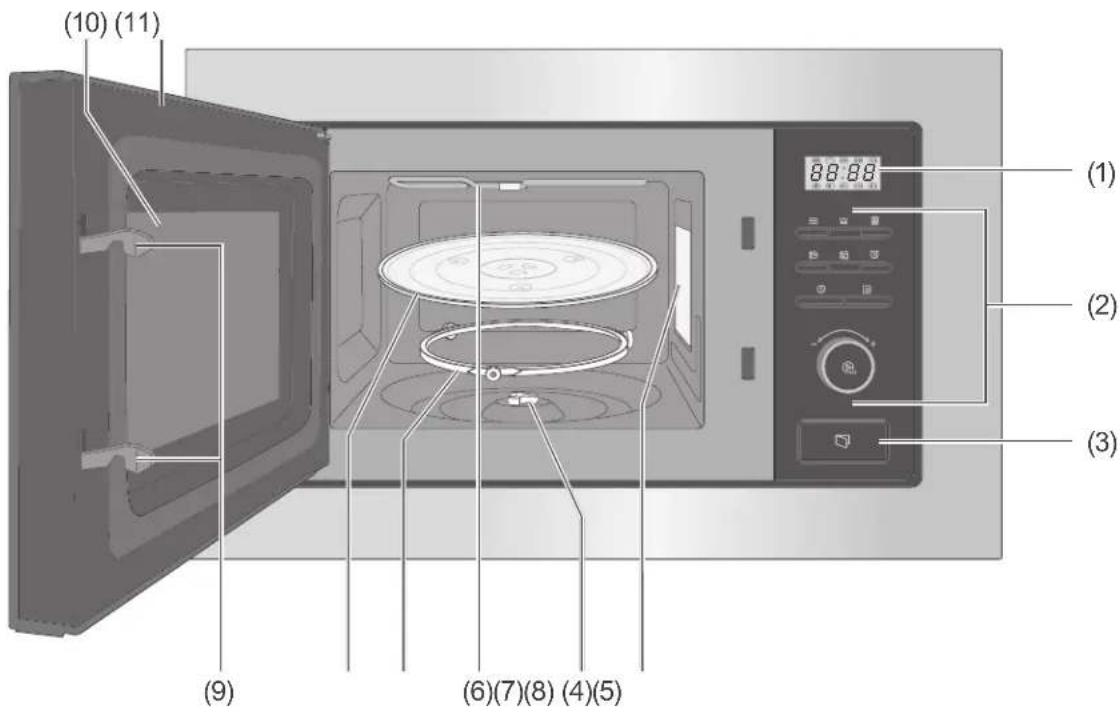
Appliance
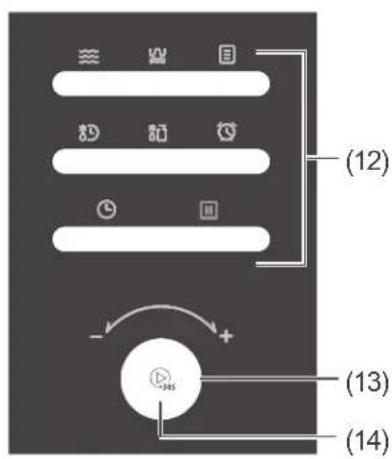
Control panel
(1) Display
(2) Control panel
(3) Button to open the cooking chamber door
(4) Magnetron
(5) Turntable drive
(6) Grill element
(7) Roller ring
(8) Turntable
(9) Appliance door locking system
(10) Viewing panel
(11) Cooking chamber door
(12) Function keys
(13) Control dial
(14) "START/+30sec/confirm" button
Function keys
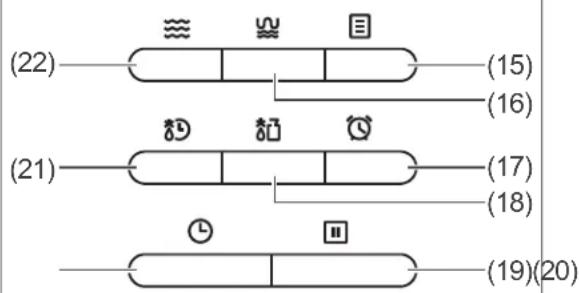
(15) "Automatic programme" button
(16) "Grill/Combi mode" button
(17) "Set timer" button
(18) "Defrosting by weight" button
(19) "Pause/Stop" button
(20) "Set clock" button
(21) "Timed defrosting" button
(22) "Microwave mode" button
Display
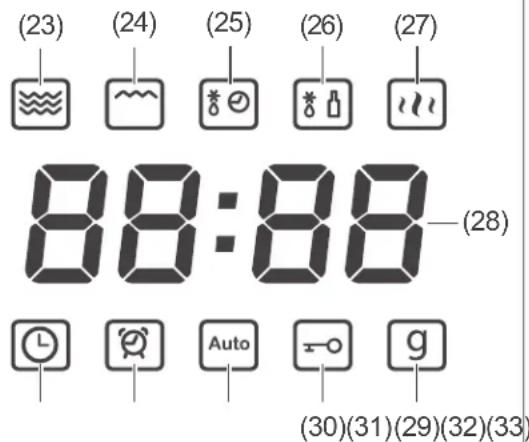
(23) "Microwave mode" indicator
(24) "Grill/Combi mode" indicator
(25) "Timed defrosting" indicator
(26) "Defrost by weight" indicator
(27) "Hot" indicator
(28) Indicator for clock time, cooking time or weight
(29) "Gram" indicator
(30) "Safety lock" indicator
(31) "Automatic programme" indicator
(32) "Timer" indicator
(33) "Clock" indicator
Information about microwaves
What are microwaves?
Microwaves are electromagnetic waves like those for radio and television; as with radio and TV waves, they cannot be seen or felt.
Microwaves
– are reflected by all metals,
– can penetrate glass, porcelain, plastic and paper,
– are absorbed by foodstuffs.
What effect do microwaves have on foodstuffs?
- The microwaves penetrate foodstuffs to a depth of approximately 3 cm.
- The water, fat and sugar molecules are heated up (dishes with a high water content are heated up most quickly).
This heat then slowly penetrates the entire dish and leads to the dish being defrosted, heated and cooked.
– Due to the fact that the individual elements of the dish are heated unevenly, it is important to stir or turn the dish over to ensure that it is cooked through evenly.
- The cooking chamber and the air inside it are not heated – the food container becomes warm primarily due to the heat of the food.
- When heating liquids in a microwave oven, a phenomenon known as “delayed boiling” can occur. The liquid then reaches boiling temperature without any outward visible sign of boiling. Even a small vibration may cause the liquid to suddenly spray out, for example when removing it from the microwave oven.
- Every dish requires a certain amount of energy for cooking or defrosting – a good rule of thumb is “high power, low time” or “low power, high time”.
How does a microwave oven work?
– A microwave generator, the so-called “magnetron” (4), generates the microwaves and disperses them into the cooking chamber.
- The cooking chamber walls and inner screen reflect microwaves, preventing them from being emitted out of the cooking chamber.
- The turntable (8) ensures that the microwaves are distributed evenly to the food.
- The microwave power can be set to several levels.
Suitable dishware
! NOTICE
Risk of explosion!
Improper handling of the appliance may result in damage or explosions.
■ Only use utensils that are suitable for use in microwave ovens. Containers that become hotter than the food inside them are not suitable for microwave cooking. Do not use such containers.
■ Metallic containers for food and beverages are not allowed during microwave cooking. Metal in the cooking chamber may cause sparks during operation! This can damage the viewing window or the entire appliance! Do not use metal pots, metal pans and metal lids or dishware with metal parts such as gold edges under any circumstances.
■ Do not use any aluminium foil, due to the fact that this can also cause sparks when coming into contact with the cooking chamber walls.
! NOTICE
Risk of damage to property!
Improper handling of the appliance can lead to property damage.
- Do not use any containers made of porcelain, ceramic or plastic and any protective fi lms that are not resistant to high heat in grill or microwave-combi mode!
■ Do not use baking paper or similar!
The appliance offers different heating modes: Microwave, grill and combi modes. Always select suitable dishware for the different heating modes. In each case observe the information provided by the manufacturer. Unsuitable crockery can lead to the appliance becoming damaged.
For microwave and microwave-combi mode
Use only microwave-suitable dishware. This includes:
– fire-resistant glass, ceramic, porcelain
– fire and frost resistant glass ceramics
– highly heat-resistant plastic (e.g. roasting bag)
- microwaveable plastics
To find out if a piece of dishware is microwaveable, perform the following test:
- Place the empty container into the cooking chamber, and close the door (11).
- Press the button 📋 "START/+30sec/confirm" (14).
The appliance will then start and run at full microwave power for 30 seconds.
- If the dishware becomes hot or if sparks are produced, open the door immediately to stop the process: This dishware is not suitable!
- If the dish remains cold or only lukewarm, it may be used in microwave mode.
For grill heating method
Any materials that can be used in a conventional oven are suitable for the grill heating method.
Size and shape
- Flat, wide containers are more suitable than tall, narrow ones. "Flat" dishes can cook through more evenly.
- Round or oval shaped containers are more suitable than square or rectangular containers. There is a risk of localised overheating in the corners!
Using the accessories
The turntable
! NOTICE
Risk of damage to property! Improper handling of the appliance can lead to property damage.
■ Do not exceed a weight of 4 kg on the turntable. Otherwise, it could break.
■ Do not place the hot turntable on a cold surface such as, for example, a work surface made of granite or tile. Doing so could shatter the plate. Always use a suitable mat underneath.
The turntable must be used whenever the microwave is operated.
– It rotates during cooking, in order to ensure that the food is evenly heated.
– Maximum load: 4 kg.
- It also collects dripping fat if used with the grill rack (34).
- Place the turntable drive (5) in the recess in the middle as required.
- Insert the roller ring (7).
- Place the turntable (8) on the cooking chamber floor and turn it until its centre clicks into place on the turntable drive.
- Always place cooking containers on the turntable. This prevents liquid from seeping into the appliance if it should boil over.
Grill rack
! NOTICE
Risk of damage to property! Improper handling of the appliance may cause it to become damaged.
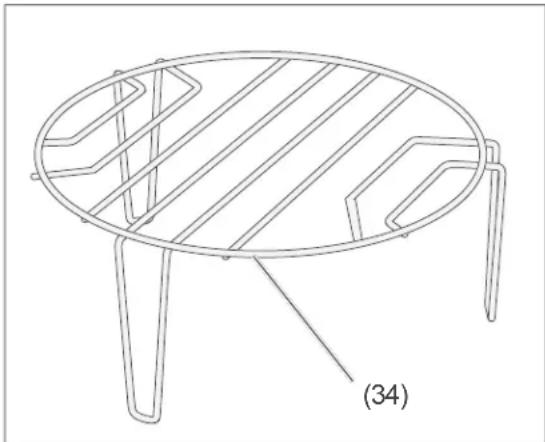
The grill rack is not suitable for purely microwave mode.
■ Use the grill rack exclusively in grill-combi or microwave-combi mode.
natural_image
Line drawing of a simple outdoor table with horizontal slats and legs, labeled (34) at the base (no text or symbols on the diagram itself)The grill rack (34) is not suitable for microwave mode. This can cause sparks. Use the grill rack exclusively in purely grill mode or in microwave-combi mode [-1] and [-2].
- If using the grill rack, always place it on the turntable (8).
General operating instructions
Before getting started
- Read the "Safety" chapter from page EN-4, in particular the safety notices.
- Install the appliance as described and connect it as described in chapter „Start-up“ on page EN-32.
Setting the time
The integrated clock is used for showing the time and stopping an automatic cooking process. It can also function as a countdown timer.
The time is always shown in 24-hour format.
After a power cut and when first set up, the display (1) will show the time as ☐☐☐.
The appliance is always in 24-hour mode and can therefore not be changed to 12-hour mode. You must also manually change the clock from Central European Time (CET) to Central European Summer Time (CEST) and vice versa.
- Press the button ⏻ "Set clock" (20).
The two left digits of the indicator flash in the display. - Set the number of hours using the control dial (13).
- Press the "Set clock" button 📁 again. The two right digits of the indicator flash in the display.
- Set the number of minutes using the control dial.
- Press the "START/+30sec/confirm" button (14) to save the entry. The display (1) will now show the set time. The colon symbol between the hour and minute display flashes.
Starting, pausing and ending the cooking process
- To start, press the START/+30sec/confirm" button (14).
- To pause, press the "Pause/Stop" button (19).
The display indicator will pause, the turntable (8) will stop and the cooking chamber light will switch off. - To continue the cycle, press the "START/+30sec/confirm" button again.
The display indicator will continue running, the turntable will start rotating again, and the cooking chamber light will switch back on. - To end the cycle, press the "Pause/Stop" button again.
The turntable stops, the cooking chamber light goes out and the display (1) shows the time.
The appliance will pause if the cooking chamber door (11) is opened while in operation.
Setting the cooking time
Cooking times can be set in the following increments:
| Cooking times Steps |
| 0–1 min: 5 seconds |
| 1–5 min: 10 seconds |
| 5–10 min: 30 seconds |
| 10–30 min: 1 minute |
| 30–95 min: 5 minutes |
Extending the cooking time
- You can extend the cooking time in increments of 30 seconds while cooking. Press the 📋 "START/+30sec/confirm" button (14) repeatedly if necessary. The cooking time cannot be extended while using the "Defrost by weight" and automatic programmes.
Cooking chamber light
The cooking chamber light switches on automatically when
– the appliance is in operation;
– the cooking chamber door (11) is open.
Modes
Microwavemode

WARNING
Microwave hazard!
A door that fails to close adequately can cause microwave radiation to escape. Under such circumstances, the appliance may not be used.
■ Pay particular attention to the cleanliness of the door seals and door seal faces along with all adjacent parts.
■ Do not use the appliance if the door is warped or damaged, or if the door latch, hinges, or door seals are defective, or if the door does not close tightly for any other reason.

CAUTION
Fire hazard!
Improper handling of the appliance may result in damage or cause a fire.
In case of a fire or smoke in the cooking chamber: Do not open the door! Switch off the microwave, pull out the mains plug or switch off the fuse in your fuse box.

CAUTION
Risk of scalding!
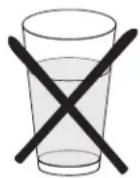
A boiling delay can occur when heating liquids. This may cause hot liquid to suddenly spray out, for example when removing it from the microwave.
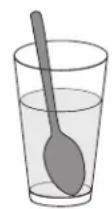
■ To avoid a delayed (eruptive) boiling, place a plastic or glass spoon in the container.
■ Make sure that the spoon is always at least 2 cm away from the interior walls of the microwave.

NOTICE
Risk of damage to property!
Improper handling of the appliance may cause it to become damaged.
■ Never remove the cover from the cooking chamber! It serves to protect the magnetron, which emits the microwaves.
■ The appliance is not intended to be operated by means of an external timer or a separate remote-control system.
■ Never operate the appliance without the turntable and never without food!

NOTICE
Risk of damage to property!
Improper handling of the appliance may cause it to become damaged.
The grill rack is not suitable for microwave mode.
■ The grill rack cannot be used solely in pure microwave mode. It can be used in all other operating modes.
Microwave power levels
| Power level | suitable for |
| P 100(800 W) | - Heating or warming- Water- Poultry, fish, vegetables |
| P80(640 W) | - Reheating- Mushrooms, shellfish- Cooking dishes that contain eggs or cheese |
| P50(400 W) | - Keeping rice or soup warm |
| P30(240 W) | - Melting chocolate and butter |
| P 10(80 W) | - proofing yeasted dough |
Selecting and starting microwave mode
Before getting started
- Place the turntable (8) with food or beverage in the cooking chamber and close the cooking chamber door (11).
-
Check that the display (1) shows the correct time.
-
Press the ≈ "Microwave mode" button (22).
The “Microwave mode” indicator (23) appears in the display (1). The P 100 indicator flashes on the line below.
- To select a different power level, turn the control dial (13).
- To confirm the power level selection, press the ▶ "START/+30sec./Confirm" button (14).
- To set the cooking time, turn the control dial.
The display will show the cooking time (0:05–95:00 minutes).
- To start the cooking process, press the "START/+30sec./Confirm" button ☑ _30s .
- The appliance will start and the fan will switch on. On the display, the "Microwave mode" indicator will flash and the cooking time indicator will begin to count down.
Once the countdown reaches 0:00, 5 beeps will sound and the appliance will switch off. The display will again show the time.
Microwave quick start
If you want to cook at 800 W for 30 seconds, you can use the quick start feature.
Before getting started
- Place the turntable (8) with food or beverage in the cooking chamber and close the cooking chamber door.
- Check that the display (1) shows the correct time.
- Press the 📋+305 "START/+30sec/confirm" button (14).
The appliance will start at power level P 100 and the fan will switch on. In the display (1) the indicators ☐Microwave mode" (23) and ☐Hot" (27) will flash.
The cooking time begins counting down. Once the countdown reaches 0:00, 5 beeps will sound and the appliance will switch off. The display will again show the time.
You can extend the cooking time in increments of 30 seconds while cooking. Touch the ▶ "START/+30sec/confirm" button (14) repeatedly if necessary.
Grillmode
Grilling is best for cooking thin portions of meat or fish.
Before getting started
- Place the turntable (8) and the grill rack (34) with the dish into the cooking chamber and close the cooking chamber door (11).
-
Check that the display (1) shows the correct time.
-
Press the ≈ "Grill/Combi mode" button (16).
The ☐ “Grill/Combi mode” indicator (24) appears in the display and the ☐ indicator flashes on the line below. - To confirm the selection of grill mode, press the ⒽSTART/+30sec./Confirm" button (14).
- The indicator ☐ goes out and the cooking time ☐:☐ is shown.
- Turn the control dial (13) to set the grilling time.
The display will show the set grilling time (0:05–95:00 minutes). - To start, press the 📋 "START/+30sec/confirm" button.
The appliance will start and the fan will switch on. On the display, the ☐ “Grill/Combi mode” indicator will flash and the cooking time will begin to count down.
Once the countdown reaches 0:00, 5 beeps will sound and the appliance will switch off. The display will again show the time.
You should turn your food during grilling to make sure it is cooked on both sides. To help you remember this, 2 beeps will sound halfway through the cooking time. Interrupt the grilling process then by pressing the ☐"Pause/Stop" button (19). Open the cooking chamber door, turn the food over and continue cooking by pressing the Ⓗ "START/+30sec/confirm" button.
Microwave-combi mode
! NOTICE
Risk of damage to property! Improper handling of the appliance may cause it to become damaged.
The grill rack is not suitable for purely microwave mode.
■ Use the grill rack exclusively in grill-combi or microwave-combi mode.
You can choose between two combi modes ( [-1] and [-2] ). The combi mode lets you cook quickly and produce a nice crust at the same time. This shortens preparation times enormously.
Before getting started
- Place the turntable (8) with food or beverage in the cooking chamber and close the cooking chamber door (11).
-
Check that the display (1) shows the correct time.
-
Press the ☑ “Grill/Combi mode” button (16), until the indicator of the desired combi mode flashes in the display ([- - 1] or [- - 2]).
- To confirm the selection, press the "START/+30sec./Confirm" button (14).
-
Turn the control dial (13) to set the grilling time.
The display will show the set cooking time (0:05–95:00 minutes). -
To start, press the ▶+305 "START/+30sec/confirm" button.
The appliance will start and the fan will switch on. On the display, the indicators for the combined heating modes will flash and the cooking time indicator will begin to count down.
Once the countdown reaches 0:00, 5 beeps will sound and the appliance will switch off. The display will again show the time.
Defrosting

WARNING
Health hazard!
The water that melts during defrosting can contain harmful bacteria, especially with meat and poultry!
■ Avoid any physical contact.
■ Pour defrost water away. Do not use it for any other purpose.
■ Thoroughly clean the crockery you have used.
Before getting started
- Ideally, use food which has been frozen at -18^ in portions that are as thin as possible.
- Removal all packaging.
- Weigh the food – its weight is needed to ensure the correct settings.
- Place the food in an appropriately large container which can collect the defrost water without overflowing.
- Do not cover the food.
Defrosting by weight

For meat, poultry and fish weighing from 100 to 1800 g. The defrosting time is dependent on weight, between 06:20 to 68:40 minutes.
- Place the container on the turntable (8) in the cooking chamber.
- Close the cooking chamber door (11).
- Press the “Defrosting by weight” button(18).
- Turn the control dial (13) to select the weight.
- Push the "START/+30Sec/Confirm" button (14) to start the defrosting process. The appliance will start and the fan will switch on. In the display (1) the indicators "Microwave mode" (23) and Defrosting by weight" (26) will flash. The defrosting time indicator will begin to count down.
When the countdown reaches 0:00, 5 beeps will sound and the appliance will switch off. The display will again show the time.
Timed defrosting

For frozen food with details of defrosting times on the packaging. The maximum possible defrost time is 95 minutes. The power level is P30 (240 W).
- Place the container on the turntable (8) in the cooking chamber.
- Close the cooking chamber door (11).
- Press the ⚙️ “Timed defrosting” (21) button.
- Turn the control dial (13) to select the defrost time.
The display (1) will now show the set defrosting time. - Press the ⚫ "START/+30Sec/Confirm" button (14) to start the defrosting process. The appliance will start and the fan will switch on. In the display the ⚫ "Microwave mode" (23) and "Timed defrosting" ⚫ (25) indicators will flash. The defrosting time indicator will begin to count down. When the countdown reaches ☐:☐☐, 5 beeps will sound and the appliance will switch off. The display will again show the time.
Automaticprogrammes
You can prepare dishes with ease thanks to the 7 automatic programme settings. You simply select the programme and enter the weight of the dish. Automatic mode does the rest.
Before getting started
- Remove all packaging
- Weigh the food – its weight is needed to ensure the correct settings.
Using the automatic programmes
- Place the container on the turntable (8) in the cooking chamber.
- Close the cooking chamber door (11).
- Press the ☐ "Automatic programme" button (15), to call up the menu for the automatic programmes.
- Turn the control dial (13) until the display shows (1) the desired automatic programme (R - 1 to R - 7). The indicator will flash.
- To confirm the selection, press the "START/+30sec./Confirm" button (14).
- Turn the control dial to select the desired weight.
- Press the “START/+30Sec/Confirm” button to start the automatic programme. The appliance will start and the fan will switch on. On the display (1), the “Automatic programme” indicator (31) will flash and the cooking time indicator will begin to count down.
When the countdown reaches 0:00, 5 beeps will sound and the appliance will switch off. The display will again show the time.
Automatic programme table
| Programme | Weight in g/cup | Cooking time in min:sec | Power Notes | |
| A-1: Rice | 200400 | 19:0027:00 | 100%+50% | |
| A-2: Reheating | 200300400 | 2:103:104:10 | 100 % | |
| A-3: Vegetables | 200300400 | 3:305:157:00 | 100 % | |
| A-4: Pasta | 100200 | 25:0030:00 | 80 % | with 800 g cold water with 1600 g cold water |
| A-5: Potatoes | 150300450 | 3:506:008:00 | 100 % | |
| A-6: Fish | 200400600 | 4:306:308:30 | 80 % | |
| A-7: Beverages | 1 cup (120ml)2 cups (240ml)3 cups (360ml) | 1:302:454:00 | 100 % |
Additional functions
Timer

When the countdown timer is running, all other appliance functions are disabled. The timer can only be used when oking process is running.
- Press the ⏻ "Set timer" button (17).
A beep will sound and the display (1) will show the 0000 indicator. The Timer" indicator (32) appears on the display. - Turn the control dial to set the desired time.
The display will show the selected time (0:05 to 95:00). - Press the 📋 "START/+30sec/confirm" button (14) to confirm the setting and start the timer.
The time indicator begins counting down. When the countdown reaches ☐☐☐, there will be five beeps and the appliance will switch off. The display will again show the time.

To stop the timer prematurely, press the ☐"Pause/Stop" button (19).
A beep will sound. The clock time will reappear on the display, and the appliance will be fully functional again.
Safety lock (child safety lock)
This functionality lets you prevent accidental operation of the appliance.

The safety lock can only be used when no cooking process is running.
- To switch on the safety lock, press the "Pause/Stop" button (19) for 3 seconds. A beep will sound and the display (1) will show the "Safety lock" indicator (30). All of the buttons of the appliance are now disabled.
- To switch off the safety lock, press the ☐“Pause/Stop” button for 3 seconds.
A beep will sound and the “Safety lock” indicator will disappear from the display. The appliance is now ready for use again.
Practical tips for microwaving
The correct cooking temperature
Given that microwaves react with varying intensity to water, fat and sugar, the cooking time depends significantly on the composition of the dish.
- Dishes with a high fat or sugar content (doughnuts, puddings, fruitcakes) cook through more quickly and reach higher temperatures faster than other dishes. Make absolutely sure to follow recommended cooking times to avoid burning the food and damaging the appliance.
- Dishes that have a high water content (fish, vegetables, sauces) cook faster than "dry" dishes.
- “Dry” dishes (rice, grain products, dried beans) cook very slowly. Please add a little water to these before cooking.
The correct quantity
The larger the quantity to be prepared, the longer the cooking time. If, for example, a potato takes 4 minutes, then two potatoes will take 7 minutes.
Rule of thumb: Twice the quantity requires approximately twice the amount of time.
- Small food items cook more quickly than large food items. And food items of equal size cook through more evenly than food items of different sizes. If possible, cut all food into pieces of roughly the same size. Remember to do this when freezing!
- When defrosting, size and form play a key role. Small, flat food portions defrost faster and more evenly than larger, thicker food portions. During the defrosting process, separate portions that have already begun to thaw, as exposed pieces defrost faster.
Order of dishes
To achieve an even result, special attention must be paid to arranging the food correctly for cooking:
- Arrange food with several equally sized pieces (potatoes, meatballs, hamburgers) in a circle in the container and leave the middle empty.
- For pieces of different sizes, place the small or thin pieces in the middle, as these pieces will be the last to cook.
- For irregularly shaped pieces (e.g. fish) place the thin or flatter end towards the middle.
– Lay thin slices of meat on top of each other or criss-cross them. - Place thicker slices and pieces of meat (joints, sausages etc.) close together.
- Heat meat juices and sauces in a separate container; only fill this 23 full!
Piercing and scoring
Excess pressure can be caused in many dishes when heating them through. It is therefore recommended to pierce or score certain dishes, in order to prevent them from bursting.
- Do not microwave eggs in their shells – unless using special containers which are commercially available.
- Pierce food with peels or skins (potatoes, tomatoes, sausages, aubergines, egg yolks) to prevent it from bursting open.
– Score the skin of whole fish to prevent it from tearing open.
Stir and turn

WARNING
Risk of burns!
Food is sometimes heated up unevenly in the microwave. The containers should not get as hot as the food inside.
■ Check the temperature of any food thoroughly and carefully, especially for children.
■ The contents of feeding bottles and baby food jars shall be stirred or shaken and the temperature checked before consumption, in order to avoid burns.
• Always stir baby food in particular very thoroughly to avoid burns.
- It is essential to check the temperature by tasting the food.
- With poultry, with dishes containing fresh egg, and when warming up meals, make absolutely sure that the food is fully cooked through to kill off all pathogens (such as salmonella).
- Stir the food after half the cooking time has elapsed and turn it, as food does not heat through evenly in the microwave.
Careandmaintenance

WARNING
Health hazard!
Improper use of this appliance can lead to damage to health.
■ The oven should be cleaned regularly and any food deposits removed.
■ Cleaning and user maintenance shall not be made by children without supervision.

CAUTION
Risk of burns!
During use the appliance becomes hot. Care should be taken to avoid touching heating elements inside the oven.
■ Children less than 8 years of age shall be kept away unless continuously supervised.
Risk of electric shock!
Improper cleaning may lead to electric shocks and short circuits.
■ Switch off the fuse and pull out the mains plug from the socket before cleaning. Always take hold of the plug itself, do not pull on the mains cord.
■ Ensure that no cleaning water or other liquids can penetrate the ventilation slits or the electrical components.
■ A steam cleaner is not to be used for cleaning. Steam can get into live components through cracks.
Risk of burns!
The housing becomes hot during operation, especially in the area of the vents. The containers can also get very hot due to the foods. After use in grill or combi mode, the grill (at the top of the cooking chamber) will be very hot.
■ Allow the appliance to completely cool down before cleaning.

NOTICE
Risk of damage to property!
The surfaces and door seals can get damaged by improper handling.
■ Never use harsh, soda, acid, solvent or abrasive cleaners. All-purpose cleaners with a neutral pH are recommended.
■ Use care products only on the outer surfaces.
- The door seals are sensitive to oil and grease – making the rubber porous and brittle.
■ Only use soft cloths.
- If possible, clean the appliance after each use before any contaminants can dry.
- Wash the grill rack (34) by hand using mild washing-up liquid.
- Clean the turntable (8) in the dishwasher.
- Clean the appliance, especially the cooking chamber floor and the door seals, with a damp, soft cloth. Use warm water and a standard all-purpose detergent or washing-up liquid and a soft sponge or cloth.
- Dissolve stubborn dirt with an undiluted all-purpose cleaner.
- Wipe down all surfaces after cleaning with a dry, soft cloth.
- Leave the cooking chamber door (11) open in order to allow the cooking chamber to dry out completely.

WARNING
Microwave hazard!
Microwaves can be emitted if the cooking chamber door is insufficiently sealed when closed. Under such circumstances, the appliance may not be used.
■ Pay particular attention to the cleanliness of the door seals and door seal faces along with all adjacent parts.
■ If the door or door seals are damaged, the oven must not be operated until it has been repaired by a competent person.
■ It is hazardous for anyone other than a competent person to carry out any service or repair operation that involves the removal of a cover which gives protection against exposure to microwave energy.
- For your own safety, please check regularly whether the appliance is intact:
- Are the mains cable and plug undamaged?
- Are the housing and the viewing panel (10) undamaged?
– Is the rotary plate (8) undamaged?
– Are the door seal faces clean? - Can the door hinges move freely?
– Are both hooks for the locking system (9) undamaged? - Does the door close properly, or is it warped?
- If the cooking chamber light stops working, contact a qualified professional.
The bulb is not located under the cover that is fastened inside the cooking chamber! Never unscrew or damage this cover! It serves to protect the magnetron, which emits the microwaves.
Delivery
natural_image
Line drawing of a microwave oven with various interior components including a lid, fan, and control knob (no text or symbols present)Package contents
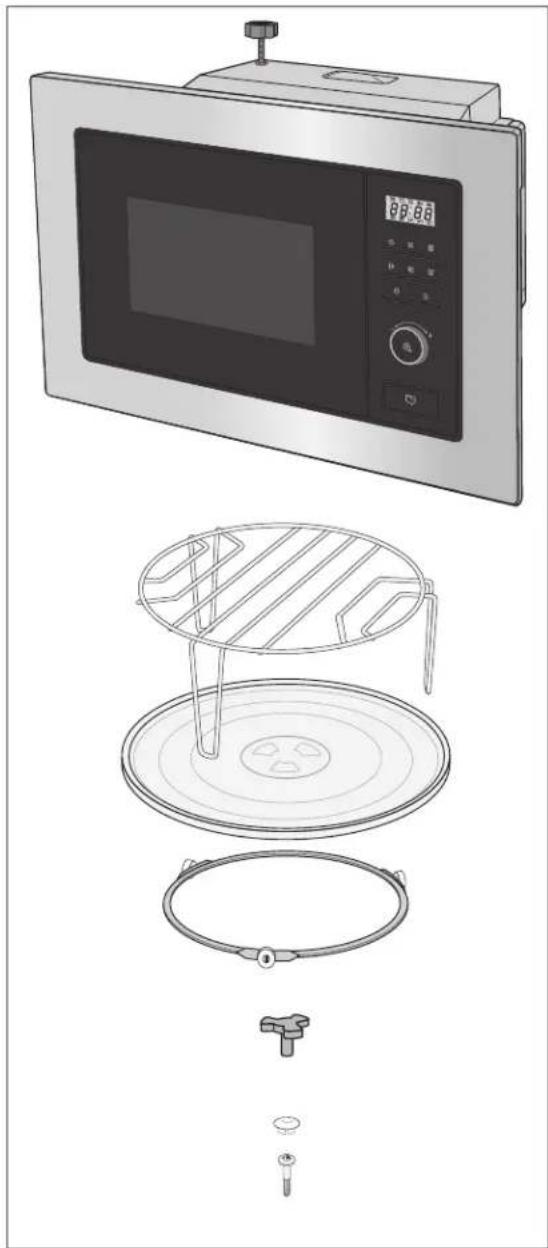
- Microwave
- Grill rack
- Turntable
- Roller ring
- Turntable drive
- Assembly material (screw and cover)
- User manual
Check the delivery
- Move the appliance to a suitable place and unpack it (see „Start-up“ on page EN-32).
- Check that the delivery is complete.
- Check whether the appliance was damaged during transit.
- If the delivery is incomplete or the appliance has been damaged during transit, please contact your mail order company.

WARNING
Risk of electric shock!
Touching live parts may result in severe injury or death.
■ Never use a damaged appliance.

You can find information on installation and start-up from page EN-32.
Start-up

CAUTION
Risk of injury!
The appliance is heavy and bulky.
■ Get another person to help with moving and installation.
■ Do not use the door and door handle as a step or for lifting.
Fire hazard!
Improper handling of the microwave may result in damage or cause a fire. Heat trapped inside the appliance may shorten its service life.
■ Ensure suffi cient ventilation. Do not cover the vents, for example with oven mitts or cookery books!
■ When installing the appliance, follow the dimension specifications for ventilation.
■ Never remove the cover that is fastened inside the cooking chamber! It serves to protect the magnetron, which emits the microwaves.

NOTICE
Risk of damage to property!
Improper handling of the appliance may result in damage.
■ Do not use sharp objects to unpack the appliance.
Moving and unpacking
- Move the appliance using a trolley or with a second person.
- Carefully unpack the device and remove all packaging items, plastic profiles, adhesive strips and foam padding from inside, outside and from the back plate of the device.
Installing the appliance
The appliance can be installed in a tall cupboard or underneath a work surface. The following conditions must be observed at all times:
Installation requirements
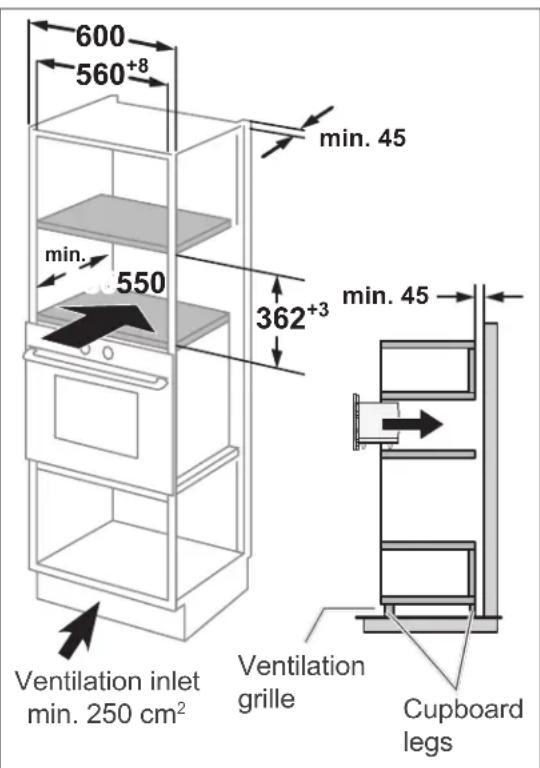
• Install the unit only in a cupboard with an open back panel.
If necessary, have your built-in furniture reworked accordingly. If you do not have the manual skills to do this, you should hire a professional.
• Install the appliance only in furniture whose veneer or plastic coverings are bonded with heat-resistant adhesive (100 °C). If the adhesive and surfaces are not heat-resistant, the covering may warp and come loose.
- Note that an earthed socket is installed in the alcove or its immediate vicinity (see the following section, "Connection").
- Do not place the appliance directly next to a refrigerator or freezer. Heat loss unnecessarily increases their energy consumption.
- Position the unit at least 2 m away from radio devices, televisions, etc., to prevent the reception from being disrupted.
The installation alcove
The appliance can be installed in a tall cupboard or underneath a work surface. The minimum installation height is 85 cm. The installation recess must have the following dimensions:
Connection
Depending on the installation alcove, the appliance must be connected before or after installation.

WARNING
Risk of electric shock / fi re hazard!
Touching live parts may result in severe injury or death.
■ Since all poles of the appliance cannot be disconnected from the mains via an accessible disconnecting device, an all-pole disconnecting device in accordance with overvoltage cate-
gory III must be connected within the house installation with at least 3 mm contact clearance; consult a specialist if necessary.
- Connect the appliance only to a professionally installed earthed socket with sufficient fuse protection (230 V\~/50 Hz/10 A).
Connection requirements
- To connect your new appliance to the electricity supply, you will need a professionally installed earthed socket with adequate fuse protection (see „Technical specifications“ on page EN-40).
- The connection voltage of the appliance must correspond to the mains voltage in your home (see rating plate on the back of the appliance).
- The plug socket must be located away from the back of the microwave, otherwise the plug will touch the back panel and the microwave will not push all the way in.
- Do not use multiplugs or extension cables!
Connecting/installing the appliance
- Connect the mains plug to the socket. A beep will sound and the display (1) will show ☐☐☐ (see „Setting the time“ on page EN-18).
- Make sure that the fixing screw (35) in the upper part of the appliance is screwed in.
- Push the appliance into the installation compartment until the fixing screw is inserted.
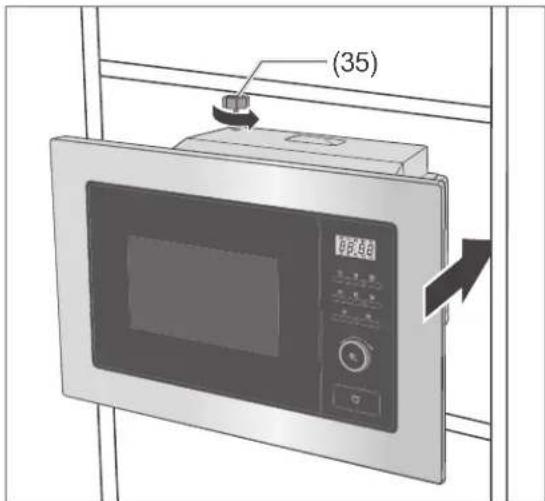
- Adjust the fixing screw to leave a distance of approx. 1 mm between the installation compartment and the fixing screw.
- Push the appliance into the installation compartment until the front panel meets the frame of the installation compartment.
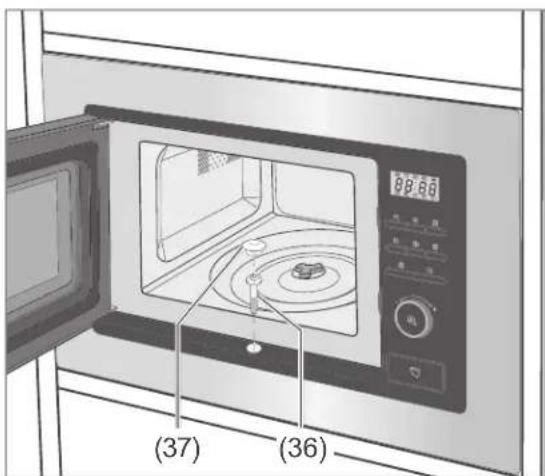
- Secure the appliance in the hole with the supplied screw (36) and cover the screw with the cover (37).
Cleaning before use
The appliance should be cleaned before first use, for example to ensure that packaging remnants will not negatively affect the taste of food (see page EN-29).
Heating up the appliance for the first time
A slight odour may be produced when the tubular heating elements are used for the first time. This is non-toxic and disappears after a short moment.
- Empty the cooking chamber completely and brush or blow it out.
- Preheat the appliance for approx. 10 minutes in grill mode before use (see page EN-22).
Troubleshooting table
Malfunctions can occur in all electrical appliances. This does not necessarily mean there is a defect in the appliance. For this reason, please check the tables to see if you can correct the malfunction.

WARNING
Risk of electric shock in case of improper repair!
Never attempt to repair the appliance yourself. You can put your own and future users' lives in danger. Only authorised specialists are allowed to carry out this repair work.
| Problem Possible cause | Solutions, tips | |
| Appliance will not start, display is off. | No electricity to socket. | Check by connecting another appliance. |
| Mains plug is loose. | Check the tightness of the mains plug. | |
| Door does not close properly. | Foreign bodies on the door seal faces. | Clean the door seal faces thoroughly. |
| Door is warped or door latch is defective. | Do not use the appliance! Contact a qualified professional. | |
| Cooking compartment light does not illuminate. | Bulb defective. Contact a qualified professional. | |
| The turntable does not turn or does not turn properly. | The turntable is not correctly positioned on the drive motor. | Position the turntable correctly. |
| The cooking chamber floor is dirty. | Clean the cooking chamber floor thoroughly. | |
| Scratching, grinding sounds in the cooking chamber. | Turntable does not rotate properly. Insert the turntable correctly | |
| The food dish is either too large or is positioned incorrectly. | The container may not protrude over the edge of the turntable. | |
| Exploding, popping sounds in the cooking chamber. | The dish is being cooked and/or defrosted with too much power, and will burst open. | Cancel the setting and reselect a lower power level. |
| Other noises or flashes of light in the cooking chamber. | Sparks – metal objects in the cooking chamber! | Pull out the mains plug or isolate the fuse immediately. Remove metal parts. |
| The dish is cooked unevenly. | The dish was not sufficiently rotated or stirred. | Stir or rotate the food dish, and allow it to heat up a little more. |
| Problem Possible cause Solutions, tips | ||
| The dish does not get sufficiently hot. | The power or time is set too low. | Keep warming up the food for a short while in the microwave. |
| The dish was very cold when being placed inside. | ||
| Container is unsuitable if it becomes hotter than the dish. | Use a suitable container. | |
| The appliance emits odours. | This happens when the tubular heating elements are used for the first time. | See „Heating up the appliance for the first time“ on page EN-34. |
| Door/viewing window steams up. | Moisture is escaping from the food; this is normal. | Wipe up the moisture after operation. |
Service
Please note!
You are responsible for the condition of the appliance and its proper use in the household.
Damage resulting from non-compliance with this manual cannot be recognised.
In order for us to help you quickly, please tell us:
| Name of appliance Model Order number | |
| Hanseatic Built-in microwave AG820B3AT-P0CE 98429654 |
General customer service
Please contact your mail order company's product advice centre if you have questions, complaints or accessory orders.
Spare parts
Customers in Germany
Please contact the company Hermes Fulfilment GmbH:
Phone: (057 32) 99 66 00
Monday–Thursday 8 a.m.–3 p.m., Friday 8 a.m.–2 p.m.
Customers in Austria
Please contact your mail order company's customer service centre or product advice centre.
Waste prevention, free return and disposal
Waste prevention
According to the provisions of Directive 2008/98/EC, waste prevention measures always take priority over waste management.
For electrical and electronic devices, waste prevention measures include extending the lifespan of defective devices through repair and reselling used working appliances instead of disposing of them.
Please help us reduce waste and contact our customer service if your product is faulty.
More information can be found in the brochure "Waste Prevention Programme - of the German Government with the Involvement of the Federal Länder".
Free return of old electrical appliances
Upon purchasing a new electrical appliance of the same type with essentially the same function, consumers may return an old electrical appliance to a distributor obliged to take back old appliances, at no extra cost for the consumers. This option also exists for deliveries made to a private household. For distance selling, the option of having old electrical equipment collected for free applies only in the case of purchase of new electrical equipment with heat exchangers (e.g. refrigerators, dehumidifiers), screens and display devices with a screen surface > 100 cm ^2 , and large devices with at least one of its external dimensions measuring more than 50 cm.
In addition, consumers may return up to three old electrical appliances of the same type to a distributor's collection point for free, without having to purchase a new electrical appliance. In this case, however, the old appliances' external dimensions may not exceed 25 cm.
Disposal
Disposing of old electrical devices in an environmentally-friendly manner
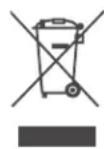
Electrical appliances contain harmful substances as well as valuable resources.
Every consumer is therefore required by law to dispose of old elec-
trical appliances at an authorised collection or return point. They will thus be made available for environmentally-sound, resource-saving recycling.
You can dispose of old electrical appliances free of charge at your local recycling centre.
Please contact your dealer directly for more information about this topic.
Don't forget to erase data!
If necessary, each consumer is responsible for erasing personal data from electrical and electronic equipment
Batteries and rechargeable batteries, lamps and bulbs
If necessary, old single-use and rechargeable batteries that are not encased by an old electrical appliance, as well as lamps/bulbs that can be removed from an old electrical appliance without being destroyed, must be removed and disposed of separately before you return the appliance.
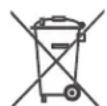
This symbol means that single-use and rechargeable batteries must not be disposed of with other household waste.
Consumers are required by law to bring all single-use and rechargeable batteries, regardless of whether they contain harmful substances*) or not, to a collection
point operated by their communal authority or borough or to a retailer, so that they can be disposed of in an environmentally friendly manner and so that valuable resources (e.g. cobalt, nickel or copper) can be recovered.
Single-use and rechargeable batteries can be returned free of charge.
Some of the possible contents (e.g. mercury, cadmium and lead) are toxic and, if improperly disposed of, can have adverse effects on the environment. Heavy metals, for instance, can have detrimental health effects on humans, animals and plants and accumulate in the environment and food chain, and then enter the body indirectly through the consumption of food.
There is a high risk of fire with old lithium batteries. Special care must therefore be taken to properly dispose of old lithium batteries and rechargeable batteries. Improper disposal can also lead to internal and external short circuits due to thermal effects (heat) or mechanical damage. A short circuit can lead to a fire or an explosion and have serious consequences for people and the environment. It is therefore important to tape off the terminals of lithium batteries and rechargeable batteries before disposing of them to prevent an external short circuit.
Single-use and rechargeable batteries that are not built into the device should be removed before disposal and then disposed of separately.
Please only dispose of single-use and rechargeable batteries in a discharged state!
If possible, use rechargeable batteries in place of disposable batteries.
Charge your batteries correctly and fully to maximise their service life. If necessary, discharge them completely with a suitable charger before recharging them.
Always use the correct type of batteries for your devices. Incorrect use can shorten the life of the batteries and possibly have harmful effects.
*) labelled with:
Cd = Cadmium
Hg = Mercury
Pb = Lead
Packaging

Our packaging is made of environmentally friendly, recyclable materials:
– Outer packaging made of cardboard
– Moulded parts made of foamed, CFC-free polystyrene (PS)
– Films and bags made of polyethylene (PE)
– Tension bands made of polypropylene (PP)
- Saving energy also protects against excessive global warming. Your new appliance uses little energy due to its environmentally friendly insulation and technology.

If you have sufficient space, we recommend retaining the packaging, at least during the warranty
period. If the appliance needs to be sent out for repairs, only the original packaging will provide sufficient protection.
If you would like to dispose of the packaging, please dispose of it in an environmentally friendly way.
Appendix
Technicalspecifications
Data sheet for built-in microwave oven
| Manufacturer hanseatic | |
| Name of appliance Built-in microwave | |
| Model AG820B3AT-P0CE | |
| Microwave output power in W 800 | |
| Rated frequency in MHz 2450 | |
| Microwave power levels 5 (80–800 W) | |
| Grill power levels 1 | |
| Built-in appliance Yes | |
| Fuse in A min. 10 | |
| Microwave power consumption in W 1250 | |
| Grill power consumption in W | 1000 |
| Supply voltage in V~/50 Hz | 230 |
| Cooking chamber volume in litres approx. 20 | |
| Turntable diameter in mm | approx. 245 |
| Appliance dimensions (height × width × depth) in cm | 38.2 × 59.5 × 36.2 |
| Empty weight in kg | 14.5 |
| Order no. | 98429654 |
| Power consumption standby mode | 0.8 W |
| Power consumption off mode | - |
| Time after which the equipment automatically reaches standby mode | 20 min |
| Time after which the equipment automatically reaches off mode | - |
This microwave corresponds to the device category:
Group 2, Class B.
- Group 2: Generates high-frequency electromagnetic radiation that is suitable for the treatment of food.
- Class B: May be operated in the living area and directly from the normal mains at a voltage of up to 230 volts (low voltage network).

- Gebrauchsanleitung
- Inhaltsverzeichnis
- Lieferumfang
- Table of contents
- Explanation of terms and symbols, definitions
- Explanation of terms
- WARNING
- CAUTION
- NOTICE
- Explanation of symbols
- Definitions
- Safety
- Intended use
- Safety notices
- Risks to children and certain groups of individuals
- Risks in handling household electrical appliances
- Fire hazard!
- When cleaning, please note:
- Risks when handling heat-generating appliances
- Risk of burns!
- Risk of scalding!
- Appliance parts and control elements
- Information about microwaves
- What are microwaves?
- Microwaves
- What effect do microwaves have on foodstuffs?
- How does a microwave oven work?
- Suitable dishware
- ! NOTICE
- Risk of explosion!
- For microwave and microwave-combi mode
- For grill heating method
- Size and shape
- Using the accessories
- The turntable
- Grill rack
- General operating instructions
- Before getting started
- Setting the time
- Starting, pausing and ending the cooking process
- Setting the cooking time
- Extending the cooking time
- Cooking chamber light
- Modes
- Microwavemode
- Selecting and starting microwave mode
- Microwave quick start
- Grillmode
- Microwave-combi mode
- Defrosting
- Health hazard!
- Defrosting by weight
- Timed defrosting
- Automaticprogrammes
- Using the automatic programmes
- Additional functions
- Timer
- Safety lock (child safety lock)
- Practical tips for microwaving
- The correct cooking temperature
- The correct quantity
- Order of dishes
- Piercing and scoring
- Stir and turn
- Careandmaintenance
- Risk of electric shock!
- Risk of damage to property!
- Microwave hazard!
- Delivery
- Package contents
- Check the delivery
- Start-up
- Risk of injury!
- Moving and unpacking
- Installing the appliance
- Installation requirements
- The installation alcove
- Connection
- Connection requirements
- Connecting/installing the appliance
- Cleaning before use
- Heating up the appliance for the first time
- Troubleshooting table
- Service
- General customer service
- Spare parts
- Customers in Germany
- Customers in Austria
- Waste prevention, free return and disposal
- Waste prevention
- Free return of old electrical appliances
- Disposal
- Disposing of old electrical devices in an environmentally-friendly manner
- Don't forget to erase data!
- Batteries and rechargeable batteries, lamps and bulbs
- Packaging
- Appendix
- Technicalspecifications
- Group 2, Class B.
Brand : Hanseatic
Model : AG820B3AT-P0CE40
Category : Microwaves