HD 12 - Drill driver Cocraft - Free user manual and instructions
Find the device manual for free HD 12 Cocraft in PDF.


| Product Type | Cordless Drill Driver |
| Brand | Cocraft |
| Model | HD 12 (CDT112EL) |
| Battery Voltage | 12 V (Nominal 11.1 V) |
| Battery Capacity | 1300 mAh |
| No-Load Speed | 0–750 rpm |
| Chuck Size | 10 mm (Keyless) |
| Charging Time | 5 hours |
| Weight | 810 g |
| Drill Capacity (Wood) | 16 mm |
| Drill Capacity (Steel) | 8 mm |
| Charger Input | 100–240 V AC, 50/60 Hz, 10 W |
| Charger Output | 13.5 V DC, 300 mA |
| Noise Emission (LpA) | 75.3 dB(A) (K=5 dB) |
| Noise Emission (LwA) | 86.3 dB(A) (K=5 dB) |
| Vibration (Drilling Metal) | 3.63 m/s² (K=1.5 m/s²) |
| Key Features | Variable speed trigger, forward/reverse with lock, work light, battery status indicators, overload protection |
| Maintenance | Clean with soft brush; store in dry place; charge battery every 6 months |
| Safety | Read manual; use PPE; avoid moisture; disconnect battery before adjustments |
| Spare Parts / Repairability | Repairs by qualified personnel only; use original spare parts |
Frequently Asked Questions - HD 12 Cocraft
User questions about HD 12 Cocraft
0 question about this device. Answer the ones you know or ask your own.
Ask a new question about this device
Download the instructions for your Drill driver in PDF format for free! Find your manual HD 12 - Cocraft and take your electronic device back in hand. On this page are published all the documents necessary for the use of your device. HD 12 by Cocraft.
USER MANUAL HD 12 Cocraft
Read the entire instruction manual carefully and make sure that you fully understand it before you use the equipment. Keep the manual for future reference.
Viktig information:
Original instructions
Bruksanvisning i original
Originalbruksanvisning
Cocraft 12 V Drill Driver
Art. no 41-2300 Model CDT112EL
Please read the entire instruction manual before using the product and then save it for future reference. We reserve the right for any errors in text or images and any necessary changes made to technical data. In the event of technical problems or other queries, please contact our Customer Services (see address details on the back).
Safety
General safety instructions for cordless power tools
Warning: Read all warnings, instructions, illustrations, and specifications provided with this power tool. Failure to adhere to the following instructions may lead to electric shock, fire or serious injury.
SAVE ALL WARNINGS AND INSTRUCTIONS FOR FUTURE REFERENCE
The term “power tool” in the following text refers to your handheld mains operated or battery operated tool.
1) Work area safety
a) Keep the work area clean and well lit. Cluttered or dark areas invite accidents.
b) Do not operate power tools in explosive atmospheres, such as in the presence of flammable liquids, gases or dust. Power tools create sparks which may ignite the dust or fumes.
c) Keep children and bystanders away while operating a power tool. Distractions can cause you to lose control.
2) Electrical safety
a) Power tool plugs must match the outlet. Never modify the plug in any way. Do not use any adapter plugs with earthed (grounded) power tools. Unmodified plugs and matching outlets will reduce the risk of electric shock.
b) Avoid body contact with earthed or grounded surfaces, such as pipes, radiators, ranges and refrigerators. There is an increased risk of electric shock if your body is earthed or grounded.
c) Do not expose power tools to rain or wet conditions. Water entering a power tool will increase the risk of electric shock.
d) Do not abuse the cord. Never use the cord for carrying, pulling or unplugging the power tool. Keep the cord away from heat, oil, sharp edges or moving parts. Damaged or entangled cords increase the risk of electric shock.
e) When operating a power tool outdoors, use an extension cord suitable for outdoor use. Use of a cord suitable for outdoor use reduces the risk of electric shock.
f) If operating a power tool in a damp location is unavoidable, use a residual current device (RCD) protected supply. Use of an RCD reduces the risk of electric shock.
3) Personal safety
a) Stay alert, watch what you are doing and use common sense when operating a power tool. Do not use a power tool while you are tired or under the influence of drugs, alcohol or medication. A moment of inattention while operating power tools may result in serious personal injury.
b) Use personal protective equipment. Always wear eye protection. Protective equipment such as dust masks, non-slip safety shoes, hard hats, or hearing protection used for appropriate conditions will reduce personal injuries.
c) Prevent unintentional starting. Ensure the switch is in the off-position before connecting to a power source and/or battery pack, picking up or carrying the tool. Carrying power tools with your finger on the switch or energising power tools that have the switch on invites accidents.
d) Remove any adjusting key or wrench before turning the power tool on. A wrench or a key left attached to a rotating part of the power tool may result in personal injury.
e) Do not overreach. Keep proper footing and balance at all times. This enables better control of the power tool in unexpected situations.
f) Dress properly. Do not wear loose clothing or jewellery. Keep your hair, clothing and gloves away from moving parts. Loose clothes, jewellery or long hair can be caught in moving parts.
g) If devices are provided for the connection of dust extraction and collection facilities, ensure these are connected and properly used. Use of dust collection equipment can reduce dust related hazards.
h) Do not let the fact that you are used to using power tools make you pay less attention to applicable safety instructions. A moment's carelessness can lead to serious injury.
4) Use and maintenance of the power tool
a) Do not force the power tool. Use the correct power tool for your application. The correct power tool will do the job better and safer if used at the feed rate for which it was designed.
b) Never use the power tool if the power switch does not switch the tool on and off. Any power tool that cannot be controlled by the power switch is dangerous and must be repaired.
c) Unplug the lead from the wall socket and/or remove the battery (if it is detachable) before making any adjustments, changing accessories or putting the power tool away for storage. These precautions reduce the risk of the power tool starting unexpectedly.
d) Store power tools that are not being used out of children's reach. Do not allow people who are unfamiliar with the tool or its functions to operate it. Power tools are dangerous in the hands of untrained users.
e) Maintain power tools and their accessories. Check for any incorrect settings, parts that catch, broken parts or anything else which may cause the power tool to malfunction. If damaged, have the power tool repaired before use. Many accidents are caused by poorly maintained power tools.
f) Keep tools sharp and clean. Properly maintained cutting tools with sharp cutting edges are less likely to bind and are easier to control.
g) Use the power tool, accessories and similar according to the instructions and in an appropriate way for the type of power tool used, taking into consideration your work environment and the type of work to be done. Use of the power tool for a purpose other than that for which it is intended could result in dangerous situations.
h) Keep any handles and gripping surfaces dry, clean and free from oil and grease. Slippery handles and gripping surfaces could contribute to unexpected situations in which the power tool cannot be handled and controlled safely.
5) Use and maintenance of the battery
a) Only charge the battery using a charger specified by the manufacturer.
A charger suitable for one type of battery, can pose a fire hazard if used for another type of battery.
b) Only use a battery which has the correct specifications, is designated for and constructed for the power tool you are using. Using any other types of batteries may create a risk of fire and injury.
c) When not in use, the battery pack should be stored away from other metal objects such as paper clips, coins, keys, nails, screws or any small metal object that could bridge the gap between the battery terminals. Shorting the battery terminals together may cause burns or a fire.
d) If the battery is abused it can leak acid; avoid contact with this acid. If contact accidentally occurs, flush with water. If the acid contacts eyes, additionally seek medical help. Battery acid can cause irritation and burns.
e) Never use a power tool or tool battery that has been damaged or modified. Damaged or modified batteries may exhibit unpredictable behaviour resulting in fire, explosion or risk of injury.
f) Never expose the battery to high temperatures or naked flames. Exposure to fire or temperature above 130 °C (265 °F) may cause the battery to explode.
g) Follow all charging instructions and never charge the power tool or battery outside the temperature range specified in this instruction manual. Charging improperly or at temperatures outside the specified range may damage the battery and increase the risk for fire.
6) Service
a) Repairs and service should only be performed by qualified tradesmen, and only with original spare parts. This will ensure that the safety of the power tool is maintained.
b) Never attempt to repair damaged batteries. Service of tool batteries should only be performed by the manufacturer or authorised service technicians.
Specific safety instructions for drilling and screwdriving
Always hold the power tool by the insulated gripping surfaces whenever there is the risk of the drill bit or tool attachment coming in contact with energised electrical cables including the flex of the drill itself. Drill attachments which contact live wires may energise any metallic components on the housing of the power tool and lead to an electric shock.
Safety instructions for working with long drill bits
- Never operate the drill at a higher speed than the maximum speed rating of the drill bit. At higher speeds, the drill bit is likely to bend if allowed to rotate freely without contact with the workpiece, which can lead to personal injury.
- Always start drilling at low speed and with the tip of the drill bit in contact with the workpiece. At higher speeds, the drill bit is likely to bend if allowed to rotate freely without contact with the workpiece, which can lead to personal injury.
- Only apply pressure in a direct line with the drill bit and do not apply excessive pressure. Bits can break and cause loss of control resulting in personal injury.
Additional safety instructions
- Immediately switch the power tool off if the tool attachment jams. Be prepared for high torque which will cause the power tool to twist. A cutting tool/accessory could jam in the workpiece if it is clamped or if the power tool is overloaded.
- Always grip the power tool firmly. Screwing fasteners in and out generates high instances of torque.
- Secure the workpiece firmly. A workpiece that is held in a clamp or vice is more secure than one which is held by hand.
- Use appropriate detectors to check the work area for concealed electrical cables and gas or water pipes. Contact a professional if you need help. Contact with live electrical wires may lead to fire or electric shock. Damaging a gas pipe may cause an explosion. Damaged water pipes can cause extensive property damage.
- Wait until the power tool stops completely before you lay it down. Attached tool accessories may catch on objects and cause you to lose control of the tool.
- A damaged or abused battery may emit vapours. The battery could catch fire or explode. Make sure that the workplace is well ventilated and seek medical advice if you feel affected by the vapours. The vapours can cause respiratory tract irritation.
- Never open the battery. Doing so poses a risk for short-circuiting.
- The battery can be damaged by sharp objects such as nails, screwdrivers or other external stress or impacts to the housing. Short-circuiting within the housing may result which can lead to smoke, fire, explosion or overheating.
- Only use the battery in products from the manufacturer. This protects the battery from dangerous overloading.
- Do not subject the battery to excessive heat such as continuous sunlight or fire. Do not expose it to water or moisture either. Doing so poses a risk of explosion.
Safety symbols on the product

Read the entire instruction manual.

Always use a face mask.

Always use safety glasses.

Always use ear protection.
Product description
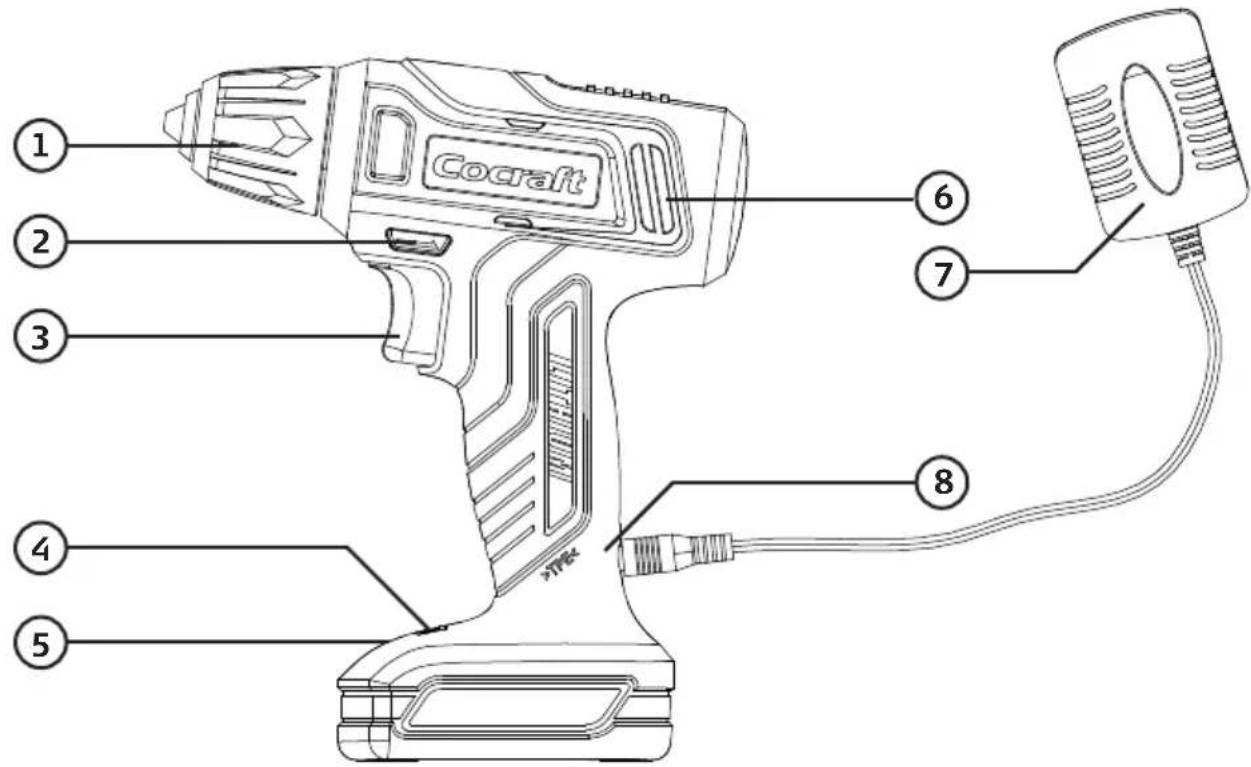
- Keyless chuck
- Forward/reverse selector and power trigger lock
- Power trigger (variable speed control)
- Battery status indicators
- Light
- Motor housing ventilation slits
- Charger
- Input socket for charger
Instructions for use
Charging
The battery should be charged at normal room temperature (18–24 °C). Do not charge the battery if the ambient temperature is below 4 °C or higher than 40 °C.
- Plug the charger into a wall socket.
-
Plug the DC connector on the cable from the charger into the socket on the drill driver (8).
-
The battery charge status indicators (4) indicate as follows:
- The battery is fully discharged when the charger is connected: steady red light only
- As the battery is charging: steady red and yellow light. Then steady red, yellow and green light.
- Fully charged battery: steady green light only
△ Important
If the drill driver is hot or has been operated so that the battery has become too hot to charge, the battery status indicators will flash red when the charger is connected. Let the drill driver cool before beginning to charge the battery.
Overload protection and other safety features
The battery has a number of safety features to prevent damage to the drill driver and battery during use.
- During short high-load situations the overload protection may turn the drill/driver off. This protection resets automatically. Release the trigger, wait a few seconds, ensure that the drill driver is under no load and then restart it. The drill driver should now function normally again.
- If subjected to a high load for an extended period the overheating protection may turn the drill driver off. This feature is self-resetting but the drill driver cannot be restarted until it has returned to normal operating temperature. Let the drill driver and battery cool properly before trying to start working again. Exposure to continuous sunlight can give rise to detrimental temperatures and should therefore be avoided.
- The battery has a deep discharge undervoltage protection device which operates when the battery becomes discharged. The undervoltage protection device turns the drill driver off automatically and the battery then needs to be recharged.
Functions
Power trigger
- The drill driver is started and stopped by squeezing or releasing the power trigger (3).
- The drill driver is equipped with a variable speed control, which makes it extremely practical for screwdriving. The more the power trigger is squeezed, the higher the speed of the chuck.
Work light
The drill driver is equipped with a light (5) which is positioned close to the battery so that it can light up the work area without being obscured by the chuck. The light comes on when the trigger is pulled and goes off about 4 seconds after the trigger has been released.
Forward/reverse selector, trigger lock
natural_image
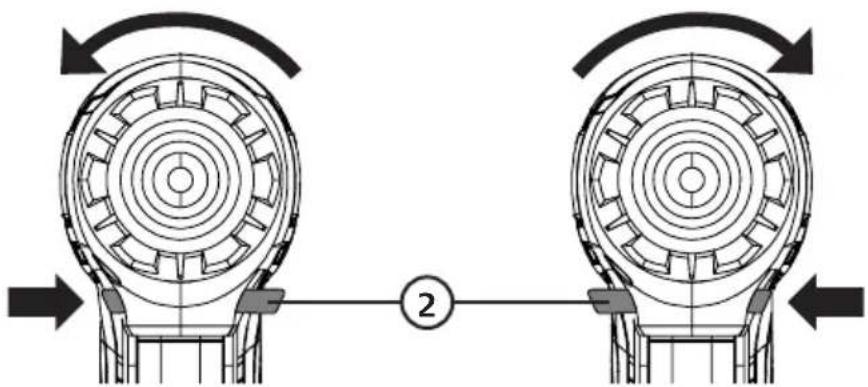
Mechanical diagram showing two rotating gears with rotational arrows and a numbered connection point (no text or symbols)Choose the direction of rotation (forward or reverse) using the selector (2). The rotation selector also has a middle setting which locks the power trigger. If the selector is set to this middle position, the drill driver will not start.
Changing drill and screwdriver bits
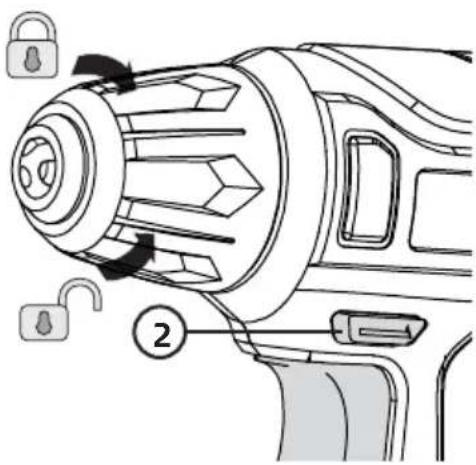
The drill driver has a keyless chuck which enables drill bits or screwdriver bits to be changed with one hand. Twist the chuck to the left to tighten, to the right to untighten. Make sure that the bit is tight and centred in the chuck.
-
Set the selector (2) to the middle position to lock the trigger.
-
Twist the chuck in the direction shown in the picture to tighten/untighten respectively.
Drilling tips and advice
- When drilling into slippery materials, like tiles, you should place a strong piece of tape on the area in which you wish to drill to prevent the bit from wandering.
- When drilling into metal you should first use a centre punch to make a small indentation at the spot where you wish to drill. This indentation will help hold the bit in place and prevents it from wandering when you drill.
- When drilling into metal you should also use cutting oil to assist in drilling and to preserve the machine and drill bit.
• Always use a clamp or vice to hold the workpiece.
- When drilling into walls, make sure not to damage water pipes, electricity cables or gas pipes.
Care, maintenance and storage
Drill driver
- Clean the exterior of the drill driver with a soft brush or cloth. Never use water, solvents or corrosive chemicals for cleaning.
- Regularly remove all dirt, especially from around the motor ventilation slits (6).
- Store the drill driver in a dry place out of children's reach whenever it is not to be used for a long time.
- Store the drill driver at room temperature and charge the battery fully every 6 months in order to maintain its capacity.
Charger
- Keep the housing of the charger clean. Wipe it clean with a dry cloth and vacuum it clean if necessary. Dirt can cause electric shocks.
- Unplug the charger and store it in a dry, dust-free environment out of children's reach whenever it is not in use.
Troubleshooting guide
| The drill driver doesn’t start. | The battery is discharged. Charge the battery. |
| The drill driver is sluggish and/or cuts out. | Too much force applied. Decrease the applied force.The battery might be overheated. Refer to the Overload protection and other safety features section. |
| Poor battery operating time. | The battery is not fully charged. A few charging cycles where the battery is charged 100% might be needed before it reaches full capacity. |
| The battery does not charge. | Check that the charger is properly plugged into a wall socket.Is the wall socket energised?The battery is too hot, let it cool.Make sure that the charger and charging cable are intact and that the input socket (8) on the drill driver is intact and free from dirt and debris. |
| Poor battery capacity after charging. | The battery is not fully charged. Charge the battery until the green indicator (4) shines a steady green. |
Responsible disposal
This symbol indicates that the product should not be disposed of with general household waste. This applies throughout the entire EU. In order to prevent any harm to the environment or health hazards caused by incorrect waste disposal, the product must be handed in for recycling so that the material can be disposed of in a responsible manner. When recycling your product, take it to your local collection facility or contact the place of purchase. They will ensure that the product is disposed of in an environmentally sound manner.
Specifications
Drill driver
Battery 12 V (Nominal 11.1 V)
Battery capacity 1300 mAh
No-load speed 0–750 rpm
Chuck 10 mm
Charging time 5 hours
Drill bit capacity for wood 16 mm
Drill bit capacity for steel 8 mm
Weight 810 g
Noise emission LpA 75.3 dB(A), Uncertainty K = 5 dB(A)
Noise emission LwA 86.3 dB(A), Uncertainty K = 5 dB(A)
Vibration data Drilling into metal ah, D=3.63 m/s², Uncertainty K = 1.5 m/s²
Charger
Input 100–240 V AC 50/60 Hz, 10 W
Output 13.5 V DC, 300 mA.
Vibration
- The measurement of the vibration emission level (triaxial vector sum) and the noise level values declared in this instruction manual have been carried out in accordance with a standardised test method described in EN 62841 and can be used for comparing one power tool with another.
- The measurement method may also be used for a preliminary assessment of vibration exposure.
- The declared vibration emission level applies when the power tool is used in accordance with this instruction manual. If however, the power tool is used for other purposes and with other accessories or has not been properly maintained, the vibration emission level could increase significantly over the total working period.
- For an exact assessment of the vibration exposure, the times when the tool is switched off or running idle should also be taken into account. This significantly reduces the vibration exposure over the total working period. Decide upon safety measures to protect the operator from the effects of vibration during all types of use.
Skruvdragare Cocraft 12 V
Art.nr 41-2300 Modell CDT112EL
natural_image
Mechanical diagram showing two rotating gears with rotational arrows and a numbered connection point (no text or symbols)natural_image
Mechanical diagram showing two rotating gears with rotational arrows and a numbered connection point (no text or symbols)Inn 100–240 V AC 50/60 Hz, 10 W
Ut 13,5 V DC; 300 mA; 6 W
Vibrasjon
natural_image
Diagram of two mechanical components with rotational arrows and a numbered connection point (no text or symbols)asennus/vaihtaminen
Vinkkejä poraukseen
natural_image
Mechanical diagram showing two rotating gears with rotational arrows and a numbered connection point (no text or symbols)Declaration of Conformity
Declares that this product complies with the requirements of the following directives and standards
Cocraft 12 V Drill Driver
41-2300
CDT112EL
Machinery Directive 2006/42/EC
EN 62841-1:
2015/+AC: 2015
EN62841-2-1:2018
EMC Directive 2014/30/EU
EN 55014-1: 2006/+A1:
2009/+A2: 2011
EN 55014-2: 2015
EN 61000-3-2: 2014
EN 61000-3-3: 2013
EN55014-1:2017
Low Voltage Directive 2014/35/EU
EN 60335-2-29:2004/
+A2:2010
EN 60335-1:2012/
+A11:2014
EN 62233: 2008
Henrik Alfredsson
Product & Quality Compliance Mgr
Insjön, Sweden, 2019-10-22
CLAS OHLSON AB, SE-793 85 INSJÖN, SWEDEN
Sverige
Postal Clas Ohlson Ltd, Aquilla House (First floor),
1 Becketts Wharf, Lower Teddington Road,
Hampton Wick, Kingston Upon Thames, KT1 4ER
Deutschland
Kundenservice Hotline: 040 2999 78111
E-Mail: kundenservice@clasohlson.de
Homepage
www.clasohlson.de
Postanschrift Clas Ohlson GmbH, Valentinskamp 88
20355 Hamburg
- Viktig information:
- Cocraft 12 V Drill Driver
- Safety
- General safety instructions for cordless power tools
- 1) Work area safety
- 2) Electrical safety
- 3) Personal safety
- 4) Use and maintenance of the power tool
- 5) Use and maintenance of the battery
- 6) Service
- Specific safety instructions for drilling and screwdriving
- Safety instructions for working with long drill bits
- Additional safety instructions
- Safety symbols on the product
- Product description
- Instructions for use
- Charging
- △ Important
- Overload protection and other safety features
- Functions
- Power trigger
- Work light
- Forward/reverse selector, trigger lock
- Changing drill and screwdriver bits
- Drilling tips and advice
- Care, maintenance and storage
- Drill driver
- Charger
- Responsible disposal
- Specifications
- Vibration
- Skruvdragare Cocraft 12 V
- Vibrasjon
- asennus/vaihtaminen
- Vinkkejä poraukseen
- Declaration of Conformity
- Sverige
- Deutschland
Brand : Cocraft
Model : HD 12
Category : Drill driver