
CME-121773 - Coffee maker Emerio - Free user manual and instructions
Find the device manual for free CME-121773 Emerio in PDF.


| Product Type | Coffee maker with hot water dispenser |
| Brand | Emerio |
| Model | CME-121773 |
| Power | 1600-1900W |
| Voltage | 220-240V~ 50/60Hz |
| Capacity (water reservoir coffee) | Approx. 1.25 L (10 cups) |
| Capacity (water reservoir hot water) | Approx. 1.0 L |
| Brew Strength Settings | 4 levels (1-4) plus default |
| Keep Warm Time (coffee) | 30 minutes, then auto shut-off |
| Keep Warm Time (hot water) | 2 hours, then auto shut-off |
| Programmable Timer | Yes, independent for coffee and hot water |
| Anti-Drip Function | Yes |
| Housing Material | Stainless steel and plastic |
| Glass Jug Capacity | Approx. 1.25 L |
| Warming Plate | Yes |
| Safety Features | Auto shut-off, overheat protection |
| Cleaning | Detachable parts washable in warm soapy water; descaling required periodically |
| Warranty | 2 years |
| Weight | Approx. 3.5 kg |
| Dimensions (W x D x H) | Approx. 25 x 35 x 40 cm |
Frequently Asked Questions - CME-121773 Emerio
User questions about CME-121773 Emerio
0 question about this device. Answer the ones you know or ask your own.
Ask a new question about this device
Download the instructions for your Coffee maker in PDF format for free! Find your manual CME-121773 - Emerio and take your electronic device back in hand. On this page are published all the documents necessary for the use of your device. CME-121773 by Emerio.
USER MANUAL CME-121773 Emerio
natural_image
Exterior view of a modern stainless steel coffee maker with clear glass and control panel (no visible text or symbols)Coffee machine and hot water dispenser (EN) Kaffeemaschine und Heißwasserspender (DE) Kaffebryggare och varmvattenautomat (SE) Koffiezetapparaat en heet water dispenser (NL) Kahvikone ja kuuman veden annostelija (FI) Kaffemaskin og dispenser for varmt vann (NOR) Kaffemaskine og varmtvandsbeholder (DK)
Content – Inhalt – Innehåll – Inhoud – Pitoisuus – Innhold – Indhold
Instruction manual – English ...... - 2 -
Before use make sure to read all of the below instructions in order to avoid injury or damage, and to get the best results from the appliance. Make sure to keep this manual in a safe place. If you give or transfer this appliance to someone else make sure to also include this manual.
In case of damage caused by user failing to follow the instructions in this manual the warranty will be void. The manufacturer/importer accepts no liability for damages caused by failure to follow the manual, a negligent use or use not in accordance with the requirements of this manual.
-
This appliance can be used by children aged from 8 years and above if they have been given supervision or instruction concerning use of the appliance in a safe way and if they understand the hazards involved.
-
Cleaning and user maintenance shall not be made by children unless they are older than 8 and supervised.
-
Keep the appliance and its cord out of reach of children aged less than 8 years.
-
Appliances can be used by persons with reduced physical, sensory or mental capabilities or lack of experience and knowledge if they have been given supervision or instruction concerning use of the appliance in a safe way and understand the hazards involved.
-
Children shall not play with the appliance.
-
If the supply cord is damaged, it must be replaced by the manufacturer, its service agent or similarly qualified persons in order to avoid a hazard.
-
This appliance is intended to be used in household and similar applications such as: staff kitchen areas in shops, offices and other working environments; farm houses; by clients in hotels, motels and other residential type environment; bed and breakfast type environments.
-
Regarding the instructions for cleaning the surfaces which come in contact with food, please refer to the paragraph "cleaning and maintenance" of the manual.
-
There is a potential risk of injuries from misuse.
-
The heating element surface is subject to residual heat after use.
-
Before inserting the plug into the mains socket, please check that the voltage and frequency comply with the specifications on the rating label.
-
Disconnect the mains plug from the socket when the appliance is not in use and before cleaning.
-
Ensure that the mains cable is not hung over sharp edges and keep it away from hot objects and open flames.
-
Do not immerse the appliance or the mains plug in water or other liquids. There is danger to life due to electric shock!
-
To remove the plug from the plug socket, pull the plug. Do not pull the power cord.
-
Do not touch the appliance if it falls into water. Remove the plug from its socket, turn off the appliance and send it to an authorized service center for repair.
-
Do not plug or unplug the appliance from the electrical outlet with a wet hand.
-
Never attempt to open the housing of the appliance, or to repair the appliance yourself. This could cause electric shock.
-
Never leave the appliance unattended during use.
-
This appliance is not designed for commercial use.
-
Do not use the appliance for other than intended use.
-
Do not wind the cord around the appliance and do not bend it.
-
Fill the reservoir with water only – not with any other liquids.
-
If you want to make coffee several times consecutively, always switch off the device for about 5 minutes before operating again.
-
Use the appliance on a flat, dry and heat resistance surface.
-
Never use the appliance of the glass jug shows signs of cracks or glass jug having a loose or weakened handle. Only use the glass jug with this appliance. Use carefully as the glass jug is very fragile.
-
WARNING!!

Please do not touch surface while in use. The temperature of accessible surfaces may be high when the appliance is operating.
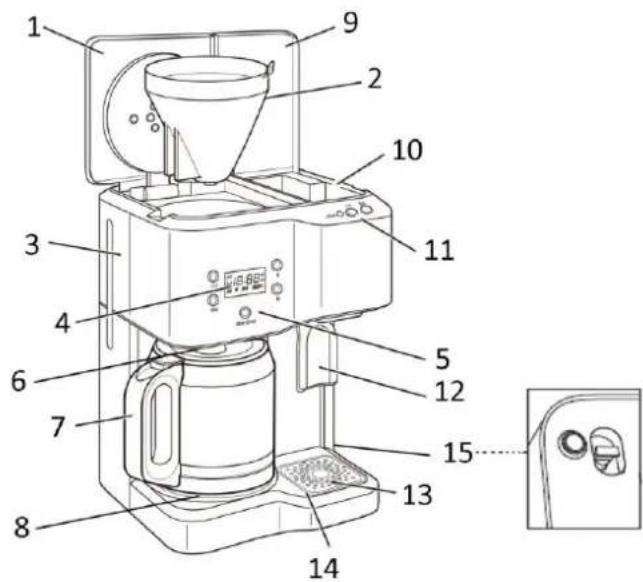
COMPONENT PARTS
- Reservoir lid for coffee function
- Filter reservoir
- Water reservoir for coffee function
- Display
- Coffee maker control panel
- Anti-drip valve
- Glass jug
- Warming plate
- Reservoir lid for hot water function
- Water reservoir for hot water function
- Hot water dispenser control panel
- Hot water dispense lever
- Drip tray cover
- Drip tray
- Redundant water release plug
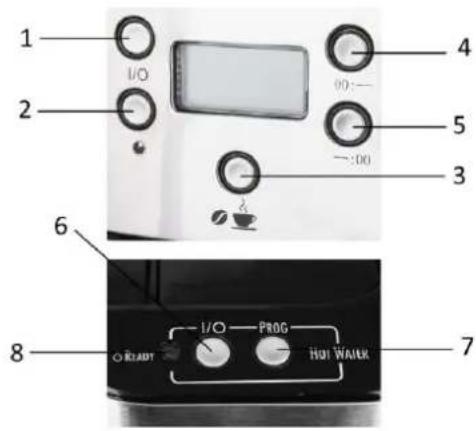
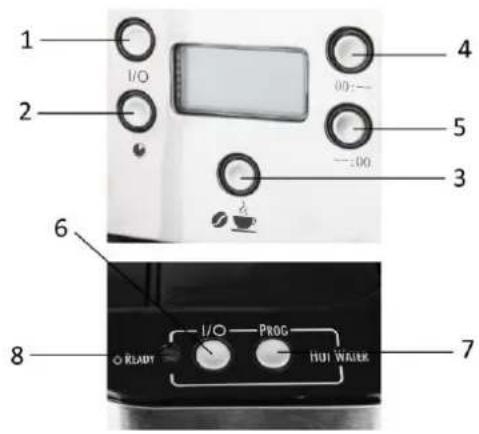
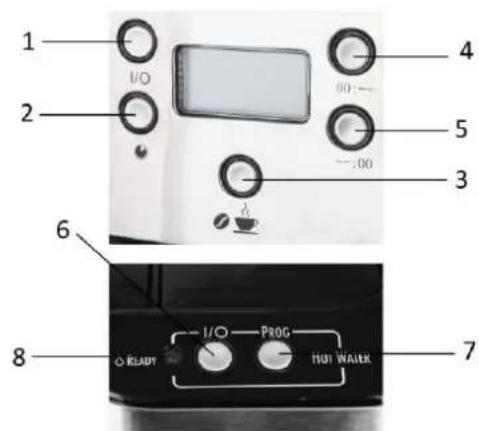
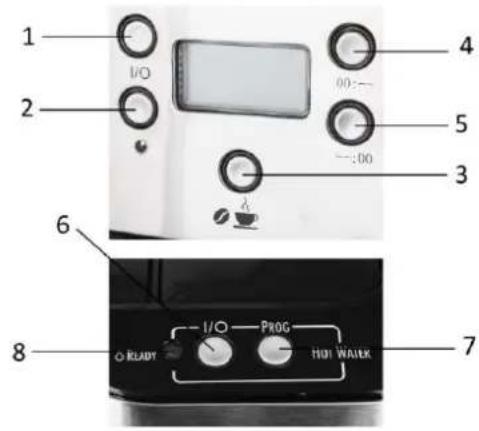
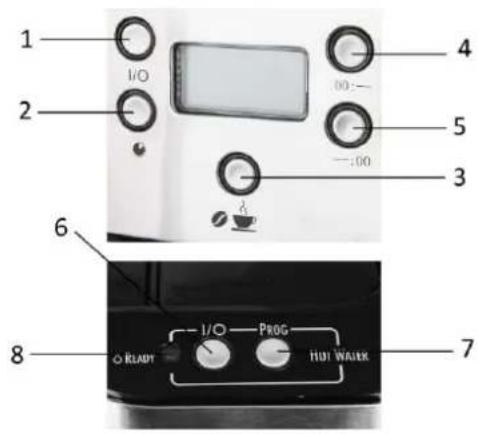
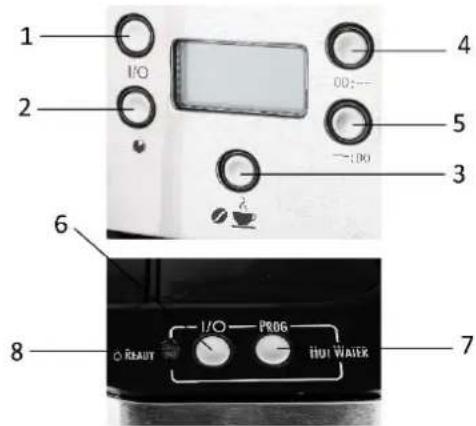
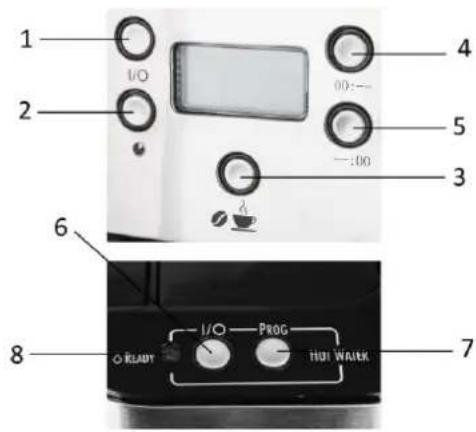
Coffee maker control panel
- On/off button
- Program button
- Brew option button
- Time button (hour)
- Time button (minute)
Hot water control panel
- On/off button
- Program button
- Ready light
OPERATION
Before first-time use:
- Before using this device for the first time please carefully rinse all detachable components with warm water.
• Fill the reservoir with cold water to the maximum water level indication.
• Now brew water twice without coffee powder.
• Do the same for the hot water function.
- Open the reservoir lid for coffee function and fill the reservoir with cold water. Do not fill the water over the maximum level.
- Place a commercially available filter in the filter reservoir and add amount of coffee powder appropriate to the amount of cups you want to brew. Close the lid of the reservoir.
To avoid the risk of overflow, please only use medium or coarse ground filter coffee for brewing. Please don't add too much coffee powder.
If the filter reservoir overflows due to mis-use, please unplug the appliance and allow the coffee in the filter reservoir to cool down completely, before removing the filter reservoir.
-
Insert the glass jug in place onto the warming plate horizontally, ensure the center hole in the glass jug lid aligns with the anti-drip valve.
-
Plug the power cord into an appropriate outlet. "0:00" in the display will flash.
-
By pressing the button "💡" once or more times, you can set the desired aroma intensity:
→ ↗ ↗ → 1-4 ↘ ↗ ... . The aroma intensity ↗ ↗ > 1-4 ↘ ↗ > ↗ . If you don't set this, the appliance works in the default setting with only one shown on the screen. If you want to reset this setting when the appliance has started running or has been set to automatic start, you first have to cancel the appliance's running or automatic start, then change the mode for aroma intensity.
-
Start brewing coffee by pressing the button I/O once. The button illuminates blue, the icon " 🔵P" flashes on the display. The lid of the reservoir needs to be closed in order to unlock the drip stop function.
-
Press button I/O again to turn off the appliance when finished. If you leave the appliance switched on, the warming plate will keep the coffee warm for 30 minutes after finishing brewing. After 30 minutes the unit will automatically shut off and turn to standby mode.
Note: The appliance is designed with an Anti-drip function. You can temporarily remove the glass jug and pour out coffee during brewing cycle.
CAUTION! When pouring coffee from the glass jug, pour it slowly. Do not incline the glass jug suddenly in a large tilting angle, because hot coffee can flow out from the lid rim and hurt people.
Do not put an empty glass jug back on the hot warming tray.


CAUTION! The glass jug is very fragile, please use with care.
HOW TO SET TIME AND PROGRAM
- To set current time: press button "00: --" to set the current hour; press button "--:00" to set the current minute.
- While holding button ⏻, press button "00: --" and "--:00" until the desired start time (AM or PM) is reached. Then, release button ⏻, the start time is programmed; the current time is displayed.
- Press button ⏻, the light will illuminate green; the program has been set. Press the button again to cancel the function.
HOT WATER FUNCTION
- Open the reservoir lid for hot water function and fill the reservoir with cold water. Fill with clean water between minimum and maximum marks.
- Close the lid. Press button I/O to heat the water. The button illuminates blue, the icon "O" flashes on the display, and water begins to heat. When water is boiled, the Ready light illuminates green. Water keeps hot for 2 hours, and after this the appliance will shut off automatically and turn to standby mode.
- Place your mug, bowl, or carafe against the hot water lever to dispense.
Note:
- If icon "FIL H2O" shows in the display, that means no water in the water reservoir for hot water function. Please fill the reservoir.
- During operation, if you want to fill the reservoir. Please turn off the appliance first, then add clean water.
How to program:
-
Press the button "00: --" and "--:00" to set the current time. Make sure the hot water dispenser is off.
-
While holding button PROG, press button "00: --" and "--:00" until the desired start time (AM or PM) is reached. Then, release button PROG, the start time is programmed; the current time is displayed.
-
Press button PROG, the light will illuminate green; the program has been set. Press the button again to cancel the function.
Note:
- You can program both the hot water dispenser and the coffee maker independently.
- To see programmed time, press and hold button PROG. Press again to turn program back on.
HOW TO EMPTY THE HOT WATER RESERVOIR
Caution! Unplug and cool completely. Make sure the appliance is cooled completely, to avoid the risk of scald. The hot water reservoir must be emptied if it is being stored or if it hasn't been used in more than one week. Hold the appliance over a sink and pull down the redundant water release plug to remove the drain water. After emptied, replace the plug.
CLEANING AND MAINTENANCE
• Before cleaning remove the mains plug and let the device cool down.
- Never immerse the device in water. Please use a slightly damp cloth to clean the surfaces.
- Avoid using acrid or scrubbing cleaning agents.
- All detachable parts can be cleaned in warm soapy water. Rinse and dry.
Descaling:
- Pour 2 cups / 473ml vinegar into water reservoir for coffee function.
- Press button I/O to turn on the coffee function. Press the button again after 30 seconds to turn off the appliance and wait for 30 minutes. Press the button to start blew. When finished, turn off the appliance. Run 2-3 more cycles with clean water only. Allow to cool between cycles.
- Hot water dispenser can also be descaled according to above steps.
TECHNICAL DATA
Operating voltage: 220-240V\~ 50/60Hz
Power: 1600-1900W
GUARANTEE AND CUSTOMER SERVICE
Before delivery our devices are subjected to rigorous quality control. If, despite all care, damage has occurred during production or transportation, please return the device to your dealer. In addition to statutory legal rights, the purchaser has an option to claim under the terms of the following guarantee:
For the purchased device we provide 2 years guarantee, commencing from the day of sale. If you have a defective product, you can directly go back to the point of purchase.
Defects which arise due to improper handling of the device and malfunctions due to interventions and repairs by third parties or the fitting of non-original parts are not covered by this guarantee. Always keep your receipt, without the receipt you can't claim any form of warranty. Damage caused by not following the instruction manual, will lead to a void of warranty, if this results in consequential damages then we will not be liable.
Neither can we hold responsible for material damage or personal injury caused by improper use if the instruction manual is not properly executed. Damage to accessories does not mean free replacement of the whole appliance. In such case please contact our service department. Broken glass or breakage of plastic parts is always subject to a charge. Defects to consumables or parts subjected to wearing, as well as cleaning, maintenance or the replacement of said parts are not covered by the warranty and are to be paid.
ENVIRONMENT FRIENDLY DISPOSAL
Recycling – European Directive 2012/19/EU
This marking indicates that this product should not be disposed with other household wastes. To prevent possible harm to the environment or human health from uncontrolled waste disposal, recycle it responsibly to promote the sustainable reuse of material resources. To return your used device, please use the return and collection systems or contact the retailer where the product was
purchased. They can take this product for environmental safe recycling.
SICHERHEITSHINWEISE
BEDIENUNG
ANVÄNDNING
BEDIENING
KÄYTTÖ
BETJENING
BETJENING
Før første brug:
- Content – Inhalt – Innehåll – Inhoud – Pitoisuus – Innhold – Indhold
- COMPONENT PARTS
- OPERATION
- Before first-time use:
- HOW TO SET TIME AND PROGRAM
- HOT WATER FUNCTION
- How to program:
- Note:
- HOW TO EMPTY THE HOT WATER RESERVOIR
- CLEANING AND MAINTENANCE
- Descaling:
- TECHNICAL DATA
- GUARANTEE AND CUSTOMER SERVICE
- ENVIRONMENT FRIENDLY DISPOSAL
- SICHERHEITSHINWEISE
- BEDIENUNG
- ANVÄNDNING
- BEDIENING
- KÄYTTÖ
- BETJENING
- Før første brug:
Brand : Emerio
Model : CME-121773
Category : Coffee maker