
FN-214468 - Fan Emerio - Free user manual and instructions
Find the device manual for free FN-214468 Emerio in PDF.


| Type | Stand fan |
| Model | FN-214468 |
| Power supply | 220-240 V ~ 50-60 Hz |
| Power consumption | 30 W |
| Fan speed levels | 1-12 |
| Swing angles | 30°, 60°, 90°, 120° |
| Timer | 0-12 hours (0.5h steps for 0-6h, 1h steps for 6-12h) |
| Remote control | Yes (CR2032 battery included) |
| Battery operation | Yes (rechargeable, 6 hours charging time) |
| Digital display | Yes |
| Memory function | Yes (retains speed, mode, swing settings) |
| Wind modes | Normal, Natural, Sleep |
| Maximum fan flow rate | 25.52 m³/min |
| Sound power level | 55.5 dB(A) |
| Maximum air velocity | 4.58 m/s |
| Service value | 1.01 (m³/min)/W |
| Standby power consumption | 0.46 W |
| Assembly | Required (includes wrench and screws) |
| Cleaning | Wipe with damp cloth; do not immerse |
| Safety features | Overheat protection, auto shut-off? Not specified; fan guards prevent finger insertion |
Frequently Asked Questions - FN-214468 Emerio
User questions about FN-214468 Emerio
0 question about this device. Answer the ones you know or ask your own.
Ask a new question about this device
Download the instructions for your Fan in PDF format for free! Find your manual FN-214468 - Emerio and take your electronic device back in hand. On this page are published all the documents necessary for the use of your device. FN-214468 by Emerio.
USER MANUAL FN-214468 Emerio
natural_image
Modern office desk fan with grid-patterned circular headrest and vertical stand (no text or symbols visible)Stand fan (EN)
Stand Ventilator (DE)
Golvfläkt (SE)
Instruction manual – English ...... - 2 -
Before use make sure to read all of the below instructions in order to avoid injury or damage, and to get the best results from the appliance. Make sure to keep this manual in a safe place. If you give or transfer this appliance to someone else make sure to also include this manual.
In case of damage caused by user failing to follow the instructions in this manual the warranty will be void. The manufacturer/importer accepts no liability for damages caused by failure to follow the manual, a negligent use or use not in accordance with the requirements of this manual.
- This appliance can be used by children aged from 8 years and above and persons with reduced physical, sensory or mental capabilities or lack of experience and knowledge if they have been given supervision or instruction concerning use of the appliance in a safe way and understand the hazards involved.
- Children shall not play with the appliance.
- Cleaning and user maintenance shall not be made by children without supervision.
- This appliance contains batteries that are only replaceable by skilled persons.
- Exhausted batteries are to be removed from the appliance and safely disposed of.
- Before inserting the plug into the mains socket, please check that the voltage and frequency comply with the specifications on the rating label.
- Disconnect the mains plug from the socket when the appliance is not in use and before cleaning.
- Ensure that the mains cable is not hung over sharp edges and keep it away from hot objects and open flames.
-
Do not immerse the appliance or the mains plug in water or other liquids. There is danger to life due to electric shock!
-
To remove the plug from the plug socket, pull the plug. Do not pull the power cord.
-
Do not plug or unplug the appliance from the electrical outlet with a wet hand.
-
Never attempt to open the housing of the appliance, or to repair the appliance yourself. This could cause electric shock.
-
Never leave the appliance unattended during use.
-
This appliance is not designed for commercial use.
-
Do not use the appliance for other than intended use.
-
Do not wind the cord around the appliance and do not bend it.
-
Keep the appliance away from damp, and protect from splashes.
-
Use the appliance on a flat, dry and heat resistance surface.
-
Do not store or operate the appliance in the open air.
-
Keep the appliance in a dry place for storage, inaccessible to children (in its packaging).
-
Never put fingers or any other objects through the fan guards when the fan is running.
-
Never operate the product without the fan guards in place, as serious personal injury may result.
-
The appliance must be assembled completely before use.
-
Watch out for long hair! It can be caught in the fan owing to the air turbulence.
-
Do not point the air flow at people for a long time.
-
Ensure that the fan is switched off from the supply mains before removing the guard.
-
To avoid over heating, it is recommended to fully unwrap the power cable when the appliance is operating.
-
Multiple adaptors and extension cords are not recommended.
-
Keep the appliance away from the curtains or materials that could obstruct the air intake grille.
PARTS DESCRIPTION
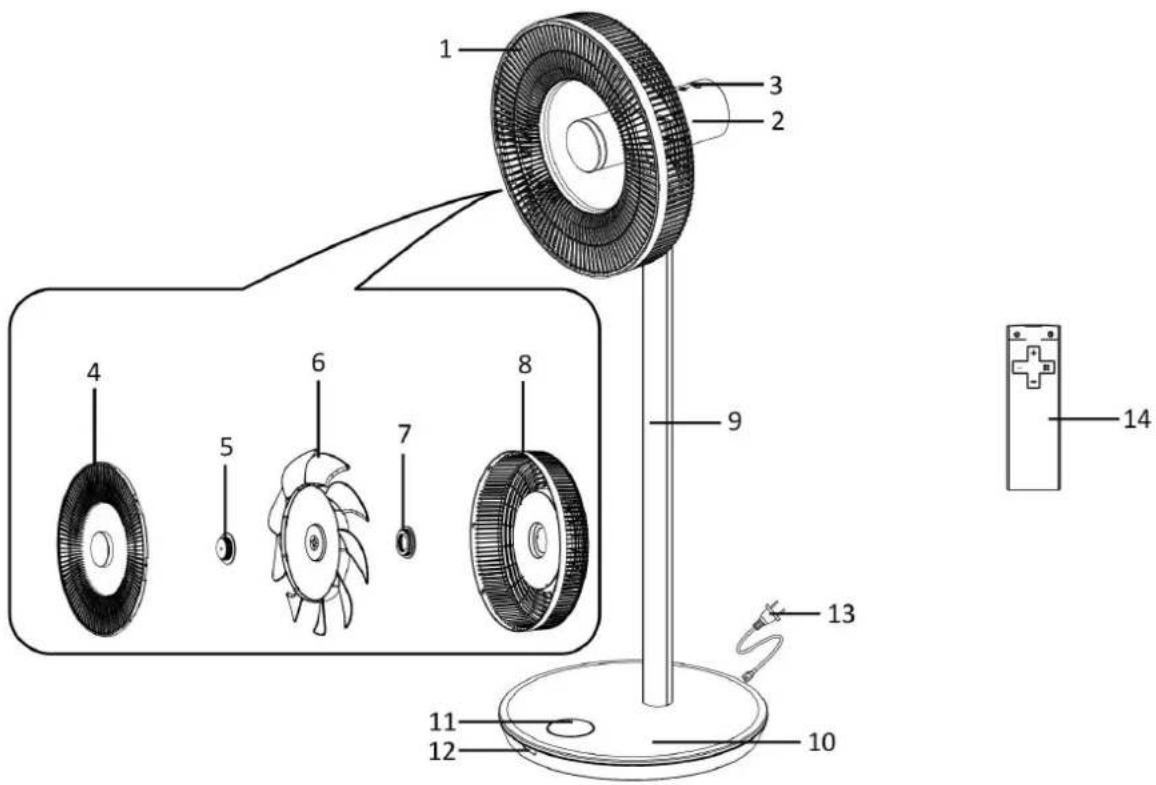
- Fan head
- Motor unit
- Control panel
- Front guard
- Blade fastening screw
- Fan blade
- Guard fastening screw
- Rear guard
- Standing shaft
- Standing base
- Digital display
- Infrared receiving window
- Power cord
- Remote control
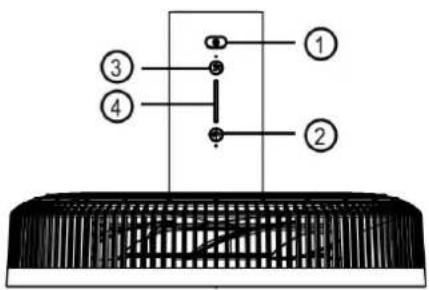
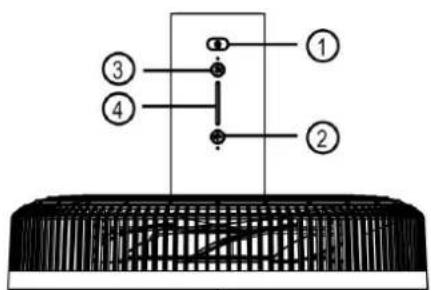
Control panel
- On/off button
- Swing button
- Wind speed button
- Indicator light
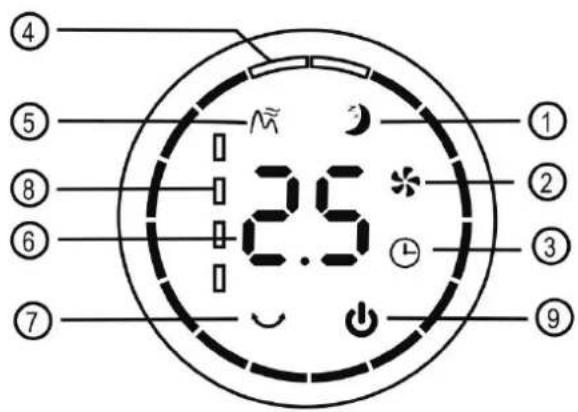
Digital display
- Sleep mode
- Normal mode
- Timer function
- Swing angle indication
- Natural mode
- Timer/speed value
- Swing function
- Battery indication
- ON/OFF
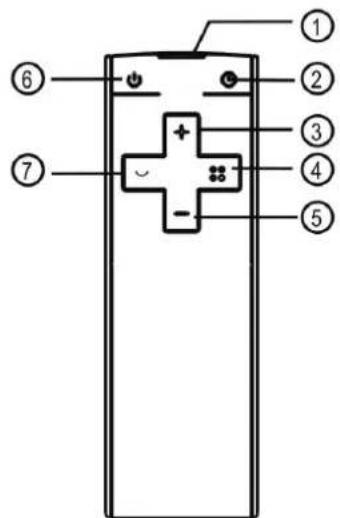
Remote control
- Window of remote control
- Timer button
- Value increasing button
- Mode button
- Value decreasing button
- On/off button
- Swing button
This unit has a remote control. One piece of CR2032 battery will be provided with the remote control. Before starting to use the remote control, remove the plastic protection from the battery. If it is not in use for a long time, please take the battery out of the remote control. Keep button cell batteries out of reach of small children. During use, the window of remote control should be pointed at the infrared receiving window on the base.
Note: Most functions of the appliance can only be controlled by remote control. If you have lost the remote control or if it is damaged, please contact our customer service.
ASSEMBLING INSTRUCTIONS
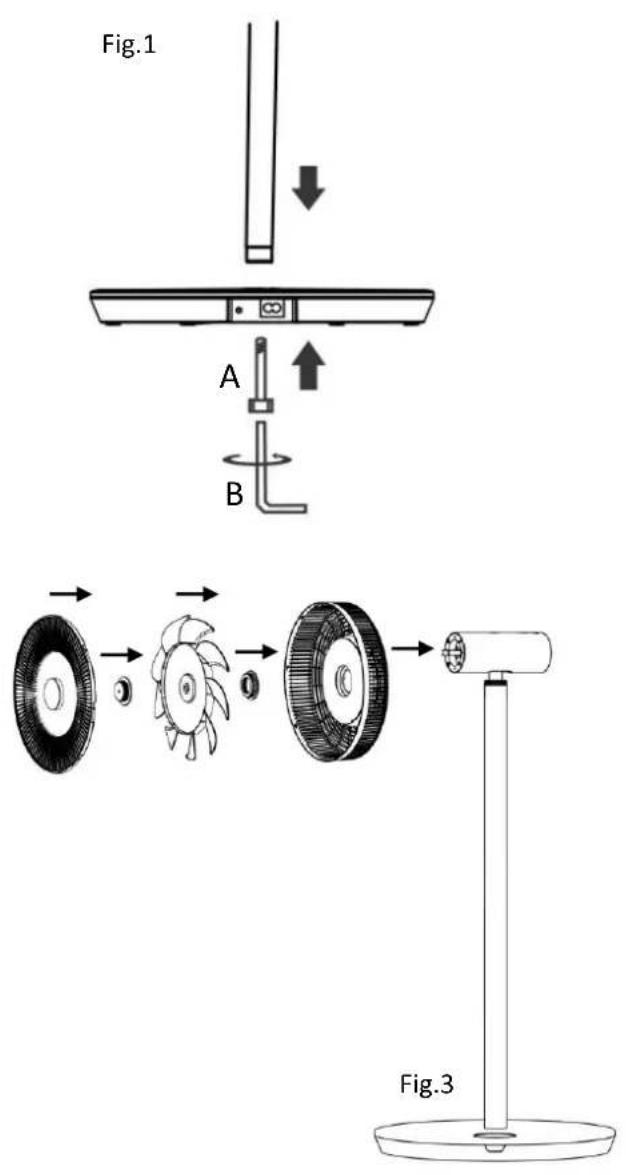
- Insert the standing shaft into the standing base. Fix with the M6 screw (A) by using the wrench (B) provided. (Fig.1)
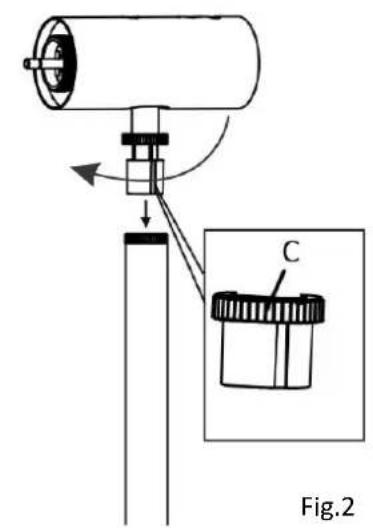
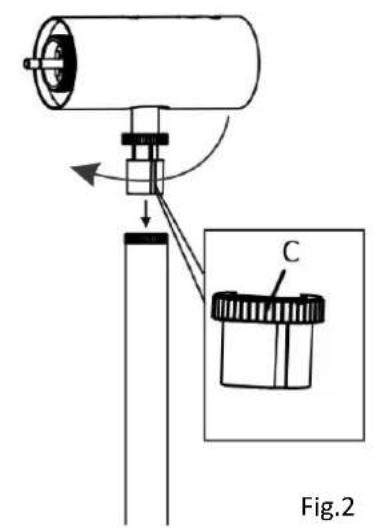
- Insert the motor unit into the standing shaft. Fix with the nut (C) by rotating it in a clockwise direction. (Fig.2)
- Assembly of the fan head. (Fig.3)
Before assembly, take the fan blade out of the fan head first. Rotate the front guard in an anti-clockwise direction to separate it from the rear guard. Take out the fan blade.
- Attach the rear guard onto the motor unit. Fix with the guard fastening screw by rotating it in a clockwise direction.
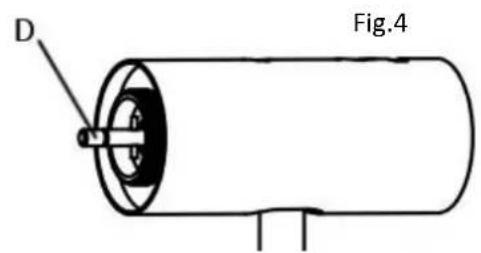
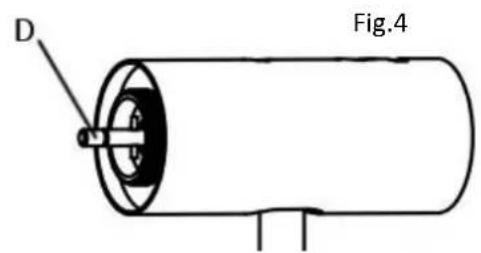
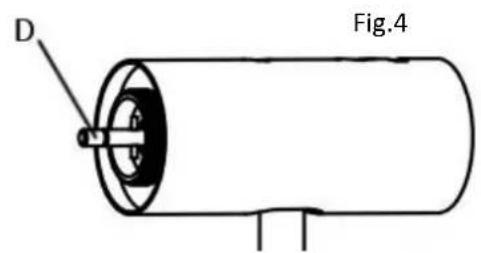
- Attach the fan blade onto the motor shaft (D). (Fig.4) Make sure the groove on the back of the fan blade fits over the spacer pin on the motor shaft. Fix with the blade fastening screw by rotating it in an anti-clockwise direction.
-
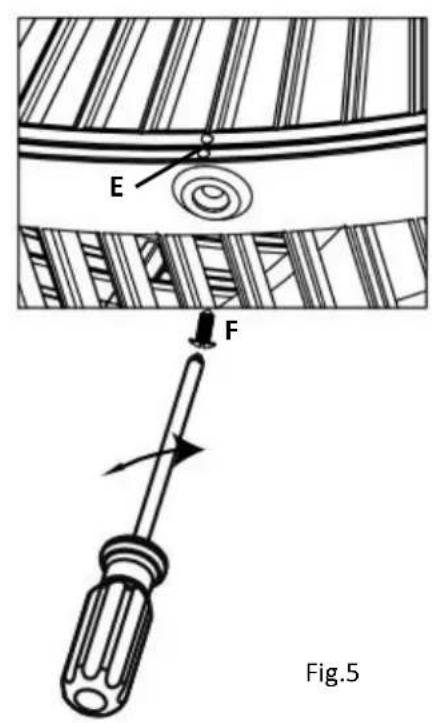
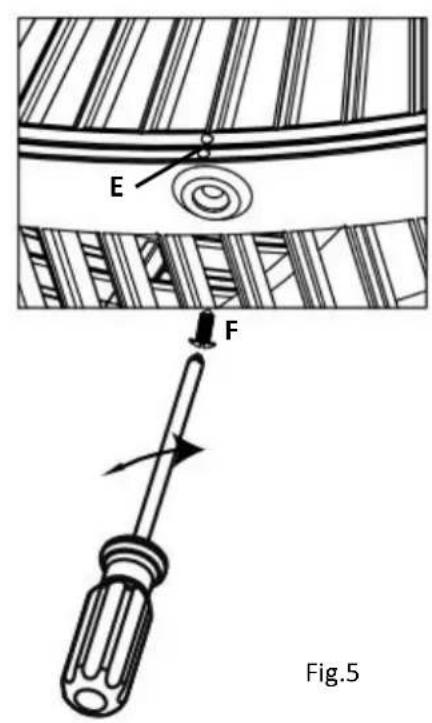
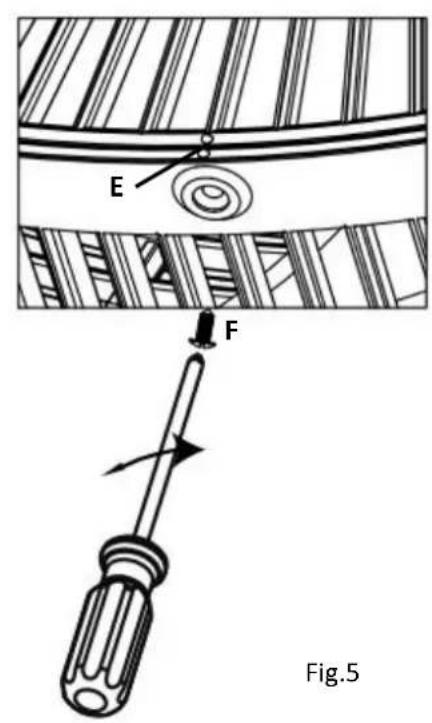
Attach the front guard onto the rear guard. Rotate it in a clockwise direction to make the positioning points (E) aligned vertically. Secure with the small screw (F) provided. (Fig.5)
-
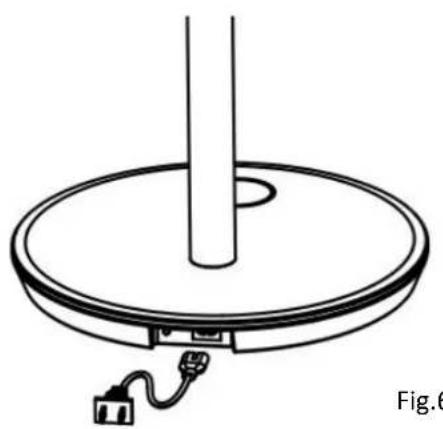
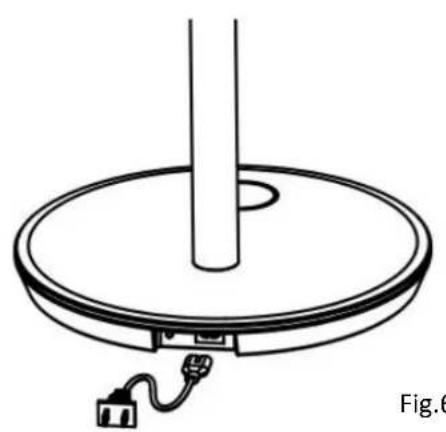
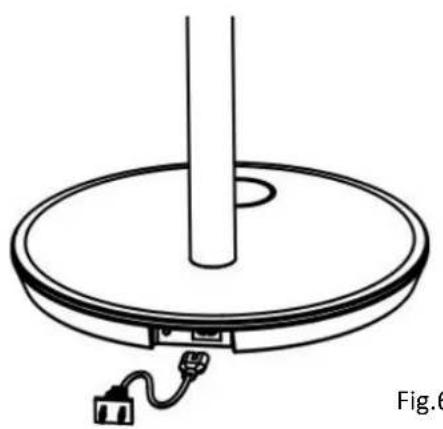
Connect one end of the power cord into the base and then insert the power plug into an appropriate electrical outlet. (Fig.6)
natural_image
Simple line drawing of a circular base with a vertical rod and cable, no text or symbols present.FIRST USE / OPERATION
-
Plug in the appliance. A beep sound will be heard. The digital display lights up with the symbol "illuminating and the battery indication flashing. The appliance is in standby mode.
-
To switch on and off:
Press the on/off button on the control panel to start the appliance. The indicator light on the control panel is illuminated. The digital display shows the wind speed value "06" and the normal mode symbol "♣" is on. Press the button again to turn off the appliance. The appliance will be in standby mode.
- To set the wind speed:
Continuously press the wind speed button on the control panel to select the wind speed from 1 to 12 levels circularly. The digital display shows the wind speed value accordingly.
- To set the swing function:
Countinuously press the swing button on the control panel to select the swing angle: 30^ 60^ 90^ 120^ off ... (repeating) The swing angle indication on the digital display will illuminate in green and convert into a circle by adding the angle in sequence. You can also long press the swing button for approx. 2 seconds to turn off the swing function.
To use the remote control:
-
On/off button: the function of this button is the same as the function of the button on the control panel.
-
Swing button: the function of this button is the same as the function of the button on the control panel.
-
Timer button: press the timer button to enter the timer setting state.
-
Value increasing button and value decreasing button: press the button “+” / “-” to adjust the value of the wind speed and the timer.
- Value of the wind speed: press the button "+" / "-" directly to adjust the wind speed from 1 to 12.
- Value of the timer: press the timer button first to enter the timer setting state and then press the button "+" / "-" to adjust the shutdown time from 0 to 12 hours. Each press of the button "+" / "-" will increase / decrease the timer value by 0.5h for 0-6 hours timer setting. Each press of the button "+" / "-" will increase / decrease the timer value by 1h for 6-12 hours timer setting.
After the timer is set, the digital display will show the wind speed value and the timer value alternately.
- Mode button: press the mode button to select the wind blowing mode from normal mode "✿" → natural mode "Â" → sleep mode "✿" → ... (repeating) The fan can automatically and intelligently adjust the wind blowing state of the natural mode and the sleep mode.
Memory function:
This appliance is equipped with a memory function. The unit will retain the wind speed, wind blowing mode and swing function of the former settings when turn on the unit again.
Power supply mode of battery:
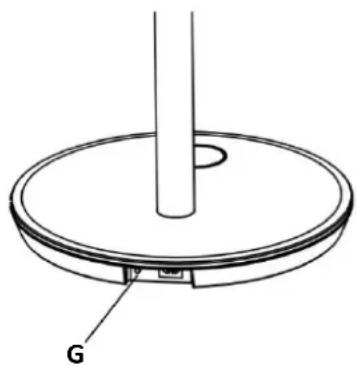
This appliance can work without the power cord after charging. Pull out the power cord from the base. Press the battery control button (G). A beep sound will be heard. It indicates the appliance is in power supply mode of battery. Now you can press the on/off button to start the fan.
natural_image
Technical line drawing of a circular mechanical component with a central shaft and base, labeled 'G' (no text or symbols beyond label)Note: The fan will be fully charged in 6 hours approximately. It is recommended to use the appliance under power supply mode of battery after the fan is fully charged.
CLEANING
- Before servicing the fan and after each occasion of use, switch off the appliance and unplug the mains cable from the socket.
- Never immerse the appliance in water (danger of short-circuit). To clean the appliance, only wipe it down with a damp cloth and dry it carefully. Always take out the mains plug first.
- Take care that excessive dust does not build up in the air-intake and air-outlet grille, and clean it occasionally using a dry brush or vacuum cleaner.
TECHNICAL DATA
Operating voltage: 220-240V \~ 50-60Hz
Power consumption: 30W
GUARANTEE AND CUSTOMER SERVICE
Before delivery our devices are subjected to rigorous quality control. If, despite all care, damage has occurred during production or transportation, please return the device to your dealer. In addition to statutory legal rights, the purchaser has an option to claim under the terms of the following guarantee:
For the purchased device we provide 2 years guarantee, commencing from the day of sale. If you have a defective product, you can directly go back to the point of purchase.
Defects which arise due to improper handling of the device and malfunctions due to interventions and repairs by third parties or the fitting of non-original parts are not covered by this guarantee. Always keep your receipt, without the receipt you can't claim any form of warranty. Damage caused by not following the instruction manual, will lead to a void of warranty, if this results in consequential damages then we will not be liable. Neither can we hold responsible for material damage or personal injury caused by improper use if the instruction manual is not properly executed. Damage to accessories does not mean free replacement of the whole appliance. In such case please contact our service department. Broken glass or breakage of plastic parts is always subject to a charge.
Defects to consumables or parts subjected to wearing, as well as cleaning, maintenance or the replacement of said parts are not covered by the warranty and are to be paid.
ENVIRONMENT FRIENDLY DISPOSAL
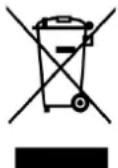
Recycling – European Directive 2012/19/EU
This marking indicates that this product should not be disposed with other household wastes. To prevent possible harm to the environment or human health from uncontrolled waste disposal, recycle it responsibly to promote the sustainable reuse of material resources. To return your used device,
please use the return and collection systems or contact the retailer where the product was purchased. They can take this product for environmental safe recycling.


BATTERY MUST BE RECYCLED OR DISPOSED OF PROPERLY. DO NOT OPEN. DO NOT DISPOSE
OR IN FIRE OR SHORT CIRCUIT.
ERP information (EN)
Supplier: Emerio International AB
Smedjegatan 6
131 54 Nacka
Sweden
Declare that the product detailed below:
Information requirements
| Information to identify the FN-214468.1 to which the information relates to [Stand fan] | |||
| Description | Symbol | Value | Unit |
| Maximum fan flow rate | F | 25,52 | m3/min |
| Fan power input | P | 29,23 | W |
| Service value | SV | 1,01 | (m3/min)/W |
| Standby power consumption | PSB | 0,46 | W |
| Fan sound power level | LWA | 55,5 | dB(A) |
| Maximum air velocity | c | 4,58 | meters/sec |
| Measurement standard for service value | IEC 60879:1986 (corr.1992) | ||
| Contact details for obtaining more information | Emerio International ABSmedjegatan 6131 54 NackaSweden | ||
Satisfies the requirement of the Council Directives:
COMMISSION REGULATION (EU) No 206/2012 of 6 March 2012 and Amending COMMISSION REGULATION (EU) 2016/2282 implementing Directive 2009/125/EC of the European Parliament and of the Council with regard to ecodesign requirements for air conditioners and comfort fans
Regarding information for consumers on how to install, use and maintain the product, WEEE information, please check the instruction manual provided with packaging.
SICHERHEITSHINWEISE
natural_image
Technical line drawing of a circular mechanical component with a central shaft and base, labeled 'G' (no text or symbols beyond label)natural_image
Simple line drawing of a circular base with a vertical rod and cable, labeled 'bild 6' (no text or symbols on the diagram itself)FÖ RSTA ANVÄNDNING/DRIFT
natural_image
Technical line drawing of a circular mechanical component with a central shaft and base, labeled 'G' (no text or symbols beyond label)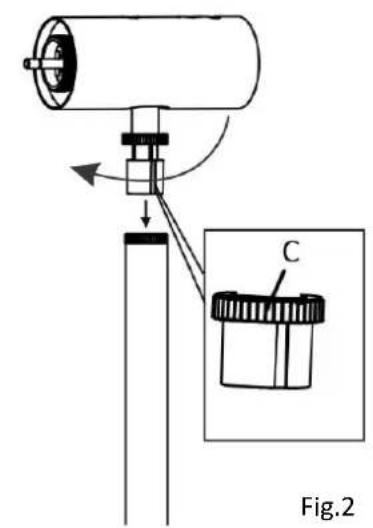
natural_image
Simple line drawing of a circular base with a vertical rod and cable, no text or symbols present.natural_image
Technical diagram of a circular mechanical component with a central shaft and labeled part G (no text or symbols beyond label)natural_image
Simple line drawing of a circular base with a vertical rod and cable, labeled 'Kuva 6' at the bottom (no other text or symbols)ENSIMMÄINEN KÄYTTÖ KERTA / TOIMINTA
natural_image
Technical line drawing of a circular mechanical component with a cylindrical shaft and base, labeled 'G' (no text or symbols beyond label)- Viftehode
- Motorenhet
- Kontrollpanel
- Frontbeskyttelse
- Festeskrue for blad
- Vifteblad
- Festeskrue til viftevern
- Bakre beskyttelse
- Stående skaft
- Stående base
- Digitalt display
- Infrarødt mottaksvindu
- Strømledning
- Fjernkontroll
Kontrollpanel
- På-/av knapp
- Svingknapp
- Vindhastighetsknapp
- Indikatorlys
Digital skjerm
natural_image
Simple line drawing of a circular base with a vertical rod and cable, no text or symbols present.F∅ RSTE BRUK / DRIFT
natural_image
Technical line drawing of a circular mechanical component with a central shaft and base, labeled 'G' (no text or symbols beyond label)natural_image
Simple line drawing of a circular base with a vertical rod and cable, labeled 'Fig.' (no text or symbols on the diagram itself)Fig. 6
F∅ RSTE BRUG/BETJENING
natural_image
Technical line drawing of a circular mechanical component with a central shaft and labeled part G (no text or symbols beyond label)- PARTS DESCRIPTION
- Control panel
- Digital display
- Remote control
- ASSEMBLING INSTRUCTIONS
- FIRST USE / OPERATION
- To use the remote control:
- Memory function:
- Power supply mode of battery:
- CLEANING
- TECHNICAL DATA
- GUARANTEE AND CUSTOMER SERVICE
- ENVIRONMENT FRIENDLY DISPOSAL
- ERP information (EN)
- SICHERHEITSHINWEISE
- FÖ RSTA ANVÄNDNING/DRIFT
- ENSIMMÄINEN KÄYTTÖ KERTA / TOIMINTA
- Kontrollpanel
- Digital skjerm
- F∅ RSTE BRUK / DRIFT
- F∅ RSTE BRUG/BETJENING
Brand : Emerio
Model : FN-214468
Category : Fan