
SOMA-1600SS - Coffee maker WILFA - Free user manual and instructions
Find the device manual for free SOMA-1600SS WILFA in PDF.


User questions about SOMA-1600SS WILFA
0 question about this device. Answer the ones you know or ask your own.
Ask a new question about this device
Download the instructions for your Coffee maker in PDF format for free! Find your manual SOMA-1600SS - WILFA and take your electronic device back in hand. On this page are published all the documents necessary for the use of your device. SOMA-1600SS by WILFA.
USER MANUAL SOMA-1600SS WILFA
natural_image
Exterior view of a modern kitchen blender with black and silver casing, digital display, and control knob (no visible text or symbols)Suppe Maker
Soup maker
Bruksanvisning
Bruksanvisning
Brugsanvisning
Käyttöohje
Instruction manual
Ugit officia porem et ent, inctorem resent volorumqui bearum corestota et ut am
quo magnihitae.
Produktkode SOMA-1600SS quo magnihutae.
Forholdsregler 3
Produktbeskrivelse 5
Hurtigmikseren 6
Glassbeholder 6
Montering 6
Lokk og målebeger 8
Suppe 10
Mikse kalde ingredienser 11
Tips og triks 11
natural_image
Brand blender with black and silver casing, no visible text or symbols on the device itselfnatural_image
Exploded view diagram of a portable device showing internal components and assembly steps (no text or labels)natural_image
Three line drawings of a kitchen appliance with a side panel, showing step-by-step assembly (no text or symbols)Demontering
natural_image
Line drawings of three different types of portable thermos or enclosures (no text or symbols)natural_image
Line drawings of two different kitchen appliances, one with a downward arrow indicating a change or adjustment (no text or symbols present)© Kontrollpanel
På/av-knapp
natural_image
Brand blender with black and silver casing, no visible text or symbols on the device bodynatural_image
Exploded view diagram of a portable refrigerator with internal components and fan base (no text or labels)flowchart
graph TD
    A["Raw Material"] --> B["Add Cover"]
    B --> C["Add Cover with Plastic Bottle"]
    C --> D["Add Cover with Plastic Bottle"]
    D --> E["Add Cover with Plastic Bottle"]
    E --> F["Add Cover with Plastic Bottle"]
    F --> G["Final Product"]
natural_image
Three line drawings of a kitchen appliance with a handle, showing step-by-step assembly (no text or symbols)Demontering
natural_image
Three line drawings of a portable electronic device with internal components, shown from different angles (no text or symbols)natural_image
Line drawings of two different types of kitchen appliances, one with a downward arrow indicating rotation or change, the other with a curved arrow (no text or symbols)© Kontrollpanel
Knapp för På/av
natural_image
Modern kitchen blender with black and silver casing, no visible text or symbols on the device bodynatural_image
Exploded view diagram of a portable device showing internal components and assembly steps (no text or labels)natural_image
Three line drawings of a kitchen appliance with internal components, shown in different angles (no text or symbols)Demontering
natural_image
Line drawings of three different types of portable thermos or enclosures (no text or symbols)natural_image
Line drawings of two different types of kitchen appliances, one with a downward arrow indicating rotation or change, the other with a curved arrow (no text or symbols)© Kontrolpanel
Til/fra-knap
The image contains only background ruled lines. According to Rule 2, these lines must be ignored. There is no actual text content to extract.
Therefore, the corrected OCR output is:
[Empty String]
natural_image
Brand blender with black and silver casing, no visible text or symbols on the device itselfnatural_image
Exploded view diagram of a portable air conditioner unit showing internal components and assembly steps (no text or labels)flowchart
graph TD
    A["Raw Material"] --> B["Add Cover"]
    B --> C["Product with Stacked Cover"]
    C --> D["Recycling"]
    D --> E["Final Product with Stacked Cover"]
natural_image
Three line drawings of a kitchen appliance with a handle, showing step-by-step assembly (no text or symbols)Irrottaminen
natural_image
Line drawings of three different types of portable thermos or enclosures (no text or symbols)natural_image
Line drawings of two different types of kitchen appliances, one with a downward arrow indicating a component (no text or symbols present)
Ohjauspaneeli
Virtapainike
Safety Cautions ....3
Product Description ....5
The Soup Maker ....6
Glass Jar 6
Fitting 6
Lid & Measuring Cup 8
Making Soup 10
Blending Cold Ingredients ....11
Hints & Tips 12
Recipes 13
Carefully read all the instructions before using the appliance and keep in a safe place for future reference
Safety Cautions
■ Always follow these safety cautions when using this appliance to avoid personal injury or damage to the appliance. This appliance should be used only as described within this instruction book.
■ Ensure all packaging materials and any promotional labels or stickers are removed from the Soup Maker before first use.
■ Always inspect the appliance before use for noticeable signs of damage. Do not use if damaged, or if the appliance has been dropped. In the event of damage, or if the appliance develops a fault, contact the Princess Customer Care Line (See “Princess After Sales Service” section).
In the event of lead damage discontinue use immediately. If the lead is damaged it must be replaced with a special lead available from the manufacturer or its service agent.
■ Whilst in use the surfaces will become extremely hot. Do not touch hot surfaces. Always use handles.
■ Unplug from the mains when not in use and before cleaning. Allow to cool before cleaning the appliance. To disconnect, press On/Off button and then remove the plug from the mains.
This appliance should not be used by adults or children whose lack of experience, product knowledge or disability might cause a hazard, unless they have been correctly instructed and are adequately supervised.
■ Children should always be supervised to ensure that they do not play with this product.
■ Do not use any accessories or attachments with this appliance other than those recommended by Princess.
■ To protect against fire, electric shock or personal injury, do not immerse cord, plug or unit in water or other liquids.
If motor stalls, switch off and unplug from the mains. Leave for 30 seconds and switch plug and appliance back on.
■ Do not leave the lead hanging over the edge of a kitchen table or worktop. Avoid contact between the lead and hot surfaces.
■ For indoor use only.
■ For domestic use only.
This appliance should be used only for preparation of drinks / food as described within the instructions for use that accompany it. Please retain these instructions for future reference.
If the appliance is humid or wet, unplug it immediately. Do not put it in water.
■ Always ensure that your hands are dry before removing the plug from the mains outlet. Never pull the plug out of the mains outlet by its lead.
■ To avoid injury or possible fire, do not cover the appliance when in use.
■ Do not connect this appliance to an external timer or remote control system.
WARNING:
A cut off plug inserted into a 13 amp socket is a serious safety hazard. Ensure the cut off plug is disposed of safely.
WARNING:
Polythene bags over the product or packaging may be dangerous. To avoid danger of suffocation, keep away from babies and children. These bags are not toys.

The temperature of all surfaces marked with this symbol will be very hot when the appliance is in use, DO NOT TOUCH these surfaces as possible injury could occur. Allow to cool completely before handling this appliance.
Product Description
natural_image
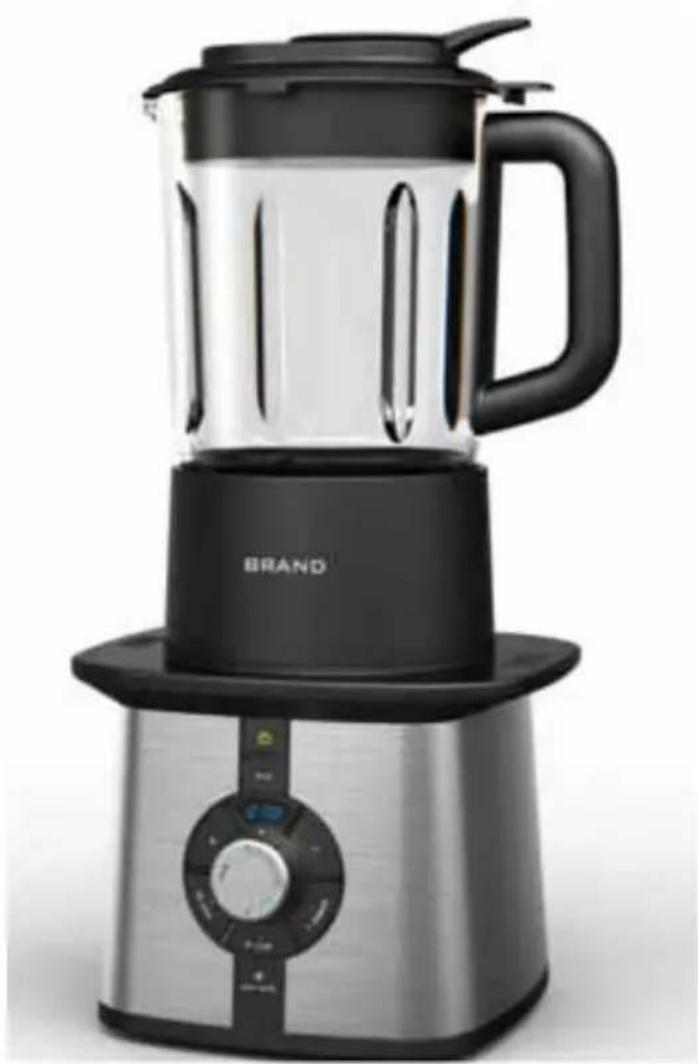
Brand blender with black and silver casing, no visible text or symbols on the device bodyLid with removable measuring cup
Glass Jar
■ 1750 ml (Cold Use)
1400 ml (Soup Use)
Jar Collar
On/Off
Stir Button
■ Display of time
■ Timer Control (Right "+"; Left "-")
Blender Knob
Simmer
Low heating
High heating
■ Housing Base
■ Non-Slip Rubber Feet
The Soup Maker
A Glass Jar
Before first use, clean the glass jar thoroughly (see cleaning & maintenance section for more information).
Fitting
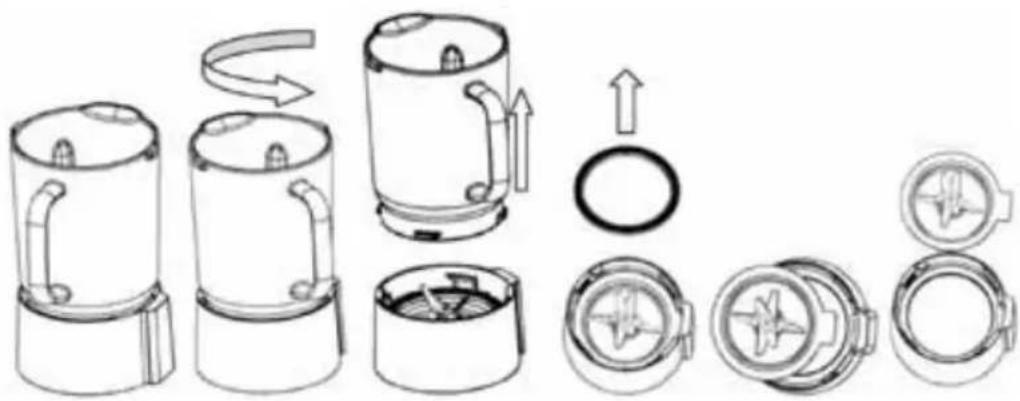
Cleaning of Jar unit
- Position the jar unit stably
- Hold the base steady, rotate the glass jar counterclockwise at an angle of 70.
- Pull up the glass jar.
- Move the airproof ring from the jar.
- Poise up the blade unit gently
- Take the blade base away from the jar carefully in case of any damage to hands or body.
natural_image
Exploded view diagram of a portable refrigerator with internal components and mounting holes (no text or labels)Assembly of Jar Unit:
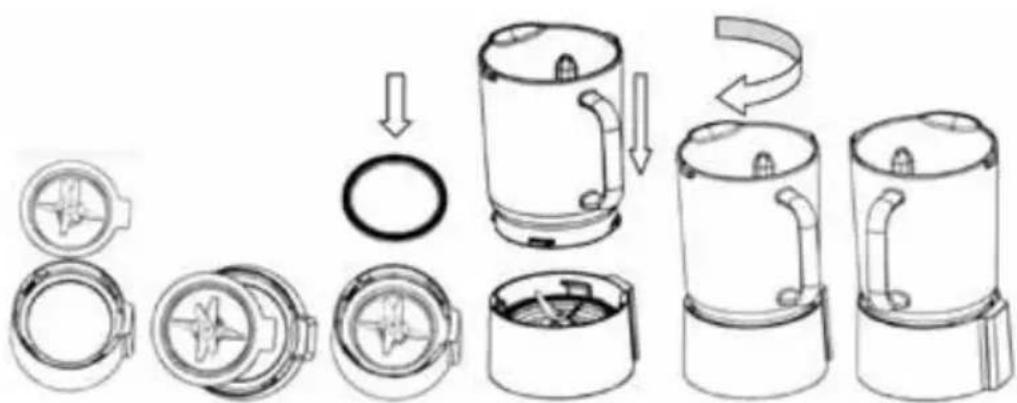
- Clean the jar unit thoroughly. Take care during the cleaning to avoid any hurts on hands or body parts.
- Place the blade tongue to the mouth, press the blade unit into the base.
- Place the airproof ring to the blade (N.B.: Moisture the airproof ring before the placement to make it easy for assembly)
- Place the glass jar to the base.
- Rotate the glass jar clockwise at the angle of 70 to lock the glass jar to the base. Place the glass jar to the body, cover it with the lid.
flowchart
graph TD
    A["Blender with star-shaped lid"] --> B["Shake with ring"]
    B --> C["Blender with inner casing"]
    C --> D["Shake with inner casing"]
    D --> E["Blender with handle"]
    E --> F["Shake with side casing"]
    F --> G["Blender with handle"]
Assembly of jar unit and body
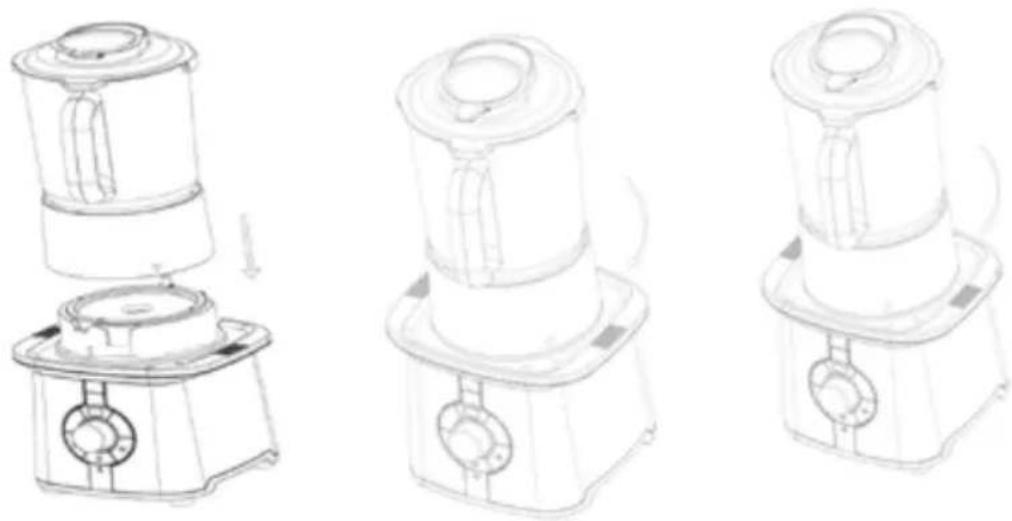
Position jar unit on the motor housing (fig. 1) and rotate it clockwise until the arrow on the jar collar is level with the arrow on the housing unit (fig. 2).
N.B. Take care when placing the jar unit on the housing base as incorrect positions may damage the interlock switches (fig. 2).
natural_image
Three line drawings of a kitchen appliance with a side panel, showing step-by-step assembly (no text or symbols)Removing
Switch the Soup Maker off and unplug from the mains outlet. Grip the jar unit, rotate it anticlockwise, and then away from the housing base.
N.B.: Rotate the jar from left to right. Move the jar away when the arrows on the base matching.
Do not try to rotate the jar rudely in case of the lossened of jar and jar base and food leakage.
Caution: The heating element is hot when the Soup Maker is in heat mode, do not touch the underside of the collar.
B Lid & Measuring Cup
To remove the lid from the glass jar, grip the jar handle while use the thumb to press the edge of the lid and push it anticlockwise firmly with one hand (fig. 1) and lift upwards with the help of the other hand (fig. 2). When you have added the required food to the blender jar, replace lid on jar before heating and blending. To replace, simply position over the jar with the edge of the lid at the right side of the handle, press down firmly, and push it clockwise until the pouring spout on the jar is covered by the protrusion on the lid (fig. 3).
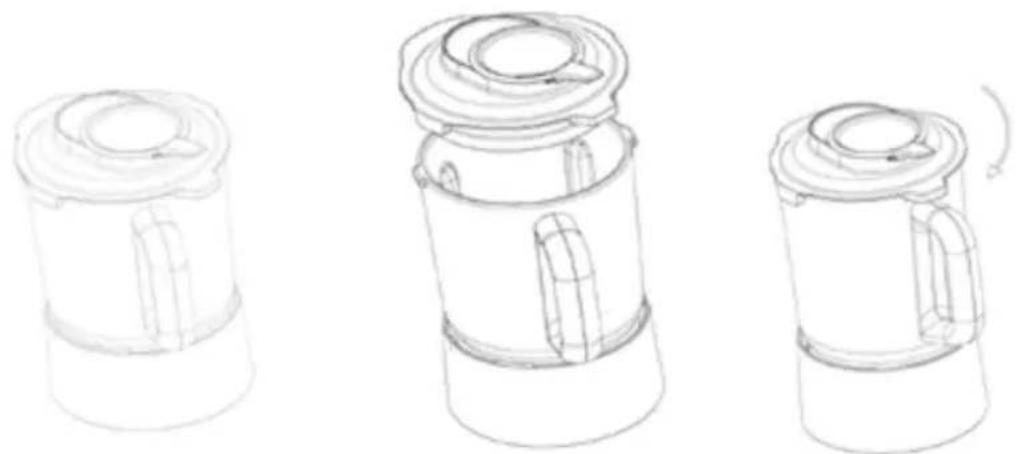
natural_image
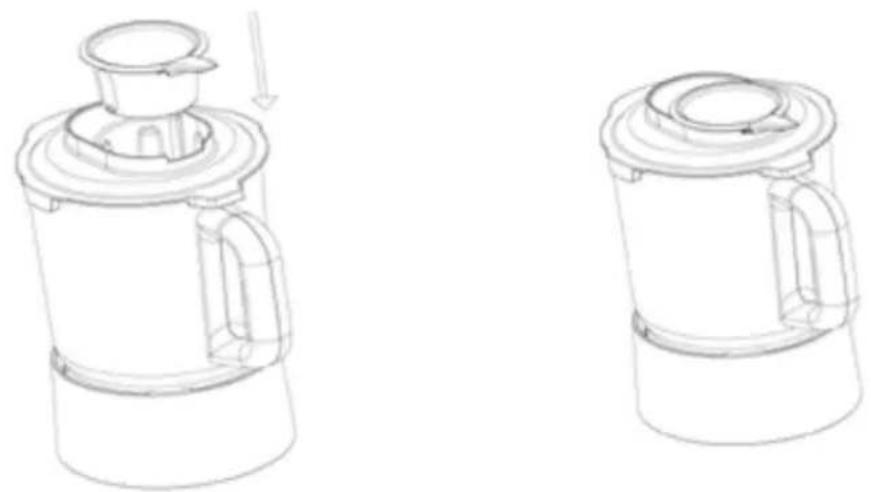
Three line drawings of a portable kettle with lid, showing internal structure and rotation (no text or symbols)To remove the measuring cup from the lid, lift up and away. To replace, position the cup over the lid, aligning with the corresponding grooves in the lid.
N.B. Press gently and when you hear click sound, the measuring cup positions in place (fig. 1-2).
WARNING:
Steam will escape around the measuring cup when the Soup Maker is in heat mode, this is normal, but handle with care – steam can burn. Always ensure the lid and cup are replaced before blending.
natural_image
Line drawings of two different kitchen appliances, one with a downward arrow indicating a component (no text or symbols present)
Control Panels
Power Button
Plug the Soup Maker into the mains outlet, the power button (on/off) will flash. Press once and the light will become static; the Soup Maker is now in "stand-by" mode.
If the on/off button is pressed whilst in "stand-by" mode, the Soup Maker will revert back to dormant with the on/off button flashing. Any settings entered will be cancelled.
The only way to turn the flashing on/off button off is to unplug the Soup Maker from the mains.
Timer Control
When the Soup Maker is in "stand-by" mode the cooking time can be set by either pressing the + or - buttons, if the "-" button is pressed at this stage, 30 minutes will be displayed on the digital display, this is the maximum cooking time. If the "-" button is pressed at any other time, the cooking time will be reduced in one minute increments.
The "+" button increases the cooking time in 1 minute increments.
N.B. Pressing any of the buttons will be accompanied by an audible sound.
N.B. The cooking time can be increased or decreased by pressing the "+" and "-" buttons at any time during the heating or cooking cycle.
Temperature Control
The Soup Maker will start its heating or cooking cycle when the temperature is selected to either high, low or simmer. After boiling in High for several minutes, it will switch to Simmer automatically. When cooking time has finished, the machine will beep 6 times, and then shift to "KEEP WARM" mode, the power indicator will become static green.
N.B. The temperature can be changed at any time during the heating or cooking cycle.
Stir Button
The stir function can be operated at any time during the heating or cooking cycle, it can also be operated in "stand-by" mode when ingredients are being added to the glass jar.
It is recommended that you use the stir function while frying or sautéing onions, garlic or other base ingredients at the start of your recipe.
It is not ideal to use the stir button to blend the soup but it can be used if you require chunky soup.
N.B. For safety, do not use stir button longer than ten seconds on heat mode. Use stir function intermittently.
Blending Function
For safety, the blending function only works when the cooking or heating process has completed.
The heater can also manually be turned off by pressing the heat button currently in use (lights will be illuminated) or alternatively pressing the on/off (power button).
If the on/off power button is used to turn off the heater, the Soup Maker will switch off completely and will have to be re-started for blending.
For safety, when hot ingredients' temperature is over 70^ C, the max blending speed can only reach level 2 even if you are on level 3 or level 4.
N.B. Do not blend for longer than three minutes. This is the maximum running time for the motor.
D Making Soup
Place the housing base onto a flat, sturdy surface.
Assemble the Soup Maker jar and plug into a suitable mains outlet.
Press the on/off button to set the Soup Maker to "standby" mode.
Select the required time, this can be adjusted throughout the cooking process, but a time must be selected to start the heater initially.
To fry ingredients such as onions or garlic, add butter or oil first before switching on heat mode. Make sure you place the butter on the heating plate rather than the blades. Select low heat setting to melt butter. If frying onions and garlic, add and cook until softened, replacing lid.
The appliance may smoke a little and release a slight odour during first use, this is normal.
To mix the onions or garlic, use the stir button on the control panel.
Add the remaining ingredients (vegetables, stock and seasoning etc) and set on a high heat and bring to the boil.
When making soup, only fill the contents of the glass jar to 1400 ml mark. Once boiled reduce heat to simmer, set timer and leave to cook. After boiling in High for several minutes, it will switch to Simmer automatically. When cooking time has finished, the machine will shift to "KEEP WARM" mode.
N.B. The heater works with a thermostat and so heat will increase or decrease accordingly and bubbles will become bigger or smaller during cooking.
When cooking program has finished the Soup Maker will beep 6 times.
To blend soup, use the blend function; this can only be used once the heat mode and timer has been exited. When ready, simply blend soups on level 1 until desired consistency is achieved and serve.
Warning:
When cooking or blending with hot liquid it is essential the lid and cup are left on the blender to prevent harm to self.
E Blending Cold Ingredients
The blender can also be used as a standard blender to blend cold ingredients and crush ice.
Place the housing base onto a flat, sturdy surface.
Assemble the jar; place on the base and plug into a suitable mains outlet.
Add all necessary ingredients into the glass jar and replace the lid. You may add more ingredients during blending by lifting the measuring cup in the lid and dropping ingredients through the opening in the lid.
N.B. The maximum fill for cold ingredients is 1750 ml.
Turn the blender control dial to your desired speed or use the pulse function. Turn the blender control dial to "off" when the desired consistency is reached.
Unplug the appliance immediately after use.
Do not store food or liquid in the glass jar. Empty and clean thoroughly after use.
Do not overload the Soup Maker. If the motor stalls, turn the Soup Maker off immediately, unplug the unit and carefully remove a portion of the food, then continue.
F Hints & Tips
Add butter or oil to heating plate and allow to melt before frying vegetables.
If soup recipes call for cheese or cream to be added at the end of the recipe, don't allow to boil. Most soup will actually be hot enough to melt the cheese using just the stir function rather than adding more heat.
If you are making tomato soup and your tomatoes are too pale and under ripe, add 1 tbsp of tomato purée to add colour and flavour.
Cut most foods into cubes approximately 1.5-2.5 cm to achieve a more uniform result. Cut all cheese into pieces no larger than 1.5 cm.
Use measuring cup in the lid to measure liquid ingredients such as alcohol. Always replace after ingredients have been added.
When chopping fresh herbs, garlic, onion, zest, breadcrumbs, nuts and spices make sure the glass jar and cutting assembly are completely dry.
If food tends to stick to the sides of the glass jar when blending, pulse in short bursts.
Pulses/stirs should be short bursts. Space the pulses/stirs so the blades stop rotating between them.
Don't over process foods. This appliance will achieve most desired results in seconds not minutes.
For frozen drinks, chill all ingredients before blending.
If foods do not seem to be blending smoothly, use the pulse function to chop then blend continuously.
Ensure you add oil or butter to the non-stick plate before you turn the heater on.
If in any doubt about what's happening, switch off the Soup Maker and refer to this IB.
Care & Maintenance
Always unplug the appliance from the mains outlet before cleaning. Before first use and after every use, clean each part thoroughly.
Periodically check all parts before reassembly. If any part is damaged or jar is chipped or cracked.
Recipes
Tomato and basil soup
Serves 4
Preparation: 10 minutes
Cooking: 25 minutes
■ 1 tbsp olive oil
■ 25 g butter
■ 1 onion, roughly chopped
■ 2 large garlic cloves, crushed
■ 800 g fresh tomatoes, roughly chopped
■ 500 ml chicken or vegetable stock
■ 50 ml dry white wine
■ 2 tbsp tomato purée
■ 1 bunch of basil, shredded
■ 100 ml double cream
Salt and pepper
- Set the timer on the Soup Maker to 25 minutes and switch to High.
- Add olive oil and butter to heat and follow immediately with the onion and garlic. Leave for 60-90 seconds until steam is emitted, using the Stir button at intervals.
- Add tomatoes and stir.
- Add the stock, wine and tomato purée; bring to the boil on High and then switch to Simmer, stirring occasionally. Add the basil, stir and then blend the soup on Level 1 until smooth.
- Stir in the cream and heat through on a low heat (do not boil).
- Pour soup into four bowls, garnish with fresh basil and serve with fresh bread.
Red wine sauce
Serves 4
Preparation: 5 minutes
Cooking: 20-25 minutes
■ 1 tbsp olive oil
■ 1 red onion, peeled and finely chopped
■ 1 large garlic clove, crushed
■ 2 tbsp tomato purée
■ 1 sprig of rosemary, chopped
■ 3 tbsp balsamic vinegar
■ 400 ml red wine
■ 400 ml chicken bouillon
■ 1 tbsp butter
- Pour the oil into the Soup Maker and set the timer for 14 minutes on Low. Add onion and garlic and simmer for 2-3 minutes until they start to soften.
- Add tomato purée and fry for 1-2 minutes, stirring constantly using the Stir function.
- Add the rosemary and balsamic vinegar and leave to simmer on Low for about a minute.
- Add the red wine and leave to simmer on Low with the lid off for 7-8 minutes until the mixture reduces by about half. Turn off the heat, replace the lid and blend on Level 1 until smooth.
- Add stock and a little seasoning and continue to Simmer (keep lid on, but the cup may be removed) on Medium for a further 8-10 minutes until the mixture has reduced by about half. Stir in the butter and check the seasoning.
Dressing/dip (preparation 5 minutes)
A tasty dressing that goes perfectly with chicken.
Serves 4
■ 2 tbsp sweet soybean oil
■ 1 tbsp sherry vinegar
■ 1 red chilli, chopped
■ 100 g unsalted peanuts
■ 50 ml oil
■ 50 ml cold water
Add all ingredients to the Soup Maker and blend on Level 4 until smooth.
According to the Waste Electrical and Electronic Equipment (WEEE) Directive, this type of waste must be collected and treated separately. If it becomes necessary to dispose of this product at some point, kindly make sure that it is not discarded with your everyday household refuse. Instead, bring the product to your closest WEEE collection centre.

- Suppe Maker
- Demontering
- © Kontrollpanel
- På/av-knapp
- Knapp för På/av
- © Kontrolpanel
- Til/fra-knap
- Irrottaminen
- Ohjauspaneeli
- Virtapainike
- Carefully read all the instructions before using the appliance and keep in a safe place for future reference
- Safety Cautions
- WARNING:
- Jar Collar
- The Soup Maker
- A Glass Jar
- Fitting
- Cleaning of Jar unit
- Assembly of Jar Unit:
- Assembly of jar unit and body
- Removing
- B Lid & Measuring Cup
- Control Panels
- Power Button
- Timer Control
- Temperature Control
- Stir Button
- Blending Function
- D Making Soup
- E Blending Cold Ingredients
- F Hints & Tips
- Care & Maintenance
- Recipes
- Tomato and basil soup
- Red wine sauce
- Dressing/dip (preparation 5 minutes)
Brand : WILFA
Model : SOMA-1600SS
Category : Coffee maker