
NO.12 PE-12S - Coffee maker WILFA - Free user manual and instructions
Find the device manual for free NO.12 PE-12S WILFA in PDF.


| Product Type | Coffee Percolator |
| Brand | Wilfa |
| Model | NO.12 PE-12S |
| Capacity | 1.5 L (max) |
| Material | Stainless steel body, stainless steel top lid, coffee basket, steel tube, comfort-grip handle, stay-cool base |
| Power Supply | 220-240 V AC, 50/60 Hz (standard household outlet) |
| Indicators | Red (brewing) and green (finished) indicator light |
| Brew Cycle | Automatic percolation with keep warm mode (approx. 30 minutes) |
| Keep Warm Time | Approximately 30 minutes after brewing |
| Dimensions (approx.) | Height: 28 cm, Diameter: 15 cm (estimated based on typical percolator size) |
| Weight (approx.) | 1.5 kg (estimated) |
| Cord Length | Short power supply cord (approx. 0.8 m, reduces tripping hazard) |
| Dishwasher Safe Parts | Lid, coffee basket, basket lid, steel tube with spring (upper rack) |
| Cleaning Instructions | Exterior: wipe with damp cloth. Interior: mild detergent, rinse and dry. Do not immerse body. |
| Safety Features | Auto shut-off after keep warm, do not open lid during brewing, short cord, stay-cool base, overfill protection warning |
| Decalcification | Recommended using vinegar solution (25% vinegar, 75% water) then rinse with fresh water |
| Spare Parts Availability | Contact authorised service centre for replacement parts |
| Warranty | Standard manufacturer warranty (refer to manual for details) |
| Country of Origin | Designed in Norway (since 1948) |
Frequently Asked Questions - NO.12 PE-12S WILFA
User questions about NO.12 PE-12S WILFA
0 question about this device. Answer the ones you know or ask your own.
Ask a new question about this device
Download the instructions for your Coffee maker in PDF format for free! Find your manual NO.12 PE-12S - WILFA and take your electronic device back in hand. On this page are published all the documents necessary for the use of your device. NO.12 PE-12S by WILFA.
USER MANUAL NO.12 PE-12S WILFA
natural_image
Two identical stainless steel water heaters with black handles and control buttons, shown against a white background (no text or symbols visible)Wilfa NO.6 / Wilfa NO.12
Percolator
Bruksanvisning
Bruksanvisning
Operating Instructions
PE-12S, PE-6S


LES ALLE ANVISNINGER F∅R BRUK
LÄS IGENOM ALLA INSTRUKTIONER INNAN PRODUKTEN ANVÄNDS
LÆS ALLE VEJLEDNINGER INDEN BRUG
LUE OHJEET HUOLELLISESTI ENNEN KÄYTTÖÄ
READ ALL INSTRUCTIONS BEFORE USING
SLIK BRUKER DU KAFFEPERKOLATOREN
natural_image
Exploded view diagram of a portable stove or oven system (no text or labels)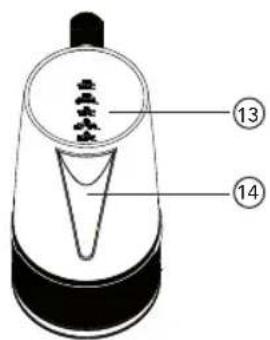
ANVÄNDA PERKOLATORBRYGGAREN
natural_image
Exploded view diagram of a portable stove with lid, vent, and cooling unit (no text or labels)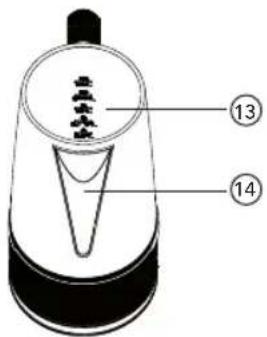
BRUG AF PERKOLATOREN
natural_image
Exploded view diagram of a portable stove with cooling unit and lid (no text or labels)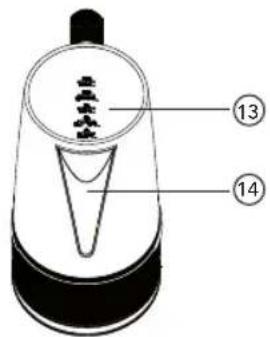
PERKOLAATTORIN KÄYTTÖ
natural_image
Exploded view diagram of a kitchen appliance showing top, front, side, and interior views (no text or labels)Read all instructions before use. Read carefully and keep for future reference.
IMPORTANT SAFETY INSTRUCTIONS....5
Product overview 7
Using the percolator 8
Cleaning and maintenance 9
Decalcification....10
IMPORTANT SAFETY INSTRUCTIONS
- Always unplug the unit from the outlet when not in use and before cleaning.
- Allow to cool before putting on or taking off parts and before cleaning the appliance.
- Do not touch hot surfaces. Use handles and knobs.
- To protect against fire, electric shock and injury to persons, do not place cord, plug, or base unit in water or other liquids.
- Do not operate any appliance with a damaged cord or plug or after the appliance malfunctions or has been dropped or damaged in any manner. Return appliance to the nearest authorised service facility for examination.
- A short power supply cord is provided to reduce the risks resulting from becoming entangled in or tripping over a longer cord.
- The use of accessory attachments is not recommended by the appliance manufacturer. It may result in fire, electric shock or injury to persons.
- For indoor use only.
- Do not let cord hang over edge of table or counter, or touch hot surfaces.
- Do not place the unit near an open flame, electric burner, or in a heated oven.
-
Always fill the percolator with water first, then plug cord into the wall outlet. To disconnect, turn controls to "Off", then remove plug from wall outlet.
-
Do not use appliance for anything other than its intended use.
- Scalding may occur if the lid is removed during the brewing cycle.
- If the supply cord is damaged, it must be replaced by the manufacturer, its service agent or similarly qualified persons in order to avoid a hazard.
- This appliance can be used by children aged from 8 years and above if they have been given supervision or instruction concerning use of the appliance in a safe way and if they understand the hazards involved. Cleaning and user maintenance shall not be performed by children unless they are older than 8 and supervised. Keep the appliance and its cord out of reach of children aged less than 8 years.
- Appliances can be used by persons with reduced physical, sensory or mental capabilities or lack of experience and knowledge if they have been given supervision or instruction concerning use of the appliance in a safe way and understand the hazards involved.
• Children shall not play with the appliance.
- Warning: If the coffee percolator is overfilled, boiling water may be ejected.
- The coffee percolator may only be used with the stand provided.
- This appliance is intended to be used in a household only.
- Never immerse the percolator body in water or other liquid.
PRODUCT OVERVIEW
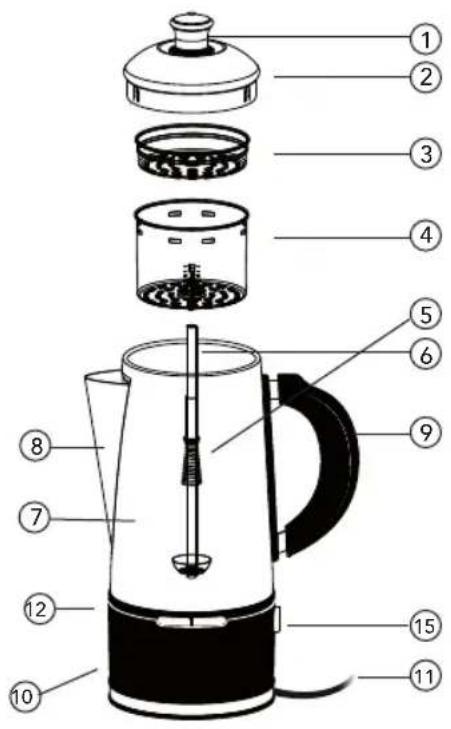
① Percolator Knob
② Stainless Steel Top Lid
③ Coffee Basket Lid
④ Coffee Basket
⑤ Spring
⑥ Steel Tube
⑦ Stainless Steel Body
⑧ Tapered Spout
⑨ Comfort-Grip Handle
⑩ Stay-Cool Base
⑪ Removable Power Cord
⑫ Indicator Light
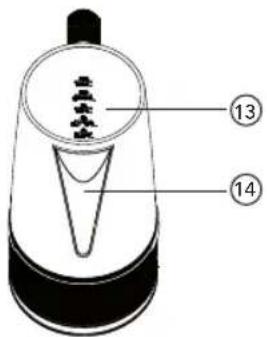
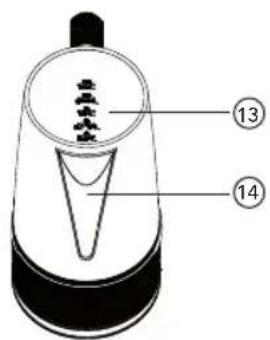
⑬ Water Level Markings
⑭ Container
⑮ On/Off button
USING THE PERCOLATOR
- Before using for the first time, thoroughly wash all parts of the percolator. For more information see the Cleaning and Maintenance section of this instructions manual.
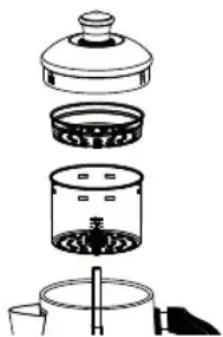
- Remove top lid, coffee basket, basket lid and steel tube (with spring). Use the markings located on the inside wall of the percolator to fill it with the desired amount of water. Use cold water for best result.
Caution: Do not exceed the maximum capacity for the percolator. Max is 1.5 l on PE-12S and 0.75 l on PE-6S.
natural_image
Exploded view diagram of a kitchen appliance showing top, front, side, and interior views (no text or labels)- Place coffee basket on top of steel tube. Add desired amount of coffee into the basket. Distribute the coffee powder evenly, avoid using coffee with too fine grind quality to prevent coffee grounds from slipping through the filter. Choose a coarser quality of coffee, i.e., French press or similar quality, if available. The level indicator on the coffee percolator shows number of cups/volume in litre. 1 cup is equal to 125 ml.
Note: Clogging of water and/or coffee in the coffee basket may occur under the following conditions: The use of too fine size coffee powder or improper cleaning of coffee basket; see cleaning section for more information on how to clean the product properly.
- Place coffee basket and steel tube assembly into percolator according to the illustration in figure 3. Put the top lid on top of coffee basket and push it firmly into position on top of the percolator.
- Connect the base into standard household 220-240 volt AC wall outlet and press the on/off button, the red light will switch on to indicate that the brewing process has been initiated.
- When the indicator light switches to green colour the brewing process is finished. After brewing is completed the unit will go into keep warm mode for around 30 minutes before switching off.
Warning: Make sure the brewing process is completed before removing the lid.
- Once brewing has completed, remove the lid carefully and remove the coffee basket and steel tube using protective equipment like an oven mitt or similar. Replace the top lid and the coffee is ready to be served.
Caution: Avoid touching the stainless-steel parts of the percolator without proper protection, as it may cause injury due to hot surfaces.
OPERATING NOTICE
Caution: Never open the top lid during the brewing cycle, extremely hot water/coffee can spill out from the coffee basket and cause serious injury. If water/coffee is not draining from the coffee basket during the brewing cycle, unplug the unit and wait for at least 10 minutes before opening the top lid and checking the coffee basket.
CLEANING AND MAINTENANCE
General:
Important: Never immerse the percolator body in water or other liquids.
Always disconnect the appliance from the electrical outlet and remove the unit from the base before attempting to clean the percolator.
Removable parts:
The percolator lid, coffee basket, basket lid, and steel tube (with spring) are dishwasher safe if placed in the upper rack of a dishwasher or washed in warm soapy water and rinsed thoroughly. Note: The washer at bottom of the steel tube must be able to move freely. If the washer is stuck due to coffee residues, use a toothpick to loosen it and rinse it under water to clean it.
Exterior:
Wipe with damp cloth and let dry.
Interior:
To clean the percolator, use only mild detergents, rinse and dry.
Storage:
The percolator should be stored with top lid off.
Note: Any other servicing should be performed by an authorised service representative.
DECALCIFICATION
Decalcification is useful to remove the calcium deposits inside the unit. The decalcification interval depends upon hardness of the tap water and the frequency of using the product.
To decalcify, fill percolator with vinegar to 25% of the maximum capacity then add 75% water. Combined mixture should not exceed 1.5 litres for PE-12S and 0.75 litres for PE-6S.
Be sure that all parts are assembled and placed correctly; make sure that the top lid is attached. Connect the appliance to an electrical outlet.
Let the unit run uninterrupted for 1 cycle. Once complete, discard the vinegar and water mixture. Run at least 1 cycle of fresh, cold water (without vinegar) through the unit before using the unit to brew coffee.
Under the Waste Electrical and Electronic Equipment Directive (WEEE), such waste must be collected separately and processed. If in future you need to discard this product, please do not throw it out with your normal rubbish. Please send this product to a collection point where one is available.

in homes since 1948
- Wilfa NO.6 / Wilfa NO.12
- SLIK BRUKER DU KAFFEPERKOLATOREN
- ANVÄNDA PERKOLATORBRYGGAREN
- BRUG AF PERKOLATOREN
- PERKOLAATTORIN KÄYTTÖ
- IMPORTANT SAFETY INSTRUCTIONS
- PRODUCT OVERVIEW
- USING THE PERCOLATOR
- OPERATING NOTICE
- CLEANING AND MAINTENANCE
- General:
- Removable parts:
- Exterior:
- Interior:
- Storage:
- DECALCIFICATION
Brand : WILFA
Model : NO.12 PE-12S
Category : Coffee maker