
BDV157 - Flashlight BLACK & DECKER - Free user manual and instructions
Find the device manual for free BDV157 BLACK & DECKER in PDF.


| Product type | LED flashlight |
| Brand | Black & Decker |
| Model | BDV157 |
| Light source | High brightness white LED |
| Luminous output | Approximately 100 lumens |
| Battery life | Up to 5 hours of continuous use |
| Power supply | 2 AA batteries (not included) |
| Dimensions (L x W x H) | 15 cm x 5 cm x 5 cm |
| Weight | Approximately 200 g (without batteries) |
| Housing material | Impact-resistant ABS plastic |
| Adjustable beam | Yes, focus by rotating the head |
| On/Off function | Sliding switch or push button |
| Protection rating | IPX4 (splash-resistant) |
| Intended use | Indoor and outdoor, domestic and professional use |
| Included accessories | Wrist strap, batteries not included |
| Care and cleaning | Clean with a soft dry cloth. Do not use solvents. |
| Safety instructions | Do not look directly into the beam. Keep out of reach of children. |
| Spare parts | Replacement batteries (AA) |
| Repairability | Lamp not user-repairable: contact customer service |
| Warranty | 2 years |
Frequently Asked Questions - BDV157 BLACK & DECKER
User questions about BDV157 BLACK & DECKER
0 question about this device. Answer the ones you know or ask your own.
Ask a new question about this device
Download the instructions for your Flashlight in PDF format for free! Find your manual BDV157 - BLACK & DECKER and take your electronic device back in hand. On this page are published all the documents necessary for the use of your device. BDV157 by BLACK & DECKER.
USER MANUAL BDV157 BLACK & DECKER
Intended use
Your Black & Decker Spotlight has been designed for providing illumination for DIY projects and leisure use. This product is intended for consumer use only.
Safety instructions
Warning! When using battery-powered appliances, basic safety precautions, including the following, should always be followed to reduce the risk of fire, leaking batteries, personal injury and material damage.
◆ Read all of this manual carefully before using the appliance.
The intended use is described in this manual. The use of any accessory or attachment or the performance of any operation with this appliance other than those recommended in this instruction manual may present a risk of personal injury.
◆ Retain this manual for future reference.
Using your appliance
Always take care when using the appliance.
- This appliance is not intended for use by young or infirm persons without supervision.
◆ The appliance is not to be used as a toy.
Use in a dry location only. Do not allow the unit to become wet.
◆ Do not immerse the appliance in water.
Do not open body casing. There are no user-serviceable parts inside.
Do not operate the appliance in explosive atmospheres, such as in the presence of flammable liquids, gases or dust.
◆ To reduce the risk of damage to plugs and cords never pull the cable to remove the plug from a socket outlet.
After use
When not in use, the appliance should be stored in a dry, well ventilated place out of the reach of children.
◆ Children should not have access to stored appliances.
When the appliance is stored or transported in a vehicle it should be placed in the boot or restrained to prevent movement following sudden changes in speed or direction.
◆ The appliance should be protected from direct sunlight, heat and moisture.
Inspection and repairs
Before use, check the appliance for damaged or defective parts. Check for breakage of parts, damage to switches and any other conditions that may affect its operation.
- Do not use the appliance if any part is damaged or defective.
◆ Have any damaged or defective parts repaired or replaced by an authorised repair agent.
◆ Never attempt to remove or replace any parts other than those specified in this manual.
Specific safety instructions for spotlights
The following safety symbol is marked on your spotlight:

Do not touch the lens as it becomes very hot during operation and remains hot for several minutes after the spotlight is switched off.
- Allow the spotlight to fully cool down before storage or charging.
- Keep combustible materials away from spotlight lens. Extreme heat can cause fires.
◆ Never place the light face-down on any surface when it is switched on or cooling.
Do not leave the spotlight unattended. Keep children and animals away from the work area. - Inspect the lens for damage following impact or if the spotlight is dropped. Do not operate without the lens in place or with a damaged lens.
- The lens is manufactured from glass. The lens may crack or break if subject to an impact. If the lens is damaged it must be replaced by manufacturers original parts. Wear gloves as sharp edges may cause injury.
- Never look directly into the light or shine the light into another person's eyes.
◆ Do not immerse spotlight in water.
◆ Only replace bulb with type indicated in technical data.
◆ Use only with the Black & Decker charging adapters that are provided with unit. Plug in the charging adapter at the spotlight first, then plug into the charging source.
Additional safety instructions for batteries and chargers
Batteries
◆ Never attempt to open for any reason.
◆ Do not expose the battery to water.
Do not store in locations where the temperature may exceed 40 °C.
◆ Charge only at ambient temperatures between 10 °C and 40 °C.
◆ Charge only using the chargers provided with the tool.
When disposing of batteries, follow the instructions given in the section "Protecting the environment".
Under extreme conditions, battery leakage may occur. When you notice liquid on the batteries, carefully wipe the liquid off using a cloth. Avoid skin contact.
◆ In case of skin or eye contact, follow the instructions below.
Warning! The battery fluid is a diluted sulphuric acid and may cause personal injury or damage to property. In case of skin contact, immediately rinse with water. If redness, pain or irritation occurs seek medical attention. In case of eye contact,
ENGLISH
rinse immediately with clean water and seek immediate medical attention.
Chargers
Your charger has been designed for a specific voltage. Always check that the mains voltage corresponds to the voltage on the rating plate.
Warning! Never attempt to replace the charger unit with a regular mains plug.
Use your Black & Decker charger only to charge the battery in the tool with which it was supplied. Other batteries could burst, causing personal injury and damage.
◆ Never attempt to charge non-rechargeable batteries.
◆ Have defective cords replaced immediately.
◆ Do not expose the charger to water.
◆ Do not open the charger.
◆ Do not probe the charger.
The battery must be placed in a well ventilated area when charging.
DO NOT OVERCHARGE:
◆ AC recharge up to 30 hours maximum.
◆ DC recharge up to 4 hours maximum.
- After recharge, disconnect the charging adapter and wait 5 minutes before use.
The following symbols are found on your charger:

Your charging base is double insulated; therefore no earth wire is required.
Fail-safe isolating transformer. The mains supply is electrically separated from the transformer output.
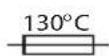
The charger automatically shuts off if the ambient temperature becomes too high. As a consequence the charger will be inoperable. The charging base must be disconnected from the mains supply and taken to an authorised service centre for repair.

The charging base is intended for indoor use only.
Electrical safety

This tool is double insulated; therefore no earth wire is required. Always check that the power supply corresponds to the voltage on the rating plate.
If the supply cord is damaged, it must be replaced by the manufacturer or an authorised Black & Decker Service Centre in order to avoid a hazard.
Features
This appliance includes some or all of the following features:
- Replaceable quartz halogen bulb
- Rubber ring guard
- LED area lights pushbutton
- Carry handle
- Battery status LED indicator
- Mains charger input socket
- Trigger lock
- Pistol grip
- Carry lanyard
- 12 Vdc charging socket
- Vehicle dc power cord
- Mains charging adaptor
- Twin LED area lights
- Trigger
Charging the spotlight (fig. A - C)
- This spotlight is shipped in a partially charged state. Charge the spotlight before first use using the mains charging adaptor (12) for 20-30 hours or until the green battery status LED (5) lights.
◆ Charge after each use until the green battery status LED (5) lights.
To check the battery charge status at any time, press the battery status pushbutton (5).
The LED Indicators display the level of charge.
◆ One red LED indicates that the unit should be charged soon.
◆ Two red LEDs indicate a high level of charge.
◆ The green LED lights to show a fully charged unit.
Charging with the mains charger (fig. A & B)
◆ Make sure that the LED area lights are off.
Make sure that the spotlight is off (the trigger lock (7) is in the off position and the trigger (14) is not pressed).
Warning! Do not charge for longer than 30 hours.
◆ Plug the supplied mains charging adaptor (12) into the 12 Vdc charging socket (6).
◆ Insert the mains charging adaptor (12) into a mains power socket.
◆ Charge until the green battery status LED (5) lights (approximately 20-30 hours).
When charging is complete, wait for 5 minutes before using the spotlight.
Charging with the vehicle dc power cord (fig. A & C)
Your spotlight can be simultaneously charged and operated from a 12 Vdc source. Make sure that the 12 Vdc source can supply a minimum 10 amps of current if the spotlight is to be operated while the batteries are being charged.
Warning! Do not charge for longer than 4 hours.
◆ Plug the free end of the supplied vehicle dc power cord (11) into the 12 Vdc charging socket (10) (fig. C).
- Insert the plug end of the vehicle dc power cord (11) into the accessory outlet of your vehicle or other 12 Vdc power source.
◆ Charge until the green battery status LED (5) lights (approximately 3-4 hours).
Make sure that the dc source, ie jump-starter, battery pack, vehicle accessory outlet, etc., is 12 Vdc and is able to supply at least 0.5 amps at 12 Vdc for eight hours. This means that a battery pack should be charged with at least a 4 amp/hour capacity.
Note: When using a vehicle's 12 Vdc accessory outlet as a charging source, it may be necessary to turn on the vehicles ignition to power the accessory outlet.
USE
Operating the LED area lights
◆ Press the pushbutton (3) to turn the LED area lights on.
◆ Press the pushbutton (3) again to turn the LED area lights off.
Operating the spotlight (fig. B)
◆ Move the trigger lock (7) down to the off position.
◆ Press the trigger (14) to turn the spotlight on.
◆ Release the trigger (14) to turn the spotlight off.
◆ To lock the trigger (14) in the on position, press the trigger then move the trigger lock (7) up to the on position.
◆ To shut the spotlight off, move the trigger lock (7) down to the off position.
◆ Lock the trigger by moving the trigger lock (7) up to the on position
Using the built-in carry lanyard
- The carry lanyard (9) may be used to store or carry the spotlight. Adjust the slide on the cords to keep the lanyard secure around the supporting object.
MAINTENANCE
Your Black & Decker tool has been designed to operate over a long period of time with a minimum of maintenance.
Continuous satisfactory operation depends upon proper tool care and regular cleaning.
Warning! Before performing any maintenance or cleaning of the tool, unplug the unit from the power supply.
- From time to time wipe the appliance with a damp cloth. Do not use any abrasive or solvent-based cleaner. Do not immerse the appliance in water.
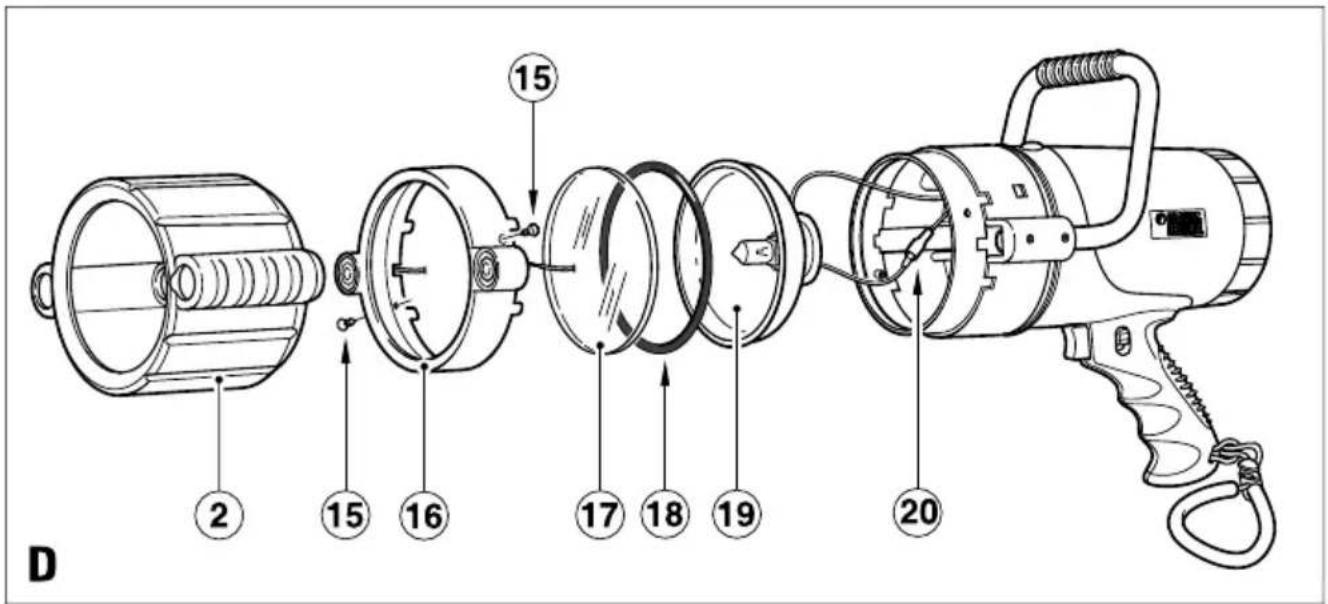
Replacing the bulb (fig. D & E)
To replace the bulb (1), you will need a small cross-head screwdriver and a replacement bulb as per the technical data.
Warning! Do not touch the glass part of the bulb. Bulb life may be shortened by installing a bulb with dirt or fingerprints on it.
The bulb (1) can be wiped clean with a cloth moistened with alcohol based cleaner.
◆ Disconnect the spotlight from any charging adapters.
◆ Push the rubber ring guard (2) forward toward the front of the spotlight to reveal the two small cross-head screws (15) in the retaining ring (16).
◆ Remove and retain the two screws (15).
◆ Lift off the retaining ring (16), the glass lens (17) and the rubber "O" ring (18) and set them aside.
◆ Carefully remove the reflector (19) and the bulb assembly.
◆ Disconnect the bulb wire (20) from the power wire.
◆ Unclip the retaining clip (21) from the flange of the reflector (19) (fig E).
◆ Remove the screw (22) and detach the wire.
◆ Remove the bulb (1) and detach the wire.
◆ Insert the replacement bulb (1) into the flange of the reflector (19).
◆ Install the retaining clip (21) into the flange of the reflector (19).
◆ Install the wire with the screw (22).
◆ Connect the bulb wire (20) to the power wire.
◆ Place the reflector (19) in position in the body of the spotlight.
◆ Replace the rubber "O" ring (18) in the groove around the perimeter of the reflector (19).
◆ Install the glass lens (17) and the retaining ring (16) so that the screw holes are aligned.
◆ Secure the retaining ring (16) with the two screws (15).
◆ Install the rubber ring guard (2).
Replacing the fuse in the vehicle dc power cord
◆ Remove the gold cap by turning it counter clockwise.
◆ Remove the rubber washer, centre pin and the spring.
◆ Remove the fuse.
◆ Fit a new fuse of the same type and size (8 A).
◆ Install the centre pin, spring and rubber washer.
◆ Install the gold cap by turning clockwise onto the plug.
Protecting the environment

Should you find one day that your appliance needs replacement, or if it is of no further use to you, think of the protection of the environment. Black & Decker repair agents will accept old Black & Decker tools and ensure that they are disposed of in an environmentally safe way.
ENGLISH

Separate collection of used products and packaging allows materials to be recycled and used again. Re-use of recycled materials helps prevent environmental pollution and reduces the demand for raw materials.
Local regulations may provide for separate collection of electrical products from the household, at municipal waste sites or by the retailer when you purchase a new product.
Black & Decker provides a facility for the collection and recycling of Black & Decker products once they have reached the end of their working life. To take advantage of this service please return your product to any authorised repair agent who will collect them on our behalf.
You can check the location of your nearest authorised repair agent by contacting your local Black & Decker office at the address indicated in this manual. Alternatively, a list of authorised Black & Decker repair agents and full details of our after-sales service and contacts are available on the Internet at: www.2helpU.com.

Black & Decker batteries can be recharged many times. At the end of their useful life, discard batteries with due care for our environment:
- Do not dispose of the battery in fire, as this may result in an explosion.
Lead Acid (Pb) batteries are recyclable. They must not be disposed of with household waste. If you do not have access to a product recycling scheme the battery must be removed as described below and disposed of in accordance with local regulations.
◆ Do not short-circuit the battery terminals.
◆ Be aware that the battery is heavy.
◆ If possible, operate the appliance to run the battery down completely.
Please refer to the exploded diagram at the back of this manual to aid you in the removal of the batteries.
Place the battery in a suitable packaging to ensure that the terminals cannot be short-circuited.
Take the battery to your service agent or a local recycling station. Collected batteries will be recycled or disposed of properly.
Technical data
BDV157
| Input voltage Vdc 12 | ||
| Input current mA 300 max | ||
| Weight kg 2.2 | ||
| Battery Type 12V 3Ah SLA | ||
| Bulb Type H3 | ||
| Vdc 12 | ||
| W | 75 | |
Charger
Input Vac 230
Approx. charging time h 30
Weight kg 0.2
EC declaration of conformity
BDV157
Black & Decker declares that these products conform to: Standards & Legislation.
73/23/EEC, 89/336/EEC, 95/54/EC, EN60335, EN61000, EN60598, EN61347, EN55014

Kevin Hewitt
Director of Consumer Engineering
Spennymoor, County Durham
DL16 6JG,
United Kingdom
31-08-2006
Guarantee
Black & Decker is confident of the quality of its products and offers an outstanding guarantee. This guarantee statement is in addition to and in no way prejudices your statutory rights. The guarantee is valid within the territories of the Member States of the European Union and the European Free Trade Area.
If a Black & Decker product becomes defective due to faulty materials, workmanship or lack of conformity, within 24 months from the date of purchase, Black & Decker guarantees to replace defective parts, repair products subjected to fair wear and tear or replace such products to make sure of the minimum inconvenience to the customer unless:
- The product has been used for trade, professional or hire purposes.
◆ The product has been subjected to misuse or neglect. - The product has sustained damage through foreign objects, substances or accidents.
◆ Repairs have been attempted by persons other than authorised repair agents or Black & Decker service staff.
To claim on the guarantee, you will need to submit proof of purchase to the seller or an authorised repair agent. You can check the location of your nearest authorised repair agent by contacting your local Black & Decker office at the address indicated in this manual. Alternatively, a list of authorised Black & Decker repair agents and full details of our after-sales service and contacts are available on the Internet at:
www.2helpU.com
Please visit our website www.blackanddecker.co.uk to register your new Black & Decker product and to be kept up to date on new products and special offers. Further information on the Black & Decker brand and our range of products is available at www.blackanddecker.co.uk
DEUTSCH
Director of Consumer Engineering
Spennymoor, County Durham
DL16 6JG,
Spennymoor, County Durham
DL16 6JG,
Royaume-Uni
31-08-2006
Garantie
Spennymoor, County Durham
DL16 6JG,
Regno Unito
31-08-2006
Garanzia
Director of Consumer Engineering
Spennymoor, County Durham
DL16 6JG,
Verenigd Koninkrijk
31-08-2006
Garantie
Spennymoor, County Durham
DL16 6JG,
Reino Unido
31-08-2006
Garantía
Spennymoor, County Durham
DL16 6JG,
Reino Unido
31-08-2006
Garantia
Director of Consumer Engineering
Spennymoor, County Durham
DL16 6JG,
Storbritannien
31-08-2006
Garanti
Standards & Legislation.
73/23/EEC, 89/336/EEC, 95/54/EC, EN60335, EN61000,
Spennymoor, County Durham
DL16 6JG,
Storbritannia
31.08.2006
Garanti
Black & Decker er trygg på kvaliteten til sine produkter og tilbyr en enestående garanti. Denne garantierklæringen kommer i tillegg til dine lovbestemte rettigheter, og er ikke i konflikt med disse. Garantien er gyldig i EU- og EFTA-medlemsstatene.
Director of Consumer Engineering
Spennymoor, County Durham
DL16 6JG,
Storbritannien
31-08-2006
Garanti
Director of Consumer Engineering
Spennymoor, County Durham
DL16 6JG,
Iso-Britannia
31-08-2006
Takuu
The following table is part of the 'at least one year' and is also in line with
A.U.D. on value appreciation
◆ Data protection act: Tick the box if you prefer


koneesi? • Eival to evaporatio auto in npurtm oas ayopod?
revendor ▲ Artificialis layers address
• No Nein • Non • No • Nee
O XO ◆ 13 ◆ NO ◆ 0N ◆
The image contains no text or content.
◆ Yes Ja Qui Si
♦ To evaporatio activ grupo?
◆ Onko kone lahia?
presente? ♦ Ar verkyaget en gava?
regalo? ♦ Recabell esta terremetta compo
◆ Is this tool your first purchase? ◆ Ist diseases
◆ Is this tool your first purchase? ◆ Ist dieses
◆ Is this tool your first purchase? ◆ Ist diseases
◆ Is this tool your first purchase? ◆ Ist dieses
Code postale ♦ Postcode
♦ Cedibo ♦ Cedibo postal ♦ Postnr.
♦ Cedibo ♦ Cedibo postal ♦ Postnr.
♦ Cedibo ♦ Cedibo postal ♦ Postnr.
m = 311
|
[Non-Text]
[Non-Text]
[Non-Text]
[Non-Text]
[Non-Text]
[Non-Text]
[Non-Text]
[Non-Text]
[Non-Text]
[Non-Text]
[Non-Text]
[Non-Text]
[Non-Text]
5
pd
o人
p
la
u
rio
d3
erl
H
no
m
0
od
11.
LA
o l
or
an
θ
31
▽
[Non-Text]
|
[Non-Text]
[Non-Text]
[Non-Text]
[Non-Text]
[Non-Text]
[Non-Text]

......
[Non-Text]
[Non-Text]
[Non-Text]
[Non-Text]
[Non-Text]
◆ Kuwikos ◆ Postnr. • Postnr. • Postinmero ◆ Postnr. • Postnr. ◆ Codigio • Codigio postal • Postnr. ◆ Codice postale • Postcode
◆ Kuwikos ◆ Postnr. • Postnr. • Postinmero ◆ Postnr. • Postnr. ◆ Codigio • Codigio postal • Postnr. ◆ Codice postale • Postcode
◆ Kuwikos ◆ Postnr. • Postnr. • Postinmero ◆ Postnr. • Postnr. ◆ Codigio • Codigio postal • Postnr. ◆ Codice postale • Postcode
♦ Kwaikos ♦ Postnr. • Postnr. • Postinmero ♦ Postnr. • Postnr. ♦ Cadi go • Cadi go postal • Postnr. ♦ Codice postale • Poscode
◆ Postal code ◆ Postelizahl ◆ Code postal
◆ Postal code ◆ Postelizahl ◆ Code postal
◆ Postal code ◆ Postelizahl ◆ Code postal
◆ Postal code ◆ Postelizahl ◆ Code postal
◆ Postal code ◆ Postelizahl ◆ Code postal

English Please complete this section immediately after the purchase of your
English Please
tool and send it to Black & Decker in your country. If you live in Australia or New Zealand, please register by using the alternative guarantee card supplied.
Black & Decker in uw land.


- Intended use
- Safety instructions
- Using your appliance
- After use
- Inspection and repairs
- Specific safety instructions for spotlights
- Additional safety instructions for batteries and chargers
- Batteries
- ENGLISH
- Chargers
- The following symbols are found on your charger:
- Electrical safety
- Features
- Charging the spotlight (fig. A - C)
- Charging with the mains charger (fig. A & B)
- Charging with the vehicle dc power cord (fig. A & C)
- USE
- Operating the LED area lights
- Operating the spotlight (fig. B)
- Using the built-in carry lanyard
- MAINTENANCE
- Replacing the bulb (fig. D & E)
- Replacing the fuse in the vehicle dc power cord
- Protecting the environment
- Charger
- EC declaration of conformity
- Guarantee
- www.2helpU.com
- DEUTSCH
- Garantie
- Garanzia
- Garantía
- Garantia
- Garanti
- Takuu
Brand : BLACK & DECKER
Model : BDV157
Category : Flashlight