
NMEA 2000 - Electronic accessory GARMIN - Free user manual and instructions
Find the device manual for free NMEA 2000 GARMIN in PDF.


| Product Type | Thru-Hull Depth Transducer (Intelliducer) |
| Brand | Garmin |
| Model | NMEA 2000 (also available in NMEA 0183) |
| Dimensions | 4 19/32 × 4 × 3 in (116.3 × 101.4 × 76.2 mm) |
| Weight | 13 oz (364 g) |
| Power Input (NMEA 2000) | 9–16 Vdc |
| Power Input (NMEA 0183) | 9–33 Vdc |
| Power Consumption | 2 W max |
| Sonar Power | 150 W RMS, 1200 W peak-to-peak |
| Frequency | 160 kHz |
| Depth Capacity | 900 ft (275 m) |
| Cable Length (NMEA 2000) | 19 ft 8 in (6 m) drop cable |
| Cable Length (NMEA 0183) | 29 ft 6 in (9 m) power/data cable |
| Operating Temperature Range | -15°C to 33°C (5°F to 91°F) |
| Case Material | PC/PBT and ASA plastic |
| Mount Type | Thru-Hull (0–12° or 13–24° deadrise angle models) |
| Hull Compatibility | Metal and fiberglass (not wood) |
| NMEA 2000 LEN | 4 |
| Included Accessories | Gasket, locking ring, NMEA 2000 T-connector, drop cable |
| Maintenance | Clean with mild detergent; apply water-based antifouling paint in saltwater |
| Certifications | NMEA 2000 certified, CE |
Frequently Asked Questions - NMEA 2000 GARMIN
User questions about NMEA 2000 GARMIN
0 question about this device. Answer the ones you know or ask your own.
Ask a new question about this device
Download the instructions for your Electronic accessory in PDF format for free! Find your manual NMEA 2000 - GARMIN and take your electronic device back in hand. On this page are published all the documents necessary for the use of your device. NMEA 2000 by GARMIN.
USER MANUAL NMEA 2000 GARMIN
Thru-Hull Intelliducer
installation instructions (EN) instructions d'installation (FR) istruzioni di installazione (IT) installationsanweisungen (DE) instrucciones de instalación (ES) installationsvejledning (DA) installeringsinstruksjoner (NO) installationsinstruktioner (SV)
GARMIN®
Thru-Hull Intelliducer Installation Instructions
To obtain the best possible performance, install your Thru-Hull Intelliducer according to the following instructions. If you experience difficulty during the installation, contact Garmin Product Support, or seek the advice of a professional installer.
The Intelliducer is designed for metal and fiberglass boats. Do not install this Intelliducer in a wood-hull boat.
This Thru-Hull Intelliducer provides depth information either to a NMEA 0183-compatible device, or to your existing NMEA 2000 ^® network, depending on the model. For more information about NMEA 2000, visit www.garmin.com.
WARNING: See the Important Safety and Product Information guide in the product box for product warnings and other important information.
Product Registration
Help us better support you by completing our online registration today! Connect to our Web site at http://my.garmin.com. Keep the original sales receipt, or a photocopy, in a safe place.
For future reference, write the serial number assigned to your Intelliducer in the space provided. The serial number is located on a sticker on the top portion of the Intelliducer.
Serial number
Contact Garmin
Contact Garmin if you have any questions while installing or using your Intelliducer. In the USA contact Garmin Product Support by phone: (913) 397-8200 or (800) 800-1020, or go to www.garmin.com/support/.
In Europe, contact Garmin (Europe) Ltd. at +44 (0) 870.8501241 (outside the UK) or 0808 2380000 (within the UK).
Packing List and Tools Needed
Before installing your Intelliducer, confirm that your package includes the following items. If any parts are missing, contact your Garmin dealer immediately.
Standard Package
- Thru-Hull Intelliducer – top and bottom portions
• Gasket and locking ring
• Power/data cable, or NMEA 2000 cable
• NMEA 2000 T-connector
Tools Needed (not included)
• Angle finder OR digital level
• Safety goggles and dust mask
- Drill and drill bits
- Hole saws
- Sandpaper
- Mild detergent OR weak solvent (such as isopropyl alcohol)
- Marine sealant (suitable for below-waterline use) (3M - Fast Cure 5200 or Boat Life - Life Seal recommended)
- Cable ties
• Water-based antifouling paint (mandatory for salt-water installations) - File (metal hull installations)
- Fiberglass cloth and resin OR 2 in. (51 mm) cylinder, wax, tape, and casting epoxy (cored fiberglass hull installations)
Install the Intelliducer
To install the Thru-Hull NMEA 2000 Intelliducer:
- Choose a location.
- Drill through and prepare the hull.
- Install the Intelliducer in the hull.
- Connect the Intelliducer your existing NMEA 2000 network.
OR
Connect the Intelliducer to power and a NMEA 0183-compatible device.
- Update your Garmin chartplotter (if applicable).
Step 1: Choose a Location to Install the Intelliducer
It is very important to carefully choose a proper location on your boat to install the Thru-Hull Intelliducer. When choosing a location, consider the following guidelines.
General
- The Intelliducer is designed for metal- and fiberglass-hull boats.

CAUTION: Do not install the Intelliducer in a wood-hull boat, because swelling wood can break the intelliducer and possibly sink your boat.
• Install the Intelliducer as close to the keel as possible.
- Install the Intelliducer away from obstructions and sources of interference such as the propeller, shafts, other machinery, other sounder transducers, and cables.
- Do not mount the Intelliducer near water intake openings or water discharge openings. Do not mount the Intelliducer behind fittings, strakes, or irregularities in the hull.
- The Intelliducer must be submerged at all times during use.
- You must be able to access the Intelliducer from inside the boat.
- Allow for 8 in. (200 mm) top clearance and 6 in. (150 mm) of clearance around the Intelliducer to accommodate the height of the internal unit housing, and to allow for the rotation and connection of the internal unit housing.
Hull Types
Additional, boat-specific details should be considered when choosing a location.
Sailboats
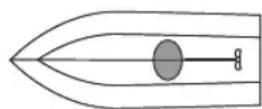
- Fin Keel – Install as close as possible to the centerline, 1–2 ft. (300–600 mm) ahead of the fin.
- Full Kccl – Install midships, at the point with the least deadrise.
Outboard and Inboard/Outboard engine boats
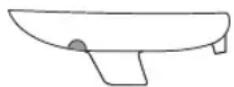
Fin keel sailboat
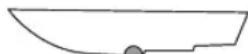
Stepped hull powerboat
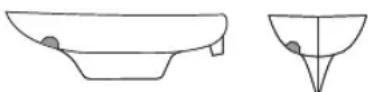
Full keel sailboat
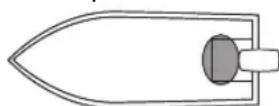
Outboard and I/O
Inboard
- Mount slightly forward of the engine, off of the transom.
- Mount on the side where the propeller blades are turning downward, or centered between dual engines. Mount as far aft as possible, but out of the wash of the propellers.
Inboard engine boats
- Mount forward of the shaft and propeller, and ensure the location is submerged at high speeds.
Planing hull boats
- Mount within the first set of lifting strakes, near the keel and as far aft as possible, to ensure that the location is submerged at high speeds.
- Mount on the starboard side (where the propeller blades are turning downward).
Stepped hull boats
- Mount ahead of the first step and ensure the location is submerged at high speeds.
Boats capable of speeds in excess of 25 knots (29 MPH)
- Consult a professional installer.
Confirm Your Intelliducer Choice
Garmin has four models of Thru-Hull Intelliducers:
| NMEA 2000 NMEA 0183 | |
| 0–12 Degrees (010-00701-00) 0–12 Degrees (010-00702-00) | |
| 13–24 Degrees (010-00701-01) 13–24 Degrees (010-00702-01) | |
After you have chosen a suitable location on your boat, ensure you have chosen the correct Intelliducer to offset the angle of your hull and the type of data interface on your boat.
Use an angle finder or digital level to measure the deadrise angle of your hull at the chosen mounting location. The deadrise angle is the angle measured between the waterline and the slope of the hull.

CAUTION: If the deadrise angle of your boat does not fall within the angle specified by your model of Thru-Hull Intelliducer, you will not obtain accurate depth readings. Be sure to install the correct Intelliducer for your boat.
Step 2: Drill and Prepare a Hole for the Intelliducer
After you have chosen the proper location for the Thru-Hull Intelliducer in your hull, drill a hole in the hull to install the Intelliducer.

WARNING: Always wear a dust mask and safety goggles when drilling, cutting, filing, and sanding.
To drill a hole for the Intelliducer:
- Drill a 18 in. (3 mm) pilot hole from the inside of the boat.
- On the outside of the boat, ensure the pilot hole is in the correct location; if not, seal the incorrect pilot hole with epoxy and drill the pilot hole in a better location.
- Use a hole saw to cut a 2 in. (51 mm) hole from the outside of the boat.

NOTE: If you are installing the Intelliducer in a cored-fiberglass hull, see the additional preparation procedures provided in this section.
- Ensure the Intelliducer fits in the hole. If needed, refine the hole using a file or sandpaper.
- Sand the hole and the area around the hole, inside and outside the boat, using a fine sandpaper, to ensure the sealant will properly seal the hull.
- Clean the hole using a mild detergent or weak solvent (such as isopropyl alcohol) to remove any dust and dirt.
Drilling and Preparing a Cored Fiberglass Hull
When installing the Intelliducer in a cored fiberglass hull, you must take precautions to carefully seal and reinforce the core. Seal and reinforce the core with either fiberglass or with casting epoxy.

CAUTION: If the core of a cored fiberglass hull is not sealed and reinforced properly, water may seep into the core and severely damage the boat. In addition, the boat may sink.

WARNING: Always wear a dust mask and safety goggles when drilling, cutting, filing, and sanding.
To drill a hole in a cored fiberglass hull:
-
Drill a 18 in. (3 mm) pilot hole from the inside of the boat.
-
On the outside of the boat, ensure the pilot hole is in the correct location; if not, seal the incorrect pilot hole with epoxy and re-drill the pilot hole in a better location.
-
Use a hole saw to cut a 2 in. (51 mm) hole from the outside of the boat through the outer skin only. Do not cut completely through the hull.
-
On the inside of the boat, at the pilot hole location, use a hole saw to cut a hole ^3/8-^1/2 in. (9–12 mm) larger than the hole through the outer skin. Cut through the inner skin and most of the core.

CAUTION: When cutting the inner skin and core, be extremely careful to not cut the outer skin, or you will not be able to correctly seal the hull.
-
Remove the plug containing the inner skin and core material on the inside of the boat. You should be able to see the inside of the outer skin.
-
Sand the inside of the outer skin around the hole, the core, and the area around the hole in the inner skin. Clean the area using a mild detergent or weak solvent (such as isopropyl alcohol), to remove any dust and dirt.
To seal the core with fiberglass:
-
From inside the boat, coat a layer of fiberglass cloth with fiberglass resin and place it in the hole to seal the core.
-
Add layers until the hole is the correct diameter of 2 in. (51 mm).
-
After the material has hardened, sand and clean the hole and areas around the inside and outside of the hole.
To seal the core with casting epoxy:
-
Coat a 2 in. (51 mm) cylinder with wax.
-
Insert the cylinder in the hole through the outer skin and tape it in place.
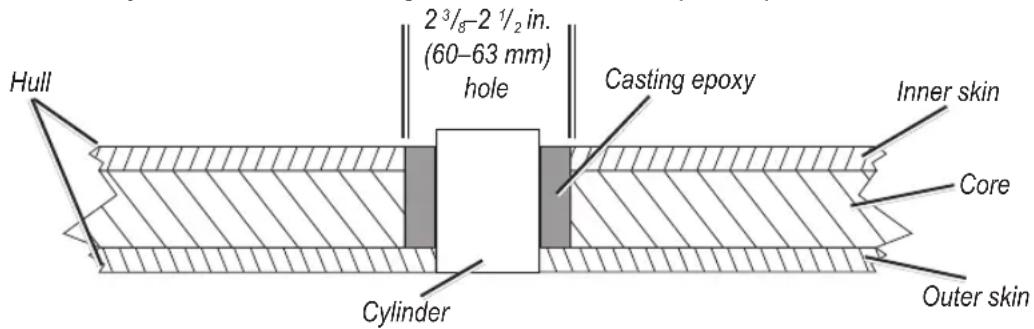
- Fill the gap between the cylinder and the core with casting epoxy.
- After the epoxy has hardened, remove the cylinder.
- Sand and clean the hole and areas around the inside and outside of the hole.
Step 3: Install the Intelliducer
After you have a hole drilled and prepared, install the bottom portion of the Intelliducer in the boat.
To install the bottom portion of the Intelliducer:
-
Apply a layer of marine sealant, at least 1 / 8 in. (4 mm) thick, on the inside of the outer lip and on the threads of the Intelliducer. Ensure the sealant extends at least 1 / 2 in. (12 mm) higher than the thickness of the hull, gasket, and locking ring.
-
From the outside of the boat, push the Intelliducer into the hole with a twisting motion. Push firmly to squeeze out excess marine sealant.
-
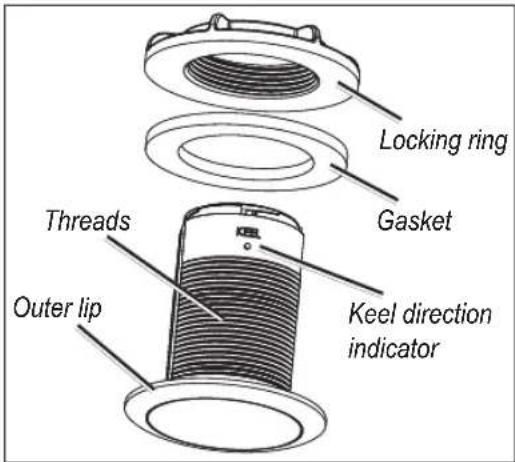
From inside the boat, twist the Intelliducer so the "Keel" marking points toward the keel of the boat.
-
Place the gasket over the Intelliducer and press it against the hull.
-
Thread the locking ring on the Intelliducer until it tightens against the gasket. Hand tighten the locking ring—do not use tools—while ensuring that the "Keel" marking points toward the keel of the boat.
-
From outside the boat, remove any excess marine sealant. This ensures water will pass smoothly over the Intelliducer.
-
Allow the sealant to dry completely as specified by the manufacturer of the sealant.
-
Test the installation for leaks.

CAUTION: Do not leave the boat in the water unchecked for several days. Ensure there are no leaks before leaving the boat unattended in the water for more than an hour. Microscopic leaks may not be immediately apparent and could possibly sink your boat if left unattended.
- Place the boat in the water and immediately check for leaks in the installation of the Intelliducer.
- If no immediate leak is observed, check the installation every hour for the first 24 hours.
To install the top portion of the Intelliducer:
-
Ensure the sealant has dried completely, and ensure the installation of the bottom portion does not leak.
-
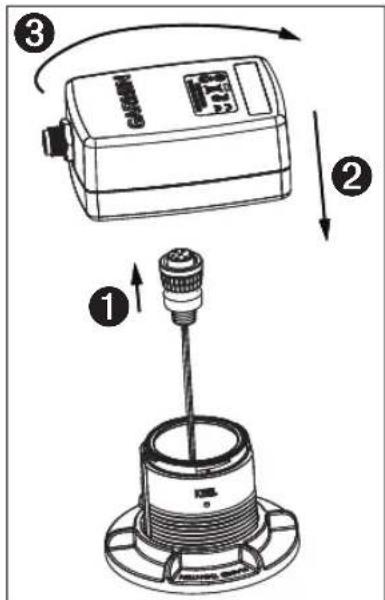
Connect the cable from the bottom portion of the Intelliducer to the underside of the top portion ①.
-
Place the top portion of the Intelliducer on the bottom portion while ensuring that the top portion is flat against the bottom portion ②. Twist it clockwise—do not use tools—until it clicks to lock it in place ③.
Step 4 (NMEA 2000): Connect the Intelliducer to a NMEA 2000 Network
Follow these instructions to connect a NMEA 2000 Thru-Hull Intelliducer. If you have a NMEA 0183 Thru-Hull Intelliducer, see Step 4 (NMEA 0183).
The Intelliducer is packaged with a NMEA 2000 T-connector and a NMEA 2000 drop cable. Use these two components to connect the Intelliducer to your existing NMEA 2000 network. If you do not have an existing NMEA 2000 network, you will need to install a NMEA 2000 network on your boat. For more information on NMEA 2000, visit www.garmin.com.
To connect the Transom Mount Intelliducer to your existing NMEA 2000 network:
- Determine an appropriate location to connect the Intelliducer to your existing NMEA 2000 backbone.
- Disconnect one side of a NMEA 2000 T-connector, or disconnect a terminator from the backbone nearest to the location where you want to connect the Intelliducer.
If you need to extend the NMEA 2000 backbone, connect an appropriate NMEA 2000 backbone extension cable (not included) to the T-connector or terminator you disconnected. - Connect the included T-connector for the Intelliducer in the NMEA 2000 backbone.
- Route the NMEA 2000 drop cable to the Intelliducer and to the bottom of the T-connector you added to your NMEA 2000 network.
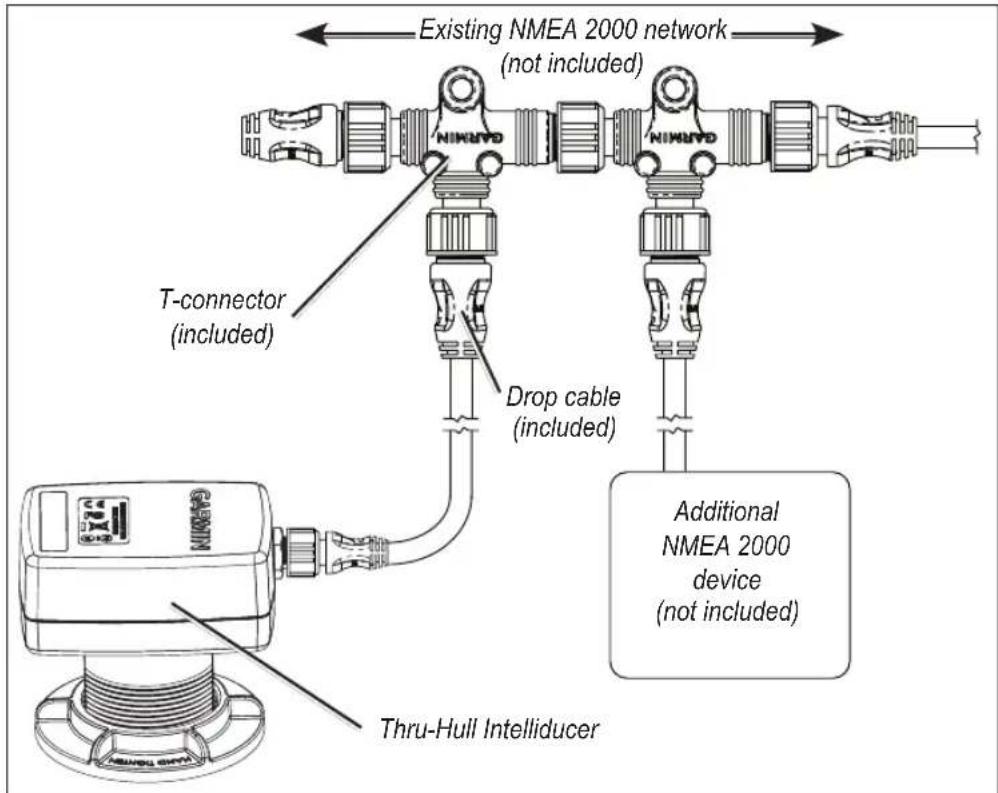
Connecting the Intelliducer to a NMEA 2000 Network
Step 4 (NMEA 0183): Connect the Intelliducer to Power and a NMEA 0183-compliant Device
Follow these instructions to connect a NMEA 0183 Thru-Hull Intelliducer. If you have a NMEA 2000 Thru-Hull Intelliducer, see Step 4 (NMEA 2000).
The Thru-Hull NMEA 0183 Intelliducer must be connected to power. Use the diagrams to correctly wire the Inteliducer. In the diagrams, Tx = transmit, and Rx = receive. You can connect up to three NMEA 0183-compliant devices to receive data from one Intelliducer.
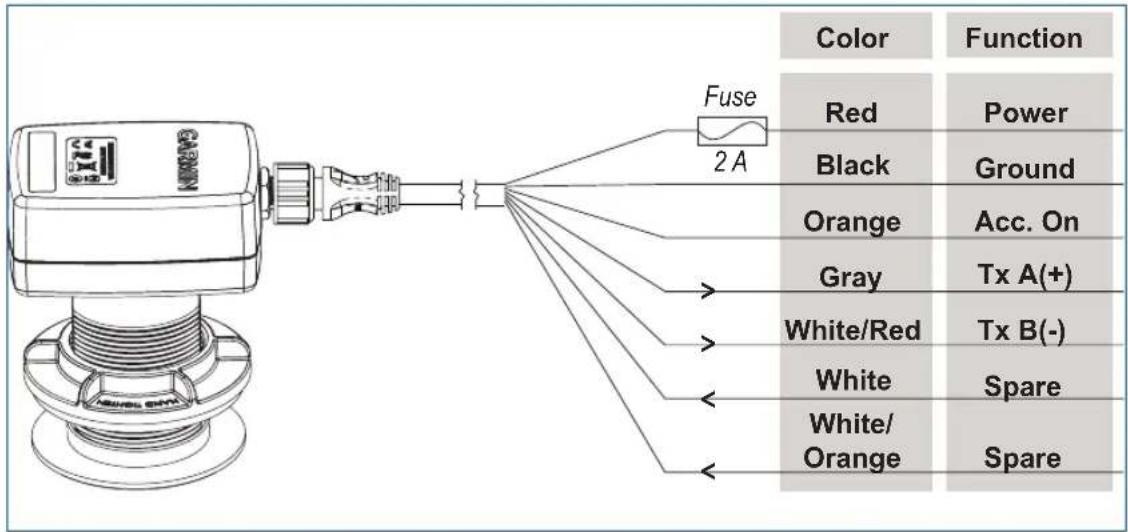
Thru-Hull NMEA 0183 Intelliducer Power/Data Cable
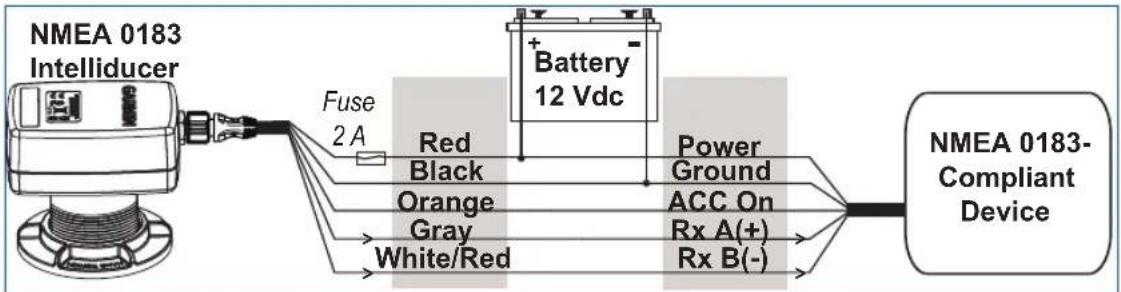
flowchart
graph LR
    A["NMEA 0183 Intelliducer"] -->|Fuse 2 A| B["Battery 12 Vdc"]
    B --> C["Power Ground"]
    B --> D["ACC On"]
    B --> E["Rx A(+)"]
    B --> F["Rx B(-)"]
    C --> G["NMEA 0183-Compliant Device"]
    D --> G
    E --> G
    F --> G
Thru-Hull NMEA 0183 Intelliducer Wired to a NMEA 0183-compliant Device
Exceptions:
- If your NMEA 0183-compliant device has only one receiving wire (Rx), connect it to the gray wire (Tx/A) from the Intelliducer, and leave the white/red wire (Tx/B) from the Intelliducer unconnected.

NOTE: The orange (accessory on) wire is used when wiring the Intelliducer to a Garmin chartplotter, or other NMEA 0183 device that has a defined accessory signal wire. If you are wiring the Intelliducer to a device that does not have an accessory signal wire, the orange wire from the Intelliducer should be connected to ground.

CAUTION: If you are wiring the Intelliducer to a device that does not have an accessory signal wire, connect the Intelliducer power wire to the ignition or install an in-line switch. The Intelliducer can drain the battery of the boat if it is not switched.
Step 5: Update Your Chartplotter: Update Your Chartplotter
If you are using the Intelliducer with an existing Garmin chartplotter, upgrade your Garmin chartplotter with the latest software to ensure compatibility with the Intelliducer. For more information, visit www.garmin.com.
Maintenance
You must regularly maintain and clean your Intelliducer to get the best results.
Antifouling paint
If you are using the Intelliducer in salt water, you must coat the submerged surface of the Intelliducer with antifouling paint. Use only water-based antifouling paint, because other paints may damage the Intelliducer. Re-apply the paint at the beginning of each season.
Cleaning
Clean the submerged surface of the Intelliducer regularly to keep it clear of aquatic growth. The performance of the Intelliducer will be greatly reduced if the surface collects a large amount of growth. Use a scour pad (lightly) and a mild detergent to clean the surface. Avoid scratching the surface as much as possible.
Specifications
Physical
Unit Dimensions: 4 ^19/_32 in. (116.3 mm) L × 4 in. (101.4 mm) W × 3 in. (76.2 mm) D
Weight: 13 oz. (364 g)
Cables: NMEA 2000 drop cable — 19 ft. 8 in. (6 m)
NMEA 0183 power/data cable — 29 ft. 6 in. (9 m)
Temperature range: From -15°C to 33°C (from 5°F to 91°F)
Case Material: PC/PBT and ASA plastic
Power
Power input source: NMEA 2000 — 9–16 Vdc
NMEA 0183 — 9–33 Vdc
Main power usage: 2 W max
NMEA 2000 Load Equivalency Number (LEN): 4
Sonar
Power: 150 W (RMS), 1,200 W (peak-to-peak)
Frequency: 160 kHz
Depth: 900 ft. (275 m) (Depth capacity is dependent on water salinity, bottom type, and other water conditions.)
NMEA 2000 PGN Information
The Thru-hull NMEA 2000 Intelliducer transmits the following PGN information to your NMEA 2000 network:
| 059392 ISO | Acknowledgement |
| 060928 ISO | Address Claim |
| 126208 NMEA-Command/Request/Acknowledge Group Function | |
| 126464 Transmit/Receive PGN List Group Function | |
| 126996 Product Information | |
| 128267 Water Depth | |
| 130312 Temperature | |

Garmin Intelliducers are NMEA 2000 certified
NMEA 0183 Information
The Thru-Hull NMEA 0183 Intelliducer communicates with NMEA 0183 devices using the SDDPT, SDDBT, and SDMTW NMEA 0183 sentences.
Software License Agreement
BY USING THE INTELLIDUCER, YOU AGREE TO BE BOUND BY THE TERMS AND CONDITIONS OF THE FOLLOWING SOFTWARE LICENSE AGREEMENT. PLEASE READ THIS AGREEMENT CAREFULLY.
Garmin grants you a limited license to use the software embedded in this device (the “Software”) in binary executable form in the normal operation of the product. Title, ownership rights, and intellectual property rights in and to the Software remain in Garmin.
You acknowledge that the Software is the property of Garmin and is protected under the United States of America copyright laws and international copyright treaties. You further acknowledge that the structure, organization, and code of the Software are valuable trade secrets of Garmin and that the Software in source code form remains a valuable trade secret of Garmin. You agree not to decompile, disassemble, modify, reverse assemble, reverse engineer, or reduce to human readable form the Software or any part thereof or create any derivative works based on the Software. You agree not to export or re-export the Software to any country in violation of the export control laws of the United States of America
Declaration of Conformity (DoC)
Hereby, Garmin, declares that this Intelliducer is in compliance with the essential requirements and other relevant provisions of Directive 1999/5/EC.
To view the full Declaration of Conformity, see the Garmin Web site for your Garmin product: www.garmin.com/products/intelliducer/. Click Manuals, and then select the Declaration of Conformity link.

© 2008, 2009, 2010 Garmin Ltd. or its subsidiaries
All rights reserved. Except as expressly provided herein, no part of this manual may be reproduced, copied, transmitted, disseminated, downloaded or stored in any storage medium, for any purpose without the express prior written consent of Garmin. Garmin hereby grants permission to download a single copy of this manual onto a hard drive or other electronic storage medium to be viewed and to print one copy of this manual or of any revision hereto, provided that such electronic or printed copy of this manual must contain the complete text of this copyright notice and provided further that any unauthorized commercial distribution of this manual or any revision hereto is strictly prohibited.
Information in this document is subject to change without notice. Garmin reserves the right to change or improve its products and to make changes in the content without obligation to notify any person or organization of such changes or improvements. Visit the Garmin Web site (www.garmin.com) for current updates and supplemental information concerning the use and operation of this and other Garmin products.
Garmin ^® and the Garmin logo are trademarks of Garmin Ltd. or its subsidiaries, registered in the USA and other countries. This trademark may not be used without the express permission of Garmin.
GARMIN™
Fase 4 (NMEA 2000): collegare l'Intelliducer a una rete NMEA 2000
Installation af Intelliducer
Sådan installerer du Thru-Hull NMEA 2000 Intelliducer:
Effekt: 150 W (RMS), 1.200 W (peak-to-peak)
Frekvens: 160 kHz
Installere Intelliducer-enheten
Trinn 3: Installere Intelliducer-enheten
Trinn 4 (NMEA 2000): Koble Intelliducer-enheten til et NMEA 2000-nettverk
Strøm: 150 W (RMS), 1200 W (spiss-til-spiss)
Frekvens: 160 kHz
Installera Intelliducer-enheten
Steg 3: Installera Intelliducer-enheten
© 2009-2010 Garmin Ltd. or its subsidiaries
Garmin International, Inc.
1200 East 151 ^st Street, Olathe, Kansas 66062, USA
Garmin (Europe) Ltd.
Liberty House, Houndown Business Park, Southampton, Hampshire, SO40 9LR UK
Garmin Corporation
No. 68, Jangshu 2 ^nd Road, Sijhih, Taipei County, Taiwan
www.garmin.com
- Thru-Hull Intelliducer
- GARMIN®
- Thru-Hull Intelliducer Installation Instructions
- Product Registration
- Serial number
- Contact Garmin
- Packing List and Tools Needed
- Standard Package
- Tools Needed (not included)
- Install the Intelliducer
- To install the Thru-Hull NMEA 2000 Intelliducer:
- Step 1: Choose a Location to Install the Intelliducer
- General
- Hull Types
- Sailboats
- Outboard and Inboard/Outboard engine boats
- Inboard engine boats
- Planing hull boats
- Stepped hull boats
- Boats capable of speeds in excess of 25 knots (29 MPH)
- Confirm Your Intelliducer Choice
- Step 2: Drill and Prepare a Hole for the Intelliducer
- To drill a hole for the Intelliducer:
- Drilling and Preparing a Cored Fiberglass Hull
- To drill a hole in a cored fiberglass hull:
- To seal the core with fiberglass:
- To seal the core with casting epoxy:
- Step 3: Install the Intelliducer
- To install the bottom portion of the Intelliducer:
- To install the top portion of the Intelliducer:
- Step 4 (NMEA 2000): Connect the Intelliducer to a NMEA 2000 Network
- To connect the Transom Mount Intelliducer to your existing NMEA 2000 network:
- Step 4 (NMEA 0183): Connect the Intelliducer to Power and a NMEA 0183-compliant Device
- Exceptions:
- Step 5: Update Your Chartplotter: Update Your Chartplotter
- Maintenance
- Antifouling paint
- Cleaning
- Specifications
- Physical
- Power
- Sonar
- NMEA 2000 PGN Information
- NMEA 0183 Information
- Software License Agreement
- Declaration of Conformity (DoC)
- GARMIN™
- Fase 4 (NMEA 2000): collegare l'Intelliducer a una rete NMEA 2000
- Installation af Intelliducer
- Sådan installerer du Thru-Hull NMEA 2000 Intelliducer:
- Installere Intelliducer-enheten
- Trinn 3: Installere Intelliducer-enheten
- Trinn 4 (NMEA 2000): Koble Intelliducer-enheten til et NMEA 2000-nettverk
- Installera Intelliducer-enheten
- Steg 3: Installera Intelliducer-enheten
Brand : GARMIN
Model : NMEA 2000
Category : Electronic accessory