
Parking Mode Cable - Electronic accessory GARMIN - Free user manual and instructions
Find the device manual for free Parking Mode Cable GARMIN in PDF.


| Product Type | Electronic accessory for dash cameras |
| Compatible Devices | Garmin Dash Cam 45, 54, 55, 65W |
| Primary Function | Enables parking mode recording when vehicle is off |
| Wire Connections | Black (ground), Yellow (constant 12V battery), Red (switched 12V accessory) |
| Input Voltage | 12V DC (vehicle electrical system) |
| Connection to Camera | USB (micro-USB compatible) |
| Installation | Professional installation recommended by Garmin |
| Cable Length | Not specified; typical accessory cables approx. 3-5 meters |
| Safety | Incorrect wiring may cause vehicle or battery damage; follow wiring diagram |
| Warranty | Standard Garmin warranty applies |
| Additional Features | Automatic motion detection recording when parked |
Frequently Asked Questions - Parking Mode Cable GARMIN
User questions about Parking Mode Cable GARMIN
0 question about this device. Answer the ones you know or ask your own.
Ask a new question about this device
Download the instructions for your Electronic accessory in PDF format for free! Find your manual Parking Mode Cable - GARMIN and take your electronic device back in hand. On this page are published all the documents necessary for the use of your device. Parking Mode Cable by GARMIN.
USER MANUAL Parking Mode Cable GARMIN
natural_image
Line drawing of a camera with concentric rings and a side panel (no text or symbols)GARMIN DASH CAM™ 45/54/55/65W
Owner's Manual
© 2020 Garmin Ltd. or its subsidiaries
All rights reserved. Under the copyright laws, this manual may not be copied, in whole or in part, without the written consent of Garmin. Garmin reserves the right to change or improve its products and to make changes in the content of this manual without obligation to notify any person or organization of such changes or improvements. Go to www.garmin.com for current updates and supplemental information concerning the use of this product.
Garmin ^® the Garmin logo, and VIRB ^® are trademarks of Garmin Ltd. or its subsidiaries, registered in the USA and other countries. Garmin Dash Cam ^™ , Garmin Express ^™ , and Travelapse ^™ are trademarks of Garmin Ltd. or its subsidiaries. These trademarks may not be used without the express permission of Garmin.
Apple ^® is a trademark of Apple Inc., registered in the U.S. and other countries. microSD ^™ and the microSD logo are trademarks of SD-3C, LLC. Wi-Fi ^® is a registered mark of Wi-Fi Alliance Corporation.
M/N: A03110, AA3110
Table of Contents
Getting Started.... 1
Device Overview.... 1
Installing the Memory Card.... 1
Formatting the Memory Card.... 1
Removing the Memory Card.... 1
Installing the Mount onto Your Windshield.... 1
Installing and Setting Up the Garmin Dash Cam.... 2
Setting the Camera Placement.... 2
Turning On the Device Manually.... 2
Turning Off the Device Manually.... 2
Dash Cam Recording.... 2
Saving a Video Recording.... 2
Event Detection....2
Turning Audio Recording On or Off 2
Taking a Photo....3
Travelapse™ 3
Recording a Travelapse Video....3
Recording Videos While Parked.... 3
Parking Mode Cable Wiring Diagram....3
Connecting the Parking Mode Cable Accessory to Power.... 3
Viewing Videos and Pictures.... 3
Saving Unsaved Video Footage 3
Deleting a Video or Photo.... 3
Garmin VIRB® App.... 3
Viewing Videos and Photos in the Garmin VIRB App...... 3
Garmin VIRB App Gallery 4
Videos and Photos on Your Computer.... 4
Connecting the Device to Your Computer.... 4
Driver Awareness Features and Alerts...... 4
Forward Collision Warning System....4
Forward Collision Warning System Performance Tips...... 5
Lane Departure Warning System.... 5
Lane Departure Warning Performance Tips.... 5
Go Alert....5
Red Light and Speed Cameras.... 5
Voice Control....5
Controlling the Camera Using Voice Commands.... 6
Turning Voice Control On or Off 6
Voice Control Tips....6
Settings.... 6
Camera Settings....6
Video Resolution Settings.... 6
Driver Assistance Settings....6
Proximity Alerts Settings.... 6
System Settings....6
Device Setup....7
Device Information....7
Cleaning the Camera Lens....7
Support and Updates....7
Setting Up Garmin Express....7
Garmin Support Center....7
Viewing E-Label Regulatory and Compliance Information...... 7
Restarting the Device....7
Specifications....7
Troubleshooting....7
My camera feels warm while it is operating.... 7
My memory card has degraded and needs to be replaced...... 7
My video recordings are blurry....7
My video recordings are choppy or incomplete.... 8
Index....9
Getting Started
WARNING
See the Important Safety and Product Information guide in the product box for product warnings and other important information.
Device Overview
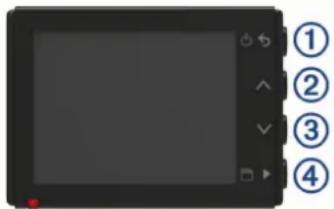
| 1 | Press to turn the device on.Hold for 3 seconds to turn the device off.Select to return to the previous page. | |
| 2 | ^ | Select to scroll through menus or pages. |
| 3 | √ | Select to scroll through menus or pages. |
| 4 | From the viewfinder, select to save a photo.Hold to save a video clip.Select to choose an option in a menu. | |
Installing the Memory Card
The camera requires a microSD ^™ or microSDHC memory card of up to 64GB with a speed rating of class 10 or higher. You can use the included memory card, or you can purchase a compatible memory card from an electronics supplier.
1 Insert the memory card ① into the slot . ②
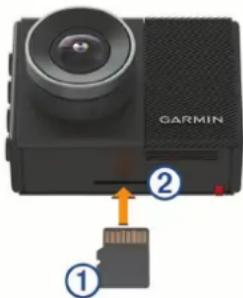
2 Press it in until it clicks.
Formatting the Memory Card
The camera requires a memory card formatted using the FAT32 file system. You can use the camera to format your card using this file system.
You should format your memory card at least one time every 6 months to help extend the useful life of the memory card. You must also format a brand new memory card if it is not formatted using the FAT32 file system.
NOTE: Formatting the memory card deletes all videos, photos, and data on the card.
1 Connect the camera to power.
2 Select Settings > Camera > Format Card.
3 Keep the camera connected to power until the formatting is complete.
When formatting is complete, the camera displays a message and begins recording.
Removing the Memory Card
NOTICE
Removing the memory card while the device is turned on can result in a loss of data or damage to the device.
1 Turn off the device.
2 Press the card in until it clicks.
3 Release the card.
The card ejects from the slot.
Installing the Mount onto Your Windshield
NOTICE
The adhesive mount is extremely difficult to remove after it is installed. You should carefully consider the mounting location before you install the mount.
Before you can install the adhesive mount onto your windshield, the ambient temperature must be from 21^ to 38^ C (from 70^ to 100^ F).
TIP: You can connect the device to power and hold the device in the preferred mounting location to check the camera's field of view at that location.
1 Clean the windshield using water or alcohol, and a lint-free cloth.
The windshield must be free of dust, wax, oils, or coatings.
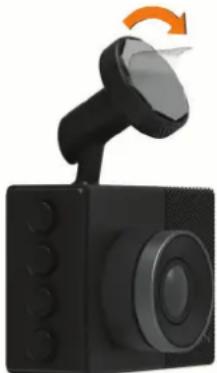
2 Remove the protective film from the mount adhesive.
natural_image
Black digital camera with a circular head and orange rotation arrow (no text or symbols)3 Position the mount over the mounting location.
TIP: The adhesive is extremely sticky. Do not touch the adhesive to the windshield until the mount is properly positioned and aligned.
4 Press the mount firmly onto the windshield, and maintain pressure for 30 seconds.
natural_image
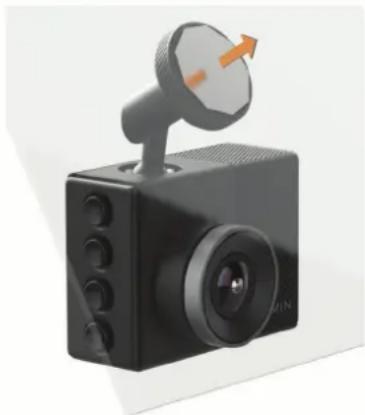
Black MIN 3.0 video camera with a circular head-mounted sensor and orange arrow indicator (no text or symbols on device)5 Pull the camera and mount away from the windshield.
The metal disc remains attached to the windshield.
6 Using your finger, press firmly on the disc for 30 seconds. This helps to ensure the disc adhesive has proper contact with the windshield.
7 Wait 24 hours before installing the Garmin Dash Cam. It takes 24 hours for the adhesive to bond properly to the windshield.
Installing and Setting Up the Garmin Dash Cam
NOTICE
Before installing the Garmin Dash Cam, you must install the mount and allow the adhesive to bond to the windshield for 24 hours. Failure to allow adequate bonding time may cause the mount to detach from the windshield, which could result in damage to the product or mount.
1 Place the camera and mount onto the metal disc.
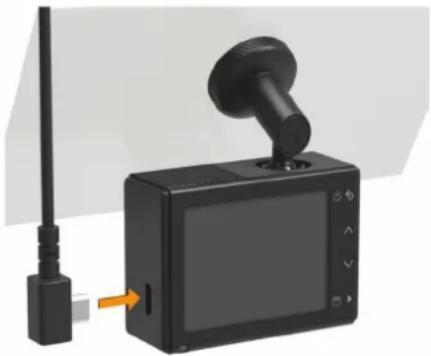
2 Plug the vehicle power cable into the USB port on the device.
natural_image
Black electronic device with antenna and power outlet, showing a small orange button connected to its side (no text or symbols visible)3 Route the power cable to your vehicle power outlet.
The included vehicle power cable is designed to be routed out of sight. It is long enough to route around the windshield in most vehicles, and you can hide the thin cable along or behind the trim or headliner.
4 Plug the other end of the vehicle power cable into a power outlet in your vehicle.
5 If necessary, turn on the vehicle ignition switch to provide power to the power outlet in your vehicle.
The device turns on.
6 Follow the on-screen instructions to complete the initial device setup.
The camera view appears.
7 Adjust the position of the camera to capture the desired field of view.
Setting the Camera Placement
You can mount the device in the left, center, or right of your windshield. For the best performance, you should set the Camera Placement option to indicate the location of your device in the vehicle.
1 Select Settings > Driver Assistance > Camera Placement.
2 Select Horizontal Placement, and select the horizontal placement of your camera.
3 Select Vehicle Height.
4 Select an option:
- If you are driving a large vehicle, like a full size van or truck, select Tall.
- If you are driving a car, select Normal.
Turning On the Device Manually
NOTE: When the device is connected to an ignition-switched power outlet, it turns on automatically when you turn on the vehicle.
Select
The device turns on.
Turning Off the Device Manually
NOTE: When the device is connected to an ignition-switched power outlet, it turns off automatically when you turn off the vehicle.
Hold for 3 seconds.
The device turns off.
Dash Cam Recording
NOTICE
Some jurisdictions regulate or prohibit use of this device. It is your responsibility to know and comply with applicable laws and rights to privacy in jurisdictions where you plan to use this device.
The dash cam records video to the camera memory card (Installing the Memory Card, page 1). By default, the device immediately starts recording video when it turns on, and it continues recording until it is turned off. If the memory card is full, the device automatically deletes the oldest unsaved video to create space for new video.
When the option to promptly delete unsaved video is enabled, the device continually deletes unsaved video more than three minutes old and deletes all unsaved video each time it is powered off. This feature is available only for specific regions and is enabled by default for some of those regions. When the camera is set to a supported region, you can enable or disable this feature in the camera settings (Camera Settings, page 6).
You can save a video recording to prevent it from being overwritten or deleted.
Saving a Video Recording
By default, the device uses a sensor to detect a possible incident and automatically saves video footage before, during, and after the detected event. You can also save video files manually at any time.
Hold
The device saves the video footage before, during, and after you hold 📋
The memory card has limited storage. After you save a video recording, you should transfer the recording to your computer (Videos and Photos on Your Computer, page 4) or to your smartphone (Editing and Sharing a Video, page 4).
Event Detection
By default, the device uses a sensor to detect possible incidents and saves video footage automatically before, during, and after the detected event. The video footage is stamped with the time, date, and location of the event.
Turning Audio Recording On or Off
NOTICE
Some jurisdictions may prohibit recording audio in the vehicle or may require that all passengers have knowledge of the recording and provide consent before you record audio in the vehicle. It is your responsibility to know and follow all laws and restrictions for your jurisdiction.
The device can record audio using the integrated microphone while recording video. You can turn audio recording on or off at any time.
Select Settings > Camera > Record Audio.
Taking a Photo
From the viewfinder, select 📄
The device saves the photo to the memory card.
Travelapse™
The Travelapse feature captures a fast-motion video of your trip, which allows you to share a short video of all the places you traveled. Recording Travelapse does not stop dash cam recording.
NOTE: Travelapse recording is not available when the option to promptly delete unsaved video is enabled (Camera Settings, page 6).
Recording a Travelapse Video
You can manually start and stop Travelapse recording at any time using the main menu or voice commands.
NOTE: The device continues to record regular dash cam footage while recording a Travelapse video.
- To start recording a Travelapse video, select an option:
- From the main menu, select Travelapse > Start.
- Say OK, Garmin, Start Travelapse.
- To stop Travelapse recording, select an option:
- From the main menu, select Travelapse > Stop.
- Say OK, Garmin, Stop Travelapse.
Recording Videos While Parked
NOTICE
Due to privacy regulations, this feature is not available in all areas. It is your responsibility to know and comply with applicable laws and rights to privacy in your jurisdiction.
Before you can record videos while parked, you must connect your camera to the Dash Cam parking mode cable accessory (Parking Mode Cable Wiring Diagram, page 3).
The parked video recording feature allows the camera to record video automatically while your vehicle is parked.
Select ∧ > Settings > Camera > Record While Parked.
When you turn off your vehicle, the camera enters parked recording mode and automatically records video each time the camera sensor detects motion.
Parking Mode Cable Wiring Diagram

Item Wire Color Wire Function
| 1 | Black Ground | |
| 2 | Yellow Battery 12 V | |
| 3 | Red Accessory 12 V |
Connecting the Parking Mode Cable Accessory to Power
CAUTION
Garmin ^® strongly recommends having an experienced installer with the proper knowledge of electrical systems install the device. Incorrectly wiring the power cable can result in damage to the vehicle or the battery and can cause bodily injury.
1 Route the parking mode cable accessory to a location in the vehicle with constant power, switched power, and a ground connection.
2 Connect the BATT wire to a constant power source.
3 Connect the ACC wire to a switched power source.
4 Connect the GND wire to the bare metal of the vehicle's chassis using an existing bolt or screw.
5 Plug the parking mode cable accessory into the USB port on the camera.
Viewing Videos and Pictures
NOTE: The device stops recording and alerts are disabled while viewing videos or pictures.
1 Select ▶ Gallery.
2 Select an option:
NOTE: Unsaved videos and Travelapse videos are not available when the option to promptly delete unsaved video is enabled (Camera Settings, page 6).
- To view videos you saved, select Saved Videos.
- To view parked videos you saved, select Parked Videos.
- To view saved photos, select Pictures.
- To view Travelapse videos, select Travelapse.
- To view recent video footage that has not been saved, select Unsaved Videos.
3 Select a video or photo.
Saving Unsaved Video Footage
You can view your unsaved temporary footage in the gallery and save video clips from the unsaved footage. This feature is not available when the option to promptly delete unsaved video is enabled (Camera Settings, page 6).
1 Select ▷ Gallery > Unsaved Videos.
2 Select a day and time.
The unsaved video for that timeframe starts playing.
3 Hold or to move backward or forward through the video.
While you hold the button, the device increases the speed at which it moves through the video. The timestamp appears in the lower-left corner of the video.
4 When you find the video footage you want to save, press ▶ Save.
The device saves a three-minute video clip.
Deleting a Video or Photo
- While viewing a video, select #Delete > Yes.
- While viewing a photo, select 📄Yes.
Garmin VIRB® App
The free Garmin VIRB app allows you to view and share recorded dash cam videos and photos on your smartphone. To download the Garmin VIRB app or for more information, go to garmin.com/VIRBapp.
Viewing Videos and Photos in the Garmin VIRB App
1 From the app store on your mobile device, install the Garmin VIRB app.
For more information, go to garmin.com/VIRBapp.
2 On your Garmin Dash Cam device, select Gallery > Share Gallery.
3 On your smartphone, open the Garmin VIRB app.
The app searches for your Garmin Dash Cam device and connects automatically.
4 If necessary, enter the wi-fi password that appears on your Garmin Dash Cam screen.
5 On your smartphone, select a video or photo to view or share it.
Garmin VIRB App Gallery
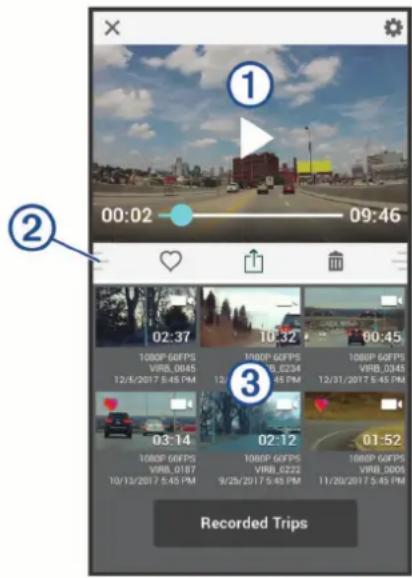
| Select to change the camera settings. | |
| 1 | Displays a preview of the selected video or photo. |
| 2 | Drag up or down to expand or shrink the library. |
| Select to mark the selected video or photo as a favorite. | |
| Select to edit, save, and share the selected photo or video. | |
| Select to delete the selected video or photo. | |
| 3 | Select a photo or video thumbnail to preview it. |
Editing and Sharing a Video
1 From the Garmin VIRB app gallery, select a video.
2 Select an option:
- If you are using an Apple ^® device, select
- If you are using a device with Android ^TM , select
3 Use the sliders to trim the video clip and select the section of video to share.
4 When you are finished editing the video, select Next.
The app processes the video. This may take a while depending on the length of the video.
5 After the app finishes processing the video, select an option:
- To save the video to your mobile device, select .
- To share the video to a social network using an Apple device, select ↩
- To share the video to a social network using a device with Android, select
Videos and Photos on Your Computer
NOTE: Some media players might not support high-resolution playback.
Videos and photos are stored in the DCIM directory on the camera memory card. Videos are stored in MP4 file format, and photos are stored in JPG format. You can view and transfer photos and videos by connecting the memory card or the device to your computer (Connecting the Device to Your Computer, page 4).
The videos and photos are sorted into several folders.
NOTE: Unsaved videos and Travelapse videos are not available when the option to promptly delete unsaved video is enabled (Camera Settings, page 6).
100EVENT: Contains videos saved automatically when the device detects an incident.
101PHOTO: Contains photos.
102SAVED: Contains videos saved manually by the user.
103PARKM: Contains videos saved while parked.
104TLPSE: Contains Travelapse videos.
105UNSVD: Contains unsaved video footage. The device overwrites the oldest unsaved video when the storage space for unsaved videos is full.
Connecting the Device to Your Computer
You can view videos and photos on your computer using a micro-USB cable.
1 Plug the small end of the micro-USB cable into the port on the device.
2 Plug the larger end of the micro-USB cable into a port on your computer.
Depending on your computer operating system, the device appears as either a removable drive or a removable volume.
Driver Awareness Features and Alerts
Your camera provides features that can help encourage more attentive driving, even when you are driving in a familiar area. The device plays an audible tone or message and displays information for each alert. You can enable or disable the audible tone for some types of driver alerts.
Forward collision warning: The device alerts you when it detects that you are not maintaining a safe distance between your vehicle and the vehicle in front of you.
Lane departure warning: The device alerts you when it detects you may be crossing a lane boundary unintentionally.
Go alert: The device plays a tone and displays an alert when stopped traffic starts moving.
Speed cameras: The device plays a tone and displays the speed limit and the distance to the speed camera.
Red light cameras: The device plays a tone and displays the distance to the red light camera.
Forward Collision Warning System
WARNING
The forward collision warning system (FCWS) feature is for information only and does not replace your responsibility to observe all road and driving conditions, abide by all traffic regulations, and use safe driving judgment at all times. The FCWS relies on the camera to provide a warning of upcoming vehicles and, as a result, may have limited functionality in low visibility conditions. For more information, go to garmin.com/warnings.
NOTE: This feature is not available in all areas or for all product models.
The FCWS feature alerts you when the device detects that you are not maintaining a safe distance between your vehicle and the vehicle in front of you. The device determines your vehicle speed using GPS, and it calculates an estimated safe following distance based on your speed. The FCWS activates automatically when your vehicle speed exceeds 48 km/hr (30 mph).
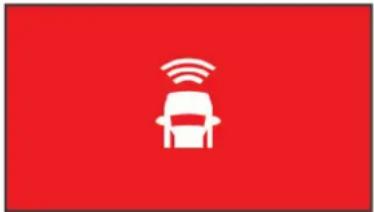
When the device detects that you are too close to the vehicle ahead of you, the device plays an audible alert, and a warning appears on the screen.
natural_image
Red background with white icon of a car and Wi-Fi signal symbol (no text or numbers)Forward Collision Warning System Performance Tips
Several factors affect the performance of the forward collision warning system (FCWS). Some conditions may prevent the FCWS feature from detecting a vehicle ahead of you.
- The FCWS feature activates only when your vehicle speed exceeds 50 km/h (30 mph).
- The FCWS feature may not detect a vehicle ahead of you when the camera's view of the vehicle is obscured by rain, fog, snow, sun or headlight glare, or darkness.
- The FCWS feature may not function properly if the camera is incorrectly aligned (Setting the Camera Placement, page 2).
- The FCWS feature may not detect vehicles greater than 40 m (130 ft.) away or closer than 5 m (16 ft.).
- The FCWS feature may not function properly if the camera placement settings do not correctly indicate your vehicle height or the placement of your device in the vehicle (Setting the Camera Placement, page 2).
Lane Departure Warning System
WARNING
The lane departure warning system (LDWS) feature is for information only and does not replace your responsibility to observe all road and driving conditions, abide by all traffic regulations, and use safe driving judgment at all times. The LDWS relies on the camera to provide warnings for lane markers and, as a result, may have limited functionality in low visibility conditions. For more information, go to garmin.com/warnings.
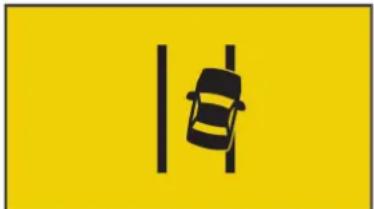
The LDWS feature alerts you when the device detects you may be crossing a lane boundary unintentionally. For example, the device alerts you if you cross some solid painted lane boundaries or cross into an oncoming traffic lane. The LDWS feature provides alerts only when your vehicle speed exceeds 64 km/h (40 mph). The alert appears on the left or right side of the screen to indicate which lane boundary you crossed.
natural_image
Yellow road sign with a black car silhouette crossing a vertical road (no text or symbols)NOTE: For the best LDWS performance, you should set the Camera Placement option to indicate the location of your device in the vehicle.
Lane Departure Warning Performance Tips
Several factors affect the performance of the lane departure warning system (LDWS). Some conditions may prevent the LDWS feature from detecting lane departures.
- The LDWS feature provides alerts only when your vehicle speed exceeds 65 km/h (40 mph).
- The LDWS feature does not provide alerts on certain types of roads, such as highway ramps or merging lanes.
- The LDWS feature may not function properly if the camera is incorrectly aligned.
- The LDWS feature may not function properly if the camera placement settings do not correctly indicate your vehicle height or the placement of your device in the vehicle (Setting the Camera Placement, page 2).
- The LDWS feature requires a clear, continuous view of the lane divider lines.
- Lane departures may not be detected when divider lines are obscured by rain, fog, snow, extreme shadows, sun or headlight glare, road construction, or any other visual obstruction.
- Lane departures may not be detected if lane divider lines are misaligned, missing, or heavily worn.
- The LDWS feature may not detect lane departures on extremely wide, narrow, or winding roads.
Go Alert
The go alert plays a tone and displays an alert when stopped traffic ahead of your vehicle starts moving again. This alert appears only after the vehicle ahead has moved a substantial distance and your vehicle has remained stopped. This can be useful at stop lights or in traffic delays. This feature uses the dash camera to detect the stopped or moving vehicle and requires a clear view of the road.

Red Light and Speed Cameras
NOTICE
Garmin is not responsible for the accuracy of or the consequences of using a red light or speed camera database.
NOTE: This feature is not available for all regions or product models.
Information about red light and speed camera locations is available in some areas for some product models. The device alerts you when you approach a reported speed or red light camera.
- You can use the Garmin Express™ software (garmin.com /express) to update the camera database stored on your device. You should update your device frequently to receive the most up-to-date camera information.
Voice Control
NOTE: The voice control feature is not available for the 45 product model.
The voice control feature allows you to control your camera by saying words and commands.
NOTE: The voice control feature is not available for all languages. You can use this feature while the interface is set to an unsupported language, but you must speak the commands in English.
Controlling the Camera Using Voice Commands
NOTE: The voice control feature is not available for the 45 product model.
1 Say OK, Garmin to activate the voice control feature. The camera plays a tone and starts listening for a command.
2 Say a command:
• To save a video, say Save Video.
• To take a picture, say Take a Picture.
• To record audio with the video, say Record Audio.
• To record video without audio, say Stop Audio.
- To start Travelapse, say Start Travelapse.
• To stop Travelapse, say Stop Travelapse.
The camera plays a tone when it recognizes your command.
Turning Voice Control On or Off
Select √ > Voice Control > Settings > Disable.
Voice Control Tips
- Speak in a normal voice directed at the device.
- Reduce background noise to increase the accuracy of the voice recognition.
- Before each command, say OK, Garmin.
- Listen for a tone to confirm that the camera successfully recognized a command.
Settings
Camera Settings
Select ↗ Settings > Camera.
Resolution: Adjusts the video resolution.
Event Detection: Turns on and off event detection (Event Detection, page 2).
Record Audio: Turns on and off audio recording (Turning Audio Recording On or Off, page 2).
Data Overlay: Adjusts the type of data displayed on videos and pictures.
Unsaved Videos: Determines when the device deletes unsaved video footage. When the Delete When Full option is selected, the device deletes the oldest unsaved video when the memory card storage is full. When the Promptly Delete option is selected, the device continually deletes unsaved video more than three minutes old and deletes all unsaved video each time it is powered off. This is useful to help protect data privacy. While the Promptly Delete option is selected, you cannot record Travelapse videos or view unsaved video in the gallery.
Record After Power Loss: Sets the amount of time that the device continues to record video after power is turned off.
Record While Parked: Allows the camera to record video while the vehicle is parked and turned off, and sets the amount of time the camera remains active while parked. This feature is only available when the Dash Cam parking mode cable accessory is connected to the camera (Recording Videos While Parked, page 3).
NOTICE
Due to privacy regulations, this feature is not available in all areas. It is your responsibility to know and comply with applicable laws and rights to privacy in your jurisdiction.
Format Card: Formats the memory card and deletes all videos, photos, and data on the card.
Video Resolution Settings
You can change the video resolution on your camera.
Resolution is the height of the video in pixels. Higher resolution video settings require more memory card space than lower resolution settings.
Select Settings > Camera > Resolution.
1440p, 30fps: Records video in 1440p resolution at 30 frames per second.
NOTE: This option is available only for the 54/55/65W product models.
1080p, 60fps: Records video in 1080p resolution at 60 frames per second.
NOTE: This option is available only for the Garmin Dash Cam 54/55 product models.
1080p, 30fps, HDR: Records video in 1080p resolution at 30 frames per second using high dynamic range (HDR) imaging. HDR imaging records multiple exposure levels for each frame and can improve video clarity in high contrast or low-light conditions.
NOTE: This option is available only for the Garmin Dash Cam 54/55 product models.
1080p, 30fps: Records video in 1080p resolution at 30 frames per second.
720p, 30fps: Records video in 720p resolution at 30 frames per second.
Driver Assistance Settings
Select ↗ Settings > Driver Assistance.
Camera Placement: Allows you to indicate the placement of your device in the vehicle (Setting the Camera Placement, page 2).
Forward Collision: Adjusts the sensitivity of the FCWS feature.
Go Alert: Turns on or off the go alert display and audible alerts when traffic starts moving (Go Alert, page 5).
Lane Departure: Adjusts the lane boundary settings (Lane Departure Warning System, page 5).
Proximity Alerts: Adjusts the audible proximity alerts.
Proximity Alerts Settings
The camera plays a tone and shows an on-screen alert when you approach proximity points, such as a speed camera or red-light camera. To use proximity alerts, you must have proximity point data on your device, such as a speed camera or red-light camera database. You can customize the behavior of proximity alerts.
NOTE: This feature is not available in all areas.
Select Settings > Driver Assistance > Proximity Alerts.
Audio: Sets the style of alert that plays when you approach proximity points.
Alerts: Sets the type of proximity points for which alerts are played.
Delete Files: Allows you to delete proximity point data.
NOTE: This option is provided primarily for commercial distribution and deployment applications. Most users should not delete proximity point data. Deleted proximity point data cannot be restored, and updates are not available for a deleted database. If your proximity point database is out of date, you should update it instead of deleting it.
Update: Shows instructions for updating the proximity point data on your device.
System Settings
Select ↗ Settings > System.
Volume: Adjusts the volume of the camera alerts and video playback.
Brightness: Adjusts the viewfinder display brightness.
Color Mode: Allows you to select day or night color mode. If you select the Auto option, the device automatically switches to day or night colors based on the time of day.
Display Timeout: Allows you to set the screen to stay on while the camera is receiving power or turn off after one minute of idle time. The camera continues to record while the screen is off, and the recording LED remains red to indicate the device is recording.
Setup: Allows you to set the units of measure, time, and language, and restore them to their default values.
About: Displays the camera name, software version number, the unit ID number, and information about several other software features.
Regulatory: Displays regulatory and compliance information.
Device Setup
Select ∧ > Settings > System > Setup.
Units: Sets the unit of measure used for distances.
Time: Sets the time, date, and format for the time stamp.
Language: Sets all on-screen text to the selected language.
Restore: Restores all settings to the factory default values and unpairs the camera from the Garmin VIRB app. This option does not delete recorded photos and videos. To delete all photos and videos on your memory card, you can format the memory card (Formatting the Memory Card, page 1).
Device Information
Cleaning the Camera Lens
NOTICE
Avoid chemical cleaners and solvents that can damage plastic components.
You should clean the camera lens regularly to improve the quality of recorded video.
1 Wipe the lens with a non-scratch lens cloth, optionally dampened with isopropyl alcohol.
2 Allow the lens to air dry.
Support and Updates
Garmin Express (garmin.com/express) provides easy access to these services for Garmin devices.
- Product registration
- Product manuals
- Software updates
Setting Up Garmin Express
1 Connect the device to your computer using a USB cable.
2 Go to garmin.com/express.
3 Follow the on-screen instructions.
Garmin Support Center
Go to support.garmin.com for help and information, such as product manuals, frequently asked questions, videos, and customer support.
Viewing E-Label Regulatory and Compliance Information
1 From the settings menu, scroll to the bottom of the menu.
2 Select System.
3 Select Regulatory.
Restarting the Device
You can restart your device if it stops functioning.
Hold the power key for 12 seconds.
Specifications
| Operating temperature range From -20° to 55°C (from -4° to 131°F) | |
| Charging temperature range From 0° to 45°C (from 32° to 113°F) | |
| Memory card Class 10 or higher microSDHC from 4 to 64 GB | |
| Garmin Dash Cam 45 wireless frequencies | 2.4 GHz @ 9 dBm |
| Garmin Dash Cam 54/55/65W wireless frequencies | 2.4 GHz @ 8 dBm |
Troubleshooting
My camera feels warm while it is operating
It is normal for the camera to feel warm during typical use, especially while it is recording high-resolution video or transmitting a Wi-Fi ^® signal.
My memory card has degraded and needs to be replaced
All microSD memory cards wear out after they are overwritten a large number of times. Periodically formatting the card can extend the useful life and improve performance. Because the dash camera records continuously, you may need to replace the memory card periodically (Installing the Memory Card, page 1). Your device detects memory card errors automatically and alerts you when it is time to format or replace your memory card.
You can take these actions to help extend the useful life of the memory card.
- Format the memory card at least one time every six months (Formatting the Memory Card, page 1).
- If the device displays a memory card error alert, first try formatting the memory card (Formatting the Memory Card, page 1) and then, if necessary, replace the memory card (Installing the Memory Card, page 1).
- Turn off the device when your vehicle is not in use. If your device is not connected to an ignition-switched vehicle power outlet, you should turn off the device when your vehicle is not in use to prevent the dash camera from recording unneeded footage.
- Use a memory card with a higher storage capacity. Because higher-capacity memory cards are overwritten less frequently, they usually last longer.
- Use a high-quality memory card with a speed rating of class 10 or higher.
- Purchase your replacement memory card from a high-quality manufacturer and a reputable vendor.
My video recordings are blurry
- Clean the camera lens (Cleaning the Camera Lens, page 7).
- Clean the windshield in front of the camera.
- Verify the area of the windshield in front of the camera is cleared by the windshield wipers, and move the device, if necessary.
My video recordings are choppy or incomplete
- For the best camera and video results, use a high-quality memory card with a speed rating of class 10 or higher. A slower memory card may not record video quickly enough.
- If you are viewing videos on your smartphone using a wireless connection to the camera, try viewing them in another location with less wireless interference, or try transferring videos to the smartphone (Editing and Sharing a Video, page 4).
- Transfer important recordings to a computer or smartphone, and format the memory card (Formatting the Memory Card, page 1).
- If the device displays a memory card error alert, first try formatting the memory card (Formatting the Memory Card, page 1) and then, if necessary, replace the memory card (Installing the Memory Card, page 1).
- Update your device to the latest software (Support and Updates, page 7).
Index
saving 3
viewing 4
voice control 5,6
tips 6
W
Wi-Fi, connecting 3
A
advanced driver assistance system (ADAS) 5
alerts 4
audio, proximity points 6
C
camera placement 2
cameras
dash cam 1
red light 5
speed 5
cleaning, device 7
computer, connecting 4
customizing, settings 7
D
dash cam 7
memory card 1
photos 3
playing video 3
recording audio 2
recording video 2
device overview 1
driver alerts 4, 5
E
event detection 2
F
forward collision warning system (FCWS) 4, 5
G
Garmin Express 7
registering the device 7
updating software 7
L
lane departure warning system (LDWS) 5
M
memory card 1,7
installing 1
microSD card 1,7
mounting, windshield 1
P
parking mode cable 3
photos, viewing 3, 4
power key 2
product registration 7
proximity points alerts, settings 6
R
red light cameras 5
registering the device 7
resetting, device 7
resolution 6
S
settings 6
setup 2
software
updating 7
version 7
speed cameras 5
system 6
T
taking, photos 3
Travelapse 3
troubleshooting 7,8
V
video
deleting 3
editing 4
photos, viewing 3
playing 3,4
quality 7,8
recording 2,3
support.garmin.com
- GARMIN DASH CAM™ 45/54/55/65W
- Table of Contents
- Getting Started.... 1
- Dash Cam Recording.... 2
- Viewing Videos and Pictures.... 3
- Driver Awareness Features and Alerts...... 4
- Voice Control....5
- Settings.... 6
- Device Information....7
- Troubleshooting....7
- Getting Started
- WARNING
- Installing the Memory Card
- Formatting the Memory Card
- Removing the Memory Card
- NOTICE
- Installing the Mount onto Your Windshield
- Installing and Setting Up the Garmin Dash Cam
- Setting the Camera Placement
- Turning On the Device Manually
- Turning Off the Device Manually
- Dash Cam Recording
- Saving a Video Recording
- Event Detection
- Turning Audio Recording On or Off
- Taking a Photo
- Travelapse™
- Recording a Travelapse Video
- Recording Videos While Parked
- Parking Mode Cable Wiring Diagram
- Connecting the Parking Mode Cable Accessory to Power
- CAUTION
- Viewing Videos and Pictures
- Saving Unsaved Video Footage
- Deleting a Video or Photo
- Garmin VIRB® App
- Viewing Videos and Photos in the Garmin VIRB App
- Editing and Sharing a Video
- Videos and Photos on Your Computer
- Connecting the Device to Your Computer
- Driver Awareness Features and Alerts
- Forward Collision Warning System
- Forward Collision Warning System Performance Tips
- Lane Departure Warning System
- Lane Departure Warning Performance Tips
- Go Alert
- Red Light and Speed Cameras
- Voice Control
- Controlling the Camera Using Voice Commands
- Turning Voice Control On or Off
- Voice Control Tips
- Settings
- Camera Settings
- Video Resolution Settings
- Driver Assistance Settings
- Proximity Alerts Settings
- System Settings
- Device Setup
- Device Information
- Cleaning the Camera Lens
- Support and Updates
- Setting Up Garmin Express
- Garmin Support Center
- Viewing E-Label Regulatory and Compliance Information
- Select Regulatory.
- Restarting the Device
- Troubleshooting
- My camera feels warm while it is operating
- My memory card has degraded and needs to be replaced
- My video recordings are blurry
- My video recordings are choppy or incomplete
- Index
- W
- A
- C
- D
- E
- F
- G
- L
- M
- P
- R
- S
- T
- V
Brand : GARMIN
Model : Parking Mode Cable
Category : Electronic accessory