
MUMS2EW40 - Food processor BOSCH - Free user manual and instructions
Find the device manual for free MUMS2EW40 BOSCH in PDF.

| Product Type | Food Processor |
| Brand | Bosch |
| Model | MUMS2EW40 |
| Motor Power | 1000 W |
| Bowl Capacity | 4.5 L (stainless steel) |
| Dimensions (H x W x D) | 35 cm x 28 cm x 25 cm |
| Weight | 7.2 kg |
| Voltage | 220–240 V, 50–60 Hz |
| Main Functions | Mixing, kneading, chopping, slicing, shredding, blending, whipping |
| Included Accessories | Dough hook, whisk, blender attachment, slicing/shredding insert, citrus press |
| Speed Settings | 7 speeds + pulse function |
| Bowl Material | Stainless steel |
| Blade Material | Stainless steel |
| Safety Features | Safety locking system, overload protection, non-slip feet |
| Cleaning | Detachable parts dishwasher safe (except motor unit) |
| Repairability Index | 8.0 / 10 (based on user rating) |
| Warranty | 2 years |
Frequently Asked Questions - MUMS2EW40 BOSCH
User questions about MUMS2EW40 BOSCH
0 question about this device. Answer the ones you know or ask your own.
Ask a new question about this device
Download the instructions for your Food processor in PDF format for free! Find your manual MUMS2EW40 - BOSCH and take your electronic device back in hand. On this page are published all the documents necessary for the use of your device. MUMS2EW40 by BOSCH.
USER MANUAL MUMS2EW40 BOSCH
new device on MyBosch now and get free benefits:
bosch-home.com/ welcome
MUM Serie | 2
MUMS2....
[en] User manual Universal kitchen machine 25
3
4
5

natural_image
Illustration of a kitchen mixer with blue bowl and black tool blades (no text or symbols)6
7
8
natural_image
Illustration of a kitchen mixer blending liquid into a bowl, showing the brush and blade (no text or symbols)9
10
11
The image is too blurry to recognize any text content.
natural_image
Technical illustration of a mechanical component with a blue cylindrical component and an arrow indicating rotation (no text or symbols)13
The image is too blurry to recognize any text content.
15
natural_image
Line drawing of a mechanical device with a blue handle and central component (no text or symbols)The image is too blurry to recognize any text content.
17
The image is too blurry to recognize any text content.
19
The image is too blurry to recognize any text content.
| √ | × | × | × | × | |
| √ | √ | √ | √ | √ | |
| √ | √ | √ | √ | √ |
21
 |  |  |  | |||
 |  | 100-600 ml | 4 | 1-6 min | ||
 |  | 1-8 x | 4 | 4-6 min | ||
 |  | 1 | 30 s | |||
| 3 | 4-5 min | |||||
 | 1 | 30 s | ||||
| 2 | 3-4 min | |||||
 |  |  | 1 | 30 s | ||
| 2 | 5-6 min | |||||
 |  | 1 | 30 s | |||
| 2 | 6-7 min | |||||
 |  | 1 | 30 s | |||
| 2 | 4-5 min |
Inhaltsverzeichnis
Sicherheit 8
Restriction on user group...... 27
Safety instructions 27
Avoiding material damage...... 30
Environmental protection and saving energy.... 30
Disposing of packaging 30
Unpacking and checking...... 30
Unpacking the appliance and parts 30
Contents of package.... 30
Setting up appliance 31
Familiarising yourself with your appliance.... 31
Appliance 31
Rotary switch.... 31
Swivel arm 31
Drives 32
Tools.... 32
Parked position 32
Before using for the first time ..... 33
Preparing the appliance.... 33
Basic operation 33
Cable length 33
Moving the swivel arm 33
Inserting bowl 33
Removing bowl.... 33
Inserting tools.... 33
Removing tools 33
Attaching bowl lid 34
Removing bowl lid.... 34
Processing.... 34
Drive cover 35
Cleaning and servicing.... 35
Cleaning products.... 35
Overview of cleaning.... 35
Special accessories...... 36
Application examples 36
Sample recipe 36
Troubleshooting...... 37
Malfunctions 37
Disposal.... 38
Disposing of old appliance .... 38
Customer Service.... 38
Product number (E-Nr.) and production number (FD) 38
Warranty conditions.... 38

Safety
Please read the safety information to ensure that you use the appliance safely.
General information
You can find general information for this instruction manual here.
- Read this instruction manual carefully. Only this will ensure you use the appliance safely and efficiently.
■ Please note the additional instructions when using supplied or optionally available accessories.
■ This manual is intended for the user of the appliance.
■ Follow the safety instructions and warnings. - Keep the instruction manual and the product information safe for future reference or for the next owner.
- Check the appliance after unpacking it. Do not connect the appliance if it has been damaged in transit.
Intended use
Please read the information on intended use to ensure that you use the appliance correctly and safely.
Only use this appliance:
■ As specified in this instruction manual.
■ With genuine parts and accessories.
■ For additional applications described in the instructions for accessories that are optional or come with the appliance.
■ For mixing, kneading and beating food.
■ Under supervision.
■ In private households and in enclosed spaces in a domestic environment at room temperature.
■ for normal processing quantities and for normal processing times for domestic use.
■ Up to an altitude of max. 2000 m above sea level.
Disconnect the appliance from the power supply when:
■ are not using the appliance.
■ the appliance is unattended.
■ assembling the appliance.
■ taking the appliance apart.
■ cleaning the appliance.
■ approaching rotating parts.
■ Change tools.
■ confronted with a fault.
Restriction on user group
Avoid risks to children and vulnerable persons.
This appliance can be used by persons with reduced physical, sensory or mental capabilities or a lack of experience and/or knowledge if they have been given supervision or instruction concerning use of the appliance in a safe way and if they understand the hazards involved.
Children must not play with the appliance.
Cleaning and user maintenance must not be performed by children.
The appliance must not be used by children. Keep children away from the appliance and power cable.
Safety instructions
Observe the safety instructions.

WARNING – Risk of electric shock!
■ If the appliance or the power cord is damaged, this is dangerous.
▶ Never operate a damaged appliance.
▶ Never operate an appliance with a cracked or fractured surface.
▶ Never pull on the power cord to unplug the appliance. Always unplug the appliance at the mains.
▶ If the appliance or the power cord is damaged, immediately unplug the power cord or switch off the fuse in the fuse box.
▶ "Call Customer Service." → Page 38
▶ Repairs to the appliance should only be carried out by trained specialist staff.
en Safety
■ Improper installation is dangerous.
- Connect and operate the appliance only in accordance with the specifications on the rating plate.
■ Incorrect repairs are dangerous.
▶ Repairs to the appliance should only be carried out by trained specialist staff.
▶ Only use genuine spare parts when repairing the appliance.
▶ If the power cord of this appliance is damaged, it must be replaced by the manufacturer, the manufacturer's Customer Service or a similarly qualified person in order to prevent any risk.
■ An ingress of moisture can cause an electric shock.
▶ Never immerse the appliance or the power cord in water or clean in the dishwasher.
▶ Only use the appliance in enclosed spaces.
▶ Never expose the appliance to intense heat or humidity.
- Do not use steam- or high-pressure cleaners to clean the appliance.
■ If the insulation of the power cord is damaged, this is dangerous.
▶ Never let the power cord come into contact with hot appliance parts or heat sources.
▶ Never let the power cord come into contact with sharp points or edges.
▶ Never kink, crush or modify the power cord.
⚠ WARNING – Risk of fire!
Intense heat may cause the appliance and tools to catch fire.
▶ Never place the appliance on or near hot surfaces.
⚠ WARNING – Risk of injury!
■ Rotating drives, tools or accessory parts may cause injury.
- Keep hands, hair, clothing and utensils away from rotating parts.
▶ Only attach and remove tools and accessories once the drive has stopped and you have unplugged the appliance.
▶ Before changing tools or cleaning the appliance, switch off and disconnect it from the mains.
▶ Only use the tools when the bowl is inserted, the lid is fitted and the drive covers are in place.
- Switch on the appliance only if all preparations are complete and the swivel arm is engaged in the position described.
▶ Never open the swivel arm during processing.
▶ Never leave the appliance switched on if the power supply is interrupted. The appliance will automatically start up again following the interruption in the power supply.
■ Operating the appliance with damaged parts may result in injury.
- Parts which show cracks or other damage or do not fit correctly must be replaced with genuine spare parts.
⚠ WARNING – Risk of crushing!
Your hands and fingers could get caught.
▶ Do not reach into the bowl when lowering the swivel arm.
⚠ WARNING – Risk of suffocation!
■ Children may put packaging material over their heads or wrap themselves up in it and suffocate.
- Keep packaging material away from children.
▶ Do not let children play with packaging material.
■ Children may breathe in or swallow small parts, causing them to suffocate.
- Keep small parts away from children.
▶ Do not let children play with small parts.
⚠ WARNING – Risk of harm to health!
Soiling on surfaces may be harmful to health.
▶ Follow the cleaning instructions.
- Clean surfaces which come in contact with food before each use.
Avoiding material damage
Follow these instructions to prevent material damage to your appliance, accessories or other objects in your kitchen.
ATTENTION!
■ Improper use may cause material damage.
▶ Never use different drives at the same time.
▶ Never operate the appliance longer than necessary.
- Do not operate the appliance at no-load.
▶ Never use genuine parts and accessories for other appliances.
- Observe the maximum processing quantities.
- Do not use the bowl to store objects which do not belong to it.
■ During operation warm exhaust air escapes from the vent grille at the rear. If this is blocked, it may cause the appliance to overheat.
- Set up the appliance at a sufficient distance from walls, easily damaged surfaces and other appliances.
Environmental protection and saving energy
Help protect the environment by using your appliance in a way that conserves resources and by disposing of reusable materials properly.
Disposing of packaging
The packaging materials are environmentally compatible and can be recycled.
- Sort the individual components by type and dispose of them separately. Information about current disposal methods are available from your specialist dealer or local authority.
Unpacking and checking
Find out here what you need to note when unpacking the appliance.
Unpacking the appliance and parts
- Take the appliance out of the packaging.
- Take all other parts and the accompanying documents out of the packaging and place them to hand.
- Remove any packaging material.
- Remove any stickers or film.
Contents of package
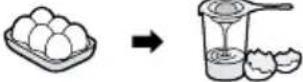
After unpacking all parts, check for any damage in transit and completeness of the delivery.
Note: The appliance comes with additional accessories depending on its features. See the instructions for the accessories to discover the further contents of the package.
→ Fig. 1
| A | Base unit with mixing bowl |
| B | Lid with integrated filling shaft |
| C | Stirrer |
| D | Whisk |
| E | Kneading hook |
| F | Accompanying documents |
Setting up appliance
WARNING
Risk of fire!
Intense heat may cause the appli- ance and tools to catch fire.
▶ Never place the appliance on or near hot surfaces.
ATTENTION!
During operation warm exhaust air escapes from the vent grille at the rear. If this is blocked, it may cause the appliance to overheat.
- Set up the appliance at a sufficient distance from walls, easily damaged surfaces and other appliances.
-
Place the appliance on a stable, level, clean and flat work surface.
-
Pull the power cable out to the required length.
→ "Cable length", Page 33
Do not insert the mains plug.
Familiarising yourself with your appliance
Familiarise yourself with the parts of your appliance.
Appliance
You can find an overview of the parts of your appliance here.
→ Fig. 2
| 1 | Mixing bowl |
| 2 | Lid with integrated filling shaft |
| 3 | Release button for swivel arm |
| 4 | Swivel arm |
| 5 | Rotary switch |
| 6 | Protective cover for drive 2 |
| 7 | Drive 2 |
| 8 | Protective cover for drive 3 |
| 9 | Drive 3 |
| 10 | Vent grille |
| 11 | Main drive |
| 12 | Cord store |
| 13 | Recess for bowl |
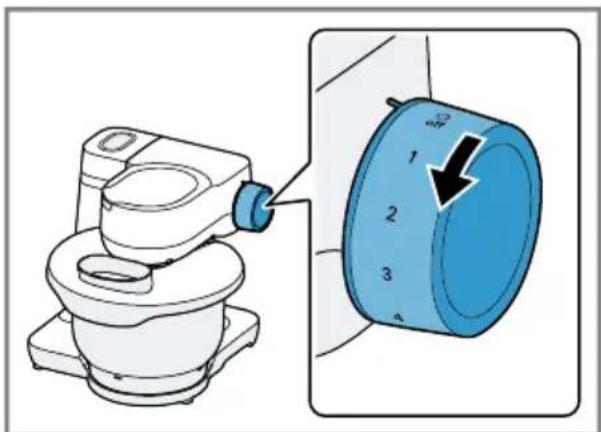
Rotary switch
The rotary switch is used to start and stop processing and select the speed.
Symbol Function
| ○ off Stop processing. |
| 1 Process ingredients at low speed. |
| 4 Process ingredients at maximum speed. |
| P Move the drive to the parked position. |
Swivel arm
The swivel arm can be adjusted and fixed in different positions.
If the release button is pressed, the swivel arm can be moved to the required position.
→ "Moving the swivel arm", Page 33
Swivel arm positions
You can find an overview of the positions of the swivel arm here.
Position Use
| Position 1 Swivel arm is closed. | |
| ■ Process ingredients with tools. | |
| ■ Use accessory on drive 2, e.g. Continuous-feed shredder | |
Position Use
Position 2 Swivel arm is open.

■ Insert or remove bowl.
■ Insert or remove tool.
■ Add the ingredients to the bowl.
Position 3 ■ Use accessory on main drive, e.g. Meat mincer.
■ Use accessory on drive 3, e.g. Blender attachment.
Drives
Your appliance is equipped with different drives, which are specially designed for its tools and accessories.
Note: Drives 2 and 3 come with protective covers.
→ "Drive cover", Page 35
Overview of drives
You can find an overview of the drives and their purposes here.
Drive Use
Drive 1 For the tools.
Drive 1 For accessories, e.g. meat min- cer
Drive 2 For accessories, e.g.
■ Continuous-feed shredder
Citrus press
Drive 3 For accessories, e.g. Blender attachment
Tools
You can find out everything you need to know about the different tools here.
Overview of tools
Use the appropriate tool depending on use.
Tool Use
 | Kneading hook■ Knead heavy dough, e.g. yeast dough.■ Fold in food that is not to be cut, e.g. raisins or chocolate chips. |
 | Stirrer■ Stir food, e.g. cake mixture or mousse.■ Fold in food, e.g. egg whites, cream or raisins. |
 | Whisk■ Beat egg whites and cream.■ Make light dough, e.g. sponge mixture. |
Parked position
Your appliance is equipped with a manual parked position.
Note: The swivel arm will only open or close with the inserted tool when the drive is located in the correct parked position.
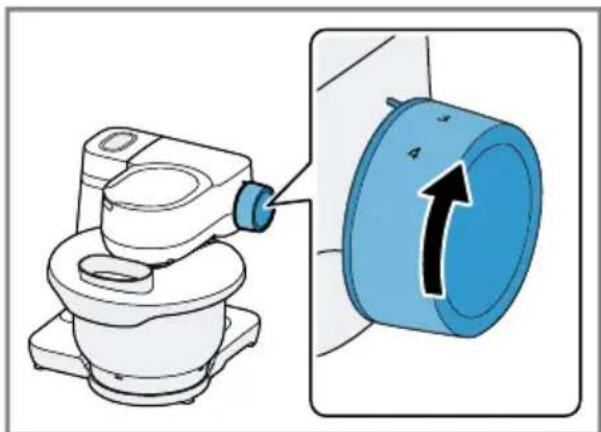
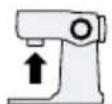
Moving the drive to the parked position
Requirement: The rotary switch is set to Q off
- Set the rotary switch to Pand hold.
√ The drive slowly moves until the correct parked position is reached.
Note: If the drive does not move, the correct parked position has already been reached.
Before using for the first time
Prepare the appliance for use.
Preparing the appliance
- Press the release button and raise the swivel arm until it engages.
→ "Moving the swivel arm", Page 33 - Lift and remove the bowl.
→ "Removing bowl", Page 33 - Clean all parts that come into contact with food before using for the first time.
→ "Cleaning and servicing", Page 35 - Put the cleaned and dried parts out ready for use.
Basic operation
You can find out everything you need to know about operating your appli-ance here.
Cable length
Adjust the length of the power cable to your needs.
Adjusting cable length via cable storage compartment
-
Pull the power cable out to the required length.
-
To shorten the cable, push it into the cable storage compartment.
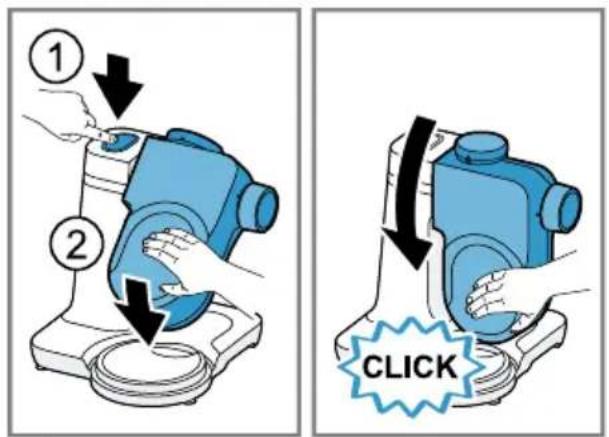
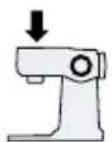
Moving the swivel arm
- Press the release button and raise the swivel arm until it engages.
→ Fig. 3
√ The swivel arm is fixed in position 2.
- Press the release button and move the swivel arm down until it engages in the vertical position.
→ Fig. 4
√ The swivel arm is fixed in position 3.
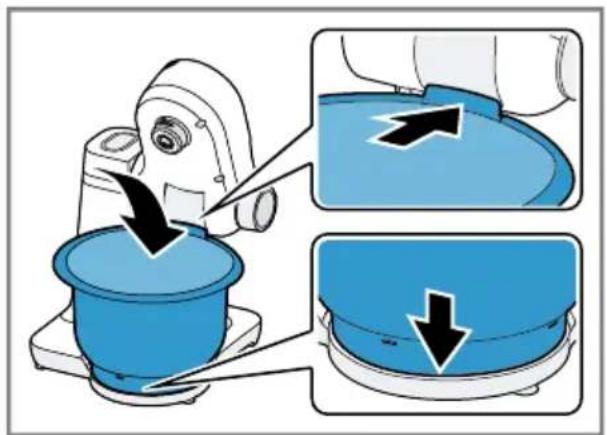
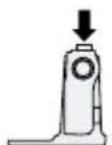
Inserting bowl
- Place the bowl in the base unit.
→ Fig. 5
The bowl must be positioned straight and firm on the base unit.
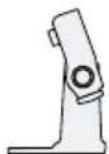
Removing bowl
▶ Lift and remove the bowl.
→ Fig. 6
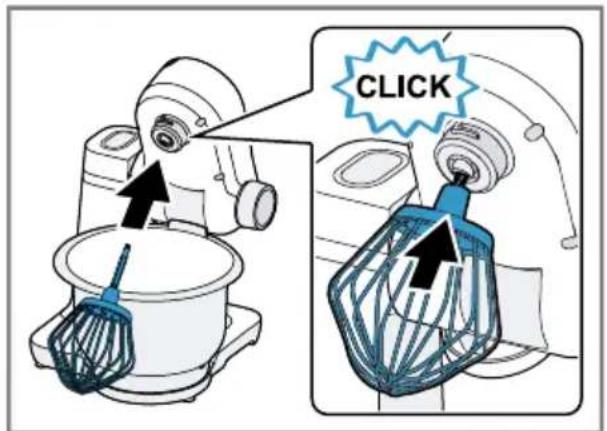
Inserting tools
Requirement: The drive is in the parked position.
→ "Moving the drive to the parked position", Page 32
- Select the tool required.
→ "Overview of tools", Page 32 -
Press the tool into the main drive until it engages.
→ Fig. 7 -
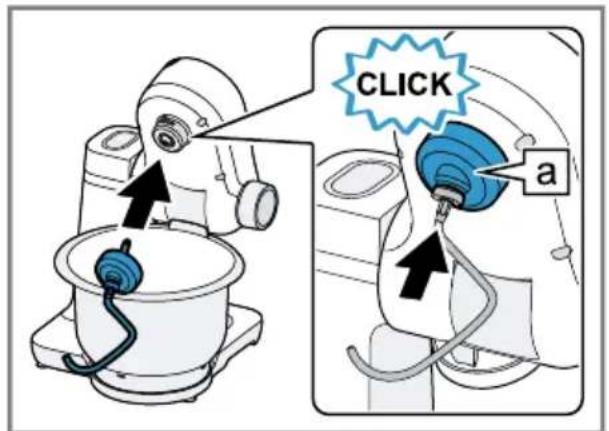
To insert the kneading hook:
-
Insert the kneading hook with the protective cap fitted in the main drive.
- Turn the protective cap until the kneading hook engages fully.
→ Fig. 8
The protective cap a must cover the main drive completely.
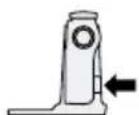
Removing tools
- Pull the tool completely out of the drive.
→ Fig. 9
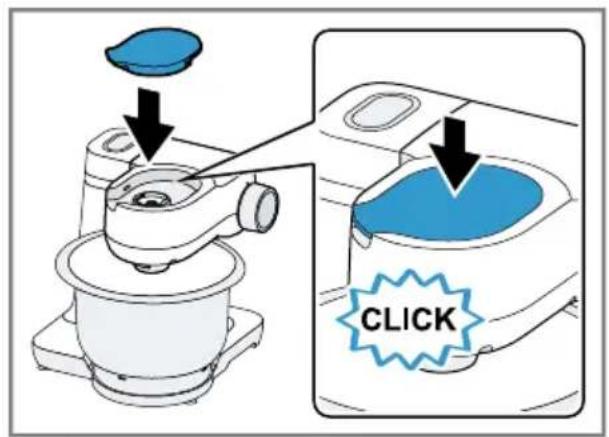
Attaching bowl lid
Requirements
■ The required tool is used here.
■ The bowl has been inserted.
■ The swivel arm is closed.
- Press the release button, raise the swivel arm slightly and hold in place.
→ Fig. 10
- Lift the lid slightly at the front, slide fully onto the bowl and set down.
→ Fig. 11
The filling shaft must face towards the front.
- Push the swivel arm down until it engages.
→Fig. 12
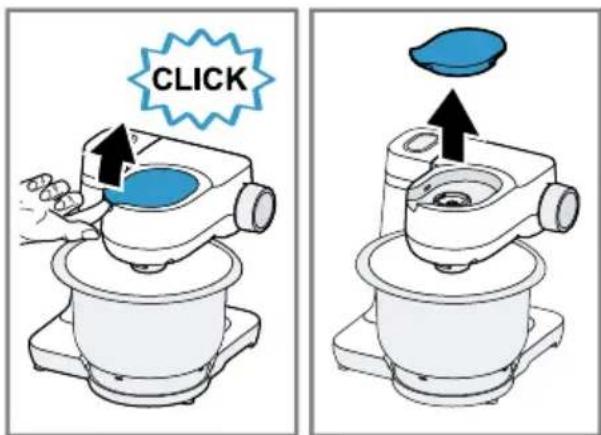
Removing bowl lid
- Press the release button, raise the swivel arm slightly and hold in place.
- Lift the lid slightly at the front and pull it out towards the front.
- Push the swivel arm up until it engages.
Processing
You can find out everything you need to know about processing food here.
Recommended speeds
Observe the recommended speeds for optimum results.
Setting Use
| 1-2 Stir in and mix ingredients. |
| 1-2 Knead heavy dough, e.g. yeast dough. |
| 3-4 Beat and stir ingredients, e.g. whipped cream. |
Processing ingredients with tools
WARNING
Risk of injury!
Rotating drives, tools or accessory parts may cause injury.
- Keep hands, hair, clothing and utensils away from rotating parts.
- Only attach and remove tools and accessories once the drive has stopped and you have unplugged the appliance.
▶ Before changing tools or cleaning the appliance, switch off and disconnect it from the mains.
▶ Only use the tools when the bowl is inserted, the lid is fitted and the drive covers are in place. - Switch on the appliance only if all preparations are complete and the swivel arm is engaged in the position described.
▶ Never open the swivel arm during processing.
▶ Never leave the appliance switched on if the power supply is interrupted. The appliance will automatically start up again following the interruption in the power supply.
Requirements
■ The bowl has been inserted.
■ The required tool is inserted.
-
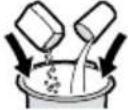
Add the ingredients to the bowl.
-
Press the release button and push the swivel arm down until it engages.
-
Insert the mains plug.
-
Set the rotary switch to the required speed.
→ Fig. 13
-
Process the ingredients until you achieve the required result.
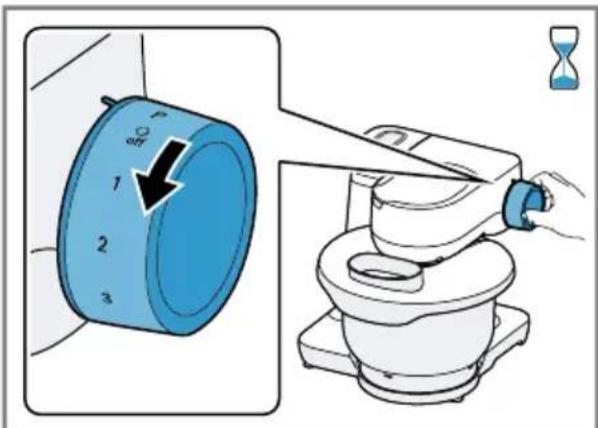
-
Set the rotary switch to ☐ off
→ Fig. 14
Wait until the appliance stops.
- Set the rotary switch to Pand hold.
→ Fig. 15
√ The drive slowly moves until the correct parked position is reached.
- Unplug the mains plug.
Tips
■ You can change the speed at any time during processing or interrupt processing.
■ Clean all parts immediately after use so that residues do not dry on.
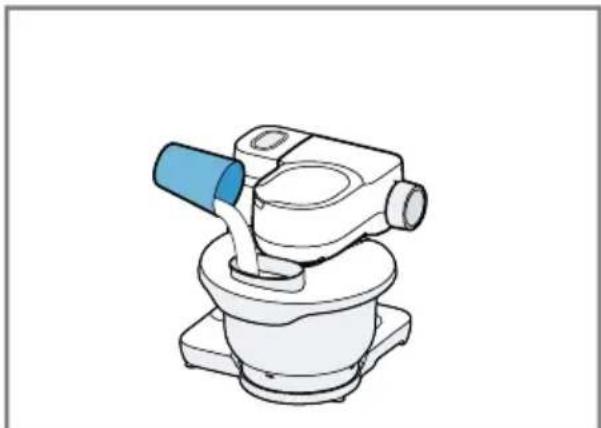
Adding more ingredients
- To add ingredients during processing, use the filling shaft in the lid.
→ Fig. 16
- To add large quantities, set the rotary switch to off
Wait until the appliance stops.
- Set the rotary switch to Pand hold.
→ Fig. 15
√ The drive slowly moves until the correct parked position is reached.
- Remove the bowl lid.
→ "Removing bowl lid", Page 34
-
Add the ingredients to the bowl.
-
Attach the bowl lid.
→ "Attaching bowl lid", Page 34
- Process the ingredients until you achieve the required result.
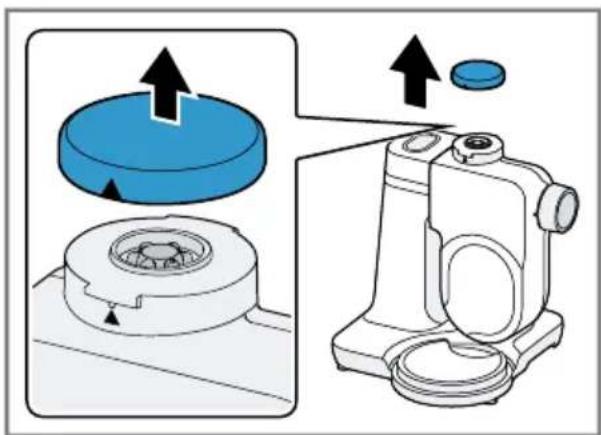
Drive cover
Remove the protective cover to use accessories on drive 2 or 3.
Removing drive cover
- Lift the protective cover of drive 2 by the side lug and remove.
→ Fig. 17
- Pull up the protective cover for drive 3 and remove.
→ Fig. 18
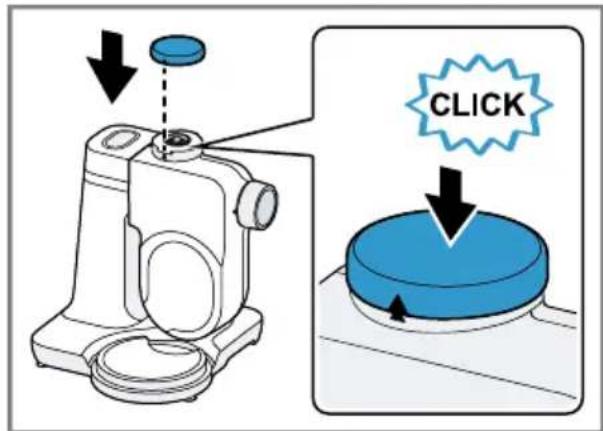
Fitting drive cover
- Position the protective cover for the drive 2 and press in place firmly.
→ Fig. 19
- Position the protective cover for the drive 3 and press in place firmly.
→ Fig. 20
Markings ▲ and must match up.
Note: Always close unused drives with the protective covers.
Cleaning and servicing
To keep your appliance working efficiently for a long time, it is important to clean and maintain it carefully.
Cleaning products
Find out here which cleaning products are suitable for your appli-ance.
ATTENTION!
Using unsuitable cleaning agents or incorrect cleaning may damage the appliance.
- Do not use cleaning agents containing alcohol or spirits.
- Do not use sharp, pointed or metal objects.
- Do not use abrasive cloths or cleaning agents.
Overview of cleaning
You can find an overview of how to best clean the appliance and the other parts here.
→ Fig. 21
en Special accessories
Tip: When processing food such as carrots, plastic parts may become discoloured. Remove discolouration with a soft cloth and a few drops of cooking oil.
You can find out which accessories are available for your appliance in our catalogue, in the online shop or from our after-sales service. www.bosch-home.com
Special accessories
You can buy accessories from the after-sales service, from specialist retailers or online. Only use genuine accessories as these have been specifically designed for your appliance. "Accessories vary from one appliance to another. When purchasing accessories, always quote the exact product number (E no.) of your appliance." → Page 38
Application examples
Observe the comments and figures in the table.
→ Fig. 22
Tip: You can find more application examples and recipes for your appliance online. www.bosch-home.com
Sample recipe
You can find a sample recipe that has been specially developed for your appliance here.
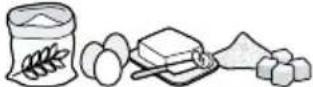
Recipe Ingredients Processing
| Heavy fruit cake ■ 3 eggs | ■ 135 g sugar■ 135 g margarine■ 255 g flour■ 10 g baking powder■ 150 g currants■ 150 g mixed dried fruitNote:Process max. 2 times the quantity at the same time. | ■ Insert stirring whisk.■ Add all ingredients except the dried fruit.■ Process for 30 seconds at setting 1.■ Then process for 3-5 minutes at setting 3.■ Select setting 1.■ Add the dried fruit within the next 30-60 seconds. |
Troubleshooting
You can rectify minor faults on your appliance yourself. Read the troubleshooting information before contacting after-sales service. This will avoid unnecessary costs.

WARNING
Risk of electric shock!
Incorrect repairs are dangerous.
- Repairs to the appliance should only be carried out by trained specialist staff.
▶ Only use genuine spare parts when repairing the appliance.
If the power cord of this appliance is damaged, it must be replaced by the manufacturer, the manufacturer's Customer Service or a similarly qualified person in order to prevent any risk.
Malfunctions
| Fault Cause troubleshooting | ||
| The appliance is not working. | The mains plug of the power cord is not plugged in. | ► Connect the appliance to the power supply. |
| The circuit breaker is faulty. | ► Check the circuit breaker in the fuse box. | |
| There has been a power cut. | ► Check whether the lighting in your kitchen or other appliances are working. | |
| The swivel arm cannot be opened or closed because the tool is jammed in the bowl. | Drive is not in the parked position. | 1. Set the rotary switch to .○ off2. When the swivel arm is open, remove the tool and close the swivel arm.3. Set the rotary switch to and hold it in this position.✓ The drive slowly moves until the correct parked position is reached. |
Disposal
Find out here how to dispose of old appliances correctly.
Disposing of old appliance
Valuable raw materials can be re-used by recycling.
- Unplug the appliance from the mains.
- Cut through the power cord.
- Dispose of the appliance in an environmentally friendly manner.

This appliance is labelled in accordance with European Directive 2012/19/EU concerning used electrical and electronic appliances (waste electrical and electronic equipment - WEEE). The guideline determines the framework for the return and recycling of used appliances as applicable throughout the EU.
Customer Service
If you have any queries, are unable to rectify faults on the appliance yourself or if your appliance needs to be repaired, contact Customer Service. You can solve many problems yourself by consulting the information on troubleshooting in these instructions or on our website. If this is not the case, contact our after-sales service. We always find an appropriate solution.
With any warranty claims, we will make sure that your appliance is repaired by trained after-sales technicians using genuine spare parts, including after the manufacturer's warranty has expired.
Function-relevant genuine spare parts according to the corresponding Eco-design Order can be obtained from Customer Service for a period of at least 7 years from the date on which your appliance was placed on the market within the European Economic Area.
Note: Under the terms of the manufacturer's warranty the use of Customer Service is free of charge.
Detailed information on the warranty period and terms of warranty in your country is available from our after-sales service, your retailer or on our website.
If you contact Customer Service, you will require the product number (E-Nr.) and the production number (FD) of your appliance.
The contact details for Customer Service can be found in the Customer Service directory at the end of the manual or on our website.
Product number (E-Nr.) and production number (FD)
You can find the product number (E-Nr.) and the production number (FD) on the appliance's rating plate. Make a note of your appliance's details and the Customer Service telephone number to find them again quickly.
Warranty conditions
You can make warranty claims for your appliance under the following conditions.
The guarantee conditions for this appliance are as defined by our representative in the country in which it is sold. Details regarding these conditions can be obtained from the dealer from whom the appliance was purchased. The bill of sale or receipt
must be produced when making any claim under the terms of this guarantee.
fr
Table des matières
Sécurité...... 41
⚠ WAARSCHUWING – Risico van brand!
⚠ WAARSCHUWING – Verstikkingsgevaar!
⚠ WAARSCHUWING – Gezondheidsrisico!
⚠ WAARSCHUWING Risico van brand!
Stand 2 Draaiarm is geopend.
⚠️ ADVARSEL – Brandfare!
⚠️ ADVARSEL – Fare for klemning!
⚠️ ADVARSEL – Fare for kvelning!
Central Service Contacts
GB Great Britain BSH Home Appliances Ltd. Grand Union House, Old Wolverton Road, Wolverton Milton Keynes MK12 5PT To arrange an engineer visit, to order spare parts and accessories or for product advice please visit www.bosch-home.co.uk Or call Tel.: 0344 892 8979* *Calls are charged at the basic rate, please check with your telephone service provider for exact charges.
IE Republic of Ireland BSH Home Appliances Ltd. M50 Business Park, Ballymount Road Upper, Walkinstown Dublin 12 To arrange an engineer visit, to order spare parts and accessories or for product advice please call Tel.: 01450 2655* www.bosch-home.ie *Calls are charged at the basic rate, please check with your telephone service provider for exact charges
IT Italia, Italy BSH Elettrodomestici S.p.A. Via. M. Nizzoli 1 20147 Milano (MI) Tel. 02 412 678 100 mailto:info.it@bosch-home.com www.bosch-home.com/it
LU Luxembourg BSH électroménagers S.A. 13-15, ZI Breedeweues 1259 Senningerberg Tel.: 26349 811 Reparaturen: lux-repair@bshg.com Ersatzteile: lux-spare@bshg.com www.bosch-home.com/lu
MT Malta Oxford House Ltd. Notabile Road Mriehel BKR 14 Tel.: 021 442 334 www.oxfordhouse.com.mt
NL Nederland, Netherlands BSH Huishoudapparaten B.V. Taurusavenue 36 2132 LS Hoofddorp Storingsmelding/Onderdelenverkoop: Tel.: 088 424 4010 mailto:bosch-contactcenter@bshg.com mailto:bosch-onderdelen@bshg.com www.bosch-home.nl
NO Norge, Norway BSH Husholdningsapparater A/S Grensesvingen 9 0661 Oslo Tel.: 22 66 05 54, -06 00 mailto:Bosch-Service-NO@bshg.c www.bosch-home.no
NZ New Zealand BSH Home Appliances Ltd. Level 3, Air NZ Building, Smales Farm Business Park, 74 Taharoto Road, Taka- puna Auckland 0622 Tel.: 0800 245 700* mailto:aftersales.nz@bshg.com www.bosch-home.co.nz *Mon-Fri 8.30am to 5pm (exclude public holidays)
SE Sverige, Sweden BSH Home Appliances AB Landsvägen 32 169 29 Solna Tel.: 0771 197 000 local rate mailto:Bosch-Service-SE@bshg.com www.bosch-home.se
SG Singapore, 新加坡
BSH Home Appliances Pte. Ltd.
38C Jalan Pemimpin, #01-01
Singapore 577180
Tel.: 6751 5000*
mailto:bshsgp.service@bshg.com
www.bosch-home.com.sg
*Mon-Fri 9am to 6pm, Sat: 9am to 1pm
(exclude public holidays)
ZA South Africa
BSH Home Appliances (Pty) Ltd.
96 Fifteenth Road, Randjespark
1685 Midrand - Johannesburg
Tel.: 086 002 6724
mailto:bsh@iopen.co.za
mailto:applianceserviceza@bshg.com
www.bosch-home.com/za

Thank you for buying a Bosch Home Appliance!
Register your new device on MyBosch now and profit directly from:
- Expert tips & tricks for your appliance
• Warranty extension options
• Discounts for accessories & spare-parts
• Digital manual and all appliance data at hand - Easy access to Bosch Home Appliances Service
Free and easy registration – also on mobile phones: www.bosch-home.com/welcome
BOSCH HOME APPLIANCES SERVICE
Looking for help? You'll find it here.
Expert advice for your Bosch home appliances, help with problems or a repair from Bosch experts.
Find out everything about the many ways Bosch can support you: www.bosch-home.com/service
Contact data of all countries are listed in the attached service directory.