
Scout RX2 - Robot vacuum MIELE - Free user manual and instructions
Find the device manual for free Scout RX2 MIELE in PDF.


| Product Type | Robot vacuum cleaner |
| Brand | Miele |
| Model | Scout RX2 |
| Height | 85 mm (3.35 in) |
| Operating Voltage | 14.4 V (robot), 230-240 V/50 Hz (base station) |
| Battery Type | Lithium-ion rechargeable (YCR-M05 for RX2, YCR-MT12 for Home Vision) |
| Charging Time | Up to 150 min (RX2) / 180 min (Home Vision) |
| Runtime | Up to 1 hour (RX2) / 2 hours (Home Vision) |
| Dust Box Capacity | Approx. 0.5 L (estimated) |
| Operating Modes | Auto, Spot, Turbo, Silent, Base |
| Connectivity | WiFi module (2.4 GHz), app "Scout RX2" |
| Video Function | Yes (Scout RX2 Home Vision models only) |
| Sensors | Toppling protection (drop sensors), cameras, collision sensor |
| Max Crossing Height | 17 mm (adjustable to 6 mm) |
| Accessories Included | Base station, remote control, 2 side brushes, magnetic strip, power supply with adapter |
| Maintenance | Empty dust box after each use; clean filters, side brushes, roller brush, front wheel, sensors as needed |
| Replacement Intervals | Side brushes: 1 year; Roller brush: 1 year; Exhaust filter: 6 months; Dust box seals: 1 year |
| Remote Control Batteries | 2 x 1.5 V AAA (not rechargeable) |
| Safety Certifications | RCM (Australia/NZ), CE (EU), UKCA |
| Warranty | 2 years (UK, subject to registration) |
Frequently Asked Questions - Scout RX2 MIELE
User questions about Scout RX2 MIELE
0 question about this device. Answer the ones you know or ask your own.
Ask a new question about this device
Download the instructions for your Robot vacuum in PDF format for free! Find your manual Scout RX2 - MIELE and take your electronic device back in hand. On this page are published all the documents necessary for the use of your device. Scout RX2 by MIELE.
USER MANUAL Scout RX2 MIELE
natural_image
Close-up of a robotic vacuum cleaner on a wooden floor, no visible text or symbolsen Operating instructions Robot vacuum cleaner
natural_image
Gray circular button with white play and double arrow icons (no text or symbols)natural_image
Simple graphic of a play button with two vertical bars, no text or symbols presentnatural_image
Gray circular button with white play and double arrow icons (no text or symbols)
natural_image
Simple graphic of a play button with two vertical bars, no text or symbols present.natural_image
Gray button with a circular play symbol and double vertical bars, no text or symbols present.
natural_image
Simple play button icon with two vertical bars inside an oval (no text or symbols)natural_image
Gray circular button with white play and double arrow icons (no text or symbols)natural_image
Simple play button icon with two vertical arrows, no text or symbols presentnatural_image
Simple graphic of a play button with two vertical arrows, no text or symbols present.natural_image
Simple diagram with a plus sign and an upward arrow inside a curved shape (no text or symbols)
natural_image
Simple diagram with a V-shaped symbol inside a rounded rectangle, no text or labels presentde
natural_image
Simple diagram with a plus sign above an inverted triangle (no text or labels)
natural_image
Simple diagram with a curved shape and a white checkmark inside, no text or symbols present.natural_image
Simple black outline of a house on a light background (no text or symbols)natural_image
3D diagram of a mechanical component with a downward arrow indicating force or direction (no text or symbols)natural_image
Diagram of a mechanical device with internal components and directional arrows indicating motion (no text or symbols)natural_image
Diagram of a mechanical assembly with rollers and guide rails, showing internal components and a downward arrow (no text or symbols)natural_image
Diagram of a mechanical component with a downward arrow indicating force or direction (no text or symbols)natural_image
Technical diagram of a mechanical assembly with directional arrows indicating motion or force (no text or symbols present)natural_image
Mechanical assembly diagram showing internal components and motion direction (no text or symbols)de
natural_image
3D diagram of a mechanical component with an upward arrow indicating motion or force (no text or symbols)natural_image
Technical line drawing of a mechanical assembly with brackets and mounting holes (no text or symbols)natural_image
Mechanical component diagram showing a rotating shaft and housing (no text or symbols)natural_image
Technical diagram of a mechanical component with two upward arrows indicating force or movement (no text or symbols present)natural_image
Technical diagram of a mechanical component with an arrow indicating rotational motion (no text or symbols present)natural_image
Diagram of a mechanical or electrical component with directional arrows and a central circular component (no text or symbols)natural_image
Diagram of a device with a handle and internal flow, showing directional arrows (no text or symbols)natural_image
Mechanical assembly diagram showing a rotating wheel with arrows indicating motion direction (no text or symbols)natural_image
Technical diagram of a mechanical assembly with internal components and arrows indicating parts (no text or symbols)natural_image
Mechanical assembly diagram showing a gear mechanism with an upward arrow indicating motion (no text or symbols present)natural_image
Technical line drawing of a mechanical assembly with scissors and internal components (no text or symbols)natural_image
Technical line drawing of a mechanical component with internal channels and housing (no text or symbols)natural_image
Diagram of a mechanical component with arrows indicating flow or movement, no visible text or symbolsnatural_image
Mechanical assembly diagram showing a gear mechanism with a downward arrow indicating motion (no text or symbols present)natural_image
Technical line drawing of a mechanical assembly with internal components (no visible text or symbols)natural_image
Illustration of two identical mechanical components with labeled parts (L and R) and a central circular component, no text or symbols present.natural_image
Cross-sectional diagram of a mechanical device showing internal components and a directional arrow (no text or symbols)natural_image
Diagram of a mechanical assembly with a central arrow indicating direction, no text or symbols presentnatural_image
Mechanical assembly diagram showing a gear and rotor components (no text or symbols)natural_image
Diagram showing a device with a lid and a close-up view of its internal structure (no text or symbols)natural_image
Diagram of a mechanical component with a lever and central shaft, no text or symbols presentnatural_image
Two mechanical devices with internal components, one showing a downward arrow and the other showing a right-handled component (no text or symbols visible)natural_image
Diagram of a mechanical component with directional arrows indicating movement or force (no text or symbols)natural_image
Technical diagram showing mechanical assembly with arrows indicating motion or force (no text or symbols)natural_image
Technical diagram of a mechanical component with a downward arrow indicating motion (no text or symbols)natural_image
Technical diagram showing a mechanical component with an arrow indicating direction, no visible text or symbolsnatural_image
Technical diagram showing mechanical components and directional arrows, no readable text or symbols presentnatural_image
Technical diagram of a mechanical component with a downward arrow indicating motion (no text or symbols)natural_image
Two abstract icons: a square with a dot and a circular motion line (no text or symbols)Warning and Safety instructions.... 39
Caring for the environment 45
Guide to the appliance....46
Functions and features of the robot vacuum cleaner.... 48
Accessories supplied 48
Preparing for use.... 48
Use 50
Switching on and off 50
Starting vacuuming 50
Finishing vacuuming if vacuuming started from the base station.... 51
Finishing vacuuming if vacuuming started from somewhere in the room.... 51
Vacuuming manually 51
Interrupting vacuuming 51
Manual navigation (without vacuuming).... 52
Directing the robot vacuum cleaner to the base station 52
Operating modes.... 52
Select operating mode.... 52
To finish using the current operating mode.... 53
Setting the timer.... 53
Deactivating the timer 54
Activating the timer / displaying a set start time 54
Deactivating the acoustic signals.... 55
Reducing the maximum crossing over height.... 55
App "Scout RX2" 55
Video function 56
Maintenance 57
Emptying the dust box 57
Cleaning the dust box 58
Cleaning the exhaust filter.... 58
Cleaning the side brushes.... 58
Cleaning the roller brush 59
Cleaning the dust box seals.... 60
Replacing the dust box seal unit.... 60
Cleaning the front wheel.... 60
Cleaning the sensors.... 61
Replacing batteries in the remote control 61
Replacing the rechargeable battery 62
en - Contents
Cleaning and care 63
Storage/Factory default settings 63
Service....64
Contact in case of malfunction 64
Warranty 64
Problem solving guide 65
Error messages 68
Technical data.... 69
Conformity declaration.... 69
Copyright and licences 70
Electrical connection for the UK.... 71
Electrical connection AU, NZ 71
This robot vacuum cleaner complies with all current local and national safety requirements. Incorrect use can, however, lead to personal injury and damage to property.
Please read the operating instructions before using the robot vacuum cleaner for the first time. They contain important information on the safety, use and maintenance of the robot vacuum cleaner. This prevents both personal injury and damage to the appliance.
Keep these operating instructions in a safe place and pass them on to any future owner.
Switch the robot vacuum cleaner off before any maintenance work and cleaning and if it is not going to be used for a longer period of time. It should also be switched off when dealing with problems. To do so press switch I/O on the side of the robot vacuum cleaner to the 0 position. The same should be done if you notice any unusual behaviour with your robot vacuum cleaner.
Correct application
This robot vacuum cleaner is intended for cleaning flooring in domestic households and similar working and residential environments.
The robot vacuum cleaner is not intended for outdoor use.
The robot vacuum cleaner must only be used for domestic household purposes to vacuum dry floor surfaces. Any other usage, modification or alteration is not supported by the manufacturer and could be dangerous.
The robot vacuum cleaner can only be used by people with reduced physical, sensory or mental capabilities, or lack of experience or knowledge, if they are supervised whilst using it or have been shown how to use it in a safe way and understand and recognise the consequences of incorrect operation.
Safety with children
Danger of suffocation. Packaging, e.g. plastic wrappings, must be kept out of the reach of babies and children. Whilst playing, children could become entangled in packaging or pull it over their head and suffocate.
Children under 8 years of age must be kept away from the robot vacuum cleaner unless they are constantly supervised.
Children 8 years and older may only use the robot vacuum cleaner unsupervised if they have been shown how to use it safely and recognise and understand the consequences of incorrect operation.
Children must not be allowed to clean or maintain the robot vacuum cleaner unsupervised.
▶ Please supervise children in the vicinity of the robot vacuum cleaner and do not let them play with it.
▶ Keep the rechargeable battery and the batteries for the remote control out of the reach of children.
Technical safety
The Robot vacuum cleaner operates at 14.4 V.

It is classified as a class III appliance.
This appliance is supplied by a safety extra-low voltage (SELV) power source where the voltage is low enough to protect users from the risk of electrical shock. A Class II plug-in power supply is used for supplying power to charge the robot vacuum cleaner.
Before each use of the robot vacuum cleaner check both the vacuum cleaner and all of the accessories supplied with it for any visible signs of damage. Do not use a damaged appliance or damaged accessories.
The mains electrical plug must be fitted with an appropriate fuse.
▶ AUS/NZ: The mains electrical outlet must be fitted with an appropriate circuit breaker.
▶ Compare the connection data on the data plate of the robot vacuum cleaner and the power supply (voltage and frequency) with that of the mains electricity supply. This data must match exactly.
▶ Reliable and safe operation of this robot vacuum cleaner can only be assured if the base station has been connected to the mains electricity supply.
While the robot vacuum cleaner is under warranty, repairs should only be undertaken by a Miele authorised service technician. Otherwise the warranty will be invalidated.
▶ Repairs should only be carried out by a Miele authorised service technician. Repairs and other work by unqualified persons can cause considerable danger to users.
▶ Make sure that the mains electrical cable is not damaged, bent or twisted. Do not place any heavy items on top of it.
▶ Do not let the robot vacuum cleaner travel over the mains cable or other cables.
▶ Only use the parts supplied for charging the rechargeable battery (adapter, power unit and base station).
▶ Batteries and rechargeable batteries will deplete over time. They can then leak corrosive fluids. Avoid contact with the eyes and skin. In the event of contact, rinse thoroughly with water and seek medical advice.
▶ AUS/NZ: To deal with leaking batteries, refer to the Safety Data Sheet (contact Miele to request a copy).
The robot vacuum cleaner is fitted with sensors to detect steps and drops in height. Do not cover these sensors or the camera, and ensure that the function of the sensors is not hindered by obstacles whilst the cleaner is moving.
Do not attach any adhesive labels to the front of the base station as this conceals an infrared transmitter. Do not place any items in front of it.
Do not immerse the robot vacuum cleaner or the parts supplied in water. Clean all parts with a dry or slightly damp cloth only.
Do not drop the robot vacuum cleaner or any of the accessories supplied with it. Items that have been dropped or damaged should not be used for safety reasons.
▶ AUS/NZ: The robot vacuum cleaner must only be supplied at safety extra low voltage corresponding to the marking on the appliance.
▶ Miele can only guarantee the safety of the appliance when genuine original Miele replacement parts are used. Faulty components must only be replaced by Miele spare parts.
Correct use
▶ Do not use the robot vacuum cleaner without the dust box, pre-filter and exhaust filter fitted.
Remove all breakable or lightweight items from the floor and make sure that the robot vacuum cleaner cannot become entangled in cords, curtains, fringes, cables or similar.
▶ Animals must be kept away from the robot vacuum cleaner. Do not allow animals to stand or sit on the robot vacuum cleaner.
▶ Take appropriate measures to prevent the robot vacuum cleaner falling down large drops, e.g. from galleries or balconies. This can be done, for instance, by setting up physical barriers.
Do not use the robot vacuum cleaner to vacuum up anything which has been burning or is still glowing e.g. cigarettes, ashes or coal, whether glowing or apparently extinguished. Do not use it in the vicinity of a fireplace.
Do not use the robot vacuum cleaner to vacuum up any water, liquid or damp dirt. Wait until any freshly cleaned or shampooed carpets or floor coverings are completely dry before attempting to vacuum.
Do not use the robot vacuum cleaner to vacuum toner dust. Toner, such as that used in printers and photocopiers, can conduct electricity.
Do not use the robot vacuum cleaner to vacuum up any inflammable or combustible liquids or gases and do not use it in areas where such substances are stored.
Exercise constant care, and do not sit or lie on the surface being cleaned whilst the vacuum cleaner is running. This is to prevent the risk of loosely fitting clothes or long hair coming into contact with the roller brush or other moving parts of the robot vacuum cleaner.
Handling the rechargeable battery and remote control batteries:
▶ Please contact Miele Service before sending the rechargeable battery.
▶ Do not drop or throw the rechargeable battery. For safety reasons do not continue to use a rechargeable battery which has been dropped or damaged.
Keep the rechargeable battery or the batteries away from naked flames or other heat sources. Do not heat the rechargeable battery or batteries or place them in direct sunlight.
▶ Do not dismantle the rechargeable battery.
▶ Do not cause a short circuit by bridging the contacts of the rechargeable battery or the batteries, either unintentionally or deliberately.
Do not allow the rechargeable battery or the batteries to come into contact with liquids.
Do not attempt to recharge the remote control batteries.
▶ Never continue to use the rechargeable battery if you notice an unusual smell from it, if liquid is leaking from it, it is significantly overheating or if it is discoloured or deformed. Dispose of the rechargeable battery immediately.
▶ Disposing of the batteries and the rechargeable battery: remove the rechargeable battery from the robot vacuum cleaner and the batteries from the remote control. Insulate the metal contacts with adhesive tape to prevent short circuits. Dispose of the batteries and the rechargeable battery in a municipal recycling facility. Dispose of the batteries and the rechargeable battery safely. Do not dispose of batteries or the rechargeable battery with normal household waste.
The battery must be removed before the appliance is scrapped.
Accessories
▶ Only use genuine accessories with the “ORIGINAL Miele” logo on them. The manufacturer cannot otherwise guarantee the safety of the product.
Miele cannot be held liable for damage caused by incorrect use or operation or by non-compliance with these Warning and Safety instructions.
Disposal of the packing material
The packaging is designed to protect the appliance from damage during transportation. The packaging materials used are selected from materials which are environmentally friendly for disposal and should be recycled.
Recycling the packaging reduces the use of raw materials in the manufacturing process and also reduces the amount of waste in landfill sites.
Disposing of your old appli- ance
Electrical and electronic appliances often contain valuable materials. They also contain specific materials, compounds and components, which were essential for their correct function and safety. These could be hazardous to human health and to the environment if disposed of with your domestic waste or if handled incorrectly. Please do not, therefore, dispose of your old appliance with your household waste.
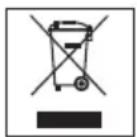
Please dispose of it at your local community waste collection / recycling centre for electrical and electronic appliances, or contact your dealer or Miele for advice. You are also responsible (by law, depending on country) for deleting any personal data that may be stored on the appliance being disposed of. Please ensure that your old appliance poses no risk to children while being stored prior to disposal.
Disposing of old batteries and rechargeable batteries
Some electrical and electronic appliances contain batteries and rechargeable batteries which, when depleted, must not be thrown away with your household waste. You are required by law (depending on country) to remove any removable batteries or rechargeable batteries and to dispose of them in a suitable recycling box for batteries. This service is free of charge. Batteries and rechargeable batteries contain substances which can damage human health and the environment.
Further instructions regarding disposal are given on batteries and rechargeable batteries. A bin with a line through it means that the battery or rechargeable battery must on no account be disposed of with your household waste. A bin with a line through it which also has one or several chemical symbols on it, indicates that the battery or rechargeable battery contains lead (Pb), cadmium (Cd) and/or mercury (Hg).
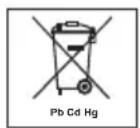
Old batteries and rechargeable batteries contain important raw materials which can be recycled. Disposing of batteries and rechargeable batteries separately makes them easier to handle and recycle.
Illustrations A, B and C for this section are on the pull-out pages in the back of these operating instructions.
A – Robot vacuum cleaner top and bottom
① Indicator field
② WiFi indicator
③ Video function indicator (for Scout RX2 Home Vision)
④ Time mode indicator (am/pm)
⑤ Start/Pause sensor (▶II)
⑥ Cameras
⑦ Impact protection
⑧ On/Off switch (I/O)
⑨ Depression to open the storage compartment
⑩ Silent vacuuming mode sensor
⑪ Turbo vacuuming mode sensor
⑫ Base sensor
⑬ Spot vacuuming mode sensor
⑭ Auto standard vacuuming mode sensor
⑮ Timer indicator
⑯ Rechargeable battery status indicator
⑰ Side brushes
⑱ Roller brush
⑲ Front wheel
⑳ Sensors (toppling protection)
②1 Charging contacts
⑳ Roller brush cover
②3 Drive wheels
⑳ Suction nozzle with sealing lip unit
⑳ Back wheel
B - Base station and remote control
Base station
① Cable rewind
② Cable guides
③ Socket for the power supply plug (not visible in the illustration)
④ Charging contacts
Remote control
① Power button (switch on and off)
② Base button (direct vacuum cleaner to base station)
③ OK confirmation button with direction buttons around it
④ Start/Pause button (▶II) (start/interrupt vacuuming)
⑤ Mode button (for selecting operating mode)
⑥ WIFI button (activate/deactivate WiFi)
⑦ Clock button (set time of day)
⑧ Timer button (set the timer)
⑨ Mute button (activate/deactivate acoustic signals)
⑩ Climb button (reduce crossing over height)
⑪ Battery compartment (at the back)
C - Dust box
① Handle
② Cleaning tool with wiper
③ Wiper button
④ Lid
⑤ Release buttons for the lid
⑥ Dust compartment
⑦ Pre-filter
⑧ Exhaust filter
⑨ Exhaust filter compartment lid
Functions and features of the robot vacuum cleaner
The robot vacuum cleaner is suitable for the daily cleaning of short pile carpets and fitted carpets, as well as hard flooring.
Please observe the flooring manufacturer's cleaning and care instructions.
The robot vacuum cleaner is fitted with cameras and sensors. It continually saves room plans as well as information regarding areas it can access freely. The robot vacuum cleaner uses this data to create an efficient vacuuming plan of the surfaces to be vacuumed, which it can then vacuum autonomously.
Accessories supplied
- Remote control / two batteries
- Two side brushes
- Power supply unit with plug
– Country-specific power adapter - Base station
- Magnetic strip
Preparing for use
Illustrations 1 - 10 for this section are on the last fold-out page at the end of these operating instructions.
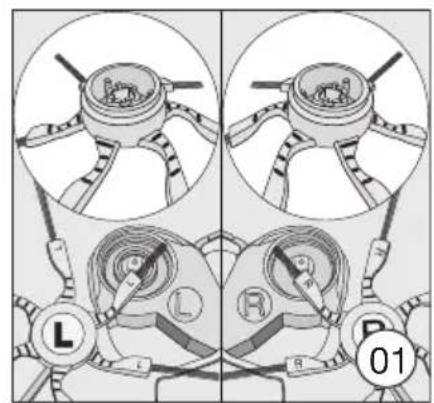
Inserting the side brushes (Fig. 01)
■ Place the robot vacuum cleaner upside down on a level, clean surface.
■ Press the two side brushes carefully onto their pins until they audibly engage. Take care to comply with the markings L and R.
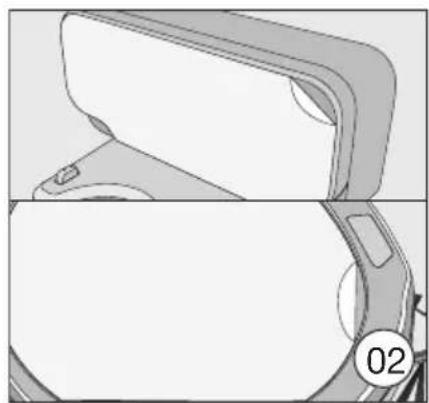
Removing the protective foil (Fig. 02)
■ Remove the protective foil from the base station and from the top of the robot vacuum cleaner.
Placing the batteries in the remote control (Fig. 03)
■ Remove the battery compartment cover.
■ Insert the two batteries supplied. Take care with the polarity.
■ Close the battery compartment cover.
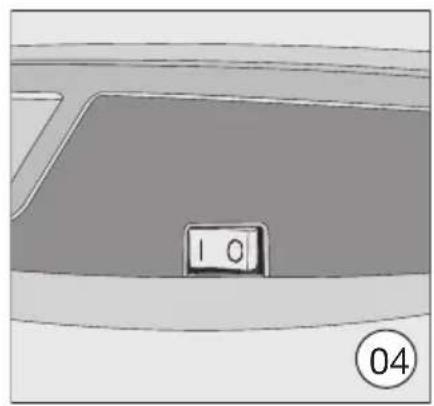
Switching on the robot vacuum cleaner (Fig. 04)
■ Press the I/O switch on the side of the robot vacuum cleaner to the I position.
The rechargeable battery status indicator lights up in the display. The robot vacuum cleaner will switch into standby after approx. 60 seconds. The robot vacuum cleaner is reactivated by pressing any button on the remote control or one of the sensor fields in the display.
Connecting the base station (Figs. 05 - 07)
■ Place the base station on a level surface against a free wall within easy access of a power socket. Ensure that there is an obstacle-free distance of at least 1.5 m in front and 0.5 m to the right and left of the base station (Fig. 05).
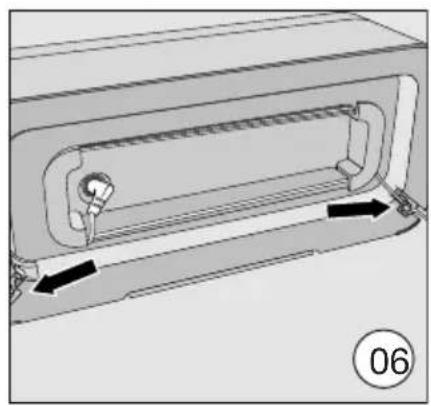
■ Insert the supplied power supply plug into the socket at the back of the base station. You can wind excess cable around the cable rewind. Guide the cable through one of the two cable runs (Fig. 06).
■ Insert the country-specific power adapter into the power supply until it audibly engages and then plug it into the selected power socket (Fig. 07).
Charging the rechargeable battery (Fig. 08)
The rechargeable battery is supplied not fully charged. Before using for the first time, it must be fully charged while the robot vacuum cleaner is switched on (switch I/O to I).
The battery can also be charged when the robot vacuum cleaner is switched off (switch I/O to 0). In this case, the vacuum cleaner indicators will not react.
■ Connect the robot vacuum cleaner correctly to the charging contacts on the connected base station.
As the rechargeable battery charges, the status indicator flashes in the display.
The charging process takes up to 150 minutes for the Scout RX2 and up to 180 minutes for the Scout RX2 Home Vision.
You can then vacuum for up to one hour with the Scout RX2 and up to two hours with the Scout RX2 Home Vision.
Rechargeable battery status indicator in the display
Red charged capacity approx. 0% - 20%
Orange charged capacity approx. 20% - 50%
Green charged capacity approx. 50% - 100%
Setting the time of day (Fig. 09)
You can choose between a 24 hour clock and a 12 hour am/pm clock.
Use the remote control to set the time of day.
■ Briefly press the Clock button.
24h will appear in the display.
■ Press the OK button if you want a 24 hour clock.
■ Press the + button if you want a 12 hour am/pm clock and confirm 12h with OK.
The hour display flashes in the indicator field.
■ Press the + or - direction button to set the current hour.
■ Press the OK button to confirm your selection.
The minute display flashes in the indicator field.
■ Press the + or - direction button to set the current minutes.
■ Press the OK button to confirm your selection.
If you want to alter the time of day, proceed as described above. Press the Clock button for three seconds.
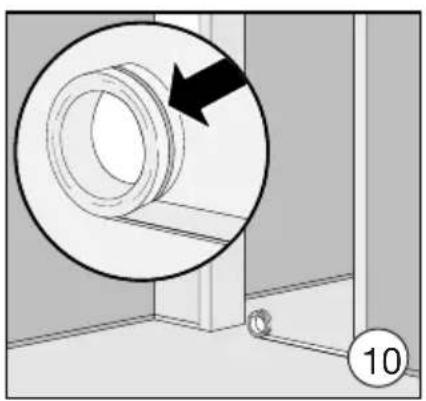
Defining the area to be vacuumed (Fig. 10)
The robot vacuum cleaner is 85 mm high. Any items under which vacuuming is required should have a minimum clearance of 87 mm.
You can define any areas which the robot vacuum cleaner should not have access to.
■ Place the magnetic strip supplied with the groove facing downwards on the floor.
The robot vacuum cleaner will not cross over the magnetic strip.
Adhesive strips are supplied for permanent fixing. Additional magnetic strips are available to order from the Miele webshop.
Use
Always observe the robot vacuum cleaner during the first cleaning session in a new environment and after making changes in your home. This way you will be able to detect and remove any problematic obstacles or section off the relevant areas with the magnetic strip. You must also check whether steps and drops in height are recognised properly.
Your robot vacuum cleaner is equipped with an integrated WiFi module. You can view status information or execute control commands using a mobile device (tablet PC or smartphone).
If you would like to control the robot vacuum cleaner using a mobile device, please read the section "App Scout RX2".
Operation of the robot vacuum cleaner via remote control and the display is described later in this section.
Switching on and off
■ Press the Power button on the remote control or any sensor on the display.
Starting vacuuming
There are two ways to start vacuuming.
Option 1 (Remote control)
natural_image
Gray circular button with white play and double buttons icon (no text or symbols)■ Press the ▶|| button.
Option 2 (Display)
natural_image
Simple graphic of a play button with two vertical bars, no text or symbols present■ Press the ▶|| sensor.
The area to be vacuumed will be cleaned.
The robot vacuum cleaner always cleans for at least five minutes, regardless of the size of the surface to be vacuumed.
Finishing vacuuming if vacuuming started from the base station
The robot vacuum cleaner will return to the base station and recharge.
If the battery is low, the robot vacuum cleaner will return to the base station and recharge. II will appear in the indicator field. The robot vacuum cleaner will then carry on vacuuming.
Finishing vacuuming if vacuuming started from somewhere in the room
The robot vacuum cleaner will return to its starting point and switch into standby after approx. 60 seconds.
The robot vacuum cleaner will stand still when there is low battery capacity. You should then recharge it.
Vacuuming manually
You can use the direction buttons on the remote control to vacuum a particular area of the room.
■ While the robot vacuum cleaner is vacuuming, press and hold one of the direction buttons.
The robot vacuum cleaner will turn in the desired direction until you let go of the direction button.
■ Press and hold the + direction button.
The robot vacuum cleaner will travel in the desired direction and continue to vacuum.
natural_image
Two gray rectangular buttons with play and pause icons, no text or symbols present■ Press the ▶|| button on the remote control or the ▶|| sensor on the display.
The original vacuuming process will continue running.
Interrupting vacuuming
natural_image
Gray circular button with white play and double arrow icons (no text or symbols)
natural_image
Simple graphic of a play button with two vertical bars, no text or symbols present■ Press the ▶II button on the remote control or the ▶II sensor on the display.
The robot vacuum cleaner stops.
Press the button or the sensor again to continue vacuuming.
If you lift the vacuum cleaner off the floor during a pause and then place it down somewhere else, rLOC will appear in the display when you activate it again. The robot vacuum will turn around and compare its new location with its saved map data.
If the data is compatible, the robot vacuum cleaner will start cleaning and not go over surfaces that have already been cleaned.
If the data is not compatible the robot
vacuum cleaner will not move.
rLOC in the display can only be cancelled by pressing the button or the sensor several times.
Manual navigation (without vacuuming)
You can use the direction buttons on the remote control to direct the robot vacuum cleaner to a specific area of the room.
■ Press and hold one of the direction buttons.
The robot vacuum cleaner will travel in the desired direction without vacuuming.
You cannot direct the robot vacuum cleaner manually to the base station in order to recharge it.
Directing the robot vacuum cleaner to the base station
(only possible when vacuuming was started from the base station)
■ Press the Base button on the remote control or the Base sensor on the display.
The robot vacuum cleaner will travel to the base station and recharge.
Operating modes
There are five different operating options.
Auto
Standard vacuuming for normally soiled flooring.
Spot Targeted vacuuming of an
area approx. 1.8 x 1.8 m around the selected starting point of the robot vacuum cleaner.
Base
Directing the robot vacuum cleaner to the base station.
Turbo

For vacuuming lightly soiled flooring with a short vacuuming duration.
Silent
Vacuuming with low noise development.
Select operating mode
■ Press the Power button on the remote control.
There are two ways of selecting the operating mode.
Option 1 (Remote control)

Mode
■ Press the Mode button repeatedly until the symbol for the operating mode you want lights up in the display.
natural_image
Gray circular button with white play and double arrow icons (no text or symbols)■ Press the ▶ll button to start vacuuming.
Option 2 (Display)
■ Press the sensor for the operating mode you want to use.
natural_image
Simple graphic of a play button with two vertical bars, no text or symbols present■ Press the ▶II sensor to start vacuuming.
To finish using the current operating mode
natural_image
Simple graphic of a play button with two vertical bars, no text or symbols present■ Press the Power button on the remote control or the ▶II sensor on the display for at least three seconds.
The robot vacuum cleaner will switch into standby after approx. 60 seconds.
You can switch the robot vacuum cleaner into standby before 60 seconds is up by pressing the Power button again.
The robot vacuum cleaner is reactivated by pressing any button on the remote control or one of the sensors in the display.
Setting the timer
(only possible if the clock has been set)
If you would like the robot vacuum cleaner to start at the same time every day, you can save the start time and the operating mode you want to memory.
The robot vacuum cleaner can also vacuum in the dark. However, please be aware that vacuuming may be less thorough. The cameras require light in order to navigate unobstructed.
Use the remote control to set the timer.
■ Press the Timer button briefly.
The timer ⏻ indicator flashes in the display and the hour display flashes in the indicator field.
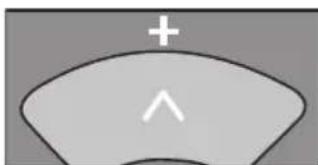
natural_image
Simple diagram with a plus sign above an upward arrow, no text or symbols present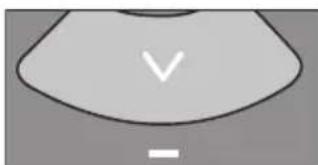
natural_image
Simple diagram with a checkmark inside a rounded rectangle and a minus sign below (no text or symbols)■ Press the + or - direction button to set the hour you want.

■ Press the OK button to confirm your selection.
The timer ⏻ indicator flashes in the display and the minute display flashes in the indicator field.
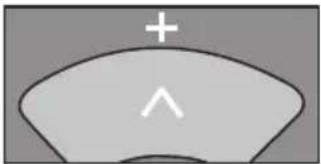
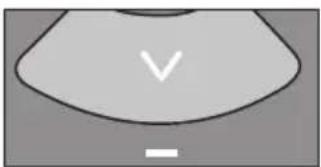
natural_image
Simple diagram with a curved shape and a white checkmark inside, no text or symbols present.■ Press the + or - direction button to set the minutes you want.

■ Press the OK button to confirm your selection.
■ Press the Mode button repeatedly until the symbol for the operating mode you want starts flashing in the display.

■ Press the OK button to confirm your selection.
The settings are shown for approx. three seconds on the display. The robot vacuum cleaner will now start to vacuum at the same time each day.
If the timer ⏻ indicator is lit up in the display, then the timer is activated.
To alter the entries, proceed as described above. Then press the Timer button for three seconds.
Tip: You can save up to seven individual combinations for the “start time – operating mode” if you set the timer using a mobile device, see section “App Scout RX2”.
Please note that the robot vacuum cleaner always follows the save commands which were set most recently, regardless of whether the settings were configured using the remote control or with a mobile device.
Deactivating the timer
■ Press the Timer button on the remote control briefly.
The timer ⏻ indicator goes out on the display.
Activating the timer / displaying a set start time
■ Press the Timer button on the remote control briefly.
The timer ⏻ indicator lights up in the display and the set start time is shown briefly in the indicator field. The robot vacuum cleaner will start to vacuum at the set time.
Deactivating the acoustic signals
Acoustic signals are set as standard. You can deactivate and then reactivate them.
■ Press the Mute button on the remote control briefly.
OFF will appear in the indicator field briefly.
Acoustic signals for error messages cannot be deactivated.
Reducing the maximum crossing over height
The robot vacuum cleaner is set to overcome height differences of up to 17 mm as standard. It is therefore able to vacuum carpets, move over door thresholds, etc.
If you would like to reduce this height (down to approx. 6 mm) in order to protect the legs of chairs, tables or lamps, for example, you can deactivate the factory default setting.
■ Press the Climb button on the remote control briefly.
LO will appear in the indicator field.
Press the Climb button again briefly if you want to reactivate the maximum crossing over height of 17 mm. HI will appear in the indicator field.
App "Scout RX2"
WiFi
You can view status information or execute control commands using a mobile device (tablet PC or smartphone).
The robot vacuum cleaner is equipped with an integrated WiFi module for this purpose.
Please note that, despite the manufacturer's extremely high security standards, there may be data security risks for the user whenever networked devices are used. For this reason, we offer you the option of removing the WiFi module from the robot vacuum cleaner. You can find instructions for this at the end of this section.
Make sure that you have sufficient signal strength for your WiFi network in the rooms where the robot vacuum cleaner will be vacuuming.
You can download the "Scout RX2" app for free via the Apple App Store or Google Play.


■ Download the app from one of the app stores.
Activating the network function of the robot vacuum cleaner
In order to connect your robot vacuum cleaner to your WiFi network, you must first activate the network function. The network function is deactivated ex-works.
There are two ways to activate the network function.
Option 1 (Remote control)
■ Press the WIFI button.
The WiFi indicator ≈ lights up in the display.
Option 2 (Display)
natural_image
Simple black outline of a house on a light background (no text or symbols)■ Press the Base sensor for at least two seconds.
The WiFi indicator lights up in the display.
■ Start the app and set up a Miele user account.
You can connect your mobile device directly to the robot vacuum cleaner or connect via your WiFi network.
■ Follow the instructions in the app.
Video function
(for Scout RX2 Home Vision models, use the "Scout RX2" app)
The camera on the right at the front of the robot vacuum cleaner sends encrypted images in real time to the selected mobile device. Transmission quality is dependent upon the speed of the internet connection in your home and the speed of your mobile device.
The video function indicator in the display flashes red when images are being sent.
No video recording takes place.
We recommend cleaning both cameras regularly with a soft, dry cloth.
Removing the WiFi module
natural_image
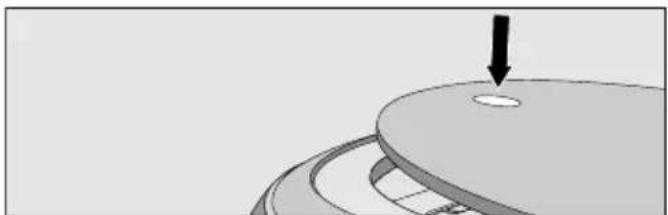
Diagram of a mechanical component with a downward arrow indicating force or direction (no text or symbols present)■ Press the depression at the top of the robot vacuum cleaner.
The lid of the storage compartment will open.
natural_image
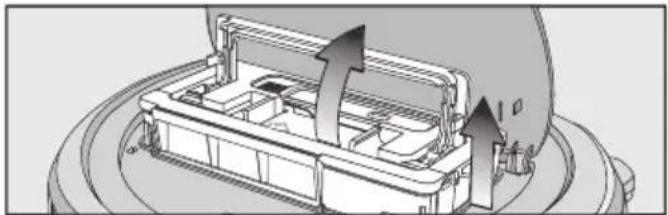
Diagram of a mechanical device with internal components and directional arrows indicating movement or force (no text or symbols)■ Unlatch the dust box by lifting the handle upwards.
■ Remove the dust box.
natural_image
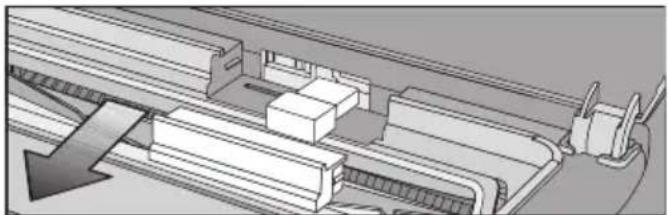
Technical illustration of a mechanical assembly with rollers and a downward arrow indicating motion (no text or symbols)■ Pull the cover out from the front.
■ Remove the WiFi module.
■ Put the cover back on.
Maintenance
⚠️ Switch the robot vacuum cleaner off before doing any maintenance work. To switch it off, press the I/O switch on the side of the robot vacuum cleaner to the 0 position.
We recommend using only genuine Miele accessories bearing the "ORIGINAL Miele" logo on the packaging. Only these will guarantee the optimum performance of your robot vacuum cleaner and the best possible cleaning results.
Purchasing accessories
Original Miele accessories are available from the Miele Webshop, Miele Service and your Miele supplier.
Original Miele accessories are identified by the "ORIGINAL Miele" logo on the packaging.

Emptying the dust box
Empty the dust box of the robot vacuum cleaner after each use in order to achieve the best possible cleaning results.
At the very latest, you must empty the dust box when "I_ _I" appears in the indicator field running from bottom to top.
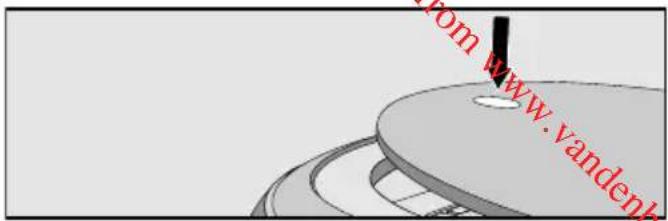
■ Press the depression at the top of the robot vacuum cleaner.
The lid of the storage compartment will open.
natural_image
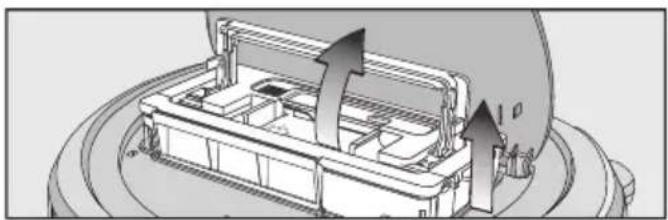
Diagram of a mechanical device with internal components and directional arrows indicating motion (no text or symbols)■ Unlatch the dust box by lifting the handle upwards.
■ Remove the dust box.
natural_image
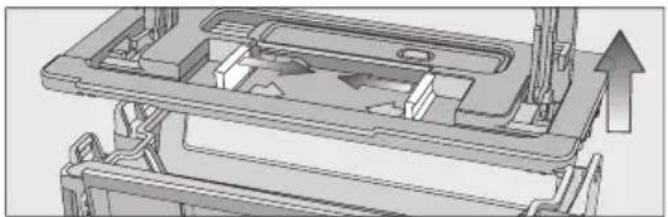
Mechanical assembly diagram showing internal components and directional arrows (no text or labels)■ Press one or both release buttons in the direction of the arrow and remove the dust box lid.
■ Empty the dust box.
The contents of the container can be disposed of with normal domestic waste, providing they consist of general household dust only.
■ Refit the lid and close the dust box making sure it clicks into place.
■ Place the dust box into the robot vacuum cleaner with the handle lifted up and latch it into place by pushing the handle back down.
en
■ Close the storage compartment lid and press down on the depression in order to lock it.
Cleaning the dust box
Clean the dust box as required.
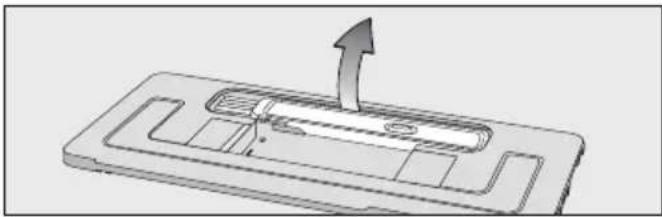
A cleaning tool is located at the top of the dust box lid.
natural_image
3D diagram of a mechanical component with an upward arrow indicating motion or force (no text or symbols)■ Remove the cleaning tool.
natural_image
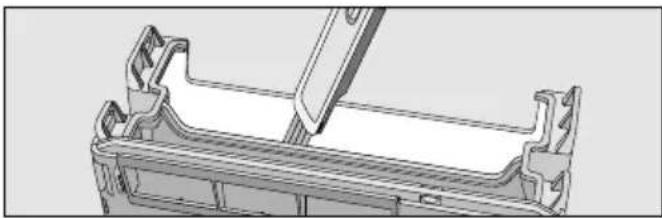
Technical line drawing of a mechanical component with no visible text or symbols■ Clean the dust box and the underside of the lid using the cleaning tool.
Cleaning the exhaust filter
Clean the exhaust filter as required.
The exhaust filter compartment is located in the dust box.
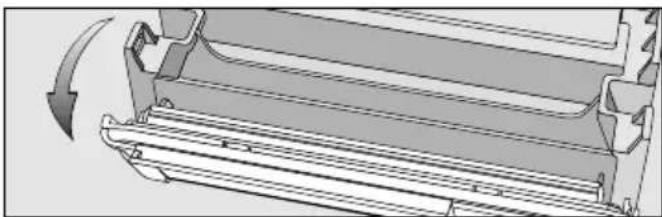
■ Remove the lid from the dust box.
natural_image
Mechanical assembly diagram showing a rotating component with internal channels and a curved arrow indicating rotation (no text or symbols present)■ Fold out the filter unit from the dust box.
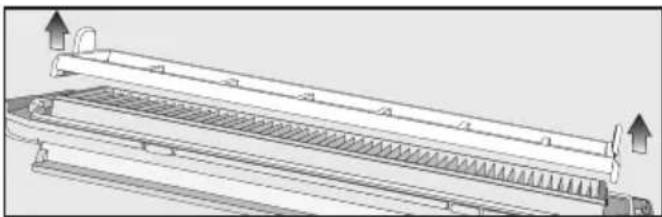
natural_image
Technical diagram of a mechanical assembly with two parallel plates and directional arrows indicating motion (no text or symbols)■ Remove the pre-filter and clean it as required using the cleaning tool.
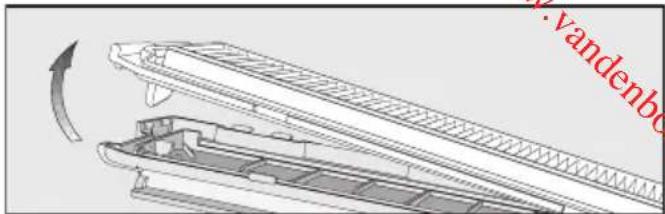
natural_image
Technical diagram of a mechanical component with internal channels and a rotation arrow (no text or symbols)■ Unlatch the exhaust filter, remove it and clean it using the cleaning tool.
■ Refit the exhaust filter into the cover.
■ Place the pre-filter onto the exhaust filter.
The filter unit is complete.
■ Carefully refit the filter unit and clip it into position.
The exhaust filter must be replaced with a new one after approx. six months in order to achieve the best possible cleaning results.
Cleaning the side brushes
Clean the side brushes as required. For this you will require the cleaning tool which is located at the top of the dust box lid.
■ Place the robot vacuum cleaner upside down on a level, clean surface.
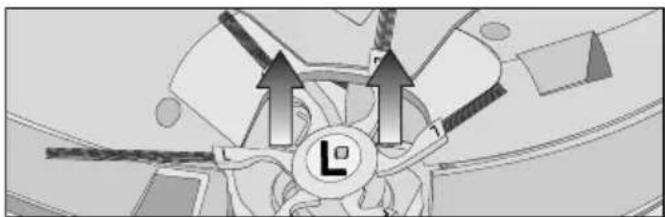
natural_image
Diagram of a mechanical or electrical component with directional arrows and a central circular symbol (no readable text or labels)■ Using both hands take hold of two opposite elastic side brush holders and pull them upwards to remove them.
■ Remove threads and hair using the wiper which is located on the bottom of the cleaning tool.
■ Hold the wiper over a bin.
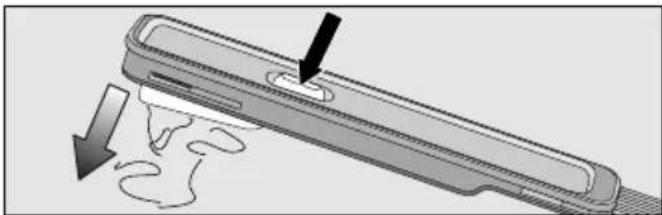
natural_image
Diagram of a device with a handle and internal flow lines, showing no text or symbols■ Press the button at the top of the wiper several times until all threads and hair have fallen out.
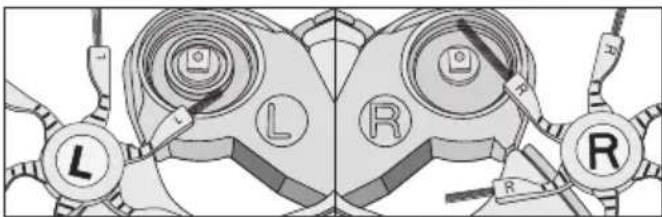
natural_image
Technical illustration of two mechanical clamps with labeled parts (L, R) and no readable text or symbols■ Press the two cleaned side brushes carefully onto their pins until they audibly engage. Take care to comply with the markings L and R.
In order to continue to achieve the best possible cleaning results replace the side brushes with new ones after approx. one year.
Cleaning the roller brush
Clean the roller brush as required. For this you will require the cleaning tool which is located at the top of the dust box lid.
■ Place the robot vacuum cleaner upside down on a level, clean surface.
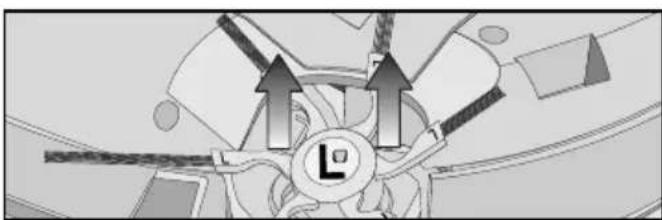
natural_image
Diagram of a mechanical or electrical component with directional arrows and a central circular symbol (no readable text or labels)■ Remove both side brushes, see previous description "Cleaning the side brushes".
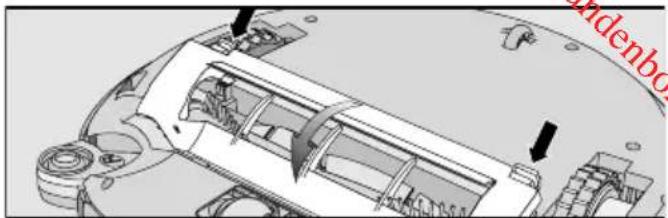
natural_image
Technical diagram of a car interior showing structural components and mounting points (no text or symbols)■ Unlatch the roller brush cover and remove the cover.
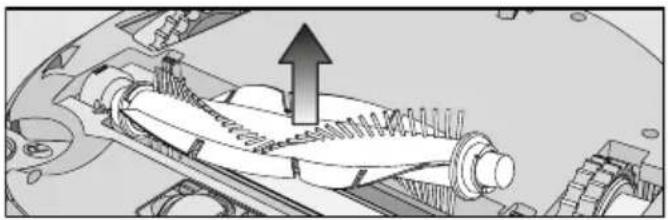
natural_image
Mechanical assembly diagram showing a gear and shaft assembly with an upward arrow indicating motion (no text or symbols present)■ Remove the roller brush.
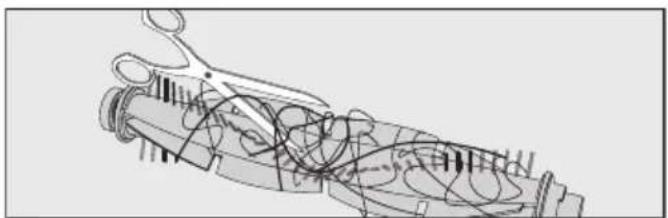
natural_image
Mechanical assembly diagram showing internal components and a cutting tool (no text or labels)■ Cut any threads or hairs that have wound themselves around the roller brush with a pair of scissors.
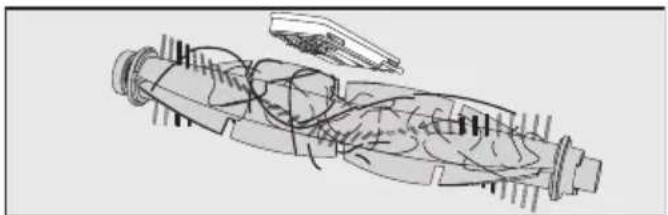
natural_image
Technical line drawing of a mechanical component with internal wiring and housing (no text or symbols)■ Remove the threads and hair using the wiper which is located on the bottom of the cleaning tool.
■ Hold the wiper over a bin.
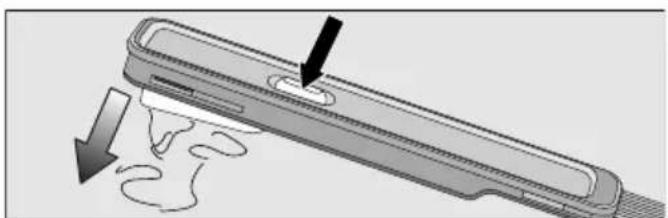
natural_image
Diagram of a device with a handle and internal components, showing fluid flow direction (no text or symbols)■ Press the button at the top of the wiper several times until all threads and hair have fallen out.
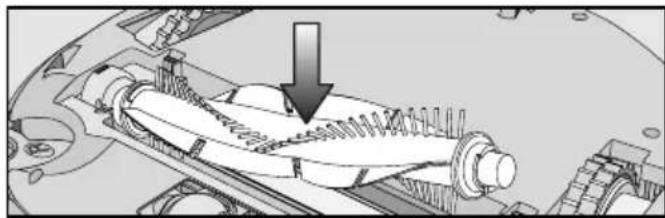
natural_image
Mechanical assembly diagram showing a gear-like component with a downward arrow indicating motion or force (no text or symbols present)■ Refit the roller brush. Make sure that the side with the pointed end is inserted into the corresponding slot.
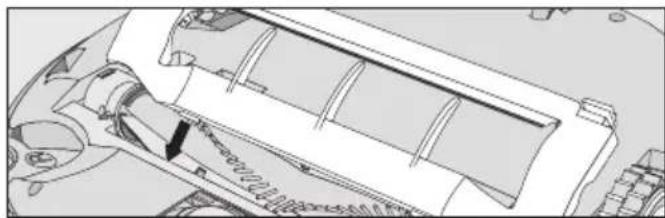
natural_image
Technical line drawing of a mechanical component with no visible text or symbols■ Carefully refit the roller brush cover making sure it clicks into position.
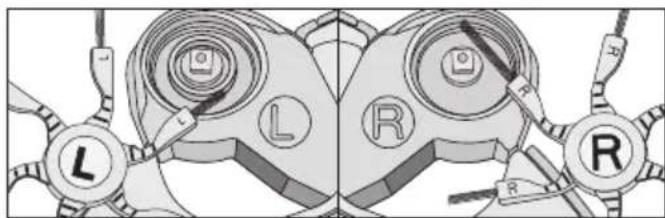
natural_image
Diagram of two mechanical clamps labeled L and R, showing internal components with no readable text or symbols.■ Refit both side brushes, see previous description “Cleaning the side brushes”.
In order to continue to achieve the best possible cleaning results, replace the roller brush with a new one after approx. one year.
Cleaning the dust box seals
Clean the seals on the bottom of the dust box as required.
■ Place the robot vacuum cleaner upside down on a level, clean surface.
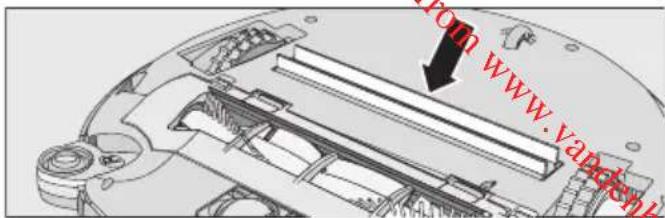
■ Wipe the seals with a damp cloth to clean them.
In order to continue to achieve the best possible cleaning results, replace the seal unit with a new one after approx. one year.
Replacing the dust box seal unit
■ Remove the dust box.
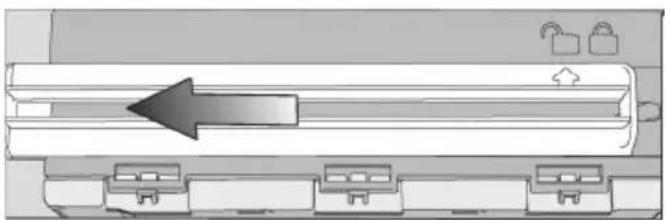
natural_image
Diagram of a mechanical assembly with a central arrow indicating direction, no text or symbols present■ Unlatch the seal unit from the underside of the dust box so that the arrow points to the 🔓 symbol.
■ Remove the seal unit.
■ Insert the new seal unit so that the arrow points to the 🔍 symbol.
■ Lock the seal unit, making sure it clicks into position.
The arrow points to the 🔒 symbol.
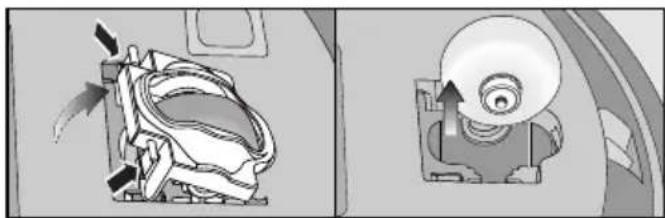
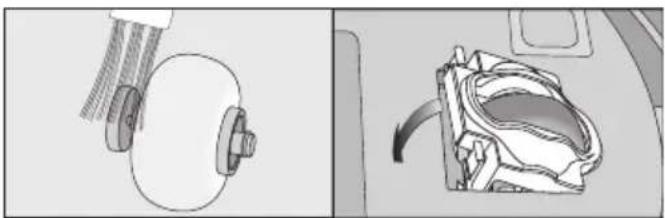
Cleaning the front wheel
Clean the front wheel as required. For this you will require the cleaning tool which is located at the top of the dust box lid.
■ Place the robot vacuum cleaner upside down on a level, clean surface.
natural_image
Diagram showing a mechanical device with a rotating component and a circular component inserted into a housing (no text or symbols present)■ Unclip the cover.
■ Remove the front wheel.
natural_image
Technical illustration showing a mechanical component and its internal structure (no text or symbols)■ Remove any threads and hair and clean the front wheel, the cover and the slot depression using the cleaning tool.
■ Refit the front wheel and close the cover making sure it clicks into position.
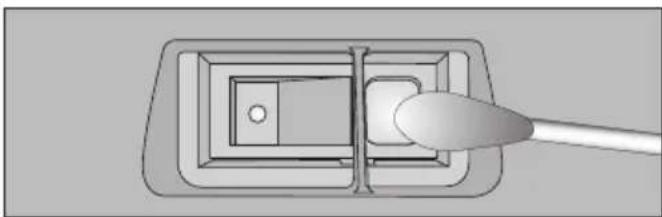
Cleaning the sensors
Clean the sensors as required.
■ Place the robot vacuum cleaner upside down on a level, clean surface.
natural_image
Diagram of a switch or connector with a lever and internal components (no text or symbols)■ Clean the sensors carefully using a dry cotton wool bud.
⚠️ Keep batteries out of the reach of children.
A swallowed battery can cause injury and even death. Even flat batteries can still be dangerous. If you suspect a child has swallowed a battery, seek medical advice immediately*. Examine devices and make sure the battery compartment is correctly secured, e.g. that the screw or other mechanical fastener is tightened. Do not use if compartment is not secure.
* Australia: Poisons Information Centre, Tel. 13 11 26;
NZ: National Poisons Centre, Tel. 0800 764 766
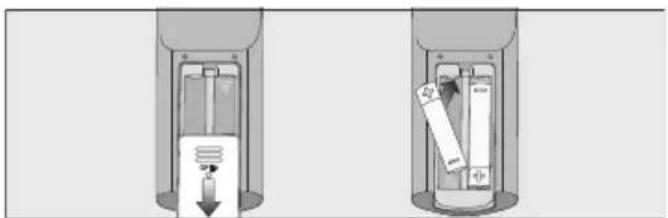
Replacing batteries in the remote control
The remote control requires two 1.5 V (AAA) batteries.
natural_image
Two identical diagrams showing a battery inside and a device inside, with no visible text or symbols.■ Remove the battery compartment cover.
■ Replace the batteries. Take care with the polarity.
■ Close the battery compartment cover.
- Observe the special instructions regarding the handling and disposal of batteries found in the sections “Warning and Safety” and “Caring for the environment” at the beginning of these operating instructions.
Replacing the rechargeable battery
You will require an original Miele lithium-ion rechargeable battery:
- YCR-M05 for Scout RX2
- YCR-MT12 for Scout RX2 Home Vision

Do not use non-rechargeable ies.
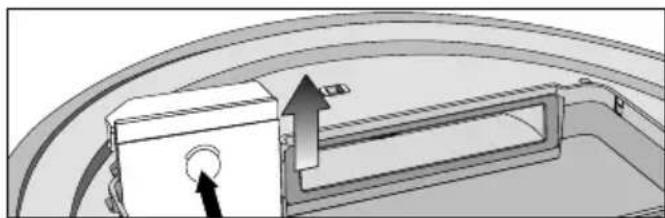
The rechargeable battery compartment is located in the robot vacuum cleaner's storage compartment.
■ Remove the dust box.
natural_image
Diagram of a mechanical component with directional arrows indicating movement or force (no text or symbols)■ Open the rechargeable battery compartment by unlatching the cover upwards.
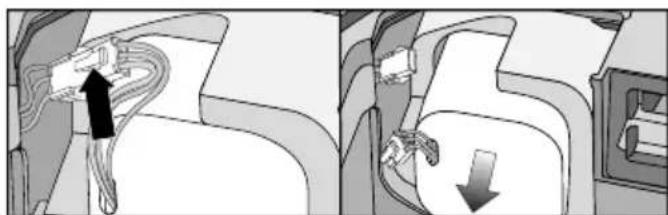
Scout RX2 (YCR-M05)
natural_image
Diagram showing a car interior with cable routing and directional arrows indicating movement (no text or symbols)■ Carefully pull the cables so that the plug connection is pulled out of the slot.
■ Press the latch on the plug connection in order to release the plug.
■ Remove the rechargeable battery.
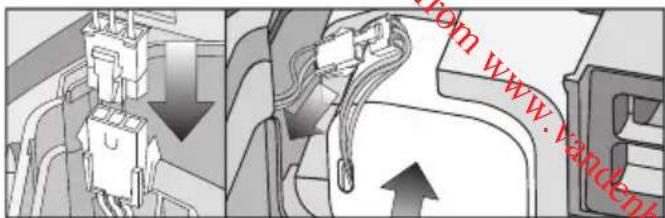
■ Insert the plug of the new rechargeable battery into the counterpart, making sure it clicks into place.
■ Insert the rechargeable battery carefully, making sure it is properly positioned (see right-hand side of picture).
■ Store the plug connection in the slot at the side.
natural_image
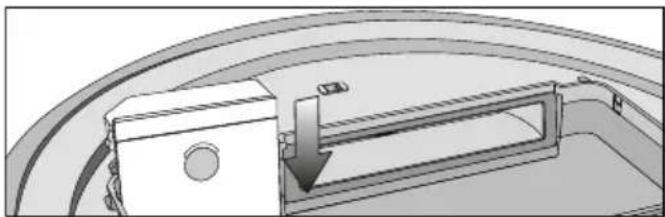
Technical diagram of a mechanical component with a downward arrow indicating motion (no text or symbols)■ Carefully refit the cover of the rechargeable battery compartment and close it, making sure it clicks into place.
- Observe the special instructions regarding the handling and disposal of the old rechargeable battery found in the sections “Warning and Safety” and “Caring for the environment” at the beginning of these operating instructions.
Scout RX2 Home Vision (YCR-MT12)
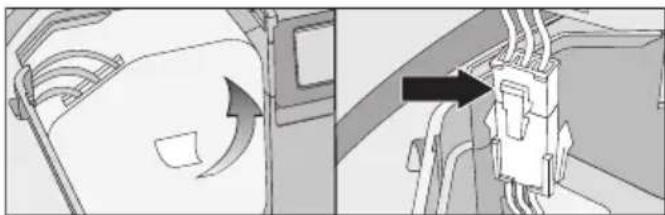
natural_image
Diagram showing a mechanical component with an arrow indicating direction, no text or symbols present■ Carefully remove the rechargeable battery until the plug connection is exposed.
■ Press the latch on the plug connection in order to release the plug.
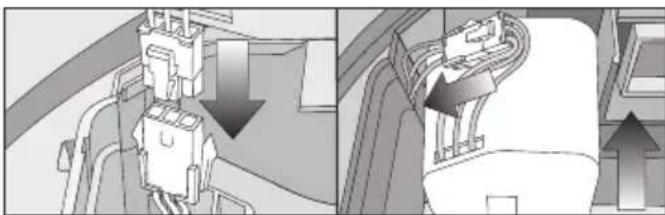
natural_image
Technical diagram showing mechanical assembly with arrows indicating motion (no text or symbols)■ Insert the plug of the new rechargeable battery into the counterpart, making sure it clicks into place.
■ Store the plug connection in the side recess.
■ Insert the rechargeable battery carefully, making sure it is properly positioned (see right-hand side of picture).
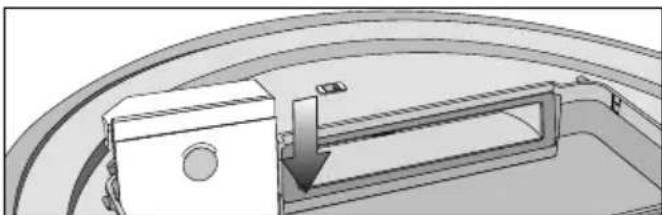
natural_image
Technical diagram of a mechanical component with a downward arrow indicating a cut or assembly (no text or symbols present)■ Carefully refit the cover of the rechargeable battery compartment and close it, making sure it clicks into place.
- Observe the special instructions regarding the handling and disposal of the old rechargeable battery found in the sections “Warning and Safety” and “Caring for the environment” at the beginning of these operating instructions.
Cleaning and care
Caring for your robot vacuum cleaner and its accessories
⚠️ Switch the robot vacuum cleaner off before doing any maintenance work. To switch it off, press the 1/0 switch on the side of the robot vacuum cleaner to the 0 position.
The robot vacuum cleaner and all plastic accessories can be cleaned with a dry or a slightly damp cloth, or with a proprietary cleaner suitable for plastic.
Static charge can cause a build-up of dust on the vacuum cleaner. This should be removed using a soft and dry cloth.
Do not use abrasive cleaning agents, glass cleaning agents, all-purpose cleaners or oil-based conditioning agents!
Do not immerse the robot vacuum cleaner or any accessories supplied with it in water!
Storage/Factory default settings
Storage
⚠️ Switch the robot vacuum cleaner off if it is not going to be used for a long period of time. To switch it off, press the I/O switch on the side of the robot vacuum cleaner to the 0 position.
If the robot vacuum cleaner is not going to be used for a long period of time, make sure it is stored in a well ventilated, cool place.
For optimum care, store the robot vacuum cleaner at half charge capacity (rechargeable battery status indicator in the display is orange).
Standard settings
The robot vacuum cleaner can be reset to its factory default settings. Have the remote control to hand.

natural_image
Simple geometric icon with a black square and a black dot inside, no text or symbols present.
natural_image
Simple black line drawing of a circle with three horizontal lines, resembling a speedometer or motion indicator (no text or symbols)■ Press and hold the Spot and Turbo sensors on the display for at least 5 seconds at the same time.
r:St will appear in the display.
■ Within the next 2 seconds press the OK button on the remote control until F:tr appears in the display.
The robot vacuum cleaner will start again with its factory default settings restored.
Service
Contact in case of malfunction
In the event of any faults which you cannot remedy yourself, please contact your Miele Dealer or Miele Service.
Contact information for Miele Service can be found at the end of this document.
Please note that telephone calls may be monitored and recorded for training purposes and that a call-out charge will be applied to service visits where the problem could have been resolved as described in this booklet.
Warranty
For information on the appliance warranty specific to your country, please contact Miele. See back cover for address.
In the UK, your appliance warranty is valid for 2 years from the date of purchase. However, you must activate your cover by calling 0330 160 6640 or registering online at www.miele.co.uk.
Problem solving guide
Many malfunctions and faults that can occur in daily operation can be easily remedied. Time and money will be saved because a service call will not be needed.
The following guide may help you to find the reason for a malfunction or a fault, and to correct it.
⚠️ Switch the robot vacuum cleaner off before dealing with any problems. To switch it off, press the I/O switch on the side of the robot vacuum cleaner to the 0 position.
| Problem Cause and remedy | |
| The robot vacuum cleaner switches itself off after it has been switched on using the Power button. | The rechargeable battery is not sufficiently charged.■ Connect the robot vacuum cleaner correctly to the charging contacts on the connected base station. |
| The cleaning result is poor. | The dust box is full.■ Empty and clean the dust box. |
| The roller brush is dirty or worn out.■ Clean the roller brush.■ Replace the roller brush. | |
| The seals on the dust box are dirty or worn out.■ Clean the seals and the suction channel between them.■ Replace the seal unit. | |
| The exhaust filter is dirty.■ Clean the exhaust filter.■ Replace the exhaust filter. | |
| The side brushes have worn out.■ Replace the side brushes. | |
| The robot vacuum cleaner is not charging. | The base station is not connected correctly.■ Connect the base station exactly as described in these operating instructions, see section “Preparing for use – Connecting the base station”. |
| The robot vacuum cleaner does not return to the base station after vacuuming. | It had started vacuuming from somewhere in the room.■ The robot vacuum cleaner will return to its starting point. |
| There is insufficient light for the robot vacuum cleaner to navigate.■ Provide sufficient lighting. | |
| The base station is not connected correctly.■ Connect the base station exactly as described in these operating instructions, see section “Preparing for use – Connecting the base station”. | |
| The signal between the infrared transmitter on the base station and the robot vacuum cleaner is broken.■ Clean the front of the base station and the front of the robot vacuum cleaner carefully with a soft, dry cloth and make sure that no items disrupt the signal. | |
| Obstacles on the floor which is to be vacuumed can impede navigation.■ Watch the robot vacuum cleaner during vacuuming.■ Remove any problematic obstacles.■ Section off the problematic area with the magnetic strip.■ Reduce the robot vacuum cleaner's maximum crossing over height, see section “Use – Reducing the maximum crossing over height”. | |
| The robot vacuum cleaner does not react. | The robot vacuum cleaner is switched off.■ Switch it on (press I/0 to I). |
| The batteries in the remote control have been inserted incorrectly.■ Take care with the polarity. | |
| The batteries in the remote control are dead.■ Exchange the batteries. | |
| The signal between the infrared transmitter on the vacuum cleaner and the remote control is broken.■ Clean the front of the robot vacuum cleaner and the top of the remote control carefully with a soft, dry cloth and make sure that no items disrupt the signal. | |
| The remote control is too close to the robot vacuum cleaner or too far away from it.■ Increase or decrease the distance and when using the remote control, direct it towards the robot vacuum cleaner. |
Error messages
⚠️ Switch the robot vacuum cleaner off before dealing with any errors. To switch it off, press the I/O switch on the side of the robot vacuum cleaner to the 0 position.
Error messages are shown in the indicator field in the display.
If "I_ _I" appears running from bottom to top, you must empty and clean the dust box.
Your robot vacuum cleaner is supplied with a sticker that lists all error messages.
You can stick this sticker to the underside of the storage compartment lid.
| Problem Cause and remedy | |
| F 1 Error “Wheel raised” | ■ Place the robot vacuum cleaner on a level floor surface. |
| F 2 Error “Dirty sensors” | ■ Clean the sensors. This error message is also shown when you start up the robot vacuum cleaner and the collision sensor is located above empty space. Remove the robot vacuum cleaner from the edge. |
| F 3 Error “Filter not recognised” | ■ Insert the dust box into the robot vacuum cleaner with an exhaust filter inserted. |
| F 4 Error “Drive wheels overloaded” | ■ Check whether the drive wheels have become dirty. Remove any threads or hair. This error message is also shown if the robot vacuum cleaner is stuck. |
| F 5 Error “Brushes overloaded” | ■ Check whether the roller brush and the side brushes have become dirty. Clean the roller brush and side brushes. This error message is also shown if objects become caught in the robot vacuum cleaner. |
| F 6 Error “Fan motor overloaded” | ■ Empty and clean the dust box. Clean or replace the exhaust filter. |
| F 7 Internal system error or | fault with the robot vacuum cleaner outside of its permitted ambient operating temperature.■ Switch the robot vacuum cleaner off and on again (I/O switch). |
| F 8 Error “Front wheel dirty” | ■ Check whether the front wheel, the cover or the slot depression have become dirty. Remove any threads and hair and clean the front wheel, the cover and the depression. |
| Resetting the error message after fixing the problem | You can reset the error messages described above in the following ways |
| - Switch the robot vacuum cleaner off and on again (I/O switch). | |
| - Press the Power button on the remote control. | |
| - Press the ▶II sensor in the display for at least three seconds. |
Technical data
(for the WiFi module Europe)
Frequency band 2.412 GHz - 2.472 GHz
Maximum transmitting power < 100 mW
Conformity declaration
Miele hereby declares that this robot vacuum cleaner complies with Directive 2014/53/EU.
The complete text of the EU declaration of conformity is available from one of the following internet addresses:
- Products, Download from www.miele.co.uk
- For service, information, operating instructions etc: go to www.miele.co.uk/domestic/customer-information-385.htm and enter the name of the product or the serial number
Copyright and licences
Miele uses software to operate and control the robot vacuum cleaner.
The copyright authorisation from Miele and other relevant software suppliers must be respected.
Miele and their suppliers reserve the rights to the software components.
In particular the following are prohibited:
- Copying and distribution
- Modifications and derivations
- Decompilation, reverse engineering, disassembling and other such reductions of software
Components which fall under GNU General Public Licence and further Open Source licences are integrated into the software.
An overview of the integrated Open Source components and a copy of the current licence can be obtained at www.miele.com/device-software-licences.
Miele will provide the source code for all components of software licensed under the GNU General Public Licence and comparable Open Source licences.
For source code requests, please email info@miele.com.
You can obtain detailed instructions for the use of test modes from Miele Service.
Electrical connection for the UK
All electrical work should be carried out by a suitably qualified and competent person in strict accordance with current national and local safety regulations (BS 7671 in the UK). The voltage and frequency are given on the data plate located underneath the vacuum cleaner. Please ensure that these match the household mains supply. The fuse rating is quoted on the plug. The appliance is supplied with a cable and moulded plug ready for connection to a 230-240 V/50 Hz a.c. single phase supply.
Non-rewireable plugs BS 1363
The fuse cover must be re-fitted when changing the fuse, and if the fuse cover is lost the plug must not be used until a suitable replacement is obtained. The colour of the correct replacement cover is that of the coloured insert in the base of the plug, or the colour that is embossed in words on the base of the plug, (as applicable to the design of plug fitted). Replacement fuses should be ASTA approved to BS1362 and have the correct rating. Replacement fuses and fuse covers may be purchased from your local electrical supplier.
Electrical connection AU, NZ
All work should be carried out by a suitably qualified and competent person in strict accordance with national and local safety regulations. The voltage and rated load are given on the data plate located underneath the vacuum cleaner. Please ensure that these match the household mains supply. The appliance is supplied with a cable and moulded plug ready for connection to a 230V/50Hz AC single phase supply.
Test Marks Electrical safety RCM Mark
Electrically suppressed according to
AS/NZS CISPR 14.1
natural_image
Gray button with a circular play symbol and double vertical lines, no text or symbols present.natural_image
Simple graphic of a play button with two vertical bars, no text or symbols presentnatural_image
Diagram of a mechanical component with a downward arrow indicating force or direction (no text or symbols)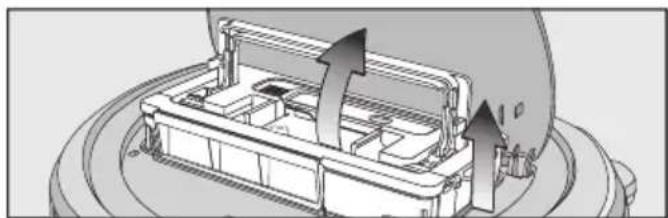
natural_image
Mechanical assembly diagram showing a container with internal components and directional arrows indicating motion (no text or symbols)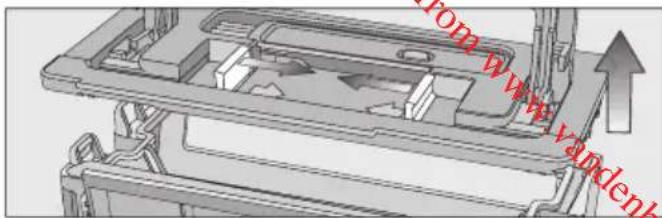
Fejlmeldinger
natural_image
Gray circular button with a white play symbol and double vertical lines, no text or numbers present.natural_image
Simple graphic of a play button with two vertical bars, no text or symbols presentnatural_image
Technical diagram showing a mechanical assembly with arrows indicating motion or force, no text or symbols present.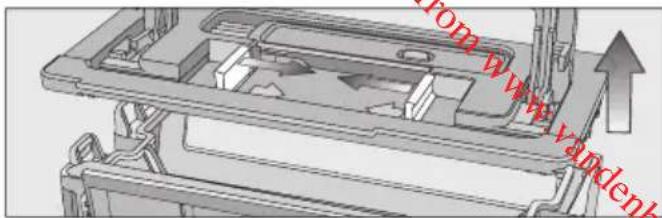
natural_image
Mechanical assembly diagram showing internal components and motion direction (no text or symbols)natural_image
Gray circular button with a play symbol and double vertical lines, no text or symbols present.natural_image
Simple graphic of a play button with two vertical bars, no text or symbols presentnatural_image
Diagram of a curved mechanical component with a downward arrow indicating force or direction (no text or symbols)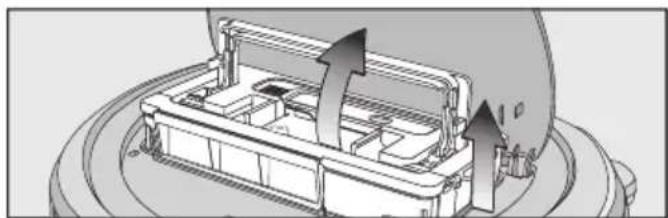
natural_image
Mechanical assembly diagram showing internal components and directional arrows (no text or symbols)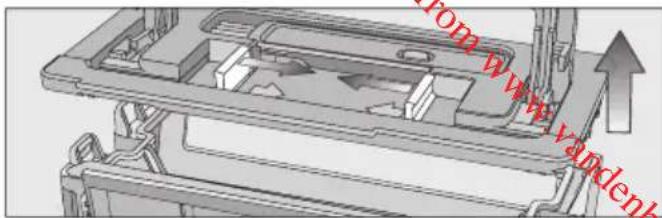
Virheilmoitukset
natural_image
Gray circular button with white play and double arrow icons (no text or symbols)natural_image
3D diagram of a curved surface with a downward arrow pointing to a small circular feature (no text or symbols)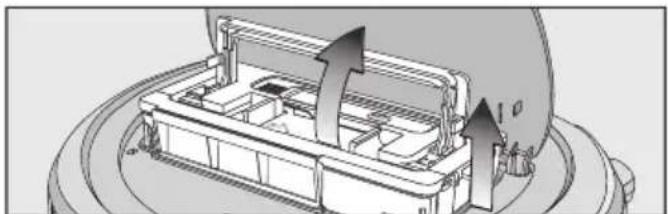
natural_image
Diagram of a mechanical device with internal components and directional arrows indicating motion (no text or symbols)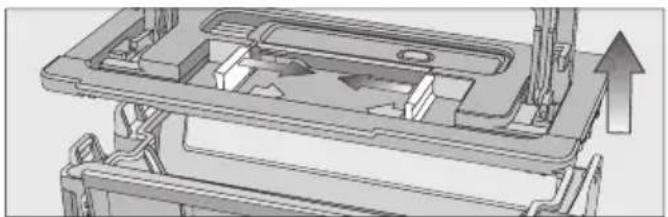
natural_image
Mechanical assembly diagram showing internal components and directional arrows (no text or symbols)Messages d'erreur
natural_image
Gray circular button with white play and double buttons icon (no text or symbols)natural_image
Diagram of a curved mechanical component with a downward arrow indicating force or direction (no text or symbols)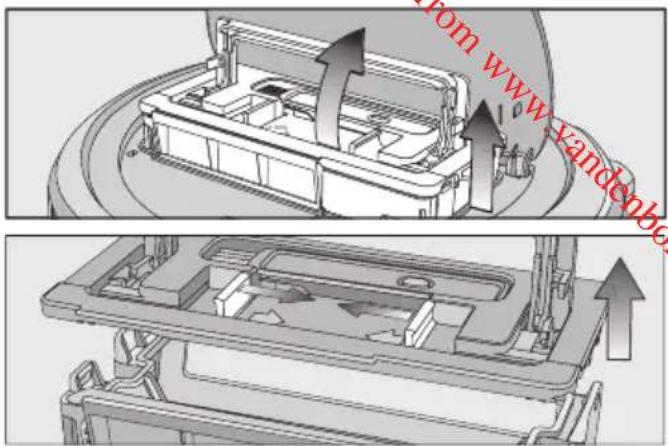
natural_image
Gray circular button with white play and double arrow icons (no text or symbols)natural_image
Simple graphic of a play button with two vertical bars, no text or symbols present.natural_image
Diagram of a curved mechanical component with a downward arrow indicating force or direction (no text or symbols)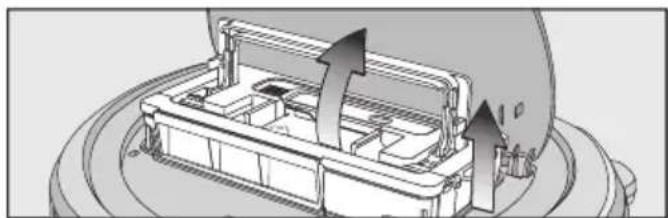
natural_image
Mechanical assembly diagram showing internal components with directional arrows (no text or labels)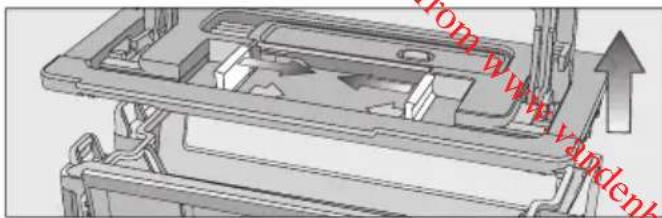
Foutmeldingen
natural_image
Gray circular button with white play and double arrow icons (no text or symbols)natural_image
Simple graphic of a play button with two vertical bars, no text or symbols presentnatural_image
3D diagram of a curved surface with a downward arrow pointing to a small circular feature (no text or symbols)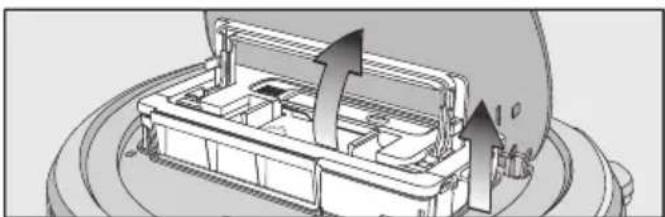
natural_image
Technical diagram of a mechanical device with internal components and directional arrows (no text or symbols)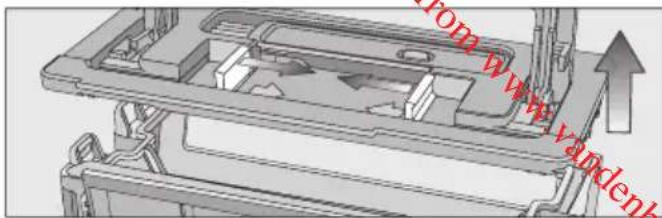
natural_image
Mechanical assembly diagram showing internal components and a directional arrow (no readable text or symbols)Feilmeldinger
Acertar as horas (fig. 09)
natural_image
Gray circular button with white play and double arrow icons (no text or symbols)natural_image
Simple graphic of a play button with two vertical bars, no text or symbols presentnatural_image
3D diagram of a curved surface with a downward arrow pointing to a small circular feature (no text or symbols)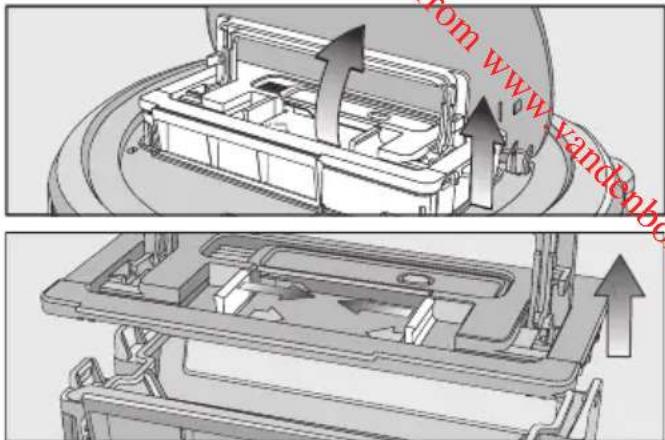
Mensagens de erro
natural_image
Gray circular button with white play and double arrow icons (no text or symbols)Till basenheten (FK)

natural_image
Simple graphic of a play button with two vertical bars, no text or symbols presentnatural_image
3D diagram of a curved surface with a downward arrow pointing to a circular hole (no text or symbols)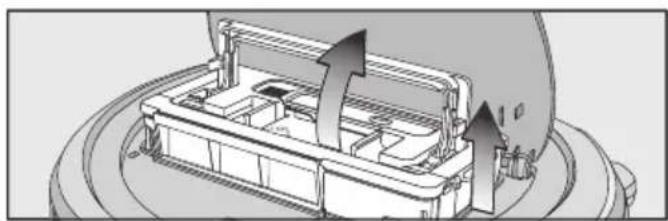
natural_image
Mechanical assembly diagram showing internal components with directional arrows (no text or symbols)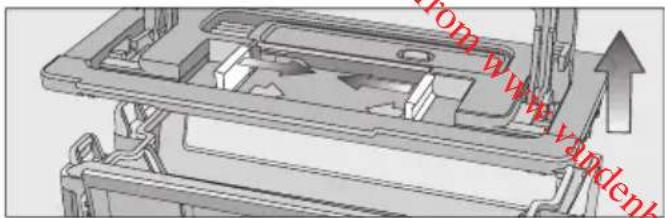
natural_image
Mechanical assembly diagram showing internal components and directional arrows (no readable text or symbols)Felmeddelanden
Chile:
Miele Electrodomésticos Ltda.
natural_image
Technical illustration of a mechanical component with no visible text or symbols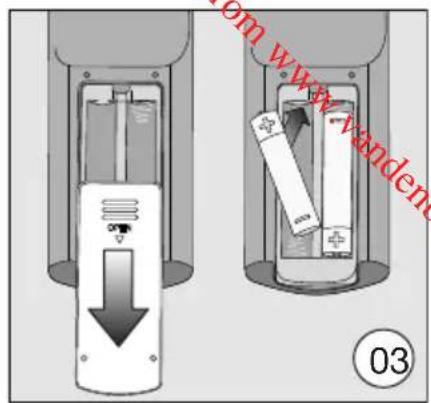
natural_image
Diagram of a car's front panel with a numbered button labeled '10' and circled number '04' (no text or symbols beyond basic labels)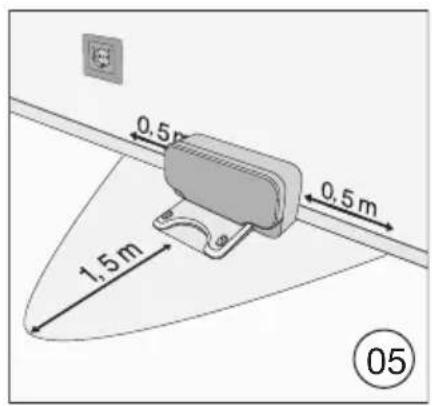
natural_image
Diagram of a mechanical device with internal components and directional arrows, no text or symbols present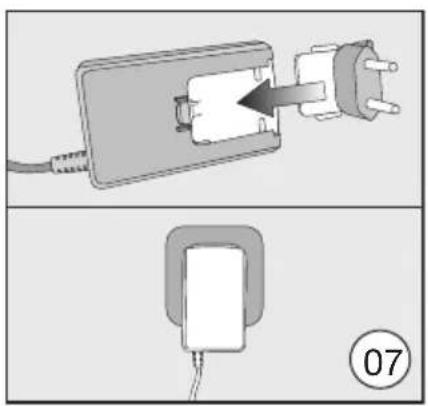
natural_image
Two-step diagram showing a plug inserted into a socket, with an arrow indicating the insertion direction (no text or symbols present)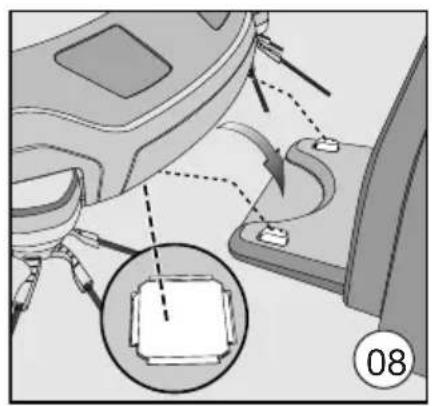
natural_image
Diagram showing mechanical components with arrows and a magnified inset of a component (no text or symbols)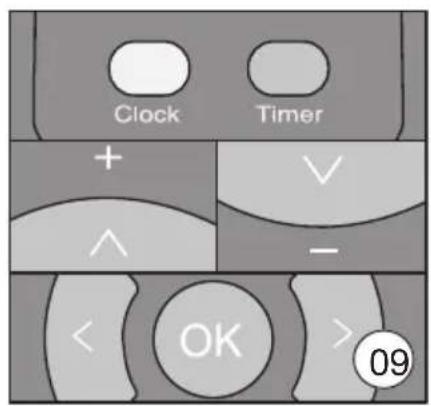
natural_image
Technical diagram showing a mechanical component with a magnified inset highlighting a circular feature (no text or symbols)United Kingdom
Miele Co. Ltd.
Fairacres, Marcham Road
Abingdon, Oxon, OX14 1TW
Customer Contact Centre Tel: 0330 160 6600
E-mail: mielecare@miele.co.uk
Internet: www.miele.co.uk
Australia
Miele Australia Pty. Ltd.
ACN 005 635 398
ABN 96 005 635 398
1 Gilbert Park Drive
Knoxfield, VIC 3180
Tel: 1300 464 353
Internet: www.miele.com.au
China
Miele (Shanghai) Trading Ltd.
1-3 Floor, No. 82 Shi Men Yi Road
Jing' an District
200040 Shanghai, PRC
Tel: +86 21 6157 3500
Fax: +86 21 6157 3511
E-mail: info@miele.cn,
Miele (Hong Kong) Limited
41/F - 4101, Manhattan Place
23 Wang Tai Road
Kowloon Bay, Hong Kong
Tel: (852) 2610 1025
Fax: (852) 3579 1404
Email:
customerservices@miele.com.hk
Website: www.miele.hk
India
Miele India Pvt. Ltd.
Ground Floor
Copia Corporate Suites
Plot No. 9, Jasola
New Delhi - 110025
Tel: 011-46 900 000
Fax: 011-46 900 001
E-mail: customercare@miele.in
Internet: www.miele.in
Ireland
Miele Ireland Ltd.
2024 Bianconi Avenue
Citywest Business Campus
Dublin 24
Tel: (01) 461 07 10
Fax: (01) 461 07 97
E-Mail: info@miele.ie
Internet: www.miele.ie
Malaysia
Miele Sdn Bhd
Suite 12-2, Level 12
Menara Sapura Kencana
Petroleum
Solaris Dutamas No. 1
Jalan Dutamas 1
50480 Kuala Lumpur, Malaysia
Phone: +603-6209-0288
Fax: +603-6205-3768
New Zealand
Miele New Zealand Limited
IRD 98 463 631
Level 2, 10 College Hill
Freemans Bay, Auckland 1011
New Zealand
Tel: 0800 464 353
Internet: www.miele.co.nz
Singapore
Miele Pte. Ltd.
163 Penang Road
# 04 - 03 Winsland House II
Singapore 238463
Tel: +65 6735 1191
Fax: +65 6735 1161
E-Mail: info@miele.com.sg
Internet: www.miele.sg

South Africa
Miele (Pty) Ltd
63 Peter Place, Bryanston 2194
P.O. Box 69434, Bryanston 2021
Tel: (011) 875 9000
Fax: (011) 875 9035
E-mail: info@miele.co.za
Internet: www.miele.co.za
Taiwan
K.E. & Kingstone Co., Ltd.
6th Fl., No. 120, Sec. 2
Jianguo N. Rd.
Taipei, Taiwan
TEL: +886 2 2502-7256
FAX: +886 2 2502-3077
BHIRAJ TOWER at EmQuartier
43rd Floor Unit 4301-4303
689 Sukhumvit Road
North Klongton Sub-District
Vadhana District
Bangkok 10110, Thailand
United Arab Emirates
Miele Appliances Ltd.
Gold & Diamond Park
Office No. 6-217
Sheikh Zayed Road
P.O. Box 11 47 82 - Dubai
Tel. +971 4 3044 999
Fax. +971 4 3418 852
800-MIELE (64353)
- de
- en - Contents
- Correct application
- Safety with children
- Technical safety
- Correct use
- Handling the rechargeable battery and remote control batteries:
- Accessories
- Disposal of the packing material
- Disposing of your old appli- ance
- Disposing of old batteries and rechargeable batteries
- A – Robot vacuum cleaner top and bottom
- B - Base station and remote control
- Base station
- Remote control
- C - Dust box
- Functions and features of the robot vacuum cleaner
- Accessories supplied
- Preparing for use
- Inserting the side brushes (Fig. 01)
- Removing the protective foil (Fig. 02)
- Placing the batteries in the remote control (Fig. 03)
- Switching on the robot vacuum cleaner (Fig. 04)
- Connecting the base station (Figs. 05 - 07)
- Charging the rechargeable battery (Fig. 08)
- Rechargeable battery status indicator in the display
- Setting the time of day (Fig. 09)
- Defining the area to be vacuumed (Fig. 10)
- Use
- Switching on and off
- Starting vacuuming
- Finishing vacuuming if vacuuming started from the base station
- Finishing vacuuming if vacuuming started from somewhere in the room
- Vacuuming manually
- Interrupting vacuuming
- Manual navigation (without vacuuming)
- Directing the robot vacuum cleaner to the base station
- Operating modes
- Auto
- Base
- Turbo
- Silent
- Select operating mode
- Mode
- To finish using the current operating mode
- Setting the timer
- Deactivating the timer
- Activating the timer / displaying a set start time
- Deactivating the acoustic signals
- Reducing the maximum crossing over height
- App "Scout RX2"
- WiFi
- Activating the network function of the robot vacuum cleaner
- Video function
- Removing the WiFi module
- Maintenance
- Purchasing accessories
- Emptying the dust box
- en
- Cleaning the dust box
- Cleaning the exhaust filter
- Cleaning the side brushes
- Cleaning the roller brush
- Cleaning the dust box seals
- Replacing the dust box seal unit
- Cleaning the front wheel
- Cleaning the sensors
- Replacing batteries in the remote control
- Replacing the rechargeable battery
- Cleaning and care
- Storage/Factory default settings
- Storage
- Standard settings
- Service
- Contact in case of malfunction
- Warranty
- Problem solving guide
- Error messages
- Technical data
- Conformity declaration
- Copyright and licences
- Electrical connection for the UK
- Non-rewireable plugs BS 1363
- Electrical connection AU, NZ
- Fejlmeldinger
- Virheilmoitukset
- Messages d'erreur
- Foutmeldingen
- Feilmeldinger
- Mensagens de erro
- Felmeddelanden
- Chile:
- United Kingdom
- Australia
- China
- Miele (Hong Kong) Limited
- India
- Ireland
- Malaysia
- New Zealand
- Singapore
- South Africa
- Taiwan
- United Arab Emirates
Brand : MIELE
Model : Scout RX2
Category : Robot vacuum