
IAN 94519 - Alarm Clock AURIOL - Free user manual and instructions
Find the device manual for free IAN 94519 AURIOL in PDF.


| Type | Radio-controlled alarm clock |
| Model | IAN 94519 |
| Power supply | 1 x AA 1.5 V battery (included) |
| Radio signal | DCF-77 (Germany, up to 1500 km range) |
| Time display | Analog hands with LC display (temperature, calendar) |
| Alarm function | Switchable ON/OFF, rotary control for alarm time |
| Alarm duration | Approx. 20-50 minutes; reactivates after 12 hours if not switched off |
| Snooze function | Snooze time approx. 5 minutes (via SNOOZE/LIGHT button) |
| Backlight | Illuminates for approx. 5 seconds when SNOOZE/LIGHT button pressed |
| Manual time setting | Possible via M.SET button |
| Reset function | RESET button (use pointed object) or remove batteries |
| Battery type | AA (LR6) 1.5 V |
| Indoor use only | Yes, normal room temperatures |
| Cleaning | Soft dry cloth; do not use liquids |
| Warranty | 3 years from date of purchase |
| Disposal | Product and batteries separately at collection points; follow local regulations |
| Safety certification | CE, EMC, R&TTE (1999/5/EC) |
Frequently Asked Questions - IAN 94519 AURIOL
User questions about IAN 94519 AURIOL
0 question about this device. Answer the ones you know or ask your own.
Ask a new question about this device
Download the instructions for your Alarm Clock in PDF format for free! Find your manual IAN 94519 - AURIOL and take your electronic device back in hand. On this page are published all the documents necessary for the use of your device. IAN 94519 by AURIOL.
USER MANUAL IAN 94519 AURIOL
natural_image
Black-and-white photo of multiple analog clocks displayed on a shelf, no visible text or symbols
RADIO CONTROLLED ALARM CLOCK
Operation and safety notes

RADIJSKO VODENA BUDILKA
GB Operation and safety notes Page 3
Description of Parts ......Page 4
Technical data Page 5
General Safety Information ......Page 5
Safety Instructions for Batteries ......Page 6
Preparing the product for use......Page 8
Operation Page 9
Receiving the DCF radio time signal ......Page 9
Setting the time manually Page 10
For the LC-display Page 10
Switching the alarm on and off ......Page 11
Using the snooze function ......Page 11
Resetting the settings ......Page 12
Cleaning and Maintenance Page 12
Disposal Page 12
Information Page 14
Declaration of Conformity ......Page 14
Warranty Page 15
GB 3
Radio Controlled Alarm Clock
- Proper Use
The device is intended for use indoors at normal room temperatures only. The device is not intended for commercial use.
Description of Parts
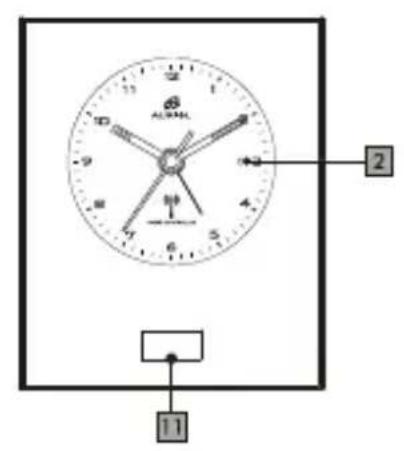
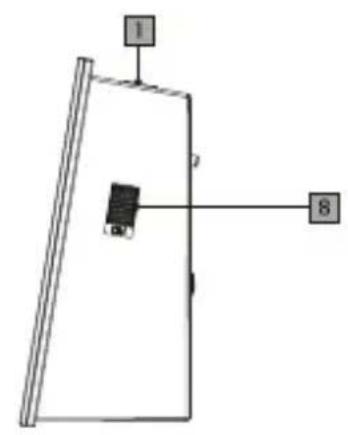
1 SNOOZE/LIGHT button
2 Colouredindicator
3 ALARM rotary control
4 M.SETbutton
5 RECbutton
6 Battery 1.5V, AA
7 Battery compartment cover
8 ALARM switch ON/OFF
9 Speaker
10RESETbutton
11 LC-display
4 GB
- Technical data
DCF radio time signal
Battery type: 1 Battery 1.5 V—, AA (included with product)

General Safety Information

WARNING! RISK OF LIFE AND ACCIDENTS FOR INFANTS AND
CHILDREN! Never leave children unattended with the packaging material. Risk of suffocation. Keep children away from the product.
This appliance can be used by children aged from 8 years and above and persons with reduced physical, sensory or mental capabilities or lack of experience and knowledge if they have been given supervision or instruction concerning use of the appliance in a safe way and understand the hazards involved. Children shall not play with the appliance. Cleaning and user maintenance shall not be made by children without supervision.
GB 5

WARNING!
DANGER TO LIFE! Batteries can be
swallowed, which may represent a danger to life. If a battery has been swallowed, medical help is required immediately.
Never take the device apart. Unsatisfactory repairs can lead to considerable danger for the user. Have repairs carried out by a suitably qualified or experienced specialist.

Safety Instructions for Batteries
■ Remove the batteries from the device if they have not been used for a long period.

CAUTION! DANGER OF EXPLOSION! The batteries must never be recharged!
- When inserting the battery, ensure the correct polarity! This is shown in the battery compartment.
If necessary, clean the battery and device contacts before inserting the battery.
6 GB
■ Remove a spent battery immediately from the device. There is an increased danger of leaks!
If you disregard the above instructions and advice, your batteries may discharge beyond their minimum voltage, thus increasing the chance of leakage. If the batteries in your device leak, remove them immediately to prevent the device from being damaged.
- Batteries must not be disposed of in the normal domestic waste!
■ Every consumer is legally obliged to dispose of batteries in the proper manner!
- Keep batteries away from children. Do not throw batteries into a fire. Never short-circuit them or take them apart.
- Avoid contact with the skin, eyes and mucous membranes. Any parts of the body coming into contact with battery acid should be rinsed off with copious amounts of water and / or a doctor contacted if necessary!

WARNING!
The batteries may explode if they have been improperly replaced. Ensure that only batteries of the same type are used.
GB 7
● Preparing the product for use
- Carefully remove the battery compartment cover. - Remove the battery insulation strip from between the battery and the contact. The alarm clock sounds once and automatically starts the radio time signal reception process.
Note: Reception may be considerably reduced by obstructions (e.g. concrete walls) or sources of interference (e.g. other electrical devices). In the event of reception problems, change the position of the alarm clock (e.g. to somewhere near a window).
Radio Signal (DCF):
The DCF signal (time signal transmitter) consists of time pulses emitted by one of the most accurate clocks in the world close to Frankfurt / Main, Germany – this varies by 1 second in a million years. Your radio-controlled alarm clock will receive the time signal under optimum conditions up to a distance of approx. 1,500 km from Frankfurt am Main, Germany. The radio time signal reception process normally takes about 12 minutes.
Note: After the alarm clock has received the DCF signal, the appropriate time zone is set automatically.
8 GB
Operation
Receiving the DCF radio time signal
The alarm clock automatically starts to search for the DCF radio time signal when the batteries 6 are inserted. This process takes about 12 minutes to complete. As soon as the radio alarm clock has synchronised, it displays the time from the DCF radio time signal. If synchronisation is not successful, the display stops at "12:00" until the radio alarm clock receives a signal again (For products intended for the Finland, Cyprus, Romania, Bulgaria and Greek market, the display stops at "01:00"). The reception of the DCF radio time signal by the alarm clock can also be started manually.
Press and keep pressed the REC button for a short while. The alarm now starts to receive a signal again.
Note: If the alarm clock was not able to receive the DCF radio time signal because of data errors, e.g. due your location to being at too great a distance from the transmitter or for other reasons, you can set the time manually.
GB 9
Setting the time manually
Press the M.SET button for at least 3 seconds. The alarm clock switches into manual mode.
Press and keep pressed the M.SET button again until the hands reach the correct position for you to set the time. Release the M.SET button 4 when the hands have reached the desired position.
Briefly pressing the M.SET button moves the hands forward in one minute steps to enable you to set the current time manually.
If the M.SET button is not pressed for 8 seconds, the clock is set.
For the LC-display
If the radio signal is received, the LC-display switch between the temperature (C) and the calendar for every 20 seconds.
Remark: If the radio signal has not been received, LCD displays temperature only.
10 GB
Switching the alarm on and off
Switch the alarm function on by moving the ALARM switch ON/OFF 8 to the ON position. When the alarm is switched on, the coloured indicator 2 turns up green. When the alarm is switched off, the coloured indicator 2 turns up red.
Turn the ALARM rotary control to set the alarm time. The alarm sounds for approx. 20-50 minutes when the set alarm time is reached.
It will be reactivated 12 hours later at the same time, if the ALARM ON/OFF 8 is not switched off.
Using the snooze function
Press the SNOOZE / LIGHT button to activate the snooze function. When the alarm signal sounds, the light on the back of the device illuminates for about 5 seconds.
The alarm signal stops sounding for approx. 5 minutes. The alarm sounds again after approx. 5 minutes.
GB 11
- Resetting the settings
Press the RESET button to reset the radio clock settings. Alternatively, remove the batteries 6 from the device and insert them again. The radio alarm clock now automatically starts to search for the DCF radio time signal.
Note: Press the button with a pointed object (e.g. pencil).
Cleaning and Maintenance
The device should only be cleaned on the outside with a soft dry cloth.
Disposal

The packaging is made entirely of recyclable materials, which you may dispose of at local recycling facilities.
12 GB
Contact your local refuse disposal authority for more details of how to dispose of your worn-out product.
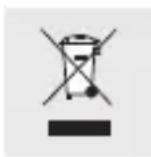
To help protect the environment, please dispose of the product properly when it has reached the end of its useful life and not in the household waste. Information on collection points and their opening hours can be obtained from your local authority.
Faulty or used batteries must be recycled in accordance with Directive 2006/66/EC. Please return the batteries and/or the device to the available collection points.
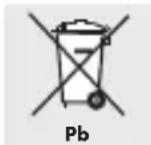
Environmental damage through incorrect disposal of the batteries!
Pb Batteries may not be disposed of with the usual domestic waste. They may contain toxic heavy metals and are subject to hazardous waste treatment rules and regulations. The chemical symbols for heavy metals are as follows: Cd = cadmium, Hg = mercury, Pb = lead. That is why you should dispose of used batteries at a local collection point.
GB 13
• Information
Declaration of Conformity
We, OWIM GmbH & Co. KG, Stiftsbergstraße 1, D-74167 Neckarsulm, hereby declare under our sole responsibility that the product: Radio controlled alarm clock, Model No.: Z31846A/Z31846B/Z31846C/Z31846D/Z31846E/Z31846F, Version: 11/2013, to which this declaration refers, complies with the standards / normative documents of 1999/5/EC.

The complete Declaration of Conformity can be viewed at www.owim.com.
EMC CE
14 GB
- Warranty
The device has been manufactured to strict quality guidelines and meticulously examined before delivery. In the event of product defects you have legal rights against the retailer of this product. Your legal rights are not limited in any way by our warranty detailed below.
The warranty for this device is 3 years from the date of purchase. Should this device show any fault in materials or manufacture within three years from the date of purchase, we will repair or replace it - at our choice - free of charge to you. The warranty period begins on the date of purchase. Please keep the original sales receipt in a safe location. This document is required as your proof of purchase. This warranty becomes void if the device has been damaged or improperly used or maintained.
The warranty applies to faults in material or manufacture. This warranty does not cover product parts subject to normal wear, thus possibly considered consumables (e.g. batteries) or for damage to fragile parts, e.g. switches, rechargeable batteries or glass parts.
GB 15
Kazalo vsebine
Pravilna uporaba ....Stran 17
Opis delov ....Stran 17
Z31846C/Z31846D
natural_image
Simple line drawing of a mechanical or architectural component with labeled points (no text or symbols)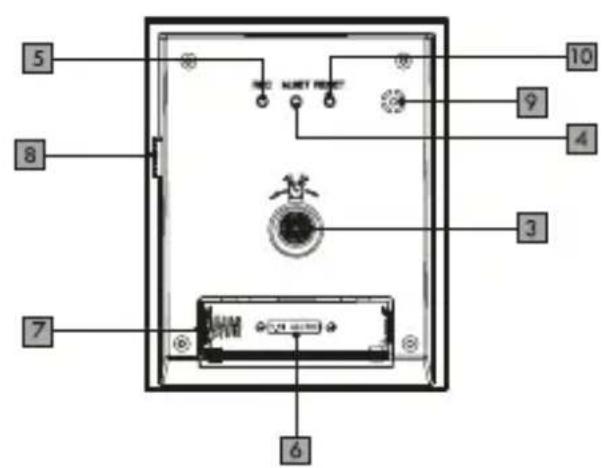
Z31846E/Z31846F
- RADIO CONTROLLED ALARM CLOCK
- RADIJSKO VODENA BUDILKA
- - Proper Use
- Description of Parts
- - Technical data
- General Safety Information
- WARNING! RISK OF LIFE AND ACCIDENTS FOR INFANTS AND
- WARNING!
- DANGER TO LIFE! Batteries can be
- Safety Instructions for Batteries
- CAUTION! DANGER OF EXPLOSION! The batteries must never be recharged!
- ● Preparing the product for use
- Radio Signal (DCF):
- Operation
- Receiving the DCF radio time signal
- Setting the time manually
- For the LC-display
- Switching the alarm on and off
- Using the snooze function
- - Resetting the settings
- Cleaning and Maintenance
- Disposal
- Environmental damage through incorrect disposal of the batteries!
- • Information
- Declaration of Conformity
- EMC CE
- - Warranty
- Kazalo vsebine
Brand : AURIOL
Model : IAN 94519
Category : Alarm Clock