
IAN 49049 - Alarm Clock AURIOL - Free user manual and instructions
Find the device manual for free IAN 49049 AURIOL in PDF.
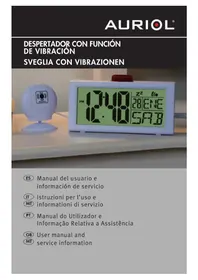


| Product Type | Alarm Clock Radio |
| Brand | Auriol |
| Model | IAN 49049 |
| Dimensions (approx.) | 15 x 8 x 5 cm (5.9 x 3.1 x 2.0 in) |
| Weight (approx.) | 0.3 kg (10.6 oz) |
| Power Supply | AC 230 V, 50 Hz; backup battery (CR2032, not included) |
| Alarm | Dual alarm with snooze function |
| Radio | FM/AM tuner with digital presets |
| Display | LED display with adjustable brightness |
| Clock | 12/24 hour format, automatic time setting (if supported) |
| Additional Functions | Sleep timer, alarm via radio or buzzer, USB charging port (if available) |
| Cleaning and Maintenance | Wipe with a soft, dry cloth; do not use liquids or abrasive cleaners |
| Safety Warnings | Keep away from water and heat sources; do not disassemble; use only supplied power adapter |
| Spare Parts and Repairability | No user-serviceable parts; contact professional for repairs |
| General Information | Operating temperature: 0-40°C; humidity up to 80% |
Frequently Asked Questions - IAN 49049 AURIOL
User questions about IAN 49049 AURIOL
0 question about this device. Answer the ones you know or ask your own.
Ask a new question about this device
Download the instructions for your Alarm Clock in PDF format for free! Find your manual IAN 49049 - AURIOL and take your electronic device back in hand. On this page are published all the documents necessary for the use of your device. IAN 49049 by AURIOL.
USER MANUAL IAN 49049 AURIOL
Operating and Safety Instructions 65
Getting Started
Setting the Time and Date 56
Setting the Alarm 58
Connecting the Vibrating Pad 59
Setting the Time and Date
Thank you for purchasing this alarm clock with an additional vibrating alarm.
This alarm clock signals the set alarm time with an alarm sound, a flashing light and if required, also with a vibrating pad. The display shows the date and time.
Package Contents
- Alarm clock VWS2010
- Vibrating pad
- User manual with service information
- Power adapter TYT70600030EU 6V=, 300 mA
Table of Contents
Introduction...... 65
Package Contents 65
Table of Contents 66
Important Safety Instructions 67
Operating Environment.... 67
Children and Persons with Disabilities 68
Power Adapter and Batteries.... 69
Intended Use 70
Conformity Notice 71
Overview 72
The Display.... 74
Getting Started 75
Connecting the Power Adapter.... 75
Inserting the Batteries.... 75
Setting the Language.... 77
Operation.... 77
Setting the Time and Date 77
Setting the Alarm Clock 79
Connecting the Vibrating Pad.... 80
The Repeat Alarm.... 81
Selecting an Alarm Sound 81
Appendix 82
Repair and Maintenance.... 82
Technical Specifications 83
Disposal of Old and Defective Devices.... 84
Warranty Information 85
Declaration of conformity.... 86
Important Safety Instructions
Before you use this device for the first time, please read the following notes in this manual and heed all warnings, even if you are familiar with handling electronic devices. Keep this manual safe for future reference. If you sell the device or pass it on, it is essential you hand over this manual also.

This icon denotes important information for the safe operation of the product and for the user's safety.

This symbol denotes further information on the topic.

Operating Environment
The device is not for use in rooms with a high temperature or humidity (e.g. bathrooms), and must be kept free of dust. Operating temperature and operating humidity: 5°C to 40°C, max. 90% RH. The device may not be used outdoors or in tropical climates. This product has not been designed for corporate or commercial applications. Use the product in domestic environments for private applications only. Any use other than that mentioned above does not correspond to the intended use.
Always make sure that:
- no direct heat sources (e.g. heating) affect the device;
- no direct sunlight or artificial light reaches the device;
- never place the device in the immediate vicinity of magnetic fields (e.g. loudspeakers);
- do not place any fire sources (e.g. burning candles) on or near the device;
- no foreign bodies are introduced into the device;
- the device should not be subject to any sharp temperature changes.
- Do not place any recipients containing liquids (beverages, vases, etc.) onto or next to the device.

Children and Persons with abilities
Electrical appliances do not belong in the hands of children. People with disabilities should only use electrical devices in appropriate circumstances. Do not allow children or persons with disabilities to use electrical devices when not under supervision. These may not comprehend the presence of potential risks. Batteries and small parts represent potential choking hazards. Keep the batteries in a safe place. If a battery is swallowed, seek medical
help immediately. Keep the packaging away from children and persons with disabilities too as there is danger of suffocation.

Power Adapter and
Batteries
In order to completely disconnect the device from the mains, the power adapter must be pulled out from the wall outlet. For this reason, the device should be positioned in a way that assures unobstructed access to the power outlet so that the power adapter can be immediately pulled out in an emergency situation. To avoid the danger of fire if the power adapter is not going to be used for a long while (e.g. during holidays) it should always be disconnected from the power socket.
During a thunderstorm unplug the power adapter from the mains in order to avoid any damage to the device.
Insert the batteries with the correct polarity. Never try to recharge the batteries and under no circumstances throw them into fire. Remove batteries when the device is not to be used for a long time. Non-intended use may cause explosion and danger to life.
Intended Use
This is a consumer electronics device. It may only be used for private use, not industrial or commercial purposes. In its default configuration, this product has not been designed for medical, lifesaving, rescue or life-maintaining purposes. Furthermore, the device may not be used in tropical climates. Only connection cables and external devices may be used that comply with safety standards and the electromagnetic compatibility and shielding quality of this device. This device fulfils all that relates to CE Conformity, relevant norms and standards. Any modifications to the equipment other than recommended changes by the manufacturer may result in these directives no longer being met. The manufacturer is not liable for any damage or interference caused by unauthorized modifications. Only use the accessories recommended by the manufacturer. Do not use this device for purposes other than those indicated and do not modify it in any way. Any use other than that mentioned above does not correspond to the intended use.
Conformity Notice
CE
This device has been tested and approved for compliance with the basic and other relevant requirements of the EMC Directive 2004/108/EC and the Low-voltage Directive 2006/95/EC, as well as the ecological design criteria according to the Commission Regulation 278/2009 to implement the Directive 2009/125/EC. The corresponding Declaration of Conformity can be found at the end of this User's Manual.
Overview

1 ALARM Enables or disables the alarm: choose between four different wakeup times 2 MODE Sets the time, date and wakeup time 3 SNOOZE Repeats the wakeup signal after 9 minutes 4 ADJUST ▼ (Previous setting) 5 ADJUST ▲ (Next setting) 6 Receptacle for vibrating pad 7 PAUSE Disables the Repeat Alarm 8 Speaker 9 TONE Selects the alarm sound 10 Receptacle for power adapter 11 Battery compartment (for 4x AA-sized batteries) 12 Vibrating pad with stand and connector cable
The Display

13 Morning and afternoon icons
AM: Morning
PM: Afternoon
14 Time
15 Repeat Alarm icon
16 Alarm enabled icon
17 Month indicator
18 Week indicator
19 Day indicator
Getting Started
Connecting the Power Adapter

In order to completely disconnect the device from the mains, the power adapter must be pulled out from the wall outlet.
You may optionally power the device by using conventional batteries. However, do not use both means of power supply at the same time. Remove batteries before connecting the power adapter.
- Plug the connector cable of the power adapter into the receptacle on the device.
- Plug the power adapter into an easily accessible wall outlet.

If the device has been separated from the mains, when it is next powered on it must be set once again.
Inserting the Batteries
You can operate the device with batteries. To do so use four AA-sized batteries, 1.5 V (not included in package contents).
- Open the alarm clock's battery compartment (11) by pushing the back panel cover in the direction of the arrow mark.
- Insert the batteries (size AA) into the unit. Make sure that the batteries are properly aligned according to the polarity (+ and -). The correct polarity is labelled on the batteries and inside the battery compartment.

- Slide the battery compartment cover onto the alarm clock housing.

When the time display is very dimmed it is time to replace the batteries. When this happens, replace the batteries with new batteries of the same type. After replacing the batteries it is necessary to set all parameters again.
Setting the Language
When you power on the device, the set language is English and the day indicator flashes with the country code "GB". The following languages can be selected:
GB English
FR French
NL Dutch
PT Portuguese
ES Spanish
DE German
DK Danish
- Press ADJUST ▼ (4) or ADJUST ▲ (5) to select your preferred language.
- Press the MODE button (2) to save the setting.
Operation
Setting the Time and Date
- Press and hold the MODE (2) button until the hours indicator on the display flashes.
- Use ADJUST ▼ (4) or ADJUST ▲ (5) to select the hours of the current time.
- Press the MODE (2) button until the minute indicator on the display flashes.
- Use ADJUST ▼ (4) or ADJUST ▲ (5) to select the minutes of the current time.
- Press the MODE (2) button until the month indicator on the display flashes.
- Use ADJUST ▼ (4) or ADJUST ▲ (5) to select the current month.
- Press the MODE (2) button until the day indicator on the display flashes.
- Use ADJUST ▼ (4) or ADJUST ▲ (5) to select the current day.
- Press the MODE (2) button until the year number on the display flashes.
- Use ADJUST ▼ (4) or ADJUST ▲ (5) to select the current year.
- Press the MODE (2) button, the 12- or 24-hour indicator on the display flashes.
- Use ADJUST ▼ (4) or ADJUST ▲ (5) to toggle between the 12-hour or 24-hour time display.
- Press the MODE (2) button, the set language flashes on the display.
- Press ADJUST ▼ (4) or ADJUST ▲ (5) to select your preferred language. You’ll find an explanation of the displayed abbreviations in the table found in the chapter “Setting the Language”.
- Press the ALARM button (1) to quit the process.

The weekday will be calculated according to the set information and displayed automatically.
Setting the Alarm Clock
You can set four different wakeup times with this alarm clock. By pressing the ALARM (1) button multiple times you can toggle between the four alarm times on the display.
- Press the ALARM (1) button as often as necessary until the alarm time is displayed that you want to change or set.
- Press and hold the MODE (2) button until the ON / OFF option (16) on the display flashes.
- Press ADJUST ▼ (4) or ADJUST ▲ (5) to select between the options ON (alarm enabled) or OFF (alarm disabled).
- Press the MODE (2) button until the hour indicator on the display flashes.
- Use ADJUST ▼ (4) or ADJUST ▲ (5) to select the hour of the desired alarm time.
- Press the MODE (2) button until the minute indicator on the display flashes.
- Use ADJUST ▼ (4) or ADJUST ▲ (5) to select the minutes of the desired alarm time.
- Press the ALARM button (1) to quit the process.
- An enabled alarm time icon (16) will show on the display.
Connecting the Vibrating Pad
You can optionally mount the vibrating pad (12) in the supplied stand or separate it from the stand to place it, for example, under your pillow. When the alarm time is reached, the vibrating pad vibrates and the signal light flashes.
- Plug the connector cable plug of the vibrating pad into the receptacle (6).
- Lie or stand the vibrating pad in the desired position.
The Repeat Alarm
The Repeat Alarm function is automatically enabled, the Repeat Alarm icon (15) flashes. You can interrupt the wakeup signal with the SNOOZE (3) button. After nine minutes the alarm is activated again.
- You can disable the current Repeat Alarm on the back of the alarm clock.
- Press the PAUSE button (7) to switch off the Repeat Alarm function.
- The Repeat Alarm icon (15) will light steady on the display.
Selecting an Alarm Sound
- Press the TONE (9) button on the back of the device multiple times to select one of the six different alarm sounds.
Appendix
Repair and Maintenance
Repairs are required when the devices have been damaged in any way, for example, when liquid or objects have entered the interior of the housing, when the products have been exposed to rain, when the products do not work normally, or if the products have been dropped. If smoke, unusual noises, or smells are noticed, immediately pull out the power adapter or remove the batteries. In these cases, the devices should not be used further and should be inspected by authorized service personnel. Please contact qualified personnel when repair is needed. Never open the housing of the alarm clock or the vibrating pad. Only use a clean, dry cloth for cleaning the devices. Never use any corrosive liquids.
Technical Specifications
| Model Vibrating Alarm Clock | |
| Auriol VWS2010 | |
| Power Supply Power | adapter TYT70600030EU TaiyTech Input: 100-240 V~ 50/60Hz Output: 6V ~300 mA or 4 AA-sized batteries 1.5 V |
| Power consumption 6V / 300mA | |
| Operating temperature and humidity | 5 °C to 35 °C, max. 90% RH |
| Storage temperature and humidity | 5 °C to 45 °C, max. 90% RH |
| Weight of alarm clock and vibrating pad 311g | |
| Alarm clock dimensions | 168 x 80 x 40 mm (W x H x D) |
Disposal of Old and Defective Devices

Devices marked with this symbol are subject to the European Directive 2002/96/EC. All electric and electronic devices must be disposed of separately from household waste at established bodies.
Avoid hazards to the environment and dangers to your personal health by disposing of the device properly. For further information about proper disposal, contact your local government or disposal bodies.
Respect the environment. Old batteries do not belong in with domestic waste. They must be handed in to a collection point for old batteries. Recycle the packaging material properly also. Cardboard packaging can be taken to paper recycling containers or public collection points for recycling. Any films or plastic contained in the packaging should be taken to your public collection points.
Warranty Information
The guarantee period is for 3 years as of date of purchase. For any guarantee claims, please have your proof of purchase ready, and phone our hotline:

TARGA GmbH
Postfach 22 44
D-59482 Soest
Germany
Phone: 0207 - 36 50 744
www.service.targa.de

TARGA GmbH
Postfach 22 44
D-59482 Soest
Germany
Phone: 800 - 62 175
www.service.targa.de
CE
EC-Declaration of Conformity
Address:
Targa
GmbH
Lange
Wende
59494 Soest, Germany
Product:
Vibration
Clock
Model: Auriol VWS 2010
The product complies with the requirements of the following European directives:
2004/108/EC
Electromagnetic
Compatibility
2006/95/EC
Low
Voltage
2009/125/EC Energy Related Products
Compliance was proved by the application of the following standards:
EMC: EN 55013: 2001 + A1: 2003 + A2: 2006
EN 55020: 2007
EN 61000-3-2: 2006
EN 61000-3-3: 1995 + A1: 2001 + A2: 2005
Safety: EN 60065: 2002 + A1: 2006 + A11: 2008
ErP:
Regulation
278/2009
Year of CE marking: 2010

Soest, 19th of April 2010
Matthias Klauke, Managing Director

CE
TARGA GmbH
Lange Wende 41
D-59494 Soest
www.service.targa.co.uk



- GETTING STARTED
- SETTING THE TIME AND DATE
- PACKAGE CONTENTS
- TABLE OF CONTENTS
- IMPORTANT SAFETY INSTRUCTIONS
- OPERATING ENVIRONMENT
- ALWAYS MAKE SURE THAT
- CHILDREN AND PERSONS WITH ABILITIES
- POWER ADAPTER AND
- BATTERIES
- INTENDED USE
- CONFORMITY NOTICE
- CE
- OVERVIEW
- THE DISPLAY
- CONNECTING THE POWER ADAPTER
- INSERTING THE BATTERIES
- SETTING THE LANGUAGE
- OPERATION
- SETTING THE ALARM CLOCK
- CONNECTING THE VIBRATING PAD
- THE REPEAT ALARM
- SELECTING AN ALARM SOUND
- APPENDIX
- REPAIR AND MAINTENANCE
- DISPOSAL OF OLD AND DEFECTIVE DEVICES
- WARRANTY INFORMATION
- EC-DECLARATION OF CONFORMITY
Brand : AURIOL
Model : IAN 49049
Category : Alarm Clock