
AeroVital Easy Touch - Freezer Klarstein - Free user manual and instructions
Find the device manual for free AeroVital Easy Touch Klarstein in PDF.


| Product type | Air fryer |
| Brand | Klarstein |
| Model | AeroVital Easy Touch |
| Article numbers | 10034451, 10034452 |
| Power supply | 220-240 V ~ 50/60 Hz |
| Power | 1700 W |
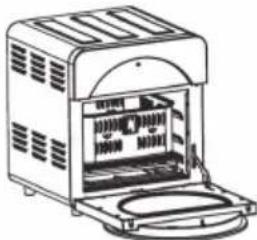
| Capacity | 14 L |
| Temperature range | 50-220 °C (dehydration: 50-70 °C) |
| Timer | 1 to 60 minutes (dehydration: up to 8 hours) |
| Preset programs | 16 programs: Fries, Popcorn, Defrosting, Chicken, Chicken wings, Cake, Dehydration, Rotisserie, Steak, Pizza, Chips, Reheating, Fish, Vegetables, Toast, Cookies |
| Heating functions | Top heat, bottom heat, or combined (selectable for most programs) |
| Rotisserie | 360° rotation, max chicken weight: 1.2 kg |
| Interior coating material | Non-stick |
| Included accessories | Drip tray, grill, mesh basket, spit, rotisserie clip |
| Safety shut-off | Automatic shut-off if door open more than 10 minutes; safety switch |
| Cleaning | Accessories washable with hot water and non-abrasive sponge; do not use metal pad |
| Use | Indoor only |
Frequently Asked Questions - AeroVital Easy Touch Klarstein
User questions about AeroVital Easy Touch Klarstein
0 question about this device. Answer the ones you know or ask your own.
Ask a new question about this device
Download the instructions for your Freezer in PDF format for free! Find your manual AeroVital Easy Touch - Klarstein and take your electronic device back in hand. On this page are published all the documents necessary for the use of your device. AeroVital Easy Touch by Klarstein.
USER MANUAL AeroVital Easy Touch Klarstein
KLARSTEIN
www.klarstein.com

area
| Category | Value | | -------- | ----- | | 1 | 100 | | 2 | 100 | | 3 | 100 | | 4 | 100 | | 5 | 100 | | 6 | 100 | | 7 | 100 | | 8 | 100 | | 9 | 100 | | 10 | 100 | | 11 | 100 | | 12 | 100 | | 13 | 100 | | 14 | 100 | | 15 | 100 | | 16 | 100 | | 17 | 100 | | 18 | 100 | | 19 | 100 | | 20 | 100 | | 21 | 100 | | 22 | 100 | | 23 | 100 | | 24 | 100 | | 25 | 100 | | 26 | 100 | | 27 | 100 | | 28 | 100 | | 29 | 100 | | 30 | 100 | | 31 | 100 | | 32 | 100 | | 33 | 100 | | 34 | 100 | | 35 | 100 | | 36 | 100 | | 37 | 100 | | 38 | 100 | | 39 | 100 | | 40 | 100 | | 41 | 100 | | 42 | 100 | | 43 | 100 | | 44 | 100 | | 45 | 100 | | 46 | 100 | | 47 | 100 | | 48 | 100 | | 49 | 100 | | 50 | 100 | | 51 | 100 | | 52 | 100 | | 53 | 100 | | 54 | 100 | | 55 | 100 | | 56 | 100 | | 57 | 100 | | 58 | 100 | | 59 | 100 | | 60 | 100 | | 61 | 100 | | 62 | 100 | | 63 | 100 | | 64 | 100 | | 65 | 100 | | 66 | 100 | | 67 | 100 | | 68 | 100 | | 69 | 100 | | 70 | 100 | | 71 | 100 | | 72 | 100 | | 73 | 100 | | 74 | 100 | | 75 | 100 | | 76 | 100 | | 77 | 100 | | 78 | 100 | | 79 | 100 | | 80 | 100 | | Note: The actual values are not provided in the code. I have used the label 'Value' as a placeholder for the value detection. You would need to run the code to get the actual values from the code list. Please note that the actual values would be the result of this example. You would need to run the code to get the actual values from the code list. You would need to run the code to get the actual values from the code list. You would need to run the code to get the actual values from the code list. You would need to run the code to get the actual values from the code list. You would need to run the code to get the actual values from the code list. You would need to run the code to get the actual values from the code list. You would need to run the code to get the actual values from you would need to run the code. You would need to run the code to get the actual values from you would need to run the code.INHALTSVERZEICHNIS
natural_image
Line drawings of four different kitchen appliances with open doors and a tray, showing structural changes (no text or symbols)natural_image
Two line drawings of a kitchen appliance with a gridded base and side panel, showing internal components (no text or symbols)natural_image
Line drawings of three household appliances: a front-mounted box, a side-mounted dish, and an open oven (no text or symbols)natural_image
Line drawing of a microwave oven with an arrow indicating airflow or movement (no text or symbols)BEDIENUNG
Bedienfeld
natural_image
Symbol of a trash bin crossed with a diagonal line, no text or labels presentBerlin Brands Group UK Limited
PO Box 42
272 Kensington High Street
London, W8 6ND
United Kingdom
Dear Customer,
Congratulations on purchasing this device. Please read the following instructions carefully and follow them to prevent possible damages. We assume no liability for damage caused by disregard of the instructions and improper use. Scan the QR code to get access to the latest user manual and more product information.

CONTENTS
Safety Instructions 18
Product Overview 19
Insert Accessories 20
Operation 23
Cleaning and Care 27
Disposal Considerations 28
Manufacturer & Importer (UK) 28
TECHNICAL DATA
| Item number 10034451, 10034452 | |
| Power supply 220-240 V ~ 50/60 Hz | |
| Power 1700 W | |
| Capacity 14 L | |
| Adjustable temperature 50-220 °C |
SAFETY INSTRUCTIONS
- Before using for the first time, check that the voltage of your power outlet matches the specified voltage.
- To avoid electric shock, do not immerse the power cord or the device itself in water or other liquids.
- Keep children and pets away from the device during operation.
• After use, switch off the appliance and disconnect the mains plug from the socket. - The unit should be operated separately from other units on a separate circuit. If the circuit is overloaded by other devices, this device may not work properly.
• Take extreme care when moving a container containing hot food. - Do not let the power cord hang over the edge of tables or work surfaces, and be careful not to allow the power cord to come into contact with the hot surfaces of the equipment.
• Always place the unit securely in the center of the table or worktop. - Do not touch hot device surfaces. Use the handles to move or lift.
• The device must not be used by children. - Use of accessories not expressly recommended by the manufacturer may result in injury.
- Do not place or use the unit on heat-sensitive glass surfaces, wooden surfaces or tablecloths. Be sure to place a heat-resistant plate with thermal protection under the unit on these surfaces.
- Never use the device if the power cord is damaged, if the device malfunctions or has been damaged in any other way.
- Before cleaning or when not in use, switch off the device and disconnect the power plug from the socket. Allow the device to cool down before removing or adding any parts.
- Do not place the device in the immediate vicinity of hot gas or electric ovens or in a heated oven.
- If the power plug does not fit properly, always contact a qualified electrician to minimize the potential for electrical shock. Never try to manipulate the power plug in any way.
- Do not clean the device with metallic scouring pads. Small metal parts could break off and short out the electrical components of the device, which could result in electric shock or damage the device.
- To minimize the risk of electric shock, only prepare food in the supplied, coated, non-stick container.
• This device is designed for indoor use only.
• Use the device only for its intended purpose.
- Keep this manual for future reference.
- This device may be only used by children 8 years old or older and persons with limited physical, sensory and mental capabilities and / or lack of experience and knowledge, provided that they have been instructed in use of the device by a responsible person who understands the associated risks.

CAUTION
Risk of burns! During hot air frying, hot steam is released through the air outlets. Keep your hands and face at a safe distance from the steam and from the air outlets. Also be careful of hot steam and air when you remove appliance parts from the appliance.
PRODUCT OVERVIEW
| 1 | Case | 7 | Rotisserie tong |
| 2 | Front panel | 8 | Rotisserie fork |
| 3 | Power cords | 9 | Wire rack |
| 4 | Interior | 10 | Mesh basket |
| 5 | Door | 11 | Drip pan |
| 6 | Control panel |
INSERT ACCESSORIES
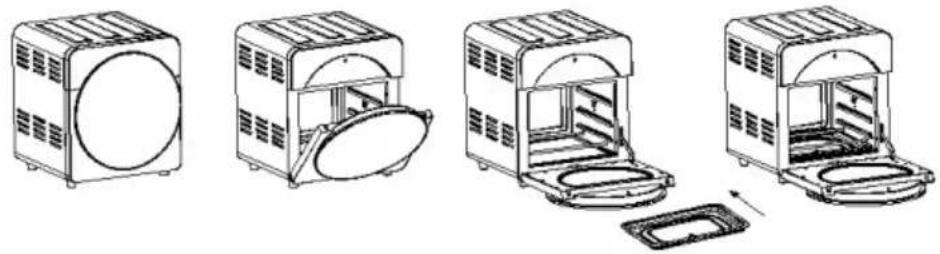
Drip pan
natural_image
Line drawings of four different kitchen appliances with open doors and a tray, showing structural changes (no text or symbols)Always place the drip pan on the floor of the interior to collect oil and water during cooking.
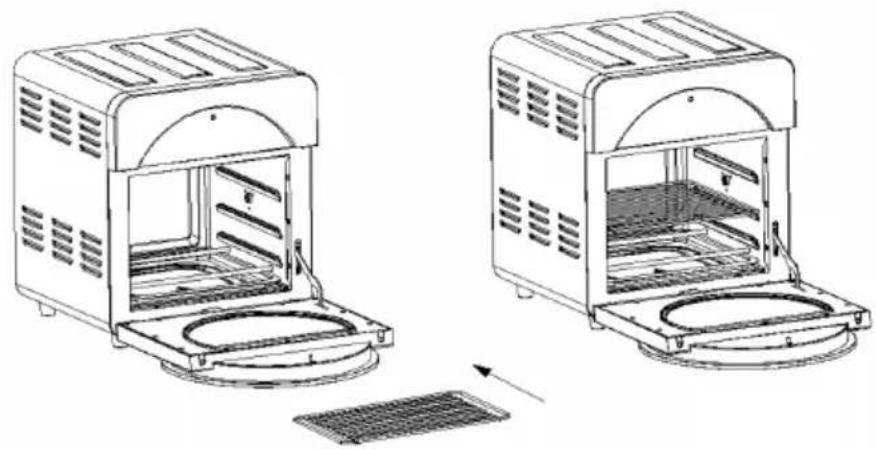
Wire rack
natural_image
Two technical line drawings of a kitchen appliance with a gridded base and side panel, showing internal components without any text or symbols.Slide the wire rack into one of the three rails.
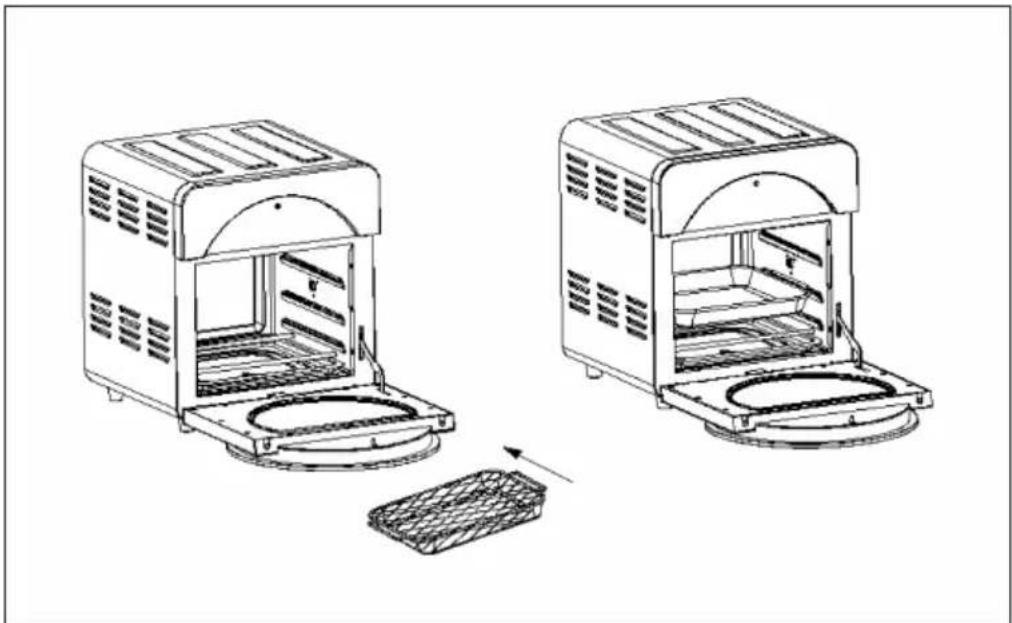
Mesh basket
natural_image
Line drawing of two kitchen appliances with a tray, showing open and closed views (no text or symbols)Slide the mesh basket into one of the two upper rails and close the door.
Rotisserie fork
natural_image
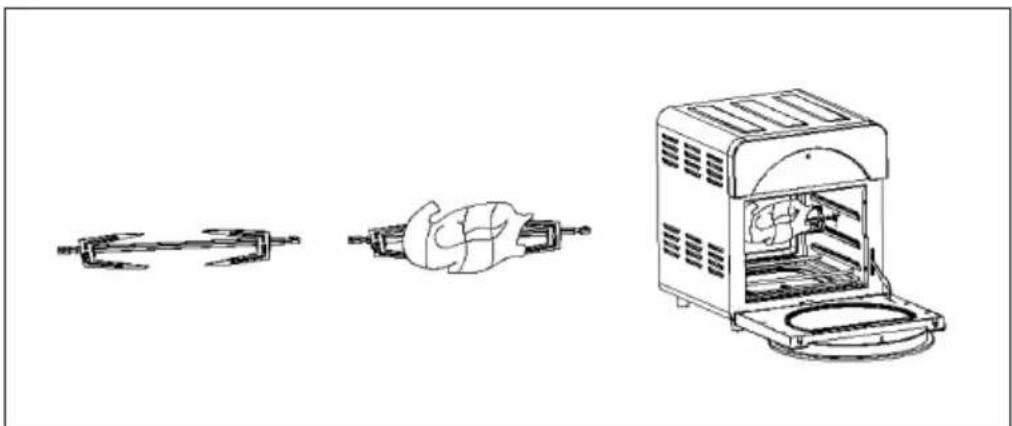
Line drawings of three different kitchen appliances: a cylindrical tool, a hand holding a fan, and an open oven (no text or symbols)The 360^ rotation ensures that the food is cooked more evenly. The rotation mode is set by default. Attach the food to the rotisserie fork as shown in the illustration.
Basket with Handle
Note: The basket is not included but can be ordered separately.
natural_image
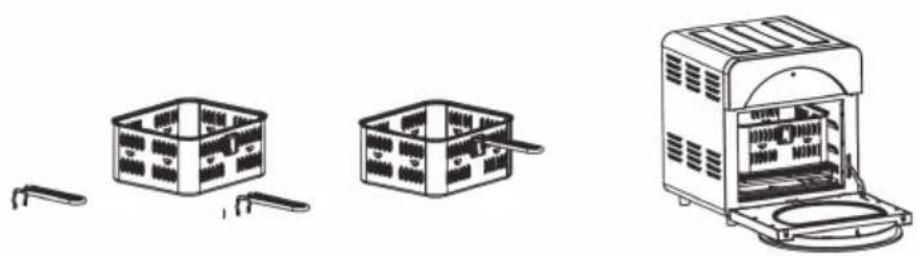
Line drawings of three household appliances: a front-mounted box, a side-mounted dish, and an open oven (no text or symbols)Attach the handle by clipping it into the appropriate slot in the basket. Then place the food in the basket, slide the wire rack into the lowest rail and place the basket on top. Remove the handle and close the door. After cooking, make sure that the handle and basket are firmly connected, grasp the handle, remove the basket from the interior and place it on a saucer.
Important notes on cooking
- Before cooking, always place the drip tray on the floor of the interior to collect oil and water during cooking.
- Do not place pans or cooking utensils directly on the lower heating pipes, always use the grate.
- Do not fill any food using the MAX position, as many ingredients may become larger when heated.
- The appliance only works when the front door is closed. Otherwise, an alarm will sound when you press the ON/OFF button.
- Some ingredients may need to be turned halfway during the preparation time to cook more evenly. If the ingredients have not fully cooked by the end of the program, return them to the appliance and continue cooking for a short time.
CAUTION
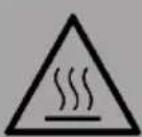
Risk of burns! Baskets, grids and other accessories become very hot during cooking. Do not touch the parts and use the appropriate tools or oven gloves when removing them.
There is a safety switch on the unit that you can press if the unit does not function properly:
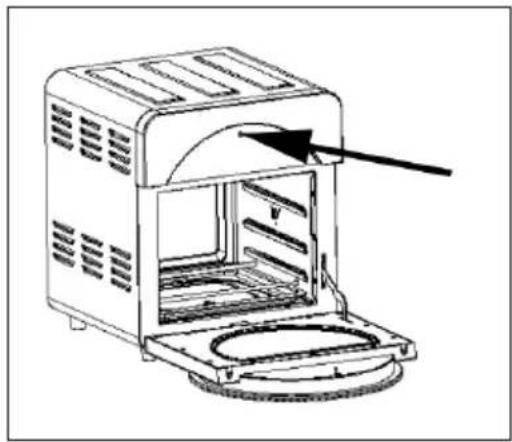
natural_image
Line drawing of a microwave oven with an arrow pointing to the interior panel (no text or symbols)OPERATION
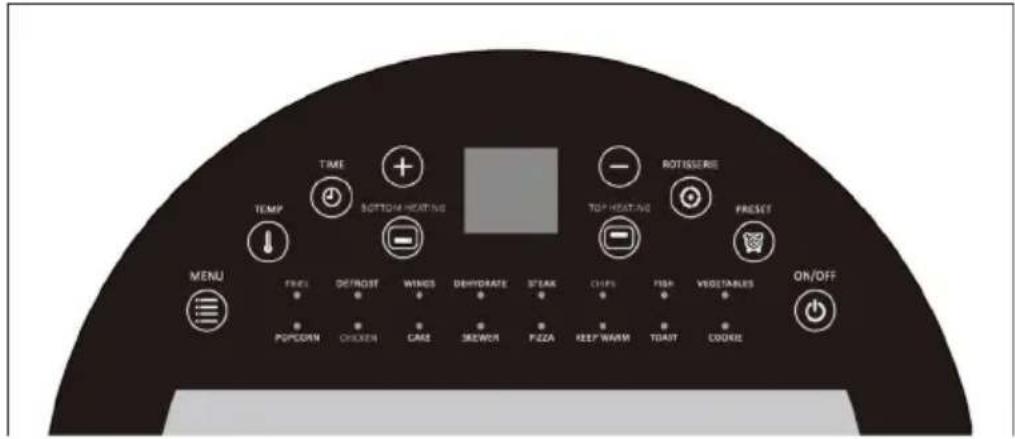
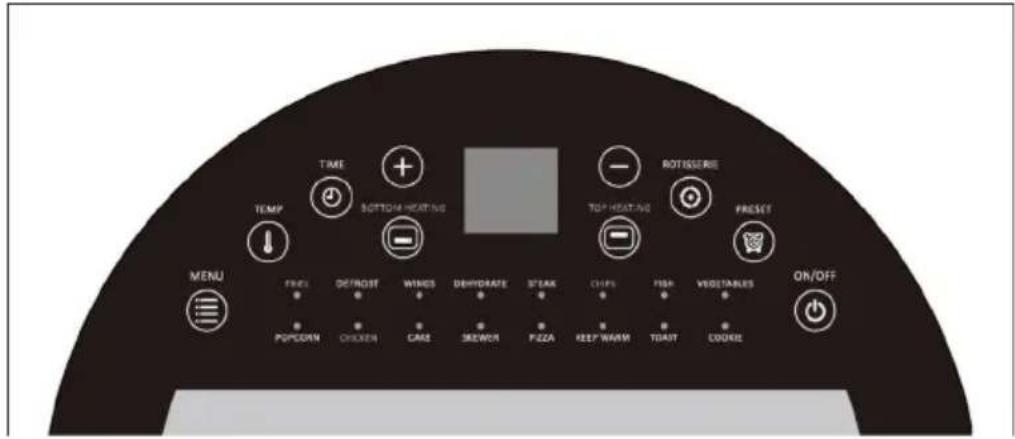
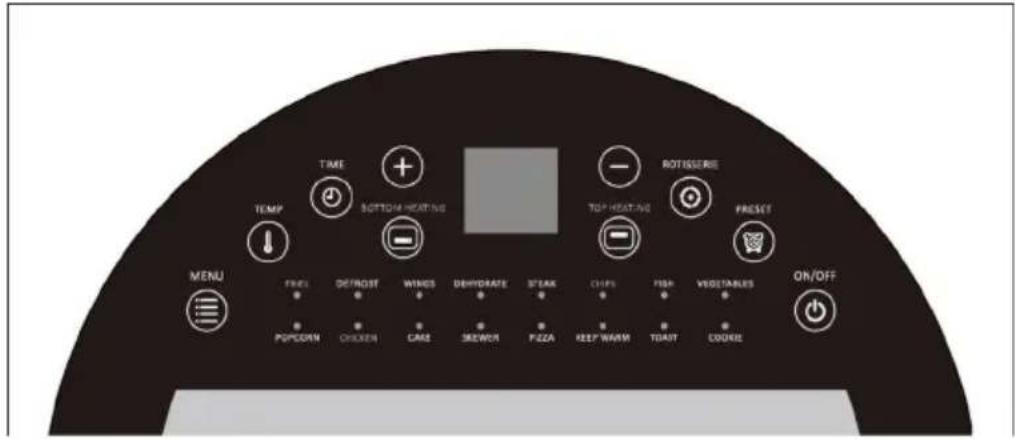
Control Panel
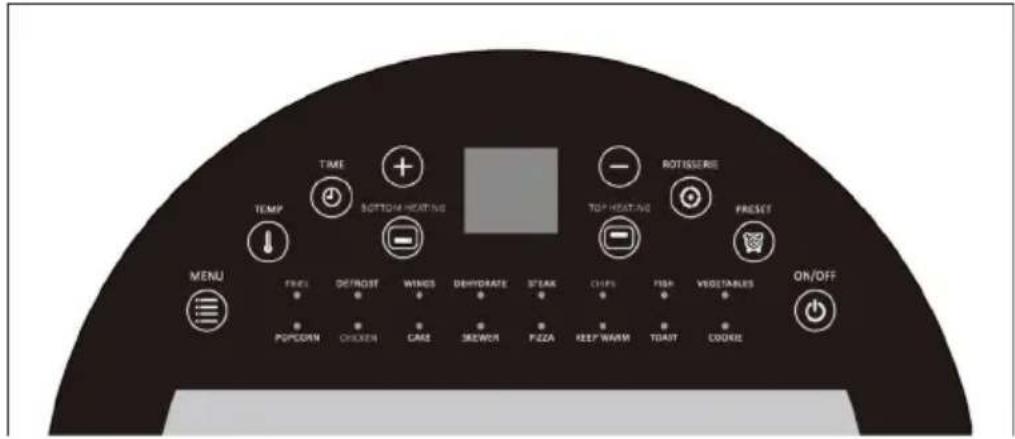
Before first use
- Remove all packing materials, stickers, and labels.
- Clean the basket and all other accessories with hot water, dishwashing detergent, and a non-abrasive sponge.
- Wipe the inside and outside of the unit with a soft cloth.
General Operation
| 1 | Insert the plug into the socket. The buzzer sounds, the digital screen and all indicator lights light up briefly once, then the display goes out again. |
| 2 | Press the ON/OFF key, the control lamp and the digital display light up. The unit is now in standby mode. |
| 3 | In standby mode, all buttons except ON / OFF, MENU and PRESET are locked. |
| 4 | If no function is selected in standby mode within 60 seconds, the unit will automatically turn off. |
| 5 | In standby mode, press the MENU button to enter the function selection. After selecting the function, press the ON/OFF button to enter the unit. |
Programms
To make cooking easier, 16 well preset programs are available. Press the MENU button several times to select one of the programs and confirm by pressing the ON/OFF button.
| FRIES POPCORN | |
| DEFROST CHICKEN | |
| WINGS CAKE | |
| DEHYDRATE SKEWER | |
| STEAK PIZZA | |
| CHIPS KEEP WARM | |
| FISH TOAST | |
| VEGETABLES COOKIE |
By default the preset programs CHICKEN, KEEP WARM and DEHYDRATE only work with top heat, the other 13 programs work with top and bottom heat. When the upper heating element is in operation, the indicator light is on. The same applies to the lower heater. For all programs (except CHICKEN, KEEP WARM and DEHYDRATE) you can also choose to use top heat, bottom heat or top/bottom heat by pressing the TOP HEATING and/or BOTTOM HEATING buttons.
Note: You can adjust the time after selecting a program by pressing the PRESET button. Then use the [+] and [-] buttons to adjust the time. Confirm the selection with ON/OFF.
Settings
- Press the ON/OFF button to turn on the unit and press the MENU button to select a desired function.
- To set the time, press the TIME button and use the [+] and [-] buttons. Each time the button is pressed, the time is incremented/decreased by one minute. Press and hold to adjust the time in 10-minute increments.
- To adjust the temperature, press the TEMP button and use the [+] and [-] buttons. Each time the button is pressed, the temperature is incremented/decreased by 10^ . The temperature is set by pressing the [+] and [-] buttons.
After all settings have been adjusted, press the ON/OFF button to start cooking.
- Adjustable time: 1-60 minutes (DEHYDRATE function: 8 hours)
- Adjustable temperature: 50-220 °C (function DEHYDRATE: 50-70 °C)
Cooking table
| Temperature Time Upper/lower heat | |||
| Fries | 220 °C 15 | min. Upper/lower | heat |
| Defrost | 80 °C 10 | min. Upper/lower | heat |
| Wings | 200 °C 15 | min. Upper/lower | heat |
| Dehydrate | 70 °C 8 St | unden Upper heat | |
| Steak | 180 °C 12 | min. Upper/lower | heat |
| Chips | 220 °C 20 | min. Upper/lower | heat |
| Fish | 180 °C 15 | min. Upper/lower | heat |
| Vegetables | 180 °C 12 | min. Upper/lower | heat |
| Popcorn | 220 °C 8 min. Upper/lower heat | ||
| Chicken | 220 °C 30 | min. | Upper heat |
| Cake | 180 °C 30 | min. Upper/lower | heat |
| Skewer | 200 °C 15 | min. Upper/lower | heat |
| Pizza | 180 °C 10 | min. Upper/lower | heat |
| Keep Warm | 80 °C 30 min. | Upper heat | |
| Toast | 200 °C 6 min. Upper/lower heat | ||
| Cookie | 180 °C 12 | min. Upper/lower | heat |
Interrupt cooking
If you open the door while cooking, cooking is automatically interrupted. When the door is closed, the cooking program continues as long as the door has not been open for more than 10 minutes. If the door remains open for longer than 10 minutes, the appliance switches off automatically.
Notes on the rotary spit
The 360° rotation ensures that the food is cooked more evenly. Press the ROTISSERIE button and the indicator light of the spit lights up. Press the button again to deactivate the function. The turning function is switched on by default.
- The total weight of the chicken should not exceed 1.2 kg. If the chicken is heavier, use the basket.
- Tie the chicken legs and wings to the chicken so that the chicken parts do not open during rotation.
- Before baking, prick a few holes in the chicken legs because the meat on the chicken legs is thick and the heat makes it difficult to penetrate.
After cooking
- When the program or the entered time has elapsed, the heating switches off. The fan continues to run for 1 minute until the temperature in the interior drops.
- When removing the accessories, use the appropriate aids or oven gloves and place the cooked food on plates or in bowls.
- After cooking, press the button to switch off the appliance and unplug it from the wall socket.
CLEANING AND CARE
- Unplug the appliance from the wall outlet and allow it to cool for at least 30 minutes.
- Remove the accessories.
- Clean the unit after each use. Do not use pointed or sharp kitchen utensils or abrasive cleaners to clean the accessories and the inside of the appliance, as these will damage the coating.
- Wipe the outside of the appliance with a damp cloth.
- Clean the accessories with hot water, a little dishwashing detergent and a non-abrasive sponge.
- Remove stubborn grease residues with a degreasing liquid.
- Clean the inside of the unit with a non-abrasive sponge.
- Clean the heating element with a cleaning brush to remove food residue.
- If you will not be using the unit for a long time, clean it before storing it.
DISPOSAL CONSIDERATIONS
natural_image
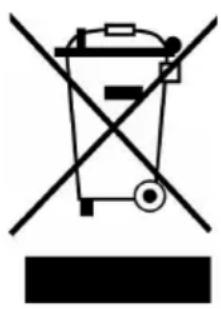
Symbol of a trash bin crossed with a diagonal line, no text or labels presentIf there is a legal regulation for the disposal of electrical and electronic devices in your country, this symbol on the product or on the packaging indicates that this product must not be disposed of with household waste. Instead, it must be taken to a collection point for the recycling of electrical and electronic equipment. By disposing of it in accordance with the rules, you are protecting the environment and the health of your fellow human beings from negative consequences. For information about the recycling and disposal of this product, please contact your local authority or your household waste disposal service.
MANUFACTURER & IMPORTER (UK)
Manufacturer:
Chal-Tec GmbH, Wallstrasse 16, 10179 Berlin, Germany.
Importer for Great Britain:
Berlin Brands Group UK Limited
PO Box 42
272 Kensington High Street
London, W8 6ND
United Kingdom
Estimado cliente:
ÍNDICE DE CONTENIDOS
natural_image
Line drawings of four different kitchen appliances with open doors and a tray, showing structural changes (no text or symbols)natural_image
Two technical line drawings of a kitchen appliance with a gridded base and side panel, showing internal components without any text or symbols.natural_image
Line drawing of two identical kitchen appliances with a side panel, showing internal components and a directional arrow (no text or symbols)natural_image
Line drawings of three different kitchen appliances: a cylindrical tool, a hand holding a fan, and an oven with a lid (no text or symbols)natural_image
Simple line drawing of a rectangular box with internal compartments and two side handles (no text or symbols)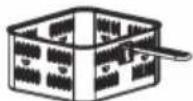
natural_image
Line drawing of a microwave oven with open lid and side panels (no text or symbols)natural_image
Line drawing of a microwave oven with a lid and vent, showing internal components and airflow direction (no text or symbols)FUNCIONAMIENTO
Panel de control
natural_image
Symbol of a trash bin crossed with a diagonal line, no text or labels presentBerlin Brands Group UK Limited
PO Box 42
272 Kensington High Street
London, W8 6ND
United Kingdom
Chère cliente, cher client,
SOMMAIRE
natural_image
Line drawings of four different kitchen appliances with open doors and a tray, showing structural changes (no text or symbols)natural_image
Two technical line drawings of a kitchen appliance with a gridded base and side panel, showing internal components without any text or symbols.natural_image
Line drawing of two kitchen appliances with a tray, showing internal components and a directional arrow (no text or symbols)natural_image
Line drawings of three household appliances: a front-mounted box, a side-mounted dish, and an open oven (no text or symbols)natural_image
Line drawing of a microwave oven with an arrow pointing to the interior panel (no text or symbols)UTILISATION
Panneau de commande
natural_image
Symbol of a trash bin crossed with a diagonal line, no text or numbers presentBerlin Brands Group UK Limited
PO Box 42
272 Kensington High Street
London, W8 6ND
United Kingdom
Gentile cliente,
INDICE
natural_image
Line drawings of four different kitchen appliances with open doors and a tray, showing structural changes (no text or symbols)natural_image
Two technical line drawings of a kitchen appliance with a gridded base and side panel, showing internal components without any text or symbols.natural_image
Line drawing of two kitchen appliances with a tray, showing internal structure and assembly (no text or symbols)natural_image
Line drawings of three different kitchen appliances: a cylindrical tool, a hand holding a fan, and an oven with a lid (no text or symbols)natural_image
Line drawings of three household appliances: a front-mounted box, a side-mounted dish, and an open oven (no text or symbols)natural_image
Line drawing of a microwave oven with an arrow indicating airflow or movement (no text or symbols)FUNZIONAMENTO
natural_image
Symbol of a trash bin crossed with a diagonal line, no text or numbers presentPRODUTTORE E IMPORTATORE (UK)
Produttore:
Chal-Tec GmbH, Wallstraße 16, 10179 Berlino, Germania.
Berlin Brands Group UK Limited
PO Box 42
272 Kensington High Street
London, W8 6ND
United Kingdom

area
| Category | Value | | -------- | ----- | | 1 | 100 | | 2 | 100 | | 3 | 100 | | 4 | 100 | | 5 | 100 | | 6 | 100 | | 7 | 100 | | 8 | 100 | | 9 | 100 | | 10 | 100 | | 11 | 100 | | 12 | 100 | | 13 | 100 | | 14 | 100 | | 15 | 100 | | 16 | 100 | | 17 | 100 | | 18 | 100 | | 19 | 100 | | 20 | 100 | | 21 | 100 | | 22 | 100 | | 23 | 100 | | 24 | 100 | | 25 | 100 | | 26 | 100 | | 27 | 100 | | 28 | 100 | | 29 | 100 | | 30 | 100 | | 31 | 100 | | 32 | 100 | | 33 | 100 | | 34 | 100 | | 35 | 100 | | 36 | 100 | | 37 | 100 | | 38 | 100 | | 39 | 100 | | 40 | 100 | | 41 | 100 | | 42 | 100 | | 43 | 100 | | 44 | 100 | | 45 | 100 | | 46 | 100 | | 47 | 100 | | 48 | 100 | | 49 | 100 | | 50 | 100 | | 51 | 100 | | 52 | 100 | | 53 | 100 | | 54 | 100 | | 55 | 100 | | 56 | 100 | | 57 | 100 | | 58 | 100 | | 59 | 100 | | 60 | 100 | | 61 | 100 | | 62 | 100 | | 63 | 100 | | 64 | 100 | | 65 | 100 | | 66 | 100 | | 67 | 100 | | 68 | 100 | | 69 | 100 | | 70 | 100 | | 71 | 100 | | 72 | 100 | | 73 | 100 | | 74 | 100 | | 75 | 100 | | 76 | 100 | | 77 | 100 | | 78 | 100 | | 79 | 100 | | 80 | 100 | | Note: The actual values are not provided in the code. I have used the label 'Value' as a placeholder for the value detection. You would need to run the code to get the actual values from the code list. Please note that the actual values would be the result of this example. You would need to run the code to get the actual values from the code list. You would need to run the code to get the actual values from the code list. You would need to run the code to get the actual values from the code list. You would need to run the code to get the actual values from the code list. You would need to run the code to get the actual values from the code list. You would need to run the code to get the actual values from the code list. You would need to run the code to get the actual values from you would need to run the code. You would need to run the code to get the actual values from you would need to run the code.
KLARSTEIN
- INHALTSVERZEICHNIS
- BEDIENUNG
- Dear Customer,
- CONTENTS
- SAFETY INSTRUCTIONS
- CAUTION
- PRODUCT OVERVIEW
- INSERT ACCESSORIES
- Mesh basket
- Rotisserie fork
- Basket with Handle
- Important notes on cooking
- OPERATION
- Control Panel
- Before first use
- General Operation
- Programms
- Settings
- Interrupt cooking
- Notes on the rotary spit
- After cooking
- CLEANING AND CARE
- DISPOSAL CONSIDERATIONS
- MANUFACTURER & IMPORTER (UK)
- Manufacturer:
- Importer for Great Britain:
- Estimado cliente:
- ÍNDICE DE CONTENIDOS
- FUNCIONAMIENTO
- Chère cliente, cher client,
- SOMMAIRE
- UTILISATION
- Gentile cliente,
- INDICE
- FUNZIONAMENTO
- PRODUTTORE E IMPORTATORE (UK)
- Produttore:
- KLARSTEIN
Brand : Klarstein
Model : AeroVital Easy Touch
Category : Freezer