
10034550 - Freezer Klarstein - Free user manual and instructions
Find the device manual for free 10034550 Klarstein in PDF.


| Product type | Chest freezer |
| Brand | Klarstein |
| Model | 10034550 |
| Net capacity | 200 L |
| Climate class | N-ST |
| Energy class | E |
| Annual consumption | 210 kWh |
| Noise level | 40 dB(A) |
| Dimensions (W x D x H) | 85 x 60 x 85 cm |
| Net weight | 35 kg |
| Power supply | 230 V / 50 Hz |
| Power consumption | 100 W |
| Refrigerant | R600a |
| Adjustable temperature | -18 °C to -24 °C |
| Defrost | Manual |
| Interior light | No |
| Temperature alarm | Yes |
| Security lock | Yes (with key) |
| Tank material | Painted steel |
| Storage baskets | 1 metal basket |
| Maintenance and cleaning | Disconnect before cleaning; use a damp cloth and mild soap |
| Safety | Do not immerse in water; do not use steam cleaner |
| Spare parts | Available via Klarstein customer service |
| Repairability | Repairability index: 6.5/10 |
Frequently Asked Questions - 10034550 Klarstein
User questions about 10034550 Klarstein
0 question about this device. Answer the ones you know or ask your own.
Ask a new question about this device
Download the instructions for your Freezer in PDF format for free! Find your manual 10034550 - Klarstein and take your electronic device back in hand. On this page are published all the documents necessary for the use of your device. 10034550 by Klarstein.
USER MANUAL 10034550 Klarstein
bar
| Category | Value | |---|---| | Category 1 | 100 | | Category 2 | 100 | | Category 3 | 100 | | Category 4 | 100 | | Category 5 | 100 | | Category 6 | 100 | | Category 7 | 100 | | Category 8 | 100 | | Category 9 | 100 | | Category 10 | 100 | | Category 11 | 100 | | Category 12 | 100 | | Category 13 | 100 | | Category 14 | 100 | | Category 15 | 100 | | Category 16 | 100 | | Category 17 | 100 | | Category 18 | 100 | | Category 19 | 100 | | Category 20 | 100 | | Category 21 | 100 | | Category 22 | 100 | | Category 23 | 100 | | Category 24 | 100 | | Category 25 | 100 | | Category 26 | 100 | | Category 27 | 100 | | Category 28 | 100 | | Category 29 | 100 | | Category 30 | 100 | | Category 31 | 100 | | Category 32 | 100 | | Category 33 | 100 | | Category 34 | 100 | | Category 35 | 100 | | Category 36 | 100 | | Category 37 | 100 | | Category 38 | 100 | | Category 39 | 100 | | Category 40 | 100 | | Category 41 | 100 | | Category 42 | 100 | | Category 43 | 100 | | Category 44 | 100 | | Category 45 | 100 | | Category 46 | 100 | | Category 47 | 100 | | Category 48 | 100 | | Category 49 | 100 | | Category 50 | 100 | | Category 51 | 100 | | Category 52 | 100 | | Category 53 | 100 | | Category 54 | 100 | | Category 55 | 100 | | Category 56 | 100 | | Category 57 | 100 | | Category 58 | 100 | | Category 59 | 100 | | Category 60 | 100 | | Category 61 | 100 | | Category 62 | 100 | | Category 63 | 100 | | Category 64 | 100 | | Category 65 | 100 | | Category 66 | 100 | | Category 67 | 100 | | Category 68 | 100 | | Category 69 | 100 | | Category 70 | 100 | | Category 71 | 100 | | Category 72 | 100 | | Category 73 | 100 | | Category 74 | 100 | | Category 75 | 100 | | Category 76 | 100 | | Category 77 | 100 | | Category 78 | 100 | | Category 79 | 100 | | Category 80 | 100 | | Category 81 | 100 | | Category 82 | 100 | | Category 83 | 100 | | Category 84 | 100 | | Category 85 | 100 | | Category 86 | 100 | | Category 87 | 100 | | Category 88 | 100 | | Category 89 | 100 | | Category 90 | 100 | | Category 91 | 100 | | Category 92 | 100 | | Category 93 | 100 | | Category 94 | 100 | | Category 95 | 100 | | Category 96 | 100 | | Category 97 | 100 | | Category 98 | 100 | | Category 99 | 100 | | Total (Total) = [sum of bars] / [bar chart] + [line chart] = [bars] * (sum of bars + line chart) * (bars). The total bar is divided into two parts: 'Number of items' and 'Percentage'. The total bar is divided into two parts: 'Percentage' and 'Number of items'. The total bar is divided into two parts: 'Percentage' and 'Number of items'. The total bar is divided into two parts: 'Percentage' and 'Number of items'.natural_image
Technical line drawing of a mechanical assembly with a cube and rotating shaft (no text or symbols)natural_image
Symbol of a trash bin crossed out by a diagonal line, with no text or labels present.Congratulations on purchasing this equipment. Please read this manual carefully and take care of the following hints to avoid damages. Any failure caused by ignoring the mentioned items and cautions mentioned in the instruction manual are not covered by our warranty and any liability.
CONTENT
Safety Instructions 16
Product Description 18
Installation 19
Operation 22
Care and Cleaning 23
Troubleshooting 24
Hints on Disposal 25
TECHNICAL DATA
| Item number 10034550 | |
| Power supply 220-240 V ~ 50-60 Hz |
DECLARATION OF CONFORMITY

Producer:
Chal-Tec GmbH, Wallstraße 16, 10179 Berlin, Germany.
This product is conform to the following European Directives:
2014/30/EU (EMC)
2014/35/EU (LVD)
2011/65/EU (RoHS)
643/2009/EC (ErP)
1060/2010/EU (ErP)
SAFETY INSTRUCTIONS
- Check that the voltage of the power supply in your home is the same as the voltage shown on the rating label of this product.
- This device may be only used by children 8 years old or older and persons with limited physical, sensory and mental capabilities and / or lack of experience and knowledge, provided that they have been instructed in use of the device by a responsible person who understands the associated risks.
- Keep ventilation opening, in the appliance enclosure or in the built-in structure, clear of obstruction.
- Do not use mechanical devices or other means to accelerate the defrosting process, other than those recommended by the manufacturer.
- Do not use electrical appliances inside the food storage compartments of the appliance, unless they are of the type recommended by the manufacturer.
- Do not damage the refrigerant circuit.
- If the supply cord is damaged, it must be replaced by the manufacturer or its service agent or a similarly qualified person in order to avoid a hazard.
- It is recommended to check regularly the supply cord for any sign of possible deterioration, and the appliance should not be used if the cable is damaged.
- To avoid injury or death from electrical shock, do not operate the appliance with wet hands, while standing on a wet surface.
- It is not recommended to use this refrigerator with an extension cord or power board. Please ensure that the appliance is plugged directly into the electrical outlet.
- When positioning the appliance, ensure that there is at least a 5 cm clearance at the sides and a 10 cm clearance at the back as this is the main outlet for heat. This will allow for adequate ventilation.
- Do not place hot food or drink into the refrigerator before it cools down to room temperature.
- Close the door immediately after putting in any items so the inside temperature will not rise dramatically.
- Keep appliance away from any heat source or direct sunlight.
- To fix stably, the appliance must be placed on a flat and solid surface. It should not be laid on any soft material.
- Do not place any other appliance on top of the refrigerator, and do not wet it.
- Do not store something like ether, methanol, gasoline, which is easy to evaporate burn or explode.
- Do not use outdoors or in wet conditions.
- Never pull the cord to disconnect it from the outlet. Grasp the plug and pull it from the outlet.
- Keep the cord away from heated surfaces.
- This appliance has been incorporated with a grounded plug. Please ensure the wall outlet in your house is well earthed.
- Connect your refrigerator to an independent electrical socket and use a safe ground wire.
- Defrost the freezer at least once a month because too much frost may affect refrigeration.
- Turn on electricity only 5 minutes later after electricity goes off. Otherwise, the compressor may be damaged.
Special Notes
- Children between the ages of 3 and 8 are allowed to fill refrigerators with food and remove food.
- When positioning the unit, make sure that the power cord is not pinched or damaged.
- Make sure that there are no multiple sockets or power supplies on the back of the unit.
To avoid contamination of food, please follow the instructions below:
- A prolonged opening of the door can lead to a significant rise in temperature in the compartments of the appliance.
- Regularly clean surfaces that may come into contact with food. Clean the water drain regularly.
- Store raw meat and fi sh in suitable containers in the refrigerator so that meat and fi sh do not come into contact with or drip on other foods.
Notes on the freezer compartments
- Two-star freezer compartments are suitable for storing pre-frozen foods, storing or making ice cream and making ice cubes.
- One-, two- and three-star freezer compartments are not suitable for freezing fresh food.
- If the refrigerator remains empty for an extended period, turn it off, defrost it, clean it, dry it and leave the door open to prevent mould from forming in the appliance.
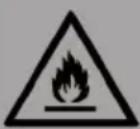
WARNING
When using, servicing and disposing of the unit, pay attention to the left symbol on the rear of the unit or on the compressor. This symbol warns of possible fires. There are flammable substances in the refrigerant lines and in the compressor. Keep the appliance away from sources of fire during use, maintenance and disposal.
PRODUCT DESCRIPTION
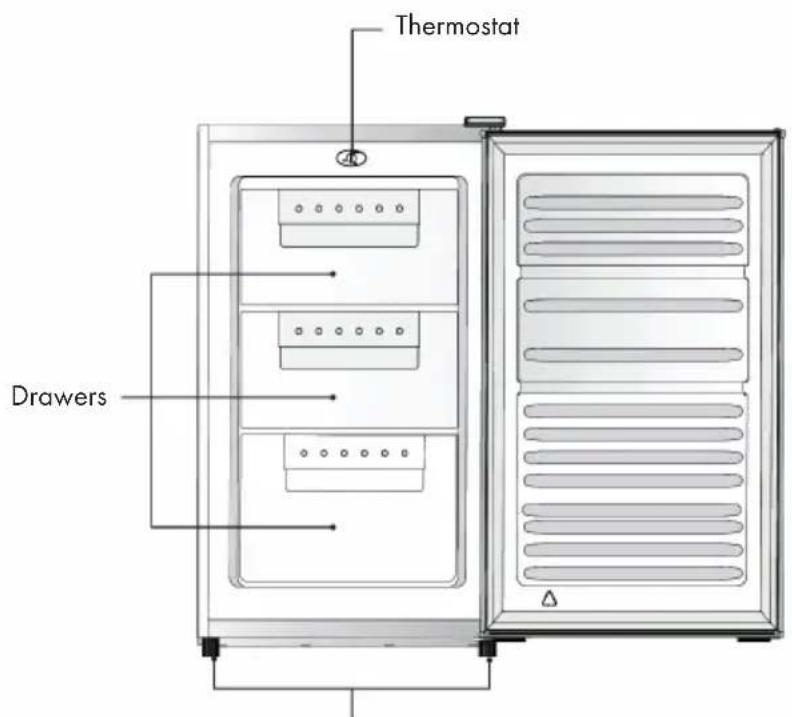
Levelling Feet
INSTALLATION
Reverse Door
Tool required: Philips screwdriver, Flat bladed screwdriver, hexagonal spanner.
- Ensure the unit is unplugged and empty.
- To take the door off, it is necessary to tilt the unit backwards. You should rest the unit on something solid so that it will not slip during the door removing process.
- All parts removed must be saved to do the reinstallation of the door.
- Do not lay the unit flat as this may damage the coolant system.
- It's better that 2 people handle the unit during assembly.
| 123 | ||
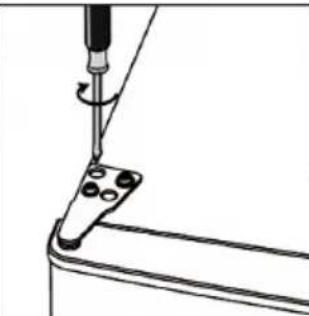
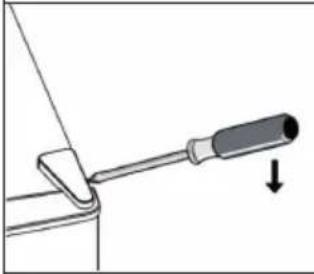 | 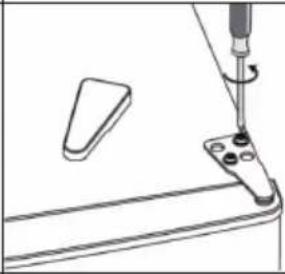 | 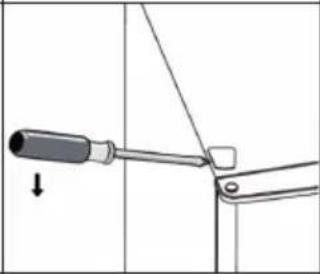 |
| Carefully remove the top hinge cover with a flat screw driver. | Unscrew the top hinge with a philiphs screw driver. | Remove the hole cover with a flat screw driver. |
| 4 | 5 | |
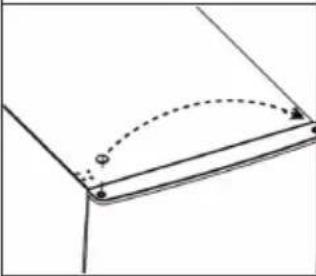 | 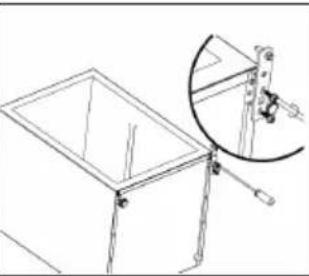 | 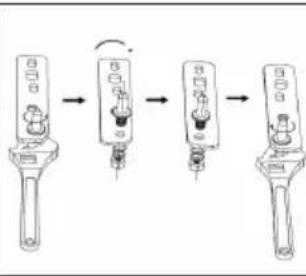 |
| Move the core cover from left side to right side. And then lift the upper door and place it on a padded surface to prevent it from scratching. | Lie down the rear of cabinet on a soft pad. And unscrew the bottom hinge and leveling foot. Unscrew and remove the bottom hinge pin, turn the bracket over and replace it. | |
| 678 | ||
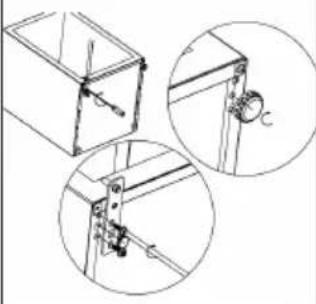 |  | 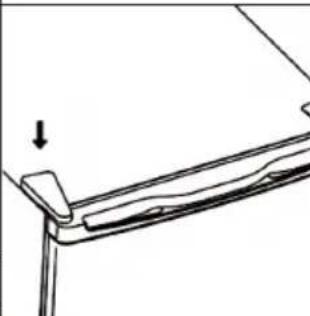 |
| Install the hinge at left side and foot base at right side. Then screw two leveling feet with their orig in al parts. | Install the upper door with the upper hinge. | Clap in the hinge cover and hole cover on the top of unit. |
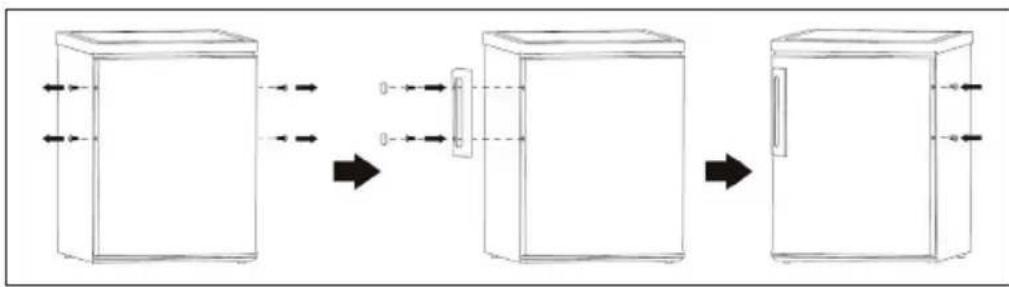
Install door external handle (if external handle is present)
flowchart
graph LR
    A["Top Box"] --> B["Door"]
    B --> C["Backdoor"]
    C --> D["Top Box"]
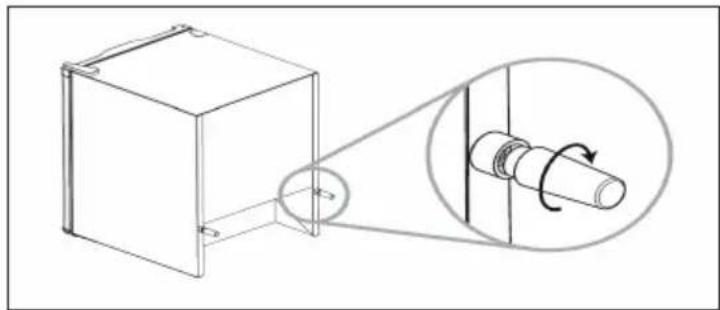
Rear spacer
Screw the rear spacers at the rear of the unit.
natural_image
Technical line drawing of a mechanical assembly with a cube and rotating shaft (no text or symbols)Space Requirement
- Keep enough space of door open.
- Keep at least 50 mm gap at two sides.
- To level the unit adjust the two levelling feet at front of the unit. If the unit is not level, the doors and magnetic seal alignments will not be covered properly.
OPERATION
Before first Use
Before using the appliance for the first time, wash the interior and all internal accessories with lukewarm water and some neutral soap so as to remove the typical smell of a brand new product, then dry thoroughly.
Temperature Setting
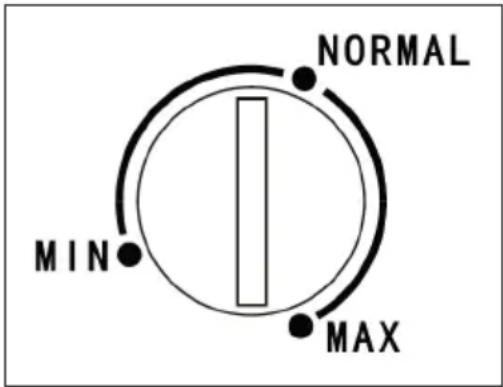
- Plug on your appliance. The internal temperature is controlled by a thermostat. There are 3 settings MIN, NORMAL and MAX. MIN is warmest setting and MAX is coldest setting.
- The appliance may not operate at the correct temperature if it is in a particularly hot or if you open the door often.
Freezing fresh food
- The freezer compartment is suitable for freezing fresh food and storing frozen and deep-frozen food for a long time.
- Place the fresh food to be frozen in the bottom compartment.
- The maximum amount of food that can be frozen in 24 hours is specified on the rating plate.
- The freezing process lasts 24 hours: during this period do not add other food to be frozen.
Storing frozen food
When first starting-up or after a period out of use, before putting the product in the compartment let the appliance run at least 2 hours on the higher settings.
NOTE: In the event of accidental defrosting, for example the power has been off for longer than the value shown in the technical characteristics chart under "rising time", the defrosted food must be consumed quickly or cooked immediately and then refrozen (after cooked).
Thawing
Deep-frozen or frozen food, prior to be used, can be thawed in the fridge compartment or at room temperature, depending on the time available for this operation.
Small pieces may even be cooked still frozen, directly from the freezer. In this case, cooking will take longer.
CARE AND CLEANING
For hygienic reasons the appliance interior, including interior accessories, should be cleaned regularly.
CAUTION
Danger of electrical shock! Before cleaning switch the appliance off and remove the plug from the mains, or switch off or turn out the circuit breaker or fuse.
- Never clean the appliance with a steam cleaner. Moisture could accumulate in electrical components, danger of electrical shock!
- Hot vapors can lead to the damage of plastic parts. The appliance must be dry before it is placed back into service.
- Ethereal oils and organic solvents can attack plastic parts, e.g. lemon juice or the juice form orange peel, butyric acid, cleanser that contain acetic acid. Do not allow such substances to come into contact the appliance parts.
- Do not use any abrasive cleaners.
- Clean the appliance and the interior accessories with a cloth and lukewarm water. After cleaning wipe with fresh water and rub dry.
• After everything is dry place appliance back into service.
Defrosting of the freezer
The freezer compartment, however, will become progressively covered with frost. This should be removed. Never use sharp metal tools to scrape off frost from the evaporator as you could damage it. However, when the ice becomes very thick on the inner liner, complete defrosting should be carried out as fellows:
1 Pull out the plug from the socket.
2 Remove all stored food and put it in a cool place.
3 Keep the door open, and placing a basin underneath of the appliance to collect the defrost water.
4 When defrosting is completed, dry the interior thoroughly.
5 Replace the plug in the power socket to run the appliance again.
TROUBLESHOOTING
| Problem Possible | Cause Suggested Solution | |
| Appliance does not work | Mains plug is not plugged in or is loose | Insert mains plug. |
| Fuse has blown or is defective Check fuse, replace if necessary. | ||
| Socket is defective Mains malfunctions are to be corrected by an electrician. | ||
| Appliance cools too much | Temperature is set too cold. Turn the temperature to a warmer setting. | |
| The food is too warm. | Temperature is not properly adjusted. | Please look in the initial Temperature Setting section. |
| Door was open for an extended period. | Open the door only as long as necessary. | |
| A large quantity of warm food was placed in the appliance within the last 24 hours. | Turn the temperature regulation to a colder setting temporarily. | |
| The appliance is near a heat source. | Please look in the installation location section. | |
| Unusual noises Appliance is not level. Re-adjust the feet. | ||
HINTS ON DISPOSAL
natural_image
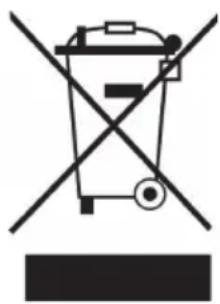
Symbol of a trash bin crossed with a diagonal line, no text or numbers presentAccording to the European waste regulation 2012/19/EU this symbol on the product or on its packaging indicates that this product may not be treated as household waste. Instead it should be taken to the appropriate collection point for the recycling of electrical and electronic equipment. By ensuring this product is disposed of correctly, you will help prevent potential negative consequences for the environment and human health, which could otherwise be caused by inappropriate waste handling of this product. For more detailed information about recycling of this product, please contact your local council or your household waste disposal service.
Estimado cliente:
natural_image
Technical line drawing of a mechanical assembly with a cube and rotating shaft (no text or symbols)Congelar alimentos
natural_image
Symbol of a trash bin crossed with a diagonal line, no text or numbers presentDÉCLARATION DE CONFORMITÉ
Fabricant :
Chal-Tec GmbH, Wallstraße 16, 10179 Berlin, Allemagne.

natural_image
Technical line drawing of a mechanical assembly with a cube and rotating shaft (no text or symbols)natural_image
Symbol of a trash bin crossed with a diagonal line, no text or numbers presentPiedi regolabili
INSTALLAZIONE
natural_image
Technical line drawing of a mechanical assembly with a cube and rotating shaft (no text or symbols)natural_image
Symbol of a trash bin crossed with a diagonal line, no text or numbers present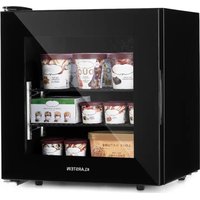
- CONTENT
- TECHNICAL DATA
- DECLARATION OF CONFORMITY
- SAFETY INSTRUCTIONS
- Special Notes
- Notes on the freezer compartments
- WARNING
- PRODUCT DESCRIPTION
- INSTALLATION
- Reverse Door
- Rear spacer
- Space Requirement
- OPERATION
- Before first Use
- Temperature Setting
- Freezing fresh food
- Storing frozen food
- Thawing
- CARE AND CLEANING
- CAUTION
- Defrosting of the freezer
- TROUBLESHOOTING
- HINTS ON DISPOSAL
- Estimado cliente:
- Congelar alimentos
- DÉCLARATION DE CONFORMITÉ
- INSTALLAZIONE
Brand : Klarstein
Model : 10034550
Category : Freezer