
FRT 550 A1 - Lawn mower FLORABEST - Free user manual and instructions
Find the device manual for free FRT 550 A1 FLORABEST in PDF.

| Product Type | Corded Electric Lawn Mower |
| Model Number | FRT 550 A1 |
| Brand | Florabest |
| Motor Power | 1500 W |
| Cutting Width | 40 cm |
| Cutting Height Adjustment | Central, 6 positions, 20-70 mm |
| Grass Collection Capacity | 40 L |
| Weight | 15 kg |
| Dimensions (L x W x H) | 70 x 45 x 35 cm |
| Power Source | 230 V ~ 50 Hz |
| Power Cord Length | 10 m |
| Noise Level (Lwa) | 96 dB(A) |
| Vibration Level (ah) | 2.5 m/s² |
| Safety Features | Safety switch, blade brake, overload protection |
| Mulching Function | Yes (with mulching plug) |
| Side Discharge | Optional (not included) |
| Handle Type | Folding, adjustable height |
| Wheel Size | Front: 15 cm, Rear: 20 cm |
| Maintenance | Regular blade sharpening, cleaning under deck, check cables |
| Spare Parts Availability | Blades, grass bag, wheels, switches available online |
Frequently Asked Questions - FRT 550 A1 FLORABEST
User questions about FRT 550 A1 FLORABEST
0 question about this device. Answer the ones you know or ask your own.
Ask a new question about this device
Download the instructions for your Lawn mower in PDF format for free! Find your manual FRT 550 A1 - FLORABEST and take your electronic device back in hand. On this page are published all the documents necessary for the use of your device. FRT 550 A1 by FLORABEST.
USER MANUAL FRT 550 A1 FLORABEST
Translation of original operation manual
SK
ELEKTRICKÝ VYŽÍNAČ TRÁVY
Before reading, unfold the page containing the illustrations and familiarise yourself with all functions of the device.


A

B
natural_image
Close-up of a hand holding a mechanical component with a directional arrow indicating motion (no visible text or symbols)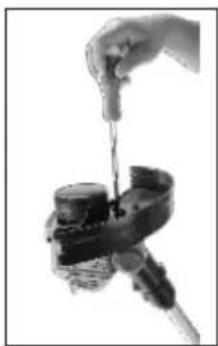
natural_image
Hand pouring liquid into a cylindrical container (no text or symbols visible)C
natural_image
Close-up of hands holding a mechanical device with a handle and cable (no visible text or symbols)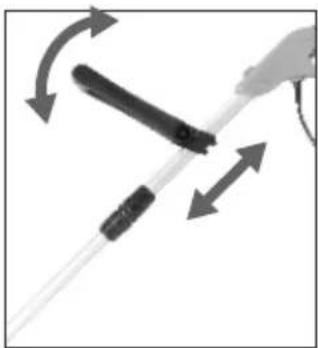
natural_image
Close-up of a medical or laboratory tool with directional arrows indicating motion (no text or symbols visible)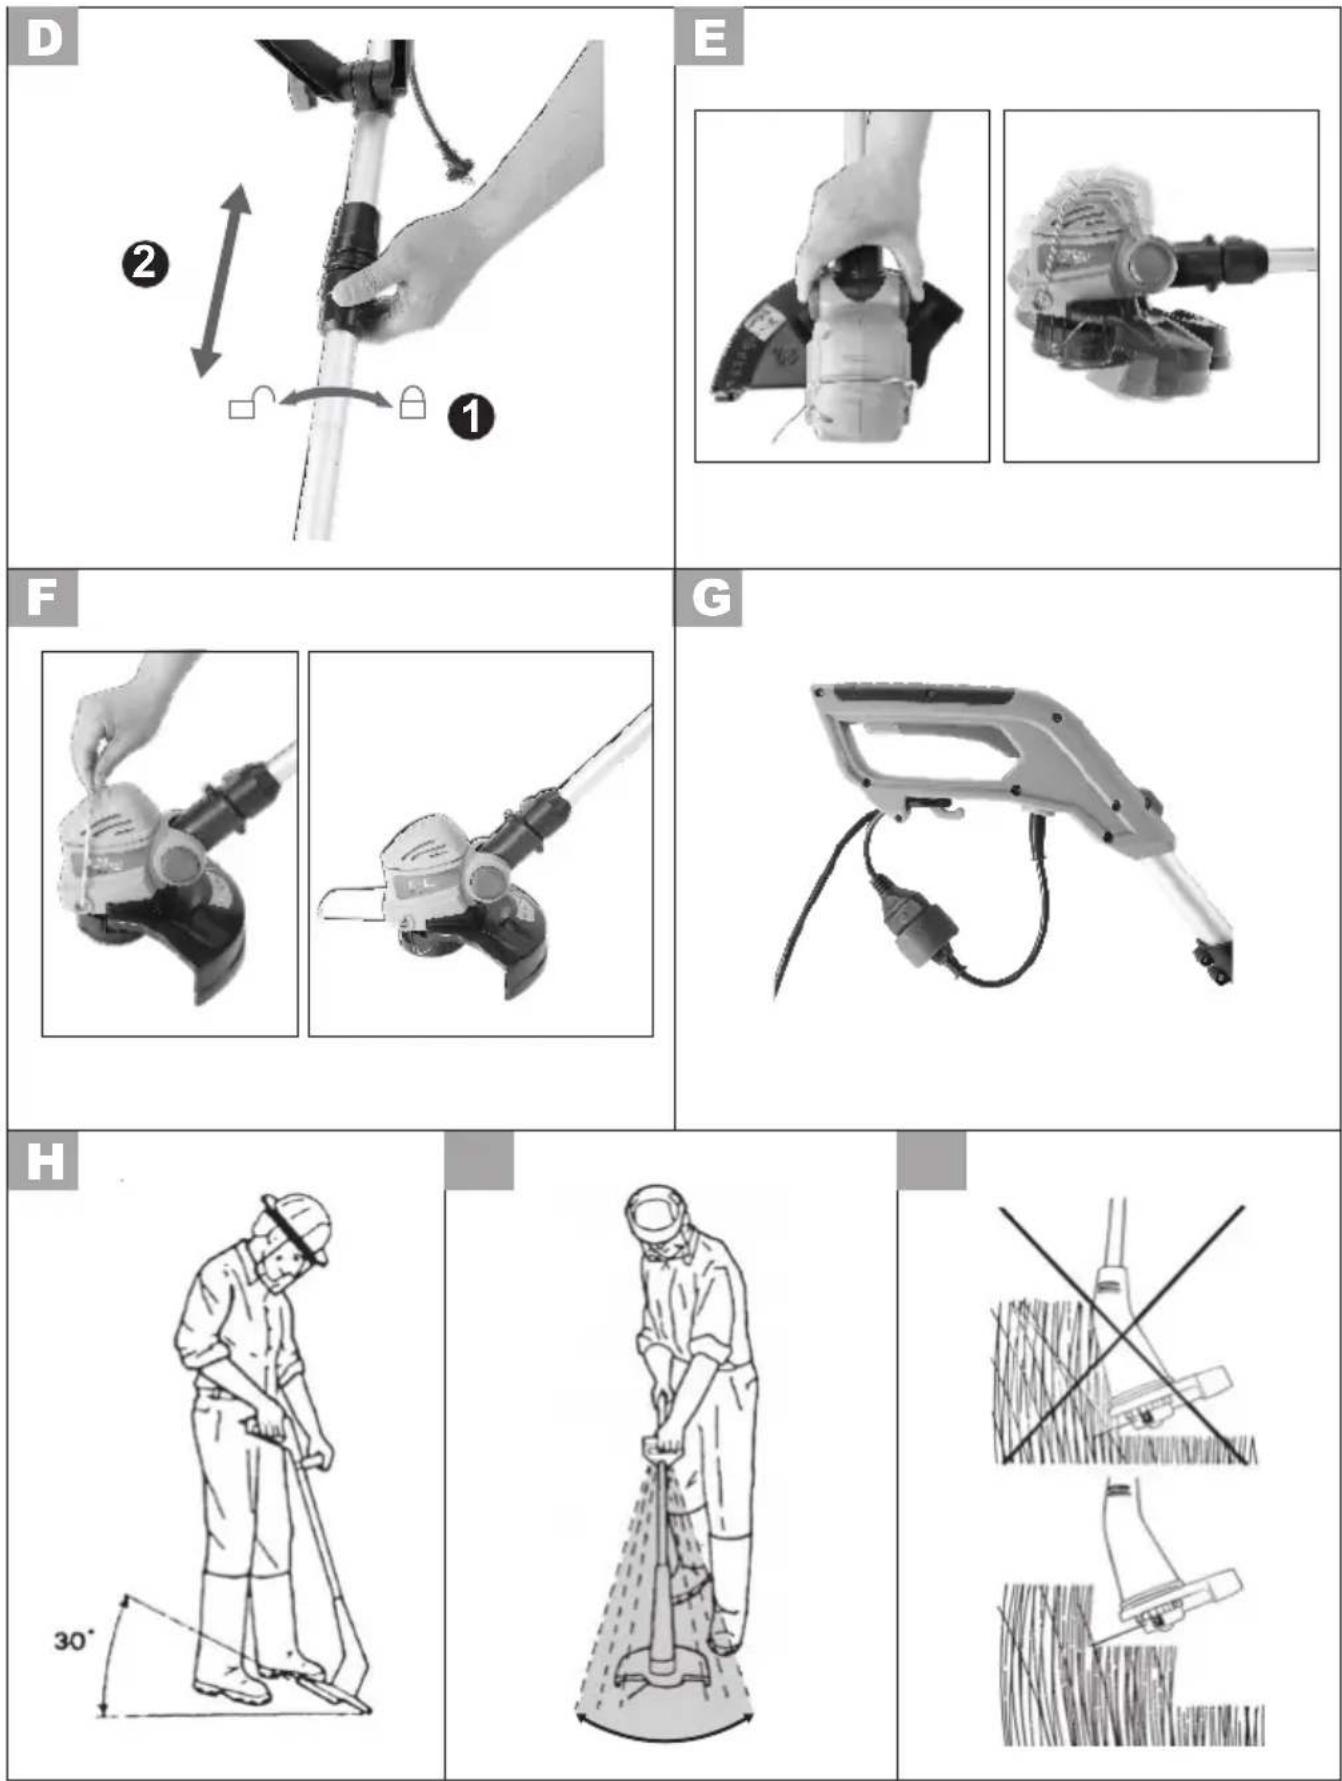
K
natural_image
Hand holding a power tool with a hose, no visible text or symbols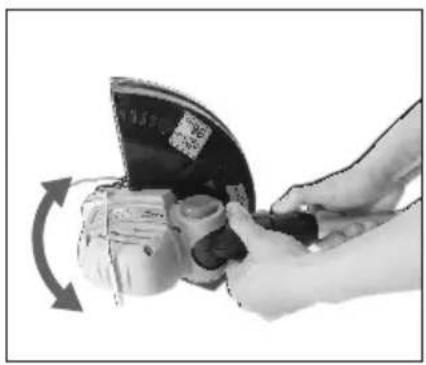
natural_image
Close-up of hands using a power shaver to adjust a component (no visible text or symbols)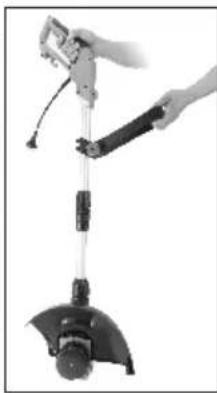
natural_image
Person using a handheld tool to lift a small mechanical component (no visible text or symbols)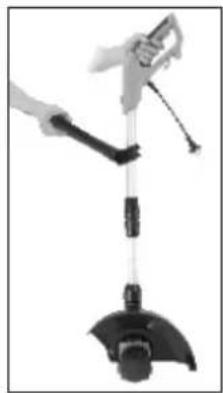
natural_image
Person using a spray gun to lift a black plastic bucket (no text or symbols visible)L

natural_image
Hand placing a small component into a mechanical device (no visible text or symbols)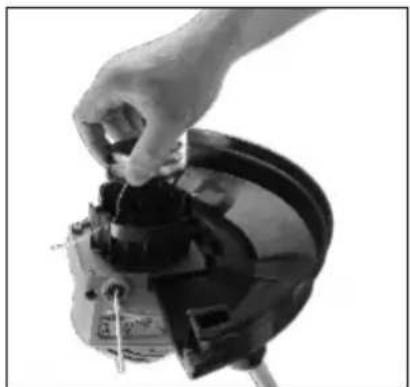
natural_image
Close-up of a hand adjusting a mechanical component (no visible text or symbols)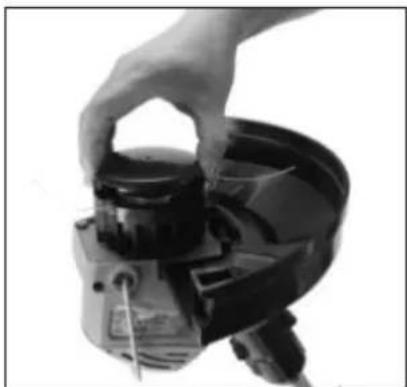
natural_image
Close-up of a hand using a handheld tool to adjust or install a mechanical component (no visible text or symbols)Content
Introduction ......6
Intended use ....6
General description ......7
Package contents 7
Survey....7
Functional description .....7
Technical data ....7
Safety instructions ....8
Symbols on the trimmer .....9
Symbols in the manual 10
General safety instructions .....10
Assembly instructions .....17
Assembling the protection cover....17
Assembling the secondary handle....17
Trimmer settings......17
Adjusting the telescopic tube......17
Adjusting the cutting head......17
Adjusting the plant guard......17
Connecting the extension cable.....17
Lengthening the cutting lines......18
Operation 18
Switching ON and OFF......18
Cutting grass....19
Cleaning and maintenance.....20
Cleaning....20
Exchanging the line spool......20
Storage....21
Disposal and protection of the environment....21
Trouble shooting....22
Guarantee....23
Repair Service....24
Service-Center......24
Translation of the original EC declaration of conformity......25
Introduction

Congratulations on the purchase of your new device. With it, you have chosen a high quality product.
The operating instructions constitute part of this product. They contain important information on safety, use and disposal.
Before using the product, familiarise yourself with all of the operating and safety instructions. Use the product only as described and for the applications specified.
Keep this manual safely and in the event that the product is passed on, hand over all documents to the third party.
Intended use
The trimmer is solely intended for cutting grass and weeds in the garden and for edge trimming. Any other use that is not specifically approved in these Instructions can result in damage to the trimmer and give rise to serious danger for the user.
The trimmer must only be used by adults.
Young people aged 16 and over may only use the trimmer under adult supervision.
This equipment is not suitable for commercial use.
Commercial use will invalidate the guarantee.
The user or operator is responsible for accidents causing injury to other people or damage to property.
The manufacturer cannot be held liable for damage when the trimmer is not used in conformity with its intended purpose or due to incorrect operation.
General description
The illustration of the principal functioning parts can be found on the front and back foldout pages.
Package contents
Carefully unpack the lawn trimmer and check that it is complete.
Dispose of the packaging material correctly.
- Lawn trimmer
• Secondary handle assembly - Protection cover
• 1 piece cross-head screw
• 1 piece replacement line spool - Instruction manual
Survey

1 Upper handle
2 ON / OFF switch
3 Cable strain relief
4 Power cable
5 Screw sleeve (for length adjustment)
6 Telescopic tube
7 Control button for edger function
8 Control button for motor head adjustment
9 Motor head
10 Protection cover
11 Cutting head with line spool
12 Plant guard
13 Fixing screw
(for secondary handle)
14 Fixing bracket (for secondary handle)
15 Secondary handle
16 Line spool (not shown)
17 Line spool hood
18 Line spool hood release buttons
19 Line cutter
20 Manual line feed button
21 Line outlet eyelets
Functional description
The portable, hand-guided lawn trimmer is powered by an electric motor. The trimmer features a dual line spool as the cutting device.
For grass trimming there are two nylon lines rotating parallel with ground level.
An additional chassis facilitates edge trimming.
A hood covering the cutting device protects the user. The following describes the functions of the operating parts.
Technical data
Electric lawn trimmer ....FRT 550 A1
Rated input voltage..... 230V\~,50Hz
Power input.... 550 W
Idle speed.... 10000 min ^-1
Weight 2.5 kg
Dual line.... 2 x 5 m, fully automatic
Cutting circle dual line....290 mm
Line thickness dual line....1.4 mm
Protection Class.... □ II
Protection category IP20
Sound pressure level
(L_pA) 80.2 dB(A), K_pA = 3 dB(A)
Sound power level (L _wA )
guaranteed 96 dB (A)
measured....94.5 dB(A); K_wA = 1.91 dB(A)
Vibration (an) .....front handle: 2.40 m/s ^2 ,
rear handle: 3.07 m/s ^2 , K= 1.5 m/s ^2
Noise and vibration values have been determined according to the standards and regulations mentioned in the declaration of conformity. The vibration and noise measuring processes in accordance with EN 786, appendices D and E, were completed successfully.
Technical and optical changes may be undertaken in the course of further development without notice. All dimensions, references and information in this instruction manual are therefore not guaranteed. Legal claims made
on the basis of the instruction manual can therefore not be considered as valid.
The stated vibration emission value was measured in accordance with a standard testing procedure and may be used to compare one power tool to another. The stated vibration emission value may also be used for a preliminary exposure assessment.

Warning: The vibration emission value may differ during actual use of the power tool from the stated value depending on the manner in which the power tool is used.
Safety precautions aimed at protecting the user should be based on estimated exposure under actual usage conditions (all parts of the operating cycle are to be considered, including, for example, times during which the power tool is turned off and times when the tool is turned on but is running idle).
Safety instructions

For your own safety and the safety of others, please read these instructions before using the equipment. Please keep the instructions in a safe place for subsequent use.

Ensure that you are completely familiar with all the operating parts before you start working with the trimmer. Ask an experienced user or expert to explain all its functions, manner of operation and working techniques, and practise operating the trimmer. Ensure that you can instantly turn off the trimmer in the event of an emergency. Incorrect use of the trimmer can result in very serious injuries.
Symbols on the trimmer

Caution!

Do not expose the equipment to the damp. Do not work in the rain and do not cut wet grass.

Wear eye and ear protection
Keep by-standers well away. Turn off the equipment if they are in the vicinity.

Remove the plug from the mains. Immediately if the cable is damaged or cut.

Caution! Read the operating instructions carefully.
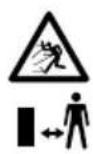
Danger due to materials blown out of machine! Remove persons in the vicinity from the danger area.

Noise level rating L_WA in dB
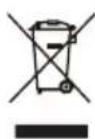
Electrical appliances must not be disposed of with the domestic waste.

Protection Class II

Cutting circle

Cutting line thickness
GB IE NI
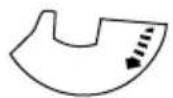
The arrow on protection guard shows the cutting means rotation direction.
The arrows on the spool show the working rotation direction.
Symbols in the manual

Warning symbols with information on damage and injury prevention.

Instruction symbols (the instruction is explained at the place of the exclamation mark) with information on preventing damage.

Help symbols with information on improving tool handling.
General safety instructions

Observe! When using the machine, please observe the safety instructions.
Operating the trimmer

CAUTION: How to avoid accidents and injuries:
Preparations:
- Never allow children and people who are not familiar with these Operating Instructions to use the trimmer. Local regulations may stipulate a minimum age for operators.
- This appliance is not intended for use by persons (including children) with reduced physical, sensory or mental capabilities,
or lack of experience and knowledge, unless they have been given supervision or instruction concerning use of the appliance by a person responsible for their safety.
- Children should be supervised to ensure that they do not play with the appliance.
- Keep the equipment well away from bystanders, children and pets. Turn off the equipment if they are in the vicinity.
- Always wear appropriate work clothes and personal protective equipment! Always wear a face shield or goggles as well as ear defenders, boots or shoes with non-slip soles, strong long trousers and work gloves. Never operate the equipment while bare footed or wearing sandals. The protective devices and your personal protective equipment will protect
yourself and other people and ensure that the equipment can be smoothly operated:
- Never use the equipment if it is damaged, incomplete or has been modified without the approval of the manufacturer.
Never operate the equipment if the protective equipment is defective.
Before starting up the equipment always check that the equipment is in a perfectly safe condition, especially the power cable, the switch and the protective cover. Never disconnect or remove any protective devices. This ensures that the equipment remains safe.
Use:
- Avoid an abnormal body alignment when working with the device. Always maintain a secure footing
and keep your balance.
Be especially careful when working on a sloping terrain. Walk - do not run. This enables you to control the equipment better in unexpected situations.
- Do not operate the equipment if you are tired or lack concentration and after having drunk alcohol or taken medication.
Always take a work break in due time.
A moment of carelessness when using the equipment can result in serious injury.
- Do not use the equipment while it is raining, in poor weather conditions and when the surrounding area is wet. Only work when the light conditions are good. There is a risk of accidents.
• Always keep the cutting line well away from the body, particularly the hands and feet, when you switch on the motor and while the motor is running.
Risk of injury from cuts.
- Never start the equipment when it is turned over or not in the correct working position. - Switch off the motor and disconnect the plug from the mains socket:
- Whenever you are not using the equipment
- If the equipment is left unattended
- When the equipment is being cleaned, maintained or is to be inspected
- When relocating the equipment
- If the power or extension cable is damaged
- When you remove or exchange the cutting device or manually adjust the length of the cutting line
- Check when starting up and working with the cutting head that it does not come into contact with stones, rubble, wire
or other foreign bodies. Danger due to materials blown out of machine.
- Never try to stop the cutting device (cutting line) with your hands. Newer touch moving, dangerous parts before the machine is unplugged and the movable dangerous parts have come to a complete stop. Contact with the cutter can result in injury.
- Only use an original cutting line. The use of a metal wire instead of the nylon line is impermissible. This can result in serious injury.
- Do not use the equipment to cut grass that is not growing on the ground, e.g. grass on walls, rocks, etc. Using the equipment for purposes other than those intended can result in dangerous situations.
- Do not traverse gravel paths while the equipment
is operating. Gravel can be thrown up and result in injury.
- Do not operate the equipment in the vicinity of inflammable liquids or gases as this could give rise to the danger of a fire or explosion.
- Store the equipment in a dry place that is not accessible to children.
CAUTION! The following states how damage to the equipment and possible injury to people can be avoided:
Taking care of the equipment:
- Ensure that the ventilation openings are not clogged.
- Only use spare parts and accessories that have been supplied or recommended by the manufacturer.
GB IE NI
- Never try to repair the equipment yourself. All work that has not been listed in these Instructions must only be carried out by an authorised servicing agency.
- Treat the equipment with the greatest care. Always keep the equipment clean for better and safer work. Follow the maintenance instructions.
- Never overload the equipment. Always work within the stated capacity range. Do not use low-power machines for heavy-duty work. Do not operate the equipment for purposes for which it is not intended.
- Always inspect the equipment before it is to be used. Do not operate the equipment if safety devices, parts of the cutting device or bolts are missing, worn out or damaged.
Electrical safety:
CAUTION! The following states how to avoid accidents and injuries due to electric shock:
- Before each usage, check the mains power cable and the extension cable for damage and signs of aging. Do not use the device if the cable is damaged or worn. Damaged mains power cables increase the risk of electric shock.
• Always keep the extension cable well away from the cutting tools. Should the power cable become damaged during work, then instantly disconnect the power cable from the mains. DO
NOT TOUCH THE POWER CABLE BEFORE IT HAS BEEN DISCONNECTED FROM THE MAINS! Risk of electric shock.
- If the power cable for this equipment is damaged, it must be replaced with a special power cable, which is available from the manufacturer or a customer service agent of the same.
- Check that the mains voltage is the same as indicated on the rating plate.
- Wherever possible connect the equipment to a power socked with a residual current circuit breaker that has a rated current of not more than 30 mA.
- Protect the equipment from moisture. The equipment must not be moist nor operated in a moist environment. Water entry into the equipment
increases the risk of electric shock.
- Avoid body contact with earthed parts (e.g. metal fences, metal posts). There is an increased risk of electric shock if your body is earthed.
- Only use extension cables with a maximum length of 75 m that have been approved for open-air use. The stranded cord diameter of the extension cable must be at least 2.5 mm ^2 . Always unreel a cable drum to its full length so that the entire cable can be inspected for damage.
- Never pass an operating equipment over the extension cable. Ensure that the power cable is always trailing behind the operator. The extension cable can be accidentally severed.
GB IE NI
- Use the envisaged cable suspensions when attaching an extension cable.
- Never carry the equipment by its power cable. Never pull the cable to disconnect the plug from the mains socket. Protect the cable from heat, oil and sharp edges. The mains power cable could be damaged.
Residual risks - risk of injury!
Even if you use this device in compliance with applicable regulations, there are always residual risks. The following risks associated with the construction and design of this device may occur:
- Injury to health attributed to hand and arm vibrations if the device is used over a prolonged period of time or if it is not guided and maintained properly.
- Eye injury due to flying parts or particles of dirt blown about by the device.
Always wear suitable eye protection when working with the device.
- Skin injury from accidental contact with the moving parts or from flying parts or particles of dirt blown about by it. Always wear suitable protective equipment, long-sleeved clothing and trousers, and firm footwear when working with the device.
- Injury to hearing due to noise exposure. Wear suitable ear protection to prevent damage to your hearing when working with the device.
Assembly instructions

Always disconnect the plug before working on the trimmer and wait until the cutting lines have completely stopped. There is the danger of electric shock and the possibility of injury by the cutting lines.

Only use original parts. Always observe the line cutter (19) during assembly work as the line cutter (19) can cause series injury!
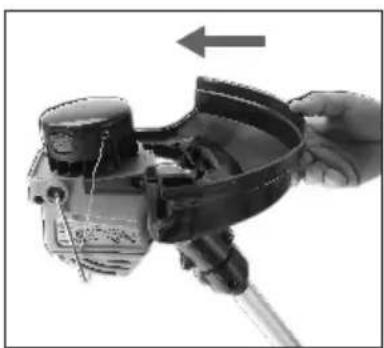
Assembling the protection cover

- Place the protection cover on the motor head (9).
Ensure that the cutting lines are not clamped in.
-
Secure the protection cover with the cross-head screw provided.
-
Remove and discard the protective cover from the line cutter (19).
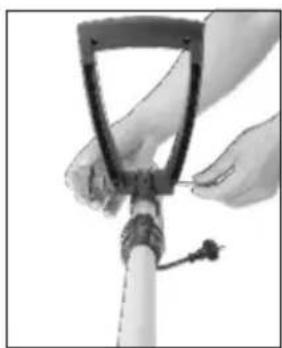
Assembling the secondary handle

-
Completely remove the fixing screw (13) from the secondary handle (15).
-
Clamp the secondary handle (15) onto the the fixing bracket (14).
-
Guide the fixing screw (13) through both the fixing bracket (14) and the secondary handle's (15) base, and tighten it just a few turns.
-
Adjust the secondary handle as desired.
-
Tighten the fixing screw (13) to hold the secondary handle in place.
Trimmer settings

Always disconnect the plug before working on the trimmer and wait until the cutting lines have completely stopped. There is the danger of electric shock and the possibility of injury by the cutting lines.
Adjusting the telescopic tube

-
Rotate the screw sleeve (5) clockwise to loosen.
-
Pull or push the telescopic tube (6) to the required length.
-
Rotate the screw sleeve (5) counterclockwise to tighten.
Adjusting the cutting head

-
Press the control button (8) for motor head adjustment on both sides at the same time.
-
Rotate the motor head (9) to the desired required position. You can choose one of five available positions.
-
Release the control button (8) for motor head adjustment. The motor head (9) must lock in position with an audible "click".
Adjusting the plant guard

-
Push the plant guard (12) forward from storage position to working position.
-
Pull the plant guard (12) back from working position to storage position.
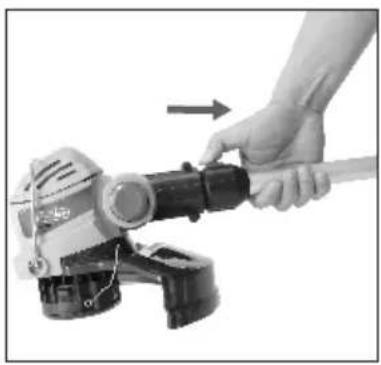
Connecting the extension cable

-
Connect the power cable (4) to the extension cable.
-
Form a loop on extension cable near the end. Guide the loop
GB IE NI
through the opening in the upper handle (1) and around the the cable strain relief (3).
- Pull back the extension cable to fasten.
Lengthening the cutting lines
The machine features an auto feeding dual line ends system. The dual line ends will automatically elongate every time you switch on the machine.
To support proper line elongation, make sure that the cutting head with line spool (11) has stopped completely before switching on the machine again.
The line cutter (19) will cut the longer lines with audible sound to defined cutting circle (29cm).

Regularly check the lines for damage and verify the correct length.

- If no line remains visible, follow the below steps:
i. Disconnect the plug from the mains socket before the change.
ii. Change the line spool (See "Cleaning and maintenance").

- Manually adjust the line length:
i. Disconnect the plug from the mains socket.
ii. Briefly press and release the manual line feed button (20). Pull out both line ends. Repeat if necessary.
Operation

WARNING: Danger of injury! Never use the trimmer without its protective cover (10). Always check the operability of the trimmer before it is used. Check that the mains voltage is the same as indicated on the rating plate. Always wear goggles when working with the trimmer.

Please observe local regulations concerning noise protection.
Switching ON and OFF
- Connect the trimmer to the mains socket by extension cable.
- Ensure a safe stance and hold the equipment firmly with both hands. Do not deposit the cutting head with line spool (11) on the ground.
- To switch on depress the ON / OFF switch (2). Release the ON / OFF switch (2) to switch off.
After the trimmer has been switched off the cutting head will continue to rotate for a few seconds. Keep hands and feet well away. There is the danger of cutting damage. Risk of injury from cuts.

The ON / OFF switch must not be locked in place. The trimmer must not be used if the switch is damaged. There is the immediate danger of injury if the motor does not switch off after the ON / OFF switch has been released.

Caution: Always remove grass residue from the line cutter (19) so that the cutting effect is not impaired.
Cutting grass

WARNING. Danger of injury!
- Do not cut moist or wet grass.
- Before starting the trimmer check that the cutting head will not come into contact with stones, rubble or other foreign bodies.
- Switch on the trimmer before you approach the grass that is to be cut.
• Always trail the extension cable behind you. Do not pass the operating trimmer over the extension cable as the cable could be damaged.
- Do not overload the trimmer during operation.
- Avoid contact with obstacles (stones, walls, fences, etc.) as this will rapidly wear out the lines
- Do not deposit the cutting head with line spool (11) on the ground during operation.
- Ensure that the cutting head with line spool (11) has stopped before you deposit the equipment on the ground.

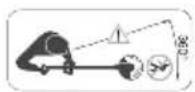
Cut slowly, keeping the machine inclined forward approx. 30° when cutting.

Cut the grass by swaying the trimmer sideways to the right and left.

Cut tall grass by a series of levels from top to bottom.

Adjust the motor head (9) to cut the grass underneath bushes or flowers.

Use the plant guard (12) to protect flowers or other plants when cutting the surrounding grass.
Using the machine as edger

- Adjust the motor head (9) to be perpendicular with telescopic tube (6).
- Pull the edger function button (7) back towards the telescopic handle.
- Turn the motor head (9) 90° to the left / right for left handed / right handed use. Release the edger function button. The motor head must lock in position with an audible "click".
- Adjust the telescopic tube (6) and secondary handle (15) to suit the alternate function.
Cleaning and maintenance

Always disconnect the plug from the mains socket before working on the trimmer.

Any work that is not described in these Instructions must be carried out by a servicing agency authorized by us. Only use original parts and be very careful with the line cutter during installation work. Danger of injury!
Disconnect the plug from the mains socket after every use and check the machine for damaged parts.
Cleaning

Do not jet water onto the trimmer and do not clean it under flowing water. This would result in the danger of an electric shock and the trimmer could be damaged.
Always keep the trimmer clean. Do no use cleaning agents and solvents.
- After the work has been completed remove all grass and soil from the cutting head with line spool (11) and the protection cover (10).
- Ensure that the ventilation slots are always clean and free of grass.
- Clean the trimmer with a soft brush or a cloth.
Exchanging the line spool

Never manipulate the cutting device by inserting worn out original or alien parts. Only use original spare parts. Never use metal lines. The use of alien parts can result in serious personal injury and cause irreparable damage to the trimmer and the guarantee will become instantly null and void.

- Disconnect the plug from the mains socket.
- Turn over the trimmer so that the cutting head with line spool (11) is facing upwards.
- Press both line spool hood release buttons (18) on the line spool hood (17) at the same time and take off the line spool hood (17).
- Remove the empty line spool (16).
- Free both ends of the new spools' line from their clamping. Guide both line ends through their respective line outlet eyelet (20) with the smooth side with arrow facing upwards. Ensure that the line ends do not slip out of the spool slots.
- Insert the new line spool (16) into the cutting head.
- Return the line spool hood (17). Ensure that the line spool hood release buttons (18) are accurately inserted in the corresponding recesses of the cutting head with line spool (11). They lock in audibly.
- Adjust the lines manually. (See "Lengthening the cutting lines").
- Connect the machine to mains socket and switch on to check the auto feeding function
Storage
- Carefully clean the trimmer and its accessories after each use (see "Cleaning and maintenance"), thereby avoiding mould formation.
- Store the trimmer in a dry place well out of reach of children.
- Do not expose the trimmer for extended periods to direct sunlight. This could damage the appliance.
- Do not wrap plastic sacks around the trimmer as this could result in the formation of moisture and mould.
- Do not stand the trimmer on its protection cover (10). Suspend it by its upper handle (1) in such a manner that the protection cover (10) does not come into contact with other objects. This is because the protection cover (10) could become deformed, thereby changing its dimensions and its safety properties.
Disposal and protection of the environment
Dispose of the trimmer, its accessories and the packaging in an environment-friendly manner.
Electrical appliances must not be disposed of with the domestic waste
Hand in a redundant trimmer to a recycling centre. The plastic and metals can then be sorted out and graded for recycling. Our Service Centre will be happy to answer any questions in this respect. Defective units returned to us will be disposed of for free.
Trouble shooting
| Problem Possible cause Remedy | ||
| Trimmer vibrates | Line spool is dirty | Clean spool(see “Cleaning and maintenance”) |
| Line spool is defective | Exchange spool(see “Cleaning and maintenance”) | |
| Trimmer does not start | No mains power | Check cable, line, plug; repair by qualified electrician |
| ON / OFF switch (2) defective | Repair by After-Sales Service | |
| Worn carbon brushes | ||
| Motor defective | ||
| Poor cutting performance | Line spool does not have sufficient line | Lengthen cutting line(see "Trimmer settings") or exchange spool (see “Cleaning and maintenance”) |
| Line has not been conducted out of the spool or only on one side | Remove spool and lace line through line outlet eyelets and return spool. | |
Guarantee
Dear Customer,
This equipment is provided with a 3-year guarantee from the date of purchase. In case of defects, you have statutory rights against the seller of the product. These statutory rights are not restricted by our guarantee presented below.
Terms of Guarantee
The term of the guarantee begins on the date of purchase. Please retain the original receipt. This document is required as proof of purchase.
If a material or manufacturing defect occurs within three years of the date of purchase of this product, we will repair or replace – at our choice – the product for you free of charge. This guarantee requires the defective equipment and proof of purchase to be presented within the three-year period with a brief written description of what constitutes the defect and when it occurred.
If the defect is covered by our guarantee, you will receive either the repaired product or a new product. No new guarantee period begins on repair or replacement of the product.
Guarantee Period and Statutory Claims for Defects
The guarantee period is not extended by the guarantee service. This also applies for replaced or repaired parts. Any damages and defects already present at the time of purchase must be reported immediately after unpacking. Repairs arising after expiry of the guarantee period are chargeable.
Guarantee Cover
The equipment has been carefully produced in accordance with strict quality guidelines and conscientiously checked prior to delivery.
The guarantee applies for all material and manufacturing defects. This guarantee does not extend to cover product parts that are subject to normal wear and may therefore be considered as wearing parts (e.g. line spool, cutting lines and line cutter) or to cover damage to breakable parts (e.g. switches, batteries).
This guarantee shall be invalid if the product has been damaged, used incorrectly or not maintained. Precise adherence to all of the instructions specified in the operating manual is required for proper use of the product. Intended uses and actions against which the operating manual advises or warns must be categorically avoided.
The product is designed only for private and not commercial use. The guarantee will be invalidated in case of misuse or improper handling, use of force, or interventions not undertaken by our authorised service branch.
Processing in Case of Guarantee
To ensure quick handling of you issue, please follow the following directions:
- Please have the receipt and item number (e.g. IAN 290202) ready as proof of purchase for all enquiries.
- Please find the item number on the rating plate, an engraved plate on the front page of your manual (bottom left) or as a sticker on the back or bottom.
- Should functional errors or other defects occur, please initially contact the service department specified below by telephone or by e-mail. You will then receive further information on the processing of your complaint.
GB IE NI
- After consultation with our customer service, a product recorded as defective can be sent postage paid to the service address communicated to you, with the proof of purchase (receipt) and specification of what constitutes the defect and when it occurred. In order to avoid acceptance problems and additional costs, please be sure to use only the address communicated to you. Ensure that the consignment is not sent carriage forward or by bulky goods, express or other special freight. Please send the equipment inc. all accessories supplied at the time of purchase and ensure adequate, safe transport packaging
Service-Center
GB Service Great Britain
Sertronics GmbH
Ostring 60
D-66740 Saarlouis-Fraulautern
Germany
Email: gapo-service-gb@sertronics.de
Tel: 0044 2036300345
Fax: 0049 21529603111
IAN 290202
Repair Service
For a charge, repairs not covered by the guarantee can be carried out by our service branch, which will be happy to issue a cost estimate for you.
We can handle only equipment that has been sent with adequate packaging and postage.
Attention: Please send your equipment to our service branch in clean condition and with an indication of the defect.
Equipment sent carriage forward or by bulky goods, express or other special freight will not be accepted.
We will dispose of your defective devices free of charge when you send them to us.
importer
Please note that the following address is not a service address. Please initially contact the service centre specified above .
Ga-Po Vertrieb GmbH
47906 Kempen, Germany
Translation of the original EC Declaration of Conformity
We, Ga-Po Vertrieb GmbH, the person responsible for documents: Mr. Z. Fabijanic, Heinrich-Horten-Straße 5 47906 Kempen, Germany, herewith declare:
The object of the declaration described below is in conformity with the relevant Union harmonization legislation. This declaration of conformity is issued under the sole responsibility of the manufacturer.
Type / Device description Electric lawn trimmer FRT 550 A1
Date of manufacture (DOM): 1 - 2018
Serial number: S-FA-00001 \~ S-FA-23774
conforms with the following applicable relevant version of the EU guideline:
2006/42/EC Machinery Directive
2014/30/EU EMC Directive
2000/14/EC Noise Directive, amended by 2005/88/EC
conformity assessment procedure: 2000/14/EC Annex VI, Notified Body 0036:
Guaranteed sound power level LwA = 96 dB(A)
2011/65/EU RoHS Directive
Applied harmonized standards:
EN 50636-2-91:2014
EN 60335-1:2012+A11:2014
EN55014-1:2006/A2:2011
EN55014-2:2015
EN61000-3-2:2014
EN61000-3-3:2013
EN 50581:2012
Ga-Po Vertrieb GmbH
*The object of the declaration described above satisfies the provisions of Directive 2011/65/EU of the European Parliament and the Council of 8 June 2011 on limiting the use of certain harmful substances in electrical and electronic appliances.
Tartalom
Bevezetés....26
Service-Center....92
47906 Kempen, Germany
Last Information Update