
FBKS 52 A1 - SAV FLORABEST - Free user manual and instructions
Find the device manual for free FBKS 52 A1 FLORABEST in PDF.

| Product type | Electric chainsaw |
| Brand | Florabest |
| Model | FBKS 52 A1 |
| Category | SAV (After-Sales Service) |
| Dimensions (L x W x H) | Approximately 45 x 25 x 25 cm |
| Weight | Approximately 4.5 kg |
| Power supply | Electric, 230 V ~ 50 Hz |
| Motor power | 2000 W |
| Guide bar length | 40 cm |
| Chain pitch | 3/8" (0.375 inch) |
| Oil tank capacity | 100 ml |
| Automatic lubrication | Yes |
| Chain brake | Yes |
| Anti-vibration protection | Yes |
| Ergonomic handle | Yes |
| Main functions | Wood cutting, pruning, branch cutting |
| Maintenance and cleaning | Clean the guide bar and chain after each use, check chain tension, sharpen regularly |
| Safety | Chain brake, safety lock, recommended protective gloves |
| Spare parts and repairability | Chain, guide bar, oil tank available via after-sales service |
| General information | 121-page user manual available online |
Frequently Asked Questions - FBKS 52 A1 FLORABEST
User questions about FBKS 52 A1 FLORABEST
0 question about this device. Answer the ones you know or ask your own.
Ask a new question about this device
Download the instructions for your SAV in PDF format for free! Find your manual FBKS 52 A1 - FLORABEST and take your electronic device back in hand. On this page are published all the documents necessary for the use of your device. FBKS 52 A1 by FLORABEST.
USER MANUAL FBKS 52 A1 FLORABEST

natural_image
Oriental chain saw with 'PRO-AM' branding and 32.5" label (no additional text or symbols visible)BENZIN-KETTENSÄGE / PETROL CHAINSAW TRONÇONNEUSE À ESSENCE FBKS 52 A1
DE AT CH
BENZIN-KETTENSÄGE
Translation of the original instructions
READ CAREFULLY BEFORE USE AND STORE SAFELY FOR LATER USE.
NL BE
BENZINEKETTINGZAAG
Before reading, unfold both pages containing illustrations and familiarise yourself with all functions of the device.
FR BE
GB/IE Translation of the original instructions Page 17
natural_image
Line drawing of a mechanical device with hands operating it, no text or symbols present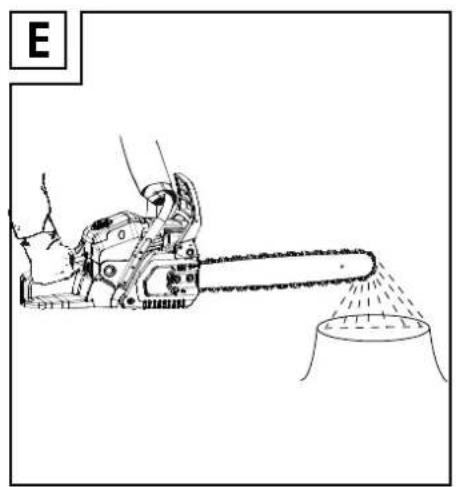
natural_image
Line drawing of a chain mill with a blade and bucket, emitting powder from a chimney (no text or symbols)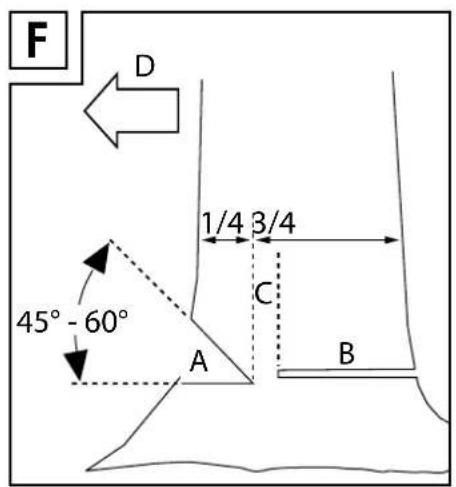
natural_image
Diagram of a chain drive with motion arrows indicating direction (no text or symbols)
natural_image
Diagram of a chain mill with motion arrows indicating movement (no text or symbols)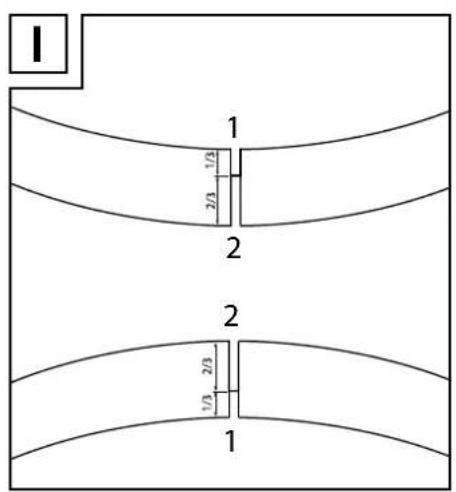
natural_image
Illustration of a person in workwear holding a chainsaw, standing on grass (no text or symbols)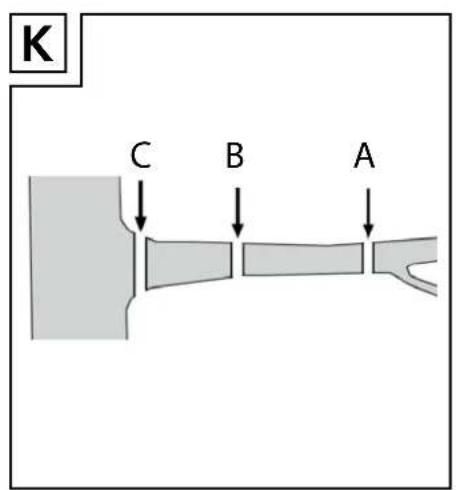
Inhaltsverzeichnis
Einleitung 2
Abb. A
KOMPERNASS HANDELS GMBH
BURGSTRASSE 21
DE-44867 BOCHUM
DEUTSCHLAND
www.kompernass.com
Entsorgung

Technical details 19
Safety instructions....20
General safety instructions 20
Personal protective equipment (PPE) 20
Storage and transportation 21
Environmental safety 21
Adding fuel 21
Before use 22
Vibrations....23
Precautions against kickback. 23
Before use 24
Mixing fuel 24
Adding fuel 24
Adding chain oil 24
Tightening and checking the saw chain 24
Use 25
Starting when the engine is cold 25
Starting when the engine is hot 25
Turning the engine off 25
Checking and adjusting the chain lubrication....26
Checking the chain brake 26
Basic working procedures when felling trees 26
Preparing the kerf (see fold-out page fig. F) 26
Branch removal 27
Working with wood that is under tension 27
Kickback (see fold-out page fig. G) 27
Drawing in (see fold-out page fig. H) 27
Working safely 27
Cleaning and maintenance.... 27
Cleaning the engine unit 27
Cleaning the air filter....28
Cleaning the chain drive 28
Maintaining the spark plug 28
Maintaining the chain lubrication 28
Maintaining the carburettor settings 28
Maintaining the guide rail 28
Fitting the guide rail and tensioning the saw chain 28
Sharpening and caring for the saw chain....29
Maintenance intervals 29
Ordering replacement parts.... 29
Storage and transportation 30
Troubleshooting.... 30
Kompernass Handels GmbH warranty.... 30
Service 31
Importer....
Disposal 31
Translation of the original Conformity Declaration 32
PETROL CHAINSAW FBKS 52 A1
Introduction
Congratulations on the purchase of your new appliance. You have chosen a high-quality product. The operating instructions are a part of this product. They contain important information about safety, usage and disposal.
Before using the product, please familiarise yourself with all operating and safety instructions. Use the product only as described and for the range of applications specified. Please also pass these operating instructions on to any future owner.
Intended use
The chainsaw is only for sawing lumber outdoors. The chainsaw may not be used for other purposes.
Do not make any modifications to the chainsaw. This can compromise safety.
The user/operator is liable for any resulting damage or injuries of any kind and not the manufacturer. Please note that this appliance is not designed for commercial use according to its intended purpose.
We accept no warranty liability if the appliance is used in commercial, manual trade or industrial operations or equivalent activities.
First-time users must seek training to familiarise themselves with the characteristics of the appliance. For your safety, visit a state-sponsored chainsaw training session.
Unauthorised operators:
Adults who are not familiar with these operating instructions, children, adolescents, and people under the influence of alcohol, drugs or medications must not operate this appliance.
National regulations may restrict the use of the appliance.
Hazard levels
DANGER!
For an imminently dangerous situation which will result in serious bodily injury or death.
WARNING!
For a potentially dangerous situation which could result in serious bodily injury or death.
CAUTION!
Indicates a potentially dangerous situation that can result in minor injury.
ATTENTION!
Indicates a potentially dangerous situation that can result in property damage.
Features
① Front hand guard
② Front handle
3 Air filter cover
4 Starter pull cord
⑤ Cap for the air filter cover
6 On/Off switch
⑦ Fuel pump (primer)
8 Cold start lever (choke)
9 Throttle control lock
10 Throttle control
⑪ Rear handle
⑫ Rear hand guard
13 Fuel tank cap
14 Chain oil tank cap
15 Spiked bumper (pre-assembled)
16 Guide rail (pre-assembled)
⑰ Saw chain (pre-assembled)
18 Grinder support
19 Oil adjusting screw
20 Locking nut
21 Chain-tensioner screw
22 Sprocket cover
23 Chain tensioner pin
24 Chain catcher
25 Hole for the chain tensioner pin
26 Chain sprocket
27 Guide rail cover
28 Ear muffs EY2-1
29 Safety goggles
30 Mixing container
31 Spark plug wrench/flat-blade screwdriver
32 Tool bag
33 Organic chain oil
34 Air filter
35 Spark plug connector
Package contents
1 engine unit
1 saw chain Oregon 18" 20LPX072X (pre-assembled)
1 guide rail Oregon 18" 180PXBK095 (pre-assembled)
1 spark plug wrench/flat-blade screwdriver
1 cover for the guide rail (chain guard)
1 mixing container
500 ml organic chain oil (Made in Germany)
1 pair of safety goggles
1 set of ear muffs EY2-1
1 tool bag
1 set of operating instructions
Technical details
Type: FBKS 52 A1
| Weight | |
| Empty tank, no cutting equipment: approx | 6 kg |
| Volumes | |
| Fuel tank: approx. 720 cm | 3 (0.72 l) |
| Tank for chain lubrication oil: approx. 260 cm | 3 (0.26 l) |
| Cut length: | |
| Usable cut length/guide rail 45 cm (18") | |
| Chain | |
| Max. chain speed: 23.1 m/s | |
| Chain pitch: 8.25 mm (0.325") | |
| Drive link thickness: 1.3 mm (0.050") | |
| Saw chain model (pre-assembled) Oregon | 18" 20LPX072X |
| Guide rail model (pre-assembled): Oregon | 18" 180PXBK095 |
| Chain sprocket | |
| Number of teeth/division: 7 teeth/8.25 mm (0.325") | |
| Engine | |
| Cylinder capacity: 51.7 cm | 3 |
| Max. motor output as per ISO 7293: 2.0 kW | |
| Idle speed: 3000 rpm | |
| Spark plug: L8RTC | |
| Sound pressure level L_pA,m , dB (A)ISO 22868 | 98.2K = 3 dB |
| Sound power level L_WA,m , dB (A)ISO 22868 | 109.2K =3dB |
| Vibration value on the rear handle:ISO 22867 | 7.254 m/s2K = 1.5 m/s2 |
| Vibration value on the front handle:ISO 22867 | 8.901 m/s2K = 1.5 m/s2 |
WARNING!
- You can reduce the vibration risk, e.g. the risk of Raynaud's phenomenon (circulatory problems), by taking regular breaks during which you rub your hands together.
The following symbols are used in these operating instructions/on the appliance:
| [D2SZ] | Read these operating instructions thoroughly before using the appliance for the first time and retain them for future reference. |
 | Warning! Read the operating instructions before use! |
 | WARNING! Special safety precautions are required when working with the chainsaw.Read and observe all warnings! |
 | Wear snugly fitting protective clothing with a cut-resistant lining. |
 | Wear a hard hat with a visor or safety goggles and ear muffs. |
 | Wear protective gloves! |
 | Wear non-slip safety shoes! |
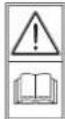
 | WARNING! Risk of kickback. Protect yourself from kickback from the chainsaw and avoid all contact with the rail tip. |
 | WARNING! Risk of kickback! Do not saw with the tip of the blade. |
 | Always operate the chainsaw with both hands. |
 | Do not work with the chainsaw in one hand. |
 | Pull the starter pull cord with the choke in this position.When you pull out the choke, the air flap is closed.When you push in the choke, the air flap is opened. |
 | Press the fuel pump (primer) 6x |
  | Fuel tank;Mixing ratio: 40 parts petrol to 1 part oil |
  | Tank for chain lubrication oil;Increase/decrease chain lubrication |
 | Petrol: RON 95/RON 98 |
 | 2-stroke motor oil: ISO-LEGD/JASO FD |
 | Open flames or smoking in the vicinity of the appliance is strictly prohibited! |
 | Guaranteed sound power level of the appliance |
| [SAXX] | Pull the starter pull cord. |
 | On/Off switch |
 | Block and unblock the chain brake |
  | Running direction of the chain |
 + + | Increase chain tension |
 | Guide rail length |
   | Chain pitch: 8.25 mm (0.325")Drive link thickness (Groove width): 1.47 mm (0.058")No. of chain links: 72 |

Safety instructions
IMPORTANT! READ CAREFULLY BEFORE USE AND STORE SAFELY FOR LATER USE.
General safety instructions
WARNING!
▶ Stay alert, watch what you are doing and use common sense when operating the appliance. Do not use the appliance while you are ill, tired or under the influence of drugs, alcohol or medication. A moment of inattention while operating the appliance may result in serious personal injury.
- Avoid improper use. Use the appliance only as described in the section "Intended use".
■ Before using the appliance for the first time, read the operating instructions and pay close attention to the safety instructions.
■ The warning and safety signs on the appliance provide important information for safe operation.
In addition to the notices in these operating instructions, all general safety and accident prevention legislation must also be complied with.
- Keep plastic wrapping away from children. There is a risk of suffocation!
■ Insufficiently informed operators can be a danger to other people and themselves due to improper use. The operator is responsible for third parties.
■ Be very careful when handling the appliance. Use common sense when working and play close attention to what you are doing.
■ Do not work for longer than 10 minutes in one session. We recommend taking a break of 10-20 minutes between working sessions.
■Lend the appliance only to users who have experience with the appliance. Hand over the operating instructions at the same time.
■ Some cutting tasks require special training and particular skills. If in doubt, please consult an expert.
■ First-time users must seek training to familiarise themselves with the characteristics of the appliance. For your safety, visit a state-sponsored chainsaw training session.
■ When not in use, the appliance must be secured to ensure that it is not a risk to anyone else. Secure against unauthorised access.
■The user of the appliance is responsible for all accidents and risks that cause injury or damage to other people's property.
■ Children, adolescents and people with reduced physical, sensory or mental capabilities must not use the chainsaw. The only exception to this are young people over the age of 16 who are being trained by a specialist.
■The appliance's electrical ignition system generates a small electromagnetic field. If you have a heart pacemaker or similar implants, consult a doctor about possible health risks before using the appliance.
■ Note that improper maintenance, the use of non-approved spare parts, or the removal or modification of the safety equipment can lead to damage to the appliance and severe injuries to the operator.
Personal protective equipment (PPE)
⚠️ DANGER!
▶ Wear personal protective equipment (PPE)!
Wear a hard hat with a visor or safety goggles and ear muffs.
-ear snugly fitting protective clothing with a cut-resistant lining.
-ear non-slip safety shoes!
- year protective gloves!
■ Avoid loose-fitting clothing that can get caught.
■ Do not wear a scarf, tie or any jewellery!
■ If you have long hair, wear a hairnet!
■ Always wear a helmet when working in wooded areas. This offers protection from falling branches. Check the helmet regularly for damage. Replace it after 5 years at most. Use only approved protective helmets.
■The face shield/safety goggles protect the user from wood chips and splinters. To prevent eye injuries, always use a face shield or safety goggles while working with the appliance.
■ Always wear ear muffs. The noise produced by the appliance can damage your hearing.
■ Wear robust protective gloves made of a durable material, e.g. leather.
■ Wear a dust mask when sawing dry wood. Sawing can generate sawdust.
Storage and transportation
■ Switch off the chainsaw before moving it anywhere, even short distances.
Engage the chain brake and put on the chain guard.
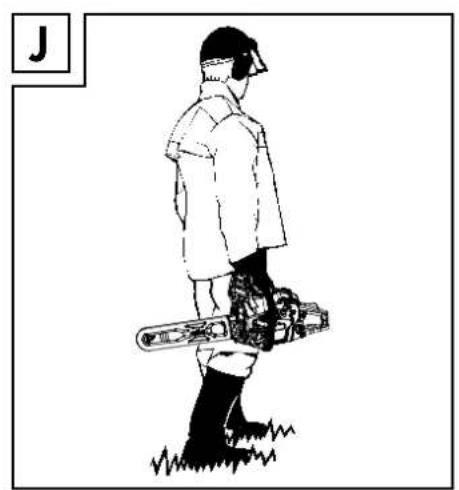
■ Always use the chain guard for transportation and storage (see fold-out page fig. J).
■ Protect the machine during transport (also in vehicles) against tipping over to prevent fuel loss, damage or injuries.
- Carry the appliance by the front handle only. The guide rail then faces to the rear, away from your body (see fold-out page fig. J).
■ Hold the hot exhaust silencer away from your body. There is a risk of burns!
■ Clean and maintain the chainsaw before storage.
■ Store the appliance in a secure and dry location. Secure it against unauthorised access.
Environmental safety
■ National and/or local regulations may restrict the use of noise-generating, motor-driven appliances during certain times. Ask at your local authority.
■ Do not operate the appliance in confined spaces or other poorly ventilated areas. Risk of suffocation from poisonous exhaust fumes/lubricating oil vapours.
■ Work only in daylight.
■ Do not work in inopportune weather conditions, such as rain or wind.
This will lead to an increased risk of accidents.
- Keep work area clean and tidy.
- Keep children, other people and animals at a distance before and during the work. Distractions can cause you to lose control.
■ Before starting work, ensure that no people, animals or valuable property are inside the danger zone.
■ Do not work in the vicinity of wire fences or areas with loose old wire.
■ If you are working in a combustible environment, e.g. on dry grass, have a fire extinguisher on hand.
There is a risk of fire!
Adding fuel
■ Petrol is highly flammable! When filling the tank, keep at a distance from open flames and do not smoke. There is a risk of fire!
■ Ensure that you do not spill any petrol. Do not allow petrol and chain oil to get into the soil. Lay down suitable tarpaulins or similar.
■ Fill up the tank only in well-ventilated areas. Petrol vapours are highly inflammable and can explode.
■ Switch off the engine before refuelling and allow the appliance to cool down. If you spill any petrol, clean the affected area immediately.
Do not allow petrol to come into contact with your clothing. If this happens, get changed immediately.
■ Avoid skin or eye contact with petrol or lubricants (oil).
■ Do not inhale any petrol/lubricating oil vapours.
■ Check for leaks. If petrol leaks out, do not start the engine.
There is a risk of burns.
■ Be careful when removing the petrol cap so that any pressure can escape slowly and no petrol sprays out.
Before use
WARNING!
▶ Always carry out checks before use and with the engine switched off.
▶ Check that the appliance is in good working order before every use and if it has fallen.
▶ Check whether moving parts work properly. Many accidents are caused by poorly maintained tools.
Have any damage repaired by qualified specialists.
▶ Use the chainsaw and accessories only as described in these instructions, taking into account the working conditions and the work to be performed.
Use of machine tools for operations different from those intended could result in a hazardous situation.
■ Check the chain brake is in good working order regularly (front hand guard, see fold-out page fig. D).
■ Check that the guide rail is correctly fitted.
■ Check that the saw chain is correctly tensioned. Follow the instructions for lubrication, chain tension and changing accessories. An incorrectly tensioned or lubricated chain can break or increase the risk of kickback.
- Keep cutting tools sharp and clean. Sharpen them regularly and replace worn parts promptly. Properly maintained cutting tools with sharp cutting edges are less likely to bind and are easier to control.
■ Check the throttle control and the throttle control lock for freedom of movement. The throttle control must spring back into the start position.
■ Check whether there is enough fuel and chain lubrication oil in the tank.
■ Check whether the handles are clean, dry and free of oil and dirt.
■ Never carry out the work alone. In case of emergency, someone should be close by.
■ Use the chainsaw only if you are standing on firm, safe and even ground.
Do not overreach.
Slippery ground or unstable standing surfaces (e.g. on a step ladder) can lead to a loss of balance or loss of control of the chainsaw.
Keep proper footing and balance at all times. This enables better control of the chainsaw in unexpected situations.
■ Do not work with the chainsaw in a tree.
When working in a tree there is a risk of injury.
■ Never saw above shoulder height.
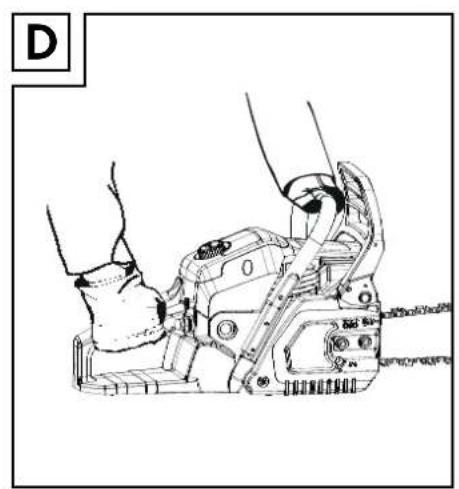
■ Always hold the chainsaw with your right hand on the rear handle and your left hand on the front handle (see fold-out page fig. D). Holding the chainsaw in an inverted working posture increases the risk of injuries and is prohibited.
■ When the chainsaw is running, keep all body parts away from the saw chain. Before starting the chainsaw, make sure that the saw chain is not touching anything. When working with a chainsaw, a moment of inattentiveness can lead to clothing or body parts getting caught in the saw chain.
■ Switch the chainsaw off immediately if you notice any changes in the way the appliance behaves.
■ If the chainsaw hits a stone, nails or other hard objects, stop the engine immediately and check the saw chain and the guide rail for damage.
■ Do not drop the chainsaw, knock it against obstructions and do not use the guide rail as a lever.
■ Use the chainsaw only for sawing wood.
■ When sawing a branch that is under tension, expect it to spring back. Once the tension in the wooden fibres is released, the branch can hit the operator and/or knock the chainsaw out of his hands.
■ Be extremely careful when cutting brushwood and young trees. The thin material can catch in the saw and fly in your direction or knock you off balance.
Vibrations
WARNING!
- You can reduce the vibration risk, e.g. the risk of Raynaud's phenomenon (circulatory problems), by taking regular breaks during which you rub your hands together.
■ Always wear protective gloves and ensure your hands are warm.
■ Make sure that the chain is always sharp.
■ Take regular work breaks.
Precautions against kickback
WARNING! KICKBACK!
▶ Be aware of the danger of kickback when working with the appliance. There is a risk of personal injury. You can avoid kickbacks by being careful and using the correct sawing technique.
■ Contact with the tip of the rail can, in some cases, lead to an unexpected rearwards reaction resulting in the guide rail flying upwards towards the operator (see Fig. A).
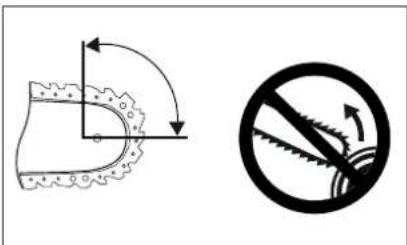
Fig. A
■ Kickbacks can occur if the tip of the guide rail touches an object or if the wood bends and the saw chain gets caught in the cut.
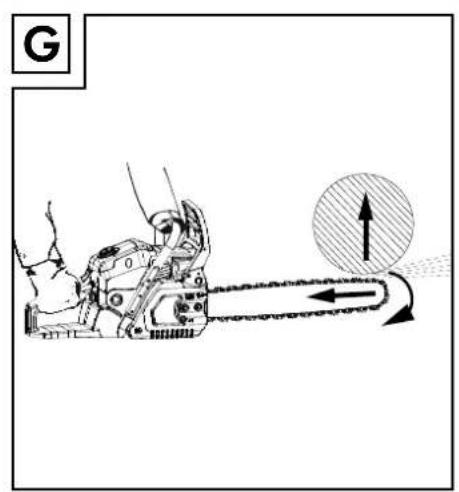
■ If the saw chain jams in the upper edge of the guide rail, the rail can kick back violently towards the operator (see fold-out page fig. G).
■ If the saw chain jams in the lower edge of the guide rail, the rail can jerk violently away from the operator (see fold-out page fig. H).
■ Be extremely careful when reapplying the chain of the chainsaw to a cut you have already begun.
■ Do not saw any branches or pieces of wood that can move their position during sawing or in which the cut could close during sawing.
■ Any such reaction can lead to you losing control over the saw and possibly injuring yourself. Do not rely solely on the chainsaw's built-in safety devices. As the user of a chainsaw, you can take a number of measures to avoid accidents and injury. A kickback is caused by incorrect use or misuse. It can be avoided by taking proper precautions as given below.
■ Hold the saw firmly with both hands, with your thumb and fingers around the handles of the chainsaw. Hold your body and arms in a position in which you can withstand kickback forces. If suitable measures are taken, the operator can control the recoil forces. Never let go of the chainsaw (see fold-out page fig. D).
■ Avoid an abnormal posture and do not saw over shoulder height. This will prevent inadvertent contact with the tip of the rail and allows a better control of the chainsaw in unexpected situations.
■ Always use the replacement rails and saw chains specified by the manufacturer. Incorrect replacement rails and saw chains can lead to a tearing of the saw chain and/or kickback.
■ Follow the manufacturer's instructions for sharpening and maintenance of the saw chain. Setting the depth limiter too low can increase the risk of kickback.
■ Do not saw with the tip of the blade. This can lead to a kickback.
■ Make sure that there are no nails or pieces of metal in the cutting area. Pay particular attention to nails and pieces of iron in the area of the cut.
Also be careful when cutting hardwoods in which the chain could jam.
This can lead to a kickback.
■ Start the cut using full power and keep the chain-saw at top speed while sawing.
■ Ensure that there are no objects on the ground that you can trip over.
Before use
Mixing fuel
The engine must be operated with a mixture of petrol and motor oil.
WARNING!
- Avoid direct skin contact with fuel and inhaling fuel vapours.
■ Always use a mixture of unleaded petrol (at least RON 95) and special 2-stroke engine oil (JASO FD/ISO-L-EGD). Mix up the fuel mix according to the fuel mixing table.
■ Pour the correct amount of petrol and 2-stroke oil into the supplied mixing container 30 (see "Fuel mix table"). Then shake the mixing container 30 well.
Fuel mix table
Mixing process: 40 parts petrol to 1 part oil
Petrol 2-stroke oil
0.5 litres 12.5 ml
Adding fuel
WARNING!
▶ Fill the fuel tank only when the engine is switched off and cooled down. There is a risk of fire!
◆ Always clean the area around the fuel tank cap ^13 before filling to prevent dirt getting into the tank. Use a dry, lint-free cloth to do this.
Lay the appliance on its side so that the fuel tank cap is facing upwards.
Turn the fuel tank cap ^13 anticlockwise and remove it. The fuel tank cap ^13 is connected to the fuel tank with an anti-loss device and cannot fall down.
◆ Fill the tank with the fuel mix. Do not spill any fuel while filling the tank and do not fill the tank to overflowing.
◆ Wipe up any spilled fuel immediately.
♦ Turn the fuel tank cap⑬ clockwise to close it.
NOTE
▶ When filling the fuel tank, also check the chain oil.
Adding chain oil
WARNING!
▶ Fill the chain oil only when the engine is switched off and cooled down. There is a risk of fire!
▶ Never work without chain lubrication! If the saw chain runs dry, the cutting equipment may become irre- parably damaged in a short time.
▶ Always check chain lubrication before starting work.
NOTE
▶ Use only saw chain oil. Preferably biodegradable. Do not use waste oil, motor oil, etc.
▶ While working, check whether the chain lubrication is working correctly.
◆ Always clean the area around the chain oil tank cap ^14 before filling to prevent dirt getting into the chain oil tank. Use a dry, lint-free cloth to do this.
Lay the appliance on its side so that the chain oil tank cap ^14 is facing upwards.
Turn the chain oil tank cap 14 anticlockwise and remove it. The chain oil tank cap 14 is connected to the chain oil tank with an anti-loss device and cannot fall down.
- Add the supplied organic chain oil ^33 to the chain oil tank. Do not spill any chain oil while filling the chain oil tank and do not fill the tank to overflowing.
◆ Wipe up any spilt chain oil immediately.
♦ Turn the chain oil tank cap⑭ clockwise to close it.
Tightening and checking the saw chain
WARNING!
▶ Wear protective gloves! There is a danger of injury from the sharp cutting teeth!
▶ Check the chain tensioning before every use.
Before tensioning, slightly loosen both locking nuts ^20 using the spark plug spanner ^31 .
Turn the chain-tensioner screw ^21 in a clockwise direction using the flat-blade screwdriver ^31 to increase the tension.
♦ Tighten the two locking nuts ^20 hand-tight using the spark plug spanner ^31
The saw chain must lie against the underside of the blade. Check whether the saw chain (chain brake off, pull front hand guard to the rear) can be drawn over the guide rail by hand.
NOTE
▶ A new saw chain ⑰ stretches and must be tightened more regularly.
Use
CAUTION!
▶ Please pay attention to the statutory provisions in the relevant noise protection regulations.
Before starting the appliance, always check that:
■ The fuel system is not leaking.
■ The protective equipment and cutting equipment is complete and in perfect working order.
■ All screw connections are firmly tightened.
■ All moving parts can move smoothly and freely.
Starting when the engine is cold
WARNING!
▶ Engage the chain brake before every use (push hand guard forwards).
CAUTION!
▶ Never allow the starter pull cord 4 to whip back. This could cause damage.
◆ Remove the cover ^27 from the guide rail ^16
Place the chainsaw on a firm, level surface. The saw chain must not touch the ground.
♦ Push the front hand guard1 forwards until it clicks into place. The saw chain 17 will be locked by the chain brake.
◆ Press the fuel pump "Primer"⑦ 6 times.
♦ Switch the On/Off switch⑥ to "I".
♦ Pull the choke 8 out.
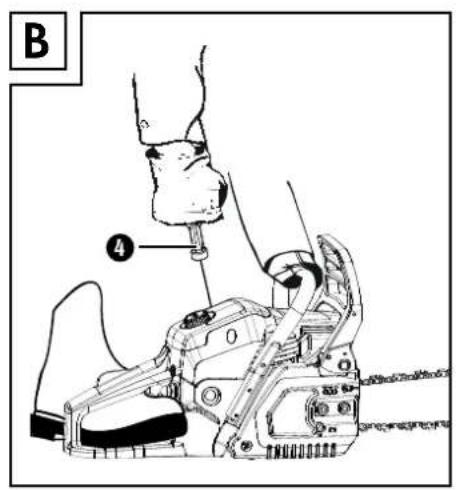
Place the tip of your shoe into the rear hand guard ^12 (see fold-out page fig. B).
Hold the chainsaw firmly by the front handle ^2 and pull the starter pull cord ^4 slowly until you feel resistance.
Now pull the starter pull cord ^4 quickly so that the engine starts. If the engine does not start, repeat the process. As long as the choke 8 is out, the engine will only run for a short time and then switch off.
♦ Push the choke⑧ back in as soon as the engine has switched off.
Now pull the starter pull cord ^4 quickly again so that the engine starts. The engine now idles
If the engine does not start after several attempts, read the "Troubleshooting guide".
CAUTION!
▶ Always pull the starter pull cord 4 straight out. Hold the handle of the starter pull cord 4 firmly when the starter pull cord 4 retracts. Do not allow the starter pull cord 4 to whip back.
NOTE
▶ At very high outdoor temperatures it is possible that even a cold engine has to be started without using the choke!
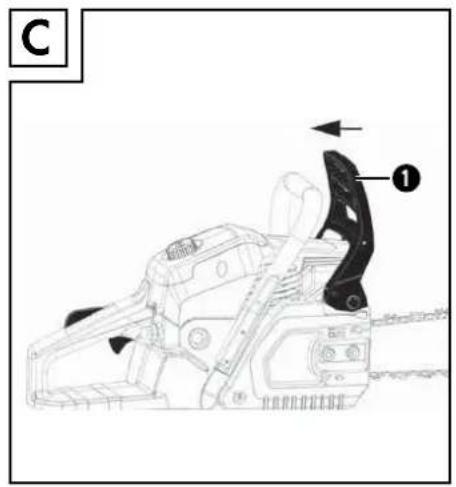
Release the chain brake by pulling the front hand guard① backwards (see fold-out page fig. C).
CAUTION! The chain brake is now released and the saw chain 17 now runs freely.
NOTE
▶ If the saw chain moves when it is idling or the engine goes out when you release the throttle, you need to adjust the carburettor (see section "Maintaining the carburettor settings").
♦ Lift the chainsaw.
◆ Hold the front handle② firmly in your left hand.
Hold the rear handle ^11 firmly in your right hand. The ball of your hand now lies on the throttle control lock ^9 and your index finger operates the throttle control ^10 (see fold-out page fig. D).
◆ After pulling the throttle⑩ once, the engine should idle.
◆ Run the engine to warm it up.
Starting when the engine is hot
(The appliance has been turned off for less than 15–20 minutes)
♦ Push the front hand guard① forwards until it clicks into place. The saw chain⑰ will be locked by the chain brake.
♦ Switch the On/Off switch⑥ to "I".
The choke lever ^8 does not need to be pulled out to start a warm motor.
Place the tip of your shoe into the rear hand guard ^12 (see fold-out page fig. B).
Hold the chainsaw firmly by the front handle ^2 and pull the starter pull cord ^4 slowly until you feel resistance.
Now pull the starter pull cord4 quickly. The appliance should start after 1-2 pulls. If the appliance still hasn't started after 6 pulls, repeat the process as described in "Starting when the engine is cold".
Turning the engine off
Emergency stop sequence
If you need to stop the appliance immediately, switch the On/Off switch 6 to "0".
Normal sequence
Release the throttle control. The engine idles. Then switch the On/Off switch to "0".
CAUTION!
▶ When idling, the saw chain ⑦ should not move. If the saw chain ⑰ moves, you need to adjust the idling speed!
Working procedures
Get to know the chainsaw before you start to use it.
Checking and adjusting the chain lubrication
CAUTION!
▶ Never work without chain lubrication!
If the saw chain runs dry, the cutting equipment may become irre-
parably damaged in a short time.
▶ Always check chain lubrication before starting work.
NOTE
▶ Use only saw chain oil. Preferably biodegradable. Do not use waste oil, motor oil, etc.
▶ While working, check whether the chain lubrication is working correctly.
With the chainsaw running at a medium speed, hold it over a sawn off tree stump or a suitable ground sheet.
If the lubrication is adequate, a light film of oil will form on the tree stump or the ground sheet (see fold-out page fig. E).
If required, the chain lubrication can be increased or decreased using the oil adjusting screw 19.
■ To do this, use the supplied flat-head screwdriver.
- Press and then turn the oil adjusting screw ^19 clockwise to decrease the chain lubrication.
- Press and then turn the oil adjusting screw ^19 anticlockwise to increase the chain lubrication.
Checking the chain brake
WARNING!
▶ You must check the chain brake before every use.
■ The chain brake stops the saw chain in the event of a kickback.
Make sure that the front hand guard ^1 is free of dirt and moves freely.
While the engine is running, push the front hand guard① forwards until it clicks into place.
◆ Pull the throttle control 10 briefly to the stop (full throttle). The saw chain 17 should not move.
WARNING!
▶ High engine revs over a long period with the engine brake engaged will damage the engine and the chain drive.
▶ If the saw chain moves anyway, contact Customer Service.
Basic working procedures when felling trees
RISK OF INJURY!
▶ Sawing and felling work as well as all associated tasks may only be carried out by properly trained operators.
NOTE
▶ Note your country's laws regarding felling work and contact the appropriate authority for more information.
■ Make sure that no one can be injured by falling branches and trees.
■ Only the required personnel should be in the working area.
- Keep the area around the trunk free and tidy to ensure secure footing for the operators.
- Keep all escape routes free and tidy to ensure that the working area can be evacuated quickly.
■ Do not carry out any felling work in strong wind, poor weather or bad visibility.
- Keep a distance of at least 2 12 tree lengths from next working area.
Use and handling
■ Never start the appliance before the guide rail ^16 , saw chain 17nd sprocket cover ^22 have been fitted correctly.
Do not cut any wood that is lying on the ground and do not attempt to saw roots that are protruding from the soil. Never immerse the saw chain 17 in the soil, as this could blunt the saw chain 17
If the appliance accidentally comes into contact with a solid object, turn off the engine immediately and inspect the appliance for damage.
■ Service the appliance carefully. Check for misalignment or binding of moving parts, breakage of parts and any other damage that may impair the tool's operation. If damaged, have the appliance repaired before use. Many accidents are caused by poorly maintained tools.
- Keep cutting tools sharp and clean. Properly maintained cutting tools with sharp cutting edges are less likely to bind and are easier to control.
■ Have the appliance checked by qualified specialists. Use only the replacement parts recommended by the manufacturer.
Preparing the kerf (see fold-out page fig. F)
NOTE
The kerf determines the direction that the tree will fall in.
▶ Place the kerf at right angles to the fall direction.
▶ Saw as close the ground as possible.
▶ Support the chainsaw using the bumper spike ^15 .
♦ Start with the first kerf cut A.
The depth of the kerf should be about 1/4 of the diameter of the tree and at an angle of 45^-60^ .
Make the felling cut B around 2–3 centimetres higher than the horizontal kerf cut A. Ensure that the felling cut B is perfectly horizontal.
Leave around 1/10 of the tree diameter, the hinge C, in front of the felling cut B. The hinge C guides the tree to the ground - like a door hinge - and prevents premature falling.
RISK OF ACCIDENTS!
Do not saw the hinge C at the same time as the felling cut B, otherwise the tree could fall in an unexpected direction!
▶ Be prepared that the tree can slip uncontrollably when it falls onto the cut.
▶ Be prepared that the tree can jump uncontrollably in an unexpected direction when it hits the ground.
To prevent the chainsaw from getting caught in the felling cut B, push aluminium or plastic wedges into the cut B. Do not use iron wedges.
CAUTION! PROPERTY DAMAGE!
▶ Make sure that the wedge does not come into contact with the saw chain 17. This can severely damage it.
Branch removal
■ Be aware of the danger of branches flying back.
■ Do not stand on the trunk while removing branches.
■ Do not saw with the tip of the blade.
■ Never saw several branches at once.
■ Support the chainsaw where possible using the bumper spike ^15 .
■ Make sure that the chainsaw cannot swing through at the end of the cut due to its own weight. If it is no longer supported in the cut, hold something appropriate against it.
■ Make sure you have firm, stable and secure footing when de-branching.
Saw in sections
♦ Trim long or thick branches before you make the final cut (see fold-out page fig. K).
Otherwise, the saw chain 17 an easily catch.
Working with wood that is under tension
It is important to carry out the working steps in the correct order when working with wood that is under tension. Otherwise the saw chain could jam or there could be a kickback.
Wood under pressure should always be worked first on the 'push' side. Only then can a separating cut be made on the 'pull' side. This helps to prevent the saw chain from jamming.
CAUTION! PROPERTY DAMAGE!
▶ Horizontal lumber may not touch the ground on the underside of the cut, otherwise the saw chain should be damaged.
Trunk is bent downwards
- Start by making a relief cut 1 (approx. 1/3 of the trunk diameter) on the push side (see fold-out page fig. 1).
Then make a separating cut 2 (approx. 2/3 of the trunk diameter) on the pull side (see fold-out page fig. 1).
Trunk is bent upwards
- Start by making a relief cut 1 (approx. 1/3 of the trunk diameter) on the push side (see fold-out page fig. 1).
Then make a separating cut 2 (approx. 2/3 of the trunk diameter) on the pull side (see fold-out page fig. 1).
Kickback (see fold-out page fig. G)
If the saw chain 17 jams on the upper edge of the guide rail 16, the chainsaw can kick back violently towards the operator.
Drawing in (see fold-out page fig. H)
If the saw chain 17 jams on the lower edge of the guide rail 16, the rail can jerk violently away from the operator (see fold-out page fig. H).
Working safely
- Keep the appliance in good working order to prevent injury.
■ If the appliance has been dropped, check for significant damage or defects.
■ Do not use the appliance while standing on a ladder or with unsteady footing.
■ Do not be tempted into making a poorly considered cut. You could endanger yourself and others.
■ Change your working position regularly. Using the appliance for a long time can lead to vibration-related circulation disorders of the hands. You can extend the usage duration by using appropriate gloves or by taking regular breaks. Note that any personal predisposition to poor blood circulation, low external temperatures or large prehensile forces can reduce the usage period.
Cleaning and maintenance
RISK OF INJURY!
▶ Always switch off the appliance before cleaning and disconnect the spark plug connector 35.
NOTE
▶ Clean the appliance thoroughly after every use.
- Carry out the cleaning and maintenance work only as described in these instructions. Any more extensive work has to be carried out by specialist personnel.
- Maintenance work must be carried out regularly (see section "Maintenance intervals").
Cleaning the engine unit
RISK OF INJURY!
▶ RISK OF BURNS! Do not touch the hot exhaust silencer, cylinder or cooling fins.
- Keep all protective equipment, air vents and the engine housing as free of dust and dirt as possible. Blow it out with low-pressure compressed air.
■ Clean the appliance regularly with a damp cloth and a mild detergent. Make sure that no water can penetrate into the interior of the appliance.
Cleaning the air filter
Contaminated air filters reduce the engine output due to low air supply to the carburettor.
Regular inspection is essential. The air filter 34 must be inspected regularly and cleaned if necessary.
The air filter 34 must be checked more frequently if the air is dusty.
Remove the cap for the air filter cover ^5 by turning it in an anticlockwise direction.
◆ Remove the air filter cover ^3 .
◆ Remove the air filter ^34 .
- Clean the air filter ^34 by tapping or blowing it out (with compressed air).
Assembly is done in the reverse order.
CAUTION!
▶ Never clean the air filter ^64 with petrol or flammable solvents.
Cleaning the chain drive
RISK OF INJURY!
▶ Always wear protective gloves when handling the saw chair ^17 . There is a danger of injury from the sharp cutting teeth!
NOTE
▶ Clean the chain drive after each use.
◆ Place the chainsaw on a level and stable surface.
Pull the front hand guard ① backwards as far as the stop to release the chain brake (see fold-out page fig. C).
◆ Remove the two locking nuts ^20 using the spark plug spanner ^31 .
◆ Remove the sprocket cover ^22 .
◆ Carefully remove the saw chain ^17 from the guide rail ^16 and the chain sprocket ^26 .
◆ Remove the guide rail ^16 . Clean it with a brush.
Now clean the entire chain drive area and the saw blade cover ^22 with a brush or by blowing it out with compressed air.
Assembly is done in the reverse order.
Maintaining the spark plug
◆ Pull off the spark plug connector ^35
◆ Remove the spark plug using the enclosed spark plug spanner31.
◆ Assembly is done in the reverse order.
Electrode gap = 0.6 mm (distance between the electrodes between which the ignition spark is generated). Check the spark plug for contamination after the first 10 hours of operation and clean it with a copper wire brush if required.
Afterwards, service the spark plug after every 50 hours of operation.
Maintaining the chain lubrication
■ See the section "Checking and adjusting the chain lubrication".
Maintaining the carburettor settings
If the saw chain 17 moves when the engine is idling or the engine goes out when you release the throttle, you need to adjust the carburettor.
NOTE
▶ Have the carburettor adjustment (e.g. adjusting the idling speed) carried out by qualified specialists only to prevent engine damage.
Maintaining the guide rail
◆ Remove any remaining burrs on the edge of the rail using a metal file.
- Clean the guide rail 15 groove using a brush or with compressed air. Replace the guide rail 16 as soon as the groove is worn.
♦ Turn the guide rail ^16 after every use to ensure even wear.
Check that the sprocket at the tip of the guide rail moves freely. Lubricate it if necessary with a little bearing oil.
Fitting the guide rail and tensioning the saw chain
WARNING!
▶ Always switch the engine off before fitting parts.
RISK OF INJURY!
▶ Always wear protective gloves when handling the saw chair. There is a danger of injury from the sharp cutting teeth!
NOTE
▶ A new saw chair7 stretches and must be tightened more regularly. Check the chain tension regularly after every cut and adjust this as required.
▶ Depending on wear, the guide rail6 can be turned.
◆ Place the chainsaw on a level and stable surface.
♦ Pull the front hand guard① backwards as far as the stop to release the chain brake (see fold-out page fig. C).
◆ Remove the two locking nuts ^20 using the spark plug spanner ^31 .
Remove the sprocket cover ^22 .
◆ Push the slotted hole of the guide rail ^16 over the two protruding bolts.
Lay the saw chain 17 over the teeth of the chain sprocket 26. Guide the saw chain 17 precisely in the direction indicated on the guide rail
16
There is a guide wheel at the tip of the guide rail 16 in whose teeth the saw chain 17 must be laid.
♦ Lightly pull the guide rail ^16 to pre-stress the saw chain ^17
Put the sprocket cover22back on.
Make sure that the chain tensioner pin 23 on the inside fits into the appropriate hole 25 on the guide rail 16
Adjust the chain-tensioner screw 21 as required using the flat-head screwdriver 31.
♦ Tighten the two locking nuts 20 hand tight.
Do not tighten them too firmly.
Use the flat-head screwdriver to turn the chain-tensioner screw 21 clockwise until the lower part of the saw chain slides into the guide rail 16.
The saw chain 17 must lie against the underside of the rail.
When the chain brake is released, you should be able to pull the saw chain 17 over the guide rail 16 by hand.
NOTE
▶ A new saw chain ^7 stretches and must be tightened more regularly.
♦ Tighten the two locking nuts20 hand-tight using the spark plug spanner 31.
Sharpening and caring for the saw chain

RISK OF INJURY!
▶ Always wear protective gloves when handling the saw chair ^⑦ . There is a danger of injury from the sharp cutting teeth!
NOTE
▶ A properly maintained and sharpened saw chain reduces the amount of bodily effort and level of wear and produces a better result.
▶ Clean, maintain and sharpen the saw chain regularly.
▶ Check the saw chain regularly for cracks and damaged rivets.
▶ A grinder can be attached to the grinder support ^18 for a secure grip during grinding.
▶ Use only special ∅ 4.8 mm (3/16") round files for saw chains for the supplied saw chain.
▶ You will find detailed information on sharpening in a sharpening set, e.g. an Oregon set.
▶ Alternatively, you can use an electrical saw chain sharpening device and follow the instructions of the manufacturer.
▶ If you have any doubts about carrying out the work, the saw chain should be replaced.
▶ If necessary, have the sharpening of the saw chain carried out by a specialist workshop.
■ Required parts (not supplied):
-∅ 4.8 mm (3/16") round file for saw chains
-Flat file
- Depth limit setter
◆ File using forwards movements only to remove material.
◆
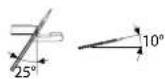
File at an angle of around 25^ at an inclination of 10^ to the guide rail 16.
◆ Check the clearance of the depth limiter with a depth limit setter.

The correct clearance of the depth limiter should be 0.6 mm (0.024").
Maintenance intervals
The figures given here are based on normal operating conditions. In the event of more difficult conditions, such as strong dust generation and longer daily working hours, the given intervals are to be reduced correspondingly.
| Appliance part | Action Before starting work | Weekly | In the event of an error | In the event of damage | As required |
| Chain lubrication | Checking | X | |||
| Saw chain 17 | Check and note sharpness | X | |||
| Check chain tension | X | ||||
| Sharpen X | |||||
| Guide rail 16 | Check (wear, damage) | X | |||
| Cleaning X X | |||||
| Replace | X | X |
Ordering replacement parts
Ordering replacement parts
The following information should be provided when ordering replacement parts:
■ Type of appliance: Petrol chainsaw
■ Item number of the appliance: IAN 302393
■ Appliance ID number: FBKS 52 A1
NOTES ON THE SAW CHAIN
▶ Recommended Oregon saw chains:
—Oregon E 72 (e.g. available in DIY stores)
-Oregon 20LPX072E
-Oregon 20LPX072X
-Oregon 20BPX072E
-Oregon 20BPX072X
▶ Pay close attention to the following specifications when purchasing from alternative suppliers:
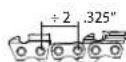
Chain pitch: 8.25 mm (0.325")

Drive link thickness
(Groove width): 1.47 mm (0.058")

No. of chain links: 72
GENERAL INFORMATION
▶ Replacement parts not listed (such as spark plugs, air filters) can be ordered via our service hotline.
▶ Recommended Oregon guide rails: Oregon 18" 180PXBK095
▶ For an exchange, only the specified guide rails and saw chains may be used.
Non-specified or non-permissible combination may lead to injuries and/or damage to the appliance.
Current prices and information are available at
www.kompernass.com
Storage and transportation
Always use the cover for the guide rail 27 during transport (see fold-out page fig. J) and storage.
◆ Always clean and maintain the appliance before storage, see section "Cleaning and maintenance".
Switch off the chainsaw before moving it anywhere, even short distances. Protect the machine during transport (also in vehicles) against tipping over to prevent fuel loss, damage or injuries.
Carry the appliance by the front handle only. The guide rail then faces to the rear, away from your body (see fold-out page fig. J).
◆ Hold the hot exhaust silencer away from your body. There is a risk of burns!
◆ Store the appliance in a secure, dry, frost-free and well-ventilated location that is protected from the effects of weather.
Outside storage is not recommended. Secure it against unauthorised access.
◆ Empty the oil and fuel tanks using a suction pump.
WARNING!
▶ Do not remove the fuel in enclosed rooms, in the vicinity of fire or while smoking. Gas vapours can cause explosions or fire.
- Start the engine and leave it running until the remaining petrol has been used up.
Troubleshooting
| Problem Possible cause Remedy | ||
| The engine does not start | Incorrect start-up process Follow the instructions regarding starting. | |
| The engine starts but does not run at full power | Contaminated air filter34 | Clean the air filter34 |
| The engine does not run smoothly | Incorrect spark plug gap Clean the spark plug and adjust the spark plug gap or replace the spark plug | |
| Soot deposits or wetness on the spark plug | Incorrect carburettor adjustment | Clean spark plug or replace it with a new spark plug |
This appliance has a 3-year warranty valid from the date of purchase. If this product has any faults, you, the buyer, have certain statutory rights. Your statutory rights are not restricted in any way by the warranty described below.
Warranty conditions
The validity period of the warranty starts from the date of purchase. Please keep your original receipt in a safe place. This document will be required as proof of purchase.
If any material or production fault occurs within three years of the date of purchase of the product, we will either repair or replace the product for you at our discretion. This warranty service is dependent on you presenting the defective appliance and the proof of purchase (receipt) and a short written description of the fault and its time of occurrence.
If the defect is covered by the warranty, your product will either be repaired or replaced by us. The repair or replacement of a product does not signify the beginning of a new warranty period.
Warranty period and statutory claims for defects
The warranty period is not prolonged by repairs effected under the warranty. This also applies to replaced and repaired components. Any damage and defects present at the time of purchase must be reported immediately after unpacking. Repairs carried out after expiry of the warranty period shall be subject to a fee.
Scope of the warranty
This appliance has been manufactured in accordance with strict quality guidelines and inspected meticulously prior to delivery.
The warranty covers material faults or production faults. The warranty does not extend to product parts subject to normal wear and tear or fragile parts such as switches, batteries, baking moulds or parts made of glass.
The warranty does not apply if the product has been damaged, improperly used or improperly maintained. The directions in the operating instructions for the product regarding proper use of the product are to be strictly followed. Uses and actions that are discouraged in the operating instructions or which are warned against must be avoided.
This product is intended solely for private use and not for commercial purposes. The warranty shall be deemed void in cases of misuse or improper handling, use of force and modifications / repairs which have not been carried out by one of our authorised Service centres.
Warranty claim procedure
To ensure quick processing of your case, please observe the following instructions:
■ Please have the till receipt and the item number (e.g. IAN 12345) available as proof of purchase.
■ You will find the item number on the type plate, an engraving on the front page of the instructions (bottom left), or as a sticker on the rear or bottom of the appliance.
If functional or other defects occur, please contact the service department listed either by telephone or by e-mail.
■ You can return a defective product to us free of charge to the service address that will be provided to you. Ensure that you enclose the proof of purchase (till receipt) and information about what the defect is and when it occurred.

You can download these instructions along with many other manuals, product videos and software on www.lidl-service.com.
Service
GB Service Great Britain Tel.: 0871 5000 720 (£ 0.10/Min.) E-Mail: kompernass@lidl.co.uk
IE Service Ireland Tel.: 1890 930 034 (0,08 EUR/Min., (peak)) (0,06 EUR/Min., (off peak)) E-Mail: kompernass@lidl.ie
IAN 302393
Importer
Please note that the following address is not the service address. Please use the service address provided in the operating instructions.
KOMPERNASS HANDELS GMBH
BURGSTRASSE 21
DE-44867 BOCHUM
GERMANY
www.kompernass.com
Disposal

The packaging is made from environmentally friendly material and can be disposed of at your local recycling plant. The appliance and its accessories are made from various materials, such as metal and plastic.
Your local community or municipal authorities can provide information on how to dispose of the appliance.
Environmental protection
■ Carefully empty the petrol and oil tank and dispose of your appliance at a recycling plant. The plastic and metal parts used can be separated and recycled.
■ Dispose of waste oil and petrol at a waste collection centre and do not dump these into the sewerage or drainage system.
■ Dispose of contaminated maintenance material and working materials at a collection point provided for this purpose.
Dispose of the packaging in an environmentally friendly manner.
Note the labelling on the packaging and separate the packaging material components for disposal if necessary. The packaging material is labelled with abbreviations (a) and numbers (b) with the following meanings:
1-7:plastics, 20-22: paper and cardboard, 80-98: composites

Your local community or municipal authorities can provide information on how to dispose of the worn-out product.
Translation of the original Conformity Declaration
We, KOMPERNASS HANDELS GMBH, documents officer: Mr. Semi Uguzlu, BURGSTR. 21, DE - 44867 BOCHUM, GERMANY, hereby declare that this appliance complies with the following standards, normative documents and EC directives:
Machinery Directive
(2006/42/EC)
EMC (Electromagnetic Compatibility)
(2014/30/EU)
Directive on noise emission
(2000/14/EC)
(2005/88/EC)
Notified body: No. 0123
TÜV SÜD Industrie Service GmbH, Westendstraße 199, 80686 Munich, Germany. Evaluation procedure for conformity as per appendix VI.
Sound power level LWA:
Measured: 109.2 dB(A)
Guaranteed: 114 dB(A)
Directive on exhaust gas emissions
(2017/656/EU)
Applied harmonised standards:
EN ISO 11681-1:2011
EN ISO 14982:2009
Type/appliance designation:
Petrol chainsaw FBKS 52 A1
Year of manufacture: 01 - 2018
Serial number: IAN 302393
Bochum, 19/01/2018

CE
Semi Uguzlu
- Quality Manager -
We reserve the right to make technical changes in the context of further product development.
Sommaire
Introduction 34
Fig. A
KOMPERNASS HANDELS GMBH
BURGSTRASSE 21
DE-44867 BOCHUM
ALLEMAGNE
www.kompernass.com
Recyclage

Directive relative aux machines (2006/42/CE)
500 ml bio-kettingolie (Made in Germany)
1 veiligheidsbril
1 gehoorbescherming EY2-1
1 gereedschapstas
⚠ WAARSCHUWING! TERUGSLAG!
Afb. A
KOMPERNASS HANDELS GMBH
BURGSTRASSE 21
DE-44867 BOCHUM
DUITSLAND
www.kompernass.com
Afvoeren

Obr. A
⚠️ POZOR! HMOTNÉ ŠKODY!
⚠ POZOR! HMOTNÉ ŠKODY!
KOMPERNASS HANDELS GMBH
BURGSTRASSE 21
DE-44867 BOCHUM
NĚMECKO
www.kompernass.com
Likvidace

Fig. A
KOMPERNASS HANDELS GMBH
BURGSTRASSE 21
DE-44867 BOCHUM
ALEMANIA
www.kompernass.com
Semi Uguzlu
Fig. A
Oregon 18" 180PXBK095
KOMPERNASS HANDELS GMBH
BURGSTRASSE 21
DE-44867 BOCHUM
ALEMANHA
www.kompernass.com
Eliminação

Semi Uguzlu
KOMPERNASS HANDELS GMBH
BURGSTRASSE 21
DE - 44867 BOCHUM
GERMANY
www.kompernass.com
Stand der Informationen · Last Information Update · Version des informations
Stand van de informatie · Stav informací · Estado de las informaciones