
PMDS 100 B1 - Mill PARKSIDE - Free user manual and instructions
Find the device manual for free PMDS 100 B1 PARKSIDE in PDF.


| Product Type | Electric Mill/Grinder |
| Brand | Parkside |
| Model | PMDS 100 B1 |
| Power Source | 220-240 V ~ 50 Hz |
| Power Consumption | 120 W |
| Capacity | Approx. 75 g |
| Grinding Mechanism | Stainless steel blades |
| Grinding Settings | Fixed (pulse operation) |
| Housing Material | Plastic (ABS) |
| Bowl Material | Stainless steel |
| Lid Material | Transparent plastic with safety lock |
| Safety Features | Overload protection, lid safety switch |
| Non-Slip Feet | Yes |
| Cable Length | Approx. 1 m |
| Dimensions (L x W x H) | 100 x 100 x 180 mm |
| Weight | Approx. 0.5 kg |
| Color | White/Black |
| Dishwasher Safe Parts | Bowl and lid (top rack recommended) |
| Cleaning Instructions | Wipe base with damp cloth; do not immerse |
| Spare Parts Availability | Replacement bowls and blades available |
| Reparability | Limited (sealed motor unit) |
| Certifications | CE, GS |
Frequently Asked Questions - PMDS 100 B1 PARKSIDE
User questions about PMDS 100 B1 PARKSIDE
0 question about this device. Answer the ones you know or ask your own.
Ask a new question about this device
Download the instructions for your Mill in PDF format for free! Find your manual PMDS 100 B1 - PARKSIDE and take your electronic device back in hand. On this page are published all the documents necessary for the use of your device. PMDS 100 B1 by PARKSIDE.
USER MANUAL PMDS 100 B1 PARKSIDE
SMERIGLIATRICE DOPPIA PER MODELLISMO PMDS 100 B1
IT MT
SMERIGLIATRICE DOPPIA PER MODELLISMO
Translation of the original instructions
PT
ESMERILADORA PARA CONSTRUÇÃO DE MODELOS
Before reading, unfold both pages containing illustrations and familiarise yourself with all functions of the device.
DE AT CH
GB / MT Translation of the original instructions Page 21
KOMPERNASS HANDELS GMBH
BURGSTRASSE 21
44867 BOCHUM
GERMANY
www.kompernass.com
KOMPERNASS HANDELS GMBH
BURGSTRASSE 21
44867 BOCHUM
GERMANY
www.kompernass.com
CE
Semi Uguzlu
Technical details 23
General Power Tool Safety Warnings 24
Working safely 24
Appliance-specific safety instructions 25
Before use 26
Working procedures 26
Dust extraction 26
Operation 26
Switching on and off 26
Fitting the polishing mandrel 27
Replacing the grinding disc 27
Maintenance and cleaning 28
Storage 28
Disposal 28
Kompernass Handels GmbH warranty 28
Service 30
Importer 30
Translation of the original Conformity Declaration .... 30
MINI BENCH GRINDER PMDS 100 B1
Introduction
Congratulations on the purchase of your new appliance. You have selected a high-quality product. The operating instructions are part of this product. They contain important information about safety, usage and disposal. Before using the product, please familiarise yourself with all operating and safety instructions. Use the product only as described and for the range of applications specified. Please also pass these operating instructions on to any future owner.
Intended use
The modellers' double grinding machine is designed for grinding and polishing a wide range of different materials. It is suitable for the grinding of hard materials such as hard metals, cast iron, HSS, ceramics and glass as well as soft materials such as copper, aluminium and plastics. It can also be used for tough materials such as unhardened steel, welds, hardened steel and titanium. The appliance is not intended for commercial use. Any other uses of or modification to the appliance is deemed to be improper and carries the risk of serious personal injury. The manufacturer accepts no responsibility for damage(s) attributable to misuse.
Features
① Spindle locking button
② Protective cover
3 Knurled screw for protecting cover
4a Grinding disc (grain size 80)*
4b Grinding disc (grain size 100)*
4c Plastic polishing disc
4d Cotton disc
4e Felt polishing disc
4f Steel wire brush
4g Brass wire brush
5 Cap
6 Workpiece rest
⑦ Power cord
8 Knurled screw for workpiece rest
9 Grinding dust draw
10 ON/OFF switch
11 Speed control
12 Polishing mandrel
13 Shaft
14 Centring flange
15 Tension disc
16 Union nut
⑰ Fixing screw
*pre-assembled
Package contents
Check the package contents immediately after unpacking the appliance:
1 mini bench grinder PMDS 100 B1
1 polishing mandrel
1 polishing set (five-piece, diameter approx. 50 mm):
- cotton disc for high-gloss finish
- plastic polishing disc for rough grinding of metals such as stainless steel
- felt polishing disc preparing painted surfaces
- steel wire brush for rust removal and cleaning of steel and non-ferrous metals
- brass wire brush for polishing non-ferrous and preciousmetals
1 set of operating instructions
Technical details
Rated voltage: 230–240 V\~, 50 Hz (alternating current)
Rated power
consumption: 100 W S2:20min*
Protection class: II / ☐ (double insulation)
Protection type: IP 20
Rated idle speed: n 3000-9000 rpm
Working speed: 8–24 m/s
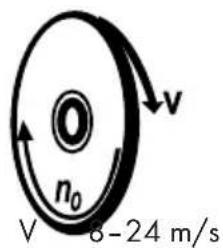
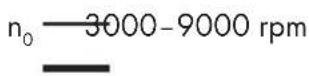
Weight (incl. accessories): approx. 1.7 Kg
* After uninterrupted operation for 20 minutes, you must take a break until the appliance temperature is within 2 K (2°C) of room temperature.
Grinding discs
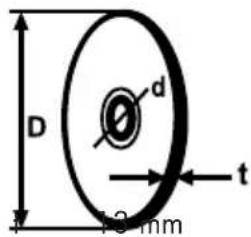
D —∅ max. 50 mm
d = 12.7 mm

Outer diameter: ∅ 50 mm
Drill hole: ∅ 12.7 mm
Thickness: 13 mm
Hardness grade: M
Grain size: 100/80
Steel wire brush/brass wire brush
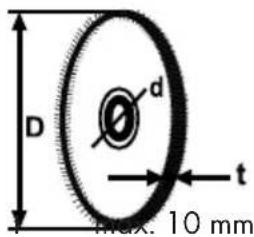
D —∅ max. 50 mm
d —∅ max. 10 mm
Outer diameter: ∅ 50 mm
Bore: ∅ 5 mm
Thickness: 8.5 mm
■ Use only brushes with a max. hole diameter of 10 mm and max. brush thickness of 10 mm.
Noise emission value:
Noise measurement value determined in accordance with EN ISO 4871. The rated noise level of the tool is typically:
Sound pressure level: L_pA = 60.94 dB (A)
Uncertainty: K_pA = 3 dB
Sound power level: L_WA = 73.94 dB (A)
Uncertainty: K_WA = 3 dB
Wear hearing protection!
Total vibration value:
Total vibration value as per EN 61029:
Vibration emission value a_n ≤ 2.5 m/s^2
Uncertainty K_h = 1.5 m/s^2
NOTE
The vibration level specified in these instructions has been measured in accordance with a standardised measuring procedure and can be used to make equipment comparisons. The specified vibration emission value can also be used to make an initial exposure estimate.
WARNING!
The vibration level varies in accordance with the use of the power tool and may be higher than the value specified in these instructions in some cases. Regular use of the power tool in such a way may cause the user to underestimate the vibration. To estimate the vibration load during a specific working period accurately, also take into account periods during which the appliance is switched off (or running, but not being used). This can significantly reduce the vibration load over the total working period.

General Power Tool Safety Warnings
WARNING!
▶ Read all safety warnings and all instructions. Failure to follow the safety instructions listed below may result in electric shock, fire and/or serious injury.
Save all warnings and instructions for future reference.
The term "power tool" in the warnings refers to your mains-operated (corded) power tool or battery-operated (cordless) power tool.
Working safely
- Keep your workspace tidy. Untidiness in the work area can cause accidents.
Take account of environmental influences. Do not expose the power tool to rain. Do not use the power tool in wet or moist environments. Ensure that your workspace is adequately lit. Do not use power tools where there is a risk of explosion or fire.
■ Protect yourself from electric shocks! Avoid body contact with grounded surfaces (e.g. pipes, radiators, electric cookers, refrigerators and freezers). - Keep other people at a distance. Do not allow other people, especially children, to touch the power tool or the cord. Keep them out of your work area.
■ Store unused power tools safely! Unused electric tools should be placed in a dry, high-up or closed-off place out of the reach of children.
- Do not overload your power tool! You will work better and more safely in the specified performance range.
Use the right power tool for the job. Do not use low performance tools for heavy work. Do not use the power tool for purposes for which it is not intended. For example, do not use a circular saw to cut tree branches or logs.
■ Wear suitable clothing! Do not wear loose clothing or jewellery, which could get caught in moving parts. Non-slip footwear is recommended when working outdoors. If you have long hair, wear a hairnet.
Use protective equipment! Wear safety goggles. Use a breathing mask for work that produces a lot of dust.
■ Connect the dust extraction device! If there are connections for dust extraction and collection, make sure that these are connected and used properly.
- Do not use the cord for purposes for which it is not intended! Do not pull on the cord to unplug the power tool. Protect the cord from hot surfaces and sharp edges.
- Secure the workpiece! Use clamps or a vice to hold the workpiece firmly in place. This is much safer than simply holding it in your hand.
- Do not overreach! Keep proper footing and balance at all times.
- Maintain tools with care! Keep the cutting tools sharp and clean to be able to work better and more safely. Follow the instructions on lubrication and exchanging tools. Check the power cord regularly and have it replaced by a certified specialist if it is damaged. Check extension leads regularly and replace them if they are damaged. Keep the handles dry, clean and free from oil and grease.
■ Unplug the appliance from the mains socket! When the power tool is not in use, before maintenance and when changing tools such as saw blades, drill bits and milling tools.
■ Never leave any tool key attached! Check that all keys and adjusting wrenches are removed before switching on.
- Avoid unattended start-up. Ensure that the switch is switched to off before inserting the plug into the wall socket.
■ Use the extension cord for outdoor use! Use only suitably certified and labelled extension cords outdoors.
■ Remain alert at all times! Pay attention to what you are doing. Proceed with caution when working with the tool. Do not use the power tool if you lack concentration.
- Check the power tool for any damage! Before continuing to use the power tool, check all safety devices and slightly worn parts to make sure they function properly and as intended.
Check that all moving parts work properly without jamming and whether parts are damaged. All parts must be properly fitted and meet all the conditions to ensure the proper operation of the power tool. Damaged safety devices and parts must be properly repaired or replaced by a specialist workshop unless otherwise indicated in the instructions.
■ Damaged switches must be replaced at an authorized customer service centre.
■ Do not use any power tools that you cannot switch on and off with the power switch.
ATTENTION! The use of other tools and accessories could lead to an increased risk of personal injury for you.
■ Have your power tool repaired by a qualified electrician! This power tool complies with all pertinent safety regulations. Repairs may only be performed by a qualified electrician using original spare parts; otherwise this could lead to accidents for the user.
Appliance-specific safety instructions
WARNING!
▶ Do not use damaged or deformed discs or brushes.
■ Use only grinding discs and brushes whose imprinted speed rating is at least as high as that on the type plate on the power tool.
■ Adjust the spark deflector occasionally to compensate for wear on the disc. Ensure that the distance between the spark deflector and the disc is a small as possible and is never more than 2 mm.
■ Always leave the brush fitted to the spindle to reduce the risk of contact with the rotating spindle.
Residual risks!
Even if you operate this power tool properly, there will still be residual risks. The following risks can occur in the context of the design and construction of this power tool:
a) Lung damage, if no suitable breathing protection is worn.
b) Hearing damage, if no suitable hearing protection is worn.
c) Damage to health caused by vibrations if the appliance is used for extended periods or is not properly used and maintained.

WARNING!
The power tool creates an electromagnetic field during operation. This field can, in certain circumstances, impair active or passive medical implants. To reduce the risk of fatal injuries, we recommend that people with medical implants consult their doctor and the manufacturer of the medical implant before operating this machine.
Before use
Working procedures
A light grinding pressure is sufficient:
work using a light grinding pressure – in particular, a constant and correct speed delivers a high grinding performance.
Grinding:
bear in mind that the workpiece heats up during grinding. Therefore, cool the workpiece in a water bath.

CAUTION!
This appliance is not designed for continuous operation.
▶ If the appliance overheats, switch it off and allow it to cool down.
Dust extraction

WARNING!
Risk of fire! This appliance has a grinding dust draw ⑨. Risk of fire! In unfavourable conditions, e.g. when sparks are flying while sanding metal or metal residues in wood, wood dust in the grinding dust draw ⑨ an spontaneously ignite. This is a particular risk if the wood dust is mixed with paint residues or other chemicals and the workpiece has become hot after being worked for a long time. Therefore, avoid overheating of the material being sanded as well as the appliance. Always empty the grinding dust draw ⑨ before taking work breaks.
Wear a dust mask!
Operation
Switching on and off
NOTE
▶ Before first use, allow the grinding disc to run without a load at top speed for about 5 minutes. Keep out of the danger area.
- Undo the knurled screw 8 on the workpiece rest 6 and set the desired grinding angle (see fig. A).
◆ Re-tighten the knurled screw 8 afterwards.

WARNING - RISK OF INJURY!
There must be a gap between the grinding disc 4a, 4b and the workpiece rest 6
- Undo the knurled screw on the protective cover and adjust this so that it provides the greatest possible protection (see fig. A).
◆ Re-tighten the knurled screw 3 afterwards. ATTENTION! Repeat the settings on the opposite side.
■ Never press on the spindle locking button 1 while the grinding disc 4a, 4b is turning
♦ Switch the appliance on by pressing the ON/OFF switch 10.
- Set a speed suitable for the work using the speed control 11.
◆ Switch the appliance off by pressing the ON/OFF switch 10 again.
Fitting the polishing mandrel
WARNING! RISK OF INJURY!
▶ Always remove the power plug from the wall socket before carrying out any work on the appliance.

WARNING! Never use grinding discs on the brush side of the machine!
CAUTION!
- Never press on the spindle locking button 1 while the grinding disc 4a, 4b is turning.
Remove the cap5.
◆ Press the spindle locking button ^1 to block the shaft.
♦ Screw in the polishing mandrel ^12 (see fig. B).
♦ Screw the desired polishing too 4c, 4d, 4e, 4f or 4g onto the polishing mandrel 12 see fig. B).
Completely cover the grinding dis4a, 4b using the protective cover 2 see fig. B).
After finishing work, remove the polishing mandrel 12 by working in the reverse order.
NOTE
▶ Do not apply any lateral pressure to the brushes.
Replacing the grinding disc
WARNING! RISK OF INJURY!
▶ Always remove the power plug from the wall socket before carrying out any work on the appliance.
WARNING!
The grinding dis4a, 4b used may not be any larger than the prescribed diameter.
- Unscrew the fixing screw on the side cover and remove the cover (see fig. C).
- Never press on the spindle locking button 1 while the grinding disc 4a, 4b is turning.
◆ Press the spindle locking button 1 to block the shaft.
◆ Unscrew the union nut ^16 from the appliance using a monkey wrench.
Take the tension dist ^15 , union nut 16 grinding disc 4a, 4b and the centring flange 14ff (see fig. C).
Place a new grinding disc on the centring flange 14 and push this onto the shaft 13 (see fig. C).
♦ Screw the tension dis⑮ and the union nut ⑯ back onto the shaft ⑰
♦ Keep the spindle locking button 1 pressed in and re-tighten the union nut 16
WARNING! RISK OF INJURY!
▶ Never use a grinding disc ^4a , 4b without the protective cover.
♦ Replace all side covers and fasten them securely in place by tightening the fixing screws 17 firmly.
Direction of rotation of the tool!
Maintenance and cleaning

NING! RISK OF INJURY! Disconnect the plug before adjustment, maintenance or repair.
The appliance is maintenance-free.
■ Always clean the appliance directly after completion of work.
◆ Pull the grinding dust draw 9 laterally out of the appliance and empty it (see fig. D).
■ Use a dry cloth to clean the housing. Under no circumstances should you use detergents, solvents or abrasive cleaners.
■ Ensure ventilation openings are always free.
■ Remove any adhering swarf with a brush.
Storage
■ Store the appliance in a dust-free and dry place.
■ Store brushes dry and not in the field aggressive media.
■ Grinding discs must be stored dry and upright and are not to be stacked.
■ Accessories otherwise protected against damage.
■ Store the appliance out of reach of children.
Disposal

The packaging consists of environmentally friendly material. It can be disposed of in the local recycling containers.
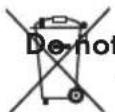
dispose of power tools in your normal household waste!
In accordance with European Directive 2012/19/EU on Waste Electrical and Electronic Equipment and its implementation into national law, used power tools must be collected separately and recycled in an environmentally friendly manner.
Your local community or municipal authorities can provide information on how to dispose of the worn-out appliance.
This appliance has a 3-year warranty valid from the date of purchase. If this product has any faults, you, the buyer, have certain statutory rights. Your statutory rights are not restricted in any way by the warranty described below.
Warranty conditions
The validity period of the warranty starts from the date of purchase. Please keep your original receipt in a safe place. This document will be required as proof of purchase.
If any material or production fault occurs within three years of the date of purchase of the product, we will either repair or replace the product for you at our discretion. This warranty service is dependent on you presenting the defective appliance and the proof of purchase (receipt) and a short written description of the fault and its time of occurrence.
If the defect is covered by the warranty, your product will either be repaired or replaced by us. The repair or replacement of a product does not signify the beginning of a new warranty period.
Warranty period and statutory claims for defects
The warranty period is not prolonged by repairs effected under the warranty. This also applies to replaced and repaired components. Any damage and defects present at the time of purchase must be reported immediately after unpacking. Repairs carried out after expiry of the warranty period shall be subject to a fee.
Scope of the warranty
This appliance has been manufactured in accordance with strict quality guidelines and inspected meticulously prior to delivery.
The warranty covers material faults or production faults. The warranty does not extend to product parts subject to normal wear and tear or fragile parts such as switches, batteries, baking moulds or parts made of glass.
The warranty does not apply if the product has been damaged, improperly used or improperly maintained. The directions in the operating instructions for the product regarding proper use of the product are to be strictly followed. Uses and actions that are discouraged in the operating instructions or which are warned against must be avoided.
This product is intended solely for private use and not for commercial purposes. The warranty shall be deemed void in cases of misuse or improper handling, use of force and modifications/repairs which have not been carried out by one of our authorised Service centres.
Warranty claim procedure
To ensure quick processing of your case, please observe the following instructions:
- Please have the till receipt and the item number (e.g. IAN 12345) available as proof of purchase.
- You will find the item number on the type plate, an engraving on the front page of the instructions (bottom left), or as a sticker on the rear or bottom of the appliance.
- If functional or other defects occur, please contact the service department listed either by telephone or by e-mail.
- You can return a defective product to us free of charge to the service address that will be provided to you. Ensure that you enclose the proof of purchase (till receipt) and information about what the defect is and when it occurred.

You can download these instructions along with many other manuals, product videos and software on www.lidl-service.com.
Service

WARNING!
▶ Have the power tool repaired by the service centre or a qualified electrician and only using genuine replacement parts. This will ensure that the safety of the appliance is maintained.

WARNING!
▶ Always ensure that the power plug or the mains cable is replaced only by the manufacturer of the appliance or by an approved customer service provider. This will ensure that the safety of the appliance is maintained.
NOTE
▶ Replacement parts not listed (such as carbon brushes, switches) can be ordered via our service hotline.

Service Great Britain
Tel.: 0871 5000 720 (£ 0.10/Min.)
E-Mail: kompernass@lidl.co.uk

Service Malta
Tel.: 80062230
E-Mail: kompernass@lidl.com.mt
IAN 275384
Importer
Please note that the following address is not the service address. Please use the service address provided in the operating instructions.
KOMPERNASS HANDELS GMBH
BURGSTRASSE 21
44867 BOCHUM
GERMANY
www.kompernass.com
Translation of the original Conformity Declaration
We, KOMPERNASS HANDELS GMBH, documents officer: Mr. Semi Uguzlu, BURGSTR. 21, 44867 BOCHUM, GERMANY, hereby declare that this product complies with the following standards, normative documents and EC directives:
Machinery Directive
(2006/42/EC)
EMC (Electromagnetic Compatibility)
(2014/30/EU)
RoHS Directive
(2011/65/EU)
Applied harmonised standards:
EN 61029-1: 2009+A11
EN 61029-2-4: 2011
EN 55014-1:2006+A1+A2
EN 55014-2: 2015
EN 61000-3-2: 2014
EN 61000-3-3: 2013
Type designation of machine:
Mini bench grinder PMDS 100 B1
Year of manufacture: 06 - 2016
Serial number: IAN 275384
Bochum, 03/05/2016
CE
Semi Uguzlu
- Quality Manager -
The right to effect technical changes in the context of further development is reserved.
Inhaltsverzeichnis
Einleitung 32
KOMPERNASS HANDELS GMBH
BURGSTRASSE 21 • 44867 BOCHUM
GERMANY
www.kompernass.com
CE
Semi Uguzlu
KOMPERNASS HANDELS GMBH
BURGSTRASSE 21
44867 BOCHUM
DEUTSCHLAND / GERMANY
www.kompernass.com


- SMERIGLIATRICE DOPPIA PER MODELLISMO PMDS 100 B1
- SMERIGLIATRICE DOPPIA PER MODELLISMO
- ESMERILADORA PARA CONSTRUÇÃO DE MODELOS
- General Power Tool Safety Warnings 24
- Before use 26
- Operation 26
- Maintenance and cleaning 28
- Storage 28
- Kompernass Handels GmbH warranty 28
- Importer 30
- Translation of the original Conformity Declaration .... 30
- MINI BENCH GRINDER PMDS 100 B1
- Introduction
- Intended use
- Features
- Package contents
- Check the package contents immediately after unpacking the appliance:
- Technical details
- Grinding discs
- Steel wire brush/brass wire brush
- Noise emission value:
- Wear hearing protection!
- Total vibration value:
- NOTE
- WARNING!
- General Power Tool Safety Warnings
- Save all warnings and instructions for future reference.
- Working safely
- Appliance-specific safety instructions
- Residual risks!
- Before use
- Working procedures
- A light grinding pressure is sufficient:
- Grinding:
- CAUTION!
- Dust extraction
- Operation
- Switching on and off
- WARNING - RISK OF INJURY!
- Fitting the polishing mandrel
- WARNING! RISK OF INJURY!
- Replacing the grinding disc
- Maintenance and cleaning
- Storage
- Disposal
- dispose of power tools in your normal household waste!
- Warranty conditions
- Warranty period and statutory claims for defects
- Scope of the warranty
- Warranty claim procedure
- Service
- Importer
- Translation of the original Conformity Declaration
- Inhaltsverzeichnis
- Einleitung 32
Brand : PARKSIDE
Model : PMDS 100 B1
Category : Mill