
PTL 4 A1 - Pressure washer PARKSIDE - Free user manual and instructions
Find the device manual for free PTL 4 A1 PARKSIDE in PDF.

| Product type | Telescopic tube for high-pressure cleaner |
| Brand | Parkside |
| Model | PTL 4 A1 |
| Compatibility | Parkside PHD 100 A1, PHD 100 B2, PHD 100 C2, PHD 100 D2, PHD 100 E2, PHD 110 A1, PHD 135 A1, PHD 150 A1, PHD 150 B2, PHD 150 C2, PHD 150 D3, PHD 150 E4, PHD 150 F4 |
| Operating pressure | 11 MPa (1595 psi) |
| Maximum permissible pressure | 16 MPa (2320 psi) |
| Maximum flow rate | 450 l/h |
| Max inlet temperature | 60 °C (140 °F) |
| Length | Telescopic tube in multiple parts, adjustable length |
| Material | Plastic and metal |
| Weight | Approximately 2 kg (estimate) |
| Water supply | Via connection on the tube handle |
| Main functions | High-pressure cleaning at height and hard-to-reach areas |
| Included nozzle | Flat jet nozzle (1) |
| Included accessories | Elbow, fuse box, high-pressure hose, stand, shoulder strap |
| Safety | Locking mechanism, safety clip, shoulder strap |
| Maintenance | Clean with a soft brush or damp cloth; no special maintenance |
| Storage | In a frost-free room |
| Warranty | 3 years |
| Identification number (IAN) | 297585 |
| After-sales service France | 0800 919270, grizzly@lidl.fr |
| After-sales service Belgium | 070 270 171 (€0.15/min), grizzly@lidl.be |
| Spare parts | Available at www.grizzly-service.eu |
Frequently Asked Questions - PTL 4 A1 PARKSIDE
User questions about PTL 4 A1 PARKSIDE
0 question about this device. Answer the ones you know or ask your own.
Ask a new question about this device
Download the instructions for your Pressure washer in PDF format for free! Find your manual PTL 4 A1 - PARKSIDE and take your electronic device back in hand. On this page are published all the documents necessary for the use of your device. PTL 4 A1 by PARKSIDE.
USER MANUAL PTL 4 A1 PARKSIDE
Translation of the original instructions
NL BE
TELESCOPISCHE LANS VOOR HOGEDRUKREINIGER
Before reading, unfold the page containing the illustrations and familiarise yourself with all functions of the device.
FR BE
GB / IE Translation of the original instructions Page 11
Service-Center......10
Importeur ......10
Einleitung

General Description ....11
Extent of the delivery .....11
Overview....12
Technical data....12
Notes on Safety 12
Symbols in the manual 12
General notes on safety......12
Working with the equipment...... 13
Fitting....13
Screwing on the base 13
Inserting the high-pressure hose .... 13
Connecting the tip of the tube......14
Initial start-up....14
Working instructions....14
Using detergents....14
Cleaning and Maintenance 15
Cleaning....15
Maintenance 15
Storage 15
Waste Disposal and Environmental
Protection 15
Replacement parts / Accessories ..... 15
Guarantee....15
Repair Service.... 16
Service-Center 17
Importer 17
Introduction

Congratulations on the purchase of your new device. With it, you have chosen a high quality product.
The operating instructions constitute part of this product. They contain important information on safety, use and disposal.
Before using the product, familiarise yourself with all of the operating and safety instructions. Use the product only as described and for the applications specified.
Keep this manual safely and in the event that the product is passed on, hand over all documents to the third party.
Intended use
This equipment is not suitable for commercial use. Commercial use will invalidate the guarantee.
- for cleaning using a high-pressure water jet in difficult-to-access areas. Particularly at height.
- cleaning the object according to its manufacturer's information.
The device is designed for use with pressure washer Parkside
PHD 100 A1, PHD 100 B2, PHD 100 C2,
PHD 100 D2, PHD 100 E2, PHD 110 A1,
PHD 135 A1, PHD 150 A1, PHD 150 B2,
PHD 150 C2, PHD 150 D3, PHD 150 E4,
PHD 150 F4.
General Description
The diagram of the most important functional elements can be found on the foldout side.
Extent of the delivery
Unpack the device and verify the contents:
- Telescopic tube, in several parts
- Flat jet nozzle
- Angle piece
- Safety clamp
- High-pressure hose
- Base
- Shoulder strap
- Instruction for use
Overview
A 1 Flat jet nozzle
2 Angle piece
3 Safety clamp
4 Third telescopic tube
5 Second telescopic tube
6 First telescopic tube
7 Main tube
8 Handgrip area
9 Shoulder strap
10 Opening for high-pressure hose 11 Handgrip
12 Connection for high-pressure hose
13 Unlocking mechanism for high-pressure hose 14 Base
15 Water connection
16 Unlocking mechanism for water connection
17 High-pressure hose
18 Connection for telescopic tube
19 Connection for angle piece
20 Switch-on lever
21 Switch lock
22 Strap bracket
23 Auxiliary handle and rotary lock
24 Unlocking mechanism for high-pressure hose
Technical data
Telescopic tube ......PTL 4 A1
Suitable for devices with the following performance data:
Rated pressure (p) .....11 MPa / 1595 psi Permissible pressure (p max)
16 MPa / 2320 psi
Max. flow rate (Q max)
450 l/h
Max. Supply temperature (T max)
60 °C / 140 °F
Notes on Safety
This Section is concerned with the basic safety rules when working with the patio cleaner.
Symbols in the manual

Warning symbols (the danger can be explained at the place of the exclamation mark) with information on damage and injury prevention.

Help symbols with information on improving tool handling.
General notes on safety
- This appliance is not intended for use by persons (including children) with reduced physical, sensory or mental capabilities, or lack of experience and knowledge, unless they have been given supervision or instruction concerning use of the appliance by a person responsible for their safety.
- People who are unfamiliar with the operating instructions are not permitted to use the equipment. The operation of the equipment is not authorised for people under the age of 16.
Working with the equipment
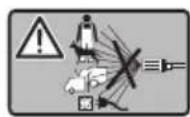
CAUTION. pressure washers can be dangerous if they are not operated correctly! The jet must never be directed at people, animals, electric equipment connected to the power supply or against the actual pressure washer.
- Do not direct the jet at yourself or others in order to clean clothes and shoes.
- Do not operate the pressure washer when other people are in the immediate vicinity, other than they are also wearing protective clothes.
• Take appropriate measures to keep children away from the equipment whilst it is running.
- Dispose of the packaging material correctly.
- Do not use the equipment in the vicinity of flammable liquids or gases. Non-observance will result in a risk of fire or explosion.
- Store the equipment in a dry place and out of reach of children.
• Children should be supervised to ensure that they do not play with the appliance.
- Follow the security tips of your high-pressure washer.
- The operator or user is responsible for any accidents or personal injury and/or material damage to third parties or their property.
Caution! To avoid damage to the equipment and any possible person injury resulting from this:
- Do not use for cleaning windows.
- Do not work with damaged or incomplete equipment, or with equipment that has been converted without the approval of the manufacturer.
- Protect the patio cleaner from frost
- Use only original accessories and do not carry out conversion work on the equipment.
Fitting
Screwing on the base
B
Screw on the base (14) to the thread socket on the handgrip (11). Tighten the base solely by hand.
Inserting the high-pressure hose
C
-
Slide the high-pressure hose (17) with connection for the angle piece (19) first into the opening for the high-pressure hose (10).
-
Slide the high-pressure hose (17) through the main tube (7) and the first, second and third telescopic tube (6,5,4). Slide the high-pressure hose (17) until it starts to exit from the third telescopic tube (4) with the connection for the angle piece (19).
-
Insert the connection for the telescopic tube (18) into the connection for the high-pressure hose (12) on the handgrip (11). It will lock into place.

To release the high-pressure hose (17), press the unlocking mechanism for the high-pressure hose (13). Pull away the high-pressure hose (17) at the connection for the telescopic tube (18).
Connecting the tip of the tube
D
- Remove the safety clamp (3) from the angle piece (2).
- Insert the connection for the angle piece (19) into the angle piece (2). It will lock into place.
- Slide the angle piece (2) with the high-pressure hose (17) back across the third telescopic tube (4) until the two holes in the angle piece (2) align with the two holes in the third telescopic tube (4).
- Slide the safety clamp (3) through the angle piece (2) and the third telescopic tube (4).
- Fix the flat jet nozzle (1) by inserting it and rotating it (bayonet locking device) with the angle piece (2).
Initial start-up
Working instructions

Be aware of the recoil force when the water jet commences. Ensure you are standing firmly and holding the spray gun firmly. Otherwise there is a risk of injuring yourself or other people.
- Adjust the telescopic tube to the desired length.
- Release the rotary lock on the auxiliary handle (23) and pull the telescopic tube (4,5,6) out of the preceding telescopic tube (5,6), or main tube (7). Fix the now extended telescopic tube (4,5,6) using the rotary lock on the auxiliary handle (23).
- Establish a water connection with your high-pressure cleaner at the water connection (15) on the handgrip (11) of your telescopic tube.
- Put the shoulder strap (9) on.
- Hold the telescopic tube with both hands on the handgrip (11) and on the handgrip area (8).
- If the high-pressure cleaner is activated, pressing the switch-on lever (20) ejects high-pressure water from the flat jet nozzle (1). Once the switch-on lever (20) is released, the flow of water stops.
Pressing the switch lock (21) enables you to secure the telescopic tube against being unintentional switched on.
Using detergents
The pressure cleaner was designed for operation with a neutral detergent based on a biologically decomposable anionic tenside. Other detergents or chemical substances could impair the safety of the pressure cleaner and damage it. Such damage to the equipment is not covered by the guarantee.
Cleaning and Maintenance

Always remove the mains plug of the high pressure cleaner before working on the device. There is a risk of electric shock or injury from moving parts.
Cleaning
Always keep the device clean. Do not use any detergents or solvents.
- Only clean the device with a soft brush or a slightly moist cloth.
Maintenance
The device is maintenance-free.
Storage
- Store the device in a frost-free room.
Waste Disposal and Environmental Protection
Be environmentally friendly. Return the tool, accessories and packaging to a recycling centre when you have finished with them. Hand the tool in at a recycling centre. The plastics and metal parts can be separated and recycled. Ask your Service Center about this.
Defective units returned to us will be disposed of for free.
Replacement parts / Accessories
Spare parts and accessories can be obtained at www.grizzly-service.eu
If you do not have internet access, please contact the Service Centre via telephone (see "Service-Center" Page 17). Please have the order number mentioned below ready.
Guarantee
Dear Customer,
This equipment is provided with a 3-year guarantee from the date of purchase. In case of defects, you have statutory rights against the seller of the product. These statutory rights are not restricted by our guarantee presented below.
Terms of Guarantee
The term of the guarantee begins on the date of purchase. Please retain the original receipt. This document is required as proof of purchase.
If a material or manufacturing defect occurs within three years of the date of purchase of this product, we will repair or replace – at our choice – the product for you free of charge. This guarantee requires the defective equipment and proof of purchase to be presented within the three-year period with a brief written description of what constitutes the defect and when it occurred.
If the defect is covered by our guarantee, you will receive either the repaired product or a new product. No new guarantee period begins on repair or replacement of the product.
Guarantee Period and Statutory Claims for Defects
The guarantee period is not extended by the guarantee service. This also applies for replaced or repaired parts. Any damages and defects already present at the time of purchase must be reported immediately after unpacking. Repairs arising after expiry of the guarantee period are chargeable.
Guarantee Cover
The equipment has been carefully produced in accordance with strict quality guidelines and conscientiously checked prior to delivery.
The guarantee applies for all material and manufacturing defects. This guarantee does not extend to cover product parts that are subject to normal wear and may therefore be considered as wearing parts (e.g. brush or nozzles) or to cover damage to breakable parts (e.g. switches, batteries, or parts made of glass).
This guarantee shall be invalid if the product has been damaged, used incorrectly or not maintained. Precise adherence to all of the instructions specified in the operating manual is required for proper use of the product. Intended uses and actions against which the operating manual advises or warns must be categorically avoided. The product is designed only for private and not commercial use. The guarantee will be invalidated in case of misuse or improper handling, use of force, or interventions not undertaken by our authorised service branch.
Processing in Case of Guarantee
To ensure quick handling of you issue, please follow the following directions:
- Please have the receipt and item number (IAN 297585) ready as proof of purchase for all enquiries.
- Please find the item number on the rating plate.
- Should functional errors or other defects occur, please initially contact the service department specified below by telephone or by e-mail. You will then receive further information on the processing of your complaint.
- After consultation with our customer service, a product recorded as defective can be sent postage paid to the service address communicated to you, with the proof of purchase (receipt) and specification of what constitutes the defect and when it occurred. In order to avoid acceptance problems and additional costs, please be sure to use only the address communicated to you. Ensure that the consignment is not sent carriage forward or by bulky goods, express or other special freight. Please send the equipment inc. all accessories supplied at the time of purchase and ensure adequate, safe transport packaging.
Repair Service
For a charge, repairs not covered by the guarantee can be carried out by our service branch, which will be happy to issue a cost estimate for you.
We can handle only equipment that has been sent with adequate packaging and postage.
Attention: Please send your equipment to our service branch in clean condition and with an indication of the defect.
Equipment sent carriage forward or by bulky goods, express or other special freight will not be accepted.
We will dispose of your defective devices free of charge when you send them to us.
Service-Center

Service Great Britain
Tel.: 0871 5000 720
(£ 0.10/Min.)
E-Mail: grizzly@lidl.co.uk
IAN 297585

Service Ireland
Tel.: 1890 930 034
(0,08 EUR/Min., (peak))
(0,06 EUR/Min., (off peak))
E-Mail: grizzly@lidl.ie
IAN 297585
Importer
Please note that the following address is not a service address. Please initially contact the service centre specified above.
Service-Center......25
Importateur ......25
Introduction

Service-Center....32
Importeur 32

Inleiding
Service-Center....38
Dovozce....38
Úvod

Service-Center......45
Importador 45
Introducción

Service-Center....52
Importador ....52
Introdução

- FR BE
- Einleitung
- Introduction
- Intended use
- General Description
- Extent of the delivery
- Overview
- A 1 Flat jet nozzle
- Technical data
- Notes on Safety
- Symbols in the manual
- General notes on safety
- Working with the equipment
- Fitting
- Screwing on the base
- B
- Inserting the high-pressure hose
- C
- Connecting the tip of the tube
- D
- Initial start-up
- Working instructions
- Using detergents
- Cleaning and Maintenance
- Cleaning
- Maintenance
- Storage
- Waste Disposal and Environmental Protection
- Replacement parts / Accessories
- Spare parts and accessories can be obtained at www.grizzly-service.eu
- Guarantee
- Terms of Guarantee
- Guarantee Period and Statutory Claims for Defects
- Guarantee Cover
- Processing in Case of Guarantee
- Repair Service
- Service-Center
- Importer
- Inleiding
- Úvod
- Introducción
- Introdução
Brand : PARKSIDE
Model : PTL 4 A1
Category : Pressure washer